Tag Archives: Hues of Happiness Designer Series Paper

Hues of Happiness Easy Birthday Card

Hues of Happiness Easy Birthday Card

I saw someone somewhere make a card like this Hues of Happiness Easy Birthday Card but with a different paper and greeting, I think. Of course I couldn’t find it again to see who made it but it’s an easy design and one you might see anywhere. The main thing is it is so quick and easy to make! Just change the paper and greeting for any occasion and you have a nice-looking card with just a slight twist to catch the recipient’s eye with the diagonal greeting!

To make this card, stamp a greeting on a strip of cardstock that is longer than the greeting. Choose a designer paper you want to use or stamp a background, whatever you like. Adhere the greeting strip across the corner of the card with the ends extending beyond the designer paper edge. Turn the paper over and trim off the extended greeting strip. Then you have a perfect fit!

Hues of Happiness Easy Birthday Card Assembly

This card uses a card base of Melon Mambo cardstock. The designer paper is one of the gorgeous patterns in the Hues of Happiness Designer Series Paper. After adhering the greeting to the designer paper, trimming off the ends, adhere to the card base. That’s it!

The greeting I used is in the Celebrating You Stamp Set. This is a great stamp set to go back to again and again when you are looking for a sentiment to use. There are a variety of fonts and useful, traditional greetings that you need all the time.

If you want to embellish the card a little bit, add some bling with some Iridescent Rhinestones Basic Jewels or other jewels or gems. You could also add a small bow to the greeting if you had space. The idea is to make a quick and simple card, but a little embellishment and sparkle doesn’t hurt!

Remember, Sale-A-Bration comes to an end on August 31 so put in your Stampin’ Up! order of $50 or more and get your FREE product! You can check the Sale-A-Bration choices here in the Online Store.

Hues of Happiness Floral Friend Card

Hues of Happiness Floral Friend Card

I was planning to make the entire card with the small print paper on the left side of the card front, but who can resist those gorgeous flowers?! So this card turned into the Hues of Happiness Floral Friend Card with a strip of the paper with the tiny flower designs on the left and a large piece of the floral paper on the right.

This is the Hues of Happiness Designer Series Paper in the Stampin’ Up! Annual Catalog that is so gorgeous! So many flowers in so many different colors! And because the paper is so pretty, it allows you to make easy and simple cards that allow the paper to be showcased.

The card base is Night of Navy with a layer of Daffodil Delight. There are so many other colors I could have chosen as well! Sometimes I get out several colors of paper and see which ones I like the best together. After I decided to use a smaller piece of the print with the tiny flowers, I cut a strip of that at 1 1/2″ x 3 3/4″. The large-flowered piece of designer paper is 3 3/4″ x 4″. The floral piece overlaps the small piece by 1/2″ so they could be adhered together and ribbon wrapped around the piece before it was adhered to the card. The Grid Paper is great for lining things up in a case like this.

The ribbon I used to cover the seam of the two papers adhered together is the White 1/4″ Crinkled Seam Binding Ribbon. I used a Daffodil Delight Stampin’ Blend Marker to color the ribbon quickly and easily to match the card. Just put down a piece of scrap paper, hold one end of the ribbon down, and run the marker along the ribbon. It should dry very quickly but you can wipe a tissue across it to be sure before you use it in case there is any excess or wet ink. Alcohol ink will dry quickly, though. The ink actually stiffens the ribbon a tiny bit which makes it easier to work with. I tied a simple knot around the ribbon with another piece of the colored ribbon.

The greeting is stamped in Melon Mambo ink on Basic White and diecut with one of the Stitched Rectangle Dies. The greeting is from the Happiness Abounds Stamp Set. To add a little extra, I fussy cut two small flowers directly from the designer paper to pop up on Mini Stampin’ Dimensionals® on the corners of the greeting. I also added some Iridescent Rhinestones Basic Jewels to the greeting and on the card front. I almost always like a little bling or sparkle!

Here is another card I made with this same designer paper and cut-out flowers.

There you have an easy card you can copy exactly or just use the design with your choice of designer paper and colors plus a greeting in this Hues of Happiness Floral Friend Card.

Hues of Happiness Trio of Flowers

Hues of Happiness Trio of Flowers

Is this Hues of Happiness Trio of Flowers card bright enough with all the colors??! I was actually making some other cards using the Hues of Happiness Designer Series Paper with all the flowers, and when I turned one piece over to apply glue I saw this dark blue pattern with the tiny flowers! I loved it and wanted to make something with that pattern.

I just started assembling the card itself without knowing what I was going to put on it! I decided on a Daffodil Delight card base, then a piece of the designer paper, plus Sweet Sorbet for the bottom portion. To cover the seam where the two pieces overlap I used a strip of Granny Apple Green. By then it was looking pretty bright!

I thought I would add some of my extra diecut flowers from the designer paper, but the ones I had cut out looked a little pale against the colors I had already used for the card. What to do? Cut out more flowers in deeper colors! I played around with those and thought the card design called for a more whimsical look. I happened to put these three single smaller flowers across the top and I liked that look! They are just glued down flat but they could have been popped up on Stampin’ Dimensionals. It would also be fun to use the Wink of Stella brush on them to give them a little sparkle.

The greeting is in the Happiness Abounds Stamp Set. I only used part of it, covering up the rest with a piece of washi tape (and remembered to remove it before stamping!!). Then I diecut it with a banner die in the Stylish Shapes Dies. I also wrapped the new In Color 2022-2024 Baker’s Twine in Sweet Sorbet around the middle of the card layer three times and added a separate bow tied with two pieces of the twine.

This is really an easy, basic card design but I think the bright colors make it stand out. A strip of Parakeet Party cardstock across the seam would have been even brighter but I thought I liked the look of the Granny Apple Green color better. You could use this same background paper with some other fun image on the top or middle portion of the card for a different look. Just play with your paper and stamps and you will always come up with something as I did with this Hues of Happiness Trio of Flowers card.

SHOP STAMPIN’ UP! ONLINE HERE!

Hues of Happiness Floral Card

Hues of Happiness Floral Card

Did you know that a lot of the flowers and even leaves in certain papers in the Hues of Happiness Designer Series Paper can be diecut right from the designer paper?! It’s a fun new trick Stampin’ Up! has been doing with some of its designer paper patterns. I came up with this Hues of Happiness Floral Card idea just by looking through the designer papers and finding this “other side of the paper” that looked so soft and pretty with mostly light blue and just a touch of green and blue in the corners to use as the background layer.

The card base is Pool Party with a layer, as I said, from “the other side” of one of the gorgeous floral papers. When you have papers like this you hate to NOT use the side with the pretty flowers, but sometimes, it must be done! I cut the paper so that it was mostly the Pool Party shade of blue and then a watercolor area of a darker blue in the upper right corner and a green watercolor area in the lower-left corner. You can see the brushstrokes.

Next, I cut the floral paper into smaller pieces so I could die cut a lot of the flowers and leaves using the Blossoming Happiness Dies. I die cut more than I needed, but I can use the extras on another card. I didn’t realize I could diecut leaves as well! Then I laid them out on the card front, fiddled with them for a while to figure out the design I liked, and fiddled some more. Finally, I was satisfied and started gluing them down. The large center flower is popped up on Stampin’ Dimensionals. Then I placed the leaves around where they looked good.

The greeting is in the Happiness Abounds Stamp Set. I stamped it in Pool Party ink on Basic White and die cut it with one of the banner dies in the Stylish Shapes Dies. This is a new set of dies in the Annual Catalog in the shapes of circles, squares, and labels all with a stitched edge. Very useful! And for a final touch, I added some Iridescent Rhinestone Basic Jewels for a little sparkle.

When you have new designer papers, be sure to check if maybe the dies work on the images on the paper! Sometimes they do like on this Hues of Happiness Designer Paper that I could use on this Hues of Happiness Floral Card.

Hues of Happiness Sending Thanks Card

Hues of Happiness Sending Many Thanks Card

If you’d like a really easy card to make that shows off the beautiful designer series paper, this Hues of Happiness Sending Many Thanks Card would be a good one to make! Really all I had to do was look through the pack of paper to be inspired! It’s always a tough choice though with Stampin’ Up! papers to choose which one to use and even which side to use sometimes because they are all so pretty.

The card base is Melon Mambo because it’s one of the many colors that coordinate with this floral pattern in the Hues of Happiness Designer Series Paper. I just happened to think of putting the designer paper as a panel right in the middle of the card instead of on one side. The floral paper is 3 1/4″ x 5 1/2″. I could have left it like that but I decided to add some Daffodil Delight cardstock on each side.

The greeting is in the Happiness Abounds Stamp Set. I didn’t want to use the entire greeting so I colored in only the words I wanted with a Melon Mambo Stampin Write Marker. The greeting is die cut with one of the Tailor Made Tags Dies.

I didn’t have Melon Mambo ribbon and I needed something narrow to fit through the tag, so I colored a piece of the White 1/4″ Crinkled Seam Binding Ribbon with my Light Melon Mambo Stampin’ Blend marker. It’s real easy to do…just use the side of the marker to color over the ribbon. Just have a piece of scrap paper underneath! Then give it a little bit of time to dry or check with another piece of paper or paper towel or something to make sure no ink rubs off. You can color most any ribbon like this! The greeting tag is popped up on Stampin’ Dimensionals.

To embellish the card, I used a few Iridescent Rhinestone Basic Jewels on the flowers and on the tag. They always add a little sparkle!

I think the Hues of Happiness Designer Series Paper is some of the prettiest we’ve had! But we’ve had lots of pretty papers! It makes cardmaking easy when your supplies are such high quality!

Check out the entire Hues of Happiness Suite for the beautiful designer paper and the lovely stamp set!

Color & Contour Slimline Card For a Friend

Color & Contour Slimline Card For a Friend

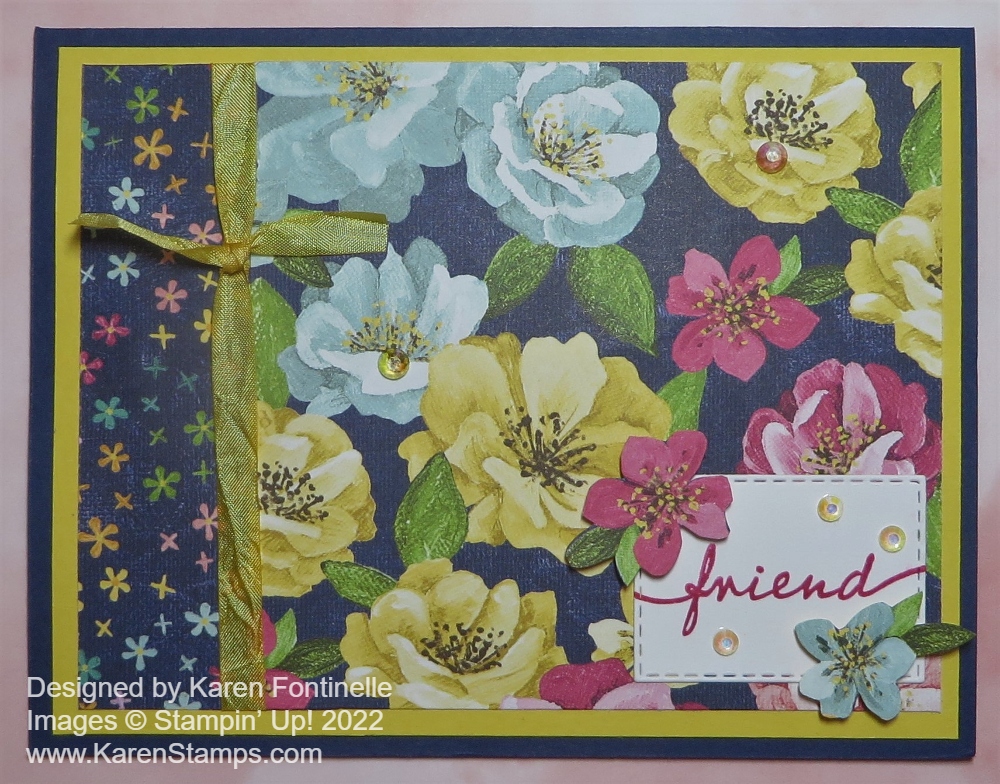
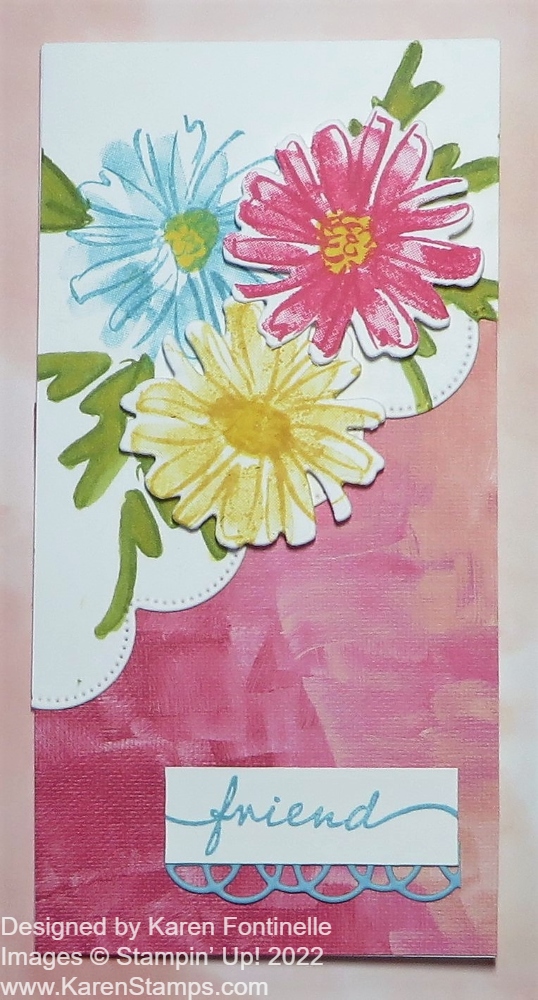
When you want to make a card, but you can’t think of an idea, just look in the Stampin’ Up! Catalog for inspiration! That’s what I needed to do to come up with a card recently and the catalog didn’t disappoint. This Color & Contour Slimline Card For a Friend is the result. I may have practically just opened the catalog to a random page or just paged through a little bit before finding this sample card on page 96. Something is bound to catch your eye when you do this! Maybe it will be a color, stamp set, or card design that gives you an idea. You never know. And oftentimes, I start out with one idea or copy one idea and end up with something completely different. This time I stuck pretty much to the sample I was copying.

First of all, this is a “slimline” card, kind of a new trend, a change from the normal size card we make. I cut a 6″ x 6″ piece of Basic White Thick Cardstock and scored it at 3″ so that the card base would be 3″ x 6″. Next, I tried to copy the scalloped edge that goes partly down the card front on a diagonal. There is a scalloped edge die in the Scalloped Contours Dies. I think I used the correct one but I think my dies got mixed up and this one was with another set of dies. (This is why it would be a good idea to scan the set of dies when you get them before you take them off the paper, so you know exactly what goes with each set!)

I just cut out a piece of Basic White cardstock that would fit on the front of the card and laid this scalloped die diagonally where I wanted it, looking at the sample in the catalog. I didn’t want it to start in the top right-hand corner, but come down a bit before the scallops started. And I wanted it to stop before it got to the bottom of the card.

The pinkish paper you see on the catalog sample and on my card is from the Hues of Happiness Designer Series Paper. It’s on the “other side” of one of the beautiful floral papers so it is difficult to use! The design on this side of the paper has other colors, too, so you may need to cut the exact section you want of the paper. You can even cut it shorter than 6″, just so it will fit under the scalloped piece when it is glued down.

The Balmy Blue flower from the Color & Contour Stamp Set is stamped directly on the white scalloped piece along with some of the leaves in the same stamp set. Then I stamped the Melon Mambo flower and the So Saffron flower on scrap paper and die cut those. These flowers are all two-step stamping and I will say it is difficult to line up the stamp design and it’s difficult to line up the die on the stamped flower. The die is easier, though! However, since the flowers are sort of an abstract design anyway, it doesn’t matter so much if you get the two-step stamping perfect! I colored in the leaves and the flower centers with Stampin’ Blends markers.

The greeting on the sample is on Balmy Blue cardstock and embossed in white with a partial greeting from the Color & Contour Stamp Set, but I chose the “friend” greeting from the Happiness Abounds Stamp Set. First I die cut the small scalloped rectangle in the Scalloped Contours Dies in Balmy Blue but I thought that looked like “too much” so I used the scalloped edge die in the Painted Label Dies for something light. I put my greeting near the bottom of the card since I didn’t make my card quite as wide as the sample. You could also add some gems to the card and I may go back and do that. Sometimes I forget before I take the photo for my blog!

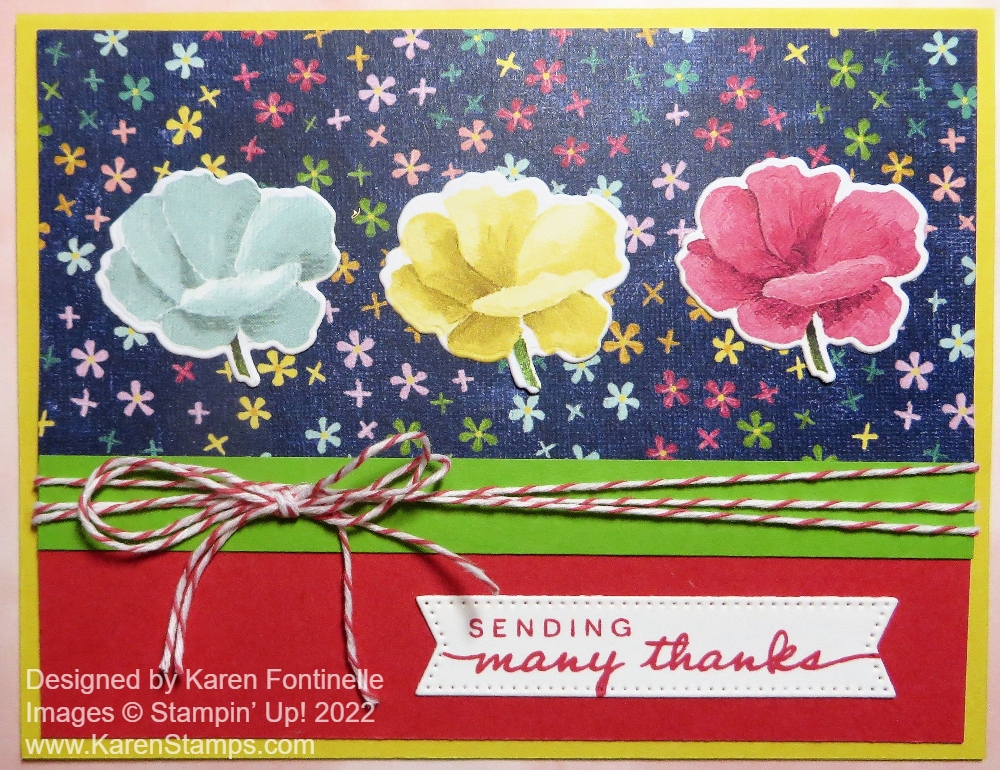
Here’s another slimline card I made a little while back on my blog.

With a brand new Stampin’ Up! catalog, there are many, many untapped new samples to try out! Copy or just get some ideas when you look in the catalog. I hope you will try a card, maybe a slimline card like this Color & Contour Slimline Card For a Friend.