Tag Archives: Stylish Shapes Dies

Shining Christmas Ornament Card

Shining Christmas Ornament Card

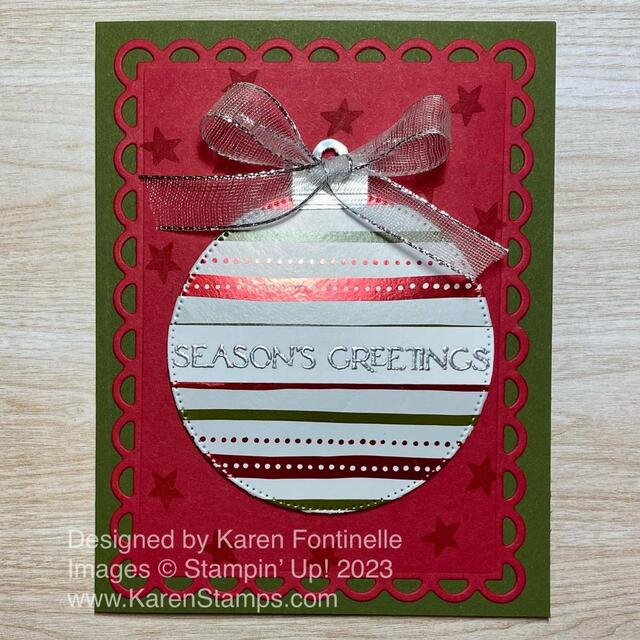
I saw an idea for a card like this online somewhere and thought I would make this Shining Christmas Ornament Card in my own style. The card I saw used some striped paper cut out in a circle to make it look like an ornament on the front of a card.

For this Christmas card, I decided to use the Shining Christmas Designer Series Paper, which was on the Online Exclusives in the Stampin’ Up! store. It appears to no longer be available now but there are other papers you can substitute. And if you already purchased it, then you are set to make some shiny cards for the holidays! With any card that we see online, we have the option to copy it exactly or change it up with whatever products we have. Look through your papers (and not just the holiday ones) and see what paper you could substitute for this Shining Christmas paper if you do not have it. Some other striped paper or one with certain prints will work just as well. Maybe you have shiny paper left over from last year.

The coordinating colors for the Shining Christmas DSP are Mossy Meadow and Cherry Cobbler. I pulled out those two cardstock but I thought the card looked too dark. I got out Real Red to see if it would go okay and I liked it just fine. So you don’t have to stick with the coordinating colors of the designer paper!

The card base is Mossy Meadow with a layer of Real Red. I diecut the Real Red with the largest scalloped die in the Scalloped Contours Dies. Even though the ornament would be taking up most of the space, it still needed “something” so I stamped some small stars randomly with the Merry & Bright Stamp Set. I used Real Red ink for that watermark look but you can also use Versamark ink.

For the ornament, I cut out a circle from the Shining Christmas paper using the largest circle in the Stylish Shapes Dies. It has a stitched pattern around the edge but it barely shows on the paper. I liked this striped pattern but there are others I could have chosen. For the top of the ornament, you can diecut a silver foil ornament hanger using the Merry & Bright Dies. Or you can cut one out yourself from foil.

For the greeting, I wondered what would show up best and be the right size. I chose the Season’s Greetings sentiment in the Brightest Glow Stamp Set. I stamped it in Versamark ink on a scrap strip of Basic White and embossed it with silver powder and the Heat Tool. You can find copper, gold, and silver all in the Metallics Embossing Powder package so you are all set with whatever color you need! The greeting seemed to fit perfectly going across the ornament so I just put it through the same stitched circle die in the Stylish Shapes Dies so that the ends would match the ornament. It worked perfectly!

The ornament is popped up with Stampin’ Dimensionals. Then I added a bow made with the Silver & White 1/2″ Sheer Ribbon which I think looks perfect on the card! It embellishes the ornament but doesn’t take away from it because it is sheer and has a silver edge. This ribbon is currently unavailable but is due back in stock next week, the week of November 20.

I hope you are coming along with your Christmas cards and have lots of ideas! But if you need more, just keep in touch!

Remember, tomorrow is the Seasonal Sale at Stampin’ Up! on papers, ribbons, and inks! Check my blog post from the other day for more details or check the Online Store tomorrow, November 14-16th!

SHOP STAMPIN’ UP! ONLINE HERE!

Hello, Irresistible Hello Card

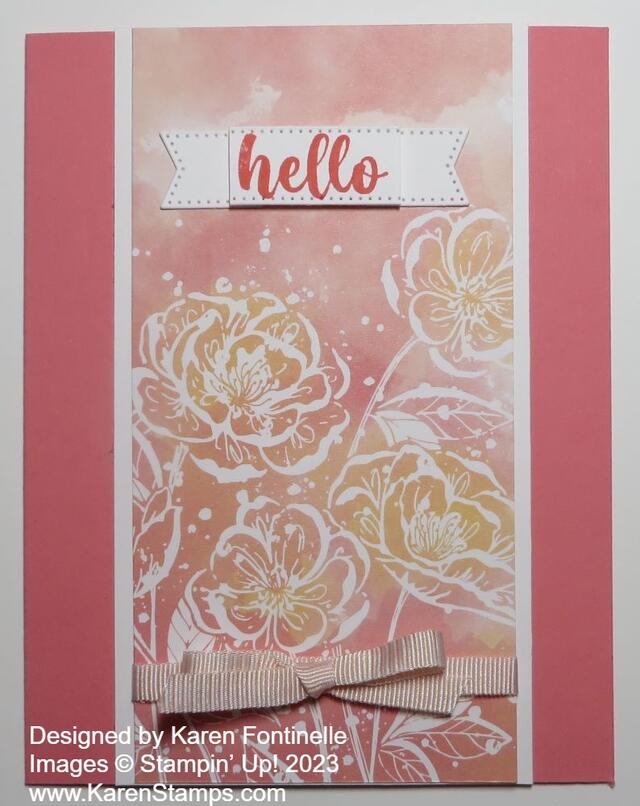
Sometimes all you have to do is spy one of your scraps to get a card idea! That’s how this Hello, Irresistible Hello Card came about. I spotted a diecut scrap and was going to use the other side of this piece of designer paper, but when I turned the paper over, I decided to use this floral side instead! So you never know what you might come up with!

I used the Hello, Irresistible 6″ x 6″ Designer Series Paper on the front of this card. You might miss this paper because it is not in the new Annual Catalog. It is one of the Online Exclusives in the Online Store. The important thing is it is one of the select papers on the Stampin’ Up! Designer Paper Sale going on right now during the entire month of June! The whole package of 48 sheets of paper is very pretty. It has digitally hand drawn botanical and floral images plus color washes.

The card base is Flirty Flamingo. I decided to make the designer paper the full length of the card and center it so it is cut at 5 1/2″ x 2 3/4″. I thought it would be pretty to put a layer of Basic White cardstock behind it to accent the white images of the flowers, but I made it narrow. It is cut at 5 1/2″ x 3″.

Before adhering anything, I wrapped a piece of the pink ribbon in the Ribbon Duo Combo Pack around the bottom of the designer paper. I put it pretty low so as not to cover up the flowers. I tied a little bow separately and adhered it to the ribbon with a Mini Glue Dot. Then I assembled the card.

The greeting is stamped in Flirty Flamingo ink on Basic White from the Irresistible Blooms Stamp Set and diecut with a banner die in the Stylish Shapes Dies. Since I didn’t want the banner as long as it was, I tried an idea I saw recently. I cut off the ends of the banner and put Stampin’ Dimensionals on the back of the greeting. Don’t put them all the way to the ends so you have space. After adhering the greeting, I put Multipurpose Liquid Glue on the backs of the two end pieces I had cut off and adhered them flat on the card but slid underneath the popped-up greeting a little bit. That shortens the whole thing and just gives a little different look to your card!

Sometimes I don’t think about adding some sparkly jewels to my card until after I take the photo, but you certainly could add some Iridescent Rhinestone Basic Jewels to this card! That would be very pretty!

Don’t forget the Designer Paper Sale this month! Save 15% on select papers, and this is one of them!

SHOP STAMPIN’ UP! ONLINE HERE!

Best Witches and Frogs Halloween Card

Best Witches and Frogs Halloween Card

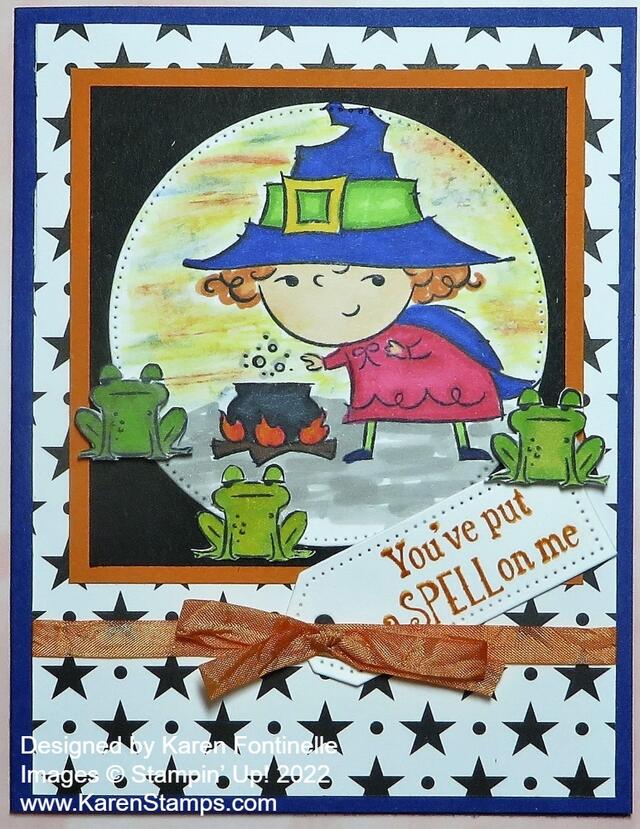
I was in the mood for some coloring and I even thought I would try for different colors on this Halloween witch. In the end, I don’t think I strayed too far from typical Halloween colors except for her Melon Mambo dress! This Best Witches and Frogs Halloween Card is one you make just to have fun coloring and playing!

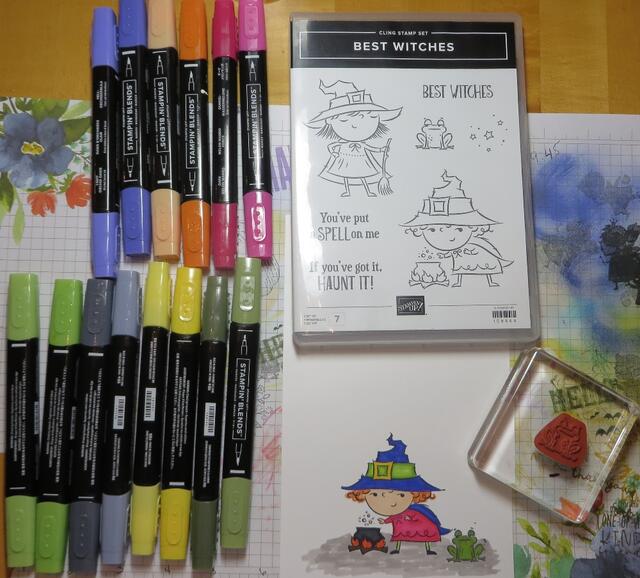
I started off using the Best Witches Stamp Set and stamping the stamp with the witch and her cauldron on Basic White cardstock with Memento ink. I colored her with a bunch of different Stampin’ Blends. You can see some of the colors I used in the photo below. I also used some of the Natural Tones markers for her face and hands and the logs for the fire. I also stamped a frog but decided to cut him out separately, and then I decided on stamping and cutting out some more frogs!

Coloring Best Witches

After I had the witch stamped and colored in with her cauldron, I diecut the image with the largest circle in the Stylish Shapes Dies. I wanted to layer it on a scalloped circle in the Layering Circles Dies, but it wasn’t large enough so I just cut out two square layers, Basic Black and Pumpkin Pie. The black one is 3 1/4″ x 3 1/4″ and the Pumpkin Pie is 3 1/2″ x 3 1/2″. I used the Black & White Designs Designer Series Paper with the black stars as the layer on the Starry Sky cardstock card base. Before adhering the designer paper, I wrapped around some ribbon. I colored the White 1/4″ Crinkled Seam Binding Ribbon with the Dark Pumpkin Pie Stampin’ Blend. Just do it on top of a piece of scrap paper and run the side of the brush tip of the marker along the ribbon, holding it down at one end with your finger. Give it a little bit of time to dry completely or even rub a tissue along it to remove any ink that hadn’t dried yet. I tied the bow separately and adhered it with a Mini Glue Dot.

Back to the stamped and die-cut witch piece. I colored underneath with a bit of light gray marker. For the sky, I thought I would try Soft Pastels in various colors. I started off picking up some chalk color with a Blender Pen but then I just scribbled on various colors for the Halloween night sky and softened them with the Blender Pen. You have to be a bit careful to not make the paper pill up from having too much moisture or rubbing too much. But you can get away with a lot for a Halloween sky! After adhering this piece to the front of the card above the ribbon, I adhered the little frogs, two with Stampin’ Dimensionals and one flat on the card with the Multipurose Liquid Glue.

The greeting is in the Best Witches Stamp Set and is stamped in Pumpkin Pie ink and die cut with one of the Tailor Made Tags. I decided to tuck it under the bow so I added another Mini Glue Dot to hold the ribbon in place over the tag hole and put a frog partly on the end of the tag. That’s all there is to this fun Best Witches and Frogs Halloween Card!

SHOP STAMPIN’ UP! ONLINE HERE!