Monthly Archives: August 2022

Last Day of Sale-A-Bration 2022!

Sale-A-Bration Cover July-Dec 2022

Today is the LAST DAY of Sale-A-Bration 2022!

This is your last chance to earn a free product with a $50 purchase! No limit!

With each $50 purchase, you can choose from these products to earn FREE!

Sale-A-Bration $50 Level Products

With a $100 Purchase, choose two $50 Level products or one of these $100 Level products!

Sale-A-Bration $100 Level Products

If you want to watch some videos to help you decide on your choice(s), click HERE to go to my blog post!

SHOP STAMPIN’ UP! ONLINE HERE!

Perfectly Penciled Black and White Card For a Friend

If you asked me what my idea or thought process was for this card I wouldn’t know! This Perfectly Penciled Black and White Card For a Friend just came about from the designer paper itself! I looked through the package of paper and decided to do something with just the designs, not the floral images on “the other side” of the paper. I wasn’t sure at all how it would turn out! Sometimes you have to just work with an idea!

I thought maybe I could use strips of three of the different designs of the designer paper. This Perfectly Penciled Designer Series Paper has pretty floral designs on one side of the paper and graphic designs on the other side. You can certainly use it just black & white as I did on this card or you could color in the images as I have done on other cards like THIS ONE. And THIS CARD uses the paper’s floral and graphic design sides in just black & white! As you can see, this paper is fun to play with!

For this card, I chose three patterns of paper, cut them into strips, and planned to run the strips vertically on the card. But once I got them together I liked them going horizontally better! I adhered them to a piece of Basic White thinking I might tie some ribbon around that layer before adhering to the Basic Black card base. If you do that and you have some edges that aren’t perfect, just trim them down a tiny bit so the underneath layer isn’t showing. These strips are just a “smidge” over 1 1/4″ wide. A “smidge” means maybe about another 1/16″ more! They don’t have to be super-exact because we don’t want to ruin our fun cardmaking with a lot of math!

I decided to cut out a square 3″ x 3″ of one of the pretty floral images and then layered it on a piece of Basic Black. I wasn’t sure what ribbon to use at first, but decided to just use a strip of this White 3/4″ Frayed Ribbon that didn’t go around to the back of the card. I really like it! For a greeting, I stamped the “friend” in the Happiness Abounds Stamp Set and cut it with one of the circle dies in the Stylish Shapes Dies.

Remember, Sale-A-Bration ends on this Wednesday, August 31 so if you need any Stampin’ Up! supplies, be sure to shop by then to get your FREE product with every $50 purchase!

SHOP STAMPIN’ UP! ONLINE!

Paper Pumpkin August 2022 Sweet Sunflowers Cards

Paper Pumpkin August 2022 Sweet Sunflowers Contents

Is this the most gorgeous Paper Pumpkin Kit we ever had or is this the most gorgeous Paper Pumpkin Kit we have ever had??! This Sweet Sunflowers Paper Pumpkin Kit for August 2022 is so pretty! You have never seen prettier envelopes (lower right corner) than this kit has! Some crafters are cutting up the envelopes to make into cards they think the designs are so pretty! Some crafters are cutting the cards in half and using the beautifully designed back of the cards to make more cards! In any Paper Pumpkin Kit, you get all the supplies, including adhesive, to make the project, whether cards or treats or whatever it is. It’s one of the best kinds of mail you can get in your mailbox every month!

This Sweet Sunflowers Kit probably has the most alternatives you can make with the contents than any other Paper Pumpkin Kit ever invented! As I said, people are cutting things apart to make more things! But first, I always like to make the cards as designed, which is what I did for this blog post! Then I will think about other ideas, if I want to make different designs and then make more cards!

Paper Pumpkin August 2022 Sweet Sunflowers Cards

These are the cards I made, as designed for the kit. The artists really did a fantastic job designing these cards and kit contents!

Most months, if you are a Paper Pumpkin subscriber, you can purchase a kit you missed or want more of, or the refill just for extra materials to make more cards or projects. But I heard this kit sold out. We’ll have to see if that is true.

Every Paper Pumpkin Kit also has a video you can watch to see how it goes together, plus pictorial instructions!

You may not be able to get this kit, but don’t miss the next holiday ones! Next to this pretty kit, always enjoy the holiday kits for Halloween and Christmas! This is the next kit coming up! I can’t wait! And when they decorate the box, you know you are getting something special!

Paper-Pumpkin-Sept-2022-Banner

JOIN PAPER PUMPKIN TODAY! DON’T MISS OUT AGAIN!

Scary Cute Slimline Halloween Trick or Treaters Card

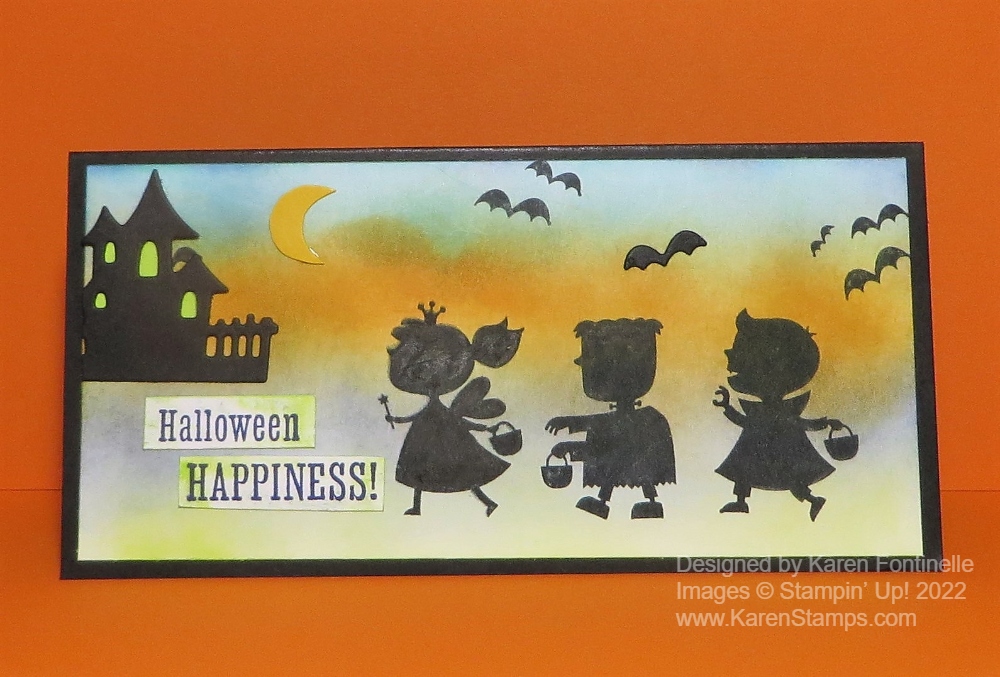
Halloween will be here before we know it so get your new stamp sets and accessories in the Stampin’ Up! Holiday Catalog and start creating! On this Scary Cute Slimline Halloween Trick or Treaters Card, I couldn’t resist making a colorful spooky background with the trick-or-treaters heading up to the house for their treats!

This is a slimline card made with a Basic Black cardstock card base. The card base is a 6″ square that is scored in half at 3″ so when it is folded, the card will be 3″ x 6″. The layer on the front of the card is Basic White cardstock 2 3/4″ x 5 3/4″.

To make the Basic White cardstock look spooky for Halloween Night, I used the Blending Brushes to add all kinds of ink colors! I used some of the new In Colors. Well, maybe all of them except Sweet Sorbet. I also used some Pumpkin Pie and Crushed Curry. I only have three Blending Brushes but if you are careful to work from light to dark ink in similar colors and really rub off the excess ink after each color on scrap paper or Grid Paper, you can use each brush for several ink colors. When you are finished, just rinse them out at the kitchen sink! Be sure to rub off a little bit of ink before applying the Blending Brush to the project to avoid getting a dark blob of ink.

Next, I stamped the three separate trick-or-treaters in black Memento Ink as if they were walking around on Halloween Night going trick-or-treating with their little baskets. You need to have a juicy ink pad to get a good, dark impression of the image. The Stamparatus would work well for this so you could stamp it over and over if necessary. You can also fill in the areas that didn’t stamp heavily enough with a black marker if the blacks match pretty well.

The Scary Cute Stamp Set has some fun stamps and greetings in it. I stamped some of the bats up in the sky. I stamped the Crushed Curry cardstock with the moon stamp but I cut it out according to the shape and used the plain cardstock side because I liked the cardstock color better than the inked side.

The haunted house is a diecut and I already had that cut out. I decided to use it but away from the trick-or-treaters so it wouldn’t look like the wrong size. I adhered tiny pieces of Parakeet Party card stock behind the windows and after adhering it to the card layer, I trimmed off the excess side so the house would fit better.

For the greeting, I stamped the “Halloween Happiness” on Basic White but decided to cut the words apart so they would fit in the corner. They were stamped with the Starry Sky In Color Ink and then I added a little Parakeet Party ink around the edges with a Blending Brush just to make the words look a little spooky and fit the card just right.

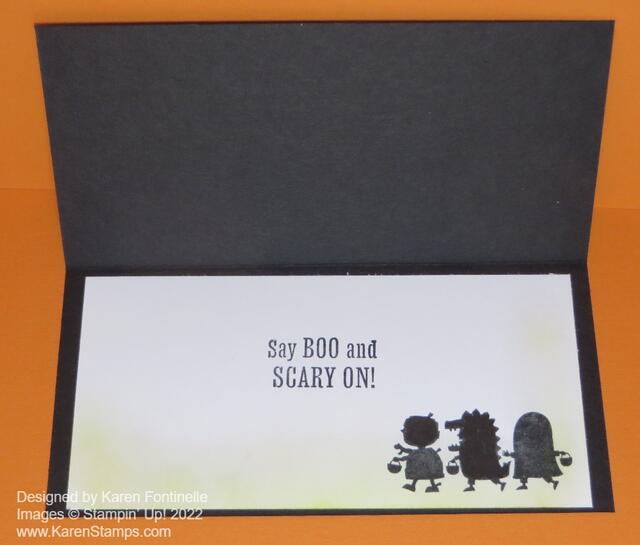
On the inside of the card, I adhered a Basic White layer just like on the front of the card. I stamped the other stamp with the three smaller trick-or-treaters and a greeting from the stamp set. Then I used the Blending Brush and just a light layer of Parakeet Party ink. You could use any color you like.

Scary-Cute-Slimline-Halloween-Trick-or-Treaters-Card-Inside

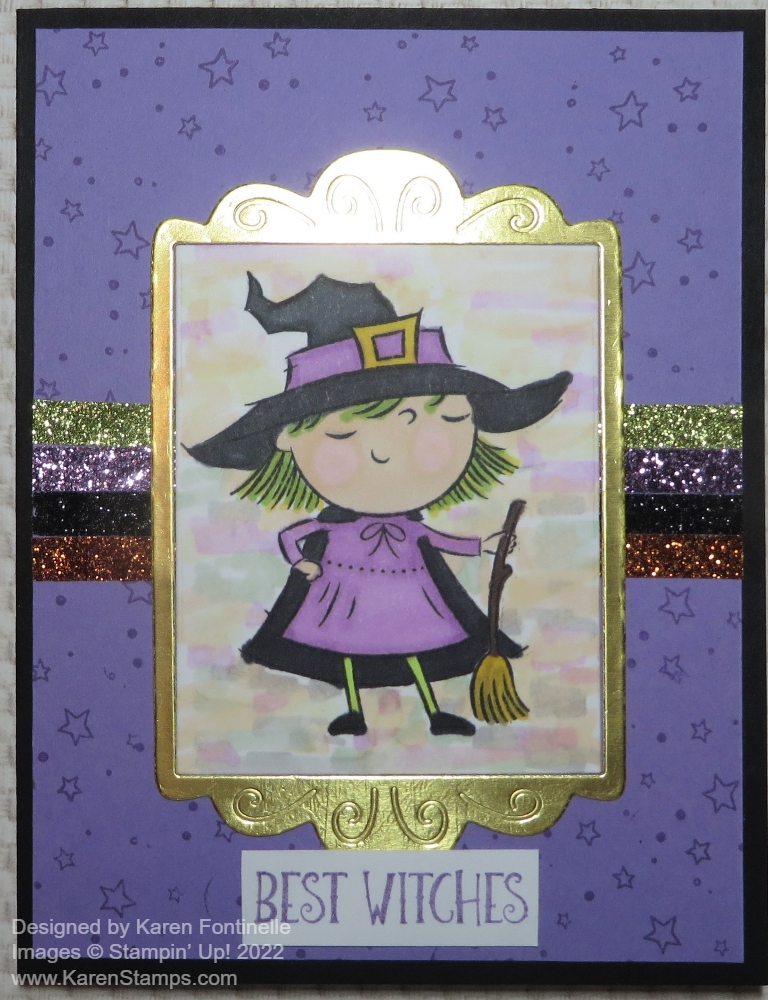
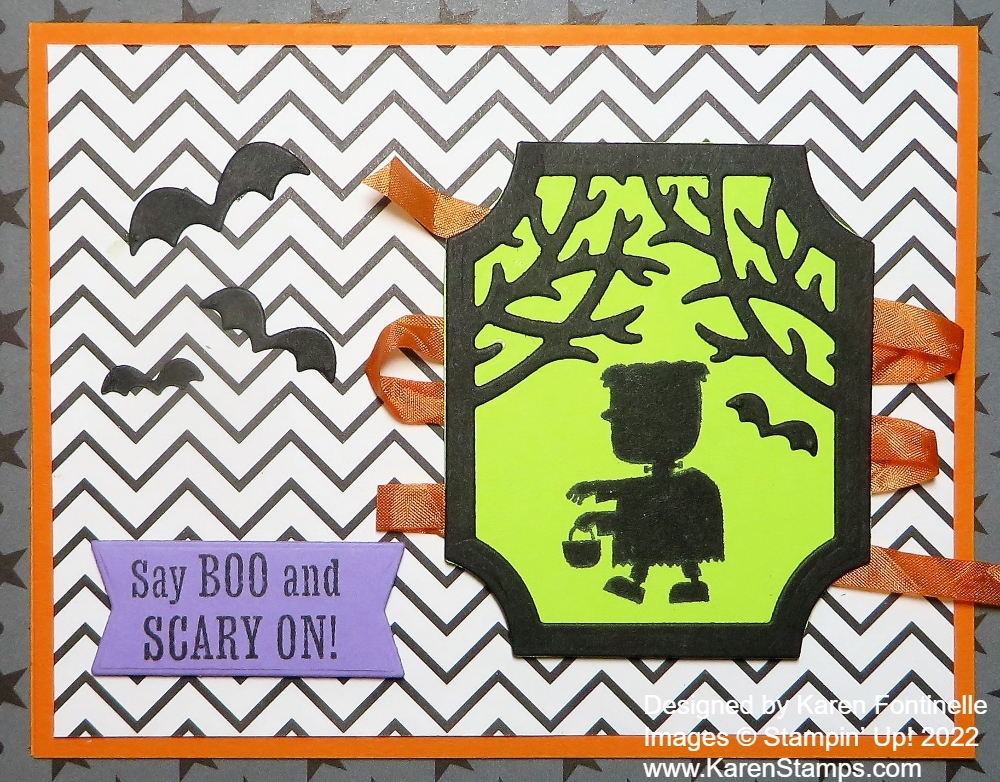
This Scary Cute Stamp Set will be fun to use making Halloween treats and other projects as well! Here is a Scary Cute card I made the other day using the spooky frame die with the tree branches. Just get the Scary Cute Bundle of stamp set and dies and you will be all set for making a card like my Scary Cute Slimline Halloween Trick or Treaters Card or many others!

SHOP STAMPIN’ UP! ONLINE HERE!

Lights Aglow Gold Christmas Card

Lights Aglow Gold Christmas Card Closeup

I looked through the Lights Aglow Designer Paper and chose this pattern without knowing what I would make. That’s a good way to get started when you are trying to come up with an idea. In a little while, I had this Lights Aglow Gold Christmas Card made!

After deciding on this gold foil snowflake pattern of paper in the Lights Aglow 6″ x 6″ Specialty Designer Series Paper, I decided to make the card base Cherry Cobbler cardstock. I started with Real Red, but I think just knowing the coordinating color for this designer paper pack was Cherry Cobbler, Real Red just didn’t feel right. I cut the snowflake layer down a little so I could add some Gold Foil strips to the top and bottom. I cut two Gold Foil strips 3/4″ x 5″ to add a 1/4″ edge peeking out.

For the greeting, I stamped “Merry Christmas’ in the Brightest Glow Stamp Set. I stamped it with Versamark ink so I could heat emboss it with Gold Embossing Powder in the Metallics Embossing Powders using the Heat Tool. I used Very Vanilla cardstock.

To help the Very Vanilla greeting stand out, I diecut it with one of the Painted Labels dies and immediately cut another one out of Gold Foil. The gold foil is then cut in half horizontally so that it could be layered just a tiny bit under the top and bottom of the greeting piece. It’s not absolutely perfect, but plenty close enough.

For a little embellishment, I remembered that I had Gold Holly Leaves leftover from last year’s Holiday Catalog but carried over to the current Holiday Mini. They are almost like little fabric leaves and come in two sizes in the package. Then I die cut some Cherry Cobbler berries from the Christmas Banners Dies. I think they are a little larger than I would have liked but they still are okay. I popped the greeting up not on Stampin’ Dimensionals but on Foam Adhesive Strips. They seem to be a little higher than the Dimensionals so I might have preferred the Dimensionals. But it is fine!

So once you know what the design is on this card, it’s really fairly simple! You can change the background designer paper and make it a little different or even make the card for a different occasion, instead of this Lights Aglow Gold Christmas Card.

Lights Aglow Gold Christmas Card Closeup

SHOP STAMPIN’ UP! and SALE-A-BRATION (until Aug. 31st)!

Best Witches Portrait Witch Halloween Card

Best Witches Portrait Witch Halloween Card

Here’s a fun Halloween card to make, the Best Witches Portrait Witch Halloween Card. This little witch must have had her portrait painted and framed! I also wanted to use the new Glitter Washi Tape and figured out a way to use it on this card! I’ll explain how I made the very artistic background around the witch!

The card base is Basic Black with a layer of Highland Heather stamped with the stars in the Best Witches Stamp Set. You have to stamp very lightly with these small stamps so as not to catch an inky edge of the rubber. Luckily some of mine got covered up with the witch!

The witch is stamped on Basic White cardstock. I diecut the frame in the Fabulous Frames Dies out of Basic White and then used the center piece for the witch. Then I diecut the frame again out of Gold Foil to get the actual frame I was going to use.

I stamped the witch (one of two in the stamp set) in Memento Ink and colored in with various colors of Stampin’ Blends. Just play with whatever colors you like or even combinations of colors. For the background around the witch, I simply chose many light colors of Blends and just put little marks or scribbles all around. Then I took the Color Lifter and colored over all the marks in hopes of blending them a little bit. I was afraid I might be messing up my witch piece but I think it turned out to be an interesting background! You never know! Just play!

I applied strips of the Glitter Washi Tape across the middle of the card. After putting down the full length of the first color, I realized the tape would mostly be covered up and I didn’t want to waste it so I just put small pieces on each edge of the card, not all the way across. You can trim the ends off on the sides if you haven’t glued down the Highland Heather layer. After gluing down the gold foil frame, I adhered the witch portrait inside the frame.

The greeting is stamped in Highland Heather ink on a scrap strip of Basic White and adhered at the bottom of the card. I thought about cutting the words apart, but the greeting seemed to look okay as is.

If you like Halloween, check out the Best Witches Stamp Set and the others in the Holiday Mini Catalog! Maybe you will even earn FREE Sale-A-Bration products with a $50 or more purchase at Stampin’ Up!

Hues of Happiness Easy Birthday Card

Hues of Happiness Easy Birthday Card

I saw someone somewhere make a card like this Hues of Happiness Easy Birthday Card but with a different paper and greeting, I think. Of course I couldn’t find it again to see who made it but it’s an easy design and one you might see anywhere. The main thing is it is so quick and easy to make! Just change the paper and greeting for any occasion and you have a nice-looking card with just a slight twist to catch the recipient’s eye with the diagonal greeting!

To make this card, stamp a greeting on a strip of cardstock that is longer than the greeting. Choose a designer paper you want to use or stamp a background, whatever you like. Adhere the greeting strip across the corner of the card with the ends extending beyond the designer paper edge. Turn the paper over and trim off the extended greeting strip. Then you have a perfect fit!

Hues of Happiness Easy Birthday Card Assembly

This card uses a card base of Melon Mambo cardstock. The designer paper is one of the gorgeous patterns in the Hues of Happiness Designer Series Paper. After adhering the greeting to the designer paper, trimming off the ends, adhere to the card base. That’s it!

The greeting I used is in the Celebrating You Stamp Set. This is a great stamp set to go back to again and again when you are looking for a sentiment to use. There are a variety of fonts and useful, traditional greetings that you need all the time.

If you want to embellish the card a little bit, add some bling with some Iridescent Rhinestones Basic Jewels or other jewels or gems. You could also add a small bow to the greeting if you had space. The idea is to make a quick and simple card, but a little embellishment and sparkle doesn’t hurt!

Remember, Sale-A-Bration comes to an end on August 31 so put in your Stampin’ Up! order of $50 or more and get your FREE product! You can check the Sale-A-Bration choices here in the Online Store.

Scary Cute Halloween Card

Scary Cute Halloween Card

It’s time to start thinking about Halloween! This is my first card using a new bundle in the Holiday Mini, my Scary Cute Halloween Card! This card is somewhat of a copy of a sample in the Holiday Mini on page 56. It looks like it was made into a shaker but I think maybe it’s a box or something with ribbon wrapped around it. My copy is actually a card but not a shaker.

The card base is Pumpkin Pie cardstock with a layer of the Black & White Designs Designer Series Paper. This paper is perfect for making Halloween cards but you don’t have to be restricted to that at all! I used the Scary Cute Bundle to make the images on the card. The spooky image of the tree branches in the frame is a die in the Bundle that I cut out of Basic Black, and I cut another Parakeet Party cardstock piece to be the spooky background piece. I added a little bit of ink with a Blending Brush but it doesn’t really show up. I should have used a darker green if I wanted to do that. The little boy trick-or-treating is stamped in Memento Black ink on the Parakeet Party cardstock.

To match the orange ribbon wrapping around the sample in the catalog, I colored the White 1/4″ Crinkled Seam Binding Ribbon with the Dark Pumpkin Pie Stampin’ Blend marker. Just put a piece of scrap paper underneath as you color the ribbon with your marker. Then I applied some Stampin’ Seal to the back of the framed piece and adhered the now Pumpkin Pie ribbon going back and forth, back and forth. Finally I popped up the piece on Stampin’ Dimensionals which would also help keep the ribbon adhered to the back.

The greeting is included in the stamp set so I stamped that on a piece of Highland Heather cardstock and diecut it with the banner shape in the Scary Cute Bundle. It is also popped up on Stampin’ Dimensionals.

Finally, there are cute little bat dies of three different sizes so I had already cut those out with the black frame. Then I just chose three and adhered them to the card. I might go back and add some sparkle with something.

This Scary Cute Bundle has lots of fun possibilities for Halloween cards, treats, and projects. Just play with it and discover lots of creative ideas!

Lights Aglow Tis the Season Christmas Card

Lights Aglow Tis the Season Christmas Card

I just got this designer paper and sort of copied a sample card in the Holiday Mini Catalog to come up with this Lights Aglow Tis the Season Christmas Card. When you don’t have an idea of what to make with one of your Stampin’ Up! products, always remember to look in the catalog for ideas. You might think you will copy the card exactly, but I’m willing to bet that as you go along you may just change it up a little as your ideas start to flow.

Although I don’t have the Christmas Lights Bundle in the Lights Aglow Suite, I wanted to get the Lights Aglow 6″ x 6″ Specialty Designer Series Paper. As I write this, the Lights Aglow Paper is not available but should be back in stock in early September. I must have ordered the last pack! LOL! This paper has gold foil dots that are meant to look like twinkling lights! Very pretty papers!

To make this card, I started with a Cherry Cobbler card base. Then I used the Cherry Cobbler paper with tiny stars all over as a layer on the card base. If you wanted to save paper, you could just add strips to the side. I made all the paper layers on this card run the full length of 5 1/2″. The Cherry Cobbler paper with stars is 5 1/2″ x 4″.

The center portion of the card, the arcs of stars and dots, needs a little extra care. Surprisingly I realized that before I cut it! To get the proper arc, you need to cut the center portion of the sheet of that paper. Below is a photo of how I cut the paper. Since I wanted a 3″ wide section, that left 3″ so I cut 1 1/2″ off each side.

How to Cut the Paper

Before adhering that center paper to the card, add some Gold Foil strips to each side, or as the Holiday Catalog shows (page 30) use the Gold Glimmer Paper in the Glimmer 12″ x 12″ Specialty Paper.

For the greeting, I sort of copied the design of the sample card but changed it up a little bit. I used a sentiment in the Brightest Glow Stamp Set. I think this is a fantastic set of traditional Christmas greetings in pretty fonts. I chose the ‘Tis the Season stamp and stamped it in Cherry Cobbler. Then I die cut it with a small plain circle in the Layering Circles Dies and layered it on a scalloped circle die in the same set, cut out of Gold Foil.

On the inside of the card, I used a layer of Basic White and added a strip of designer paper with the little stars that I used on the front of the card. That way you can stamp a greeting or write a note.

That’s all there is to this Lights Aglow Tis the Season Christmas Card but if you wanted to add any extra embellishments you could do that.

SHOP STAMPIN’ UP! ONLINE HERE!

Stylish Sketches Z-Fold Fox Card

Stylish Sketches Z-Fold Fox Card

This Stylish Sketches Stamp Set is one that will make you look like an artist by simply stamping with the fox or geese stamps. Just stamp one of the sketchy-looking images and color in if you like! Maybe the best part is that you can earn this stamp set FREE during Stampin’ Up! Sale-A-Bration until August 31 with a $50 purchase!

This stamp set appealed to me because my son likes foxes (for some reason!). He has seen some out in the wild. This card is easy to make but makes a great presentation because it is a Z-Fold card. It may look extra-special and sound extra-special but all you have to do is fold back the front of the card on itself! That’s how easy Z-Fold cards are! That’s the basic instruction, anyway, then you can stamp the panels or add designer paper.

This card is cut just like a regular card base at 8 1/2″ x 5 1/2″. Score at 4 1/4″ for the fold to form the card. Now on the front of the card, score at 2 1/8″, which is half of the 4 1/4″ front. Fold back on the score line so you have a z-shape. This card base is Garden Green and the folded back panel on the front is stamped in Garden Green ink with leaves in the Stylish Sketches Stamp Set.

The fox is stamped on a 3″ x 3 1/2″ piece of Basic White cardstock. The fox is stamped in Memento Ink. I colored in with Watercolor Pencils and blended in a little bit with a Blender Pen. This just smooths out the coloring a little bit. I also colored in the sky and some grass very lightly and in a scribble fashion just to lay down some color to ground the fox and give him a place to run. The greeting is stamped in Garden Green and is in the Celebrating You Stamp Set. This fox piece is then layered on a piece of So Saffron Cardstock, 3 1/4″ x 3 3/4″.

For the inside of the card, since the Garden Green is a rather dark color for stamping a greeting or writing a message, I cut out another piece of Basic White, the same size as the fox piece on the front. I stamped some leaves in the corners and also around the edge of the inside of the card. When you stamp randomly like that, turn your stamp so it goes different ways.

Now for the only tricky part. You want to place that Basic White piece so it will be completely under the front panel and not show from underneath. Adhere the fox piece and layer to the folded panel on the front by only putting adhesive on the left side to adhere to the folded panel and not the inside of the card! Then open the card, put adhesive on the back of the message piece of cardstock, and lay it face down on the inside of the left side of the card, lining it up behind the yellow portion you can see. Then fold over the back panel of the card so that it adheres to the message panel and will be perfectly placed behind that front panel. Check out the photo of the opened-up z-fold card and inside below.

Stylish Sketches Z-Fold Fox Card open

That’s all there is to making this Stylish Sketches Z-Fold Fox Card which would make a great masculine card for a birthday or any occasion. Here is another regular card using the fox stamp and coloring in with Stampin’ Blends. It’s a fun stamp to work with as your creative juices start flowing! Sale-A-Bration ends in just two weeks so don’t miss out on getting some free product with every $50 Stampin’ Up! purchase!

Painted Christmas 2-4-6-8 Gift Bag

Painted Christmas Gift Bag

I was inspired to make something different than a card so I looked through my designer paper and this pinecone paper is what jumped out at me! I thought it would be perfect for an easy little gift bag for the holidays, like this Painted Christmas 2-4-6-8 Gift Bag. You know the holidays will be here before we know it!

There’s almost nothing easier to make than a 2-4-6-8 gift bag! And so versatile! you can leave the top open or you can pinch it closed, as I did. Make a lid if you like. All this one takes is a piece of paper – cardstock or designer series paper – cut at 5 1/2″ x 8 1/2″. I used the Painted Christmas Designer Series Paper which was around last year and has returned this year in the Holiday Mini Catalog so you may have some! Put it in your Paper Trimmer or Simply Scored board to score at 2″, 4″, 6″, and 8″. Make sure you pay attention if there is a pattern so you have the design going the right way and not upside down or something. Then turn the paper lengthwise and score at 1 1/2″ or 2″ to make the bottom flaps of the bag. You can vary the height of the bag if you make it wider than 5 1/2″. Then cut those score lines for the flaps up to the horizontal score line. Also, cut off the tiny little 1/2″ piece at the end. Check out the paper below.

Painted Christmas 2-4-6-8 Gift Bag

To assemble, crease all the score lines with a Bone Folder for a good fold, and then see how the bag is going to go together. Apply adhesive (Multipurpose Liquid Glue gives you some wiggle room to get the paper lined up but Tear & Tape or Stampin’ Seal+ is good, too!) to that narrow 1/2″ piece on the end. You don’t really have to hold the bag up in the air to adhere the other side to that 1/2″ side. Just lay it flat on the table and carefully fold over the opposite side to adhere to that 1/2″ side. Then just fold in the flaps, trying to not have seams showing on the front side of the bag. Apply some adhesive to the flaps and always stick your Bone Folder or something down inside the bag to put pressure on all those flaps and make sure they have fully adhered together. If you want the top of the bag closed AFTER you put your gift or treat inside, just pinch in on the sides and then close the top with ribbon through some punched holes, a staple, or some kind of clip. Whatever you like!

To decorate the bag, I used a little diecut rectangle out of Crumb Cake Cardstock and die-cut some evergreen branches out of Evening Evergreen Cardstock using the Christmas Banner Dies. I had a scrap of the Real Red Glimmer Paper in the 6″ x 6″ Pack so I diecut some red berries just in case I wanted to use them. The “joy” is stamped in Real Red ink from the Brightest Glow Stamp Set. You can purchase the whole Brightest Glow Bundle with the stamp set and some fancy dies, but if you just need some more or some Christmas greetings, you can just get the stamp set.

This little Painted Christmas 2-4-6-8 Gift Bag started out with some not real exciting pinecone paper and got turned into a real Christmasy bag for a small gift or treat! Time to get ready for the holidays!

Hues of Happiness Floral Friend Card

Hues of Happiness Floral Friend Card

I was planning to make the entire card with the small print paper on the left side of the card front, but who can resist those gorgeous flowers?! So this card turned into the Hues of Happiness Floral Friend Card with a strip of the paper with the tiny flower designs on the left and a large piece of the floral paper on the right.

This is the Hues of Happiness Designer Series Paper in the Stampin’ Up! Annual Catalog that is so gorgeous! So many flowers in so many different colors! And because the paper is so pretty, it allows you to make easy and simple cards that allow the paper to be showcased.

The card base is Night of Navy with a layer of Daffodil Delight. There are so many other colors I could have chosen as well! Sometimes I get out several colors of paper and see which ones I like the best together. After I decided to use a smaller piece of the print with the tiny flowers, I cut a strip of that at 1 1/2″ x 3 3/4″. The large-flowered piece of designer paper is 3 3/4″ x 4″. The floral piece overlaps the small piece by 1/2″ so they could be adhered together and ribbon wrapped around the piece before it was adhered to the card. The Grid Paper is great for lining things up in a case like this.

The ribbon I used to cover the seam of the two papers adhered together is the White 1/4″ Crinkled Seam Binding Ribbon. I used a Daffodil Delight Stampin’ Blend Marker to color the ribbon quickly and easily to match the card. Just put down a piece of scrap paper, hold one end of the ribbon down, and run the marker along the ribbon. It should dry very quickly but you can wipe a tissue across it to be sure before you use it in case there is any excess or wet ink. Alcohol ink will dry quickly, though. The ink actually stiffens the ribbon a tiny bit which makes it easier to work with. I tied a simple knot around the ribbon with another piece of the colored ribbon.

The greeting is stamped in Melon Mambo ink on Basic White and diecut with one of the Stitched Rectangle Dies. The greeting is from the Happiness Abounds Stamp Set. To add a little extra, I fussy cut two small flowers directly from the designer paper to pop up on Mini Stampin’ Dimensionals® on the corners of the greeting. I also added some Iridescent Rhinestones Basic Jewels to the greeting and on the card front. I almost always like a little bling or sparkle!

Here is another card I made with this same designer paper and cut-out flowers.

There you have an easy card you can copy exactly or just use the design with your choice of designer paper and colors plus a greeting in this Hues of Happiness Floral Friend Card.

Rings of Love Cottage Thank You Card

Rings of Love Cottage Thank You Card

This Rings of Love Cottage Thank You Card is one that I kept forgetting to make! I’ve made other cards with this designer paper but I kept forgetting to make something with this cute paper with the little houses and cottages all over it! Finally, I remembered to use this paper!

The card base is Soft Suede with a layer of Mint Macaron. This Rings of Love Designer Series Paper has lots of coordinating colors so you could use other colors on your card. Just cut a piece of the paper to be the front of the card! That’s all there is to it. However, when cutting out the paper for the layer, you might want to “try” to get it to showcase the houses as best you can. For example, had I thought about that idea before cutting, I would have tried to have that greenish house on the right be a little more front and center. But depending on your paper, you might have to take it “as is” so you don’t waste too much paper! No matter what, it will still look pretty because it’s pretty paper!

For the greeting, I didn’t want to take up too much space and cover up a house so I just chose a smaller, narrow greeting. I found one I liked in the Dragonfly Garden Stamp Set and simply stamped it on Basic White with Mint Macaron ink. While you might find a die that fits, I just cut a rectangle as close to the words as I could get to keep it as small as possible and put a flagged end on the left. Then I took a scrap of the Whisper White 1/4″ Crinkled Seam Binding Ribbon that I had colored with a Mint Macaron Stampin’ Blends Marker to use on the greeting. I just tied a knot in the center of the piece of ribbon and trimmed the ends so that it is a teeny tiny bow, just a little something to embellish the greeting. I adhered it with a Mini Glue Dot.

One of the best parts of this Rings of Love Designer Series Paper is that you can earn it FREE with a qualifying Stampin’ Up! purchase! When you spend $50, this month, during Sale-A-Bration you can choose a FREE Sale-A-Bration product, like this paper! With a $100 purchase, you may choose a $100 Level product or two $50 Level products! This promotion has been going on for a month already and now it will come to an end on August 31! So be sure to do your shopping early so you can choose which product you would like for free!

This Rings of Love Cottage Thank You Card is a very simple one yet the paper makes it look very special. Another sheet has tree ring images on it that you can cut out and make special card designs or other project designs with them. Other papers have florals and fall images. Check out all the Sale-A-Bration products you could earn and make your choice!

SHOP STAMPIN’ UP! ONLINE HERE!

Time To Get Spooky With Paper Pumpkin!

OK! Here is what I have been waiting for!! Halloween crafting!! Just look at this Paper Pumpkin box for September! I almost wanted to squeal with excitement when I saw the photo!

Get your Halloween crafting on with the Spooky Treats Paper Pumpkin Kit. This month’s kit includes everything you need to make 18 absolutely adorable (and just the right amount of spooky) treat boxes—that’s 6 each of 3 unique designs! No need to let the season creep up on you; subscribe and order your kit today.

ABOUT THE KIT
Name: Spooky Treats

This kit includes:

  • This month’s kit contains enough elements to create 18 treat boxes—6 each of 3 designs. This all-inclusive kit includes printed box bases and tops, die-cut paper pieces, adhesives, and more!
  • The Spooky Treats Paper Pumpkin Kit includes an Orchid Oasis Classic Stampin’ Spot!
  • This kit’s stamp set puts the TREAT in trick-or-treat with fun, Halloween-themed sentiments and designs. Embrace the spooky season with ghost, bat, spider, and star images.
  • This kit also includes a special peek-through box top on one of the box designs.
  • Finished box size: 2-1/2″ x 3″ x 1″ (6.4 x 7.6 x 2.5 cm)
  • Coordinating Stampin’ Up! colors: Basic Black, Gray Granite, Orchid Oasis, Fresh Freesia, Crushed Curry, Pumpkin Pie
WHAT IS PAPER PUMPKIN?

Paper Pumpkin is our monthly One-Stop Box™ that offers a unique variety of paper projects for subscribers of any skill level to enjoy! These thoughtfully themed and all-inclusive craft kits encourage Stampin’ Up! customers to explore their creativity, try new techniques, and discover their potential in papercrafting. I say it’s a gift you give yourself, to find that special box in your mailbox each month, just for you! Try it! No risk or obligation to continue for any length of time! You can even skip a month when you need to!

JOIN PAPER PUMPKIN TODAY!

Last Day!! Join Paper Pumpkin and Get This Sweet Sunflowers Kit!

Paper Pumpkin Kit August 2022 Sweet Sunflowers

Get the Sweet Sunflowers Paper Pumpkin Kit for a crafting experience you won’t forget! This month’s kit includes watercolor designs inspired by nature, two Classic Stampin’ Spots for a Two-Step stamping experience, and an all-new twist technique. As a bonus, this month’s kit includes a FREE gift that will add the perfect golden accent to any of your projects. Time to make smiles bloom!

ABOUT THE KIT
Name: Sweet SunflowersItem Number: 161120
This kit includes:

  • All the supplies you need to create 9 cards: 3 each of 3 designs; and coordinating envelopes.
  • An all-occasion stamp set to express words of gratitude, friendship, greetings, and beautiful wildflower-designed images.
  • Specialty Vellum honeycomb shape pre-cut pieces.
  • 2 Classic Stampin’ Spots (Crushed Curry and Soft Suede) for a Two-Step stamping experience with a twist!
  • Paper pieces and embellishments with watercolor designs and images.
  • Mini Stampin’ Dimensionals.
  • FREE GIFT: 8 Gold Foil Honeycomb Sheets

Completed card size: 5-1/2″ x 4-1/4″ 

Coordinating Stampin’ Up! colors: Blackberry Bliss, Crushed Curry, Evening Evergreen, Melon Mambo, Mossy Meadow, Night of Navy, Pumpkin Pie, Soft Suede

SUBSCRIPTION INFORMATION
Subscribe to the July Paper Pumpkin Kit between July 11 and August 10 at www.paperpumpkin.com! Note: Supplies may be limited toward the end of the subscription period.

This looks like a kit I can’t wait to get!! Even the box is so pretty!

Watch this little video!

SIGN UP TODAY!
JOIN PAPER PUMPKIN HERE!