Monthly Archives: September 2021

Easy Penguin Playmates Gift Bag

While I was thinking about what to make for the LAST DAY OF SALE-A-BRATION today, I looked in the Sale-A-Bration Brochure for a little review and decided to mostly copy a little sample bag on page 5 and this Easy Penguin Playmates Gift Bag is the result!

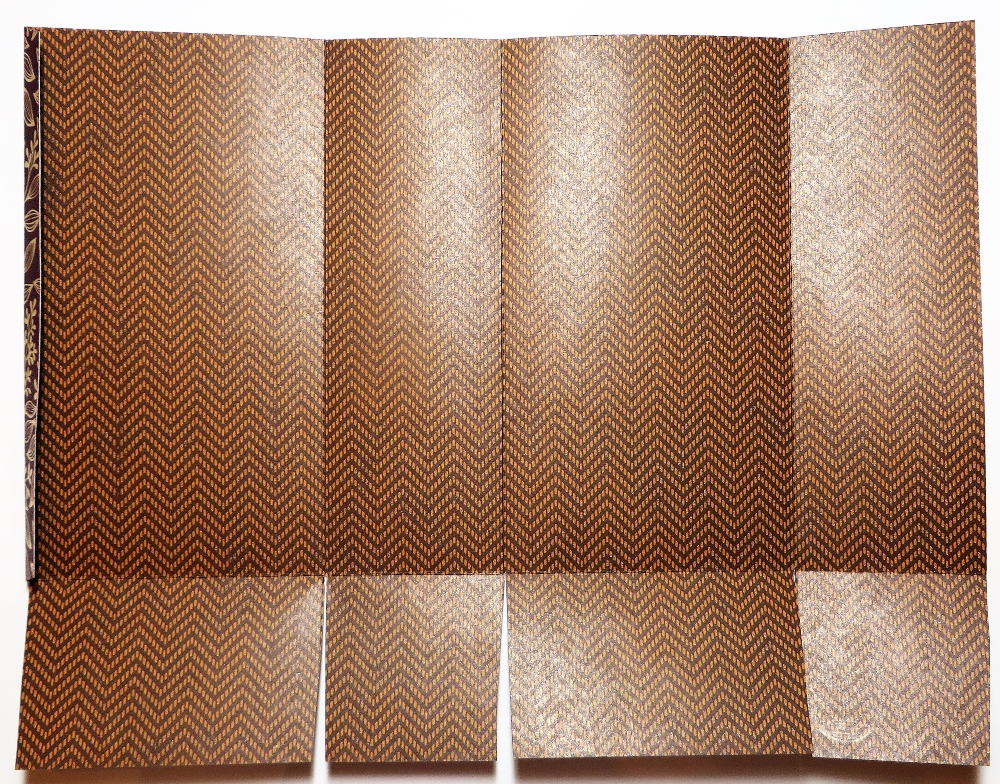
I used the same measurements to make this little bag that I did the other day on THIS POST except that I made it shorter! So I started with the Penguin Playmates Designer Series Paper that measured 6″ x 11 instead of 8″ tall on the other bag.

To make any bag like this one, always pay attention to the pattern and direction of your paper, to make sure it will end up with the design going in the correct direction! I first cut another paper (well, actually it was already cut in my package of papers) but it would have had the animal images sideways!! Score this paper at 2″ for the bottom flaps and then score on the long side at 2″, 5 1/4″, 7 1 /4″, and 10 1/2″. Cut away the tiny little piece at the end that is 1/2″ x 2″. Just crease all the lines, then cut the flaps apart at the bottom. Apply adhesive to that narrow little 1/2″ strip on the end and fold the other side over to adhere to that piece. This will start to form your bag. Next fold in the flaps at the bottom, applying some adhesive and trying to pay attention to which is the front of the bag.

Different from the bag I made the other day, I pinched the top together to close it. You can add a tiny bit of adhesive to hold it closed. You can punch holes in the top and thread ribbon through to tie it closed. On this bag, I just tied a piece of ribbon around the top. It’s the Flowers For Every Season Ribbon Combo Pack, of which I used the Just Jade gingham ribbon.

For the tag, I die cut a tag from the Tailor Made Tags Dies. It was too long so I just cut the banner end by hand (doesn’t have to be perfect!) and also cut out one of the penguins from the designer paper by hand with Paper Snips. So many cute images to choose from that you can cut out from the paper! I added a small layer of Basic White Cardstock and popped the penguin up on Stampin’ Dimensionals. Then I added tiny drops of Multipurpose Liquid Glue and adhered 5 little Subtle Shimmer Sequins. I found these in my drawer and hadn’t used them yet! These sequins would be good for shaker cards, which is probably why I bought them!

I ran one end of the ribbon through the tag and tied the bow. You can use a few Mini Glue Dots to hold everything in place if you want. I think the recipient can still get it open with a couple of glue dots! Or you could just adhere the tag to the bag and add a separate bow to the top of the tag, maybe leaving off the ribbon at the top of the bag, or use a smaller bow on the tag.

This was a fun little project to make because the paper is so cute! You could use this paper for little favor bags for Christmas parties. But the only way to get this paper is to place a Stampin’ Up! order TODAY, the LAST DAY OF SALE-A-BRATION to get this paper FREE with a $50 order!! Sale-A-Bration ends tonight just before midnight MT!

Don’t let this be YOU tomorrow!!

SHOP SALE-A-BRATION TODAY!!

IT’S THURSDAY, SEPT. 30 THE LAST DAY!!

My 12 Weeks of Christmas Begins Today!

12 Weeks of Christmas 2021

Today is the day my special 12 Weeks of Christmas 2021 holiday emails begin at 1:00 PM CT. I always look forward to sending these to my Stamping With Karen Mailing List subscribers every year as a thank you for being one of my subscribers! I hope they help with your holiday planning and project ideas!

Every week for 12 weeks you will be getting an email from me with a fantastic holiday project for you to make! It is completely FREE, but it is exclusive to people on my mailing list. You can use these ideas to make your holiday preparations easier! Just like in my regular weekly email, I will send a photo of a project, a list of supplies needed, and all the directions to make it.

In the first few weeks, I will send card ideas since it’s likely that is the first thing most of us will work on at this point. Next, come a few weeks of gift ideas, and finally, as we are doing Christmas shopping, some ideas for gift wrap, bags, and gift tags.

These are exclusive projects that I won’t be posting on my blog or anywhere else. I just want my subscribers to know that you are appreciated! If you are already on my mailing list, no need to do anything!

The only way you can get these special 12 Week of Christmas emails is to be on my Stamping With Karen Mailing List! If you are not on my Mailing List, you better get on it before 1:00 PM TODAY, otherwise, you are going to miss out! All you have to do is sign up in the red box in the upper right of my blog. If you are on your mobile phone, the red box may show up at the bottom of your phone.

You can click HERE to get to my Mailing List Sign up Box!

Sale-A-Bration ENDS Thursday, 9/30!

Sale-A-Bration Aug Sept 2021

Time flies when you’re having fun earning FREE Stampin’ Up! products during Sale-A-Bration, right?!! How did these two months – August & September – go by so fast?

In case you are brand new or just coming across my page here, Sale-A-Bration is Stampin’ Up!’s biggest promotion….and this year we had TWO of them! Historical! During Sale-A-Bration, for every $50 you spend (no limits!) you qualify for a FREE product in the Sale-A-Bration Brochure! If you spend $100, there are a couple of special $100 level products to choose from (the Delicate Dahlias Stamp Set and the Summer Shadows Dies). (The Summer Shadows Dies coordinate with the Shaded Summer Stamp Set in the Annual Catalog!) OR you can just choose two $50 Level products. If your order reaches $150, you also earn Stampin’ Rewards of 10%!

You’ve probably seen this video already, but please watch if you would like a “review” of Sale-A-Bration! The sparkly Be Dazzling 6″ x 6″ Paper is sold out, unfortunately, and other products’ status could change over these last couple of days.

I hope you have enjoyed these past two months “Sale-A-Brating” with Stampin’ Up! It’s a promotion that goes WAY back to the early days of Stampin’ Up! And I remember when Sale-A-Bration choices back in my early days of stamping were just a few stamp sets! It has certainly evolved into being even more fun with more choices!

If you don’t “need” anything right now, you can always stock up on basics like adhesives, Basic White Cardstock, Envelopes, ink refills, embellishments, one of the kits in the Kit Collection, or even a Prepaid Paper Pumpkin subscription. Order a 3-month Prepaid Paper Pumpkin subscription at $63.00 or a larger one to earn FREE Sale-A-Bration product. You can purchase a Prepaid subscription even if you have a month-to-month subscription. Just follow the instructions Stampin’ Up! will send you in an email to add a code to your account and the prepaid subscription will be used first and then revert back to your regular subscription. I just did that last night myself! Make that purchase and get that code entered by Oct. 10th and you’ll be getting the beautiful October holiday Paper Pumpkin Kit!

Maybe you’ve been thinking about becoming a Stampin’ Up! Demonstrator! This is a good time to join and choose a FREE Bundle to go with your Starter Kit! Check out the information HERE. I’m happy to answer any of your questions!

Join Stampin' Up!
Click to view.

Enjoy your last days of Sale-A-Bration 2021! Thursday will be the last day to order and qualify for Sale-A-Bration rewards. I suggest not waiting until the very last minute, if possible. Sometimes there is a glitch or problem and maybe no opportunity to fix it. Have fun shopping!

SHOP STAMPIN’ UP! HERE!

Make an Easy Gift Bag and Card With Blackberry Beauty Designer Paper

Blackberry Beauty Gift Bag and Gift Card

The season for gifts will soon be upon us, actually, it is always the season for gifts, so here is how to Make an Easy Gift Bag and Card With Blackberry Beauty Designer Paper. These gift bags, no matter the size, are really so easy to make either out of designer paper or cardstock. You can stamp the cardstock or add a layer of pretty designer paper to dress it up. You can learn to make these small gift bags and it will be faster for you to do it yourself than to drive to the store for wrapping paper or gift bags!

I made this gift bag out of the Blackberry Beauty Specialty Designer Series Paper. As I mentioned above, I thought about making the bag out of Blackberry Bliss Cardstock and then adding a layer of designer paper. It would make the bag sturdier to use cardstock. But using designer paper also makes the inside very pretty!

The paper, whether cardstock or designer paper, is 8″ x 11″. Look at the pattern of the paper before cutting and scoring and make sure your pattern will go in the correct direction. On the side that will be bottom, where the flaps will be, score the paper lengthwise at 2″. Then turn the paper so the long side is at the top, using your Paper Trimmer or Simply Scored Scoring Tool. If using the Paper Trimmer, just make sure you don’t use the cutting blade by accident! You might even want to remove it temporarily! Score at 2″, 5 1/4″, 7 1/4″, and 10 1/2″. This will make the score lines where you will fold to form the bag.

Blackberry Beauty Gift Bag Cutting

Above you see the image of the inside of the paper scored and the flaps at the bottom cut. On the left side of the photo, you can see the 1/2″ flap that I folded inward a bit. Just below that, I cut off that 1/2″ x 2″ section. That 1/2″ flap is where the adhesive will go to form the bag with the opposite side. I like to angle my cuts just a bit as you can see by the spaces between the flaps, which will form the bottom of the bag. If you cut straight on the scored lines, sometimes they don’t overlap perfectly so cutting on an angle takes away that tiny bit of extra paper and makes it all look a little more professional when you assemble the bag. Try it! Plus you don’t have to worry about cutting EXACTLY on the score lines because sometimes they are difficult to see on printed paper!

Apply adhesive to that 1/2″ flap and then just fold over the opposite edge, making sure it is lined up evenly with the flap. I used Stampin’ Seal +. You could use Multipurpose Liquid Glue or Tear & Tape as well.

After connecting the two sides, fold in those bottom flaps, applying adhesive, and then reaching inside the bag on a table with a Bone Folder or something to rub down the flaps to make sure they are adhered well. Decorate the outside of the bag.

You can do the top however you like. For now, I left mine open like a gift bag. Or you can squish in the sides a bit to bring the top edges together and either tie a ribbon around, add a clip to the top, or punch holes and tie ribbon through to close. Make sure you put the gift inside first!

For the front, I used pieces from the Blackberry Beauty Ephemera Pack. As I write this, it is back ordered but should be back in stock in another week. Its been very popular! But you don’t have to have it. Use some gold pieces, tags, ribbon, whatever you have in your stash to decorate the bag. And as long as I had everything out, I made a little gift card to go along with it, folding a 3″ x 6″ piece of cardstock in half and then decorating. You can order 3″ x 3″ envelopes.

This bag is really easy. If you want it shorter, then cut it at maybe 6″ instead of 8″ or make it taller. This Blackberry Beauty Specialty Designer Series Paper is really pretty too with its gold accents and deep colors. This will be so pretty for fall and Thanksgiving cards and projects. Try making something like this Blackberry Beauty Gift Bag today!

Blackberry Beauty Gift Bag top view

SHOP STAMPIN’ UP! ONLINE HERE! LAST WEEK OF SALE-A-BRATION!

Beauty of the Earth Thinking of You Card For Fall

Beauty of the Earth Thinking of You Card For Fall

Somehow I didn’t get around to acknowledging the first day of fall last week, so now I have made a card for the glorious fall season! We were even lucky enough here in Houston to experience some fall weather with cooler temperatures, but not colored leaves yet like this Beauty of the Earth Thinking of You Card For Fall. I actually had a physical reaction the other day when I walked out the back door and my body was stunned to not feel like I had just opened the oven door! It was cool outside!! We won’t get colored leaves here until probably December, but I’m amazed to see photos on the internet of places way north that do have colored leaves already!

This card uses the Beauty of the Earth Designer Series Paper to make a fall card. This paper is really quite interesting, different than what Stampin’ Up! usually has. You can use the paper as is in many ways, or you can even die-cut it to look like the leaves on the trees that you stamp or diecut. You can be very creative with this paper. This Suite also has the Beautiful Trees Dies which I think you really need to get the most use out of this set.

The card base is Cinnamon Cider, one of the In Colors. The layer on the card is Very Vanilla but since I actually covered it with ink it could have been Basic White! My idea was to have a strip of the Beauty of the Earth Designer Paper along the side and a fall tree on the Vanilla overlapping the designer paper. I thought the background needed to be colored in so I used Granny Apple Green ink (I think!) for the grass and Pool Party for the sky. The Beauty of Friendship Stamp Set had a little stamp in it that I used for some splotches of grass or shadows or whatever at the bottom of the card to give it a little texture and look more like a grassy area. I stamped that with Pear Pizzazz I think that I had out.

I adhered a strip of the more greenish designer paper sheet to the inked Very Vanilla piece and wrapped a piece of Linen Thread around the strip. Then I adhered the diecut tree in Cinnamon Cider covered with a diecut piece of the designer paper in the reds and golds. Again, it would have been handy to remember to use Adhesive Sheets before cutting out the tree especially but since the tree was getting mostly covered up anyway, I didn’t have to be super careful with the Multipurpose Liquid Glue because it was going to get covered with the designer paper. The leafy piece was easier to glue down because there were some larger areas to apply the glue.

The greeting is in the Beauty of Friendship Stamp Set. It is stamped in Cinnamon Cider Ink and die cut with the rectangle dies in the Beautiful Trees Dies. And because we have seen some blue jays around here (not to mention hawks!) I added two bluebirds in the tree. I love that little die that cuts out two birds at once! I added just a tiny dot of white for each bird’s eye with a white gel pen that we used to sell. Here’s another card I made in July that is very similar.

With the dies and the designer paper, this is a pretty easy card to make and it looks much more complicated. I don’t think it is going to stay cool here but at least we had a much needed cool break for a few days and will look forward to the next one! In the meantime, I’ll pretend it’s really fall here by making cards like this Beauty of the Earth Thinking of You Card For Fall.

SHOP STAMPIN’ UP! ONLINE HERE!

Don’t forget! Sale-A-Bration ends Thursday, September 30!! Don’t miss it!

Ghosts Halloween Gift Bag

Recently I told you about how fun I thought it was to decorate a plain kraft gift bag for a special occasion or just to have on hand and then last week I wanted a Halloween bag for a gift for a friend! This Ghosts Halloween Gift Bag was fun to make for a little gift!

All you need is a gift bag like this one with the handles in kraft or white or whatever color you can find at the craft store. Or often I use bags that I get at certain small shops or special places. Even if they have printing on the front, you can usually cover the store name and all that with your personalization. If they have printing on both sides, then do a good job on the front side and do something plain and simple on the backside just to cover the printing.

There is an infinite number of ways you can decorate these bags! Think of it as making a card front, but probably bigger. This design is not very complicated at all. I just used one 6″ x 6″ sheet of the Cute Halloween Designer Series Paper, my favorite one with all the little trick-or-treating ghosts! I layered it on a larger piece of Pumpkin Pie and then a layer of Basic Black.

On the front of the bag, I have various die cuts layered. These are the Tasteful Labels Dies and the scalloped rectangle in the Stitched So Sweetly The greeting is stamped from the Cutest Halloween Stamp Set and seemed perfect for this gift bag! Once I added the Black Glittered Organdy Ribbon tied in a bow I was happy with my project! Plus I added a few Cute Stars Adhesive-Backed Sequins.

You could use smaller bags to decorate or even lunch sacks! It’s so much fun to decorate bags for a birthday gift, congratulations, a holiday season, or whatever you need! Here is the bag I made just a few weeks ago. There are lots of ideas out there!

Start looking through your collection of bags and put the good ones you could use for decorated gift bags into your stash so you’ll have them handy or go ahead and decorate now for the holidays! You will be glad you did at the last minute when you need something gift-wrapped and you’re all out of wrapping paper and store-bought gift bags!

SHOP STAMPIN’ UP! ONLINE HERE!

Don’t forget Sale-A-Bration ends Thursday, September 30! Don’t miss out on the free products you can earn!

The 12 Weeks of Christmas 2021 Is Coming!

12 Weeks of Christmas 2021

Believe it or not, Christmas is not that far off, just a little over 12 weeks away, so it is time for my 12 Weeks of Christmas Holiday Emails to begin! These special emails will begin next Wednesday, September 29th!

Every week for 12 weeks you will be getting an email from me with a fantastic holiday project for you to make! It is completely FREE, but it is exclusive to people on my mailing list. You can use these ideas to make your holiday preparations easier!

This is a thank you gift for my mailing list subscribers that I like to do every year. Just like in my regular weekly email, I will send a photo of a project, a list of supplies needed, and all the directions to make it.

In the first few weeks, I will send card ideas since it’s likely that is the first thing most of us will work on at this point. Next, come a few weeks of gift ideas, and finally, as we are doing Christmas shopping, some ideas for gift wrap, bags, and gift tags.

These are exclusive projects that I won’t be posting on my blog or anywhere else. I just want my subscribers to know that you are appreciated! If you are already on my mailing list, no need to do anything!

The only way you can get these special 12 Week of Christmas emails is to be on my Stamping With Karen Mailing List! If you are not on my Mailing List, you better get on it before September 29th at 1:00 PM, otherwise, you are going to miss out! All you have to do is sign up in the red box in the upper right of my blog.

Counting Sheep Birthday Card

Counting Sheep Birthday Card

If you like sheep, I hope you are able to get this cute stamp set and dies to make a card like this Counting Sheep Birthday Card. I really had fun making this card and coloring the sheep and the background of the card. I think it’s the party hats and balloon that made me so happy! Who can’t be happy when you have party hats??!

The card base is Old Olive and the top layer is Basic White, but I colored it with ink. For the grassy area, I used Granny Apple Green ink and applied it with the Blending Brush. For the sky, I used Coastal Cabana ink. The fences are cut with the Sheep Dies. When I was going through some retired stuff in my stash, I found these wood sheets that Stampin’ Up! sold several years ago. It’s so thin it’s meant to be used like paper almost. So I die cut the fences using the wood sheets rather than paper! I also thought about using the Cork Paper! You can use any card stock you like.

The sheep were stamped on Basic White Cardstock with Memento ink and I colored them in with various Stampin’ Blends. The party hats were also stamped and colored with Blends and then everything was die cut with the Sheep Dies. The stamp set for everything is the Counting Sheep Stamp Set. After I had everything planned where I wanted it placed, I stamped the greeting at the top, which is in the same stamp set. I stamped the “You’re Amazing” on the inside of the card as well.

You can earn the Counting Sheep Stamp Set or the Sheep Dies during Sale-A-Bration with a $50 purchase. If you want both the stamps and the dies, you would need a $100 order. Sale-a-Bration ends Thursday, September 30 so don’t let it pass you by! It’s the biggest promotion of the Stampin’ Up! year and this year we had TWO Sale-A-Brations so that was pretty special…and historic! Check HERE under Sales & Specials in the Online Store to see what is currently available during Sale-A-Bration. Right now the only thing that is gone is the Be Dazzling Designer Paper.

I hope you are having as much fun as these sheep are on this Counting Sheep Birthday Card celebrating someone’s birthday!

SHOP STAMPIN’ UP! ONLINE HERE!

Delicate Dahlias Thank You Card

Delicate Dahlias Thank You Card

This Delicate Dahlias Thank You Card is one that you can make if you earn the Delicate Dahlias Stamp Set during these last two weeks of Sale-A-Bration at Stampin’ Up! During Sale-A-Bration you can qualify for a FREE product in the Sale-A-Bration Brochure with every $50 purchase, or with a $100 purchase, you can earn an extra special $100 Level product such as this Delicate Dahlias Stamp Set. This stamp set has been quite popular because the flowers are so beautiful! As I write this, it is still available, but I wouldn’t wait until the last minute! Sale-A-Bration ends on Thursday, September 30. Don’t miss the fun!

I envisioned this card having a background of a black and white stripe with bright colored flowers to contrast. As I started looking through my designer paper, I found this paper in the Beautifully Penned Designer Series Paper, one of the $50 Level products you can earn for FREE during Sale-A-Bration. This paper coordinates with the Hand-Penned Designer Series Paper in the Stampin’ Up! Annual Catalog except it is in black and white! Sometimes it is fun to leave it as is and sometimes it is fun to color in or use any of various coloring techniques. The card base is Basic Black with this scalloped pattern paper as a layer,

The dahlias were all stamped in Memento Black although perhaps Stazon would have been the better ink choice with watercoloring. It wasn’t exactly watercoloring but I used a Blender Pen and added ink from an ink refill bottle in the lid of the ink pad. The colors I used were Real Red, Pumpkin Pie, and Daffodil Delight. I didn’t worry about proper shading or anything like that! I just colored in with the ink letting some areas be lighter if I was running low on ink on the Blender Pen and darker if I just touched it to the ink. There are no dies so I just cut the flowers out by hand using my Paper Snips! The trick is to just relax and enjoy the experience! Don’t try to cut perfectly because there are lots of ins and outs with these flowers. A little white showing on the edges of the petals is no big deal. Same way with the coloring. If you leave some white spaces, don’t worry about it! I also stamped and colored the leaves in the set.

Before adhering the designer paper to the card base, I wrapped the Black & White 1/4″ Gingham Ribbon around to the backside of the paper. Then I tied a separate bow and adhered it to the ribbon with Mini Glue Dots.

Two of the flowers are glued right on the designer paper using Multipurpose Liquid Glue. The yellow dahlia is popped up on Stampin’ Dimensionals®. I just placed the leaves around randomly.

The greeting is in the stamp set and I cut it out with the Messages Die. You can just cut one greeting using the die, you don’t have to stamp and die cut the whole sheet!

On the inside of the card, I stamped a partial dahlia in Daffodil Delight in the lower right-hand corner on a layer of Basic White. You have to have a white or light-colored card layer inside with a black card base!

If you wanted to make this card a little easier, you could just stamp the flower outline in whatever color(s) you wanted and then not color them in. You can also stamp with the two-step stamp. Lots of choices!

So if you want to earn this FREE Delicate Dahlias Stamp set, you must place a $100 Stampin’ Up! order and then you can choose this stamp set as your Sale-A-Bration choice. Or you can choose 2 $50 Level products. You will get a reminder to choose the free Sale-A-Bration items you are entitled to as you place your order online. Then you can have fun making a card like this Delicate Dahlias Thank You Card or use one of the other greetings for another occasion.

SHOP STAMPIN’ UP! ONLINE HERE!

Be Dazzling Pretty Pumpkins Halloween Card

Be Dazzling Pretty Pumpkins Halloween Card

Here’s a fun Halloween card, the Be Dazzling Pretty Pumpkins Halloween Card, that came about simply because I found a square Pumpkin Pie card base already in my Pumpkin Pie cardstock. I immediately got the idea that I would make a quick card out of it right away. I don’t know if this one was quick in my fiddling with the words in the greeting, but it would be an easy one for you to copy since I already did the design!

Beyond the 4 1/4″ x 4 1/4″ Pumpkin Pie card base and putting a pumpkin on the front, I didn’t know exactly how it would all come together. Just to start, I looked through the Blackberry Beauty Specialty Designer Series Paper simply because it was laying out on my desk. Right away I saw the backside of one of the gold foil accented papers, probably one of the prettiest papers. We often don’t use the “other side” of the fancy or themed paper but sometimes we have to sacrifice the pretty side in order to use the “other” side! I immediately liked the herringbone design of this paper for a background. It is cut at 4″ x 4″.

The pumpkin is die-cut from the Sale-A-Bration Be Dazzling Paper using the Detailed Pumpkins Dies. As I write this, this paper is not coming up in the Online Store so it may not be available any longer. However, if you can’t get it, you can use a Gold Foil Sheet or any other metallic papers which will look just as pretty! This particular die is SO pretty and detailed! If you think ahead, it would be best to use an Adhesive Sheet on the back of the paper before you die cut it so that you don’t have to put teeny tiny drops of glue on the back to adhere it.

The greeting is in the Cutest Halloween Stamp Set and is quite lengthy in size. Just for fun, I decided to cut up the individual words and see if I liked that on the card. With the pumpkin taking up a lot of room on the card, front and center, it was a little difficult to arrange the words to my liking. Finally, I decided to go with a placement I liked and stamped and cut out a ghost as well from the same stamp set.

Sometimes, even when you are not totally pleased with a card, it is the addition of some little embellishment that just makes the card satisfactory! In this case, since I had struggled with the word placement and the ghost, it wasn’t like this was my favorite card of all time, but when I added the Cute Stars Adhesive-Backed Sequins, that was the final touch! I think the stars added so much and I loved the card then!

Sale-A-Bration ends on September 30, a Thursday, two weeks from yesterday! That’s all the time you have to get your free products with every $50 or more purchase! It always seems like we have lots of time in the beginning but now the end is coming up fast! Don’t disappoint yourself by forgetting or not getting free products during this favorite promotion!

Be sure to shop soon and hopefully get something FREE during Sale-A-Bration!

SHOP STAMPIN ‘ UP! ONLINE!

Be Dazzling Pretty Pumpkins Halloween Card Closeup

Harvest Meadow Pretty Pumpkins Card

Harvest Meadow Pretty Pumpkins

This year it seems to be trendy to have pumpkins of non-traditional colors so I thought I would try that with this Harvest Meadow Pretty Pumpkins Card. I’m not even sure how I came up with this particular idea but I pulled out the Harvest Meadow Designer Series Paper and played around with the various papers to see how these would work as pumpkins. I also was very interested in using the die in the Detailed Pumpkins Dies.

The card base is Old Olive mainly because I had already cut out the leaves in the Detailed Pumpkins Dies from an Old Olive scrap on the table while I was cutting out the pumpkins. I cut out the pumpkins and played around with their placement and combinations just on the table before I tried to put them on a card.

The background layer is the striped pattern in the Cute Halloween 6″ x 6″ Designer Series Paper. I just was looking through various papers to see if there was something I wanted to use for the background layer or if maybe I would use cardstock and emboss it in a folder to add some texture. At first, I didn’t think there would be anything in the Cute Halloween Paper but found this striped paper that was pretty subtle but had Old Olive in it, one of the colors I was already using. I think it provides some interest in the background without clashing with the prints on the pumpkins.

The pumpkins are cut out with the outline die in the Detailed Pumpkins Dies. I chose some patterns from the Harvest Meadow DSP that I thought could look okay as pumpkins, even the blue! The one pumpkin is die-cut from Calypso Coral Cardstock with the die with the slits. I wanted another color behind those slits, so I traced the die cut on a scrap of Bumblebee Cardstock and then cut it out with Paper Snips just inside the pencil lines so it wouldn’t stick out from the Calypso Coral cardstock. A couple of the pumpkins are popped up on Stampin’ Dimensionals® as are a couple of the leaves.

The greeting is in the Pretty Pumpkins Stamp Set. I stamped it in Old Olive ink on a scrap of Basic White Cardstock. I kept it simple by just leaving it as a rectangle. I didn’t want to take up too much more room on the card or take away from the pumpkins.

Here is another card on my blog that I made recently using non-traditional colors (but now trendy!) for the pumpkins. This was a fun card to make and I liked how it turned out with the different colors. When you make a fall card with pumpkins, take some artistic license and see what new colors you can use for the pumpkins! Just have fun with it! Experiment, like I did on this Harvest Meadow Pretty Pumpkins Card, until you are happy with your result!

SHOP STAMPIN’ UP! ONLINE HERE!

It’s the Holiday Paper Pumpkin!

PP Square Ad Oct 2021 2

Some of my favorite Paper Pumpkin Kits are the holiday ones! I already love this box and can’t wait to see what the card designs are!

When you picture a peaceful Christmas, what comes to mind? Do you see snow outside your window, softly swirling through the sky? A tree trimmed with tinsel, a fire crackling nearby? Maybe you’re dreaming of decorating a holly jolly gingerbread house. Can you catch a whiff of Christmas cookies wafting through the air?

Whatever it is you think about when Christmas comes to town, picture a peaceful Christmas with the Peaceful Christmas Paper Pumpkin Kit! This glimmering and gleaming kit is your creative kickstart to Christmas cardmaking. With sprinkles of snow, shimmering silver skies, and heartwarming holiday wishes, you’ll have enough elements and embellishments to create 10 Christmas cards and coordinating envelopes.

Speaking of coordination, make even more Christmas magic with Peaceful Place products! Our stunning Peaceful Place Suite Collection (item 156277) pairs perfectly with the kit’s components. Brew a cup of cocoa, snuggle up with a soft blanket, and prepare for a cozy craft night in!

Details

The kit contains enough elements to create 10 Christmas cards—5 each of 2 designs—and coordinating envelopes. This all-inclusive kit includes printed card bases, die-cut paper pieces, embellishments, adhesive, and more!

October’s kit arrives in a cute collectible box covered with enchanting evergreen trees. Use this special, limited-edition box to store your holiday handicrafts, or transform it into a well-wrapped package for a present!

The kit’s contents pair perfectly with the Peaceful Place Suite Collection (item 156277). To continue your Christmas crafting, combine the kit’s components with the suite’s patterned paper, shimmery sequins, and more!
Card size: 4-1/4″ x 5-1/2″ (10.8 x 14 cm)
Envelope size: 4-1/2″ x 5-3/4″ (11.4 x 14.6 cm)
Coordinating colors: Basic Gray, Real Red, Shaded Spruce, silver foil

Sign up by October 10th!

JOIN PAPER PUMPKIN TODAY!

Blackberry Beauty Slimline Floral Card

Blackberry Beauty Slimline Floral Card

This Blackberry Beauty Slimline Floral Card is what happens when you open a package of designer paper you just received and you didn’t realize this pattern was in the package and you just say to yourself, “Wow! That would make a beautiful, simple card!” Sometimes just seeing a sheet of paper inspires you to make a certain card design.

This designer series paper, Blackberry Beauty Specialty Paper, is so popular it has been back-ordered multiple times! It is beautiful paper for fall with its gold foil accents! This particular pattern is one of those with an empty space down the middle of the 12″ x 12″ paper so you can just cut it in half and then possibly make six cards out of that paper. When I saw these tall flowers (are they Queen Anne’s Lace?), I knew I was going to make a slimline card and that this pretty pattern wouldn’t really need much else!

The card base is Early Espresso. To make a slimline card, just start with a piece of cardstock 6″ x 6″ and fold it in half so the card is 3″ x 6″. This will fit in a regular envelope you might have in your desk at home. I cut the designer paper at 5 7/8″ x 2 7/8″ to just leave a narrow margin around the edge. You can cut the designer paper to take the best advantage of the placement of the flower or flowers on your card front. For example, you wouldn’t want half of this big flower cut off if somehow the way you cut the paper made that happen.

For the greeting, I stamped one from the Pansy Patch Stamp Set on a die-cut piece of Basic White. This is a small rectangle die from the Stitched So Sweetly Dies. I needed something very small for this card since there isn’t much space! This greeting is part of a longer sentiment so I colored only the part I wanted with the Early Espresso Stampin’ Write Marker. You’ll find this marker in the Neutrals Stampin’ Write Markers.

To add a little bling to the card I just added a strip of the Gold 3/8″ Shimmer Ribbon under the greeting. It just adds a little more sparkle of gold to go with the gold foil sparkles on the paper. You could use another gold ribbon if you like. Since the Early Espresso card base is pretty dark, I added a layer of Basic White for a stamped or written message on the inside of the card.

Certain designer papers are just made to be used all by themselves, I think, like this one! It would even be very pretty without the greeting on the front. We don’t always need to make a very fancy, fussy card when just a simple one that shows off the paper or some other element is all that we need for an elegant card.

SHOP STAMPIN’ UP! ONLINE HERE!

In Remembrance of September 11

Special Edition God Bless America Stamp

When September 11th happened twenty years ago, I was a Stampin’ Up! customer, not a Demonstrator yet. My Demonstrator told me about this Special Edition stamp Stampin’ Up! was selling to benefit those affected by the events of 9/11. Of course, I wanted to order one and I have always loved this stamp.

As I pondered what I should put on my blog for September 11th, I happened to think of this stamp. Perfect. As you can see in the photo below, I cut the words off the stamp and anchored them on the side of the wood block. Then I could use the flag image by itself or use the words separately. I colored on the stamp with markers since I wanted to use more than one color. I used Night of Navy and Real Red.

The stamped image is layered on Real Red cardstock, Night of Navy, and then Gold Foil. The Night of Navy border is really just a background for the photo but actually, I like it as part of the card. I didn’t actually make a card, just a card front, which really could be put in a frame.

God Bless America Special Edition Stamp

The company raised more than $1 Million for the September 11th Fund.

This was one of those events when we all remember almost every detail of what we were doing that day, what all happened, and how we felt. My boys had gotten off to school and I was home cleaning up the kitchen with the Today Show on TV. Once I realized what was happening, all I could think of was I wanted my kids and husband home, but I wondered if the schools even knew what was going on. One mom went to the high school to pick up the carpool and I went to pick up my middle-schooler and his friend that we carpooled with. I remember the parking lot full and cars all over the place picking up kids and the secretary saying there was no need to take the kids home. But we all wanted our loved ones home and close to us because we really didn’t know what else was going to happen. I didn’t want to scare my son and his friend too much since they barely, if at all, knew what was going on, so I purposely stopped at Taco Bell to pick up some lunch for them so things would seem “normal” and not too crazy. His friend, just that summer, had visited New York City and had visited the Twin Towers. My daughter was away at college but one of her best friends was in school in NYC so she called her and remembers hearing sirens in the background. I didn’t think there would be school the next day or work or anything going on, but the President decided life was going to go on, so our country continued on with our normal routines.

I love that Stampin’ Up! came up with this stamp and offered it as a way to help others. “Making a difference” has always been one of Stampin’ Up!’s values and that’s good to know about a company.

Cute Halloween Trick or Treat Ghosts Card

Cute Halloween Trick or Treat Ghosts Card

I just had to make another fun Halloween card, this Cute Halloween Trick or Treat Ghosts Card. I started by picking out the designer paper and played around from there! I have a trick for how I made one ghost go in a different direction from the one stamp!

This card base is Old Olive Cardstock with a layer of basic black. I chose the designer paper with the little houses and tiny moons and ghosts! This is the Cute Halloween 6″ x 6″ Designer Series Paper. So many cute patterns to choose from! I decided to make the designer paper narrower than the card front and have the ghosts floating along the edge. Then I decided to cut a decorative edge with a scallop die in the Penned Flowers Dies. Next, I selected another designer paper, the one with black dots, to go along the edge, after considering several options. This card opens from the top but it would be the same if it opened from the side.

The greeting is stamped from the Cutest Halloween Stamp Set on Basic White and then die cut with a die that fits inside the Basic Black die-cut, both of which are in the Ornate Frames Dies. I popped up the greeting on Stampin’ Dimensionals® and added two Elegant Faceted Gems.

For the ghosts, I stamped two ghost shapes in the Cutest Halloween Stamp Set on Basic White and then turned over the cardstock and stamped one ghost on the back where it didn’t overlap the ghosts stamped on the front. I also added the faces and little arms just on the ones on the front of the cardstock! So cute!! I cute out the ghosts by hand with my Paper Snips. Now you can purchase the Halloween Punch and get both the stamp set and punch in the Cutest Halloween Bundle and save 10%. So I cut out the two ghosts on the front of the white cardstock who were both facing the same direction. I cut them out with a bit of the black ink outline showing as it would if I had used the punch. Then I turned the paper over and cut out the ghost outline. But here’s the trick… after cutting out the ghost shape, I turned it over so it would be facing the opposite direction from the other two ghosts and stamped the face on it. Now, this ghost doesn’t have the black ink outline on it since I am using the unstamped side. But if you want that black ink outline, just take a black marker and run it around the ghost along the edge to get some black marking along the outline. Or, maybe it doesn’t really matter to you and you can skip that step! Out of the three ghosts, I wanted one facing the other direction.

I originally planned to adhere the ghosts right along the edge of the green designer paper, but in the end, I liked the placement you see better. I also turned the Ornate Frame die in portrait position and stamped the greeting in that direction which I think fits better than landscape position. Either way would be fine, though! Just play and see what looks good to your eye! Here is another Halloween card using the Cute Halloween DSP except with the sheet with ghosts! Order the Cute Halloween Paper on your next order so you have plenty of time to create “cute” Halloween cards and projects to send out, like this Cute Halloween Trick or Treat Ghosts Card.