Monthly Archives: September 2021

New Christmas Whimsy Kit Today!

Christmas Whimsy Kit Banner

“Christmas Whimsy’ is a new kit in the Stampin’ Up! Kit Collection, just being released today! You probably noticed photos of it in the Holiday Mini Catalog on page 6, with another kit coming that is shown on page 7. I suppose they are releasing these a little later than the catalog to get a little closer to the holidays!

Christmas Whimsy is an adorably festive card kit with a modern design! Santa’s elves might be hard at work in the North Pole but with this all-inclusive kit, the hard work is done for you! All pieces are printed, die cut, and ready for you to craft. The simple steps of this kit are perfect for beginner crafters and kids, too! Grab a kit or two and gather around for a simple Christmas activity that everyone will enjoy. The kit contains everything you need to create eight elf-centric Christmas cards including printed card bases, die cuts, embellishments, an exclusive stamp set, a Night of Navy Classic Stampin’ Spot, and more!

Christmas Whimsy Kit (158166) $19 USD

DETAILS
Kit contains enough supplies to create eight cards—4 each of 2 designs.
Includes printed card bases, printed die cuts, adhesive, embellishments, gold foil die cuts, gold twine, and coordinating envelopes with gold foil accents.
Includes an exclusive stamp set and a Night of Navy Classic Stampin’ Spot.
Finished card size: 5-1/2″ x 4-1/4″ (14 x 10.8 cm)
Coordinating colors: Balmy Blue, Basic Gray, Crumb Cake, Evening Evergreen, Gray Granite, Misty Moonlight, Poppy Parade, Real Red, So Saffron, Soft Succulent, Soft Suede

Christmas Whimsy Kit Contents

SHOP THE STAMPIN’ UP! KITS COLLECTION!

Cute Halloween Happy Haunting Card

Cute Halloween Happy Haunting Card

Make this easy Cute Halloween Happy Haunting Card and send to a spooky friend for Halloween! It’s a basic card design, but as usual, the designer paper makes it extra special! If you are a Halloween lover, be sure to get this paper and make some fun cards to send for Halloween!

This cute designer paper is the Cute Halloween 6″ x 6″ Designer Series Paper. I just love all the whimsical Halloween characters plus the more generic designs to pair with them. This Cute Halloween Paper is really CUTE! I could have used just the piece of paper with the black cats and pumpkins, but then the black and orange striped paper I knew would look so cute with it, too!

The card base is Pumpkin Pie with a layer of Basic Black under the designer paper. I cut the designer paper with the cats and pumpkins at 5″ x 3″ and the striped piece at 5″ x 2″. This way there was room for the two papers to overlap so I could glue them together before adding the ribbon. If you cut them exactly to the space, then you likely should glue the designer papers to another piece of cardstock the same total side so you can tie a ribbon around the seam.

Look at your designer paper with designs like this one carefully before you cut. Look at the images on the paper and see how you can maximize those and maybe not cut through too many of them. For example, instead of cutting off 1/4″ on one side and really cutting into an image you like, maybe you can cut 1/8″ off each side instead of 1/4″ of one side. That might help you preserve more of the images on the paper. Just look and see how you can place your cuts to get the best images on your paper where you want them! Maybe cut a piece off the top of the designer paper before you cut anything else to position the images on the paper.

I used the Black & White Gingham Ribbon to tie around the seam in between the two papers. I love this ribbon! I tied the bow separately and adhered it with Mini Glue Dots.

The greeting is found in the Banner Year Stamp Set. I looked at several greetings in a couple different sets and decided on this one for size and appropriateness. I stamped this in Memento Black ink on Smokey Slate Cardstock. It is die cut with one in the Stitched So Sweetly Dies. I tried layering this greeting on various colors but decided it was fine just by itself.

I love fun and whimsical Halloween things and this Cute Halloween Paper is perfect for me! Put it on your next order so you can make a few Halloween cards or projects in plenty of time!

SHOP STAMPIN’ UP! ONLINE HERE!

Last Month For Sale-A-Bration!

Sale-A-Bration Banner 2021

When Sale-A-Bration began in August, it seemed like it would go on for a long time! But now the first month is already over and we are into September! We know how fast time flies so don’t miss out! This special Stampin’ Up! promotion ends Thursday, September 30, 2021, in about 3 1/2 weeks!

In case you are new to Stampin’ Up!, you might not know what Sale-A-Bration is! Sale-A-Bration has been around since the beginning or near the beginning of Stampin’ Up, except back then it was called “Sell-A-Bration”. It really took off and has been an annual promotion ever since, one that everyone loves! However, THIS year, we are having TWO Sale-A-Brations!! We only had it starting in January before, but right now we are having the second one in 2021! And at a perfect time when we are purchasing new products anyway in the Holiday Catalog!

The concept of Sale-A-Bration is that when you spend $50 or more, you get to choose a FREE product in the Sale-A-Bration Brochure! And we all love FREE stamping supplies! If you spend $100 or more, you have a choice of one $100 Level product in the brochure or two $50 Level products. You will see those designations in the brochure. No limits to what you can spend and get for FREE!

TAKE A LOOK AT THE SALE-A-BRATION BROCHURE HERE!

Watch this video to learn about the Sale-A-Bration products!

If you have a large order yourself or go in together with friends, you can choose a FREE Host stamp set, In Your Words, with a $300 order! It’s on page 17 in the Sale-A-Bration Brochure.

In Your Words SAB Host Set 2021

And if you would like to be a Stampin’ Up! Demonstrator and start your own stamping business, now is the time to JOIN! Read about joining Stampin’ Up! HERE on my website and let me know if you have any questions. Below, you will see the choices of a FREE BUNDLE you can add to your Starter Kit when you join during Sale-A-Bration! Click to view a clear version!

Sale-A-Bration is a fun time at Stampin’ Up! This year, it is double the fun of having a second Sale-A-Bration going on now! But it won’t last forever! Sale-A-Bration ends on September 30 and you know how time flies! Get what you want before things sell out! Enjoy the Sale-A-Bration video above!

Peaceful Prints Kraft Christmas Gift Bag

Peaceful Prints Kraft Christmas Gift Bag

One thing I always enjoy making are gift bags out of plain shopping bags like this Peaceful Prints Kraft Christmas Gift Bag. Lots of times I can use ones I get at stores, even if they have the store name printed on the front because that printing gets covered up. Just remember, it is just like making a card, maybe a larger one, that you adhere to the front of the gift bag! It’s so much fun to make a personalized bag for any occasion!

For this bag, I used the Peaceful Prints Designer Series Paper. You only have this month left to get this paper, and you can get it FREE with a $50 purchase at Stampin’ Up! during Sale-A-Bration! I tried various layers of paper and cardstock and combinations before I settled on this! Sometimes you just have to keep playing and working until it all comes together!

I used a piece of the Peaceful Prints Designer Paper for the background piece. It is 7″ x 8″ and I liked the way it matched the trees. The background paper (5″ x 6″) has little deer and tiny trees on it and is layered on Real Red Cardstock (6 1/2″ x 5 1/2″). I decided to add trees, some die cut with Christmas Tree Dies out of the Peaceful Prints paper and some out of Garden Green Cardstock. I sponged a little Garden Green Ink on the cardstock trees. I used three different tree dies to make different size trees. Some are popped up on Dimensionals and some are adhered flat on the designer paper. The deer are cut out by hand with Paper Snips from the designer paper.

The greeting had to be a little bit small to fit in the space. It is in the Frosted Gingerbread Stamp Set. It is cut out with one of the Tasteful Labels Dies and layered on a small banner die also in the set. Make some of these ahead of time and you’ll be all set for gift-wrapping during the holidays!!

SHOP STAMPIN’ UP! ONLINE HERE!

Whimsy & Wonder Traditional Christmas Card

Whimsy & Wonder Traditional Christmas Card

The Whimsy & Wonder Suite in the Stampin’ Up! Holiday Catalog uses soft pastel colors in it, but for this Whimsy & Wonder Traditional Christmas Card, I decided to just use the traditional Christmas colors of red and green!

The card base is Garden Green with a layer of Real Red Cardstock. Real Red has been my favorite color forever! If you buy a red somewhere else, like the big box craft store, you will find that their red does not compare to the perfect red of the Stampin’ Up! Real Red! I know because I bought a big package of red cardstock and envelopes when I first started stamping. When I saw how it compared to the Stampin’ Up! Real Red, I threw out the store-bought red paper!

The stamped layer is Shimmery White, my other favorite paper! It has just the slightest glimmer to it and works well with any medium, even some watercoloring. I stamped the tree from the Whimiscal Trees Stamp Set in Garden Green Ink. Old Olive would also look good. Then I overstamped it with the dots to look like little red ornaments or lights on the Christmas tree. I couldn’t resist stamping the holly and berries up in each corner of the card. I just stamped them in Garden Green and then went back in with a Blender Pen and added green ink to the leaves and red ink to the berries. Just very lightly and carefully because I didn’t want the initial stamping to smear.

The greeting is stamped from the Banner Year Stamp Set. It is stamped on Shimmery White and layered on a strip of Real Red, punched at each end with the Lovely Labels Pick a Punch. The greeting itself is popped up on Dimensionals but the Real Red punched piece is adhered directly on the card front. For some embellishment, I added the smallest Gilded Gems to each end of the red piece.

Since the tree doesn’t come with a trunk, I didn’t really like it just floating in the air, so I added a bow with the Real Red 3/8″ Sheer Ribbon. I might have preferred a really narrow ribbon but since this one is sheer, I thought it looked light enough to put in between the tree and the greeting. And since my tree needed a star at the top, I looked through my retired punches and found the right size little punch with a star and punched some Gold Foil.

The lesson here is that even though this stamp set, Whimsical Trees is “whimsical” doesn’t mean you can’t make it “traditional” with color and embellishment! Here is another card I made with the same stamped tree and the new Whimsy & Wonder Specialty Designer Series Paper in the less traditional colors. I love this card as is, but if you are looking for the red and green of Christmas, you can certainly use this tree and change up the colors. If you are looking for a more traditional Christmas card or at least a few for certain people, then try this Whimsy & Wonder Traditional Christmas Card with red and green!

Join Paper Pumpkin! Get This September Haunts & Harvest Kit!

Paper Pumpkin Sept 2021

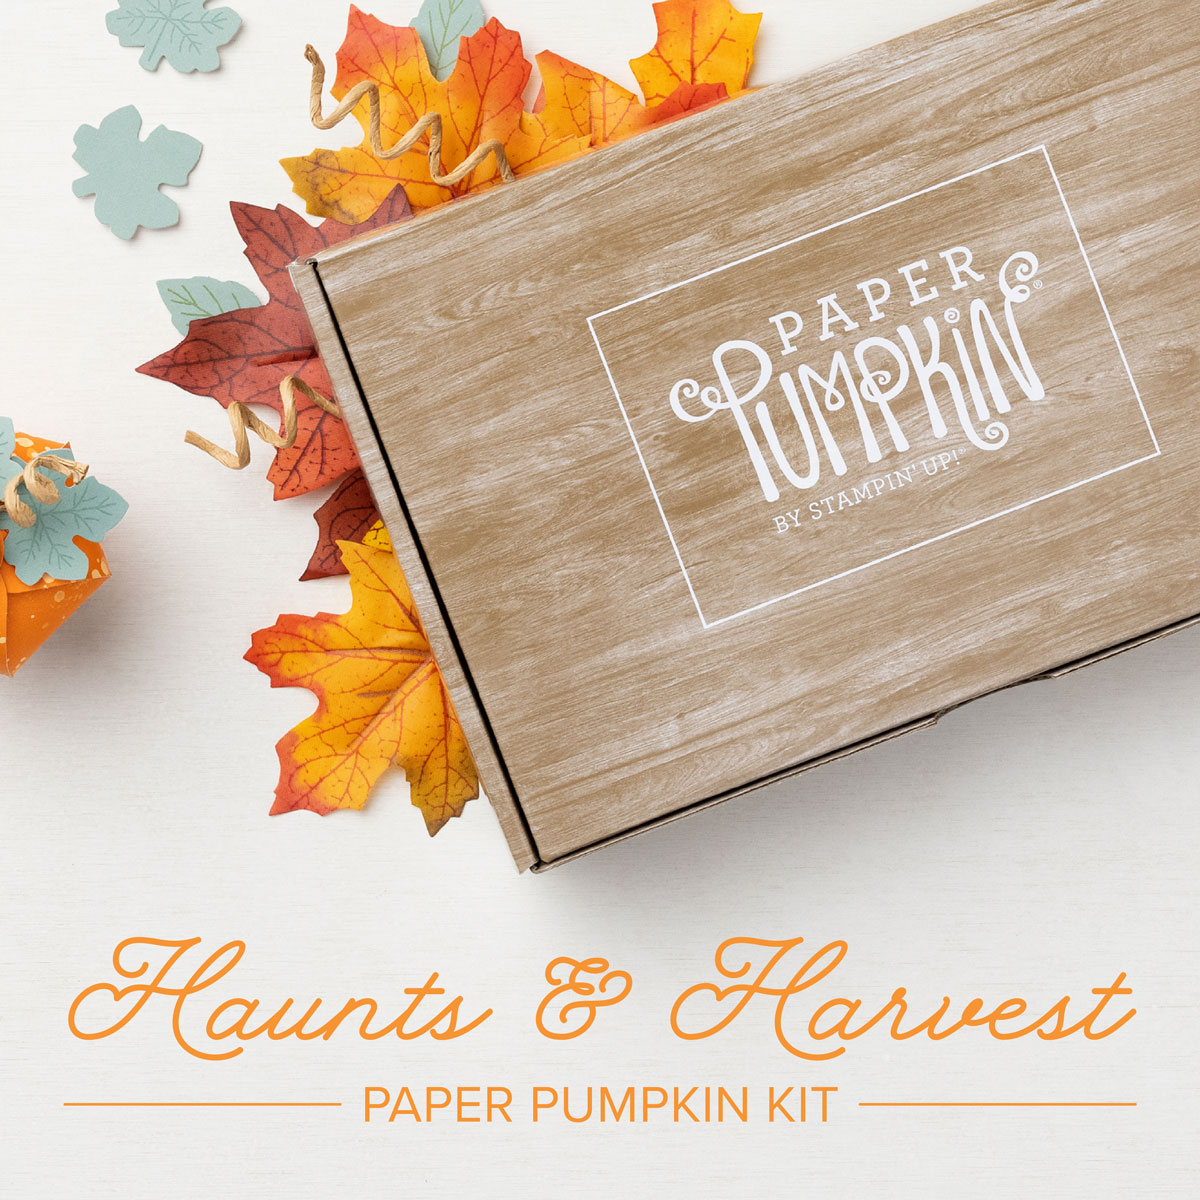
If you are new, this is how Stampin’ Up! describes Paper Pumpkin! Think about trying it, especially this month if you like fall!

What is Paper Pumpkin? Paper Pumpkin is our monthly One-Stop Box™ that offers a unique variety of paper projects for subscribers of any skill level to enjoy! These thoughtfully themed and all-inclusive craft kits encourage Stampin’ Up! customers to explore their creativity, try new techniques, and discover their potential in papercrafting.”

This kit features three different designs for every treat box. That means whether you want to celebrate the Fall harvest or feel like getting in the Halloween mood (or a mix of both!), you can choose how you want to create your adorable treat boxes! Take your pick from crisp red apples, seasonal pumpkins, spooky jack-o-lanterns, or get creative and customize them into whatever you can imagine! 

The Haunts & Harvest Paper Pumpkin Kit contains enough supplies to create 12 treat packages which means you get to share the a-maize-ing treats with your friends and family! These treat package designs are perfect for Halloween party favors or place setting favors at a fall feast. These treat packages are the perfect way to tell your family and friends to eat, drink, and be scary!

The Haunts & Harvest Paper Pumpkin Kit not only offers the cutest giftable treat packages, it is also intended as home décor with the included wheelbarrow crafting opportunity! This month’s Paper Pumpkin box is designed with pre-traced lines and instructions to create a vintage-inspired wheelbarrow as a place to display your too-cute-to-spook treat packages.

ABOUT THE KIT

Haunts & Harvest 

  • Kit contains enough supplies to create 12 treat packages—4 each of 3 designs. The all-inclusive kit includes printed die-cut boxes, die-cut sheets, adhesive, and more!
  • Finished treat box size: 2-1/2″ x 2″
  • Includes an exclusive stamp set and a Classic Stampin’ Spot
  •  Coordinating colors: Basic Black, Pale Papaya, Poppy Parade, Pumpkin Pie, Soft Succulent

Remember, this is YOUR kit when it arrives in your mailbox in mid-September! You will be ready to start thinking about fall and fall decorating! You can make everything exactly as designed in the kit or use the supplies to make your own designs and variations! If you don’t want treat boxes, make cards out of the supplies. Change it up however you like, but I have to say, it is a treat sometimes to just open the box and not have to think about “what to make”. The plan is already there for you! There’s even a video you can watch plus the directions. It’s easy enough for everyone! If you want more than 12 treat packages, order two kits! You may be able to get a “Refill Kit” later on but those are never guaranteed. Once you are signed up as a Paper Pumpkin subscriber, you can go in the Stampin’ Up! Online Store and order any past kits or refills that are available!

I always say Paper Pumpkin is a gift you give yourself! Once a month you can count on getting a package in the mail and what is better than a box of a new stamping project and supplies!

The deadline is Friday, September 10th so sign up today so you do not forget!

JOIN PAPER PUMPKIN TODAY!

Monochromatic Shaded Summer Thank You Card

Monochromatic Shaded Summer Thank You Card

I was taking inventory of all my cardstock colors before I got an order ready for Stampin’ Up! and I came across this embossed layer in the bag with the other Pool Party Cardstock. I immediately thought that would be pretty on a simple card and this Monochromatic Shaded Summer Thank You Card turned out! Sometimes it’s your scraps that turn into something interesting!

This card has a Basic White Cardstock base, which is difficult to see in the photo. I added a Pool Party Cardstock layer to go behind the embossed layer. Another extra piece I saw with the Basic White paper was this already die-cut Scalloped Contours Die so I thought it would be perfect to use!

The floral bouquet is stamped with the Shaded Summer Stamp Set. You will find this stamp set in the Stampin’ Up! Annual Catalog on page 75. It has two pretty floral stamps and a lot of useful greetings. Another interesting thing about this stamp set is that you can earn the coordinating dies FREE during Sale-a-Bration with a $100 purchase. The die set is called the Summer Shadows Dies. Not only does it have dies to cut out the stamped flowers, but it has other flower dies, too! I didn’t even own the stamp set, but with the opportunity to get the dies free, I went ahead and ordered the Shaded Summer Stamp Set. Maybe I’ll get lucky and they will carry over the dies after Sale-A-Bration! Either way, it will be a useful combination to own.

After diecutting the flowers, I popped them up with Stampin’ Dimensionals on the die cut Scalloped Contour piece. I tied a piece of White 1/4″ Crinkled Seam Binding Ribbon around the stem of the flower piece, plus added some small, white Elegant Faceted Gems around the flower.

The greeting is in the Shaded Summer Stamp Set. As I looked at my dies to see what I would like to use, I decided on the Messages Die. You don’t have to have a whole page of stamped greetings in order to use this die that cuts out an amazing number of greetings all at one time! I just placed the little scalloped die area over my stamped greeting to see if it fit, and ran it through my Stampin’ Cut & Emboss Machine. It was perfect for this card! It fit perfectly without covering up too much of the pretty embossing on the card layer. By the way, the folder is the Ornate Floral 3D Embossing Folder. So pretty with all the little embossed flowers and leaves! I had already embossed it to use on another card but didn’t like it. Then it ended up being perfect on this card, actually inspiring the creation of this card!

Remember, if you want to keep things easy, a monochromatic card can fit the bill! I only had to stamp the floral image, not color in the flowers and leaves! Here is another monochromatic card I made a while back, that was simplest to make with just one ink color.

This is the last month for Sale-A-Bration this year! Whether you spend $50 or more to earn a FREE product in the Sale-A-Bration Brochure or spend more and get a $100 level choice, you will be sure to find something fun to spur your creativity, like this Monochromatic Shaded Summer Thank You Card.

SHOP STAMPIN’ UP! and SALE-A-BRATION ONLINE HERE!