Category Archives: Easter

Radiating Stitches Easter Bunny Card

Radiating Stitches Easter Bunny Card

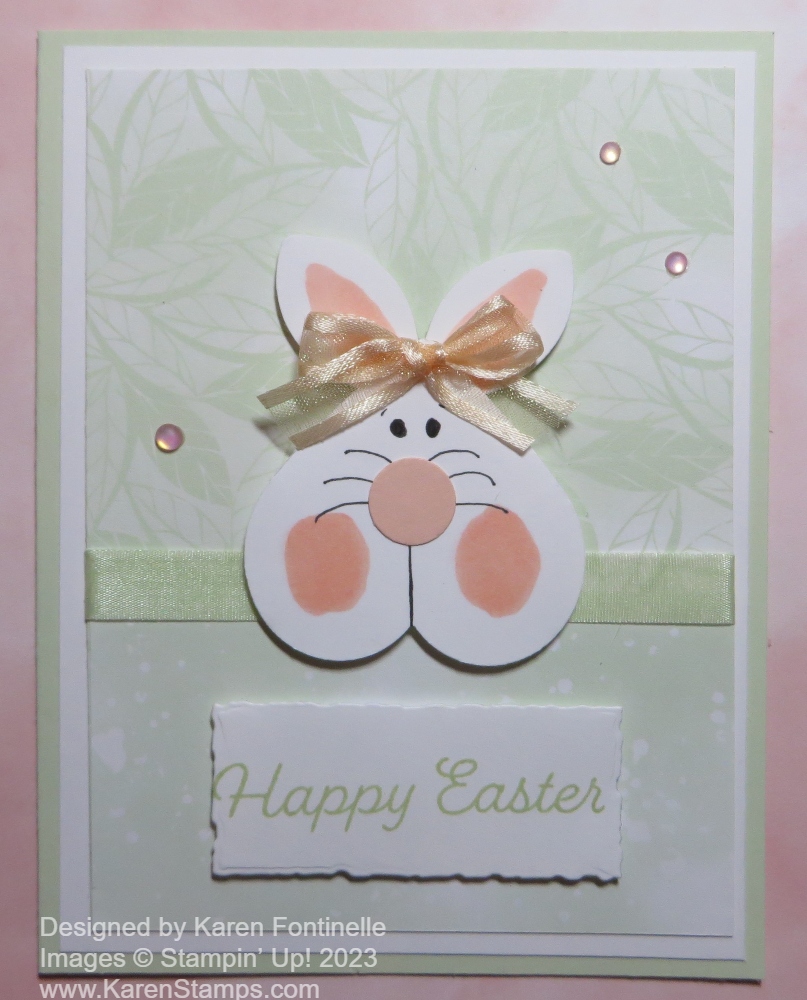
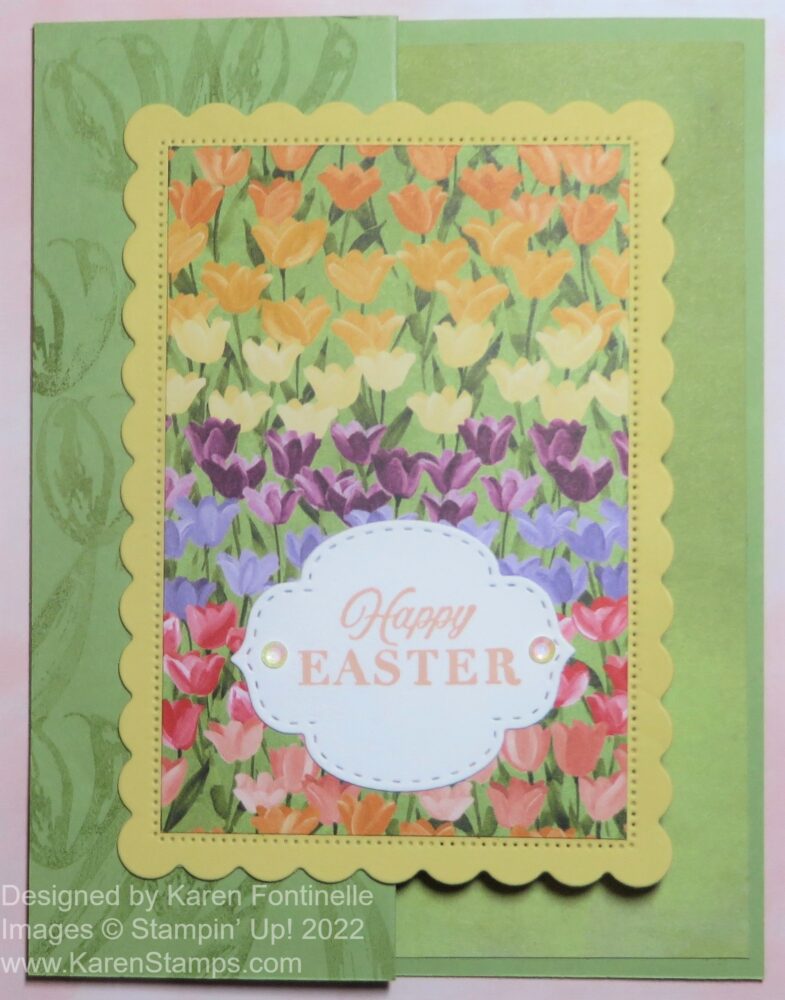
Sometimes when you want an idea for a card, it’s okay to copy yourself! Recently, I made an Easter card like this one and I liked it so much I had to keep it for myself! But then I thought I should just make another one to mail. In the process, I came up with this slightly different design which I also like a lot!

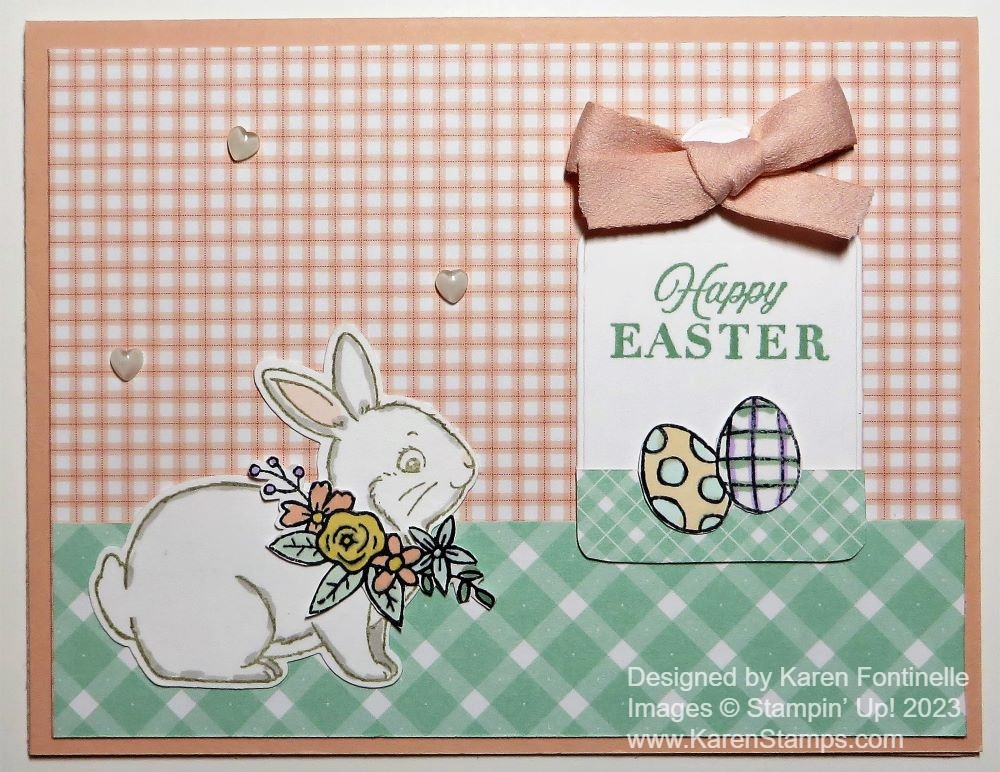
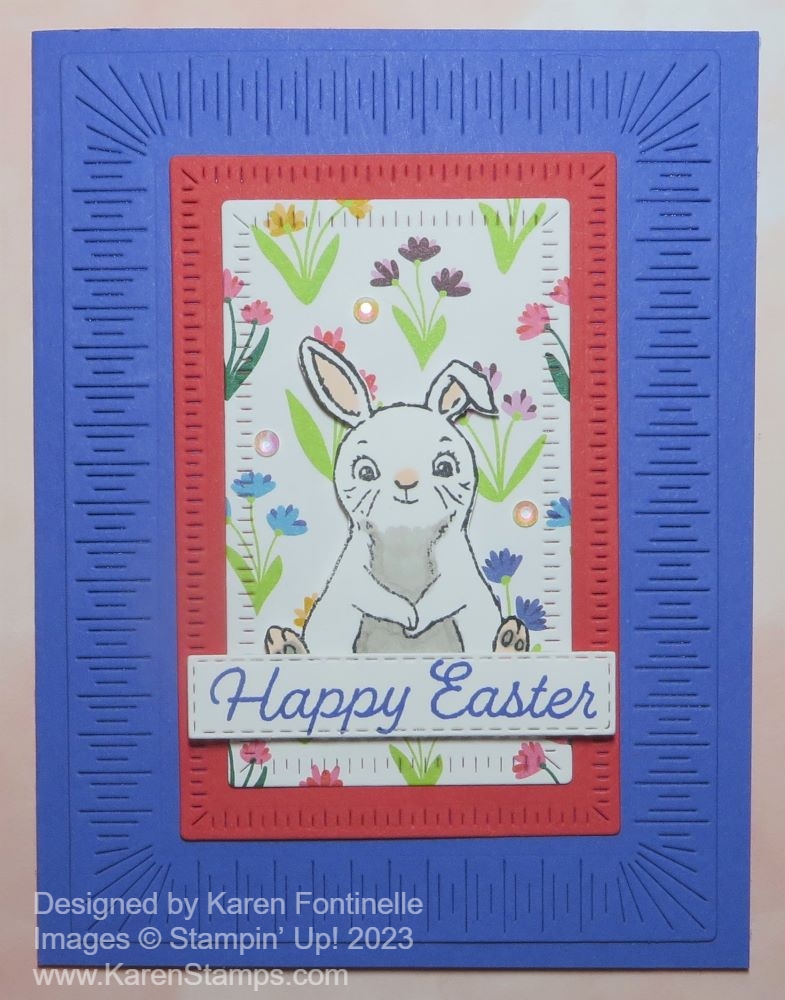
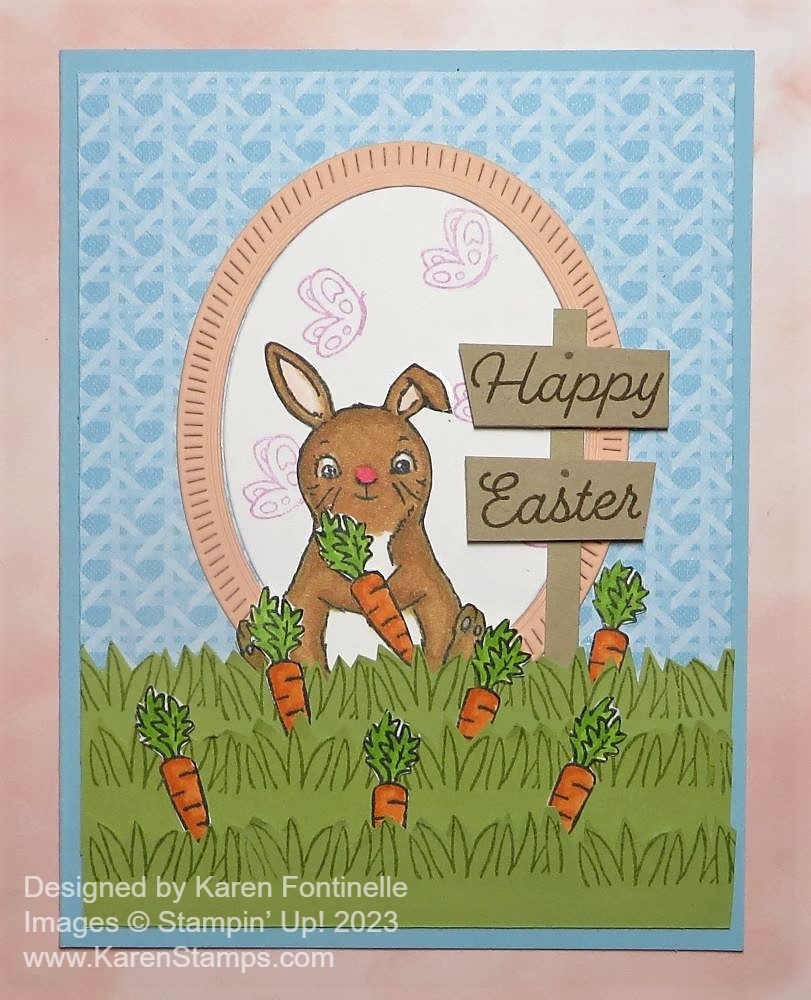
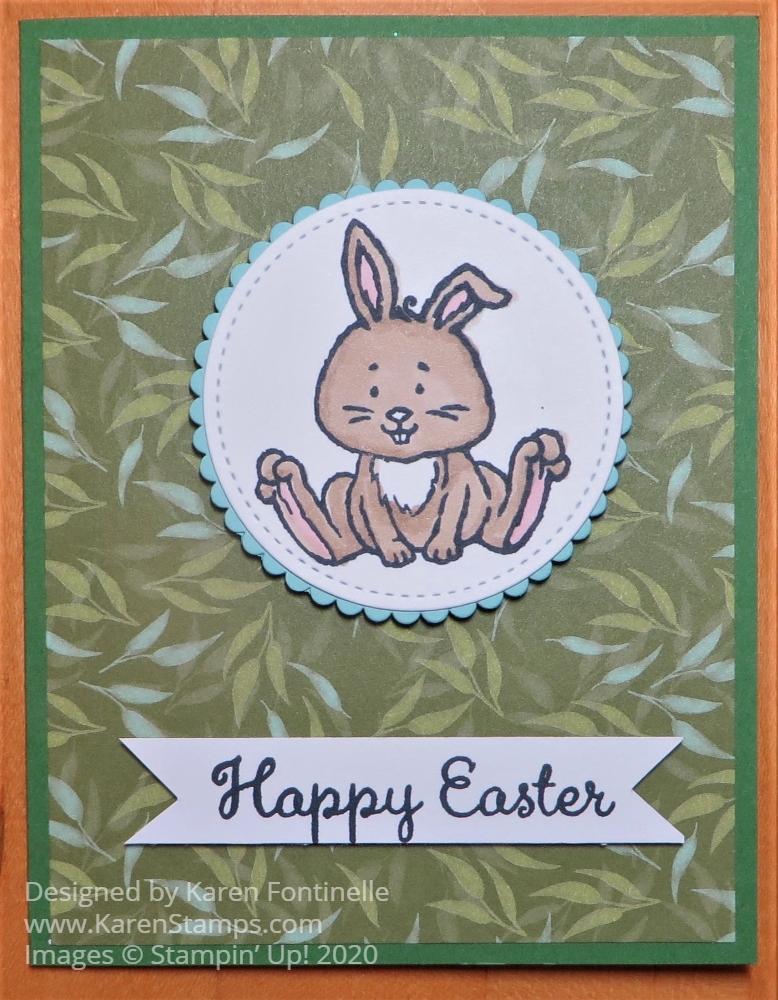
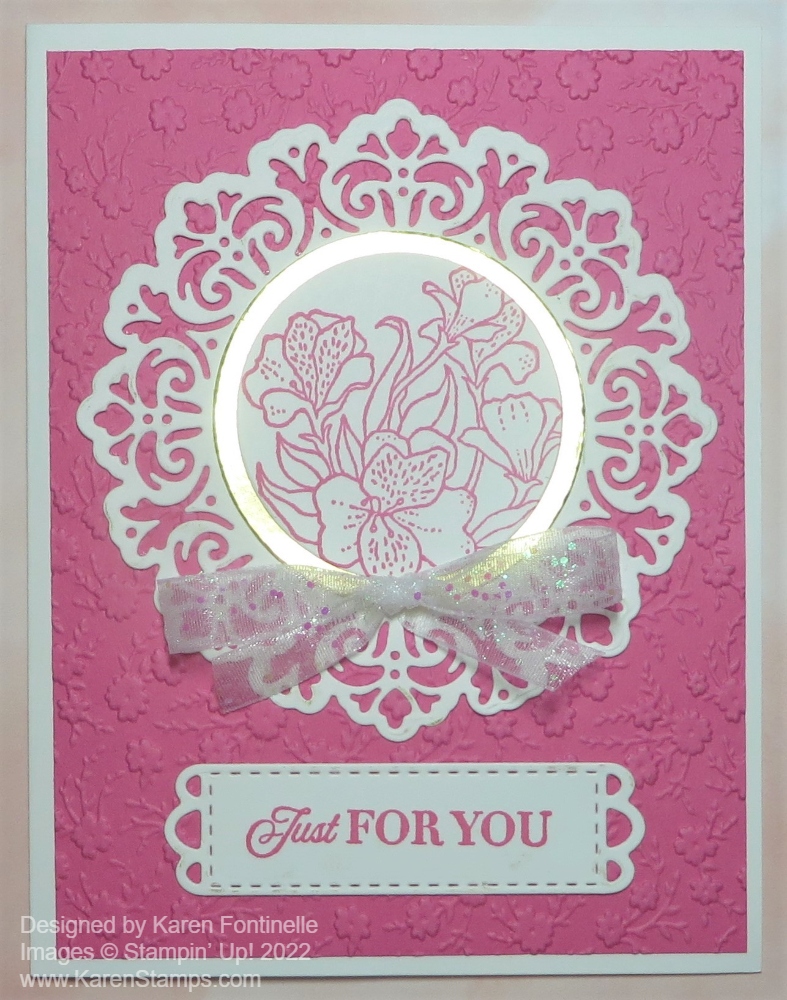
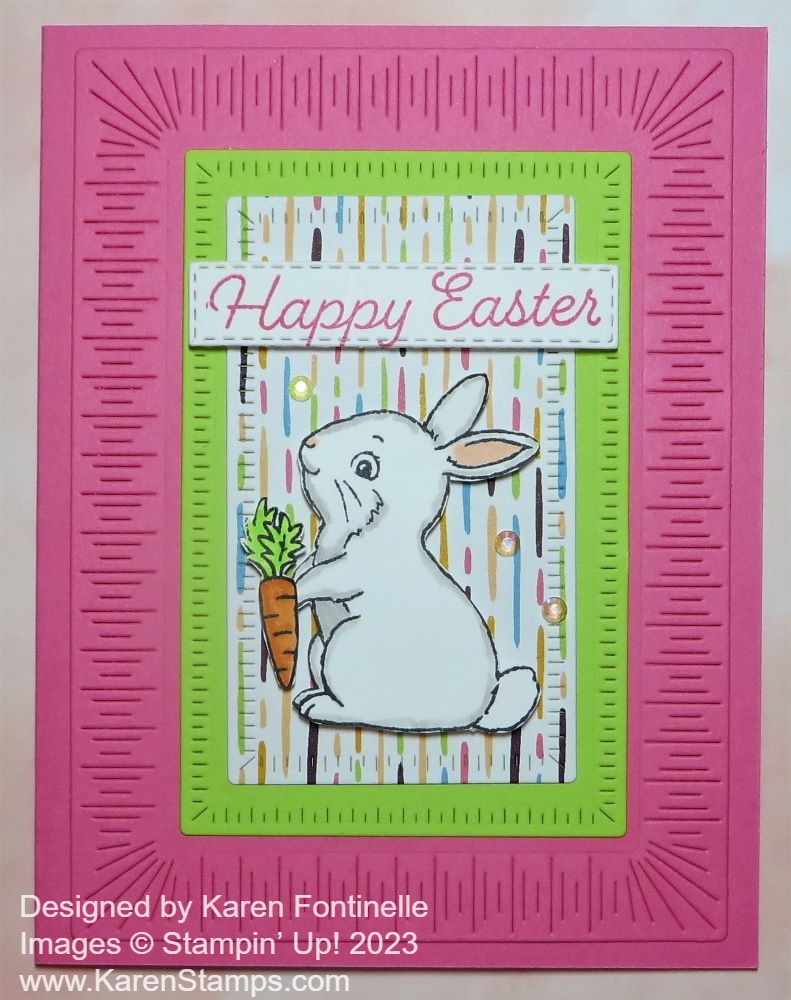
The card base is Polished Pink Cardstock and so is the first layer. Polished Pink is one of the current 2021-2023 In Colors that will be retiring. However, Fresh Freesia, in that group, will be added to the lineup of regular colors!

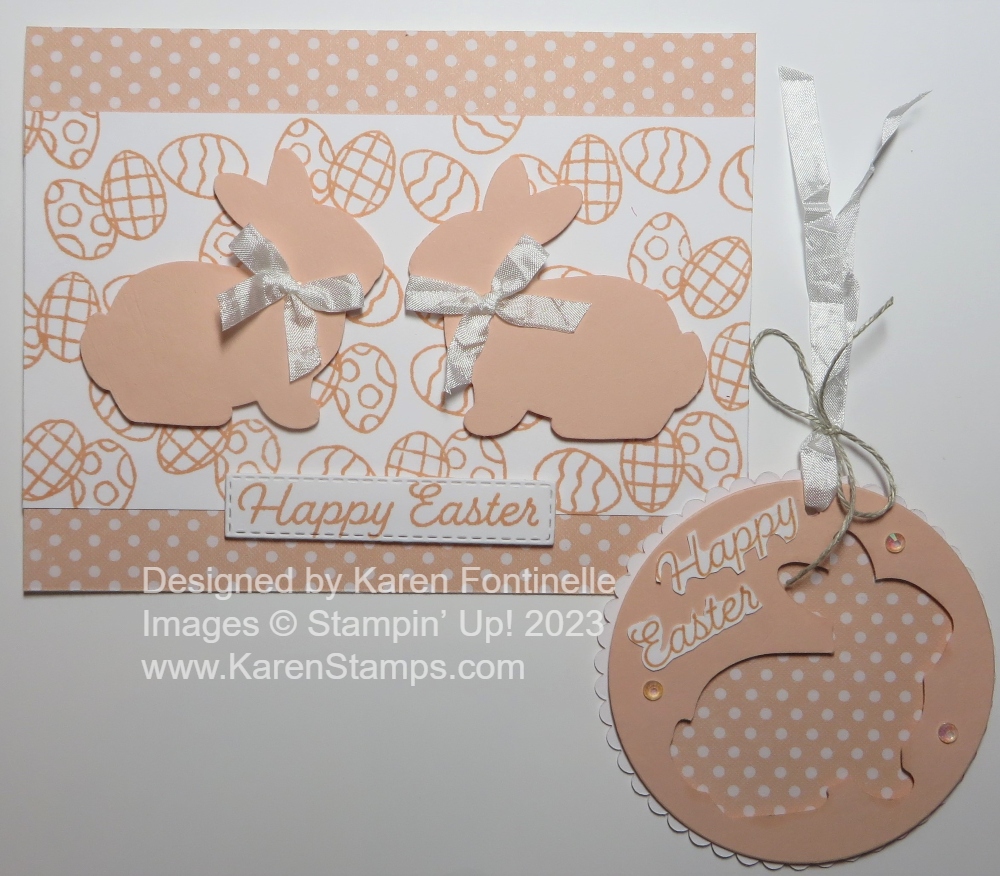
I used three of the Radiating Stitches Dies for this card to form the layers. Stampin’ Up! made these dies so that they DO layer in the right sizes! They add a different look and some texture to your cards and projects. They are unorderable right now as I write this but hopefully, they will be back in stock soon.

The next layer is Parakeet Party, one of the 2022-2024 In Colors that is staying for another year! The designer paper in the center is one of the patterns in the Flowers & More package, available as a Host Reward in the Spring Mini. Look on page 90. I thought the little lines of colors looked perfect for an Easter card!

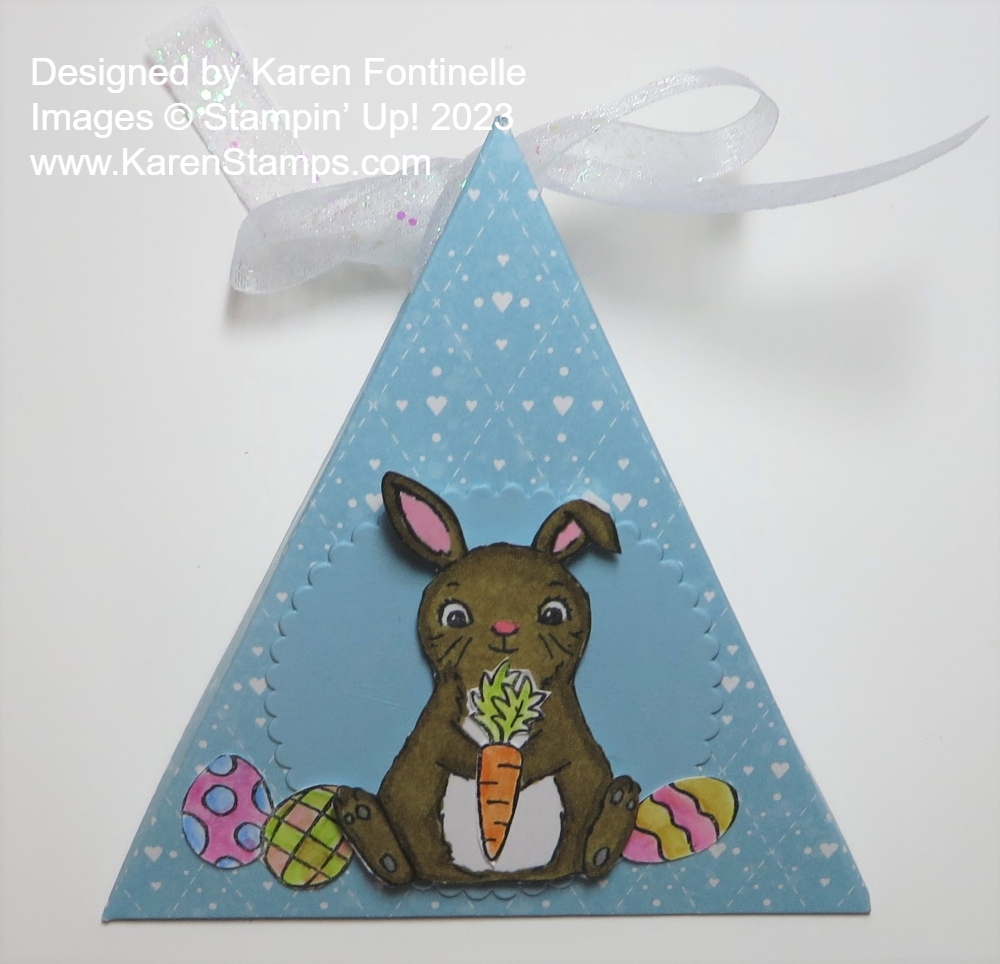
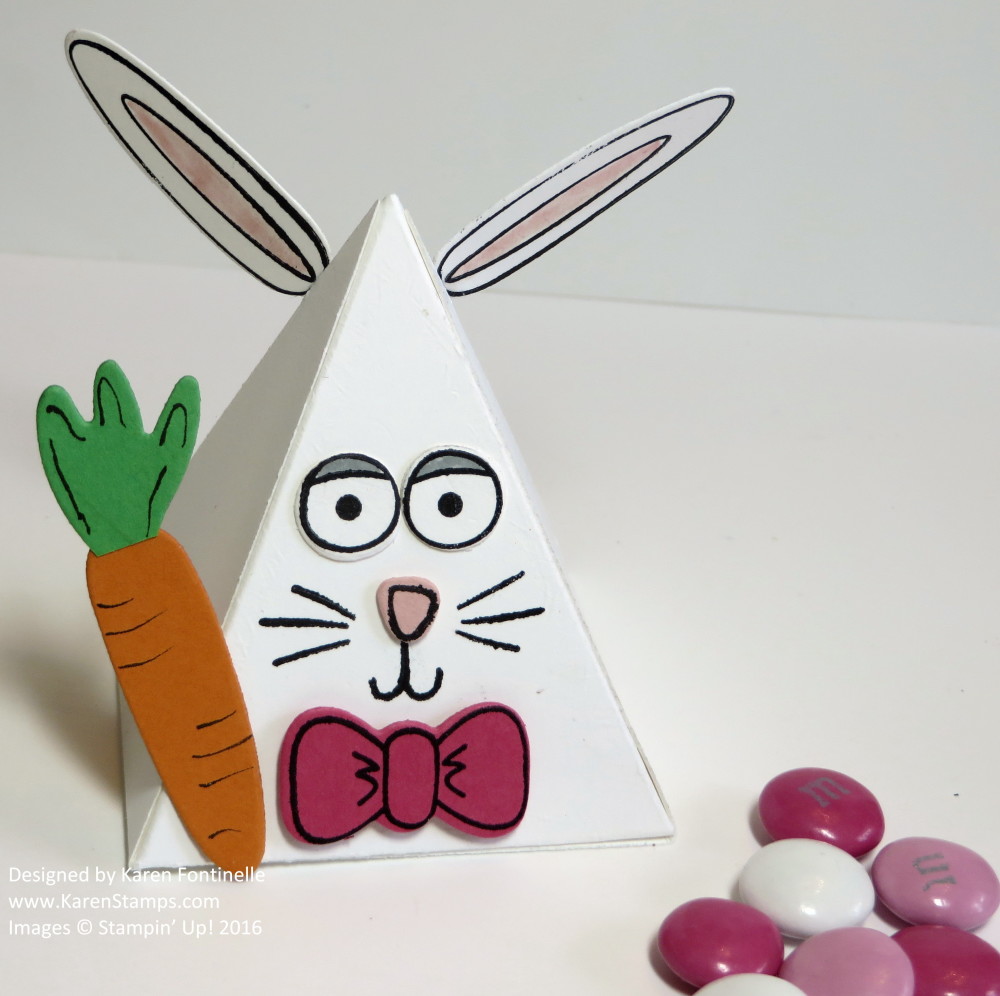
The bunny is part of the Easter Bunny Stamp Set. He is stamped in Memento Ink and then has a few colors of Stampin’ Blends markers added to give him a little color and shading. He’s also holding a carrot, one of the cute extras in the Easter Bunny Stamp Set. I just cut the bunny and carrot out by hand with my Paper Snips scissors. It’s really not difficult at all. The bunny and carrot are popped up with Stampin’ Dimensionals, both the regular size and the mini black ones.

The greeting is also from the Easter Bunny Stamp Set and is stamped and diecut with the smallest of the Stitched Rectangle Dies. The “Happy Easter” greeting JUST fits on there! The greeting is also popped up with Stampin’ Dimensionals on the back. For a little bling, I added three Iridescent Rhinestone Basic Jewels.

Whether you like the Orchid Oasis card I made with the Radiating Stitches Dies or this one with the Polished Pink colors and a different Easter Bunny, I think both are cute for Easter. Take off the bunny and add some flowers and foliage or some other image and you can change the card for another occasion!

Country Gingham Happy Easter Bunny Card

Country Gingham Happy Easter Bunny Card

After all the excitement the last couple of days about Last Chance Lists and the Color Refresh at Stampin’ Up!, thought it was time for a relaxing Easter card, like this Country Gingham Happy Easter Bunny Card. This designer paper I used is on the Last Chance List for the Spring Mini Catalog, but I’m happy the Easter Bunny Stamp Set and Punch are staying! After Easter that stamp set and punch will make very cute baby cards!

This card starts with a Petal Pink card base. Petal Pink is staying as one of our colors. I used two different patterns of the Country Gingham 6″ x 6″ Designer Series Paper for the front of the card. I chose a green gingham for the bottom to sort of represent grass that the bunny is sitting in! The top pattern is a Petal Pink and Sweet Sorbet plaid. So soft and pretty!

The Easter Bunny in the Easter Bunny Stamp Set is stamped in Gray Granite ink on Basic White and then punched with the Easter Bunny Punch. (The Easter Bunny Punch is due to be back in stock the week of May 15.) I colored in around the inside edges a little on the bunny with a Gray Granite Stampin’ Blend Marker just to add a little shading.

The flower garland in the Easter Bunny set and Easter eggs were stamped in Memento Ink on Basic White and colored with Stampin’ Blends. Just choose whatever colors you like. I cut out the flowers and the eggs by hand.

The tag is die-cut with one of the Something Fancy Dies out of Basic White. I stamped the greeting from the Celebrating You Stamp Set in Mint Macaron Ink. Mint Macaron is one of the retiring colors. I even adhered a little scrap of the Mint Macaron designer paper with a smaller diagonal plaid at the bottom of the tag.

I adhered two Easter eggs to the tag and tied a bow with the Petal Pink 3/8″ Soft Polyester Ribbon. The bow is adhered with two little Glue Dots to the tag. For a little finishing touch, I added some Heart Pearls above the bunny.

I had almost forgotten, after Valentine’s Day, that I had this Country Gingham Designer Series Paper but it’s really nice for Easter cards and for spring cards and projects. If you don’t have any or don’t have enough left, be sure to stock up before it retires or sells out!

SHOP STAMPIN’ UP! ONLINE!

Easter Triangle Treat Box with Bunny

If you have been around for a while, you know I have made MANY of these triangle boxes for various occasions and made them in multiple sizes! They are so easy yet look so cute! If you want an Easter treat box, try this Easter Triangle Treat Box with Bunny.

Here’s how to make one and then just decorate however you like!

Triangle Box Drawing

For this Easter triangle box, I used a piece of the Country Floral Lane Designer Series Paper. (It’s not just for Valentines!) It is cut at 4″ x 8″ but you can vary the size. Use the diagram above to see how to score, but it is simple! At each end of the paper, put a light pencil mark at the halfway point which in this case would be 2″. Score the paper in half at 4″. Then in that awkward manner, with your Paper Trimmer, score from that 2″ middle point at one end down to the middle score line which will be on a diagonal. Do that on both sides of one end, then turn the paper and score at the other end in the same way.

Now fold and crease all the score lines. You will see how it will fold together to make the triangle box. Determine which side will be the front or top of your box that you will want to decorate and how the flaps will go so that the top view of the box will have the fold of the flaps showing and not the open side. Pay attention to the pattern direction if it matters. Once you see how it folds together how you like, you can use any hole punch to punch holes in the sides near the top. You want the two holes on each side to align. This is how your paper should look creased and with holes punched.

Easter Triangle Treat Box with Bunny diagram

To decorate, I stamped one of the bunnies in the Easter Bunny Stamp Set in Memento Ink and colored with the Soft Suede Combo of Stampin’ Blends markers. I cut out the bunny and popped him up over a Balmy Blue scalloped circle die in the Layering Circles Dies. I already had some extra stamped and colored Easter eggs and a carrot from another project so I just adhered those to the front.

After adding some treats or a small gift inside the triangle box, just close it up and tie a ribbon through the holes you already punched. I used the White 3/8″ Glittered Organdy Ribbon because it’s white and it’s festive and pretty!

You can see what the triangle box will look like from the side.

I’ve made these triangle boxes for Halloween, Christmas, and just for fun! Here’s a Halloween one if you want to see another idea! You really could make an extra-long box, also, just follow the basic scoring directions – score in half and score diagonally from there to the middle point of the end, on each end.

If you want to do something different than an Easter basket, try making something like this Easter Triangle Box with a Bunny on the front!

An Easter Treat Easter Basket

An Easter Treat Easter Basket

These little Easter baskets are fun and easy to make! Make them for a treat to give someone or for table favors on your Easter table at dinner. Decorate as simply or as fancy as you like.

This An Easter Treat Easter Basket is made with both cardstock and designer paper. What I meant to do was make a basket out of cardstock and glue on pieces of designer paper. But I accidentally cut and scored the designer paper first and then realizing my mistake, I just cut a piece of cardstock and glued the designer paper onto it. It worked out fine and made it sturdier than if I had just used designer paper.

This basket is made with Balmy Blue cardstock and a polka dot pattern in Dandy Designs Designer Series Paper. This designer paper was a free product in the Sale-A-Bration Brochure with a $100 purchase and has all this great paper in it. I spotted the polka dot pattern and thought that would be perfect for my basket. Of course, you can use anything you like or even just cardstock.

The way you make a basket like this one is to cut a piece of paper (cardstock or designer paper) at 6″ x 6″. Then score at 2″ and 4″. Turn the paper and score at 2″ and 4″ This will look like a tic tac toe pattern so you know if you have it right! Then cut the two vertical score lines top and bottom to the horizontal score line. Crease all the fold lines. You can see the diagram below.

Fold the sides together at angles as you will see in the photo below. Have the basket handle ready to sandwich in between the layers. I cut my handle at 8 1/2″ x 3/4″. Or if you forget, just adhere it to the inside of the basket.

An Easter Treat Easter Basket back

Decorate the basket however you like! I stamped one of the bunnies in the Easter Bunny Stamp Set on Basic White cardstock and colored him in using Watercolor Pencils in both Assortments and smoothed out the coloring with a Blender Pen. I also stamped and colored one of the carrots for the bunny and cut it out by hand. The bunny was punched out with the Easter Bunny Punch. It was so popular it’s been out of stock for a while but more punches are due back in the week of May 15. I diecut a plain circle and a scalloped circle out of the Layering Circles Dies for the side of the basket. There was not enough room for a little Easter greeting, but I used this one in the stamp set and just cut it apart to fit it on the decoration in a way that it would fit! The bunny and the circles were all popped up on Stampin’ Dimensionals.

Since I hadn’t done anything fancy with the basket handle, I just tied on a bow with the Silver 3/8″ Metallic Edge Cotton Ribbon. Then just put some “shred” or tissue paper in the basket and add your Easter treats!

Here is a blog post from a few years ago showing three different Easter baskets I made!

Have fun trying out these Easter basket ideas for a cute Easter treat!

Radiating Stitches Easter Card

Radiating Stitches Easter Card

It’s time to be making Easter cards and here is one with a new design, the Radiating Stitches Easter Card! These new dies, one of the Online Exclusive products Stampin’ Up! recently released, really give a fresh new look to cardmaking!

The card base is Orchid Oasis, one of the current 2022-2024 In Colors, and one that will be staying around. I originally planned the card base to be Basic White with the Orchid Oasis as the layer. But after getting the layer ready, I didn’t care for it against the white so I made the card base out of Orchid Oasis. Color on color! The new die set is called Radiating Stitches. The dies layer pretty well. Three are rectangles and there is also a heart and two circle dies. Lots of creative possibilities!

The Orchid Oasis layer is wider, then the Sweet Sorbet rectangle fits inside the center and the smaller rectangle fits in the center of that one. I used the cute little flower paper in the Flowers & More Designer Series Paper. This is a Host reward you can choose with a $150 order from the Spring Mini Catalog. You’ll find it in the back of the catalog on page 90 up in the top corner!

You really could just add a decent-sized greeting going across the center of the card, but since I wanted an Easter card, I added a bunny! This is one of the bunnies in the Easter Bunny Stamp Set in the Spring Mini. I stamped the bunny on Basic White cardstock with Memento ink. Since I really wanted just a white bunny, I added a little gray fur on his middle with the Light Gray Granite Stampin’ Blend marker and some touches of Petal Pink for the ears and feet.

The greeting is stamped in Orchid Oasis ink on Basic White and diecut with the narrow Stitched Rectangle Die. It barely fits, but it does fit! I popped up the bunny on Stampin’ Dimensionals, so I put Dimensionals on each end of the greeting so it would fit over the bunny. For some sparkle, I added some Iridescent Rhinestones to the card front in the flowers.

These Radiating Stitches Dies are something a little different and you will find them in the Online Exclusives section of the Online Store. They give your cards a little extra texture and design!

SHOP STAMPIN’ UP! ONLINE HERE!

Easter Bunny Treat Sack

Easter Bunny Treat Sack

Here’s a cute Easter treat bag or even an Easter decoration for your home….or both! Make this super easy Easter Bunny Treat Sack in minutes!

Use a lunch sack, either kraft or white. I would have used kraft but I couldn’t find any in my house! But I did have white and there are white bunnies, too!

To begin, fold the lunch sack in half lengthwise and simply draw the bunny ear from the top down a little way or as far as you like it. Then cut with scissors, keeping the bag folded and flat so it will cut both sides the same, just like when you cut a heart for a valentine.

Easter Bunny Treat Sack Pattern
Easter Bunny Treat Sack Cut

If you are giving it as an Easter treat, put the candy or gift inside, maybe adding some shred or tissue paper to fill up the space to shape the bag. If you are just using it as an Easter decoration for your house, stuff the bag with tissue paper or newspaper or whatever you have. Then tie a ribbon around the sack below the ears to make it look like a bunny. Add a cotton ball or pompom to the sack for the bunny’s cottontail. Add a Happy Easter tag if you wish or the name of the person you are giving the treat to.

This style shows the back of the bunny with his cute cottontail, but if you prefer you could draw on the bunny face and have it be the front of the bunny. Either way is cute!

Just a fun little Easter thing to make that is so simple you may as well make one!

Punch Art Bunny Easter Card

Punch Art Bunny Easter Card

If you don’t have the Easter Bunny Punch, there are other ways to make a bunny for an Easter card or treat! This card shows you one way to make a “Punch Art” Bunny with a couple of other punches.

For the face of the bunny, use the one heart in the Heart Punch Pack. I used the plain edge one, but if you want your bunny to look a little furry, the Scallop edge one is good for that! I punched the heart out of Basic White cardstock and turned it upside down for the bunny’s face. If you don’t have a heart punch of a decent size, maybe you have dies. And if you don’t have anything, we all know how to cut out a heart by folding a paper in half!

For the bunny ears, I used the wings on the Ladybug Punch. I glued them behind the tip of the upside-down heart after coloring the inside of the ears pink. I used the Light Petal Pink Stampin’ Blends Combo marker but mine needs to be replaced and was too light. So I used the Dark Petal Pink Blend and that’s how my bunny’s pink cheeks and ears got a little dark! If you don’t have the Ladybug Punch, you can probably find some leaf shapes on another punch or certainly a die that you can use.

The bunny’s nose is punched with a retired 1/2″ Circle Punch but if you don’t have that you may have a circle punch or die that you can use instead. I used a Black Stampin’ Write Marker to draw the bunny’s whiskers and eyes. The little bow is tied with the Pale Papaya Open Weave Ribbon and adhered with a Mini Glue Dot.

To make the card, I used a Soft Sea Foam card base with a layer of Basic White to help the designer paper to stand out better. The designer paper is in the Hello, Irresistible 6″ x 6″ Designer Series Paper package. The bottom portion is the other side of the leafy top portion. Over the seam, I adhered a piece of ribbon, it’s the retired Soft Sea Foam Ribbon.

The greeting is stamped with Soft Sea Foam ink from the Easter Bunny Stamp Set and then die cut with one of the Deckled Rectangles Dies. The bunny and the greeting are popped up with Stampin’ Dimensionals. For a little sparkle, I added three small Loose Frosted Dots in pink with tiny dots of glue.

Some of the products I used are retired or not available at the moment, but all that matters is that you see how to make a bunny using whatever punches or dies you have for your Easter projects!

Petal Pink Easter Bunny Card and Easter Tag

Petal Pink Easter Bunny Card and Easter Tag

I got the idea to make an Easter tag and after I made the tag with no space for Easter eggs, I got the idea to make this Easter card! It turned out that everything was in Petal Pink so they are both monochromatic.

I know the Easter Bunny Punch is currently unavailable, but maybe you already have it or have another bunny punch or die. Hopefully, it will be back in stock, but it will be a while. Or stamp a bunny and cut it out as a pattern.

To make the tag, I needed a large area for the tag as the bunny punch is rather large. I ended up using the large plain Layering Circle Die to cut out the Petal Pink card stock and then punched the Easter Bunny out of it. I wanted to use the negative of the bunny with a piece of designer paper behind it. Since the bunny was pretty large, I just die-cut the next smaller plain circle out of the polka dot pattern in the Regency Park Designer Series Paper to place behind the bunny. I popped up the bunny on Stampin’ Dimensionals, mostly the Black Mini Dimensionals, and then adhered the bunny to the designer paper.

For the backing of the tag, I cut out the largest scalloped circle die in the Layering Circles Dies on which to layer the punched-out bunny in Basic White so the little scalloped edge would just barely show behind the bunny. Then to cover the plain white back, I die-cut another scalloped circle the same size out of the Petal Pink wicker pattern and glued that on.

For a greeting, I stamped “Happy Easter” from the Easter Bunny Stamp Set in Petal Pink ink, cut apart the words, and then even cut around the words for a different look and to have them fit on the tag! For some bling, I added some Iridescent Rhinestone Basic Jewels. I punched a small hole in the top so I could put some ribbon through and tie it with a piece of Linen Thread. This would make a cute tag for a baby gift (without the Easter greeting of course!)

I had wanted to add some of the stamped Easter eggs from the stamp set, but there was no space on the tag. At that point, I got the idea to make a card with a background of the stamped eggs!

The card base is Basic White. I decided to put a stamped center panel across the card. That Basic White piece is 3″ x 5 1/2″ I stamped the Easter eggs randomly on that piece to fill up the space. Then I pulled out a 2″ wide strip of the Regency Park polka dot paper and cut it 5 1/2″ and in half at 1″.

I adhered the two designer paper strips directly to the card base top and bottom and then overlaid the stamped center panel. I punched two bunnies with the Easter Bunny Punch and popped them up with Stampin’ Dimensionals. I added a tiny bow for each bunny and stamped the greeting. It is diecut with a narrow Stitched Rectangle Die. I was hoping the words would fit! The greeting is also popped up on Dimensionals.

That’s all there is to that card so it is actually pretty simple to make. It’s easy to make a monochromatic card with no coloring or choosing multiple colors.

SHOP STAMPIN’ UP! ONLINE HERE!

Easter Bunny In the Carrot Patch Card

Easter will be here before we know it so it’s time to get going on all things Easter and Spring! This Easter Bunny in the Carrot Patch Card is mostly a copy of a sample in the Spring Mini Catalog on page 52. Sometimes when I’m not quite sure where I want to start with a new stamp set, I look at the samples in the Stampin’ Up! catalog and see if I want to copy something or get some inspiration for my own ideas. My card is mostly the same with a few changes.

Now I will warn you, as cute as this card is, it took some work! It’s like buying the whole Suite of Christmas products to make a spectacular card and then realizing you can’t make 50 of those! Not that I had the intention of making multiples of this card design necessarily, I’m just saying there was a lot of detail work. Which is okay lots of times when you really want to just enjoy a good stamping project!

For my card, I changed the colors a little bit. I used Balmy Blue for the card base. Then I found this pattern that looks like wicker in the Regency Park Designer Series Paper, on “the other side” as I like to say, of the floral pattern. I thought a wicker design would go well with an Easter bunny since wicker Easter baskets are what we use!

The Petal Pink frame is diecut with the oval frame in the Framed Florets Dies. (These should be back in stock around March 27.) I had also cut a Basic White oval frame in case I wanted to use white instead but I chose the pink frame and used the white as the insert in the frame. I stamped several butterflies for the background in Fresh Freesia ink.

The Easter Bunny Stamp Set is really a cute one to have for Easter or spring or of course babies! Bunnies are always a cute theme for baby cards and baby projects! The bunny is stamped in Memento ink and colored in with Stampin’ Blends. Don’t forget about the Natural Tones Blends to use for animals. I used #500 for most of the bunny but then added a darker brown (I forget which one!) for the shading. The ears of course have some Petal Pink in them and the nose is a bright Polished Pink! Maybe a little too bright but that’s okay! The designer paper, the frame, the insert, and the bunny are all just glued down flat on the card.

For the grass, I cut strips of Pear Pizzazz Cardstock and stamped them with the grass stamp in the Easter Bunny Stamp Set. There are no dies to cut out the strips of grass but I just zigzagged my scissors to cut imperfectly up and down around the tops of the blades of grass. When I glued these down I only put glue along the bottom edge so the top edge would be open. I needed to stick the carrots down into the grass. I first stamped five carrots and colored them with Pumpkin Pie and Granny Apple Green Blends. I cut these out by hand and glued them down into the grass. But I didn’t like the way I placed them so I made two more carrots and added those. Now I like them! The bunny even gets to hold one in his paws!

For the greeting, I stamped “Happy Easter” in Soft Suede ink on a little strip of Crumb Cake Cardstock. Since it is rather large, I cut it apart sort of like the greeting on the card in the catalog. But when I looked closely at the catalog sample, I saw that there was a post behind those words! It really is a little wooden sign in the grass! So I cut a very narrow piece of Crumb Cake, glued that down, and then popped up the words on Stampin’ Dimensionals. I even added a dot of Soft Suede marker on the top of each word to look like those boards were nailed onto the post!

As I said, this project did have a lot of steps in it, and if you hate to cut out anything, you might not enjoy this project! But the bunny and the carrots are so cute, I don’t know how you could resist!

Unfortunately, the Easter Bunny Punch is backordered until May which is sad! However, if you stamp the one bunny that fits the punch, it will be easy enough to cut out by hand.

Start thinking about bunnies, eggs, baskets, and flowers, and let’s get ready for Easter!

Shop Stampin’ Up! Online HERE!

Easter Bunny Treat Basket

Easter Bunny Treat Basket

I was asked to make two Easter treat baskets for two little boys. I had kind of a normal little basket idea with a handle (made of cardstock, of course, not a real basket! but when I got home, I saw one of my Easter decorations on my fireplace mantel that I made years ago. I just copied myself and made these two Easter Bunny Treat Baskets! Plenty of room to put some chocolate candy and other treats inside!

To make these baskets, I pulled out a lot of my retired Stampin’ Up! products! The main thing I used was the Sizzix Scallop Envelope Die, I think it is called. It was one of those first dies we had with our Big Shot, the black thick platform kind of die with the cutting blades inside the die. I cut four pieces, cut off one tab on one side of the envelope piece, laid them side by side, adhered them together, and folded in the bottom flaps to form the basket. So if you have been die-cutting for a long time, you may have this die. We could make a lot more things than just an envelope with this die. The bunny on the back of the basket is simply a sketched bunny shape. There may be a template somewhere online. I traced the one I’d already made on my basket. The bunny feet on the front of the basket are made with the retired large oval punch, the 1″ circle punch, and some smaller punched circles. There were several punches I had that could make those, like the Owl Punch and the Gingerbread Man Punch (not sure that’s the correct name). For the ears, I punched oval shapes but you could color them in with a marker. The face can just be drawn in or just small circle punches for the eyes, a small heart, or a circle for the nose. Add a little blush to the cheeks! Draw on some whiskers or use some crinkled strips of paper or this crinkled shred that I happened to have.

If you do not have the Scallop Envelope Die, just make some little kind of square box. Just take a square piece of paper, score it like a tic tac toe board, fold and crease, then cut the flaps at the bottom and the top down to the horizontal scoreline. Fold in all the sides to form a box.

There are so many ways to make bunnies, too! If you are uncomfortable drawing a bunny like mine and cutting it out, just use some circle or heart shapes to put one together! Use dies or cut freehand.

Since these were boy bunnies, I tied bows and attached them to the bunny chins rather than on their ears! You could also make kind of a paper necktie if you wanted! Just have fun with the project! Nothing has to be perfect!

Here is my original bunny I made a few years back I guess!

Easter Bunny Treat Basket Pink

If you need one more Easter idea, this Easter Bunny Treat Basket might be just the thing to inspire you!

HAPPY EASTER!

Some Last-Minute Easter Ideas For You

In case you are looking for some last-minute Easter ideas, here are a few I made in the past! Maybe it’s something different than what we’re all seeing right now or maybe you have these older stamp sets and products. Just pull them out and start creating! Or update with your current products! It’s all fun! Just click on the title to go to the blog post.

Springtime Joy Lamb Easter Card

Springtime Joy Lamb Easter Card

Easy Easter Candy Treats

Easy Easter Candy Treats

Garden Lane Easter Bunny Card

Garden Lane Easter Bunny Card

Welcome Easter Yellow Chick Card

Welcome Easter Yellow Chick Card

Chocolate Bunny Easter Joke

Chocolate Bunny Easter Joke

Easy Easter Folded Candy Holders

Easy Easter Folded Candy Holders

Make an Easy Paper Easter Basket

Three Easy Paper Easter Baskets

Easter Basket of Flowers Card on a Basket Weave Background

Easter Basket of Flowers Card

Happy Easter! Lattice Easter Cross Card

Lattice Easter Cross Card

Playful Pals Easter Bunny Pyramid Treat Box

Playful Pals Easter Bunny Pyramid Treat Box

Well, that’s probably more ideas than you need but it was fun for me going down Easter Memory Lane! So many cards and treats over many years and seeing them always brings back wonderful memories because stamping is always so much fun! If you need more or different ideas, just select Easter in the Categories drop-down box under the catalogs.

HAPPY EASTER!

Encircled In Friendship Easter Card

Encircled In Friendship Easter Card

This Encircled In Friendship Bundle of stamp set and dies was one of the prettiest sets, I thought, yet I didn’t use it quite enough and now it is retiring in May. The stamp set is already gone, but the Encircled in Beauty Dies are still available as I write this and that’s really the main thing you need to make a card similar to my Encircled in Friendship Easter Card. The flowers in the center were in the stamp set, but you can stamp any flowers, image, or greeting to put in the center of the beautiful die.

The card base is Basic White with a layer of Polished Pink, one of the current In Colors. These colors are sticking around for another year! I decided to emboss the Polished Pink with the Ornate Floral 3D Embossing Folder. This folder is retiring on May 2 and I recommend it as a pretty and useful folder for a background with a little texture you can use frequently. Lucky for you, it is also discounted on the Last Chance Products Sale! So check it out!

The fancy circle die is cut from Basic White with one of the Encircled in Beauty Dies. For the center portion, I stamped the flowers in the Encircled in Friendship Stamp Set (retired) in Polished Pink. You could also stamp them in Memento Ink or Stazon and color them in with Stampin’ Blends markers or any coloring tool. I thought I would like to have a special layer behind this floral circle, so I die cut with a Layering Circles die that was just a little bit smaller than the center of the die and then a larger circle out of Gold Foil. My fancy die was already cut out or I could have used the center of it.

The greeting, in the Celebrating You Stamp Set, was also stamped in Polished Pink ink and die cut with this cute die in the Meadows Dies. I had also die cut a little banner die in the Tasteful Labels Dies (another product I use frequently and will miss when it retires but it is discounted now!) to see which shape greeting I would like best with the fancy die cut above. I thought the Meadows Die would be too much but I liked it!

For a finishing touch, I tied a bow with the White 3/8″ Glittered Organdy Ribbon. When I pulled this ribbon out to try, I wasn’t sure it would work but once I placed the bow under the circle I loved how it looked! Being sheer is didn’t overpower the front of the card but I thought the pink glitter in the ribbon was perfect for an Easter card. This wouldn’t have to be an Easter card. The greeting on the front is generic so could be for almost anything, but on the inside, I stamped “Happy Easter” from the same Celebrating You Stamp Set.

Here’s another card I made with this Bundle. On that card, I used another fancy die as a layer under the stamped flowers, so you can use one or more of the pretty dies!

If you already own the Encircled in Beauty Dies, make some cards with the fancy dies. I would recommend using Adhesive Sheets on the back of your paper before die-cutting to make gluing them down easier. Otherwise, just use teeny tiny dots of Liquid Glue on the back, preferably using your Silicone Craft Sheet to keep the glue off everything else. If you don’t already own these pretty dies, take a look at them in the Stampin’ Up! Annual Catalog on pages 70 and 169. Use this Encircled in Friendship Easter Card for Easter or for other special occasions!

Flowering Fields Z-Fold Tulips Easter Card

Flowering Fields Z-Fold Tulips Easter Card

As I looked through my package of the Flowering Fields Designer Series Paper looking to see if a certain pattern was in there, I saw this print of tulips and decided I had to make an Easter card with it right away! As I scored the card in half, I decided to make it a Z-fold card and that’s how this Flowering Fields Z-Fold Tulips Easter Card came about! You never know when you start out what you will actually end up with!

This card was so easy really. I often add pieces of designer paper at least on the folded back front portion but this time I just stamped the smallest tulip in the Flowering Tulips Stamp Set. I used the same Pear Pizzazz ink as the Pear Pizzazz cardstock but I stamped off once on scrap paper because I wanted that light, watermark look down that side panel. I didn’t use the second step of stamping another tulip petal on top of the first because not much was going to show anyway and I just wanted that light look. I did stamp a few leaves to fill in some space.

I die cut a scalloped rectangle from the Scalloped Contours dies (retiring soon!) in So Saffron for the background layer to the tulip paper. For the designer paper, I just measured with a ruler inside the scalloped rectangle and cut out that size rectangle of DSP to fit inside the area. Mine was just a “smidge” under 4″ (about a 1/16th inch less) and about 2 5/8″ wide. If you want to tie a ribbon around that piece, do it before you adhere it to the scalloped rectangle of course.

The greeting is stamped on a die-cut piece from the Stitched So Sweetly Dies (also retiring soon!). I just glued it flat on the card as I am likely to mail this card. I couldn’t resist adding two Iridescent Rhinestone Basic Jewels to the sides of the greeting.

For the inside of the card, to add some interest, I adhered “the other side” of one of the designer papers without a particular pattern except for the shading of colors. This particular piece barely makes a difference in the look from the cardstock, but it’s there and makes a prettier finished look I think.

For the inside, I die-cut a Basic White scalloped rectangle, one size smaller than the card front to adhere inside the card on which to stamp another greeting or write a message and sign the card. You could use one the same size as the front but you would have to line it up perfectly so it wouldn’t stick out from underneath the front card design.

Here is another Z-Fold card I made recently for Easter using the Flowering Tulips Stamp Set instead of the designer paper.

I’ve made lots of Z-Fold cards and I always say they are so easy to make (just fold back the card front!) yet they make such a nice presentation! The recipient will think you are so clever and creative to make such a fancy card! The only difficult part is not to put glue all over the back of the front piece, just on the half that will be adhered to that Z-fold.

Be sure to check the Last-Chance Products list in the Stampin’ Up! Online Store to see what will be retired on May 2 and what is still available. Not everything is discounted, but some things are so grab what you “need”!

Reminder Today is the last day to sign up for Paper Pumpkin to get the April “Change Is Beautiful” Kit!

A Trio of Punch Art Bunnies Easter Card

Trio of Punch Art Bunnies Easter Card

I saw this idea for the punch art bunnies on our Demonstrator group on Facebook but I think I saw the same idea somewhere else online too recently. I thought it was so clever, I went straight for my punches and started making bunnies which turned into this A Trio of Punch Art Bunnies Easter Card!

This “punch art” as we often call something created using different punches that are different than what the punch is meant to be. I don’t know how people come up with these creative ideas, but they do! And the rest of us can copy!

To make these cute little bunnies, just use the Strawberry Builder Punch and the Ladybug Builder Punch. Punch the strawberry shape to make the bunny head. Punch the Ladybug wings to make the bunny ears! I left them attached but I suppose you could cut them apart if you wanted the ears to have different spacing. That’s all there is to it! Isn’t that a fantastic punching idea?!

Strawberry and Ladybug Punches For Bunny

I colored in the pink on the ears with the Dark Petal Pink Stampin’ Blends. I used the Light Petal Pink color to color some cheeks on the bunnies. The faces are just drawn on with the pointy tip of the Basic Black Marker.

The card base is Crumb Cake cardstock with a Petal Pink layer. I embossed that layer with the Gingham Embossing Folder. The background needed some texture and this folder is good for some generic texture! But it also kind of reminded me of the weaving on an Easter basket so that, of course, went with the bunnies!

The greeting had to be simple and not take up too much space. I wasn’t sure it would fit on this smallest rectangle die in the Stitched So Sweetly Dies, but it did! These dies are retiring on May 2 which I hate! I used these dies a lot. I planned to layer the greeting, “Happy Easter” in the Celebrating You Stamp Set on top of a die-cut Crumb Cake rectangle but it was too big for the card and I like just the Basic White greeting better along with the bunnies.

I adhered the bunnies straight to the card because I wanted to add the tiny little Loose Flower Flourishes on the bunny heads and I didn’t want the flowers to stick up too much if I wanted to mail the card. Luckily these teeny flowers are pretty low so hopefully, they can go through the mail. I always add a piece of paper towel or maybe crimped computer paper to cover embellishments in the envelope to protect them from the post office machines.

Try making some of these bunnies! Bet you can’t make just one! You could use a brown or gray cardstock or maybe even the right pattern of designer paper. Just have fun with it!

SHOP STAMPIN’ UP! ONLINE HERE!