Tag Archives: Country Floral Lane Designer Series Paper

Easter Triangle Treat Box with Bunny

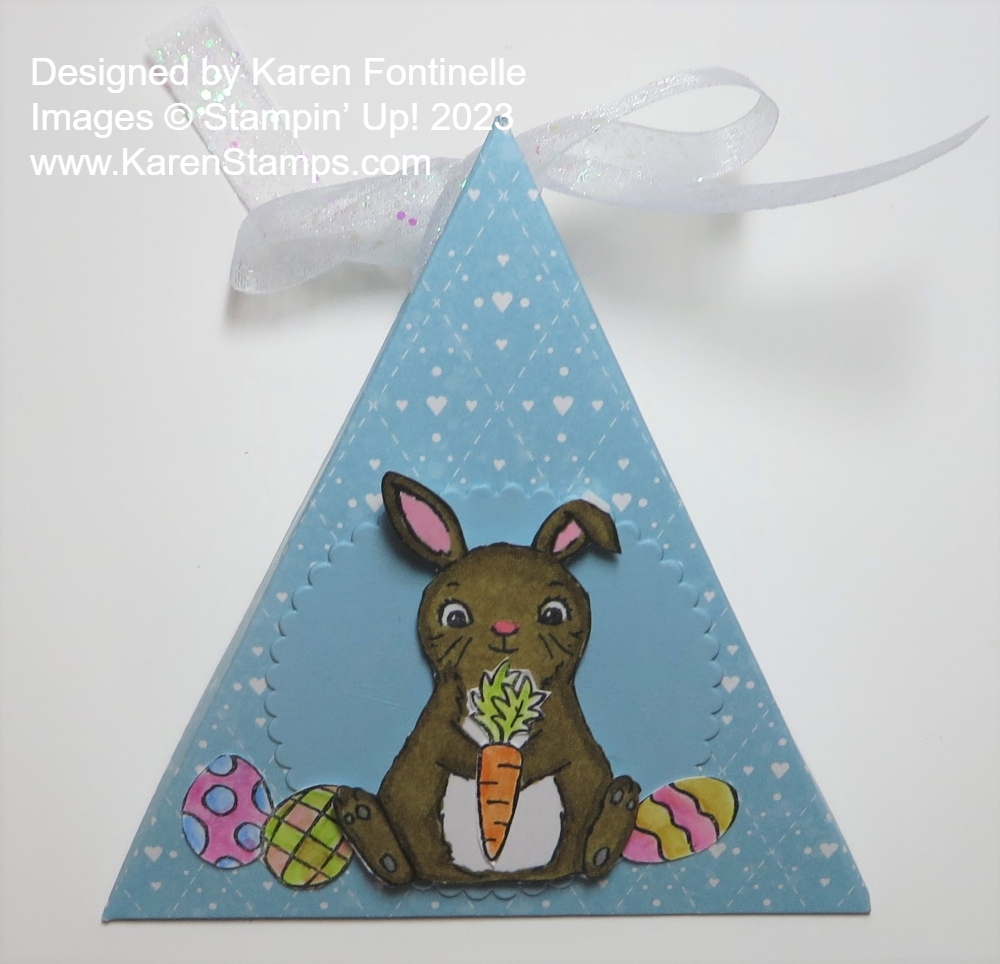
If you have been around for a while, you know I have made MANY of these triangle boxes for various occasions and made them in multiple sizes! They are so easy yet look so cute! If you want an Easter treat box, try this Easter Triangle Treat Box with Bunny.

Here’s how to make one and then just decorate however you like!

Triangle Box Drawing

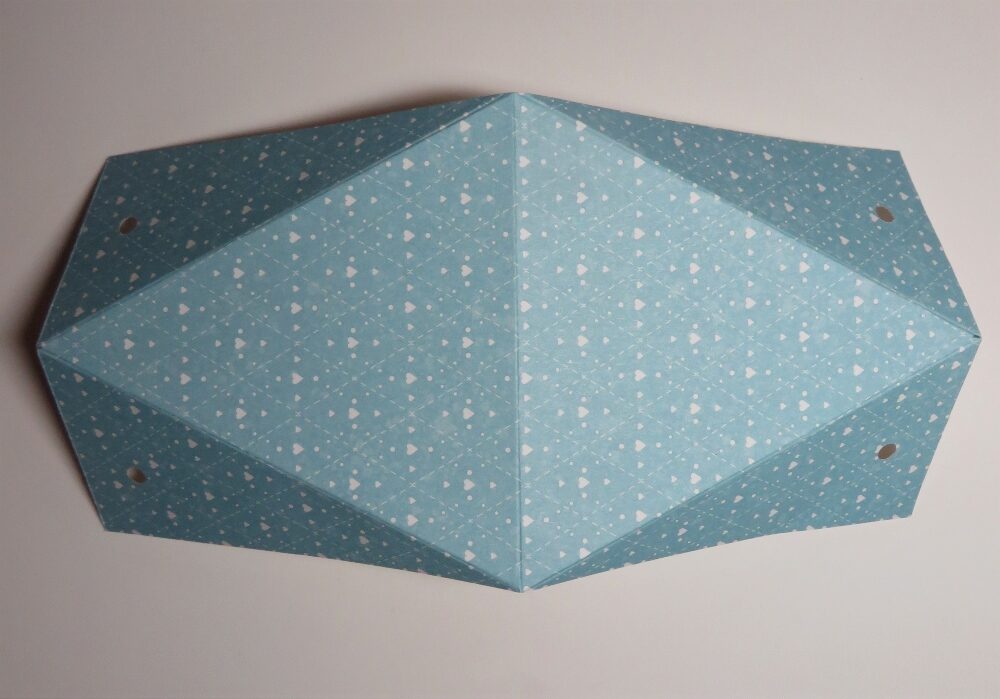
For this Easter triangle box, I used a piece of the Country Floral Lane Designer Series Paper. (It’s not just for Valentines!) It is cut at 4″ x 8″ but you can vary the size. Use the diagram above to see how to score, but it is simple! At each end of the paper, put a light pencil mark at the halfway point which in this case would be 2″. Score the paper in half at 4″. Then in that awkward manner, with your Paper Trimmer, score from that 2″ middle point at one end down to the middle score line which will be on a diagonal. Do that on both sides of one end, then turn the paper and score at the other end in the same way.

Now fold and crease all the score lines. You will see how it will fold together to make the triangle box. Determine which side will be the front or top of your box that you will want to decorate and how the flaps will go so that the top view of the box will have the fold of the flaps showing and not the open side. Pay attention to the pattern direction if it matters. Once you see how it folds together how you like, you can use any hole punch to punch holes in the sides near the top. You want the two holes on each side to align. This is how your paper should look creased and with holes punched.

Easter Triangle Treat Box with Bunny diagram

To decorate, I stamped one of the bunnies in the Easter Bunny Stamp Set in Memento Ink and colored with the Soft Suede Combo of Stampin’ Blends markers. I cut out the bunny and popped him up over a Balmy Blue scalloped circle die in the Layering Circles Dies. I already had some extra stamped and colored Easter eggs and a carrot from another project so I just adhered those to the front.

After adding some treats or a small gift inside the triangle box, just close it up and tie a ribbon through the holes you already punched. I used the White 3/8″ Glittered Organdy Ribbon because it’s white and it’s festive and pretty!

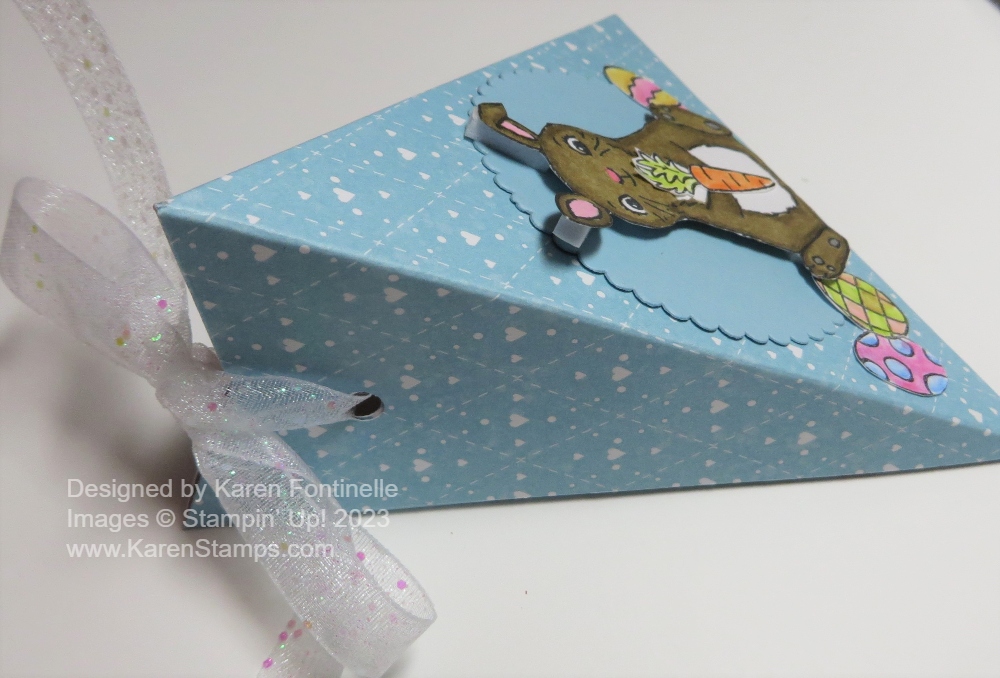
You can see what the triangle box will look like from the side.

I’ve made these triangle boxes for Halloween, Christmas, and just for fun! Here’s a Halloween one if you want to see another idea! You really could make an extra-long box, also, just follow the basic scoring directions – score in half and score diagonally from there to the middle point of the end, on each end.

If you want to do something different than an Easter basket, try making something like this Easter Triangle Box with a Bunny on the front!

Country Floral Lane Heart Punch Card

Country Floral Lane Heart Punch Card

Is this Country Floral Lane Heart Punch Card a Valentine or an all-occasion card? I think it could be either one! Hearts aren’t just for Valentine’s Day so this could be a “Thinking of You” card…but it could be a Valentine! So make it whatever you like! Of course, you can change the greeting for your specific occasion!

I chose a Mossy Meadow card base since that is one of the coordinating colors of the designer paper. Over that, I added a layer of Basic White cardstock to set off the designer paper a little better.

The paper is the Country Floral Lane Designer Series Paper in the Spring Mini. The papers aren’t strictly for Valentine’s Day so you can use them later in the year, too! For this card, I used the pink floral pattern with a dark green background on the top half of the card and the pink little hearts paper for the bottom portion. These two patterns are actually the two sides of the same sheet of paper! The top portion measures 3 3/4″ x about 3 3/8″. The pink hearts paper is 3 3/4″ x 1 3/4″. The pink paper overlaps the top portion just a tiny bit. Be sure to wrap the ribbon around to the back at the seam to cover the two papers meeting before you glue it down to the Basic White layer. The ribbon is the Petal Pink 3/8″ Soft Polyester Ribbon which is beautiful and really soft.

For the greeting, I found this one in the Celebrating You Stamp Set. It is stamped in Mossy Meadow ink on Basic White. Then punched out with the plain heart in the Heart Punch Pack with a Petal pink scalloped layer with the scalloped heart. These two punches come together in the Stampin’ Up! Annual Catalog in the Heart Punch Pack. If you missed out on the Country Bouquet Punch (it is due back in April!) these heart punches will be fun to use instead.

The heart is popped up on Stampin’ Dimensionals and I added a small Iridescent Rhinestone Basic Jewel on the point of the heart. I think it is the perfect finishing touch!

SHOP STAMPIN’ UP! ONLINE HERE!

Country Floral Lane Valentine With Heart Punch Pack

Country Floral Lane Valentine With Heart Punch Pack

With all the excitement over the Stampin’ Up! January-April 2023 Mini Catalog (the Spring Mini), we often forget about the Annual Catalog. It’s easier to look at the newest catalog and all the shiny new products. But now that it is time to make Valentines, I remembered the Heart Punch Pack in the Annual Catalog! It’s a shame the Country Bouquet Punch will not be available in time for Valentine’s Day, but maybe you have the Heart Punch Pack you can use instead (or other past heart punches and dies).

This Country Floral Lane Valentine With Heart Punch Pack card is an easy card to make. It starts with a card base of Petal Pink cardstock. I added a layer of designer paper in the Country Floral Lane Designer Series Paper, the Petal Pink with little white hearts.

The hearts are punched with the Heart Punch Pack. This is two heart punches, one with scalloped edges that can act as a layer underneath the plain heart. It’s great to have the two punches for layering and for the two designs. The scalloped heart is Petal Pink and the plain is Basic White. A greeting is stamped with Petal Pink ink from the Country Bouquet Stamp Set.

To help the heart stamp out I die cut a Basic White square from the Stylish Dies. You can use any square shape. The two hearts are adhered together, then popped up on Stampin’ Dimensionals.

But before I adhered the hearts to the square I added some White 1/4″ Crinkled Seam Binding Ribbon back and forth behind the heart. I usually like to put down some Stampin’ Seal on the back so I can stick down the ribbon and then add Dimensionals to help hold it down as well as to pop up the piece.

Trying to keep the card simple, but wanting just a little something else to add to the card, I added a frosted Heart Pearl. In this package are three “colors” of pearls – Glossy White, Milky White, and Pearl White. I just put the heart at the bottom of the heart and then stopped myself from adding any more! It’s so much fun to add some embellishments to a card!

This is just an easy, basic Valentine. Change the colors, the paper, or even the greeting to make more cards!

SHOP STAMPIN’ UP! ONLINE HERE!

Country Floral Lane Punched Red Hearts Valentine

Country Floral Lane Punched Red Hearts Valentine

This Country Floral Lane Punched Red Hearts Valentine uses a little bit of several things for this card in the Country Floral Lane Suite in the Spring Mini Catalog 2023. (As I write this, this Suite is back-ordered until mid-April because the Country Bouquet Punch unfortunately is unavailable until then, as well as the Bundle. The ribbon combo will be available in about three weeks. But other items are available individually.)

This card has a Sweet Sorbet card base with a Basic White layer. Just add some designer paper and a little stamping and you have a Valentine! Each side of the Basic White layer has a 1/2″ x 5 1/4″ strip of the Country Gingham 6″ x 6″ Designer Series Paper.

In the middle of the card, I punched five hearts from the cute print with little white hearts in the Country Floral Lane Designer Series Paper. Since these modern hearts have a slight curve to them, if you want some hearts to curve in the opposite direction, just punch from the other side of the paper! With this paper, pay attention to the pattern so you don’t get the hearts upside down! Just play around with how you like the hearts placed.

Next, I did a little stamping. The center white heart is punched out and then stamped (or you can do it the opposite way!) with a greeting in the Country Bouquet Stamp Set. You can punch out the heart itself first or stamp the heart outline and even the greeting inside it and then punch it out. I wish there was a larger heart for layering, but there isn’t so I just punched out a Sweet Sorbet cardstock heart and let it peek out over the top of the white heart. It adds a little something but nobody would notice the entire heart isn’t layered underneath. The white heart is popped up with Stampin’ Dimensionals.

For some risky stamping (could have messed up the whole card!), I stamped the little outlines of two hearts around in some of the empty spaces on the card using Sweet Sorbet ink. Fortunately, it all worked out! No messes! For a little bling, I added some Rhinestone Basic Jewels.

I forgot to take a photo, but on the inside of the card, I stamped “Happy Valentine’s Day” on a layer of Basic White and then punched out two hearts – one with the gingham like on the side of the front of the card and one with the tiny white hearts like the hearts on the front of the card and just layered them side by side on the lower right-hand corner. That makes the inside very cute!

Time to make Valentines! February is almost here! Not everything has to be red, white, or pink so use your creativity!

SHOP STAMPIN’ UP! ONLINE HERE!

Country Bouquet For You Card

Country Bouquet For You Card

Once again, the Stampin’ Up! catalog was the inspiration for this card. I noticed a sample on page 8 in the new Stampin’ Up! Spring Mini that is really a candy bar treat holder, but I made this Country Bouquet For You Card instead of a treat holder.

This card uses the two kinds of designer paper in the Country Floral Lane Suite plus the Country Bouquet Bundle. If you want it “all”, as they say, just order the Suite Collection (160390)! That saves you from entering all the product numbers!

The card base is Sweet Sorbet with a layer of the paper with tiny white hearts in the Country Floral Lane Designer Paper. Then I added a smaller layer of the Sweet Sorbet gingham pattern in the Country Gingham 6″ x 6″ Designer Series Paper. It is 2 7/8″ x 4 1/8″. To help it stand out a bit, I adhered that gingham paper to a layer of Basic White that is 3″ x 4 1/4″.

The heart and leaves in the Country Bouquet Stamp Set are stamped with Sweet Sorbet and Mint Macaron inks then punched with the new Country Bouquet Punch. You can purchase the stamp set and the punch in a Bundle and save 10%. You can swipe some green ink on a scrap of Basic White and then cut out a stem or just cut it out of cardstock. The heart and leaves are popped up on Stampin’ Dimensionals. The stem is adhered flat on the card.

The plain Basic White heart is just punched out and then stamped with a greeting in the Country Bouquet Stamp Set. This card could be a Valentine or it could just be an all-occasion card to send a happy greeting to a friend or loved one.

You can keep this card simple as is, or add some jewel embellishments of some kind or more hearts or whatever you like!

This Country Floral Lane can definitely be for Valentine’s Day but it can easily be for any cards. Check out this card I made on the first day of the Spring Mini.

Buy the Suite and add a little more and get TWO $50 Level free products during Sale-A-Bration or choose a special $100 Level free product! You will be all set for making valentines to send! Maybe instead of making a card like this Country Bouquet For You Card try making a treat holder like the sample in the catalog!

SHOP STAMPIN’ UP! ONLINE HERE!