Tag Archives: Regency Park Designer Series Paper

Regency Park Mango Melody Thinking of You Card

Regency Park Mango Melody Thinking of You Card

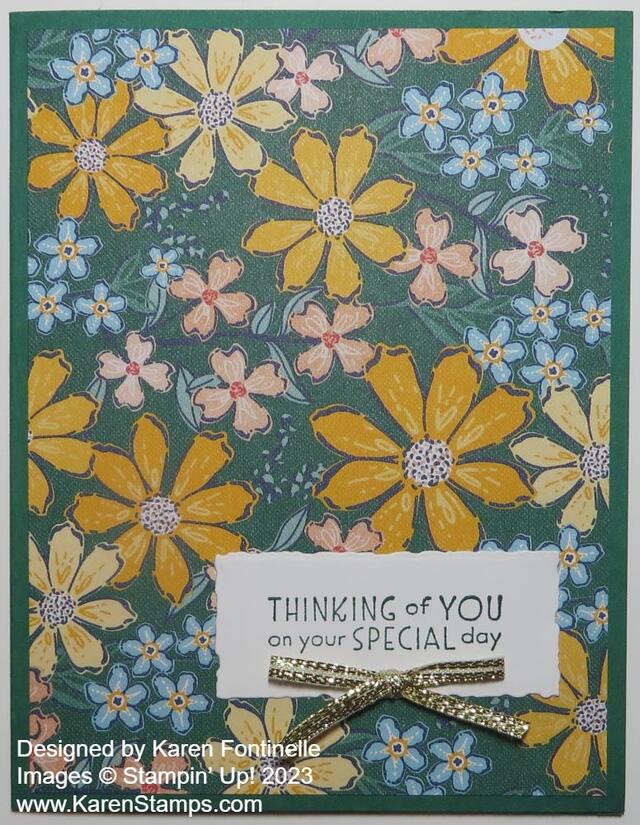
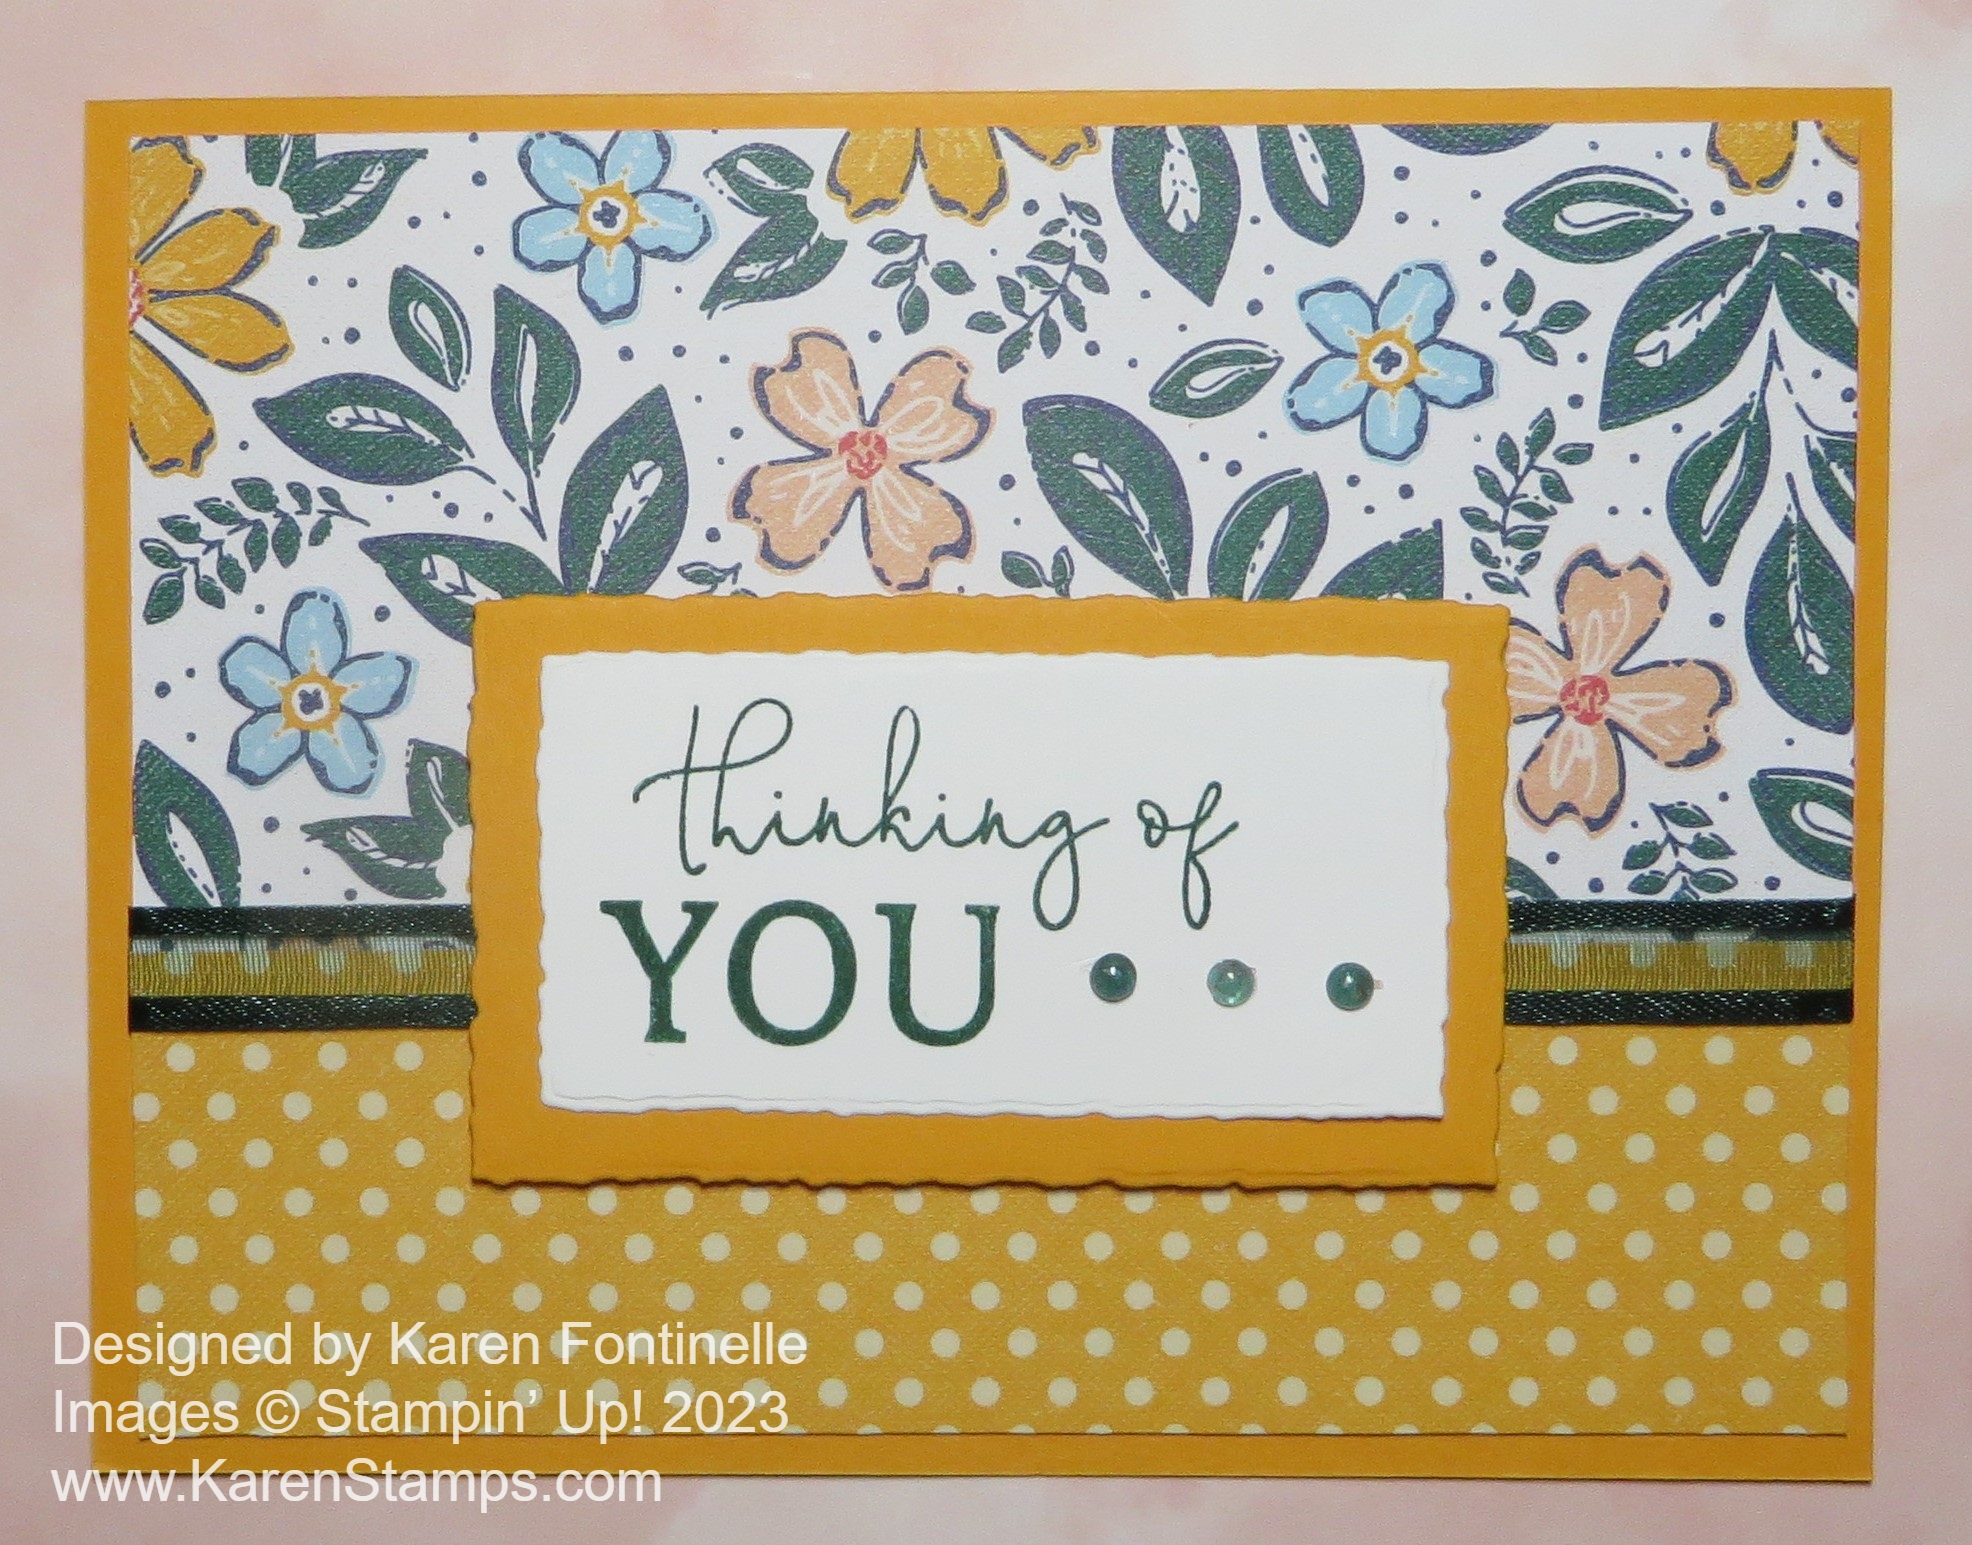
While changing out the Stampin’ Up! old colors with the new ones, I found a full new package of Mango Melody Cardstock in the drawer on reserve and ONE sheet in the package I was using. I didn’t want to open up a brand new package of cardstock just to store one more sheet in there. I left out the single sheet on the table so I would remember just to USE IT! USE IT UP!! So I made this card, the Regency Park Mango Melody Thinking of You Card. It’s a very easy design!

The Regency Park 6″ x 6″ Designer Series Paper is on the Last Chance List. You get florals on one side and all kinds of designs on the other side of the paper – stripes, polka dots, tiny flowers, and more. There are many pretty colors that coordinate so you will have many choices for your cards, scrapbook pages, and other projects.

Since I wanted to use my sheet of Mango Melody Cardstock, I chose a floral pattern that had Mango Melody in it. Then I chose a polka dot Mango Melody pattern for the bottom portion of the card. It is 1 1/2″ wide. You could use just the floral pattern and a greeting, but it’s also fun to use another pattern at the bottom. And I couldn’t resist the polka dots!

Before adhering the designer paper to the Mango Melody card base, I wrapped a piece of Evening Evergreen 3/8″ Open Weave Ribbon across the front and adhered it on the back. I didn’t end up using a bow anywhere on the card.

The greeting is stamped from the Sentimental Park Stamp Set in Shaded Spruce Ink. The Sentimental Park Stamp Set and Dies are both in the new Stampin’ Up! Catalog, but will not be bundled together. If you want to purchase both, be sure to buy the Sentimental Park Bundle before the end of the Spring Mini and save 10%.

To cut out the greeting, I used a Deckled Rectangle Die and then a larger one to cut out a layer of Mango Melody. These great dies are in the new catalog, also. To finish off the greeting, I added some 2021-2023 Opal Rounds (retired) in Evening Evergreen to fill in the space.

Here is another card on my blog that I made in almost the same style as this one except in a vertical design.

If you want to use up some Regency Park Designer Series Paper and some retiring cardstock, make some cards with this easy design!

Regency Park Easter Eggs and Bunny Card

Regency Park Easter Eggs and Bunny

Here’s one last Easter card for the year, the Regency Park Easter Eggs and Bunny Card! I saw a card that used the Framed Florets Dies to make Easter eggs! In past years we’ve had oval punches or oval dies to use to make Easter eggs, but I hadn’t thought of using these dies. Naturally, I couldn’t find the exact card again but it was easy enough to make up my own design.

This card has a Basic White cardstock card base with a layer of Petal Pink. The Easter eggs are die cut with the smallest oval die in the Framed Florets Dies. I used the Regency Park 6″ x 6″ Designer Series Paper. This paper is on the Last Chance List and is very pretty! It has all kinds of floral patterns plus more generic patterns on the “back”.

The bunny is also made by punching out the Regency Park DSP using the Easter Bunny Punch. The Bunny Punch was so popular it sold out pretty early but more are due back in stock the middle of May. The Easter Bunny Stamp Set and Punch are both in the upcoming Stampin’ Up! Annual Catalog which is great! Besides Easter, you can make cute baby cards with the stamp set and/or punch.

The background piece is Basic White but I added a little bit of Pool Party ink with a Blender Brush just so it wasn’t so plain. To make it look like the eggs and bunny are in the grass, I die cut some grass pieces from dies in the Playing in the Rain Dies.

The greeting is stamped with Flirty Flamingo ink from the Easter Bunny Stamp Set and die cut with a small Stitched Rectangle Die. These dies are retiring which makes me very sad! I used them a lot so if you don’t already own them you might want to pick them up on the Last Chance List AND they are discounted! For a finishing touch, I added a bow to the bunny with the White 1/4″ Crinkled Seam Binding Ribbon.

SHOP THE LAST CHANCE LIST AND SALE!

Happy Easter!

Regency Park St. Patrick’s Day Card

Regency Park St. Patrick's Day Card

Happy St. Patrick’s Day!

Today is St. Patrick’s Day for those of you who celebrate! Instead of making an “official” St. Patrick’s Day card, I made this card with lots of green and even a touch of gold! And the greeting could be for someone you are giving the card to on St. Patrick’s Day!

This is about a five-minute card!! The card base is Shaded Spruce cardstock which matches the Regency Park 6″ x 6″ Designer Series Paper in the Spring Mini Catalog. All I had to do was make the card base, cut the designer paper 5 1/4″ x 4″, and glue it on with Stampin’ Seal. The greeting is stamped with a stamp in the Inspired Thoughts Stamp Set in Shaded Spruce ink on Basic White. Then it was diecut with a Deckled Rectangle Die.

For a little embellishment, I decided to use the new Gold & Silver 1/8″ Trim Combo Pack. It is one of the Online Exclusives products in the Stampin’ Up! Online Store. I just got it and I can say the gold is really bright and shiny!

So if I run into somebody today to whom I wanted to give a St. Patrick’s Day card to, I think this one would be somewhat appropriate! Otherwise, I can use it for a birthday or some other occasion!

Celebrate in your green today and enjoy your special day!

Petal Pink Easter Bunny Card and Easter Tag

Petal Pink Easter Bunny Card and Easter Tag

I got the idea to make an Easter tag and after I made the tag with no space for Easter eggs, I got the idea to make this Easter card! It turned out that everything was in Petal Pink so they are both monochromatic.

I know the Easter Bunny Punch is currently unavailable, but maybe you already have it or have another bunny punch or die. Hopefully, it will be back in stock, but it will be a while. Or stamp a bunny and cut it out as a pattern.

To make the tag, I needed a large area for the tag as the bunny punch is rather large. I ended up using the large plain Layering Circle Die to cut out the Petal Pink card stock and then punched the Easter Bunny out of it. I wanted to use the negative of the bunny with a piece of designer paper behind it. Since the bunny was pretty large, I just die-cut the next smaller plain circle out of the polka dot pattern in the Regency Park Designer Series Paper to place behind the bunny. I popped up the bunny on Stampin’ Dimensionals, mostly the Black Mini Dimensionals, and then adhered the bunny to the designer paper.

For the backing of the tag, I cut out the largest scalloped circle die in the Layering Circles Dies on which to layer the punched-out bunny in Basic White so the little scalloped edge would just barely show behind the bunny. Then to cover the plain white back, I die-cut another scalloped circle the same size out of the Petal Pink wicker pattern and glued that on.

For a greeting, I stamped “Happy Easter” from the Easter Bunny Stamp Set in Petal Pink ink, cut apart the words, and then even cut around the words for a different look and to have them fit on the tag! For some bling, I added some Iridescent Rhinestone Basic Jewels. I punched a small hole in the top so I could put some ribbon through and tie it with a piece of Linen Thread. This would make a cute tag for a baby gift (without the Easter greeting of course!)

I had wanted to add some of the stamped Easter eggs from the stamp set, but there was no space on the tag. At that point, I got the idea to make a card with a background of the stamped eggs!

The card base is Basic White. I decided to put a stamped center panel across the card. That Basic White piece is 3″ x 5 1/2″ I stamped the Easter eggs randomly on that piece to fill up the space. Then I pulled out a 2″ wide strip of the Regency Park polka dot paper and cut it 5 1/2″ and in half at 1″.

I adhered the two designer paper strips directly to the card base top and bottom and then overlaid the stamped center panel. I punched two bunnies with the Easter Bunny Punch and popped them up with Stampin’ Dimensionals. I added a tiny bow for each bunny and stamped the greeting. It is diecut with a narrow Stitched Rectangle Die. I was hoping the words would fit! The greeting is also popped up on Dimensionals.

That’s all there is to that card so it is actually pretty simple to make. It’s easy to make a monochromatic card with no coloring or choosing multiple colors.

SHOP STAMPIN’ UP! ONLINE HERE!

Regency Park Blue Floral Hooray Card

I thought one time I had seen a card I really liked using this blue floral paper and without even trying to find that card or a similar one again, this Regency Park Blue Floral Hooray Card is what I came up with. I have to say I’m really pleased with how this card turned out! It’s the paper and it’s the tag!

For this card, I used the Regency Park 6″ x 6″ Designer Series Paper which you will find in the Stampin’ Up! Spring Mini Catalog on page 31. I chose this paper with Night of Navy and Balmy Blue colors. One side is the floral side and the other side has stripes so I decided to use both!

The card base is Night of Navy with a layer of Balmy Blue. I think other color combinations would be pretty too and I may try out some of those! The floral paper is cut at 3 1/2″ x 3 3/4″ and the striped portion is 2″ x 3 3/4″. This allows for some overlap of the papers. Often I want to put a ribbon over the “seam” to cover it up and sometimes I do that with just the two papers adhered together. That works, but it is a little flimsy and difficult to handle. On this card, I cut a piece of Basic White Cardstock the same size that I wanted the designer paper layer to be, 3 3/4″ x 5″, and adhered the designer papers to that first, completely covering the white cardstock. I added a narrow strip of Balmy Blue to cover the junction of the two papers and also added a bit of White 1/4″ Crinkled Seam Binding Ribbon over the strip of Balmy Blue. Then I adhered this whole piece to the layer of Balmy Blue on the card.

For the greeting, I chose one from the Sentimental Park Stamp Set in the same Regency Park Suite. I stamped the greeting in Night of Navy ink on Basic White. Then I switched to the Something Fancy Dies and diecut the greeting. These dies are great shapes of tags and labels and versatile with the extra little dies that come with them. I diecut the greeting with the tag die, then used the extra little die with the flower and leaves to diecut the top of the tag and make it really pretty! You can diecut both at the same time or separately. After trying out the tag on my card, I thought it needed a layer and luckily this die set has layering dies! I cut another larger tag out of Balmy blue to layer behind the greeting.

I might have tied a bow at the top of the tag, but with the pretty diecut at the top, I didn’t want to cover that up. So instead, for a little extra embellishment, I used my Paper Snips to cut out some little flowers from the designer paper. I really like how that turned out! I could have also added some rhinestones or other sparkly embellishments.

Since the card base is a dark color, on the inside I added a layer of Basic White and then added a strip of the floral paper to the bottom to decorate it a little bit. That way I can stamp a greeting or write a note on the white cardstock inside.

Check out the whole Regency Park Suite Collection in the Spring Mini. If the whole Suite is not available, then just pick and choose which products you would like. If just one item is not available, the whole Suite is not available, but you can still purchase products individually that are available. Here is another card I made with similarly designed paper but in Sweet Sorbet. Try your hand at a card like my Regency Park Blue Floral Hooray Card and maybe use different color combinations for fun!

SHOP STAMPIN’ UP! ONLINE HERE!