Tag Archives: Pick of the Patch Stamp Set

Layering Leaves October Fall Card

Layering Leaves October Fall Card

Happy October!! Now that it is officially October, it feels much more like the fall season, even if it still doesn’t feel like fall here in Houston! This Layering Leaves October Fall Card commemorates the beginning of October which really makes us think of fall, colored leaves, and all the upcoming holidays and seasons! Once the fall and Halloween decorations go up in my house and my regular home decor is put away, it won’t get pulled out again until January! Halloween decorations are starting to go up in the neighborhood. While I absolutely love all my Halloween decorations, I’m not quite ready for full-blown Halloween decorating quite yet. Maybe in another week or two for sure!

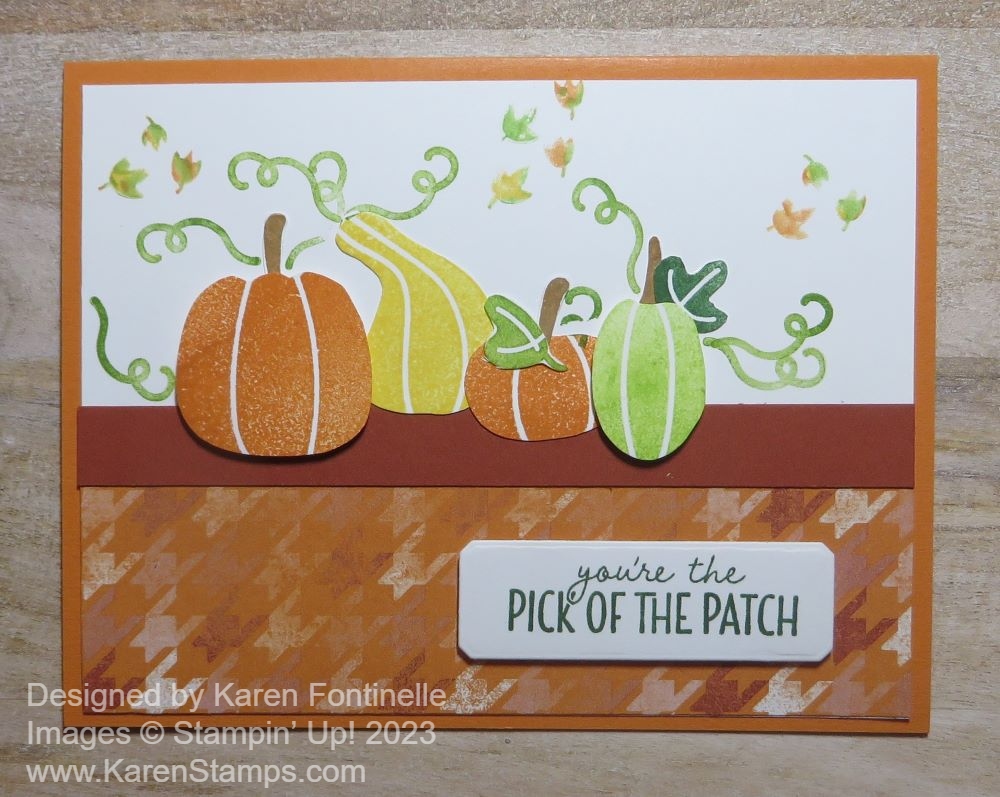
This card base is Pumpkin Pie and is cut at 11″ x 4 1/4″, scored at 5 1/2″ and the fold is at the top. I could have put the fold on the left and the card would be in a landscape position rather than our usual cards at 5 1/2″ x 8 1/2″.

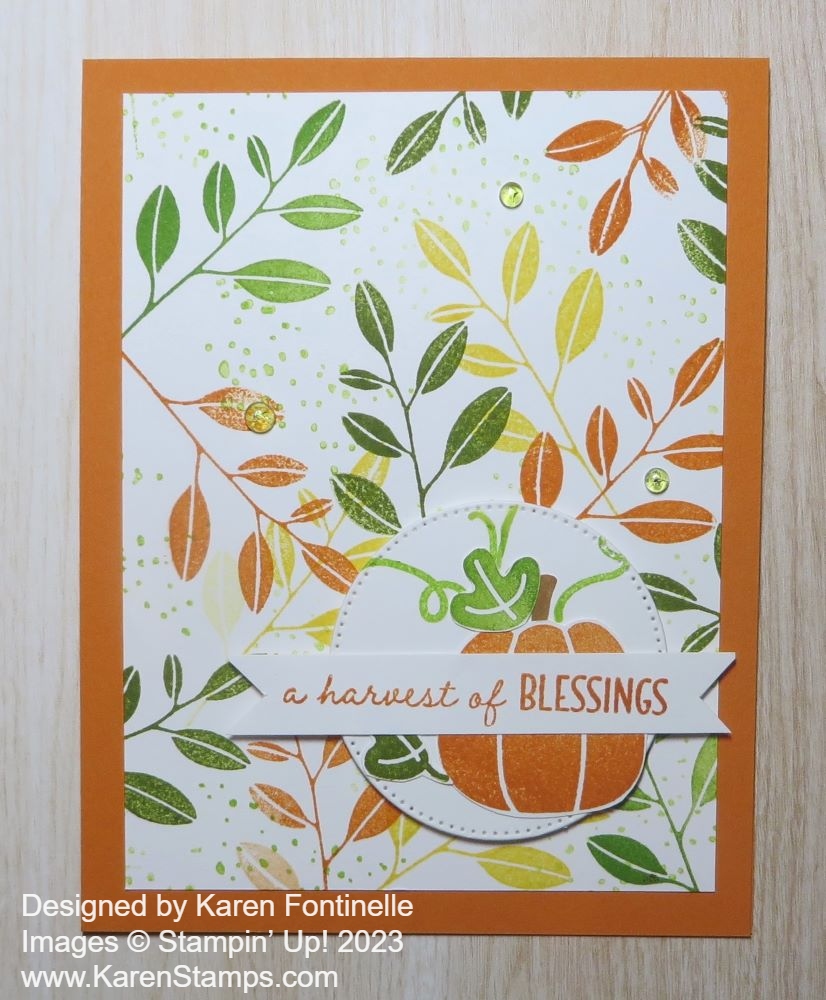
I made my own designer paper, so to speak, by stamping the leaves from the Layering Leaves Stamp Set. I used these inks: Pumpkin Pie, Daffodil Delight, Granny Apple Green, and a little bit of Old Olive. I love to do this random stamping all over the paper! To fill in the empty spaces I used a stamp in the set with just little dots. Those kinds of stamps just add a little something lots of times! Those dots are stamped with Lemon Lime Twist.

Next, I used the Pick of the Patch Stamp Set to stamp and cut out a pumpkin, some leaves, and a stem. I also stamped some vines on the die-cut circle on which I adhered the pumpkin and leaves. It is from the Stylish Shapes Dies. This circle is popped up on Stampin’ Dimensionals.

The greeting is also from the Pick of the Patch Stamp Set and is stamped in Pumpkin Pie. I always have a bunch of narrow strips of Basic White so it makes it easy when you want to stamp a narrow greeting. I just stamped the greeting on the scrap strip and then flagged the ends to make it look like a banner.

For a finishing touch, I added a few Lemon Lime Twist gems from the Tinsel Gems Four-Pack. Sometimes it is hard to stop at adding only three gems! I would have liked more by the pumpkin and/or the greeting…..but sometimes you have to know when to stop!

Get out your fall colors and do some fall stamping!

SHOP STAMPIN’ UP! ONLINE HERE!

You’re the Pick of the Patch Fall Card

You're the Pick of the Patch Fall Card

This You’re the Pick of the Patch Fall Card may have gotten lost in the shuffle and never got posted but if you’ve already seen it somewhere, it’s a replay! Making fall cards makes me hopeful that it might feel like fall here in Texas someday! Usually, it is December until the leaves turn to fall colors but hopefully, we get much cooler temperatures before that! The colors on this card make me feel a little cooler!

This card is made with the Pick of the Patch Stamp Set and the Them Bones Designer Series Paper. The card base is Pumpkin Pie cardstock with a layer of Basic White. You wouldn’t have to use a whole piece of Basic White if you are going to put a piece of designer paper at the bottom but you want them to overlap a little bit probably. Then cover the seam with ribbon or a strip of paper as I did here. It’s a little easier to use a whole layer of Basic White and then just cut a strip of the designer paper to whatever size you want instead of figuring out the math for the two pieces to be the right size for the card layer. In this case, I used a 5 1/4″ x 4″ piece of Basic White and then a layer of patterned paper that is 5 1/4″ x 1 3/4″. The strip of Cajun Craze is 5 1/4″ x 1/2″. You could also use a strip of ribbon or another patterned paper.

The pumpkins and gourds are stamped with the Pick of the Patch Stamp Set in various colors. You can use any colors that you like and even “stamp off” if you want a lighter shade. I used Pumpkin Pie, Daffodil Delight, and Granny Apple Green. There is a Pick of the Patch Builder Punch that you might like for pumpkins. I don’t have it so I just cut out my images by hand with my Paper Snips.

Here’s a tip for using the Builder Punch. Take any piece of cardstock that fits in the punch (not too large, not too small. Punch the paper. Then use that punched-out paper as a template so you can stamp all the images that match the punch that will be lined up perfectly. Lay the template on the paper you want to stamp on, then stamp each image inside the template. Remove the template, then punch. Everything should be lined up for the punch! Or you can always just punch individual pieces with the punch.

Before adhering the Basic White cardstock layer, lay out all the pieces of the card and see where the pumpkins and gourds will go. Then stamp the vines so that they will line up with the stamped pumpkins and gourds. To fill in some empty space, stamp the little leaves around the background. To make them look like fall leaves, use Stampin’ Write Markers (not Blends). Apply the marker directly on the leaf stamp, starting with the lightest color and adding another color or two to the same stamp. Breathe (huff) on the stamp to remoisten, then stamp and you will get the multicolored stamped image!

Assemble your card, popping up some of the pumpkins if you like and adding some stamped leaves in the set. The greeting is in the Pick of the Patch Stamp Set. What a cute greeting to send to someone special! I die-cut it with the narrowest die in the Countryside Corners Dies.

The Pick of the Patch Bundle is a great set of products to have for this time of year. The stamp set even includes a jack-o-lantern face if you want to make your pumpkins for Halloween!

SHOP FOR FALL AT STAMPIN’ UP!

Pick of the Patch Pumpkin Card

Pick of the Patch Pumpkin Card

Pick of the Patch is one of the new stamp sets I just got from the Stampin’ Up! Holiday Mini Catalog and this Pick of the Patch Pumpkin Card is my first play with it! I had no particular plan in mind and I’m not saying this is the best I could do with the set, but I got a card made! While I only ordered the stamp set, there is a Pick of the Patch Builder Punch you can also order for punching two different pumpkins, a leaf, and a stem. If you get both the punch and the stamp set together in the Pick of the Patch Bundle, you can save 10%.

I didn’t need the punch for this card because I only did stamping with the pumpkins and gourds. This will be a stamp set where you might need to use the masking technique. If you are unfamiliar with masking, it means covering up one stamped image so you can stamp another one to look like it is behind the first one or if they overlap on the sides. It is handy to do this with something like a sticky note. Stamp the images, such as a pumpkin, on the sticky note so that when you cut out the pumpkin you will have some of that adhesive to hold the mask in place. Now Stampin’ Up! sells Masking Paper that has adhesive on the paper that you use for a mask. So you stamp your image on the masking paper (take a peek and make sure that the side of the paper you are stamping on is the sticky side!), cut it out, them use it as a mask when you need it. Just keep it in your stamp case because you can use the masking image over and over.

The card base is Pumpkin Pie cardstock with a layer of Basic White. I stamped an assortment of pumpkins and a gourd, in Pumpkin Pie ink and Crushed Curry for the gourd and added some stems and vines. Then I stamped the leafy plants all around the pumpkins in two different colors of green. There is a stamp with three little leaves on it so I pulled out some Stampin’ Write markers (NOT Blends!) in Pumpkin Pie, Granny Apple Green, and Crushed Curry. I colored directly on the stamp with two or three of the marker colors and then stamped to give them a little fall multi-color.

For a greeting, I chose one in the Pick of the Patch Stamp set and stamped it with Pumpkin Pie ink. Then I used a rectangle die in the Timeless Arrangements Die to cut out the greeting. I cut out another rectangle of the same size in Mossy Meadow cardstock. Since it is the same size, I can’t use it as a layer, but I went about it another way. I cut the green rectangle in half horizontally and just adhered the two pieces to the top and bottom underneath the greeting to help it stand out a little better.

That’s all to this card. As I said, I may have just been trying out the pumpkins but it did turn out to be a card in the end! I look forward to using this set a lot more during the fall, for Halloween, and for Thanksgiving, anything fall! And while I’m stamping and cutting out pumpkins, I can pretend like it’s not still 100 degrees outside!

Shop Stampin’ Up! Online HERE!