Tag Archives: Easter Joy Designer Series Paper

Easter Joy Candy Treat With Bunny

Easter Joy Candy Treat WIth Bunny

It’s time to make some candy treats for Easter, like this Easter Joy Candy Treat With Bunny. This is an easy little treat to make, and you can change it up for any occasion or celebration. For Easter, you can’t make a project any easier than to use the Easter Joy Specialty Designer Series Paper! Not every paper pattern is exclusively for Easter, but some are. Even the ones that are not “Easter” are just so pretty with bright colors with a bit of a shiny look to the paper. You can use this paper even after Easter.

Candy Treat Holder Diagram

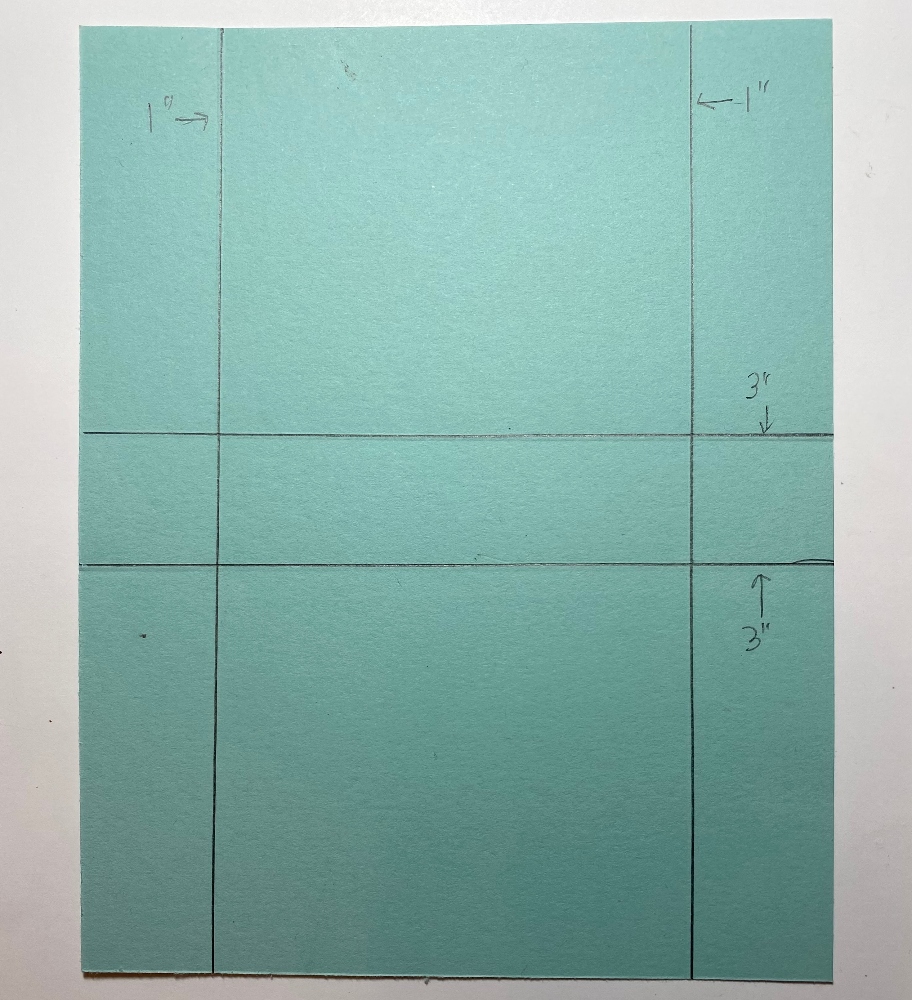
To make this little treat box, start with a piece of cardstock 5 1/2″ x 7″. Once you know how to make it, I’m sure you could modify the size. Putting the 7″ top of the paper at the top of the Paper Trimmer or Scoring Tool, score at 3″, turn and score at 3″ on the other side. Or you could say, score at 3″ and 4″, giving you a 1″ space in the center for the box that will hold the candy. Turn the paper to the 5 1/2″ side and score at 1″ on both sides in the same way. Crease and fold on all the score lines. From the top and from the bottom, cut on the 1″ score lines up to the center 3″ score lines. This will make the flaps that will form the candy box inside.

Candy Treat Holder inside folding

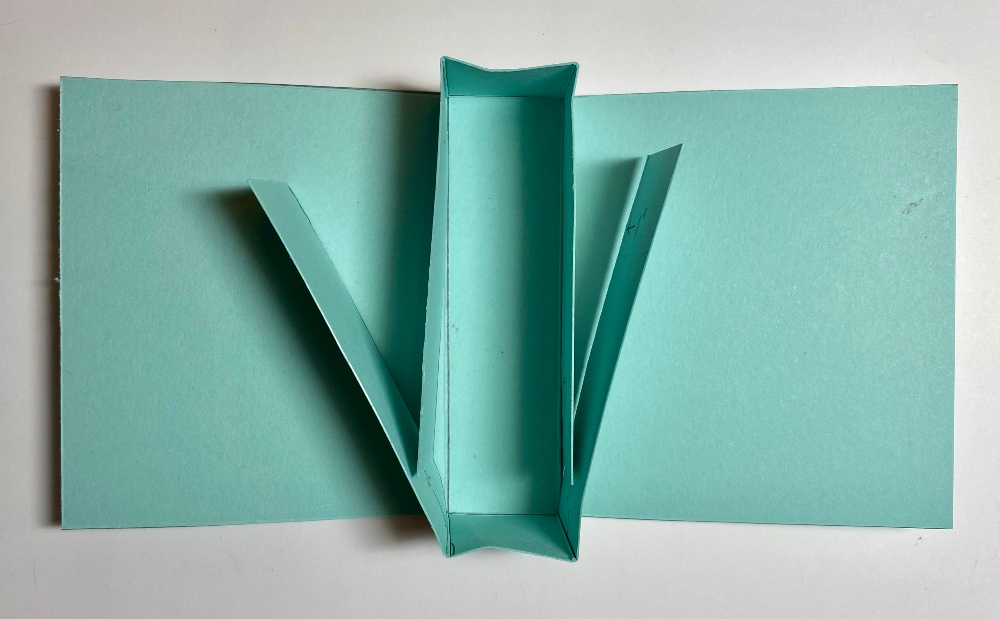
In the photo above, you can see how those side flaps fold inward and make the little inside box to hold the candy. I adhered the flaps together to make the box, being careful where one side was shorter than the other, not to get glue past where it will be exposed. OR you can glue these flaps to the front and back sides of the treat box. I did it the way I did it, but realized I could have done it the other way, too. You will see when you assemble it!

Candy Treat Holder inside folding

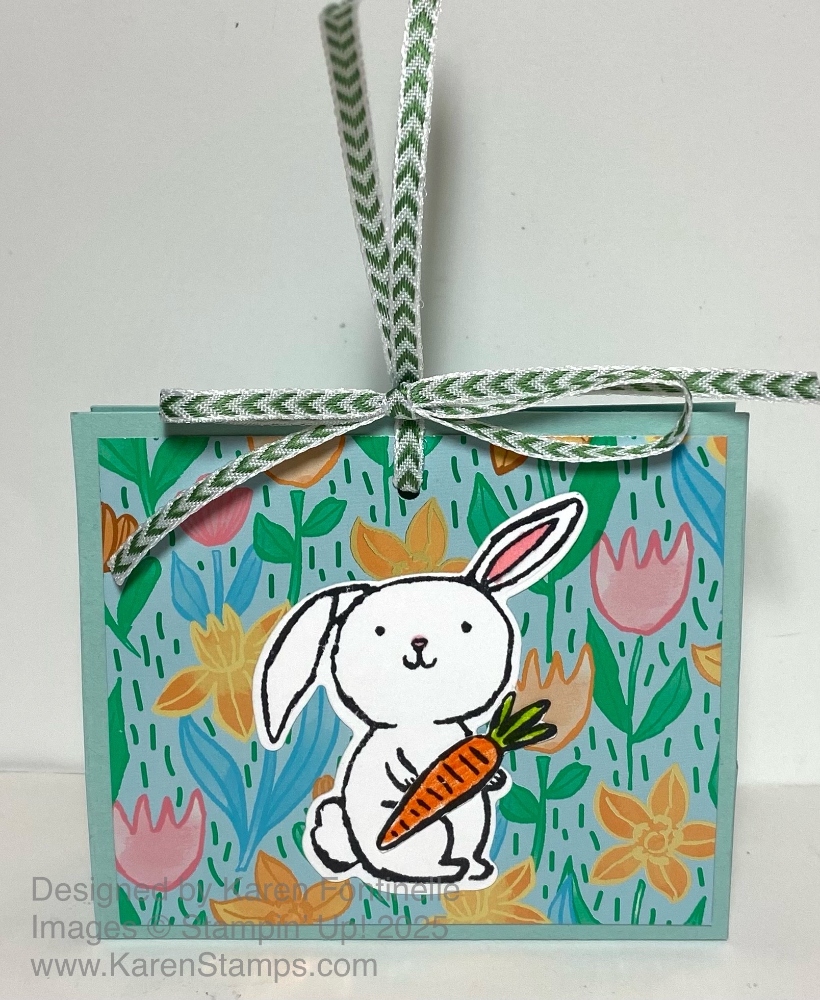
Then decorate the front at least, maybe the back, too, if you like. I added a piece of the Easter Joy DSP with tulips and daffodils. The sides are 3 1/2″ wide x 3″ tall, so I cut the DSP at 3 1/4″ x 2 3/4″. The bunny is stamped with Memento ink on Basic White using the Easter Basket Stamp Set. The carrot is also stamped and colored with Watercolor Pencils (simply because my husband was in the way of my Stampin’ Blends!). I cut it out and had the bunny hold it in his paws!

At the top, I punched a small hole through both the front and back and ran a ribbon through. It’s the Garden Green 1/8″ Chevron Ribbon. Instead of tying it in a bow right there, I left the ends loose, and tied another piece of ribbon around in a box to hold those loose ends. I don’t very often think about doing ribbon like this, but I think it is a cute way to do it. Before you tie it up, though, remember to put your candy treat inside! Or a small gift! Have fun making your treat box!

Easter Joy Candy Treat With Bunny side

Easter Bunny in a Basket Easter Card

Easter Bunny In a Basket Easter Card

There are so many opportunities for making nice Easter and Spring cards using some of the products in the Easter Joy Suite Collection. For this card, however, I used the Pastels Shimmer Specialty Designer Series Paper for the background. You’ll find this paper in the Stampin’ Up! Online Exclusives, but the Easter Joy Suite is in the Spring Mini Catalog.

Since I wanted to use the Pastels Shimmer paper, I used Pool Party cardstock for the card base after trying out a few other colors. The three colors of the Pastels Shimmer Papers are Bubble Bath (which I chose for this card), Lemon Lolly, and Pool Party. These pastels would be so pretty on cards or projects for other occasions. The paper has shimmer on both sides. I used the Forever Plaid 3D Embossing Folder to add some texture to the background. (Right now this embossing folder is unavailable with no date given yet of when it might be expected back in stock. If you are interested, fill in your email on that page to be notified when it is back in stock, or you can check with me, and I’ll see when a date becomes available.)

The basket is diecut with die in the Easter Basket Dies, along with the scallop edge and bow. I used the pink shimmer paper for the bow and scallops. The grass is diecut from Shy Shamrock cardstock. The little tag on the basket is stamped from the Banner Sayings Stamp Set, stamped in Bubble Bath ink. The little pink twine bow is from the current Paper Pumpkin Kit.

The bunny in the basket, the little brown bunny, and the Easter eggs are all stamped with the Easter Basket Stamp Set in Memento ink on Basic White and then colored with Stampin’ Blends. They are diecut with the Easter Basket Dies. For this card, since I was coloring several eggs (I made extras), I just cut those out by hand with my Paper Snips. I thought it was quicker than positioning each egg die over each stamped egg and running it through the machine, since the eggs are so easy to cut out!

The basket is popped up with Dimensionals, and then the white bunny and the eggs are stuck in behind it, but glued flat on the card. I love how the handle is diecut attached to the basket, so we don’t have to deal with a separate piece that has to be attached. If you don’t want the handle, just cut it off.

Easter Sunday will be here in just a little over a month!

Shop Stampin’ Up! Online Here!

Easter Bunny in a Basket Closeup