With all the craziness going on right now with the coronavirus, please join my Stamping With Karen Mailing List since you are probably home, looking for more stamping ideas, and have more reading time! Besides, we all need to feel connected to each other, to be checking in with each other, and just weather this storm together!
If you are on my blog, you will see a red sign-up box in the top left corner where you can simply put your name (or first name) and best email. If you are on your phone, you probably need to scroll way down to get to the sidebar things. OR you can go to my sign up page HERE.
You will receive an email with a link to your free gift from me.
I send out a weekly email every Tuesday afternoon with the latest Stampin’ Up! news and offers plus stamping ideas with a supply list and directions. Even if you never make the project, maybe just seeing ideas will do your crafty heart good! I know it does mine! I’m all about the ideas!! Tomorrow my newsletter will be the “Best of the Blog” and whatever updates Stampin’ Up! has. Sign up today and I will “see you” tomorrow!
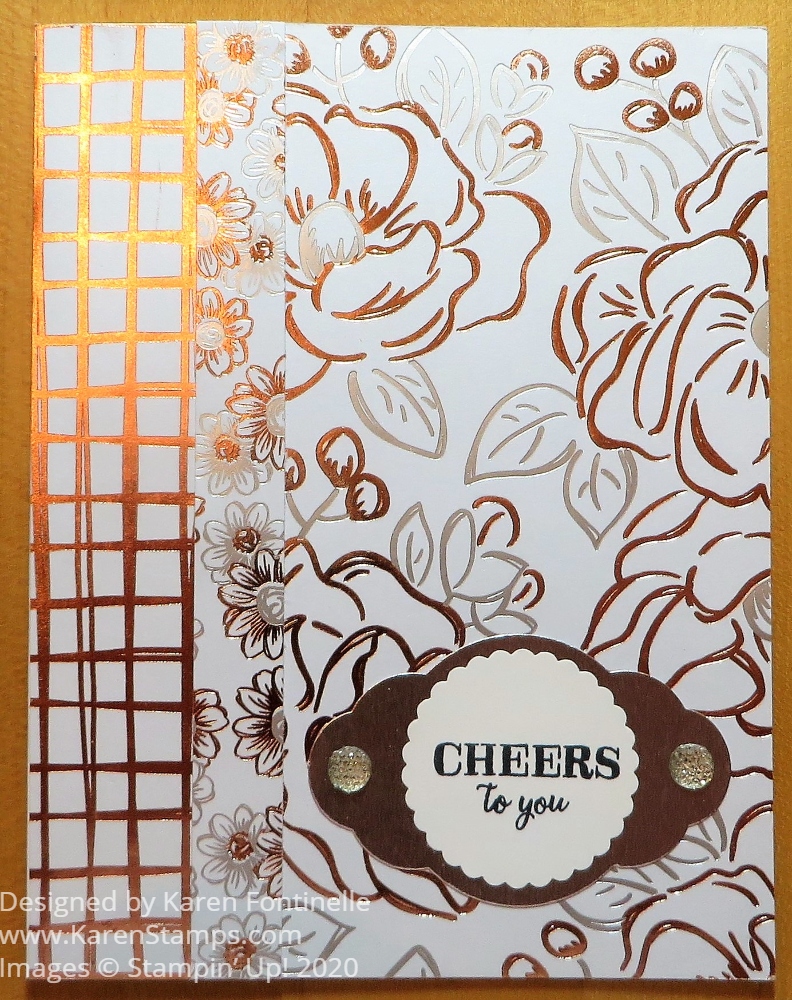
This Flowering Foils Cheers To You Birthday Card makes use of three of the designs of the pretty foil-accented designer series paper! I couldn’t stop! I just thought all these papers looked interesting together! No coloring involved on this card as these papers are pretty enough to stand on their own.
The Flowering Foils Specialty Designer Series Paper is one that you can get FREE during Sale-A-Bration! Sale-A-Bration ENDS on March 31 so there are only about two weeks left! Don’t miss out!
I started with a Whisper White card base but covered it entirely in this designer paper rather than leaving a margin as we normally do. I wanted the plaid-like pattern to be along the side of the card and then the floral pattern as the main design. Normally we might add a bit of ribbon along the seam between the two papers, but on this card, I added a narrow strip of another of the patterns, a busy one hoping it would show up against the other two patterns. So maybe the whole card is a little “busy” and of course, the foil designs are shiny.
I think in the photos with some glare from the foil, it might all look like kind of a crazy card, but it probably looks a little better in person! The Flowering Foils Specialty Designer Paper is a really pretty set of papers to play with so consider putting it on your next order this month! This Flowering Foils Cheers To You Birthday Card is an easy one to make!
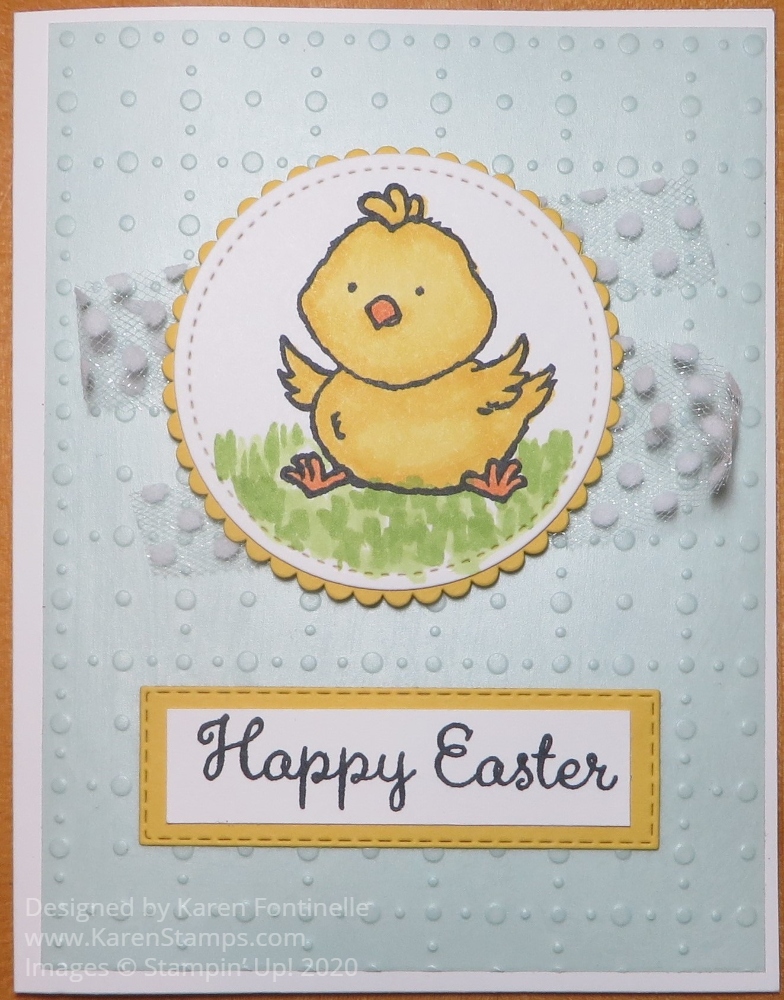
I just ordered the Welcome Easter Stamp Set recently and it is so adorable I had to make this Welcome Easter Yellow Chick Card. It’s actually a great stamp set that is not just for Easter, as you can see from the stamp set photo! It’s even got a greeting in the stamp set for a new baby and a friend. You could certainly make a lot of cute baby cards and projects with this stamp set, so don’t look at it as only for Easter.
In making this card, I wanted to use the new, beautiful vellum paper, available FREE during these last few weeks of Sale-A-Bration! It’s one of the new products available as the 2nd release during Sale-A-Bration. It is called the So Very Vellum Specialty Designer Series Paper. It comes in three colors: Pool Party, Purple Posy, and Soft Sea Foam.
I just used a card base of Whisper White and added a layer of the Pool Party vellum, sponging it on the back with Multipurpose Liquid Glue so the adhesive wouldn’t show through.
The chick is stamped in Memento Ink and colored in with Daffodil Delight Stampin’ Blends Markers and the beak and feet in Pumpkin Pie markers. It’s so fun to color with these Stampin’ Blends Markers! I just love to do it! I also colored in some green grass just for fun using the Granny Apple Green markers.
The greeting is stamped and then layered on a Stitched Rectangle Die in Daffodil Delight. It is just glued on with Multipurpose Liquid Glue or you can use Snail Adhesive.
That’s as easy as it is to make this Welcome Easter Card with the cute yellow chick on the front! Try your hand at making this simple card!
Remember, Sale-A-Bration ends March 31 so what with all the health news out there, don’t forget if you want to treat yourself to a Sale-A-Bration product!
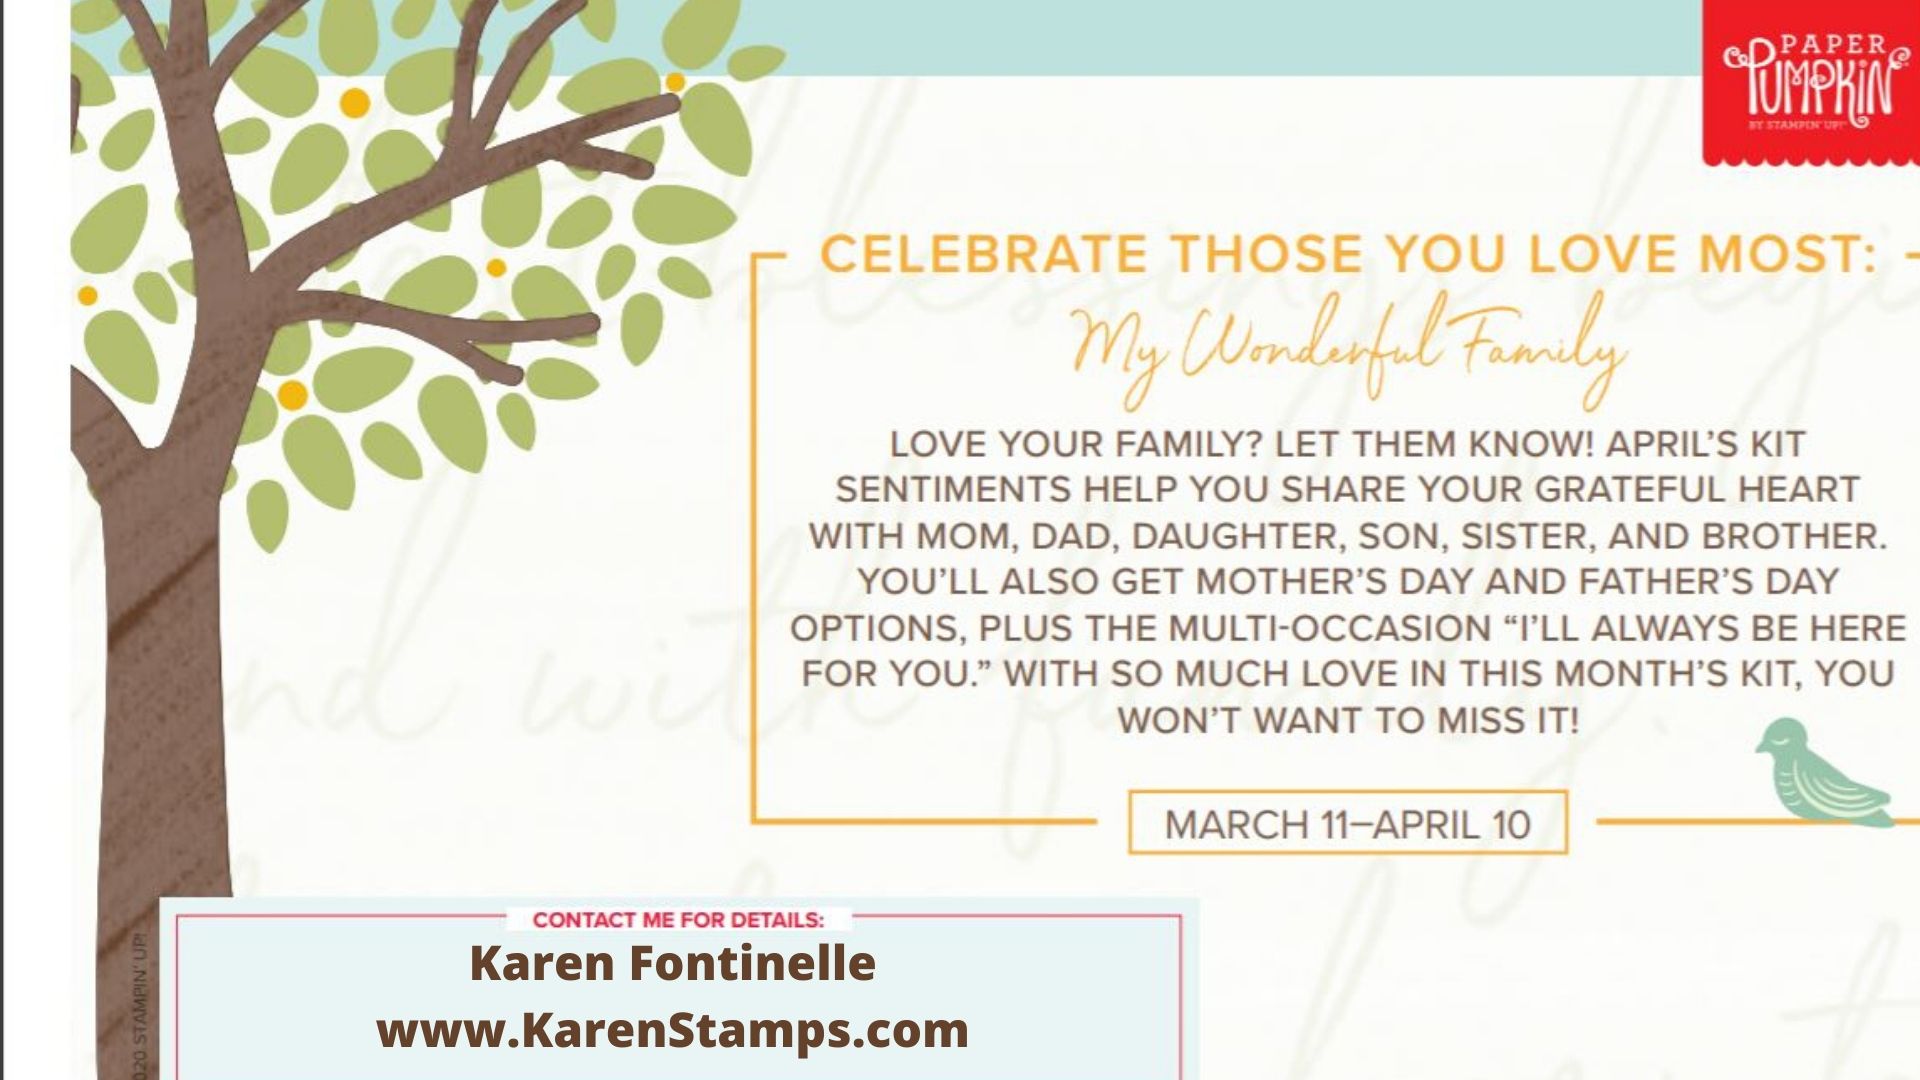
It’s time to celebrate your family with Paper Pumpkin in April and what better time than now! Any time is a good time to let family and friends know how much you care about them, but right now with all the medical news going on, we certainly are thinking about our families and loved ones. Subscribe now to Paper Pumpkin so you will be assured of getting the April Paper Pumpkin Kit that will help you express your feelings to your family.
Also, Mother’s Day will be coming up in May followed by Father’s Day in June. This kit will have options for Mother’s Day and Father’s Day. This kit consists of supplies to make 8 regular size cards. The coordinating colors will be Crushed Curry, Early Espresso, Melon Mambo, Mint Macaron, Pear Pizzazz, Shaded Spruce, Soft Sea Foam. A yellow, brown, pink and greens! That’s all we know so far!
With a 3- , 6- , or 12-month subscription you will earn Sale-A-Bration products! Just add a Prepaid Subscription to your regular Stampin’ Up! order! Then Stampin’ Up! will send you an email telling you how to set up your account and how to add your prepaid code to your account.
Even if you are already subscribed on a monthly basis to Paper Pumpkin, you can still buy a Prepaid Subscription and Paper Pumpkin will use that up first and then resume your monthly subscription.
Each Paper Pumpkin kit comes with all the materials you need to make the project inside. It’s perfect for new crafters, non-crafters, people who don’t yet have any or many stamping supplies and also experienced crafters. It’s perfect for anyone! And it’s perfect for ordering an extra kit to give as a gift or preferably to sit down and make your kits together!
Sign up for Paper Pumpkin today (or certainly by April 10th!) and you’ll be ready to make cards to celebrate your family with Paper Pumpkin!
Here’s another springtime card for you, the Thoughtful Blooms Punched In Color Flowers Card. Almost everything on this card is free with a qualifying purchase during Sale-A-Bration. In fact, the inspiration for this card started with a sample in the Sale-A-Bration Brochure.
In case you are new and have never heard of Stampin’ Up!’s big promotion called Sale-A-Bration, this is a favorite but is going to end on March 31. With every $50 Stampin’ Up! purchase, you can choose a free item in the Sale-A-Bration Brochure. There are some higher value items, like the Small Bloom Punch that I used for this card, that are free with a $100 purchase. So with a $100 Stampin’ Up! purchase, you can choose either one $100 Sale-A-Bration item or 2 Sale-A-Bration items designated with a $50 emblem. No limit! And once you reach $150, you also get to choose Stampin’ Rewards!
The Thoughtful Blooms Stamp Set, free with a $50 purchase, is the stamp set I used to stamp the flower stems and leaves and greeting. The flowers were stamped with Versamark Ink and then punched out with the Small Blooms Punch. Before I stamped the stems, I cut a strip of the Lily Impressions Designer Series Paper, also free with a $50 purchase in the Sale-A-Bration Brochure! It is a green backside of one of the lily designs and looks just like someone painted it with a watercolor brush. I thought it would be an interesting representation of grass!
To finish off the flowers, which were popped up on Mini Dimensionals, I added a Holiday Rhinestone Basic Jewel on each one. You can still purchase these, which came out in the Holiday Catalog, under the Holiday Favorites Category in the Online Store.
The sentiment also comes from the Thoughtful Blooms Stamp set and has two rhinestones added also. All you have to do is change the greeting for another occasion because you can use a floral card for lots of things!
If you are interested in these In Colors, I would suggest ordering what you need, particularly ink refills NOW before the panic begins when the retirement list comes out. Sometimes the In Colors sell out quickly.
Also, don’t forget today is the last day to subscribe to Paper Pumpkin to get the March paper-crafting kit which has notecards to make and a very cute box! JOIN PAPER PUMPKIN HERE!
Check your shopping list and see how many items you can get FREE during Sale-A-Bration to make a card like this Thoughtful Blooms Punched In Color Flowers Card!
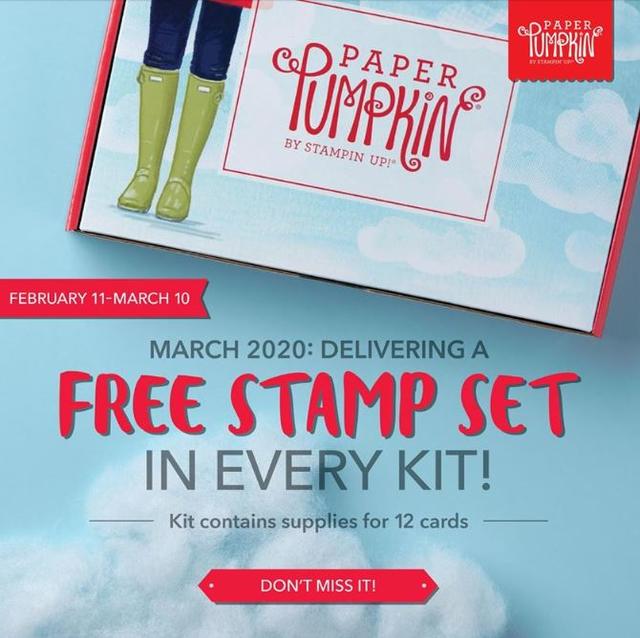
There’s a FREE stamp setin the March Paper Pumpkin 2020 Kit to celebrate Paper Pumpkin’s 7th Birthday! And it’s the last few days to get your March Paper Pumpkin Kit! You must subscribe by Tuesday, March 10 or set up your account with your Prepaid Code with a Prepaid Subscription. Don’t miss it! And look at the cute box!!!!!
Some of the most affordable stamp sets from SU! retail for $15-$20 USD, plus shipping. With March’s Paper Pumpkin kit you get 2 stamp sets (so a $30-$40 value) plus card bases, envelopes, ink spot, embellishments, adhesives, etc. and shipping is included!
This March Kit will be notecards, 5″ x 3 1/2″. They are perfect for short notes to friends and loved ones!
If you get a Prepaid Subscription, you just add it to your regular Stampin’ Up! order, especially if you are close to earning something for Sale-A-Bration or Stampin’ Rewards. Even if you already have a monthly subscription, you can order a prepaid subscription, put in the code they will email you in your account, and Paper Pumpkin will use the Prepaid months first and then revert back to your monthly subscription. Ask if you have any questions!
Paper Pumpkin has only gotten better and better through these 7 years so if you previously subscribed and dropped you might want to give it another try!
It’s time to Change Your Clocks For Daylight Savings Time Tonight! You know what that means…..one less hour to stamp! Spring is coming so you must “spring forward” before you go to bed tonight or officially at 2:00 am tomorrow. I suppose in the digital age now we don’t all have this many clocks to change twice a year, or at least if you are of a younger age! My kids say, “What clocks?” when I ask if they changed their clocks! Their phones and computers automatically update and that’s all they need.
I remember when they used to do a story on the news about daylight time and they would go to a clock shop and show how many clocks the proprietors would have to reset!
Daylight Savings Time seems to be controversial these days. But whichever side you’re on, I look at it as a harbinger of Spring.
Do some extra stamping today to make up for that hour you’re going to lose tonight!
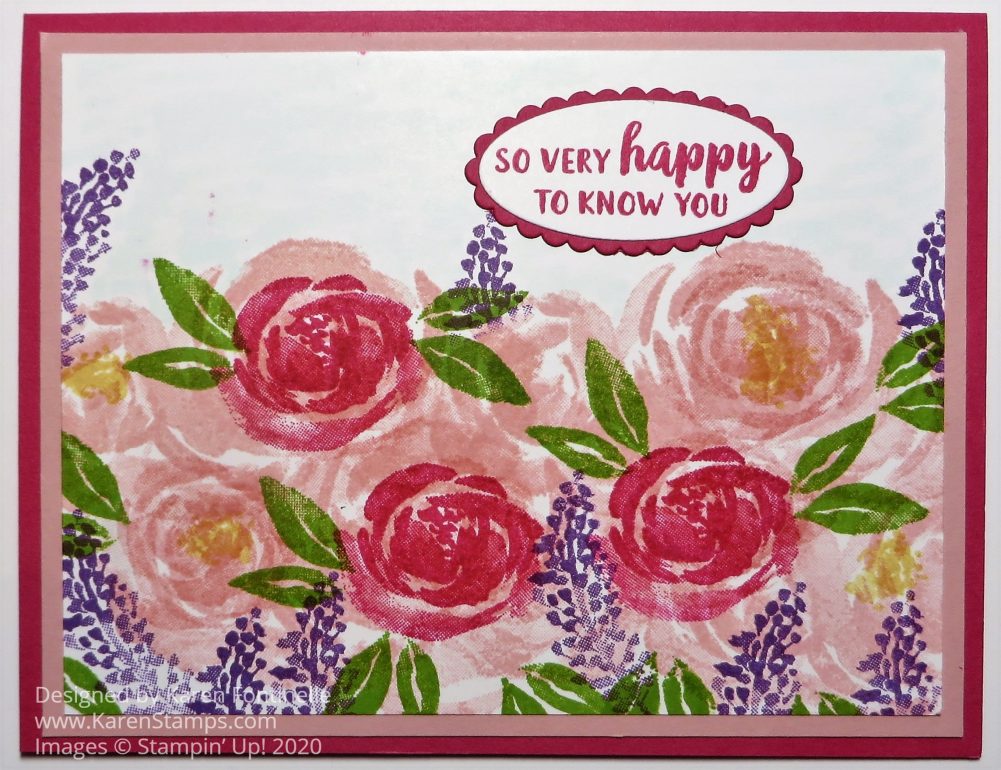
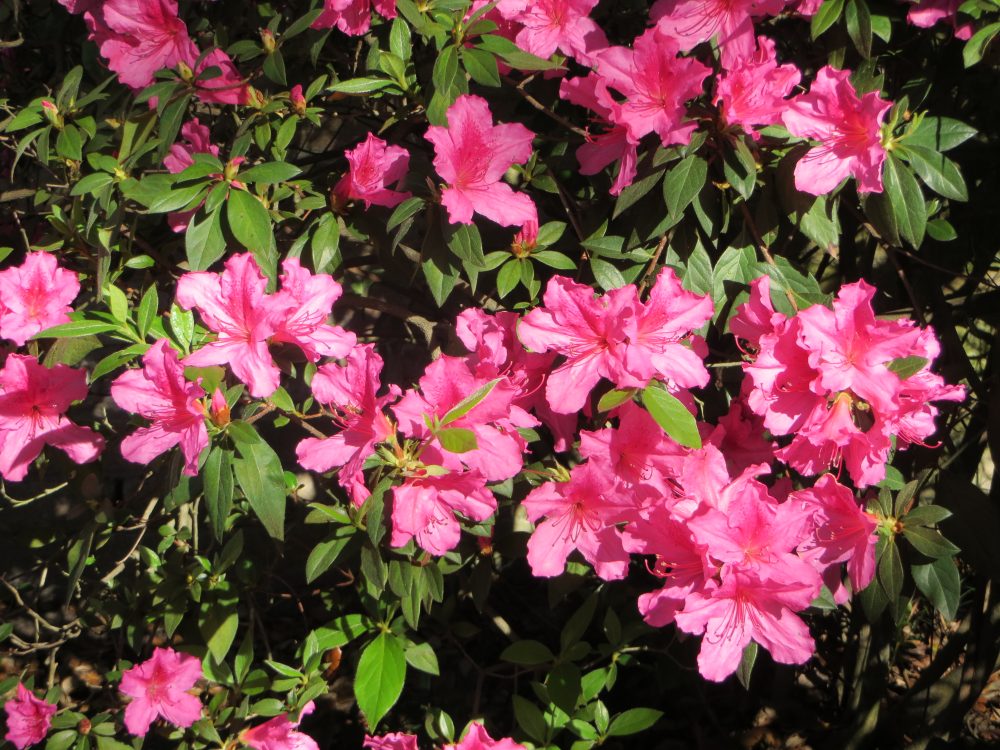
This weekend begins the River Oaks Garden Club Azalea Trail 2020 that we always like to go to so I made this Beautiful Friendship Pink Flowers Card to commemorate what we will likely see on the Trail. Actually, our yard is looking like this with our azaleas and even our Bluebonnets blooming. However, our home and garden aren’t quite like the ones we will see on the Azalea Trail! Those homes and gardens on the Azalea Trail are beautiful and today the weather should be beautiful!
Some people have been dusting off a stamp set from the Stampin’ Up! Annual Catalog that I hadn’t seen in a while but makes beautiful cards really with just stamping unless you want to make it fancier. Sometimes I forget if I actually own it or wish I had it! It’s on my shelf, I own it, thank goodness! It’s the Beautiful Friendship Stamp Set and has beautiful flower images and very nice sayings. It made me think of the flowering azaleas in our yard with various shades of pink (even on the same bush somehow!) and the bluebonnets blooming in the backyard.
For this card, I started with a card base of Melon Mambo, with a layer of Blushing Bride underneath the Whisper White top layer. I simply stamped the large grouping of blooms in Blushing Bride a couple of times in two rows. You can also overstamp, with the single flower stamp, in the same color to add more layers on the flower as I ended up doing to fill in some of the white space in between the petals. Then I stamped that smaller flower image in Melon Mambo because our azalea bushes sometimes have a few blooms of a different lighter or darker color than what the bush is supposed to be! For the bluebonnets, I stamped the springs of tiny flowers in Gorgeous Grape ink. The leaves are stamped in Granny Apple Green ink. With one of the smaller stamps, I added a bit of So Saffron to the centers of some of the flowers. I like the look of a bit of yellow on the card.
The sentiment is from the same Beautiful Friendship Stamp Set. I cut it out with the Layering Ovals Dies as well as the Melon Mambo scalloped oval. Before I added the sentiment, I colored in the background very lightly with my Light Pool Party Stampin’ Blends marker just to look a little like blue sky, although I think it washed out in the photo.
If you wanted to add anything to this card, you could color over some of the flowers with the Clear Wink of Stella Glitter Brush to add a little bit of shimmer. You could also, or separately, add a few pretty sequins mixed in with the flowers.
Here’s a card I made last year, even simpler, with the Beautiful Friendship Stamp Set. Add this stamp set to your Stampin’ Up! order and get closer to earning Sale-A-Bration rewards!
I hope this Beautiful Friendship Pink Flowers Card makes you think of spring wherever you live, whether you are experiencing it or not because spring is coming!
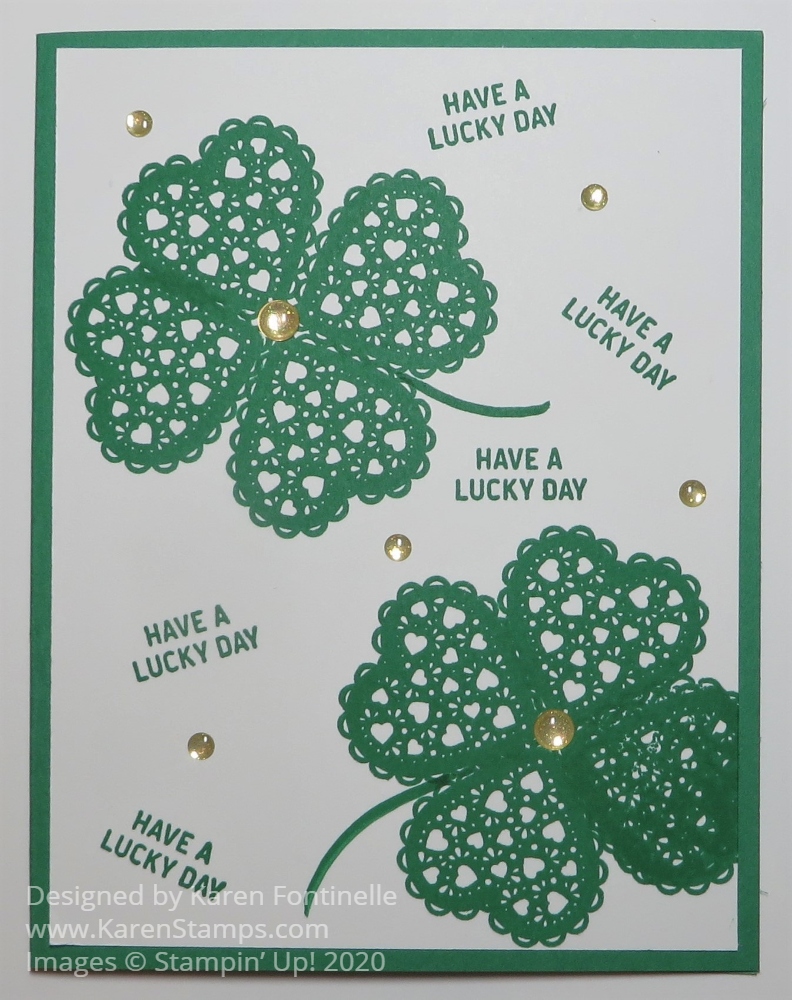
Get those heart stamps out again and let’s stamp a St. Patrick’s Day Shamrock Card! Heart stamps are good for lots of things besides Valentine’s Day and now you see how you can use them for St. Patrick’s Day. You can use any heart stamps you have for different looking shamrocks.
For this shamrock card, I started with a base of Call Me Clover Cardstock. This cardstock is one of the current In Colors that will be retiring in May before the new In Colors come in. TheseIn Colors have had their two-year run. If you need any of them, refills, ribbons, anything with these In Colors, it would be smart to order them now before people rush to get them at retirement time. And if you order in March, you can take advantage of Sale-A-Bration.
It was fun to basically “just stamp” on this card! I used the Heartfelt Stamp Set in the Occasions Mini Catalog. Just stamp four of the hearts to make a shamrock, or I have seen just 3 heart leaves to make a shamrock also. It’s easier than it used to be now that we have photopolymer stamps that you can see through. For the stem, I simply used a Blender Pen and picked up some of the Call Me Clover ink in the lid of the ink pad and drew on the stem. You could use a marker or just cut a thin stem.
Instead of just stamping a greeting on some kind of layer, I decided to just stamp the sentiment randomly in between the shamrocks on the card front. The “Have a Lucky Day” phrase is from the Itty Bitty Greetings Stamp Set. That’s such a great set to own because you can almost always find a good sentiment to use for your card.
Of course, I wanted to have a little gold on my card for St. Patrick’s Day so I chose the Gold Glitter Enamel Dots. You will find these in the Stampin’ Up! Annual Catalog back in the Embellishments section. First I just put small dots around randomly on the card, but then I also thought the center of each shamrock could use a larger gold one. You could also color a dot with a marker to match the shamrock, but I liked the gold in this case.
This card was very simple to make, quick and easy. Plus a good way to use our heart stamps! Don’t think of your heart stamp sets for just Valentine’s Day, keep them handy for other occasions like this St. Patrick’s Day Shamrock Card with St. Patrick’s Day coming up on March 17th!
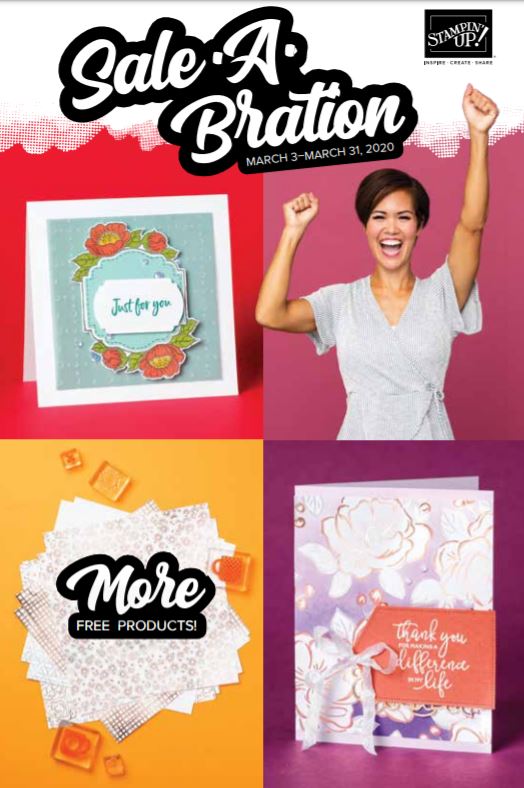
Today is the day…..More Sale-A-Bration Choices! Second Release Today! Beginning today, there are a few more choices for you with a qualifying purchase that you can choose FREE during Sale-A-Bration. And remember, this is our LAST MONTH of Sale-A-Bration! Don’t delay and miss out!
The previous products, as shown in the original Sale-A-Bration Brochure, are still there for you to choose as well.
Two products are sold out:
Metallic Baker’s Twine & Sequins Combo Pack
Kerchief Card Kit
Here are the new 2nd release items you can choose from:
Enjoy this Stampin’ Up! video about the Flowering Foils Designer Series Paper! I think it will be a favorite.
This next video shows the Rise and Shine Stamp Set, which you can use with the Cup of Cheers Dies that were in the Holiday Catalog and that you may already own! You’ll find them in the Holiday Favorites category in the Online Store.
And another new 2nd Release product is the So Very Vellum Specialty Designer Series Paper. Watch this video for ideas!
There are a fair number of products overall that are backordered for awhile and a few that are “unorderable” right now. Stampin’ Up! did comment that with the slowdown in Chinese factories and difficulty shipping products right now with the virus situation that they are doing all they can but it might be difficult for awhile to keep everything in supply. I would suggest that you order as soon as possible this month, partly for the normal situation of popular items being sold out, but also other items could go on backorder because of the supply situation.
Have fun shopping and check out these new releases! Just ask if you have any questions about the Second Release Sale-A-Bration products or backorders or anything!
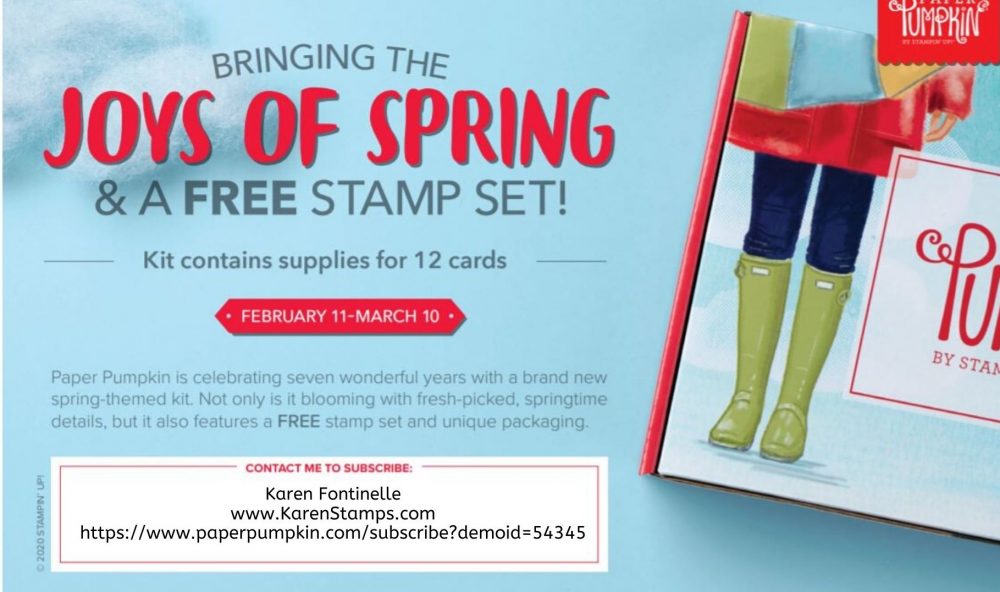
Paper Pumpkin has been around for seven years now and it just keeps getting better! If you aren’t familiar with Paper Pumpkin, it’s a monthly subscription papercrafting kit from Stampin’ Up! Once you sign up by the 10th of any month, that month’s kit will be mailed to you by mid-month and you will receive a fun craft kit all ready for you to sit down and have some creative fun! And this March kit has a FREE extra stamp set to celebrate its 7th birthday!
And look at the ad above! Do you see the Paper Pumpkin box off to the right with the raincoat and boots?? That’s the BOX! So cute!!
During Sale-A-Bration, you can add a Paper Pumpkin PREPAID subscription to your regular Stampin’ Up! order and perhaps earn a FREE Sale-A-Bration product or even reach Hostess Rewards. Stampin’ Up! will send you an email with a code to use when you set up your Paper Pumpkin account and you will be set. Even if you already subscribe monthly, you can buy a Prepaid subscription on your order, put the code into your account, and your monthly subscription will resume after your Prepaid subscription is used up!
Paper Pumpkin is for everyone, from experienced stampers and crafters to newbies with no supplies! With your first kit, you receive a special Paper Pumpkin acrylic block on which to mount your stamps, and then the kit contains all the materials you need for the project, even including adhesives! You get a stamp set, ink spot, instructions, materials, and even a link to a video to watch online. Anyone can make these kits!
Experienced stampers enjoy getting a kit all ready to go and sometimes even like making alternative projects with some of their own stamping supplies. Whatever you like to do!
Most of the Kits are cards, but can be other projects like a mini-album, home decor piece, holiday favors, tags, bags, calendar, garland….who knows?! Last fall Stampin’ Up! even gave us ideas for turning the BOX into a haunted house! I look at Paper Pumpkin as a fun gift I give myself that I look forward to every month!
Paper Pumpkin kit projects used to be top secret but I think they have found people like at least a little clue to what the kit will be. And to celebrate seven years of Paper Pumpkin, THIS kit comes with an EXTRA FREE STAMP SET!
Here is the information about this March 2020 Kit:
Kit contains supplies for 12 cards and envelopes (4 cards of 3 designs) Notecard size: 5″ x 3-1/2″ Envelope size: 5-1/8″ x 3-5/8″
Coordinating Colors: Balmy Blue, Basic Gray, Calypso Coral, Grapefruit Grove, Gray Granite, Pear Pizzazz, Petal Pink, Shaded Spruce, and So Saffron
About the FREE Stamp Set: The additional stamp set is a great value and coordinates with the March kit design; however, you do not need it to complete the March cards. The additional stamp set is a 4″ x 6″ size, which is larger than most Paper Pumpkin sets and is designed for use on a variety of crafting projects.
Subscribe for the March kit at paperpumpkin.com from February 11–March 10. Then choose my name, Karen Fontinelle, as your Demonstrator. Or click on my personal link below!
Supplies may be limited toward the end of each subscription period.
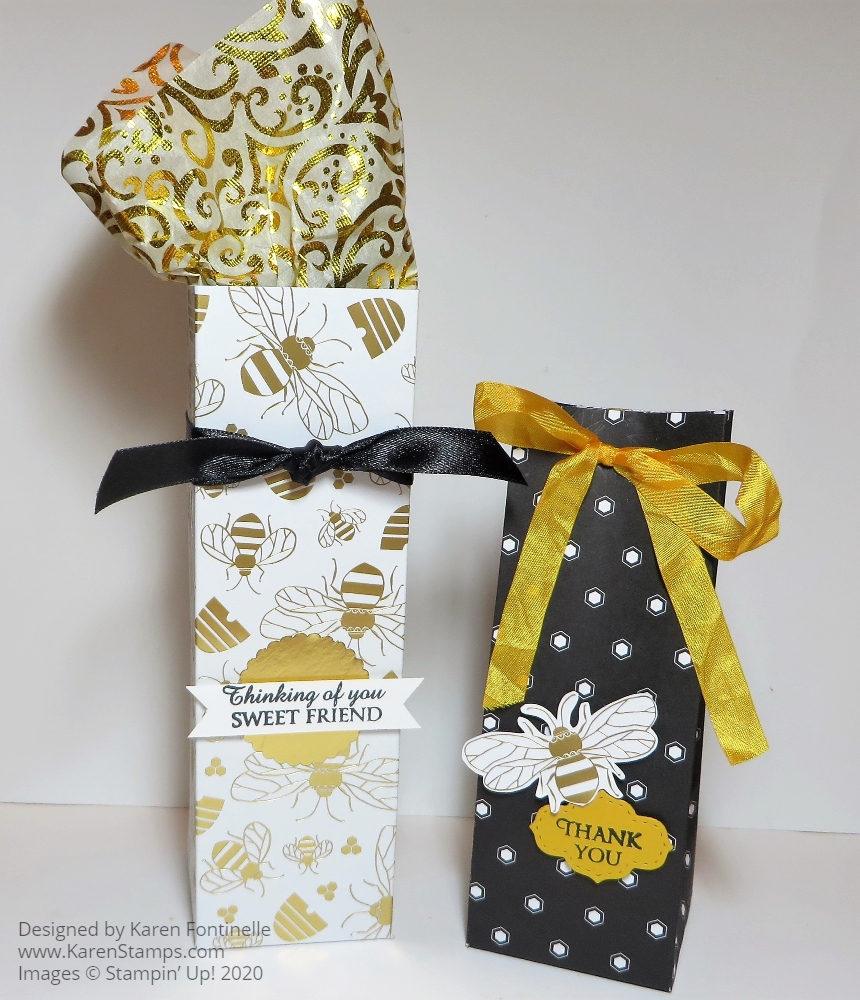
Make these easy Golden Honey Bees 2-4-6-8 Gift Boxes using the Golden Honey Specialty Designer Series Paper available during Stampin’ Up! Sale-A-Bration 2020! You never know when you might need a little gift bag or box at the last minute so make up a few of these or learn how to make them quickly and easily so you can personalize your gift!
Although I am not a fan of bees and bugs and insects because heaven knows, we have way too many of everything down here in the tropics of Houston, Texas in the summertime! But I liked this designer paper with its gold foil accents and it’s black, white, and gold stripes and prints. You can make lots of pretty things with this paper even if you are not into bees!
I first chose the paper pattern with the gold foil bees on it to make a box. The opposite side of the paper was a black and white dotted pattern so I decided to make a box with each side of the paper. They are both the 2-4-6-8 box but one is shorter.
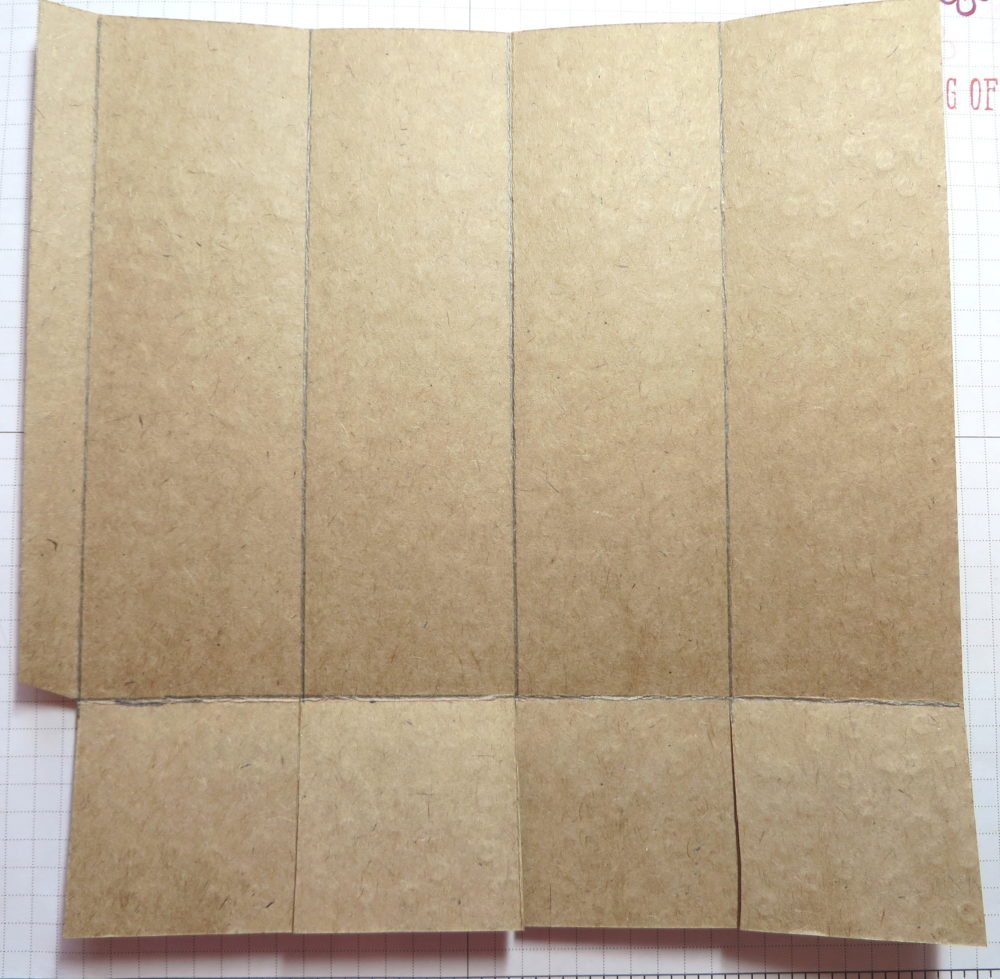
Here are the basic instructions on how to make the 2-4-6-8 box: It’s very easy and has been around a long time. No pattern required!
The first box on the left with the gold foil bees and hives is made with an 8 1/2″ x 8 1/2″ piece of paper. You can vary the measurements depending on the size you want your box. If your paper has a pattern, decide where the bottom of the box is. Score at 2″ on one side which will become the bottom tabs.
Turn the paper the other way and score at 2″, 4″, 6″ and 8″……hence, the 2-4-6-8 box! That will leave a 1/2″ edge on one side of the paper. This is where you will put a strong adhesive later on.
Now that the box is scored, hold the paper with the bottom portion at the bottom and cut up to the horizontal score line on each score line to make the bottom tabs. That little 1/2″ piece on the bottom should just be cut off.
Crease all the score lines and see how the box will go together.
Apply a strong adhesive along that 1/2″ edge, preferably Tear & Tape or Multipurpose Liquid Glue. If you lay the box flat on the table, you can just fold the other side over to adhere.
Figure out where the backside of the box will be so the seam doesn’t show from the front. Fold the back tab at the bottom in and fold the other tabs in as well. If they don’t line up perfectly, just trim with scissors. Use a little bit of glue to hold the tabs in place for the bottom of the box.
Put your gift inside, punch holes in the top for ribbon to tie shut or leave open, add a handle, whatever you like. Embellish the box if you like.
You can vary the measurements, making the box shorter or taller. The bottom tabs need to be the same width as the side panels of the box. Then you need that little 1/2″ strip at the edge of the paper so you have to consider that math as you figure out the sizes.
Here is a diagram of the scored and cut paper:
For the second box, I decided to make it a little shorter. The paper is still 8 1/2″ wide but I cut it down a little to 7 1/2″. The bottom is still scored at 2″ and then you turn the paper and score at 2″, 4″, 6″, and 8″. So the box is the same, just shorter.
You can close up the top of the box by punching holes in the top and tying closed with ribbon. I used the Crushed Curry 3/8″ Crinkled Seam Binding Ribbon. For the greeting, I stamped “Thank You” on Crushed Curry Cardstock from the Honey Bee Stamp Set and die cut it with the smallest die in the Stitched So Sweetly Dies. In keeping with the bee theme, I simply cut out a gold foil bee from the designer paper. If you like the Honey Bee Stamp Set and the Detailed Bee Dies, you can order the Honey Bee Bundle and save 10%! Spend $50 on your order and get the Golden Honey Specialty Designer Series Paper FREE during Sale-A-Bration.
For the taller box with the gold foil bee pattern, I left it open and happened to find some pretty gold foil tissue paper to put inside! I simply tied a Black Satin Ribbon around the top portion and tied a knot, but you could do a bow. The greeting is stamped from the Honey Bee Stamp Set on a narrow strip of Whisper White and layered over a Gold Foil circle punched with the 1 3/8″ Scallop Circle Punch.
Have fun trying your hand at making these Golden Honey Bees 2-4-6-8 Gift Boxes and other variations!
Only one more month of Sale-A-Bration left! This is Stampin’ Up!’s biggest promotion of the year and now we are 2/3’s of the way through! To keep things fun, Stampin’ Up! has a few new products they are releasing on Tuesday, March 3, 2020, that you will be able to choose from when you have a $50 purchase and a few with a $100 purchase! Of course, you can still choose from the products in the Sale-A-Bration Brochure with the exception of two things that are already sold out:
Metallic Baker’s Twine & Sequins Combo Pack
Kerchief Card Kit
Get your shopping list ready and if you want the maximum number of Sale-A-Bration choices, wait until Tuesday, March 3 to order from Stampin’ Up! and take advantage of the Sale-A-Bration 2nd Release!
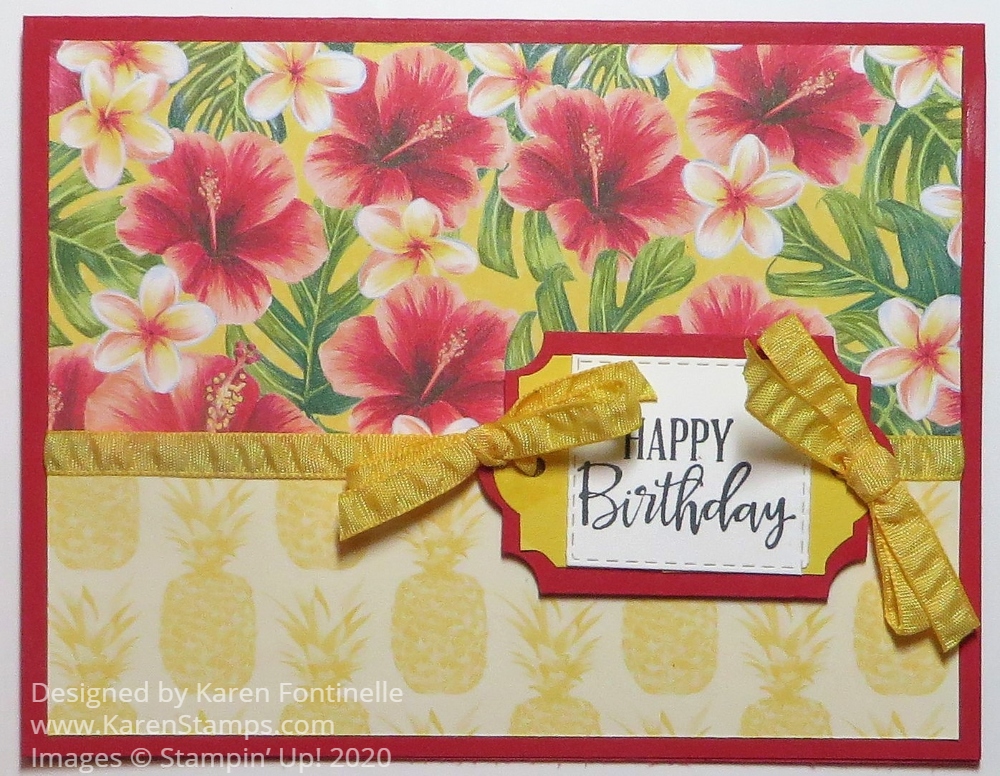
I wanted to make a quick card and the design I used for this card, Easy Tropical Oasis Birthday Card, is almost always a very quick and easy one to use! This Tropical Oasis Designer Series Paper has such gorgeous colors and floral patterns in it. I just flipped this floral pattern over, and the pineapples were on the opposite side! I saw some tiny pineapples at the grocery store one day and thought of this whole Tropical Oasis Suite!
One of the colors that go with this paper is Real Red! My favorite color, so I could not pass it up! So Real Red it was for the card base. Without measuring, I cut out a longer rectangle than I needed because I wanted to have a little overlap of the two papers so that I could glue them together. In the end, the two pieces adhered together measured like any card layer, 5 1/4″ x 4″.
I always like to cover the seam of where two papers meet, so I used the Daffodil Delight 1/4″ Ruched Ribbon. I just took a longer strip than the card and adhered it around on the back of the card layer. After I made the greeting, I use the ribbon to tie a bow on each end of the layered background for the greeting.
The greeting is stamped from the Peaceful Moments Stamp Set. You could choose lots of other greetings or sentiments with this card design and paper. I layered it on Real Red paper punched with the. Everyday Label Punch. Then I trimmed down another punched label of Daffodil Delight and cut it in half so I could make it smaller to fit under the greeting. I didn’t do a perfect job but I was trying!
The greeting itself is tricky to explain. I tried something for the first time. I used a Stitched Rectangle Die to cut it out. As you can see, the rectangle dies are longer than I wanted my greeting to be. I cut only part of the rectangle by not putting my cutting plate over the part of the die I did not want to be cut. Then I switched the die around, still lining it up with the die-cut outline on the sides (it just sticks back on the same lines) and just put the cutting pad on the end that now needed to be cut to make the greeting shorter and only rolled over that end. That all produced the smaller rectangle greeting! I didn’t take pictures because I wasn’t even sure I was doing it right! But I did!
This card design is always great to keep in mind when you want an easy card that still looks great. No fancy folds or directions to follow. Just add some designer paper to all or part of a card base, in either direction, one side of paper or two, add a ribbon or embellishment or not, then add a greeting for whatever occasion. Here’s another card I made that is similar, using a whole layer of designer paper with a strip of a different pattern going across under the greeting. When you have designer paper as bright and pretty as this, almost any card design you use like this Tropical Oasis Birthday Card will turn out beautiful.
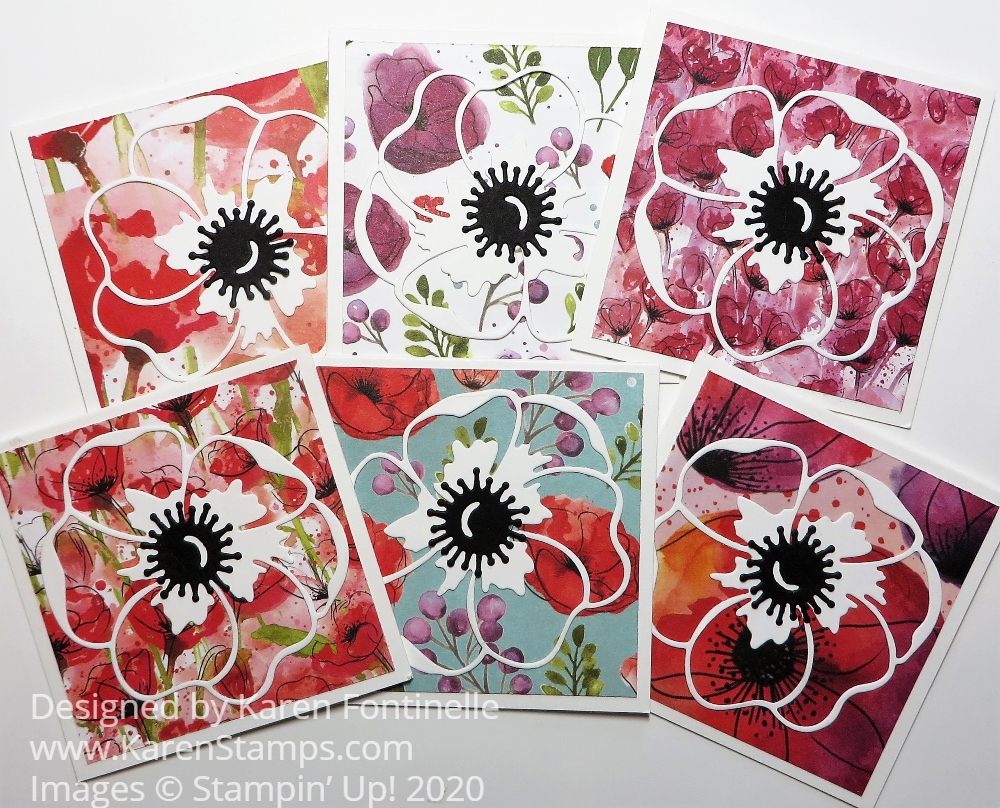
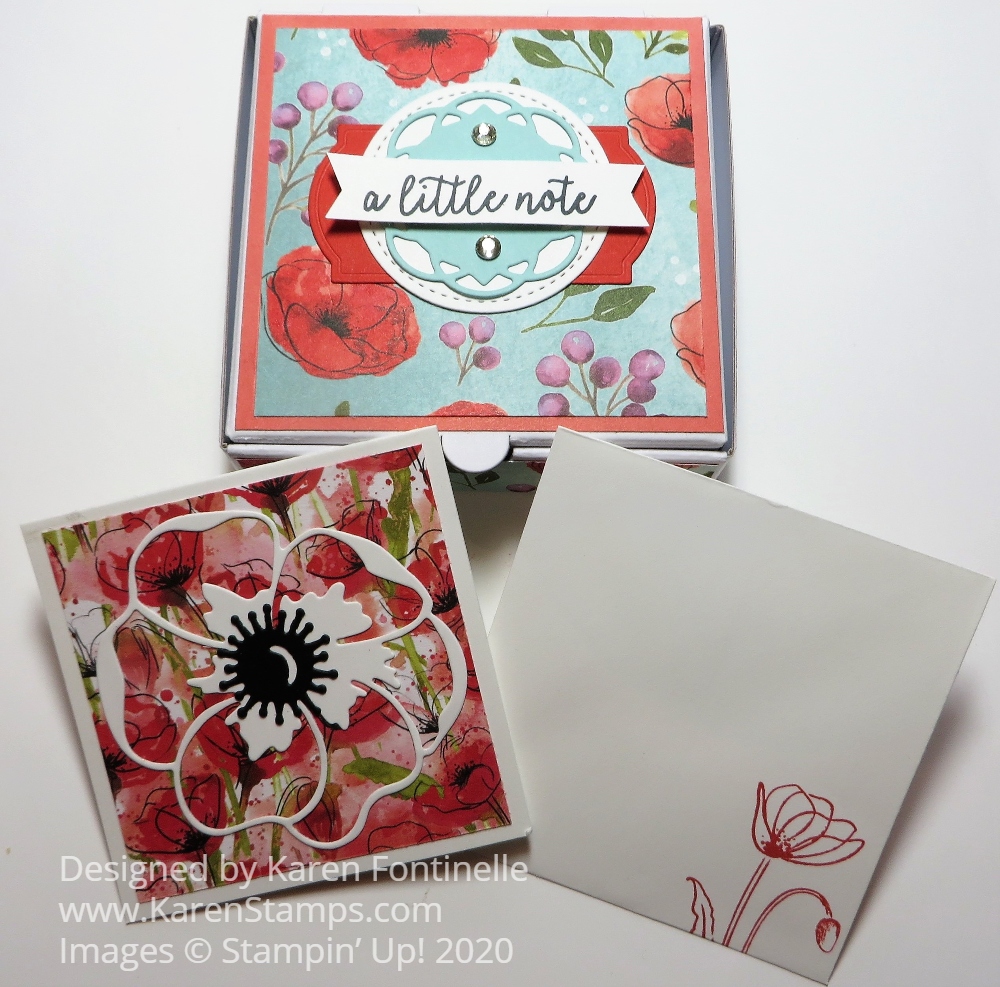
The other day I posted about decorating one of the Stampin’ Up! Mini Pizza Boxes and today I am showing you the Peaceful Poppies Pizza Box 3″ x 3″ Notecards I made to go with the box! There were really so many choices of how I could have decorated the notecards, but using a Whisper White poppy die-cut was what I ended up with.
You can make your own 3″ x 3″ cards (or you may have some old ones in your stash!) by cutting 6″ x 3″ cardstock, folded in half. You can purchase envelopes at Stampin’ Up! in the Online Store.
To make these little cards, I just cut different patterns of the Peaceful Poppies Designer Series Paper into layering pieces of 2 3/4″ x 2 3/4″. I wanted that pretty paper to show through, so I cut the large poppy die from the Poppy Moments Dies, plus the small black center die-cut for the flower. I just used tiny dots of Liquid Multipurpose Glue (I mean TINY!) to adhere the white poppies. You could even add some Peaceful Poppies Sequins if you wanted to.
For fun, I also stamped the inside of the little notecards with a stamp in the Painted Poppies Stamp Set.
And of course the envelopes!
You could even make up a few sets of these Mini Pizza Boxes and notecards and have them on hand for gifts. Who wouldn’t love to receive this little gift?!
If you want details on how I decorated the Mini Pizza Box, check out my blog post HERE from the other day. You can also purchase Gold Mini Pizza Boxes. Both kinds of boxes are food safe so you can even put a cookie or brownie or candy inside! These boxes are great to have on hand. They store flat so they don’t take up any space. All you have to do it pull one out and decorate it for whatever occasion and put something inside. Use this Peaceful Poppies Pizza Box 3 x 3 Notecards idea and use it for your inspiration!