Tag Archives: Everyday Label Punch

Peaceful Poppies Birthday Card in Poppy Parade

Peaceful Poppies Birthday Card in Poppy Parade

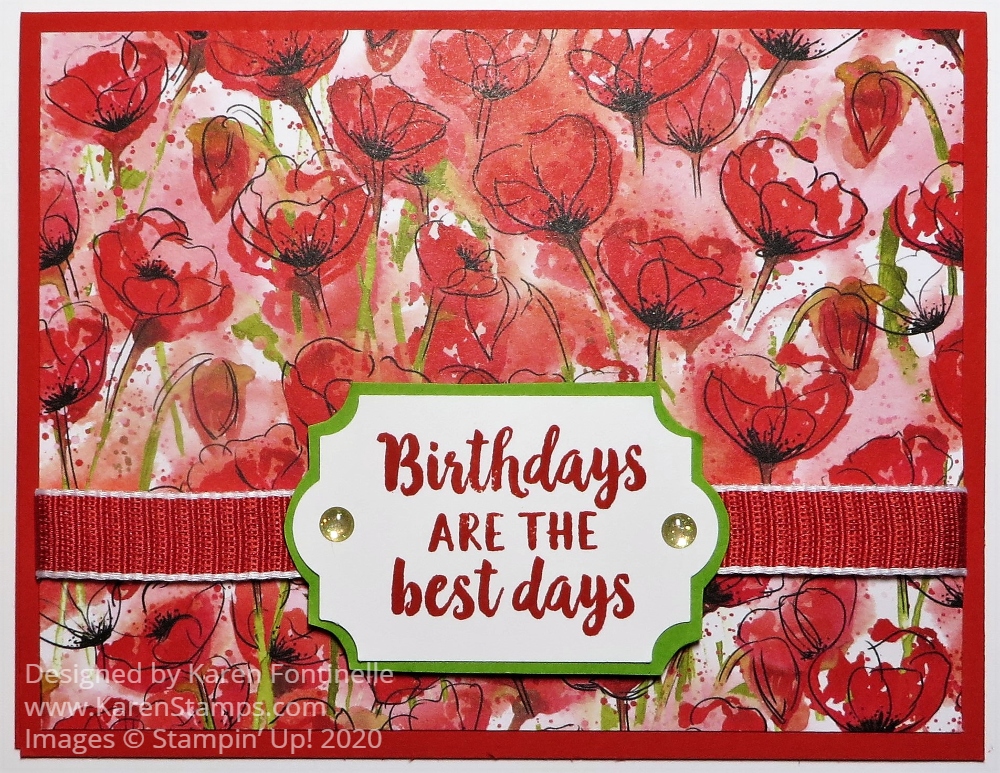
Make this easy and bright Peaceful Poppies Birthday Card in Poppy Parade with this great floral paper! It’s sure to brighten someone’s day and all you have to do is change the greeting for the occasion.

It’s funny sometimes how a card comes to be. I was making another project which I will show another day and in my package of Poppy Parade paper, I already had a folded card base. The Peaceful Poppies Designer Series Paper was also on my table that I had used on the other project and this particular paper jumped out at me. So I thought why not just go ahead and make another card and make it rather quick and easy!

All I had to do was cut a 4″ x 5 1/4″ piece of the designer paper I liked and wrap a piece of ribbon around it before adhering to the card base. The ribbon I used is the Poppy Parade 1/2″ Textured Weave Ribbon which is a really nice, soft ribbon that is easy to use even though it is wide and looks like it would be heavy.

The greeting is stamped in Poppy Parade Ink and is from the Beautiful Friendship Stamp Set. I made a card with that stamp set recently because sometimes we forget about the great stamp sets and products in the Stampin’ Up! Annual Catalog when we are glued to the extra Mini Catalogs of the season. I punched it out with the Everyday Label Punch. The problem then is what to layer it on! I tried various die cuts and things and finally settled on just adhered the punched piece to a piece of Granny Apple Green Cardstock and then just cut around it with Paper Snips! It’s not perfect but you can do it and it doesn’t have to be perfect. What person who gets the card is going to say, “I wish she had cut that curve better!”?

For a bit of embellishment I added two Gold Glitter Enamel Dots on the greeting. You could also add some sequins to the card or tie on ribbon on each side of the greeting.

If you are staying at home to avoid getting sick, this is a good time to make a stash of cards to keep on hand, but also to send! Just think how anxious we all are and how receiving a card in the mail will brighten someone’s day like nothing else will. And if it comes from YOU, that makes it the most special! Use this design of my Peaceful Poppies Birthday Card in Poppy Parade in the same colors or change the colors or change the greeting or the ribbon and then mail it!

Easy Tropical Oasis Birthday Card

Easy Tropical Oasis Birthday Card

I wanted to make a quick card and the design I used for this card, Easy Tropical Oasis Birthday Card, is almost always a very quick and easy one to use! This Tropical Oasis Designer Series Paper has such gorgeous colors and floral patterns in it. I just flipped this floral pattern over, and the pineapples were on the opposite side! I saw some tiny pineapples at the grocery store one day and thought of this whole Tropical Oasis Suite!

One of the colors that go with this paper is Real Red! My favorite color, so I could not pass it up! So Real Red it was for the card base. Without measuring, I cut out a longer rectangle than I needed because I wanted to have a little overlap of the two papers so that I could glue them together. In the end, the two pieces adhered together measured like any card layer, 5 1/4″ x 4″.

I always like to cover the seam of where two papers meet, so I used the Daffodil Delight 1/4″ Ruched Ribbon. I just took a longer strip than the card and adhered it around on the back of the card layer. After I made the greeting, I use the ribbon to tie a bow on each end of the layered background for the greeting.

The greeting is stamped from the Peaceful Moments Stamp Set. You could choose lots of other greetings or sentiments with this card design and paper. I layered it on Real Red paper punched with the. Everyday Label Punch. Then I trimmed down another punched label of Daffodil Delight and cut it in half so I could make it smaller to fit under the greeting. I didn’t do a perfect job but I was trying!

The greeting itself is tricky to explain. I tried something for the first time. I used a Stitched Rectangle Die to cut it out. As you can see, the rectangle dies are longer than I wanted my greeting to be. I cut only part of the rectangle by not putting my cutting plate over the part of the die I did not want to be cut. Then I switched the die around, still lining it up with the die-cut outline on the sides (it just sticks back on the same lines) and just put the cutting pad on the end that now needed to be cut to make the greeting shorter and only rolled over that end. That all produced the smaller rectangle greeting! I didn’t take pictures because I wasn’t even sure I was doing it right! But I did!

This card design is always great to keep in mind when you want an easy card that still looks great. No fancy folds or directions to follow. Just add some designer paper to all or part of a card base, in either direction, one side of paper or two, add a ribbon or embellishment or not, then add a greeting for whatever occasion. Here’s another card I made that is similar, using a whole layer of designer paper with a strip of a different pattern going across under the greeting. When you have designer paper as bright and pretty as this, almost any card design you use like this Tropical Oasis Birthday Card will turn out beautiful.