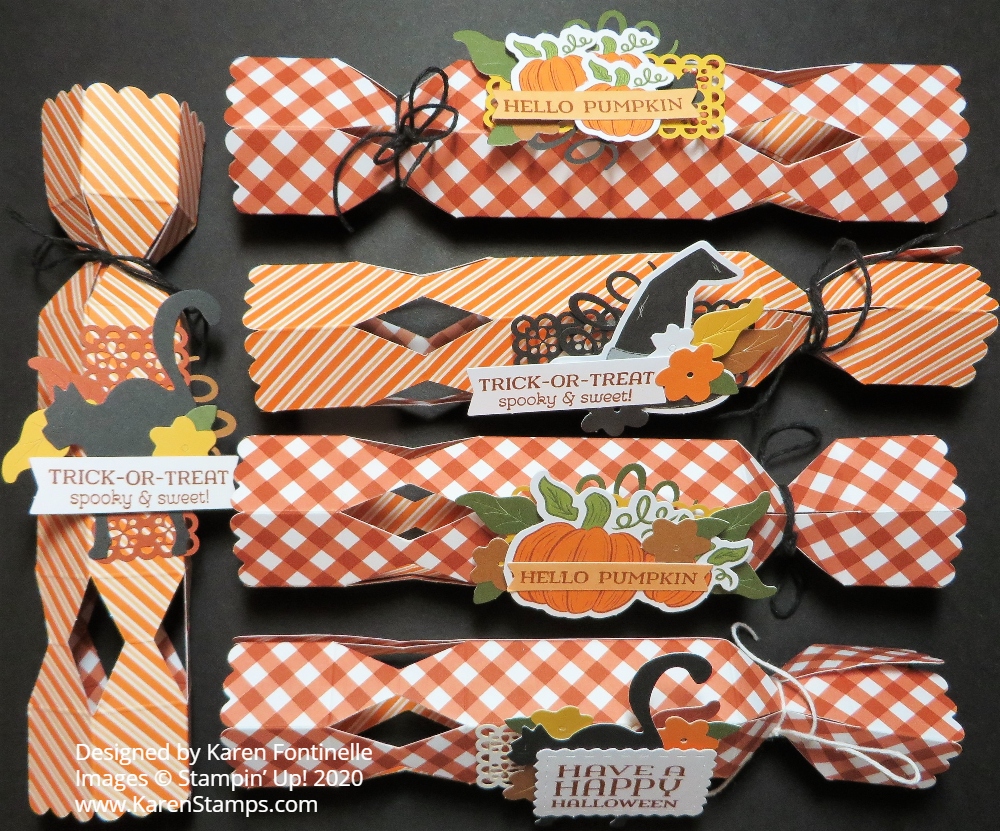
These Paper Pumpkin Halloween Treat Holders aren’t finished yet, but I thought I would show you how cute they are! Actually, they ARE finished, I just would have to put treats inside and then tie a piece of twine around the other end of the treat holder and it’s done!
This is the September 2020 “Hello Pumpkin” Paper Pumpkin kit! Paper Pumpkin is a monthly subscription for a papercrafting kit to be mailed to you around the middle of each month. There is no risk or obligation and you can skip a month if you need to!
Rather than make all the treat holders I could possibly make with this kit when I don’t know if I will have any trick-or-treaters this year, I made these and I’m going to make “alternate” projects with the rest of the supplies! And that’s perfectly okay with any of the kits! Every month there are alternate ideas posted online that you can get inspired by if you prefer to make something different with your kit. I plan to make Halloween cards with these supplies Or maybe I will make cards and a few more treat holders and save them for next year when we won’t have the pandemic and kids can trick-or-treat again safely.
October 10th is the last day this month to get signed up in order to get the NEXT Paper Pumpkin kit, which will be mailed out mid-October. It is a holiday kit which you can read all about HERE.
It’s time to be making Halloween treats and cards, whatever you like! Maybe some Halloween home decor!
Check out the Stampin’ Up! Designer Series Paper Sale going on now in the Online Store! In there you will find the Magic In This Night Designer Paper which is perfect for Halloween! Not that you have to have official Halloween paper! If you look through your other papers you may find other patterns that you can use for fall and Halloween.
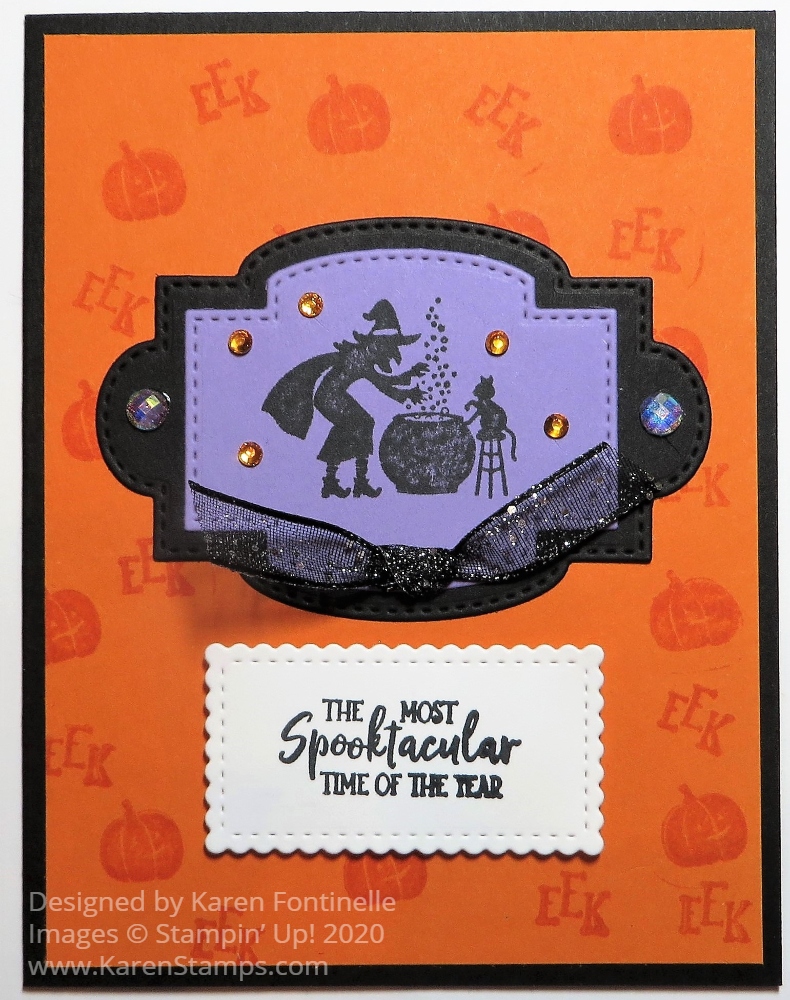
It’s October and that means it’s time to be making Halloween cards like this Ghoulish Goodies Spooktacular Halloween Card. This is one of those cards that just came about as I worked on it. Sometimes you have to know when to stop and sometimes you have to know when to keep going until you get the card you want!
The card base is Basic Black with a Pumpkin Pie Cardstock layer. I stamped the tiny little pumpkin in the Ghoulish Goodies Stamp Set randomly on the Pumpkin Pie layer with Versamark Ink. Later I also stamped the “EEK” in the stamp set to fill in some more of the spaces.
I stamped the image of the witch, the cauldron and the black cat on Highland Heather Cardstock and die cut it with a die in the Stitched So Sweetly Dies. Then I layered this piece on another die cut piece from the same die set. The greeting is also in the stamp set and the die in the same die set.
The card was coming together but still needed some jazzing up! I chose the Blue Adhesive-Backed Gems to put on each end of the black layer. Even though these say “blue” they are sparkly and iridescent so they kind of look purple and I thought went okay on this card. I also added some of the yellowish Holiday Rhinestone Basic Jewels around the witch and the black cat.
And for a final touch, I just tied a knot in a small piece of the Black Glittered Organdy Ribbon. Sometimes you just have to keep working on a card and this was one of those!
Here’s another project I made using the Ghoulish Goodies Stamp Set for a Halloween treat. It’s a fun stamp set to have for making Halloween cards but also Halloween goodies and treats.
Be sure to check out the Stampin’ Up! Designer Series Paper Sale going on during the month of October on select designer papers! Stock up or get the ones you missed before!
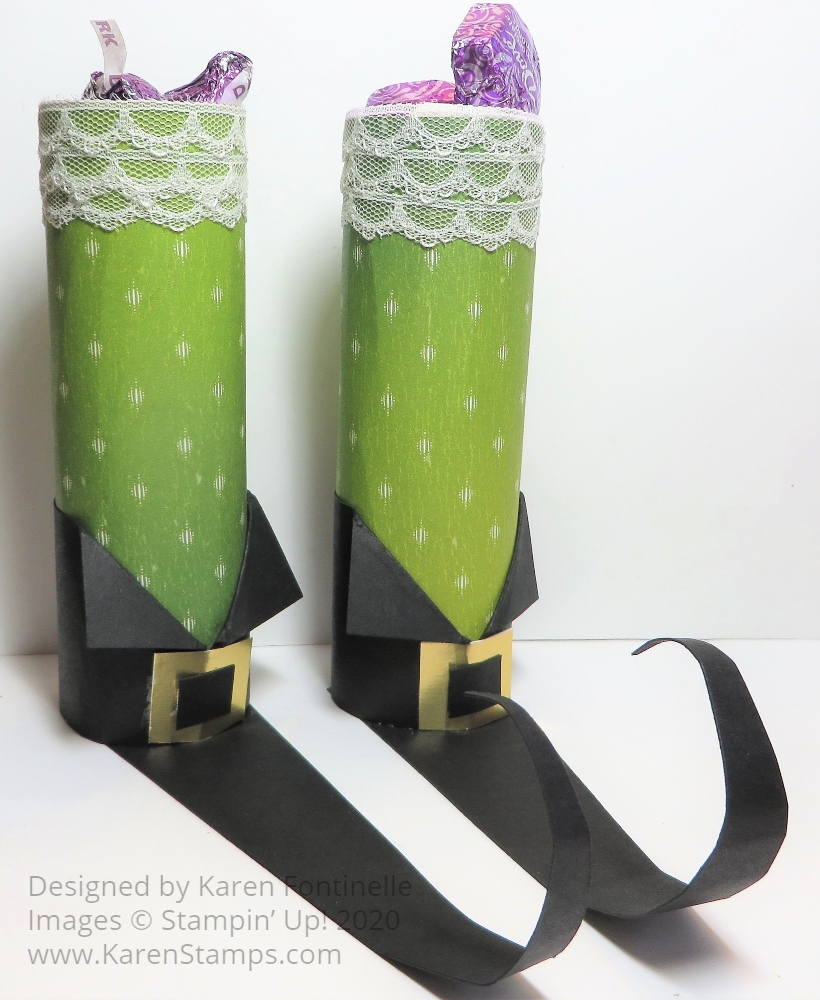
Something fun to make for Halloween is a witch’s boot out of a toilet paper roll or a paper towel roll. You can use it for a decoration in your house or you can put candy treats inside the roll or into a narrow cello bag, tie with a ribbon at the top, and put it into the boot. These are actually easy to make – just wrap the paper around the tube and add a triangle cardstock piece at the bottom for the boot.
Since I had an empty paper towel roll, I decided to make a pair of boots this year! I cut the roll in half so I could have two boots. Then I chose the Artistry Blooms Designer Series Paper to use for the stocking. Really you could use almost any of the papers in that package, especially if you wanted your witch to have some crazy stockings! But I chose this green ombre print paper pattern which definitely looked like Halloween. Just cut a piece of paper that will it the length of your roll and long enough to go all the way around the roll.
For the boot piece, cut a piece of Basic Black Cardstock to go around the bottom of the roll that just meets and then fold back the edges to look like the collar of the top of the boot. It will be just as tall as you want the boot to look, maybe about an inch high or so. For the base of the boot, just cut a triangle-shaped piece. The wide back end should be wide enough for the paper roll to fit on it. From there it tapers down to a point that you can roll back a little for the toe of the boot. I used Multipurpose Liquid Glue on the very bottom of the paper towel roll to adhere to that triangle piece.
If you want a boot buckle, just cut a piece that will fit in the space and then cut a smaller piece of black to adhere to the center to make it look like a buckle, but you don’t have to cut out the center of the buckle. It’s a “faux buckle”! I used Gold Foil for the buckle, but you can get creative and use any color you like.
Just for fun I added three rows of lace to the top of the witch’s stocking using the Very Vanilla 3/8″ Scalloped Lace Trim. I just used Mini Glue Dots to hold the lace in the back.
Click HERE to see the witch’s boot I made last year in 2019 and HERE to see one from 2018. Here’s one from 2014! See how fun and easy they are to make!
Use your imagination when you get a toilet paper roll or paper towel roll that you can use and make up your own Witch’s Boot for Halloween!
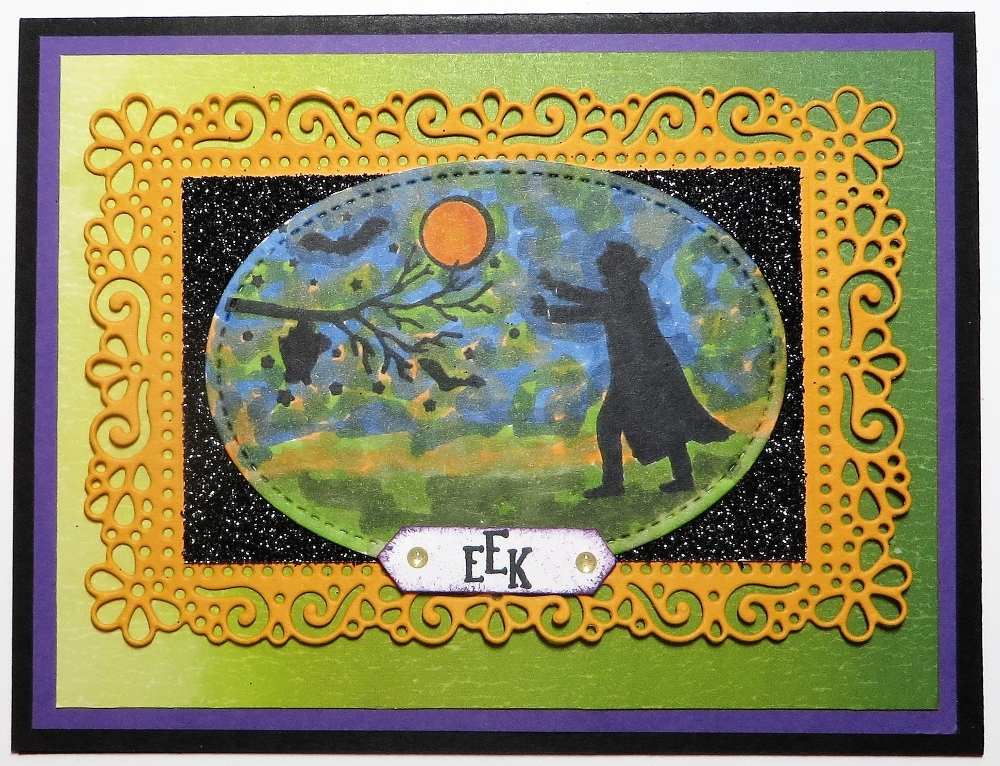
As I got ready to stamp, I decided maybe I wanted to make a Halloween card and this Ghoulish Goodies Halloween Night Card resulted! I had no idea or plan except I started out thinking I would look through my regular designer papers and see if there was something I could actually use for Halloween paper rather than “official” Halloween paper. I think sometimes we forget we can use papers that are themed in a designer paper package but really you can use that color or generic pattern for many other cards.
As I looked through my packages of designer paper, I thought maybe the Artistry Blooms Designer Series Paper, with its interesting patterns might have something. And sure enough, there were probably a couple different ones I could have used. I chose the last one I saw in the package with this multi-shaded green paper.
I chose these two images in the Ghoulish Goodies Stamp Set to stamp on Whisper White and then die cut with a large Stitched Shapes oval die. Then I colored in the background with various colors of Stampin’ Blends markers. It almost doesn’t matter what colors, just make it look spooky! I used greens, oranges, dark blue, and yellow. The only thing was I got it kind of dark around the man so I colored over him with a Black Stampin’ Blend to make him show up a little more.
For the background I die cut a frame from Mango Melody Cardstock from the Ornate Layers Dies. I had a scrap of Black Glitter Paper so I cut that to fit inside the frame for something sparkly. I also added a layer of Gorgeous Grape under the green designer paper.
For a greeting I needed something small and noticed the small little “Eek” in the stamp set so I used that and cut with the Classic Label Punch. Then I even shortened it with my Paper Snips to fit better and added two Gold Glitter Enamel Dots.
I think it turned out pretty spooky looking just with the combination of colors! It’s not too early to start working on Halloween cards! Have fun!
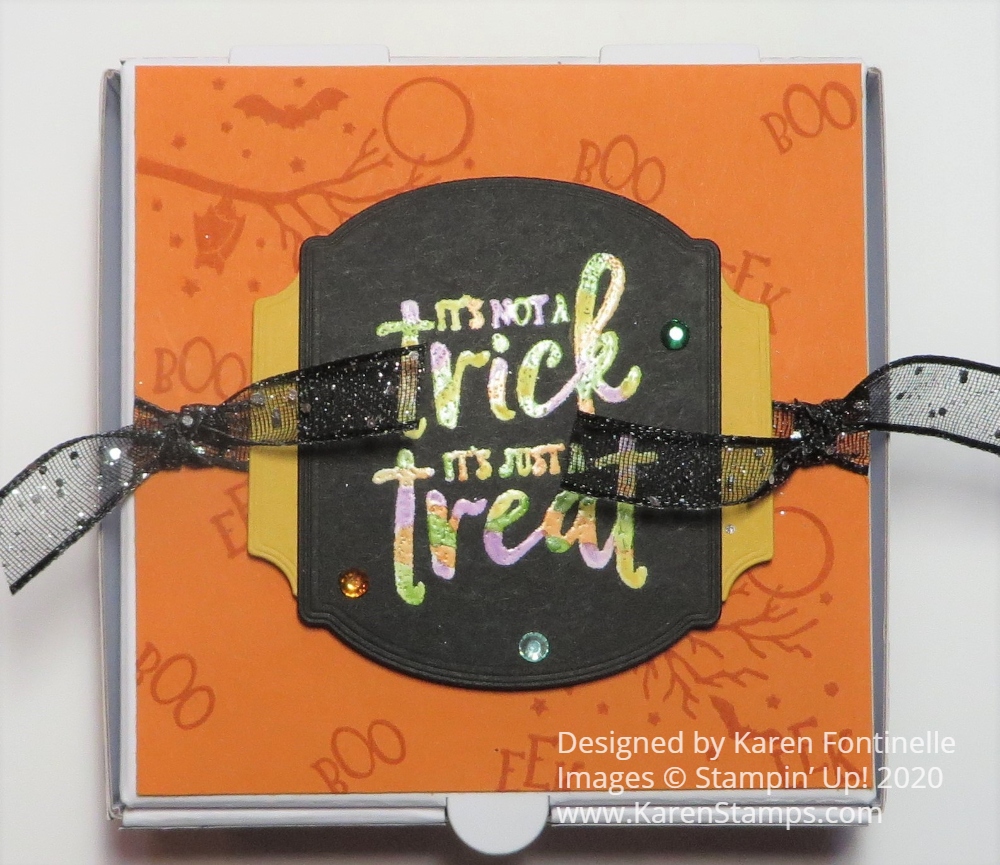
Here’s a technique you can try if you want to make a Halloween treat box like this Halloween Mini Pizza Box Colored Embossing treat box. It’s a fun way to color the greeting on the box to make it look a little more interesting or spookier for Halloween!
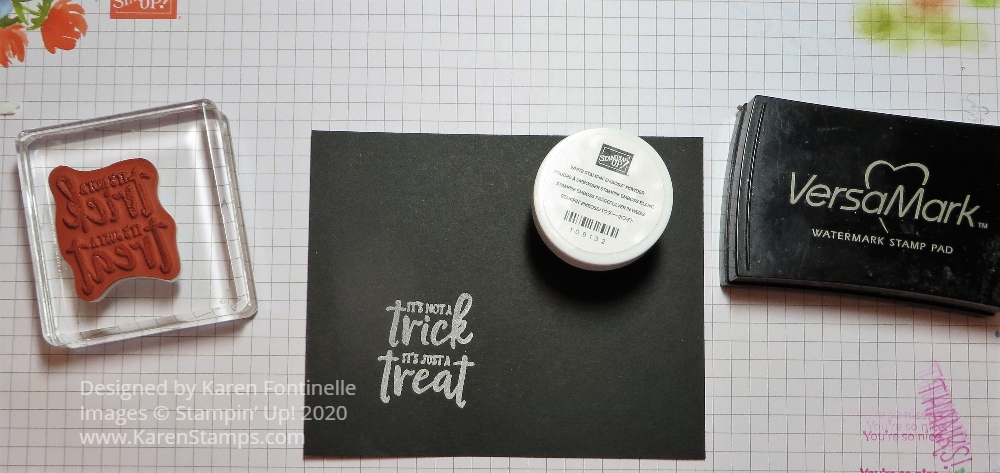
The technique involved is easy. You can use it for greetings or other images. Just emboss with Versamark Ink and White Stampin’ Emboss Powder the way you normally would, using your Heat Tool to melt the powder.
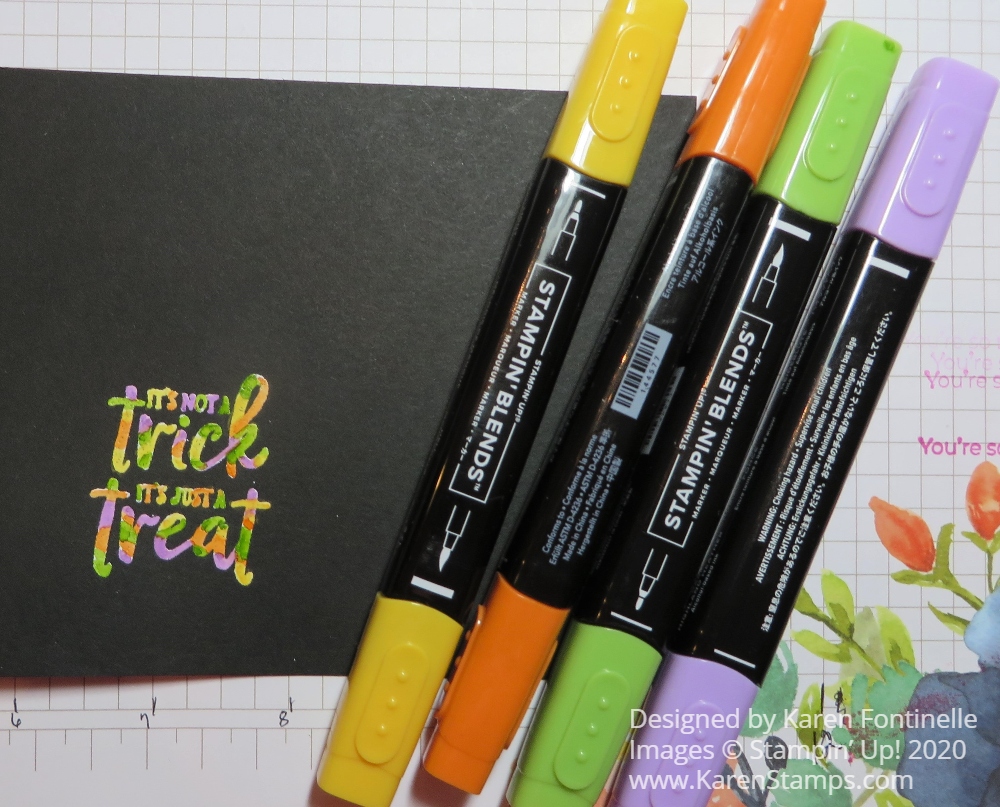
After embossing, let cool for a second and then color right over the white embossed areas with Stampin’ Blends markers. Try not to get off the embossing or it will show on the paper, even black. If you do get some marker ink on the paper, use the Color Lifter to “move” the color back over very lightly. For this Halloween project, I used multiple colors on the Halloween sentiment.
I had a similar project on my recent newsletter, so if you would like to get ideas like this and more delivered every Tuesday to your Inbox, just sign up for my Mailing List in the red box in the right sidebar or scroll all the way down on your phone to get to it.
This project is made with the Mini Pizza Box. These are handy to have on hand. They are unassembled and store flat. You get 8 food-safe boxes, 3 1/2″ x 3 1/2″ in size. You can easily put the box together, the decorate for whatever occasion. Put some cookies inside, 3″ x 3″ notecards, or some other small gift or treat.
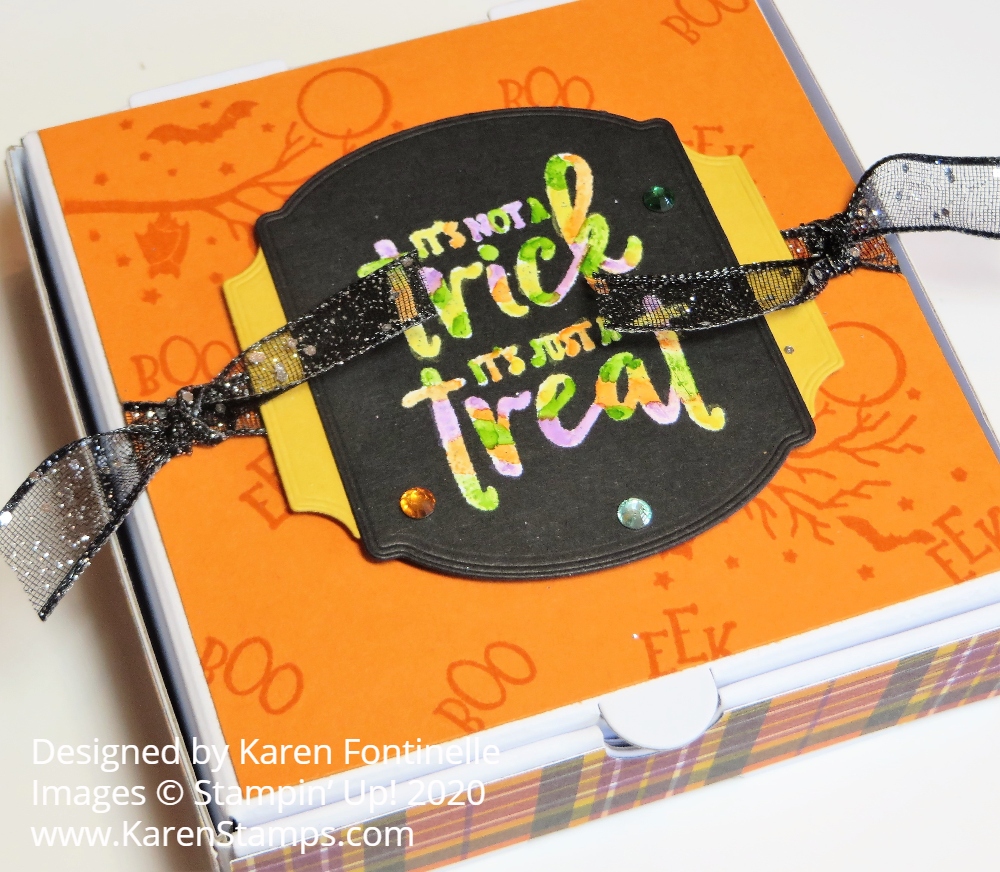
For this box, I stamped a piece of Pumpkin Pie Cardstock for the lid with images from the Ghoulish Goodies Stamp Set. Around the sides of the box, I used pieces of the Plaid Tidings Designer Paper. Since the paper is only 6″ wide, I cut four individual strips of paper. I was even fastidious enough to match the plaid lines before cutting, but you wouldn’t have to be so perfect.
The embossed sentiment is cut out with one of the Tasteful Labels Dies. For a little layer behind the sentiment I die cut another shape from the same dies and cut it in half so a little bit would show under the side of the sentiment. Before adhering the Pumpkin Pie paper to the top of the box, I adhered ends of the Black 3/8″ Glittered Organdy Ribbon to the underside and popped up the greeting with Dimensionals. Then I tied on a little knot on each side of the greeting with the ribbon. Love this Glittered Ribbon! For a little bling, I added three Holiday Rhinestones that I thought kind of matched the Halloween colors.
Who knows what kind of treats we will be able to give out this Halloween or if there will be trick-or-treating or Halloween parties, but these Mini Pizza Boxes are one of those good things to always have in your stash for when the need arises when you want to give a little treat or gift. Or order more if you have a certain occasion or gathering.
Here is another example of how to use these Mini Pizza Boxes for just a gift, not necessarily a certain occasion. I used the Peaceful Poppies Designer Series Paper (retired) to decorate this box and the Poppy Moments Dies.
These Mini Pizza Boxes are fun to decorate for many occasions. Try this fun technique of heat embossing white powder and then coloring with Stampin’ Blends markers right over the embossing to make this fun project, Halloween Mini Pizza Box Colored Embossing.
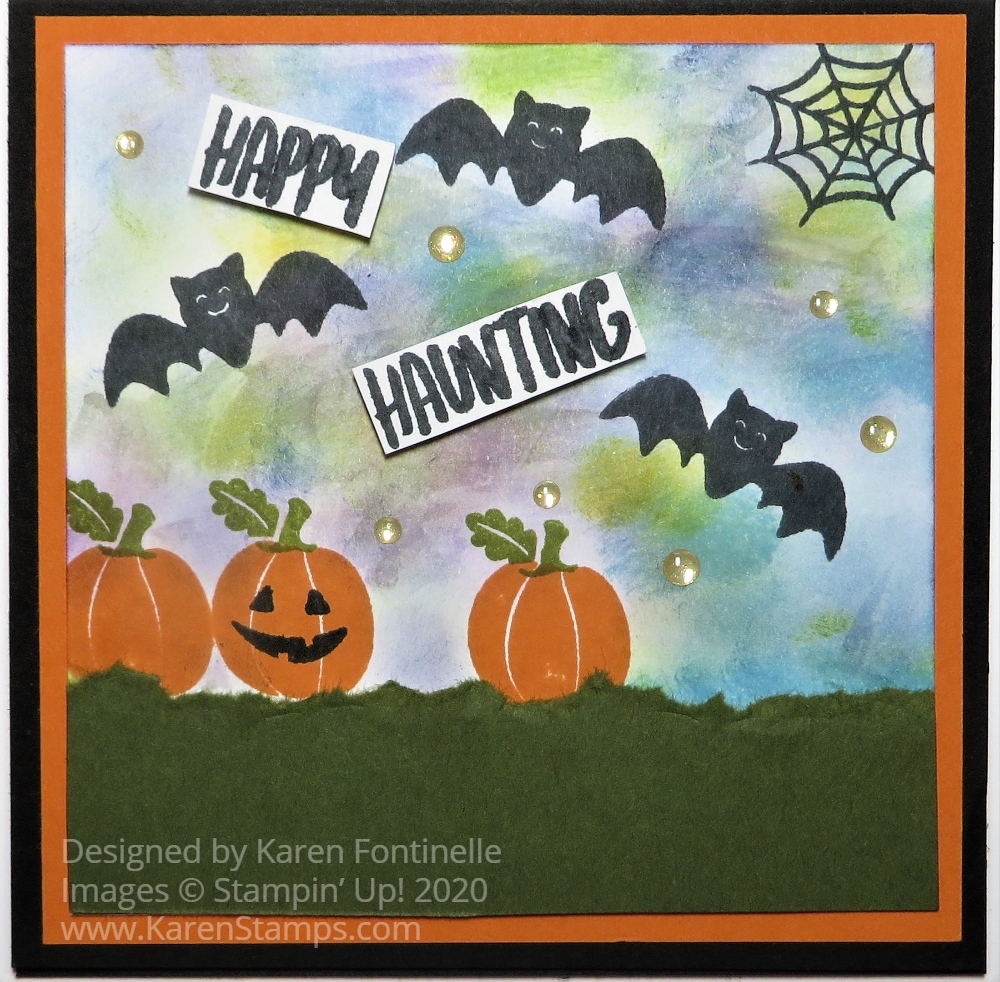
This Banner Year Halloween Card is one that I created simply by “playing around”! I won’t say it’s my best work or anywhere close, but I wanted to try out the stamp set and see what I could make!
The Banner Year Stamp Set has lots of smaller images and greetings for lots of occasions so it is a good stamp set to own. There is fall, Halloween, Christmas, and even Valentine’s Day. Of course, some of those can even be used any time of year. So I just decided I wanted to see if I could make a Halloween card with the appropriate images. That’s why I said I was playing around with the stamp set.
The card is a smaller square card, 4 1/4″ x 4 1/4″, which I thought would help with the smaller images. The card base is Basic Black with a layer of Pumpkin Pie and stamping on Whisper White. Without knowing how I would place things, I stamped the little spider web up in the corner and the three bats in the sky. I was thinking of putting a strip of designer paper, maybe the new Plaid Tidings with the greeting on some kind of label across the designer paper. But then I saw the pumpkin stamps and thought why not put some green cardstock for grass across the bottom. I went back to one of our favorite old techniques of tearing the strip of cardstock to make a rougher edge. Hold the strip vertically in front of you and tear down toward yourself. That’s how you get the edge torn the way you want it.
The pumpkins are stamped in Pumpkin Pie and the little stems and leaves (one stamp) stamped in Old Olive. There is even a little jack-o-lantern face stamp in the set so I stamped one pumpkin with that!
Then I wondered what to do about the sky, since I wasn’t necessarily planning on a “scene” when I started! I grabbed my Sponge Daubers and used various colors of ink to scrub in for the sky. I used Night of Navy, Granny Apple Green, a little bit of some color of purple (Maybe Highland Heather) and some Balmy Blue over all of it. Just play with whatever colors you like because it’s Halloween after all, anything goes for a spooky sky!
I had wanted to use the “Happy Haunting” sentiment in the Banner Year Stamp Set but once I got the card stamped it looked a little large. After I stamped it, I decided to cut the words apart and adhere them in the sky. (That would also cover up part of the sky that looked less blended than I would have liked!)
For a finishing touch, I added several Gold Glitter Enamel Dots scattered around to look like stars in the sky or just for a little bling! Sometimes just added a little something to your card, like sequins or dots or glitter just finishes it off perfectly! I made some other cards recently that were cute enough as they were but when I added some sequins, it was a Wow!
Here is another Halloween card I made several years ago with smaller images and then filled up space with washi tape! You could also use strips of designer paper.
If you are looking for a stamp set that has small, but images for lots of occasions, this Banner Year Stamp Set just might appeal to you. It actually comes in a Bundle, the Banner Year Bundle. You get the stamp set and the Banners Pick A Punch together for a 10% savings. And certainly, the punch is handy to use in many cardmaking sessions! It won’t be long until we are making Halloween cards so use this Banner Year Halloween Card to help you get some ideas!
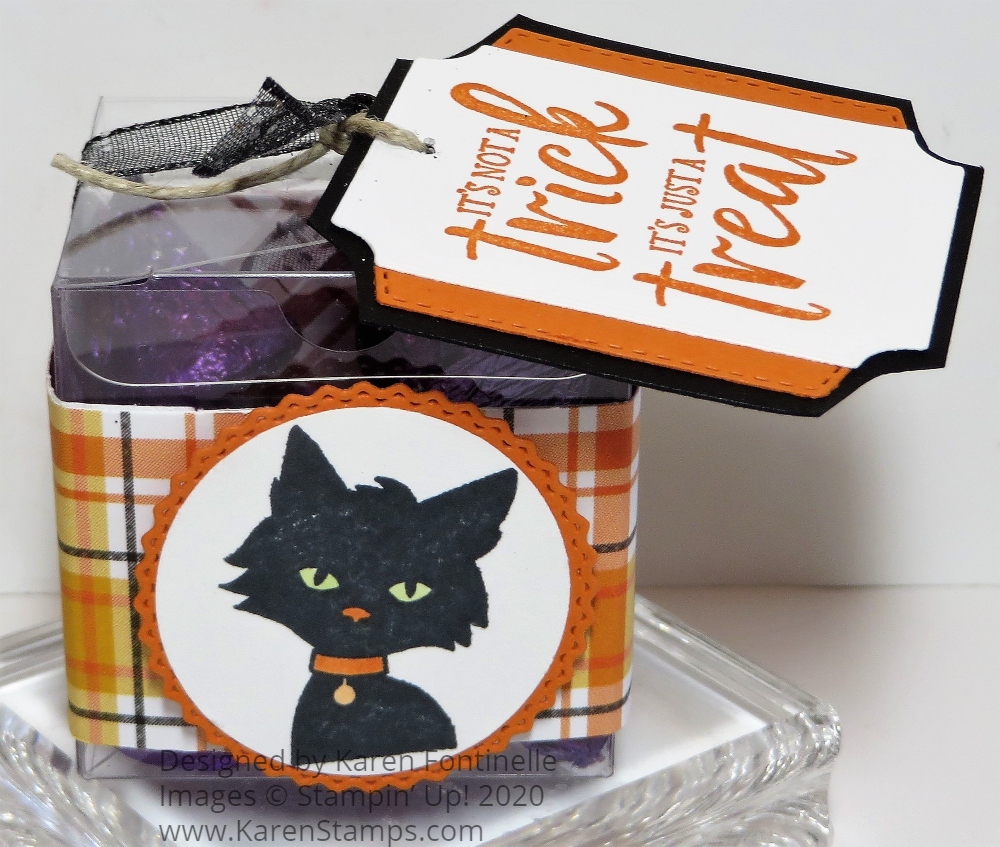
For my first, of probably many, Halloween posts for this year, here is a Ghoulish Goodies Halloween Clear Tiny Treat Box. Who knows what Halloween will look like in this pandemic year, but you can still make Halloween treats for your family or even yourself! Thank goodness the grocery stores are still able to deliver craft supplies, such as chocolate candy for treats!
As always, I love and highly recommend keeping a package or two of the Clear Tiny Treat Boxes on hand! They are only 2″ x 2″ x 2″ but food safe and have enough room for a decent treat without being too big. Or add some other small gift inside for any occasion. These boxes come flat, protected by a piece of plastic you remove, then assemble and decorate. Couldn’t be easier!
For this Halloween treat box I wrapped around a piece of the Plaid Tidings 6″ x 6″ Designer Series Paper. Now you may have figured out that a 6″ long strip will not wrap all the way around the box. I cut two strips, then realized I needed the plaid design to march up if I wanted to be picky about it (and of course most of us do!). Actually my strips were only about 1/8″ off so I matched them up, adhered the ends together then trimmed off the excess on each side. It worked fine. Or you can wrap the 6″ strip around from the front to each side and add another piece for the back. Make it longer so you can adhere the ends inside the side pieces to make it look neater.
The tag is stamped in Pumpkin Pie ink on Whisper White with a stamp in the Ghoulish Goodies Stamp Set. What a perfect saying for Halloween treat packages! I die-cut it with a die in the Tasteful Labels set of dies. Then I wanted some kind of layer, so I cut another label which was too small, but I cut it in half lengthwise and added it to each side of the treat tag. This is the Pumpkin Pie piece. To cover up the back, I adhered the whole thing onto a rectangle of Basic Black with just a small margin and simply cut those corner curves by hand. Doesn’t have to be perfect! The tag is already almost too big for the treat box so I couldn’t keep adding larger layers.
To attach the tag and further decorate the box, I used the beautiful Black 3/8″ Glittered Organdy Ribbon. It’s almost too pretty to use on a treat box but it does look great! I punched a small hole in the top of the tag, put a piece of Linen Threat (or whatever twine I had laying around here) through the tag and tied it on to the ribbon, then finished tying the ribbon in a know. You could do a bow instead.
To decorate the front of the box (and to use another new stamp!), I stamped the black cat from Ghoulish Goodies. Then I colored in its eyes with a Granny Apple Green Stampin’ Blend marker and the collar with Pumpkin Pie. I just punched out the cat with my 1 1/2″ Circle Punch and then layered it on a die-cut from the Tasteful Labels Dies again. Love those scalloped circles in that set!!
Put your treat or gift in the box before you tie it up! Luckily I had fresh chocolate kisses wrapped in purple (dark chocolate), perfect for Halloween! These candies are meant for crafting, of course! (Or for after lunch or dinner as a digestive, of course!).
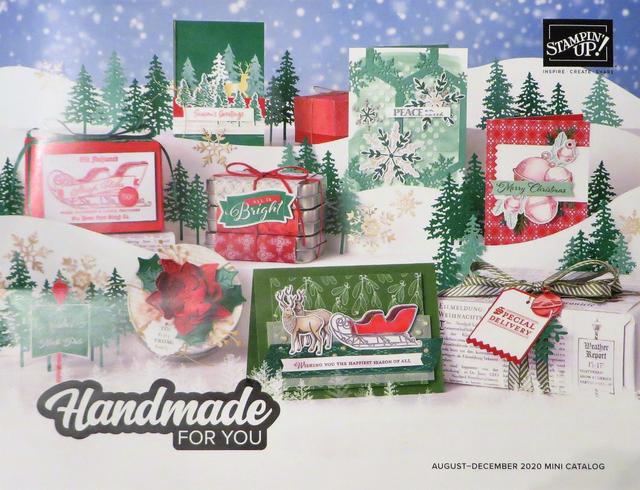
Yes, it’s time to start having fun with Halloween because now that it is August, it is really almost September and you know Halloween isn’t far behind! Check out the Ghoulish Goodies Stamp Set and others in the new holiday mini, August-December 2020 Mini Catalog. If you need a copy, send me your contact information at Karen@Karenstamps.com Then you can start making your own Ghoulish Goodies Halloween Clear Tiny Treat Box or something similar!
Big day at Stampin’ Up! The August-December 2020 Mini Catalog is LIVE with all kinds of fall and holiday seasonal products that I am sure you will love! Click the link or the catalog photo to view all the pages of the catalog!
Click the link above and it should take you to the Home Page of the Stampin’ Up! Online Store! Please check to see that my name, as your Demonstrator, shows up at the top on the left side. If not, you will have an opportunity to choose me as your Demonstrator before you place your order. After that, my name should come up as your Demonstrator.
I can’t wait to hear how you like it! Just take some time to play around in the new website! You can even click a tab on the side and leave Feedback for Stampin’ Up! if you have problems or simply want to leave a comment, good or bad.
If your computer normally remembers your password, it likely will not log you in to your account because it is a new website. If you KNOW your password, just type it in manually along with your email. If you do not remember or know your password, that’s okay! Just click on the “Forgot Your Password” link and an email will be sent to you to reset your password. If it doesn’t seem to show up, check your Spam folder.
BONUS COUPONS! Remember, starting today you can use your Bonus Coupons you may have earned in July! You will see where to add them on your order page. If you have more than one, you can use all of them or you can use only one or whatever you want. Just remember they expire August 31.
Coupon codes will now be entered one at a time in the Coupon Code section of the Order Summary window (by entering it into the field and clicking “apply”).
If you have a large order and reach $150 or more and earn Stampin’ Rewards, remember that using the coupons will reduce your total so you will need to have $150 or more total AFTER coupons are added in. Let me know if you have questions.
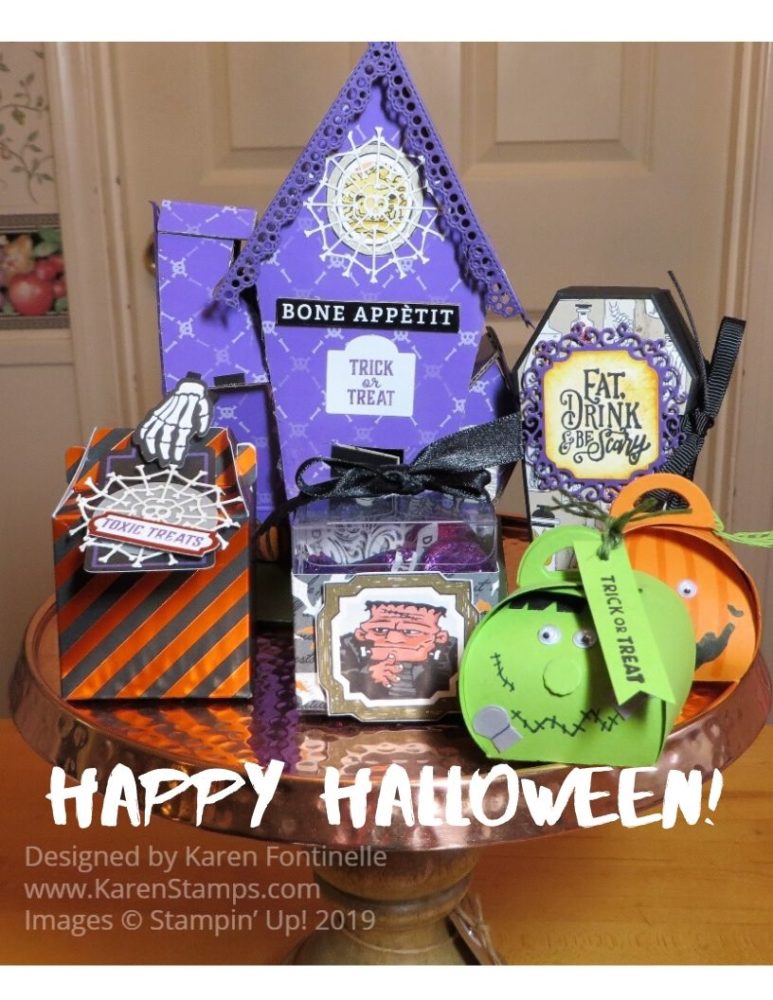
Today is the big day for kids and also moms with little kids in school! Usually there is a run on Halloween cupcakes at the grocery store for the school parties! To celebrate, I put a few of my recent Halloween projects on this cute little cake stand my friend gave me the other day! The Clear Tiny Treat Box is easy to decorate and the Mini Curvy Keepsake Boxes are really cute. There are so many fun things to make for Halloween, just not enough time!
Halloween is such a fun holiday and one we all probably remember from our childhood – what costumes we wore, what kind of candy we got, school parties! I’m still good friends with a mom I met at my youngest son’s kindergarten class Halloween party!
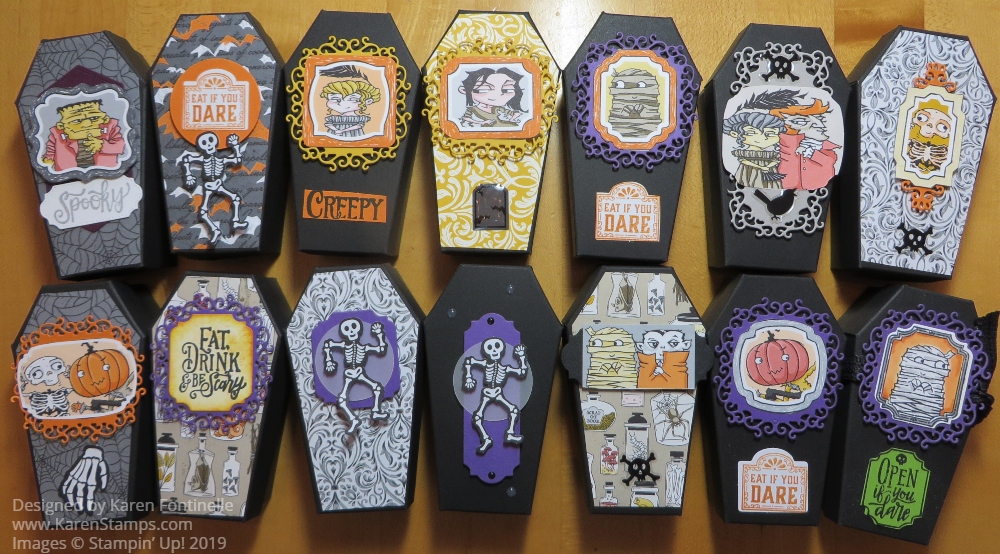
After I took the photo I tied ribbon around them to hold the lid on after I put candy inside. The top decoration I popped up on two dimensionals at the top and bottom so there would be space in between to slide a ribbon. Here is a post for the first Coffin Treat Box I made and how to assemble it.
And then the other fun Halloween project was making these treat boxes with the September Paper Pumpkin Kit! “Craft supplies” (chocolate!) being put to proper use!
Even though Halloween will be over after today, if there is anything in the Monster Bash Suite you loved and want more of for next year you can still order it!
Have a safe and fun Halloween Night! Don’t let the goblins get you!
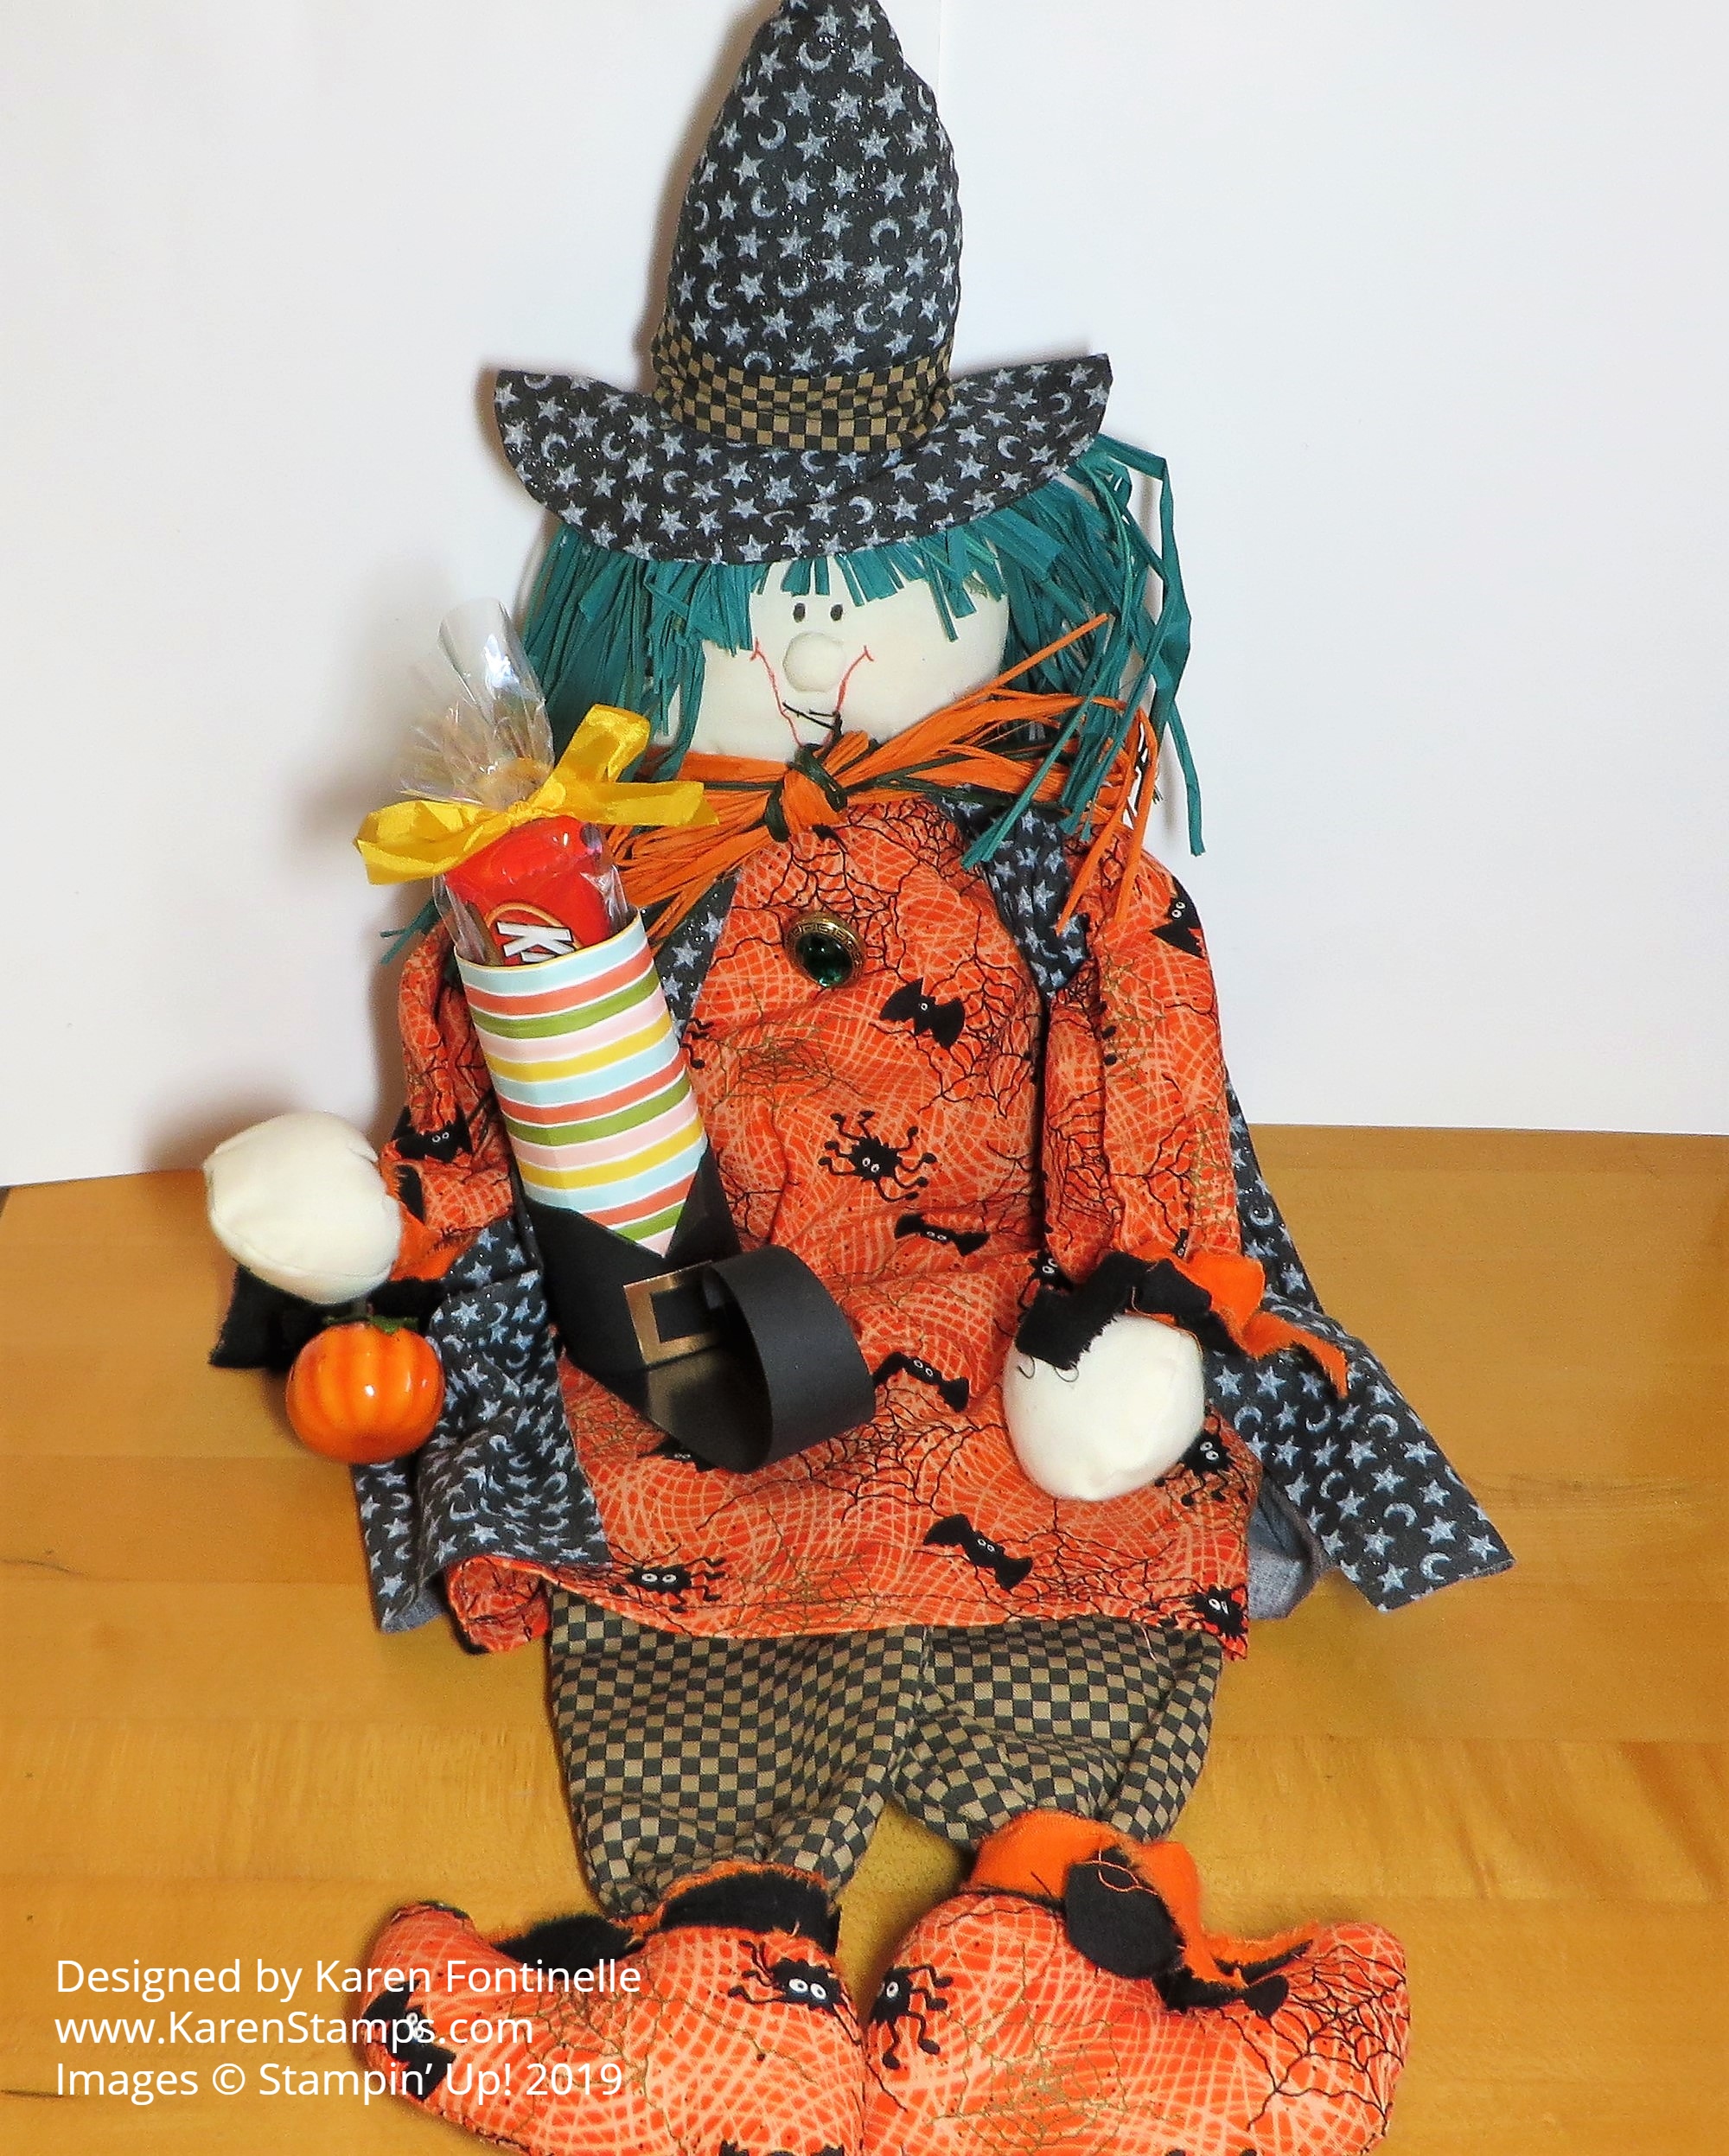
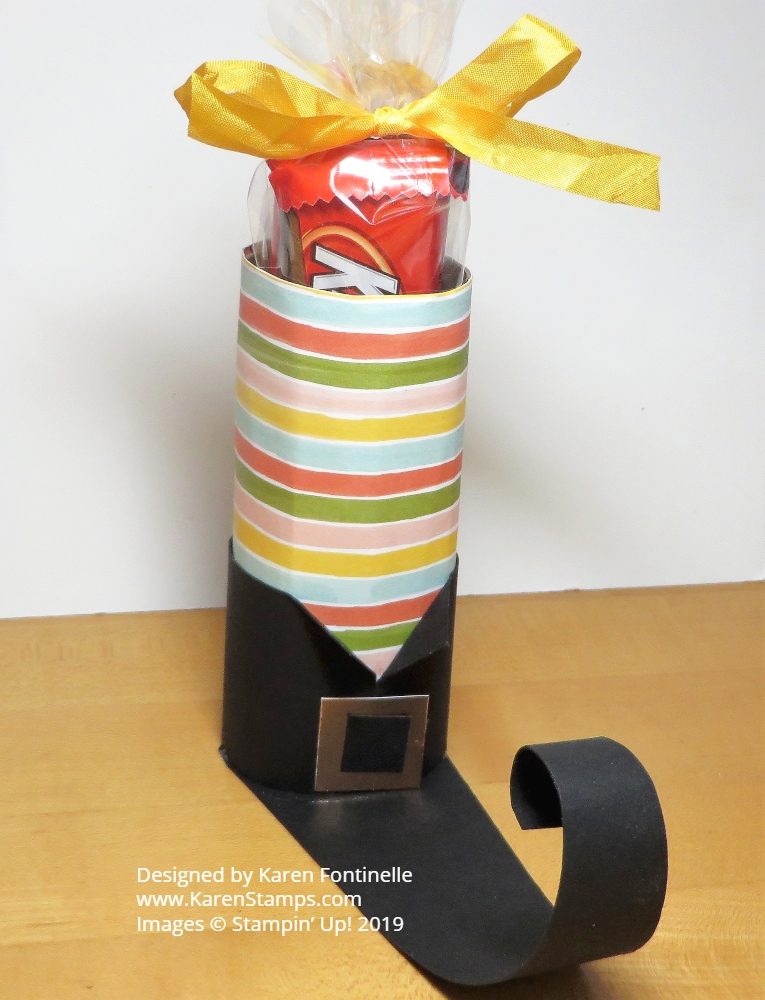
This Halloween witch is ready with her Halloween Witch Boot Candy Favor! I’ve made these for several years now and they are very simple to make. The witch isn’t simple, just the candy treat! The witch I made (lots of them!) back in my crafting and craft show days from a pattern I probably bought at the International Quilt Show held annually in Houston back before I ever heard of Stampin’ Up!
The Witch’s Boot is easy to make. Just grab an empty toilet paper roll or cut down a paper towel roll or whatever roll you have. Wrap some designer paper around that you think looks like a sock. Then make a boot collar for the base. It just wraps around and meets in the middle. Then fold back the corners. The only thing to watch for is to make it wide enough so you can add a buckle. Then add a long strip for the base of the boot that is only as wide as the toilet paper roll. Narrow it down diagonally on each side and curl the tip if you like. No measurements, you can just do it for your size roll.
To make an easy buckle, just cut a square of some kind of foil (I used Copper on this one) and then make a smaller black piece for the center to look like it is going through the buckle.
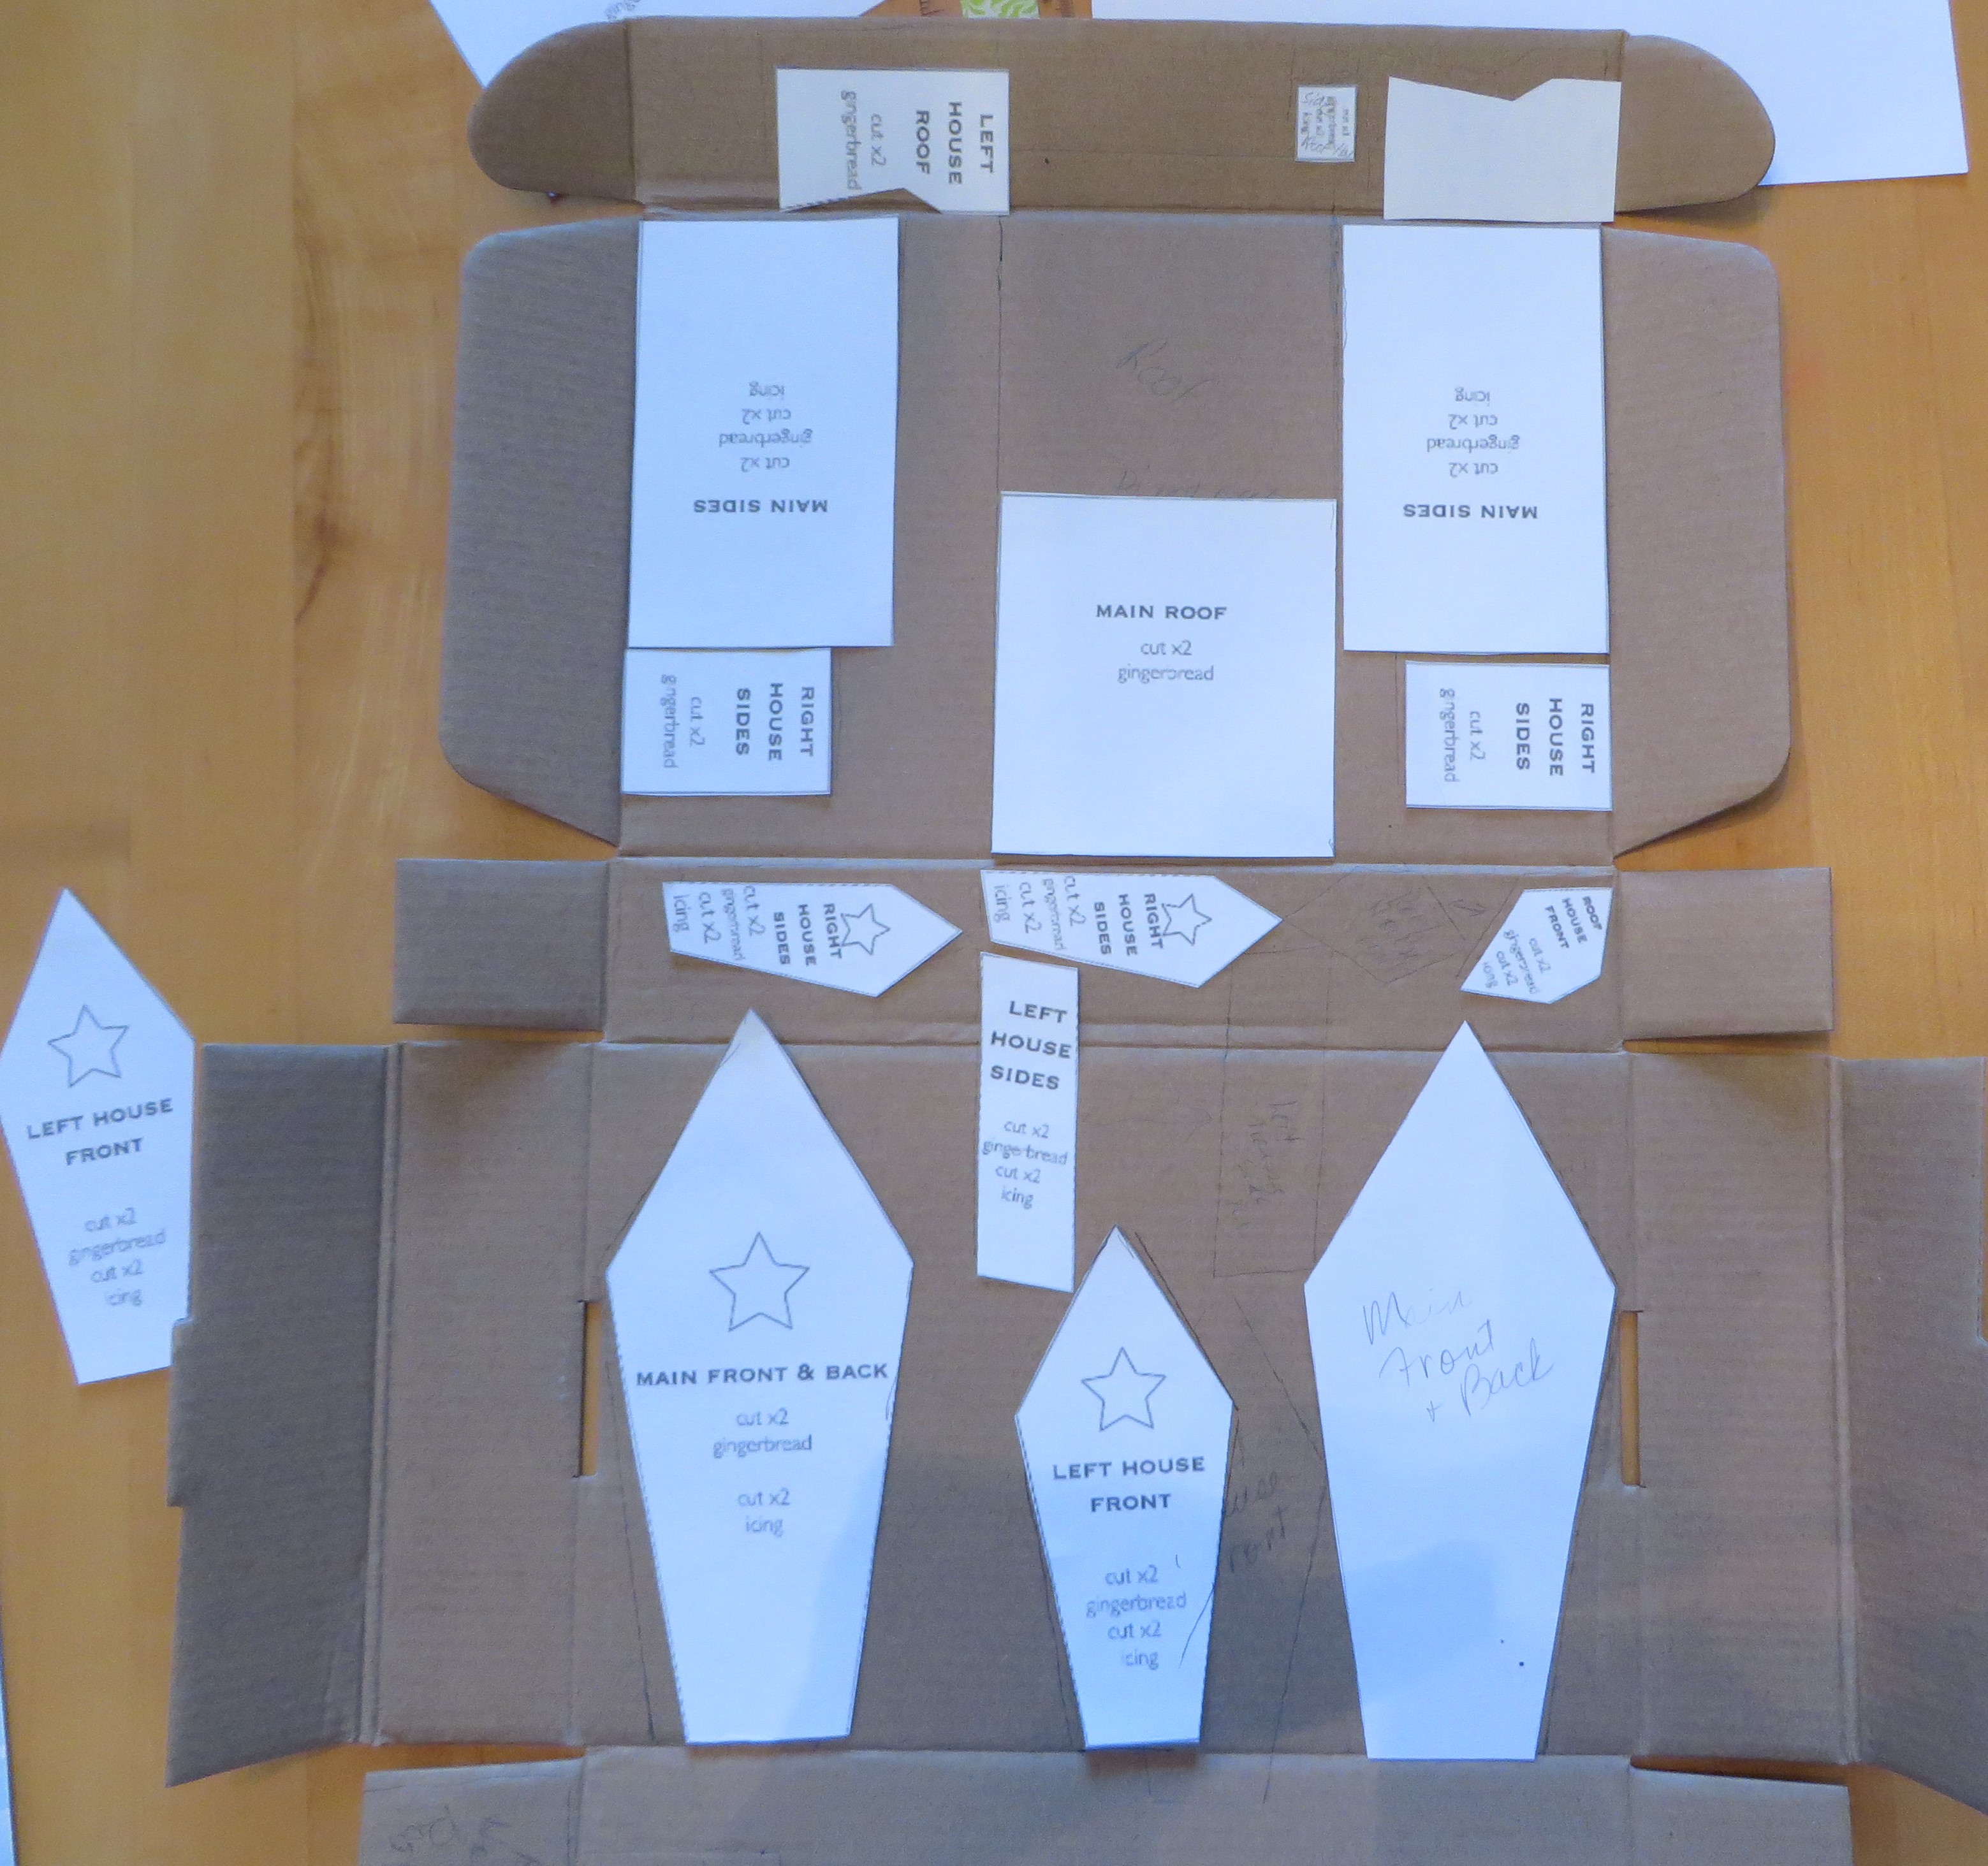
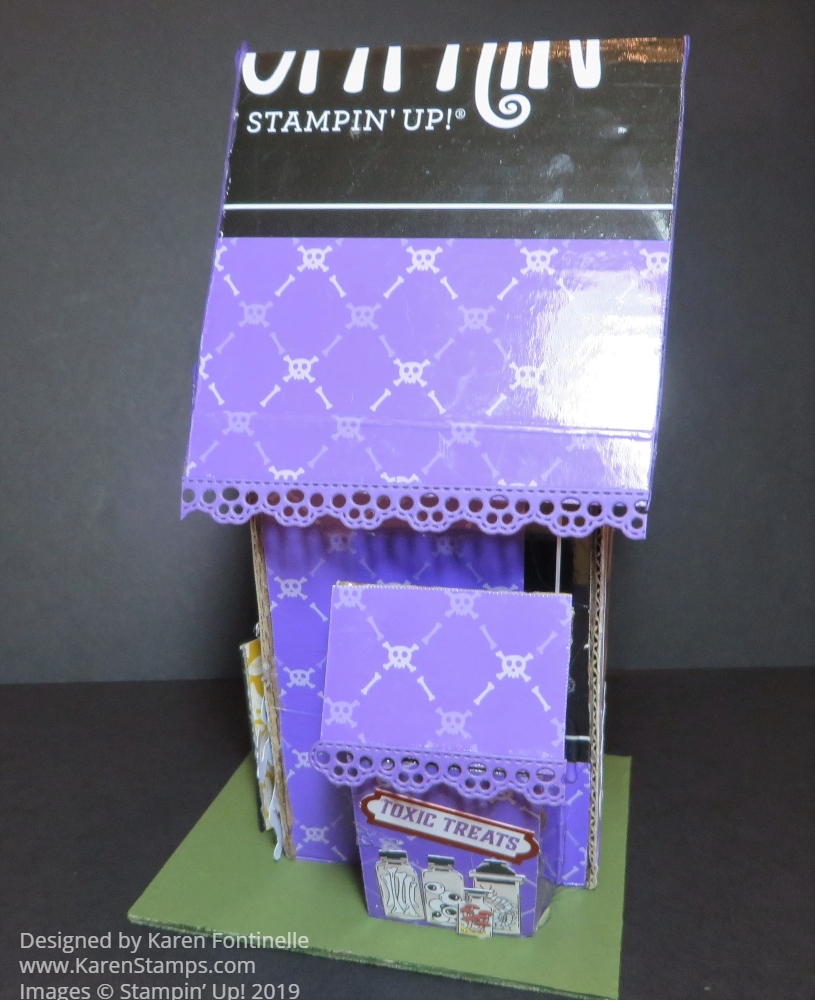
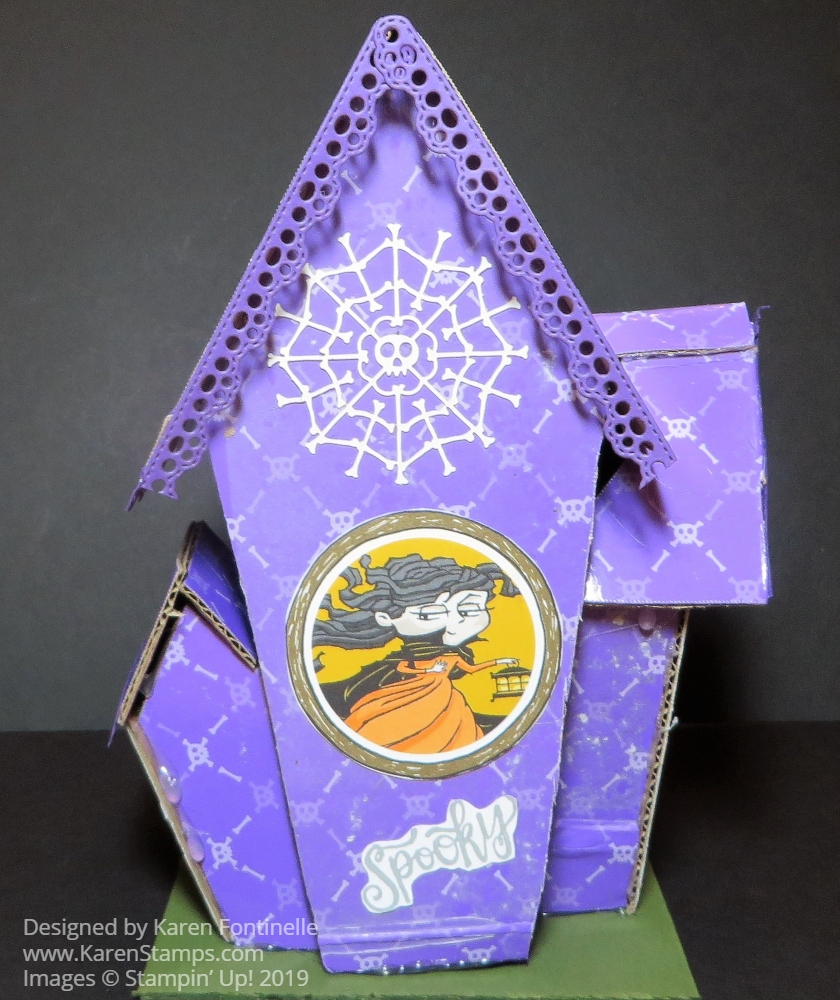
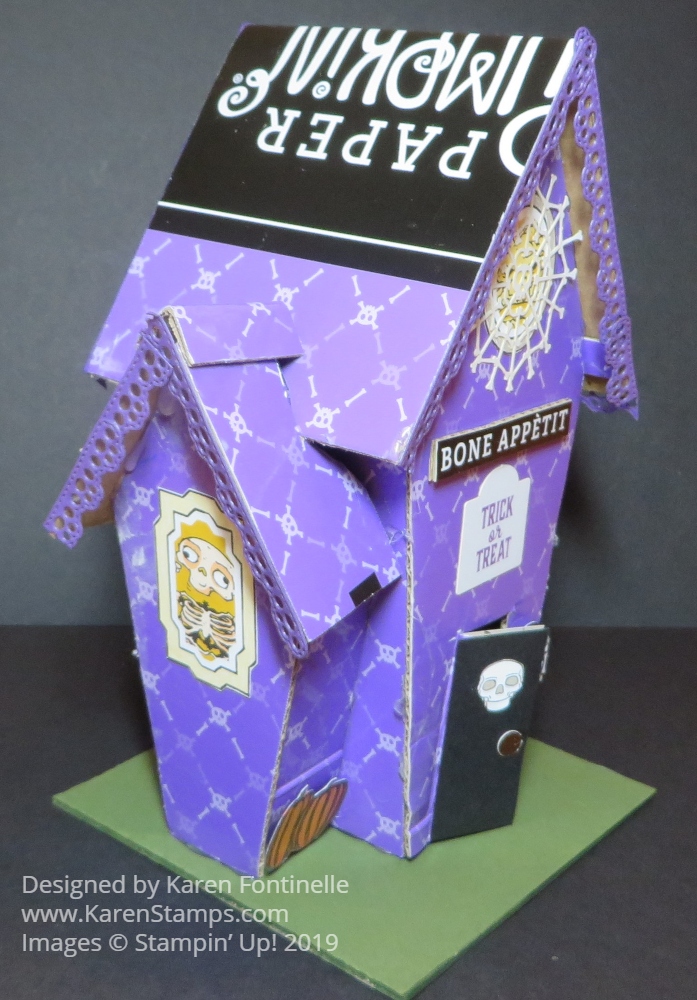
You know how they say little kids have the most fun playing with the box a gift came in? In this case, I had a lot of fun playing with the Paper Pumpkin box to make a Haunted House! I also had a lot of fun making the cute treat boxes in the Paper Pumpkin Kit! The first haunted house idea came from a Stampin’ Up! employee who then did a Facebook Live explaining his tips on making your own haunted house out of the Paper Pumpkin September Kit box. It was a special edition box in Gorgeous Grape instead of the usual red so that really lent itself to making a haunted house!
I followed the same pattern that the Stampin’ Up! employee found online. It needed to be enlarged and then printed and then placed on the opened box. A couple of pieces had to be reversed so that the outside of the box was on the outside of the house. I found a video online of a lady who made the house and showed exactly how she laid out her pieces. However, I wanted the outside of my house to have the pattern going in the correct direction so I laid my main pieces out a little differently. It all worked. You might want to make a practice house out of other cardboard or cardstock to see how it all goes together but I jumped right in!
Be sure to label the pieces as you trace them and cut them out. Use a heavy-duty scissors or utility knife of some kind. Hot glue is recommended for assembling the house. The thing is, since it is a “haunted” house, you don’t have to worry about strings of hot glue or glue that shows or house pieces that aren’t perfectly straight because any pieces that are “off” just make the house look even spookier!
After assembling the house, use whatever embellishments or pieces from the Paper Pumpkin Kit to decorate the outside of the house. I also used images from the Monster Bash Designer Paper. I didn’t decorate the roof of the house because I like the “Paper Pumpkin” showing on the top!
To get the mailing label off the outside of the box, use your heat gun and then peel it off. I don’t think you will get all the adhesive off so just pounce the Embossing Buddy all over it, which will still show the powdery effect but that’s okay because it is a haunted house! And I put that piece on the back of the house anyway!
For the base, just cut a piece of any other cardboard according to the pattern and cover with Mossy Meadow Cardstock if you like. I cut a door in mine but you could also just adhere something to look like a door. I cut out the UPC number from the box, planning to use it as the “address” on the house, but I lost it because it was so small!
This was really fun to make and easier than I thought to assemble. If you don’t have a Paper Pumpkin box, just use other cardboard and decorate. As I write this post, you CAN purchase the same Bone Appetit Kit and refill in the Stampin’ Up! Online Store but you must be a subscriber to access this category. Sign up now for Paper Pumpkin and get the Holiday Kit coming in November and possibly the past October kit for holiday cards!
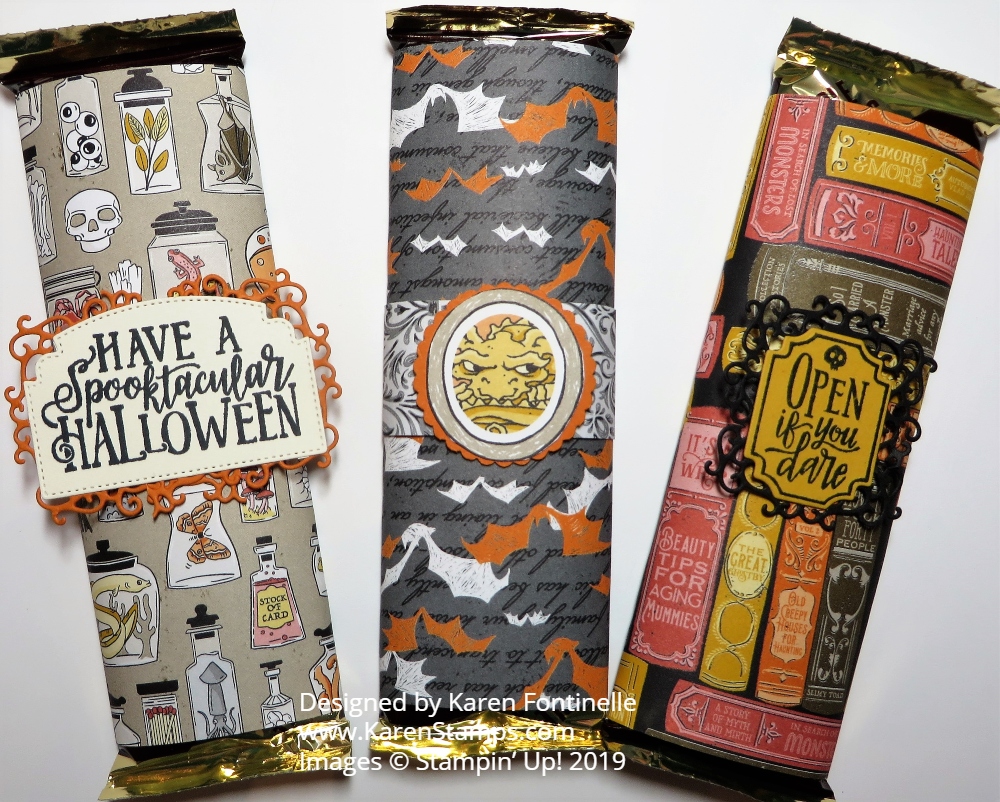
Here are some ideas on how to decorate candy bars for Halloween treats. If you happen to have a box of chocolate candy bars (I mean, craft supplies) in your pantry, you can have a good time decorating some of them (not all of them, of course!) with Halloween designer paper and embellishments. Maybe you don’t want to give out these regular size candy bars out to the trick-or-treaters but maybe it would be fun to make them for family, friends, office mates or neighbors. You could also do this with the little snack candy bars if you wanted to make a lot.
Just wrap a piece of cardstock or designer paper around the candy bar. I found that a piece of 5″ x 5″ Monster Bash Designer Series Paper worked fine. To make sure I had a good adhesive to hold the paper together after I wrapped it around, I used Tear & Tape. If you use Snail Adhesive, I would put it on both ends so the tape sticks to itself and makes the hold stronger. I do this a lot.
Decorate the candy bar however you like. On these Halloween candy bars, I used one character face from the Monster Bash Designer Paper layered on a 1 3/8″ Scallop Circle Punch. The other two have stamped greetings from the Spooktacular Bash Stamp Set. I layered each on a die-cut from the Ornate Frames Dies. Each die-cut was too big so I just cut them down in the middle and matched up the two ends underneath the greeting. It worked well enough for candy bars!
You could make these as fancy or as simple as you like, depending on who you are giving them to. Most likely you want to make them fairly simple. You could also use stamped or plain cardstock with some kind of embellishment. Here are some little candy bars I decorated several years ago! It really is fun once you get started. You may not want to stop!
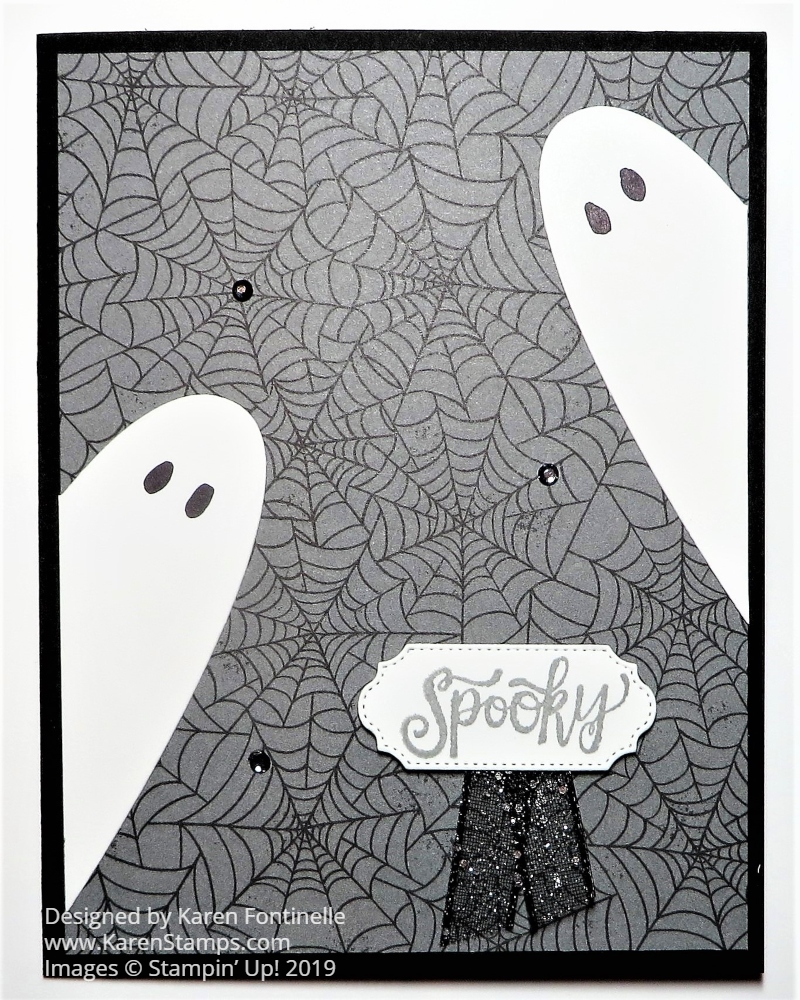
I made this Quick and Easy Ghost Card For Halloween almost in seconds! Well, a little die-cutting was involved so maybe it was a few minutes but it was very fast. And I like the card so much I plan to make more to send out!
The way I made these ghosts is a creative idea that I saw when I was first introduced to Stampin’ Up! and helped propel me to sign up as a Demonstrator. I found out that “rubber stamping” was WAY more than a stamp and ink and I was blown away by the creativity I saw with stamping and Stampin’ Up! at a little event I went to with my friend and future upline. When we started doing some stamping at this gathering, I actually had to ask what I was supposed to do with this stamp and ink pad! When I saw a ghost card similar to this one on a display board, I was hooked!
Here’s the big secret of how to make ghosts that are hanging out and peering around corners…..cut out a heart and then cut it in half! You have a ghost! You could cut out a heart by hand because, after all, a ghost doesn’t have to be made perfectly. But I used the Stitched Be Mine Dies to cut out a heart. I used one die that was large but not with the stitching. Then I simply cut the heart in half lengthwise. The eyes are just colored in by hand but you could use some kind of punch. Isn’t that clever to use a heart shape to make a ghost??! I love it!
For a little more bling on the card, I colored some Rhinestones with the Black Stampin’ Blend marker and then added three to the card. I like that touch.
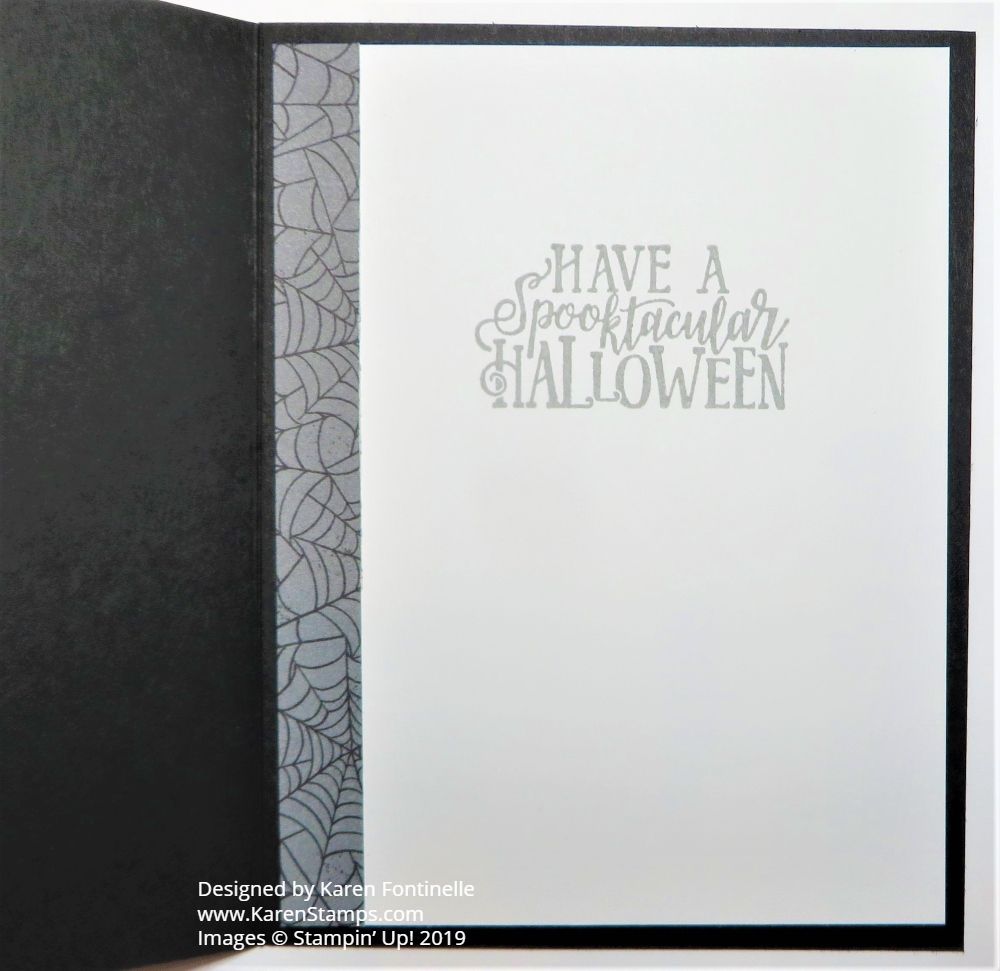
Since the inside of the card is black, unless you emboss a greeting in white on the inside, you won’t be able to write a message or note. Just add a layer of Whisper White inside and stamp a greeting. I used another greeting in the Spooktacular Bash Stamp Set and stamped it in Smoky Slate Ink. I also added a strip of the spider web designer paper inside.
That’s how easy this card is to make and it’s fun to make ghosts out of hearts! Here is another card I made with ghosts and glimmer stars. Get out your Halloween or other designer paper and make some ghosts cut from hearts! Decorate your Halloween card with ghosts and scary greetings and other things and see what you come up with, maybe something like my Quick and Easy Ghost Card For Halloween.
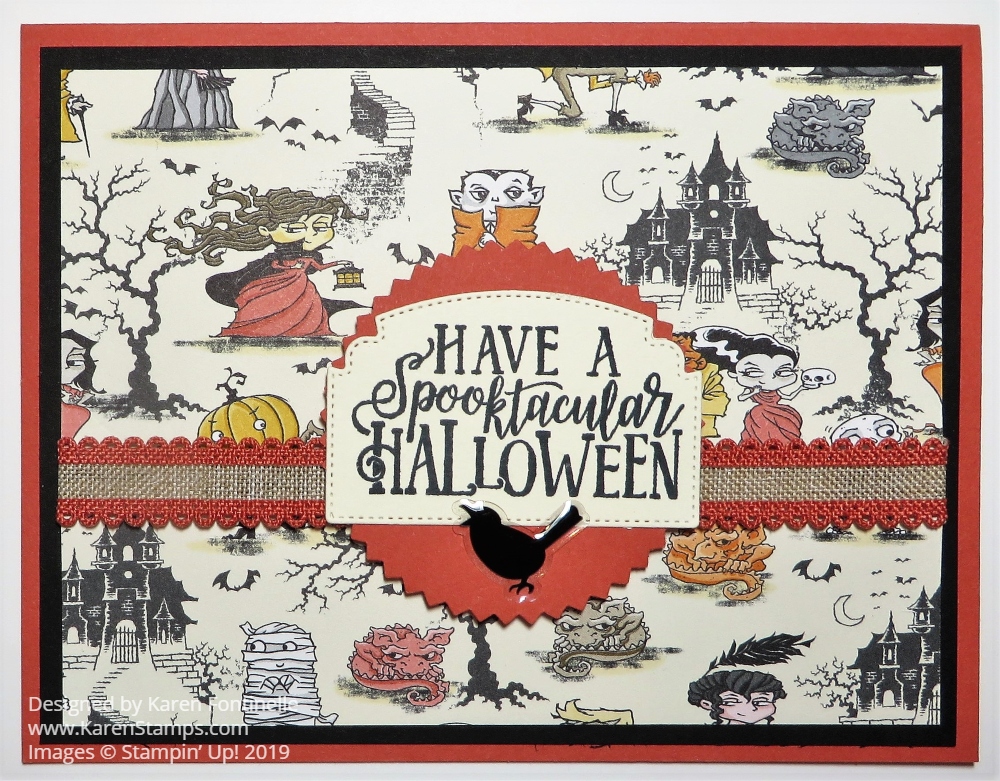
In between watching several baseball games and one Texans football game, I’ve spent some time making Halloween cards with the Monster Bash paper like this Spooktacular Bash Terracotta Tile Halloween Card. The Houston Astros have made their way to the American League Championship Series as have the St. Louis Cardinals (our hometown team) so we have been watching a LOT of baseball including the division games they got these two teams here. So it was fun to have some breaks stamping and making Halloween cards!
One of the coordinating colors for the Monster Bash Designer Series Paper is Terracotta Tile, one of the current In Colors. Since I haven’t used this color very much and the matching ribbon, I chose this color for the card base. The designer paper pattern is a cute one with little haunted houses and Halloween characters! I layered it on a piece of Basic Black to help it stand out.
The ribbon is wrapped around the designer paper and adhered on the back. It is the very nice Terracotta Tile 1/2″ Scalloped Linen Ribbon. You can use it to dress up a fun card like this one or use it on a fancier card. I’ve even cut it down the middle to use just the scalloped edge to decorate a card.
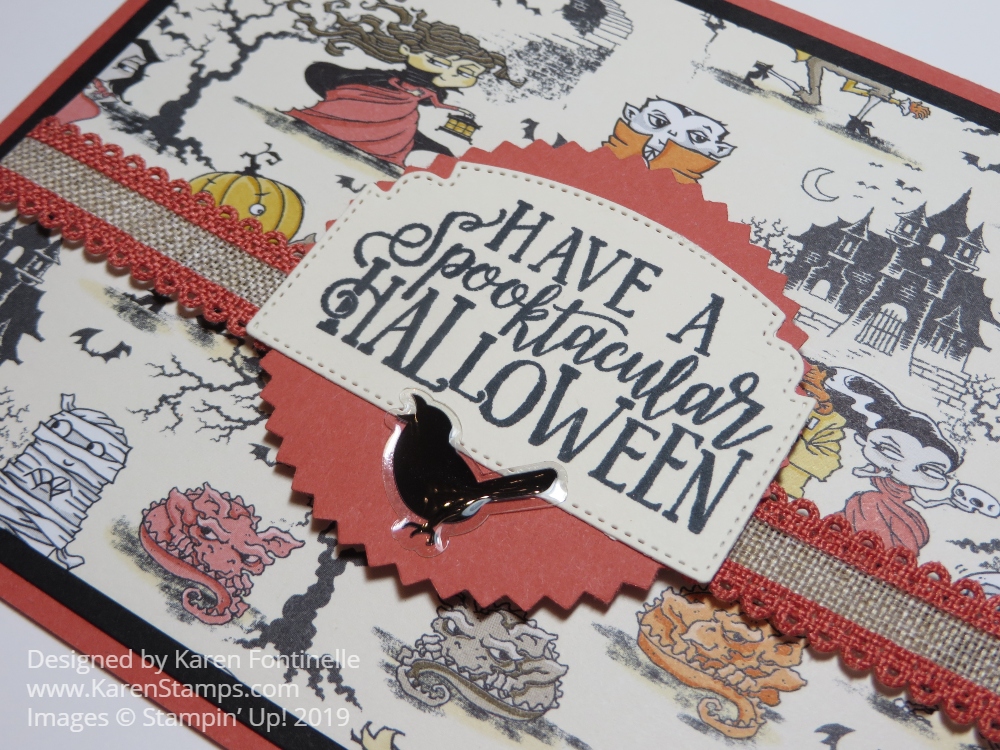
The greeting is stamped with the Spooktacular Bash Stamp Set. I really like this greeting and used it on a lot of cards! It is stamped on Very Vanilla cardstock which I think goes better with this card than Whisper White. Then it is die-cut with one of the Ornate Frames Dies. I love this particular shape that goes with this greeting so well!
Then I took a long time to decide how to layer the die-cut greeting on something! I just couldn’t find the right thing. Finally, I looked at my punches and chose the Starburst Punch. The greeting seemed to fit fine over the Starburst shape with a little room left for one of the blackbirds in the Monster Bash Enamel Shapes. I think the bird gives an appropriately spooky look to the card, right?! It’s fun to stick it on, anyway! A cute embellishment for a Halloween card!
All you have to do is change the designer paper pattern and the greeting if you want for another design for a Halloween card. It is fun making cards and treats with this Halloween paper and all the spooky, whimsical characters! The backside of some of the papers will also make very nice non-Halloween cards!
Make some Halloween cards this week and give them to your family or send them to friends who enjoy Halloween!
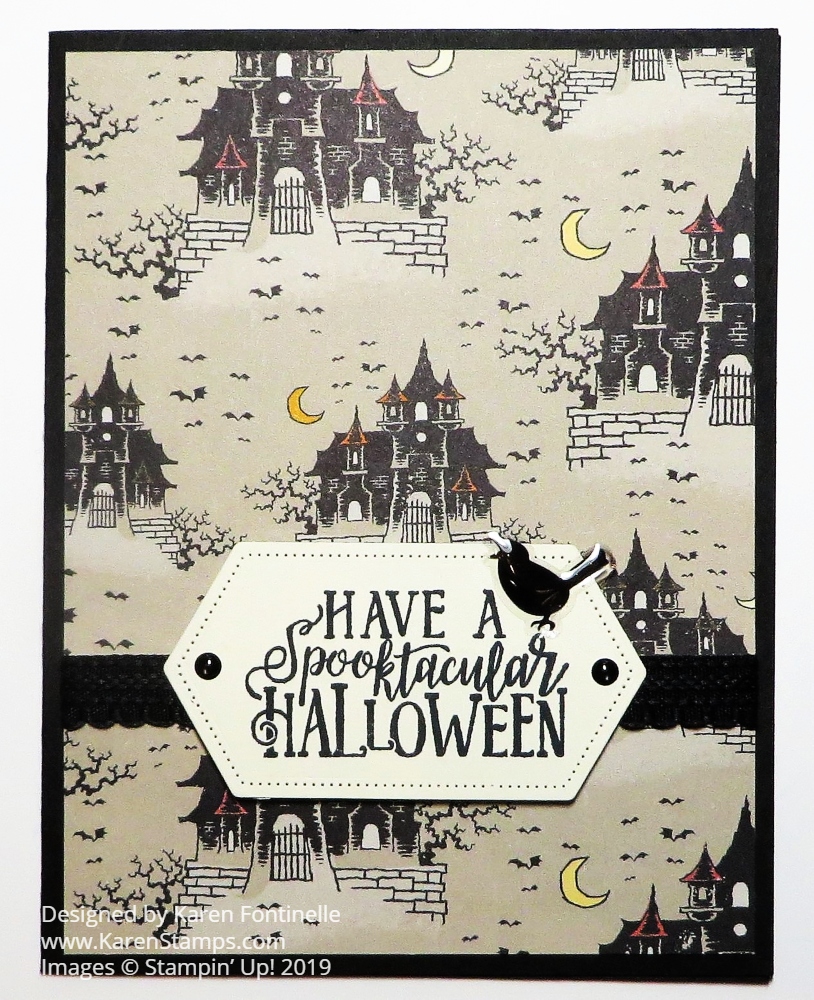
This Monster Bash Spooktacular Haunted House Halloween Card is certainly an easy card to make! And I love the paper! I had actually overlooked this pattern in the designer papers so I wanted to use it. The designer paper seemed interesting enough that all I needed on the card was a greeting…..and just a couple of easy embellishments!
The card base is Basic Black but of course, you could use any of the several coordinating colors with the Monster Bash Designer Series Paper. I chose this pattern with the haunted houses, not quite sure what else I would do with it.
Just for a little easy embellishment, I added two dots and a bird from the Monster Bash Enamel Shapes to the greeting.
Be sure to adhere a Very Vanilla layer inside the card with a stamped greeting and maybe a little Halloween stamping or strip of designer series paper since the cardstock is black. Then you can write a Halloween note or just decorate the inside of the card a little bit.
If you are making some Halloween cards, try this design that I did with my Monster Bash Spooktacular Haunted House Halloween Card and be sure to mail them to friends and family to wish them a Happy Halloween!