Category Archives: Christmas

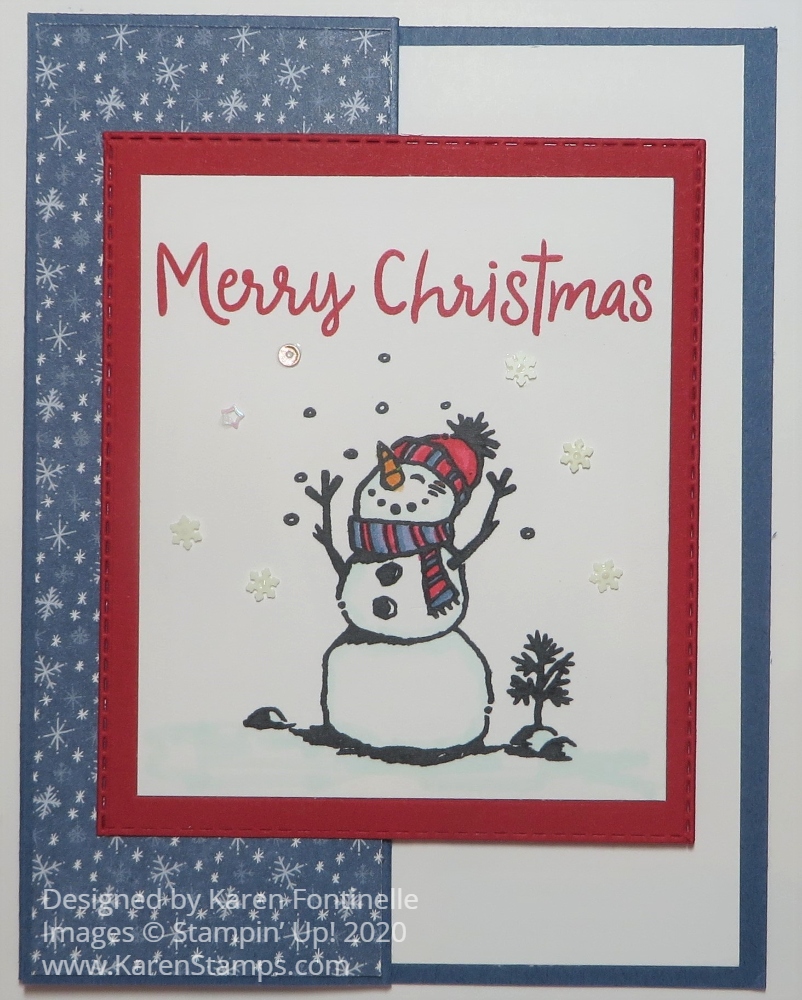
Snowman Z-Fold Merry Christmas Card

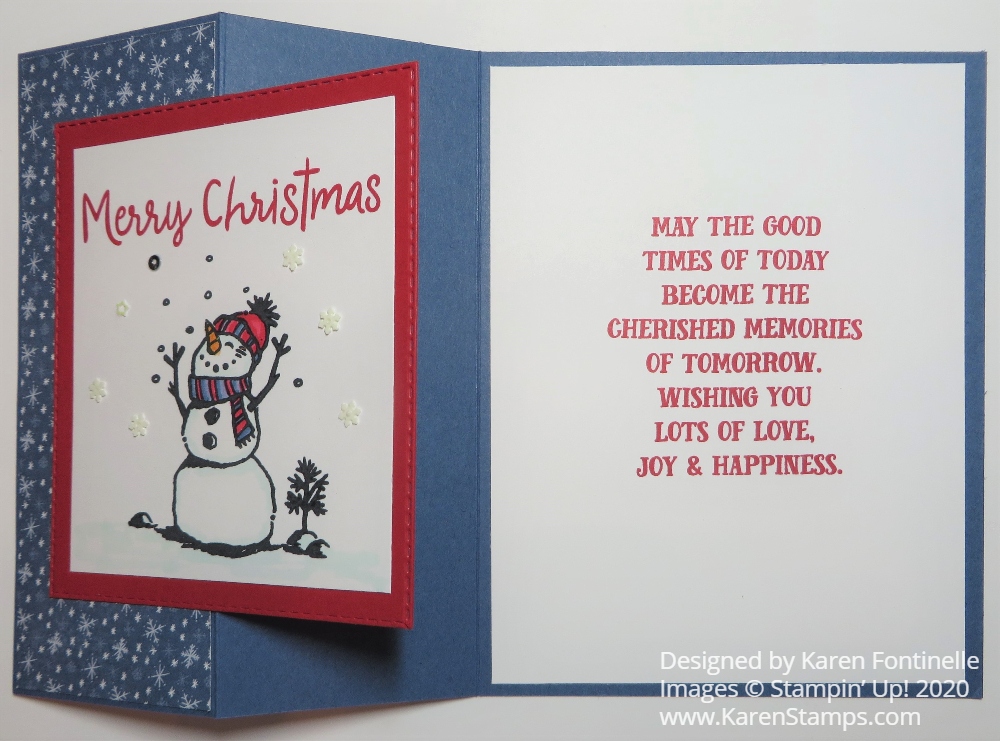
Snowman Z-Fold Merry Christmas Card Open

I was in a snowman mood when I made this Snowman Z-Fold Merry Christmas Card. I started off looking at the Trimming The Town Designer Series Paper and when I saw this snowflake print, I thought it would go well with one of the snowmen in the Snowman Season Stamp Set! Sometimes you get inspired with a card idea just by looking through your designer paper.

I decided to make a Z-Fold card. It’s something VERY easy and looks extra special. All you have to do is make a card base the usual way, then fold the front back on itself in half. So cut the cardstock like usual at 8 1/2″ x 5 1/2″. Score at 2 1/8″ and 4 1/4″. If the front of the card is 4 1/4″ wide, then you want to score that in half which would be 2 1/8″ to fold half of the front back to make that z-fold. It’s easy!

The card base is Misty Moonlight cardstock with a snowflake piece of Trimming the Town DSP. I cut it at 2″ x 5 3/8″. I could also have made it 1 7/8″ x 5 1/4″ for a slightly wider margin that would have matched the Whisper White inside layer.

The snowman is stamped in Black Memento Ink on Whisper White with the greeting, in the same stamp set, stamped in Real Red Ink. That piece is cut 3″ x 3 1/2″. It is layered on a piece of Real Red Cardstock die cut with a special technique using the Rectangle Stitched Dies. I cut out the rectangle, then moved the die so that it would make the rectangle shorter.

The snowman is colored the little bit it needs with Stampin’ Blends in Real Red, Misty Moonlight, and Pumpkin Pie with a tiny bit of Pool Party as shading on the snow. Then I adhered a few Snowflake Sequins around the snowman. The Take Your Pick tool is really handy for picking up and placing sequins on teeny tiny drops of Multipurpose Liquid Glue.

When adhering the snowman panel to the front of the z-fold, but sure to only put adhesive on the portion of the back of the snowman that will be adhered to the z-fold. You want to make sure that the panel you add to a z-fold card will cover any message inside so sometimes you have to play with positioning a little bit. The message I stamped inside this card is from the Tag Buffet Stamp Set.

Click HERE to see another z-fold card I made recently!

This really was an easy card and if you follow my design and directions, it will be even easier and faster for you to make a card like this Snowman Z-Fold Merry Christmas Card!

Snowman Z-Fold Merry Christmas Card

Easy Trimming the Town Christmas Card

Easy Trimming the Town Christmas Card

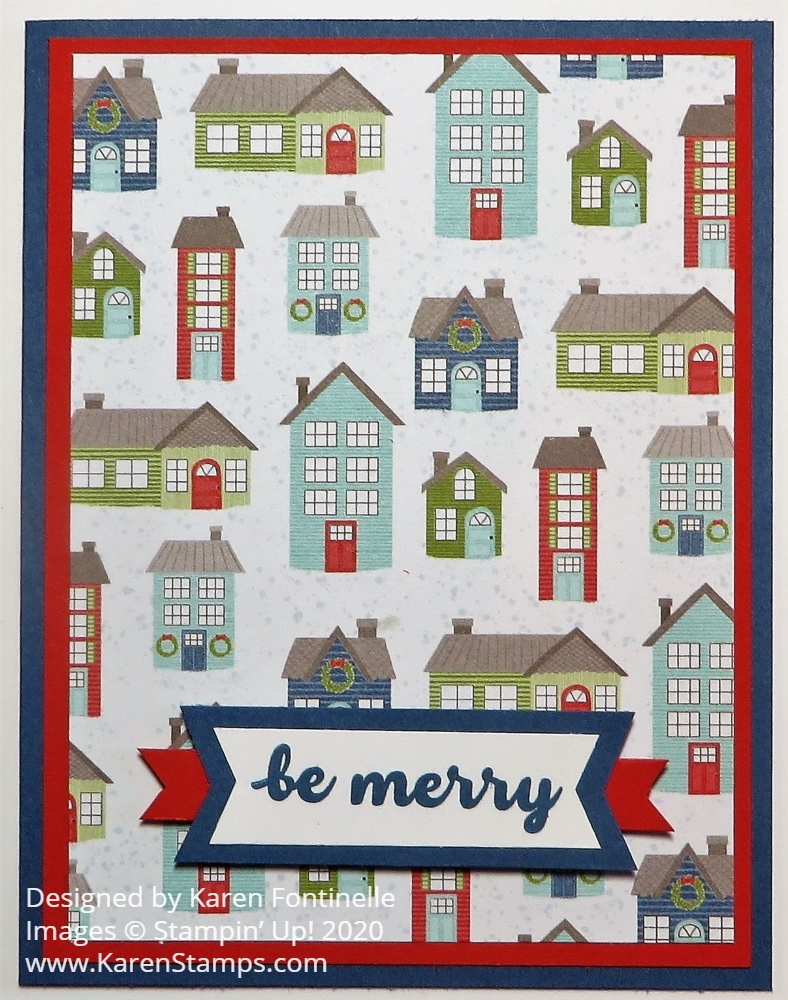
Don’t forget about the Designer Paper Sale going on this month (which is just about over) at Stampin’ Up! and the paper on this Easy Trimming the Town Christmas Card is one that is on sale, just in time for the holidays! This particular card is one that is about as simple as they get yet is colorful and festive and will spread holiday cheer!

The card base is Misty Moonlight, one of our In Colors, with a layer of Poppy Parade. I originally thought the red color on this paper was Real Red, but it is actually Poppy Parade. Not that you can’t use Real Red because I did on this other card I made!

I just cut a layer of the Trimming the Town Designer Series Paper with the smaller buildings on it. It is bright and colorful and makes a “happy” holiday card! Then all I had to do was add a greeting!

The greeting is from the Banner Year Stamp Set. This is a set that you might overlook but I have gotten a lot of use out of it with its many greetings and cute little images. I stamped it in Misty Moonlight Ink on Whisper White Cardstock and layered on a piece of Misty Moonlight Cardstock. I used the Banners Pick a Punch to punch the banner ends. If you don’t have the punch, just eyeball it and cut with Paper Snips. To help the greeting stand out, I layered a piece of Poppy Parade underneath and popped it all up on Stampin’ Dimensionals®.

The designer paper already had snowflakes printed on it, but you could add some Adhesive-Backed Snowflakes or some other sequins or gems if you wanted to jazz up the card a little bit more.

Just add a layer of Whisper White inside the card since the Misty Moonlight card base is a dark color. Maybe cut out one of the little buildings or add a strip of the designer paper or stamp a Christmas greeting inside if you like.

Be sure to check out the Designer Series Paper Sale, going on now in the Stampin’ Up! Online Store, only until October 31!

Designer Paper Sale 2020 Banner

Tag Buffet Stocking Christmas Card

Tag Buffet Stocking Christmas Card

If you need to make a lot of Christmas cards, you might want to consider a simpler card design, like this Tag Buffet Stocking Christmas Card, because not every card has to be elaborate to be beautiful. This card was not the result of a lot of planning and thinking. I had in mind making a simple Christmas card, pulled out the designer paper and then thought of using this stamp set. An already diecut Whisper White piece in my cardstock package inspired me to use it for the focal point. One thing just followed another.

The card base is Real Red and the designer paper I used is ‘Tis the Season 6″ x 6″ Designer Series Paper, which I just purchased. Originally I wasn’t too crazy about the paper designs and I was already buying other holiday papers so I didn’t think I needed it. But of course, eventually, I wanted it! The 6″ x 6″ size is very handy for cardmaking and you don’t feel so bad cutting up a 12″ x 12″ piece of DSP!

I also decided to use the Tag Buffet Stamp Set, which goes with the Tag Buffet Project Kit to make tags. I already made the tags in the kit, but the stamp set is very Christmas-y and good to use making cards or other projects for the holidays.

I found a die-cut Whisper White piece in my bag of cardstock and that gave me the idea to use the big “Merry Christmas” greeting stamped on it with the stamped and cut out Christmas stocking off to the side. The piece was die cut with the Rectangle Stitched Die. It has a really pretty edge on it which is why I like those dies so much. But when I stamped the Merry Christmas greeting across the rectangle, there really was no space for the stocking! I thought my original idea was ruined, but no fear! It occurred to me to cut the two words of the stamp apart! I know it is like heresy to cut stamps apart, but in this case, I could see no downside. I could still stamp the words side by side easily, but if I separated them I could stamp one on top of another in smaller areas. All it took was one snip of the scissors! Then there was room for the stocking!

I stamped the stocking on Whisper White in Memento Ink because I knew I would color with my Stampin’ Blends alcohol markers. I used the Light and Dark Real Red markers. I also could have used Cherry Cobbler since that is a coordinating color with the designer paper. I found the Real Red markers a little light but I just added some more coloring to the stocking.

After stamping and coloring the stocking, I cut it out by hand with my Paper Snips. Before adhering it to the greeting, I couldn’t resist stamping some greenery and holly on the cardstock. It was all in the stamp set and I wanted to play with more stamps! Then I popped up the stocking with Stampin’ Dimensionals®. For some bling, I added some Red Rhinestone Basic Jewels. And for just a little bit of glimmer, I used Clear Wink of Stella on the white areas of the stocking with the glitter brush.

On the inside of the card, I added a layer of Whisper White on top of the Real Red and stamped the long sentiment that is in the stamp set in Real Red Ink. The I also added two stamped pieces of the same greenery I used on the front of the card.

If you are interested in the Tag Buffet Stamp Set, you might enjoy the Tag Buffet Project Kit for making some tags (or even using the tags to make cards!). I loved working on these tags! The only stamping was the greeting, everything else was supplied and I just had to assemble. They are very pretty. Check out my post about the tags HERE.

I like to make a variety of Christmas cards to send out. Some I might make easy and some fancier. This Tag Buffet Stocking Christmas Card is a simpler one that you might enjoy and still would impress the recipient!

Shop Stampin’ Up! Online HERE!

Trimming the Town Christmas Wishes Card

Trimming the Town Christmas Wishes Card

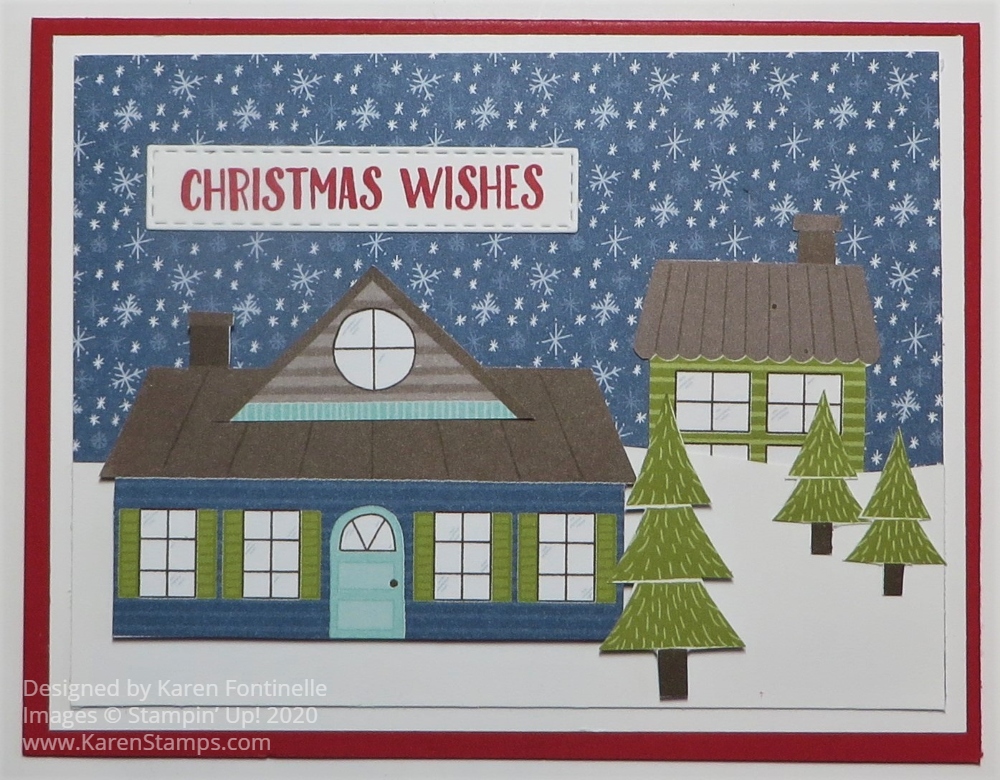
If you would like to have some fun with designer paper and card design like this Trimming the Town Christmas Wishes Card, this designer paper is for you! If you like, you can feel like a kid playing with paper and scissors and building a little town or landscape!

During the Stampin’ Up! Designer Series Paper Sale this month, I couldn’t resist purchasing this Trimming the Town Designer Series Paper. I also purchased the stamp set, but for this card, I only used the paper except for the greeting. I simply took one of the papers that had the larger houses and buildings printed on it and cut out some of the images with Paper Snips.

The large house on the front of my card I actually “remodeled”! The basic house was printed on the paper but as I tried to conserve as much of the paper as I could while cutting into it, I noticed that at the very bottom of the paper was a partial building and it was this roof piece with the round window, so I cut that roof piece out and adhered it to the top of my large house! The other little building on my card was also at the bottom of the page so I cut that out and stuck it behind the snow as it looked like the lower part of the image could have been cut off being placed at the bottom edge of the paper.

The card base is Real Red. The actual coordinating color with the paper is Poppy Parade, but I think the Real Red worked just fine on this card. Besides, I love Real Red! I put a layer of Whisper White underneath the Trimming the Town DSP with the snowy sky pattern. What a perfect paper to use as a background on a card or project! I covered the bottom portion of this designer paper with a piece of Whisper White to look like snow. I cut this the size I wanted to fit and then just added a little curviness to the top, just freehand although there are some dies that could do the same for you.

I just placed the two buildings and trees where I wanted them on the card and popped up the larger house with Stampin’ Dimensionals® as well as the large tree. If I had cut out some smaller buildings, I could have played a little more with the landscape. There is so much design potential with this designer paper as well as if you used the Coming Home Bundle (stamp set and dies).

One of the papers in the Trimming the Town package, is a full sheet of a winter scene that you could actually frame as is for a home decor piece, or use as a scrapbook page background or cut out various sections. It’s really a fun package of designer paper for the holidays!

The greeting I used on this card is from the Banner Year Stamp Set. I stamped it in Real Red ink and die cut with one of the Rectangle Stitched Dies. I think it is a perfect fit on this card.

Don’t miss out on the Designer Series Paper Sale going on until October 31 in the Stampin’ Up! Store! There is a good choice of select papers and Trimming the Town is one of them 15% off! I think you will enjoy using this paper as I did on this Trimming the Town Christmas Wishes Card.

SHOP STAMPIN’ UP! ONLINE HERE!

Can’t Miss THIS November Paper Pumpkin!

Paper Pumpkin is our monthly subscription service that offers unique papercrafting projects for crafters of any skill level! In these all-inclusive kits, subscribers receive pre-cut paper pieces, embellishments, ink, and an exclusive stamp set designed to encourage them to explore their creativity. As their subscription continues, subscribers will have a collection of cards—and other creations—for a variety of occasions, in addition to a stockpile of supplies!

So, what’s in store for this month’s Paper Pumpkin kit? November’s cute, gingerbread-themed kit contains enough supplies to create one-of-a-kind Christmas crafts! Whether it’s a gift card carrier, traditional card, or tasty-looking tag, this sweet and seasonal kit is the key to heartfelt holiday gifting. With curly cutouts, sugary stickers, and delicious die-cut designs in a special-edition box, a jolly holiday will be on its way with this kit!

ABOUT THE NOVEMBER KIT

Name: Jolly Gingerbread

  • Kit contains enough supplies to create 15 gift card carriers and coordinating envelopes.
  • Kit contents can also be used to design traditional holiday cards, gift tags, and other paper projects.
  • Contents arrive in a collectible, special-edition box!
  • Project size: 2-1/4″ x 4″
  • Envelope size: 2-3/4″ x 4-3/8″
  • Coordinating colors: Cinnamon Cider, Daffodil Delight, Calypso Coral, Mint Macaron, Shaded Spruce, Blushing Bride, and Whisper White
Paper Pumpkin Jolly Gingerbread Kit Nov 2020

Join Paper Pumpkin Today Here!

Deadline to get this November Paper Pumpkin Kit is November 10th

(while supplies last).

Sign Up Now For the October 2020 Paper Pumpkin Kit!

Paper Pumpkin October 2020 Kit

Only a few days left to get signed up for this October 2020 Paper Pumpkin Kit! Paper Pumpkin is a papercrafting kit sent to you in the mail once a month with all the materials you need to complete the project inside! So easy for you whether you are a novice or an expert! Even experts sometimes like to just sit down and make something without thinking up a design and gathering the supplies!

The Joy to the World Paper Pumpkin Kit has been thoughtfully released in preparation for the season of spreading joy. October’s Paper Pumpkin kit was designed to bring people together—connecting them with one another and spreading joy with each other around the world! With die-cut sentiments in English, French, and German, subscribers can send holiday cheer to their friends across the globe—in their language.

To connect and spread joy with international customers and demonstrators through the Joy to the World Paper Pumpkin Kit, join our Facebook group: Joy of Paper Pumpkin! When connecting with your new friends, don’t forget to share your experience with the #joyofpaperpumpkin hashtag.

Be sure to get signed up for Paper Pumpkin by this Saturday, October 10th.

Here is my personalized link to go directly to my page to sign up!

OR

If you are placing a Stampin’ Up! order by October 10th, you can add a Prepaid subscription to your order, particularly if you are trying to reach $150 or more in Stampin’ Rewards. The Paper Pumpkin subscription of whatever length you choose will count toward your total Stampin’ Up! order.

Go to Prepaid Paper Pumpkin!

Once you submit your Stampin’ Up! order, you will receive an email telling you how to set up your Paper Pumpkin account. Be sure to do this by October 10th so you will receive this October Kit. If you need help, let me know.

Paper Pumpkin is a present you give yourself every month! Have fun making the project inside the box or use the supplies to make something to your own liking! There are always a multitude of alternative projects posted online, even on the Paper Pumpkin directions, if you prefer to make something a little different. Have fun! Be creative!

Join Paper Pumpkin TODAY!

Freezin’ Fun Christmas Wishes

Freezin' Fun Christmas Wishes

Here’s a cool and icy looking Christmas Card, perfect for the skiing bunny, called Freezin’ Fun Christmas Wishes. The little guys in this stamp set are so cute you can’t help but love them! This little bunny is having fun skiing down a pretty steep slope amid the snowflakes! If you are making several designs of Christmas cards, you might like this one for a fun, whimsical card to send someone special.

I had planned to use the Feels Like Frost 6″ x 6″ Specialty Designer Series Paper. It was brought back from last year. I guess all the snowy, wintery photographic scenes on the paper were hits! As pretty as those scenic papers are, the other side with silver foil designs is also pretty and fun. It’s hard to use one side and miss out on the opposite side! For this card, the foil side won out, even though I had planned on the wintery scenes! You never know when you start creating!!

The card base is Balmy Blue with a layer of Whisper White to help the Feels Like Frost paper stand out a little. Cards with foil are always hard to photograph because of glare, but this paper is silver foil with white dots that look like snow.

I stamped the bunny from the Freezin’ Fun Stamp Set and cut him out easily with the Freezin’ Friends Dies. You can buy both the stamp set and the dies together in the Freezin’ Fun Bundle and save 10%.

The Balmy Blue oval is die cut with the Stitched Shapes Dies. In the Freezin’ Friends Dies is just a long curvy die with which I made the snowy slope. I die cut the slope just out of a scrap of Whisper White, then adhered it to the oval and trimmed off the excess with Paper Snips.

The bunny is popped up on Stampin’ Dimensionals skiing down the slope! Of course, I colored him with Stampin’ Blends first, which I love to do! After adhering the layers together to make the card and adhering the oval to the front, I added some Adhesive-Backed Snowflakes. Those were sure fun to stick on! You could also glue on Snowflake Sequins with teeny tiny drops of Multipurpose Liquid Glue. Be sure to grab your Take Your Pick tool when you are handling these tiny pieces! It makes it a lot easier!

The greeting is stamped in Balmy Blue Ink from the Banner Year Stamp Set. I simply stamped it on a long scrap and then punched the ends with the Lovely Labels Pick a Punch. Not being able to leave something plain alone, I had to add a couple of Rhinestones to the ends!

Even with the die-cutting, this card is pretty easy to make, simple design! Check your stash and see if you bought this designer paper last year and if so, get it out and start making some cards with it. It doesn’t even have to be just for winter or Christmas with the foil designs! If you don’t own it, you can purchase it, but wait until October 1st! There’s a designer paper sale coming!!

SHOP STAMPIN’ UP! ONLINE!

Tag Buffet Christmas Gift Tags

Tag Buffet Christmas Gift Tags

For some fun and relaxation, I took the afternoon and spent time making the kit I recently ordered that I couldn’t wait to get my hands on and made these Tag Buffet Christmas Gift Tags! You will find this Tag Buffet Project Kit in the Holiday Catalog on page 5. I immediately loved the images for the tags and couldn’t wait to order it! Then I forgot to order it over two orders and finally, I got it!

The project kit comes in a cute green holly print box. As long as you have a cute box, that’s almost all you need, right?! If you want, you can order the coordinating Tag Buffet Stamp Set to stamp the greetings on the tags. But if you already have a good selection of Christmas greeting stamp sets, you might have something you can use without buying a new stamp set. But I do love the ornament and stocking in this stamp set, plus the verse that you could stamp inside the card. I plan to make some extra Christmas cards and maybe more tags using this stamp set.

You get all the materials you need to make the tags, but you do need your own ink pads and Stampin’ Dimensionals. The coordinating ink colors are Real Red, Shaded Spruce, and Garden Green. The only stamping is for the greeting so really, you could get buy with any one of those colors or two if you wanted a red and green. I did use a lot of Dimensionals but I did use up some scrap edges of old sheets because no one will see them anyway! And if you don’t want to pop things up, you could just use glue or Stampin’ Seal or Stampin’ Seal+.

And if you want to, you don’t have to follow the directions at all, just do your own thing with the kit supplies. This would be a great kit for a beginning or novice stamper or crafter because all you have to do is stamp the greetings and then assemble the tags and tie them together with the included gold twine.

Since they are gift tags, I stamped the “To: From:” on the back of each of the tags before I put them together. The tags are large so if you also want to add a personal message on the back of the tag or stamp some other image, there is plenty of room! They are really nice tags!

Another thing you could do, is make the tags and then use them as a focal point on the front of a Christmas card. And what would be really fun is if you used just enough adhesive to hold it on the card but that the recipient could take off and use themselves or hang on the tree like an ornament. When I was growing up, my mother knew some people who were very rich and their Christmas card was always the fanciest one, but part of it was actually an ornament to save and use! We always looked forward to that one!

Don’t miss the Tag Buffet Project Kit in the August-December 2020 Holiday Mini Catalog on page 5! You might miss it as you rush to page through the beautiful catalog! The kit makes 30 tags!! That is 6 different designs, 5 tags each! The tags are 3 1/4″ x 4 1/4″ so that is a nice size. Your present will really stand out with these beautiful handmade tags!

SHOP STAMPIN’ UP! ONLINE!

A Special Paper Pumpkin Kit For October 2020!

Paper Pumpkin October 2020 Banner

This holiday season, share the joy of Paper Pumpkin! The Joy to the World Paper Pumpkin Kit is an exclusive holiday kit that provides a specially-designed box, enough supplies to create eight elegant cards, and an opportunity to connect with the Stampin’ Up! global community. 

With October’s magical kit, not only will you get a head start on your holiday crafting—you’ll get to create Christmas cards, share project ideas, and spread holiday cheer with Stampin’ Up! customers and demonstrators around the world! After you receive your kit, you can join the Joy of Paper Pumpkin Facebook group to make the most of this month’s kit.

ABOUT THE OCTOBER KIT

Name: Joy to the World

Details

  • Kit contains enough supplies to create eight cards—four each of two designs—and coordinating envelopes.
  • Kit includes die-cut pieces in English, French, and German. This will allow you to create cards you can use to connect with other customers and demonstrators around the world—in their language! To learn more about how to do this, read the “The Joy of Paper Pumpkin” section on this page.
  • Card size: 4-1/4″ x 5-1/2″ (10.8 x 14 cm)
  • Envelope size: 4-1/2″ x 5-3/4″ (11.4 x 14.6 cm)
  • Coordinating Colors: Cherry Cobbler, Crumb Cake, Early Espresso, Just Jade, Soft Sea Foam

Don’t worry, we’ve put a reminder flyer with details—and a key to help you translate sentiments—in every Paper Pumpkin kit so you won’t forget to participate in this fun global sharing!

Note: Customers and demonstrators in North America will receive this kit during the October subscription period (kits will ship around 11 October). The release date for our global markets will be 3 November. Make sure you join the Facebook group and save some of your cards so you can join in on the fun global sharing when customers in other markets receive the kit!

Sounds interesting, right?! It’s early, but sign up now and you’ll be ready!

JOIN PAPER PUMPKIN TODAY!

Deadline: October 10, 2020

This is my personalized link so you don’t have to look for my name! If you have a Demonstrator you work with, go to www.paperpumpkin.com.

Make Christmas Tags With the Tag Buffet Kit

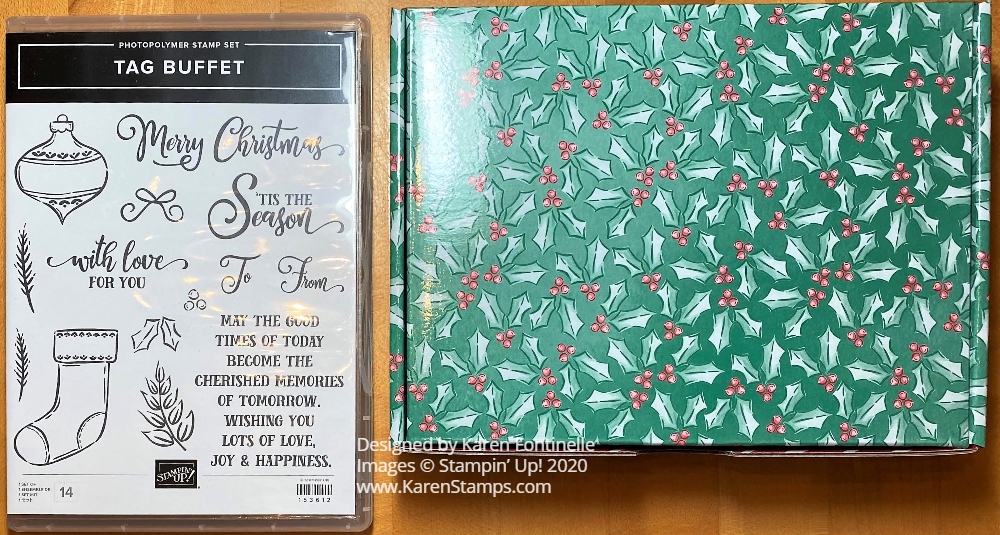
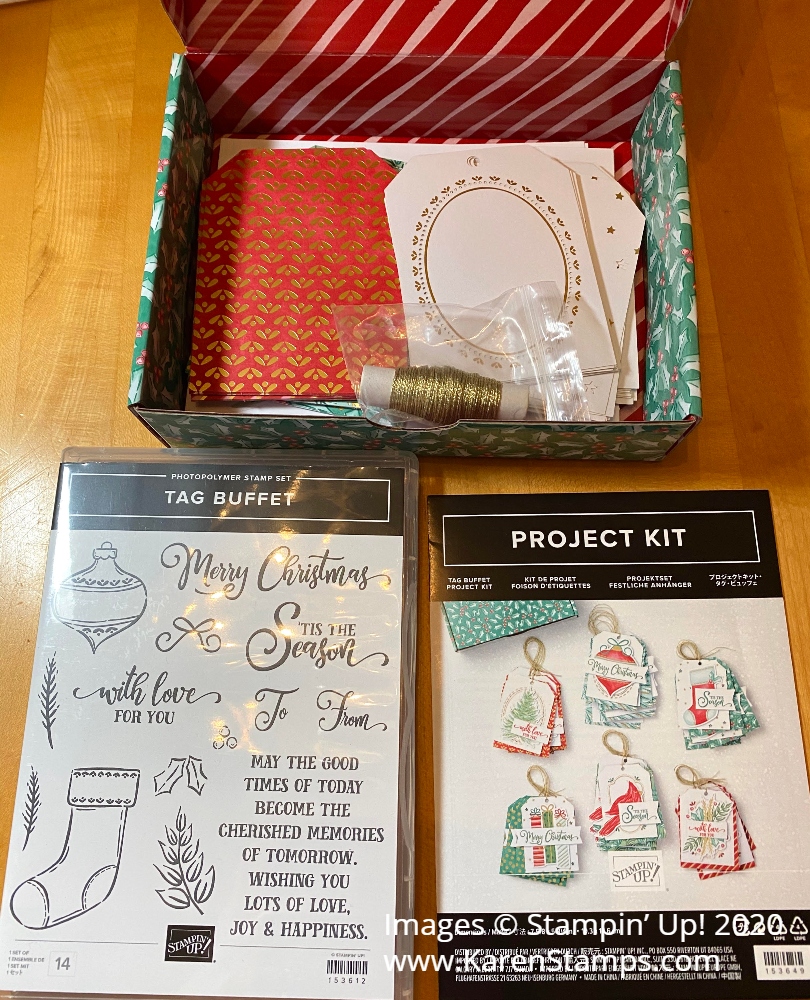
Tag Buffet Project Kit and Tag Buffet Stamp Set

Just the box alone signals that there is something really good inside! I always like a cute box! Inside this cute Christmas box are all the supplies you need to make Christmas Tags with the Tag Buffet Kit.

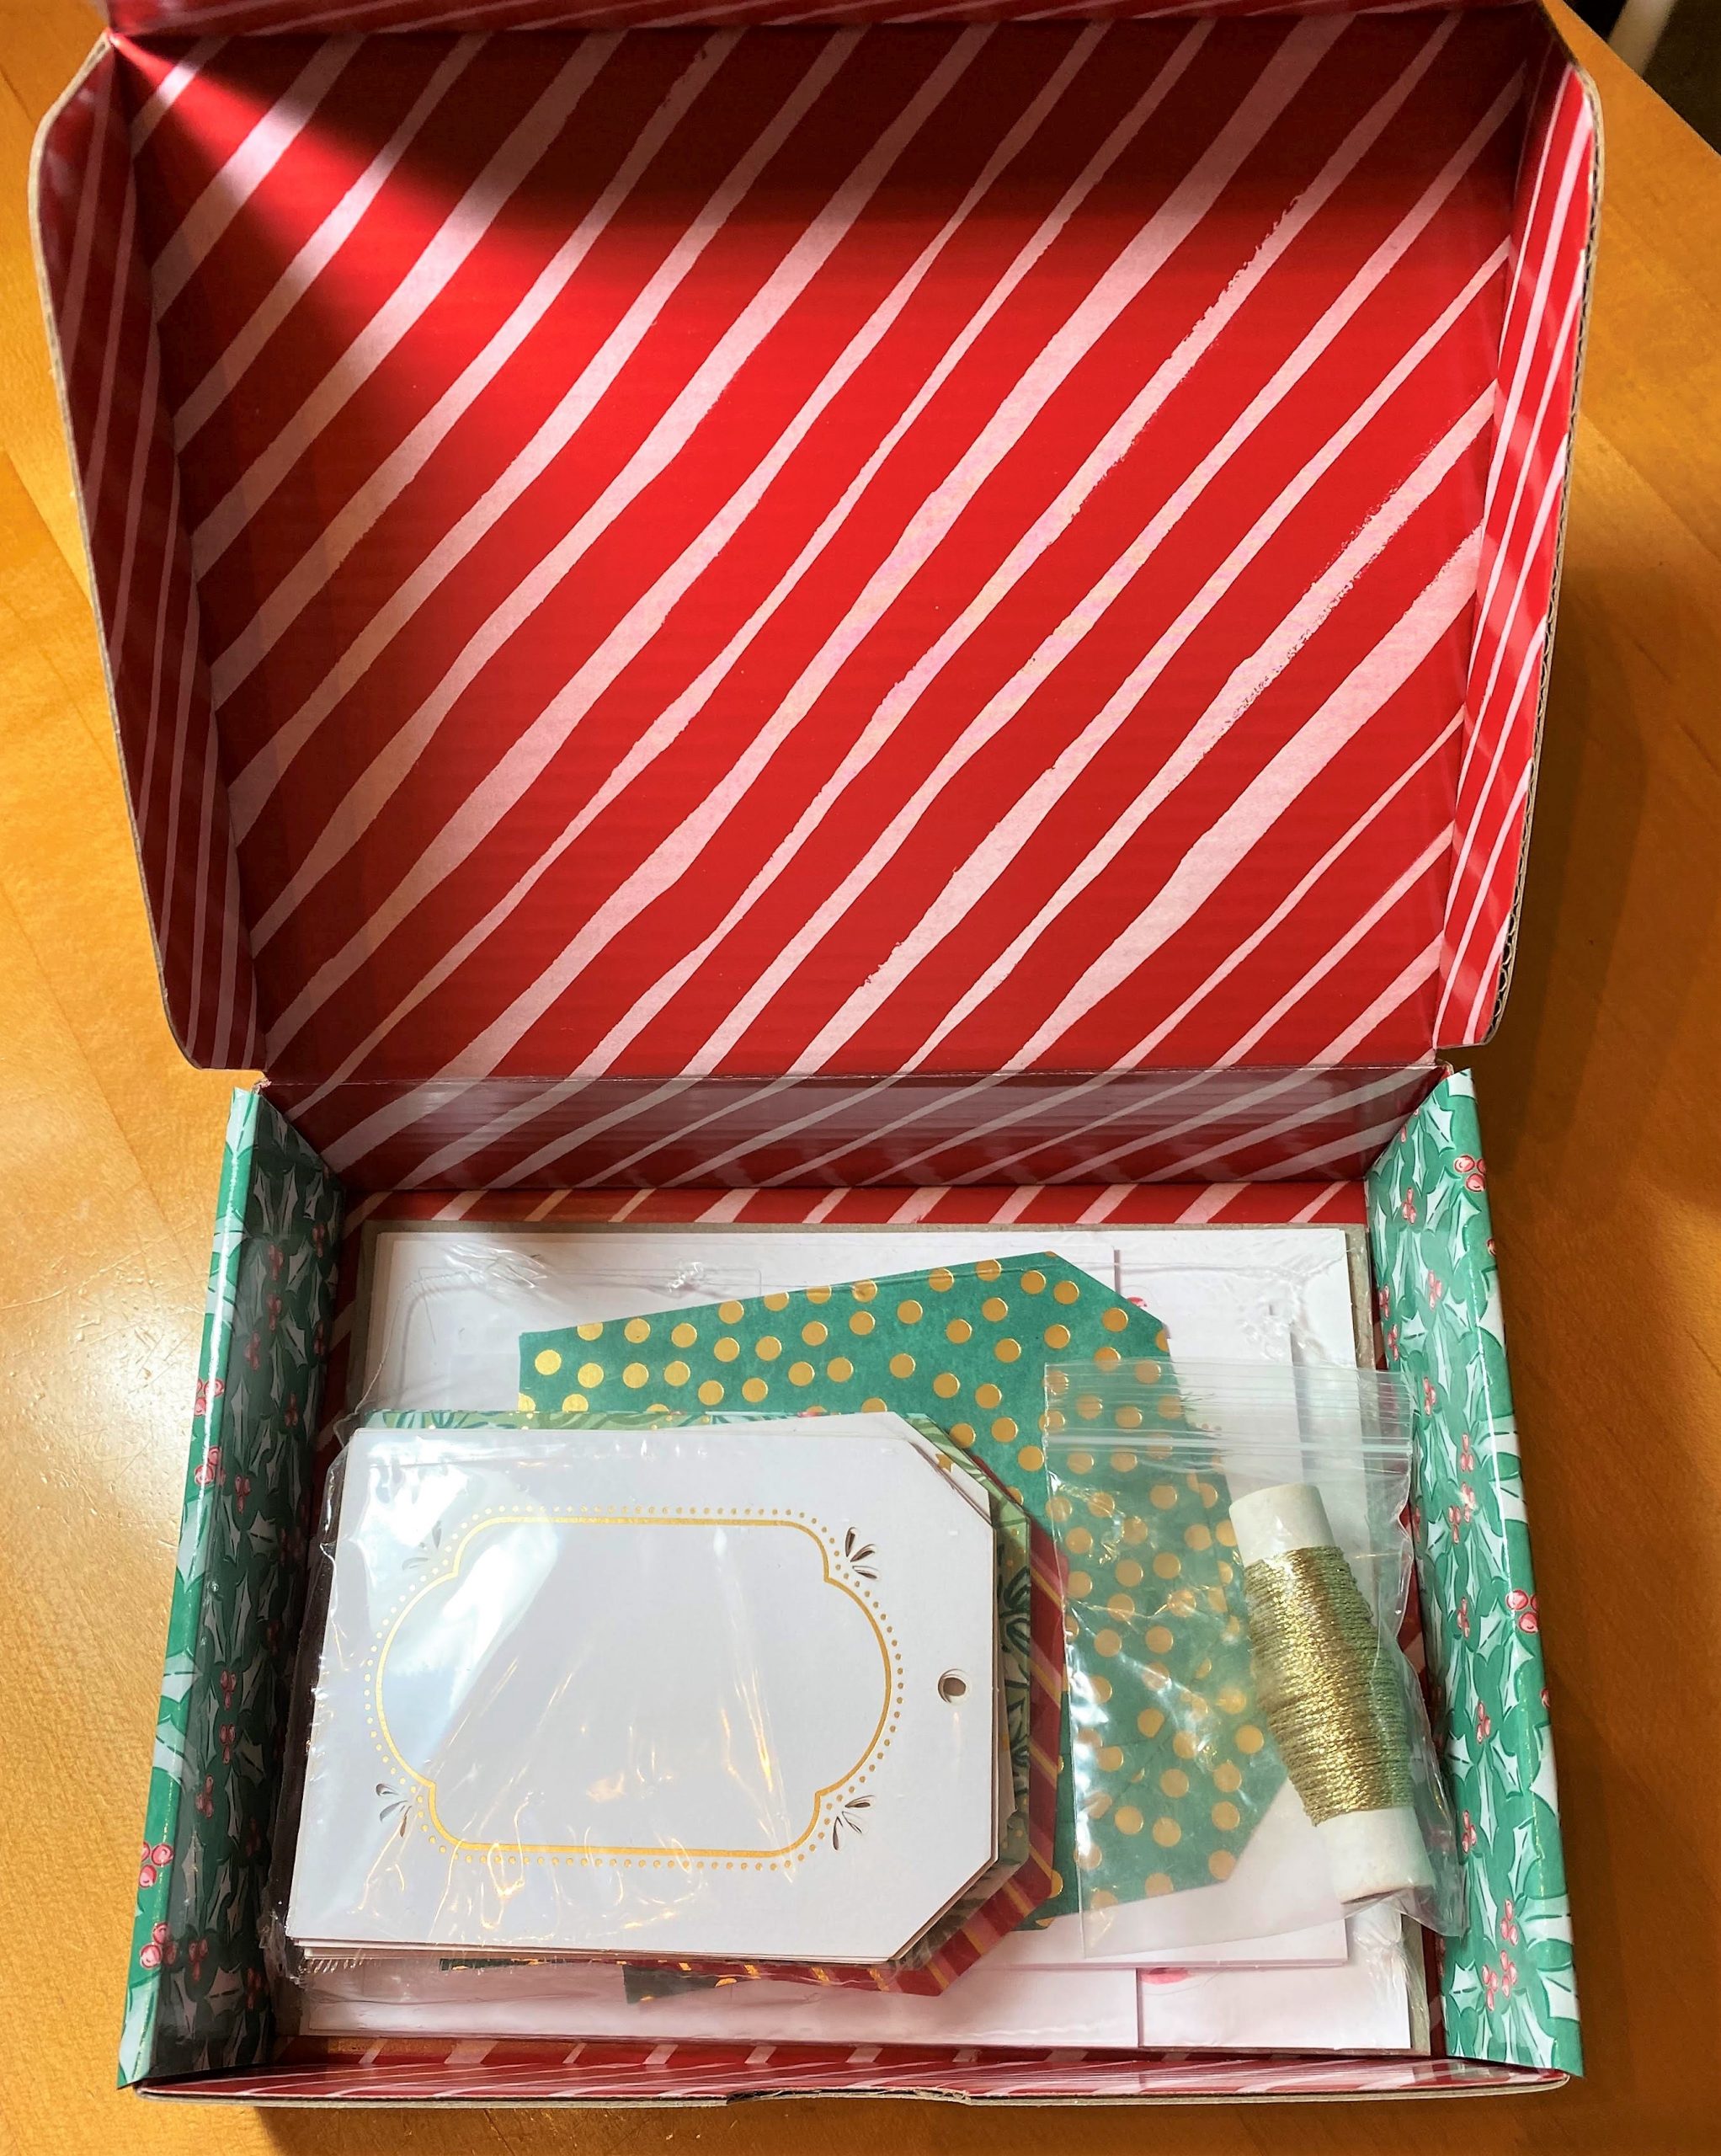
Tag Buffet Kit Open

Just open the box and see all the wonderful supplies inside!

Tag Buffet Contents

Make thirty Christmas tags, 5 each of 5 designs with this Tag Buffet Project Kit. You will love all the included pieces!

Tag Buffet Contents opened

These are beautiful images with a watercolor look and beautiful tags to use! Stamp on greetings with the Tag Buffet Stamp Set! You can use another stamp set with Christmas greetings if you have one, but I always like to get the one that matches! Then you can use the greetings on other Christmas card projects.

Tag Buffet Project Kit and Tag Buffet Stamp Set

The Tag Buffet Project Kit looks like a gorgeous kit to make it easy to sit down and have a productive crafting time! Just assemble the pieces as directed, or change it up to make your own tags. And who doesn’t need more tags when it is time to wrap gifts?! Save yourself a trip to the store at the last minute as you wrap gifts and make some special tags soon! If you want this tag kit, order it soon so it doesn’t go on backorder just when you wanted to get it! Make some quality Christmas tags for some special gifts!

SHOP STAMPIN’ UP! ONLINE HERE!

Freezin’ Fun Snowflake Card

Freezin Fun Snowflake Card

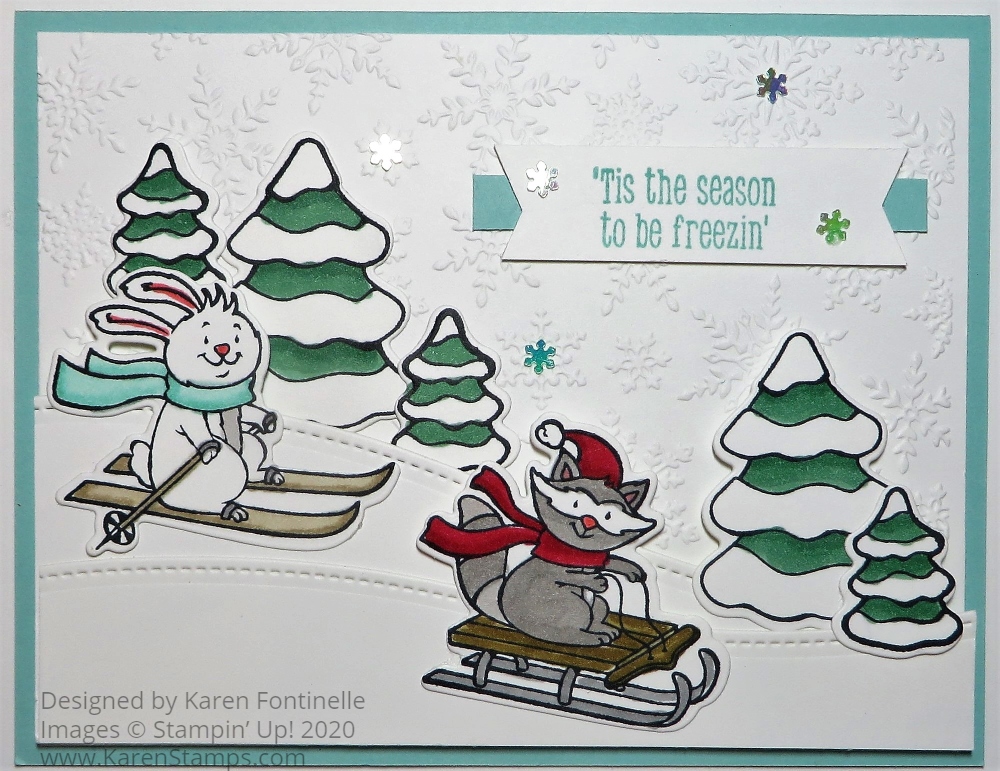
If you are interested in a variety of fun cards to make for the holidays, this Freezin’ Fun Snowflake Card might just get your creative juices flowing with ideas. There are so many possibilities with this stamp set and bundle, whether you “just stamp” or use the dies and create a whole winter scene.

I have to admit, this Freezin’ Fun Stamp Set was not one that I was interested in in the least in the Holiday Catalog. But then, recently, I saw some super-cute samples and I had to have it! The little critters are so cute and you can use one or all of them to show them having fun in the snow! Stamp them in Memento Ink and color in with Stampin’ Blends or Watercolor Pencils, perhaps.

There are also Freezin’ Friends Dies to go along with the stamp set. This makes it easy to die-cut the characters and as many trees as you want plus all the other fun things that are in the stamp set. If you want to save 10% on the stamp set and dies, buy the Freezin’ Fun Bundle.

To make this card I started with a card base of Pool Party. That color just reminded me of coolness and ice so I thought it would work for this card. For the layer, I embossed the Whisper White piece with the Winter Snow Embossing Folder to make a snowy background easily!

There is an odd long die that you can use to make a snowy hill. I die-cut two pieces, one higher than the other, for the snow for my characters to sled and ski down! You can just make these different widths and then layer then however you like. They have a pretty stitched edge, too. I popped up the back snowhill with Stampin’ Dimensionals and then adhered the front one directly on top of the back one.

The bunny and the raccoon are stamped and colored, the die-cut. I used the new Magnetic Plate with my new Stampin’ Cut & Emboss Machine and it worked perfectly. It is a self-healing mat and is actually used as a cutting plate, plus is magnetic all over! In fact, you are encouraged to place your dies around different spots on the Magnetic Plate, not just in the center, to help it wear better. I stamped and colored a bunch of large and small trees, to save a couple for another card.

This isn’t necessarily a card you want to make a bunch of because it takes a little time with the die-cutting. But you will be able to make so many fun cards and other projects with this Bundle or even just the stamp set.

Then I had to try out the new Adhesive-Backed Snowflakes! The description says they are two colors, Iridescent and Just Jade. I can certainly tell they are Iridescent. I thought maybe there were some pinks in there too! Anyway, they are pretty and I stuck a few on this card right on top of the embossed snowflakes. Also on the greeting, which is included in the Freezin’ Fun Stamp Set.

If you are ready for some wintry fun, get this Freezin’ Fun Bundle and stamp and die-cut away! It’s really a fun and cute set to have! Check it out on page 69 of the Holiday Catalog, the Stampin’ Up! August-December 2020 Mini Catalog. Then start making some cards like my Freezin’ Fun Snowflake Card!

Don’t Stop Believin’ Santa Christmas Card

Don't Stop Believin' Santa Christmas Card

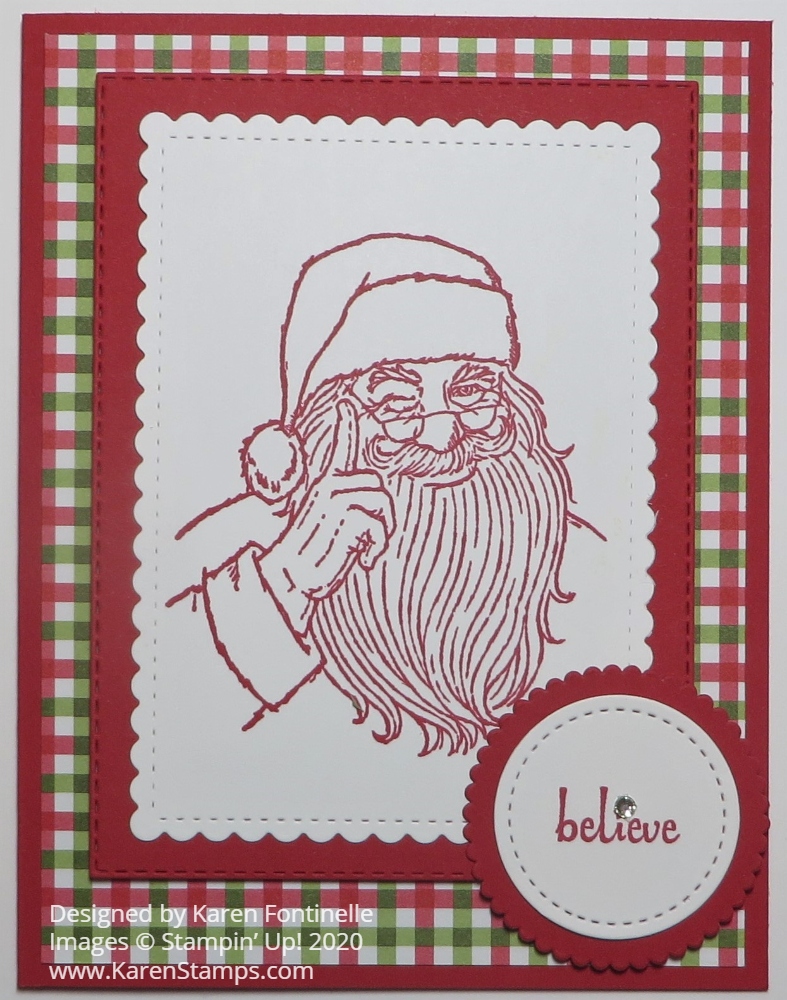
I got this Don’t Stop Believin’ Santa Christmas Card idea from myself, from Pinterest! I happened to see my Christmas Pinterest board and spotted a card I made last year with the Holly Jolly Christmas Stamp Set and thought I could do the same thing with a current stamp this year!

I planned to call this a monochromatic card, but since there is green in the plaid paper, maybe it’s technically not monochromatic! The card does have a “red” theme, though.

The card base is Real Red Cardstock with a layer of red & green plaid in the Heartwarming Hugs Designer Series Paper. The Santa is stamped from the Don’t Stop Believin’ Stamp Set. Isn’t that the best name?! It’s really a cute stamp set, worth a look! I stamped the Santa in Real Red on Whisper White and die-cut with one of the Stitched So Sweetly rectangle dies. The next smaller one was a little too small.

I wanted a layer underneath the Santa in Real Red but the Rectangle Stitched Dies don’t fit the Stitched So Sweetly rectangles exactly. I wasn’t quite sure what I was doing, but I shortened the Stitched Rectangle so it would fit the Santa better. You can find the best technique for doing this, but I took a guess and it worked. I die-cut the rectangle part way, then moved the die up so it would be shorter, keeping the die fit into the part that was already cut. You can feel it, if it is still in its die-cut design.

Next, I stamped the word “believe” in Real Red ink from the Itty Bitty Christmas Stamp Set. That word is die-cut with a small Stitched Shapes circle die. Then this was layered on a scalloped circle die in the Layering Circles Dies in Real Red.

There is a tiny star above the “i” and I thought it would be cute to put a small Rhinestone above it, almost like the twinkle in Santa’s eye. Actually, I’m not sure I like the rhinestone there, maybe some rhinestones scattered around the Santa would have been better. What do you think?

I popped up the Santa image and layers on Stampin’ Dimensionals and also the greeting. I had to put the Dimensional under the greeting off to the one side so it would line up with the popped up Santa image. Otherwise, one side of the greeting would be above the Santa. I did add a Mini Glue Dot to the side of the greeting that would overlap the Santa image to hold it in place there.

Here is my card from last year, the Monochromatic Real Red Holly Jolly Santa Christmas Card. This card is even a little simpler, cutting just rectangle shapes and an oval.

You might enjoy making this Don’t Stop Believin’ Santa Christmas Card with this cute stamp set, no matter which card design you come up with!

Shop Stampin’ Up! Online HERE!

Pine Tree Punch Christmas Card

Pine Tree Punch Christmas Card

Even though we always want new things, I was happy to see a few things I already purchased last year show up in the new Stampin’ Up! Annual Catalog. Two things I used on this Pine Tree Punch Christmas Card were the Perfectly Plaid Stamp Set for the greeting and the Pine Tree Punch for the Christmas trees.

I got the idea for this card by looking back at last year’s Holiday Catalog at a sample of a tag. I changed it a little bit plus made it into a card. Of course, I could have stamped the trees from the Perfectly Plaid Stamp Set and punched them out as they did on the sample from last year’s catalog, but instead, I wanted to use our new Plaid Tidings 6″ x 6″ Designer Series Paper for the trees. One punch and done!

Instead of doing all three trees in plaid, I punched one out of Gold Foil, but then I embossed it with the new Dainty Diamonds Embossing Folder. Two trees are adhered flat to the background and the front green and red plaid tree is popped up on Black Stampin’ Dimensionals.

The card base is Real Red with a layer of Shimmery White Cardstock. I love the Shimmery White Cardstock for its very subtle shimmer. It is basically white but just a tiny shade off-white. I embossed this layer with the new Winter Snow Embossing Folder.

The circle behind the trees is actually two die cuts in Real Red. The outer one is the largest Layering Circle Die with a scalloped edge and then a Stitched Shapes Die circle on top of that.

The greeting is stamped in Real Red Ink from the same Perfectly Plaid Stamp Set on Shimmery White. I got the idea to punch just the ends out of this narrow strip using the Everyday Label Punch.

Be sure you stick in the label from the top of the punch, not from the side like usual or you will punch both ends, unless that would happen to fit perfectly, but usually when you do a trick like this you have to punch one end at a time.

I tried various ways of layering some color underneath the greeting, even thinking about leaving the greeting without a layer, but finally, I came up with red just under the top and bottom of the greeting. Then I added a Red Rhinestone on each end. If you don’t have the Red Rhinestones, just color one of your clear rhinestones with a Stampin’ Blend marker! You can have rhinestones in any color!

I also added some Snowflake Sequins on the layer behind the trees and also on two of the trees. The gold embossed tree didn’t seem to need anything else! Mixed in with the sequins are other sequins that are not snowflakes so I used a few of those on the trees almost like ornaments. Put just the teeny tiniest dab of Multipurpose Liquid Glue where you want the sequin and place the sequin with the Take Your Pick tool. If you don’t already own this tool, you should put it on your next order! It is handy for picking up sequins with the sticky end and the pointy end or spatula end are great for picking rhinestones and other things up off their sheet getting underneath the adhesive. You will use it a lot!

Once you make one of this Christmas card, you could easily do an assembly-line process of making more. Get all the pieces punched or embossed or stamped and then just assemble. Don’t make one whole card at a time, except for maybe the first one for a sample. Cut all the strips for the greeting, emboss all the card layers, punch all the trees of one color, punch all the trees of the other color, etc. etc. In some ways, you almost get muscle-memory while you are working doing the same thing over and over and it makes assembly go faster! And it’s fun to make multiple cards without having to thing of designing each one! Try it with this Pine Tree Punch Christmas Card.

SHOP STAMPIN’ UP! ONLINE HERE!

Gnome For The Holidays 3 Gnomes Christmas Card

Gnome For The Holidays 3 Gnomes Christmas Card

This little gnome stamp set is just too cute so I made a Gnome For The Holidays 3 Gnomes Christmas Card. All three gnomes have come together to send holiday wishes on this card!

To make this card, I stamped each gnome in the Gnome For the Holidays Stamp Set side by side. Even though they are cling stamps, you can stamp them close together and likely not overlap them. The gnomes are stamped in Memento Ink because I knew I would use my Stampin’ Blends to color them in. I stamped them on a large scrap of Whisper White, not exactly knowing how I would die-cut them to put them on the front of the card.

After looking through my dies and the large size I needed to fit in all the gnomes, I decided to just cut the paper into a rectangle that would fit inside the Stitched So Sweetly scalloped rectangle die that I could use as a layer. Then I looked through the Heartwarming Hugs Designer Series Paper to see what paper I wanted to use with the gnomes. I really liked this red and green plaid!

The card base is Real Red with the Heartwarming Hugs DSP layer and then the gnomes focal point on top of that. I decided not to pop up anything but you could.

After adhering all the layers together, I stamped the greeting, also from the Gnome For the Holidays Stamp Set. I cut the strip down to 3/4″ wide and used the Lovely Labels Pick a Punch to punch each end of the greeting. Then I added a Red Rhinestone Basic Jewel to each end for a little “bling”!

You likely will want to put a Whisper White layer inside the card unless you want to stamp on the Real Red cardstock base. You could stamp one gnome or the house on this Whisper White piece or adhere a strip of the matching designer paper along the bottom edge.

If you like coloring and wanted to make a few more of these Gnome For The Holidays 3 Gnomes Christmas Cards, you could make this card pretty easily (except for lots of coloring!). Always plan to make multiple cards of the same design assembly-line fashion because it goes faster that way!

You will find the Gnome For the Holidays Stamp Set in the August-December 2020 Mini Catalog on page 23. It’s a simple little stamp set and has fun greetings. Here is a link to the first gnome Christmas card I made! I really like the little Christmas lights on the gnome house! So cute!

Be sure to use your July Bonus Coupons by August 31 on your Stampin’ Up! order!

SHOP STAMPIN’ UP! ONLINE HERE!

Snowman Season in Plaid Tidings Christmas Card

Snowman Season in Plaid Tidings

I had almost forgotten that this snowman stamp set from last year was still current this year, so when I came across the Snowman Season Stamp Set I knew I had to make this Snowman Season in Plaid Tidings Christmas Card.

You will find this Snowman Season Stamp Set in the Stampin’ Up! Annual Catalog. It was a favorite stamp set from last year – the cute snowmen and also the Snowman Builder Punch. You can’t but feel happy when you stamp with these snowmen in this set!

First I chose the plaid pattern I liked in the Plaid Tidings 6″ x 6″ Designer Series Paper. Then I chose the Seaside Spray Cardstock with a layer of Cherry Cobbler.

The snowman is stamped on a Tasteful Labels Die in Memento Ink. I colored with Stampin’ Blends but you could also use other coloring methods, like maybe Watercolor Pencils. I die-cut a stitched scalloped rectangle in the Stitched So Sweetly Dies out of Cherry Cobbler, but it seemed like too big an area behind the snowman. I decided to add a rectangle of Seaside Spray that would fit inside the stitched die and that solved the problem.

Before adhering the snowman pieces, I adhered a piece of Silver 3/8″ Metallic-Edge Ribbon from top to bottom of the Seaside Spray layer. Then the snowman die piece was popped up on Stampin’ Dimensionals®. I tied a separate bow and adhered it to the top with Mini Glue Dots.

The greetings in the Snowman Season Stamp Set were a little too big, so I used one from the Itty Bitty Christmas Stamp Set. I simply stamped it on a narrow scrap of Whisper White and used the new Lovely Labels Pick a Punch to punch each end of the greeting. It is popped up with Dimensionals on each end so that it is the same level as the snowman piece. For a little bling, I could have used Snowflake Sequins around the snowman, but instead, I used the Elegant Faceted Gems in three spots to resemble snowflakes.

It was fun to find this stamp set from the Holiday Catalog last year and make something updated with it this year! Here is a link to a card I made last year with the set and the Snowman Builder Punch. Choose stamp sets and papers that bring you joy for making your holiday and Christmas cards so it will be a fun endeavor! This Snowman Season in Plaid Tidings Christmas Card will make you happy all day long while you make multiples, perhaps, of this card!

SHOP STAMPIN’ UP! ONLINE HERE!

Remember to use your Bonus Coupons during August if you earned some in July!