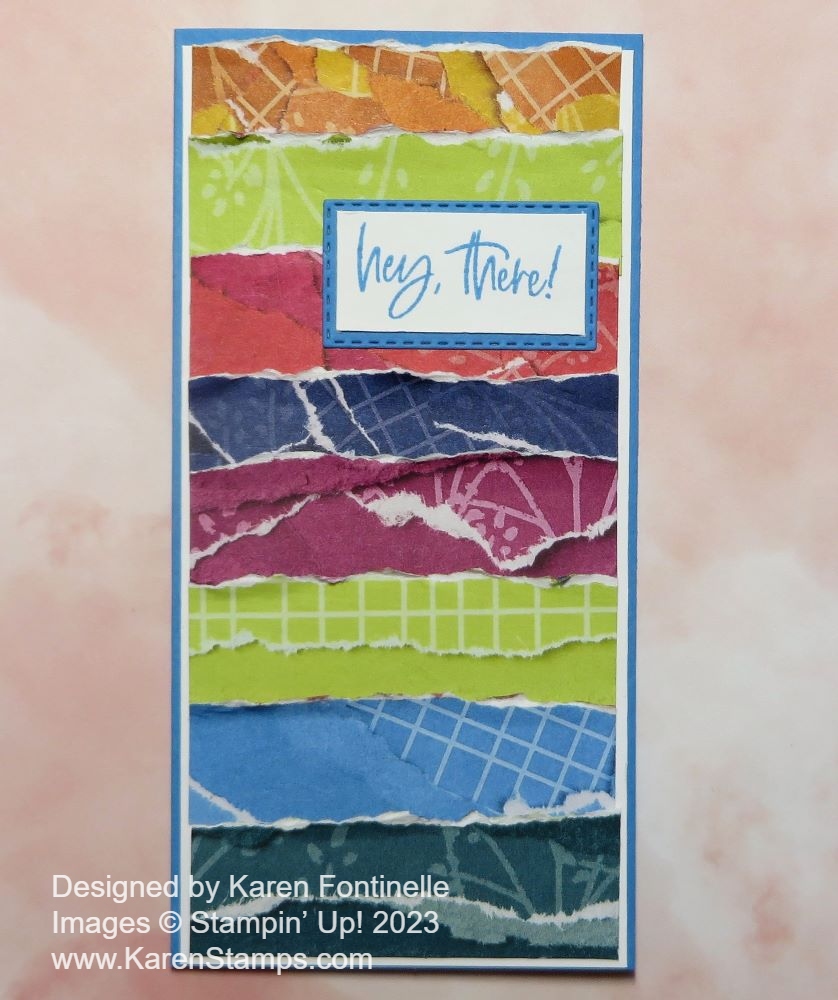
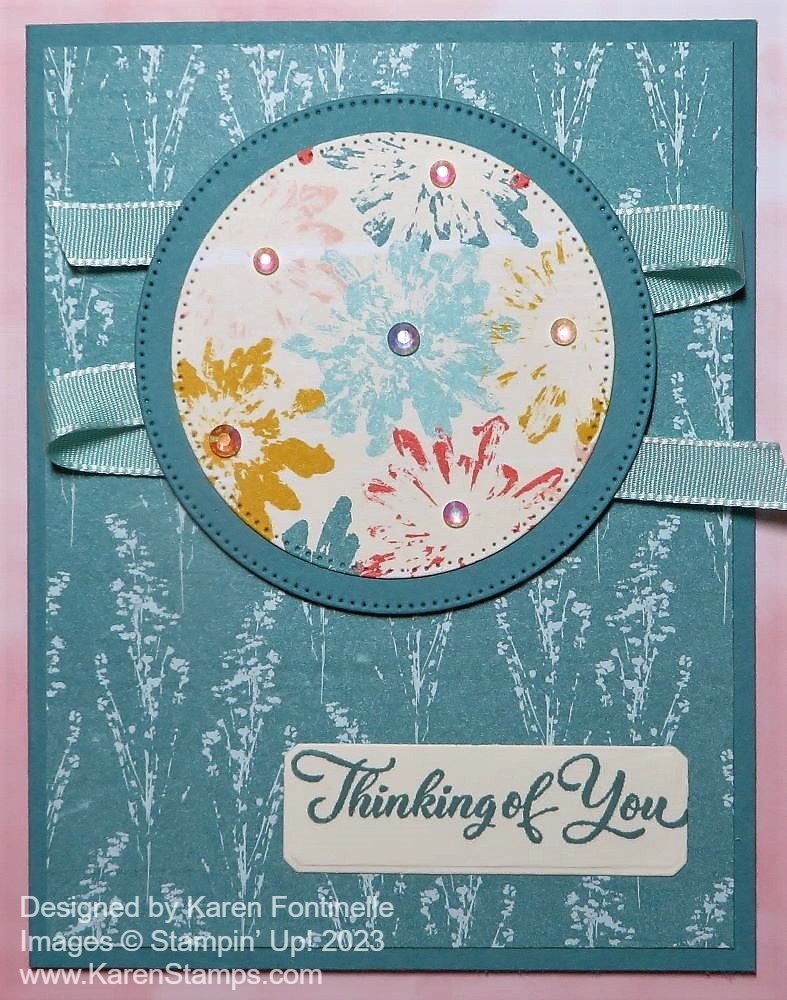
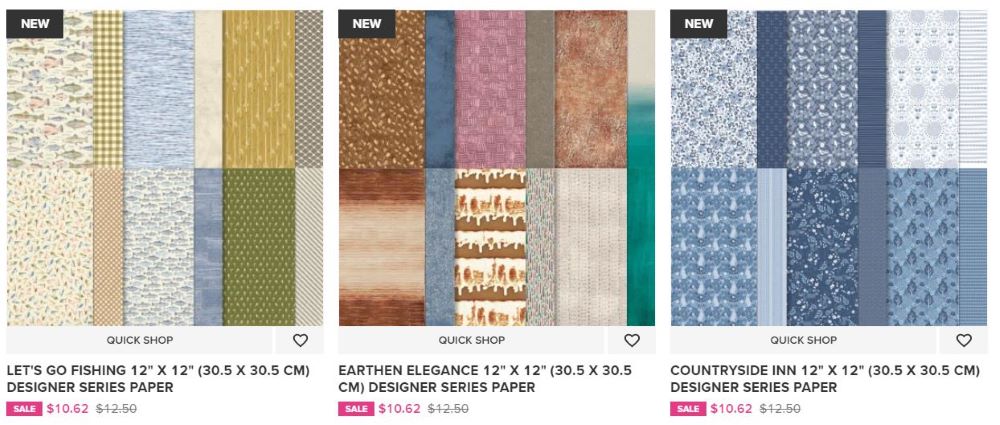
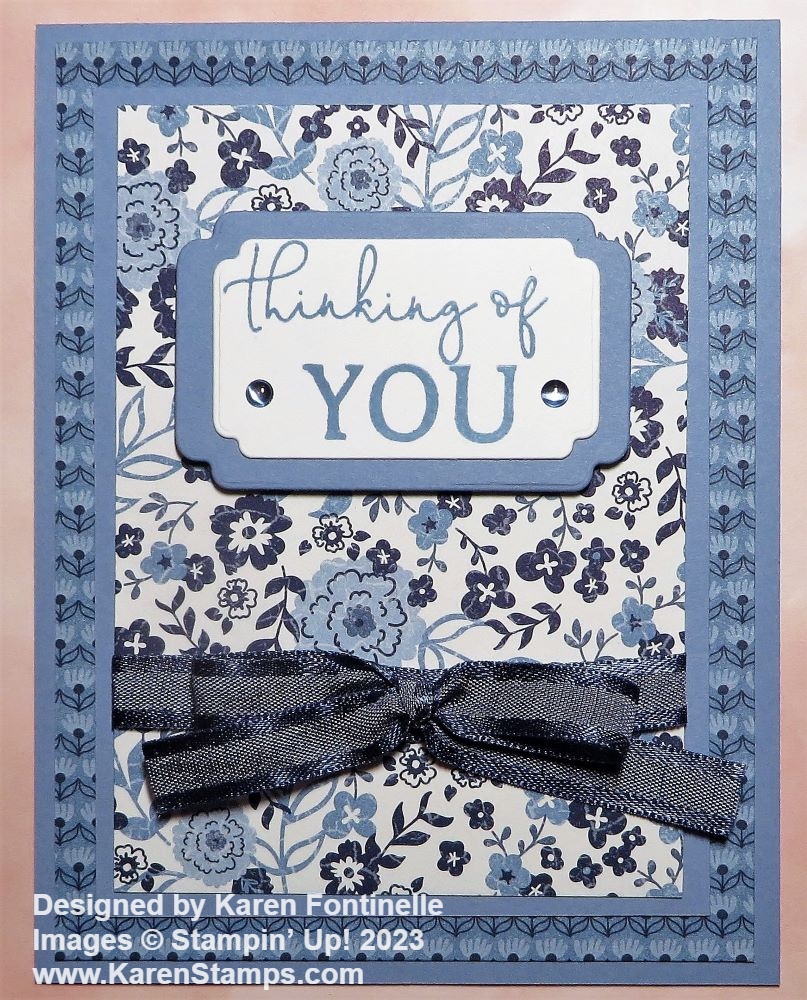
Category Archives: Cards

Circle Sayings Countryside Inn Hello Card

Circle Sayings Countryside Inn Hello Card

As I was paging through the Countryside Inn Designer Papers, I had forgotten there was this pattern with little birds, plus a cute one with little foxes! I put it together with the Circle Sayings Bundle to make this Circle Sayings Countryside Inn Hello Card.

It is not apparent from the photo, but the card front is popped up and there is a layer underneath that is the stamped greeting. Then those two parts are adhered to the card base.

The card base is Balmy Blue Cardstock. The Countryside Inn designer paper is cut at the usual 4″ x 5 1/4″. The Basic White cardstock underneath is cut at basically the same size but just a “smidge” less, maybe 1/16″ less, just enough so it won’t stick out if the papers are cut microscopically differently at the same size.

I used the 2 3/8″ Circle Punch to make the circle on the designer paper. Then I placed it on the Basic White and very lightly marked a few spots on the white cardstock with a pencil to show where the opening was. I took off the designer paper and stamped the flowers and greeting in the Circle Sayings Stamp Set on the Basic White inside the marked circle.

I had planned to just adhere the designer paper and the Basic White cardstock together and then adhere that piece to the card base. But I didn’t think the design stood out enough, so I decided to pop up the designer paper over the Basic White. I was concerned the designer paper wasn’t strong enough so I cut a piece of Misty Moonlight to adhere underneath the designer paper to give it some strength, but that meant I had to punch out a circle in the exact same place so the greeting would show through the hole. I used a bunch of Stampin’ Dimensionals to pop up that piece.

If I would have thought ahead, I could have tied a ribbon around the left side of the card through the punched hole, but when I thought of it, there were too many Dimensionals in the way! For a little embellishment, I used three of the Adhesive-Backed Solid Gems in Boho Blue in the greeting circle.

So that’s an easy idea for you to try! It’s something a little different! Try this Circle Sayings Countryside Inn Hello Card for yourself!

SHOP STAMPIN’ UP!

Quick and Easy Fresh As a Daisy Card

Quick and Easy Fresh As a Daisy Card

Sometimes you just want to make a quick and easy card like this Quick and Easy Fresh As a Daisy Card and with this new designer paper, you can surely do that!

I wanted to use this bold daisy pattern in the Fresh As a Daisy Designer Series Paper in the new Stampin’ Up! Annual Catalog. I liked these large, bright white daisies with their golden centers on this paper.

You can choose from many coordinating colors with this paper. I played around with several and decided on Daffodil Delight, which isn’t a coordinating color but I liked the bright yellow for a Monday morning! I could have chosen Crushed Curry or Lemon Lolly to go with the flower centers, or Cajun Craze to match the background of the paper, or any of the greenish blues to match the leaves. Or you could Basic White for a card base! Or you could choose Basic White and then another cardstock color for a layer and then make the designer paper a little smaller to layer on the color cardstock. Or a colored cardstock for the base and white to set off the designer paper! Whatever you are in the mood for when you are creating is fine!

I originally intended to make this a two-tone card using the daisy paper on top and a piece of one of the colors on “the other side” of the daisy paper. But once I had this 5 1/4″ x 4″ paper cut I liked it so much I didn’t want to cover up or lose any of the white daisies.

Before adhering the designer paper to the card, I adhered a piece of the Burlap Ribbon in the Real Red and Burlap Ribbon Combo Pack. I put it on the side, where I haven’t put a ribbon in a long time, so as not to cover up too many daisies. Then I just tied on a short ribbon in a knot.

The greeting is stamped from the Cheerful Daisies Stamp Set in Tuxedo Black Memento Ink on Basic White. I tried it on the Daffodil Delight also and decided to use the White but layer it on Daffodil Delight. The label die in the Cheerful Daisies Dies is one of those perfect dies to use over and over again! It’s simple yet has that little stitched look and curved corners. But there is not a layering size die to match so what do you do? I cut out another label in Daffodil Delight, then cut it in half across the middle. Then I could layer those two half pieces under the top half and bottom half of the greeting. If you do it just a tiny bit, it really lines up with the curved corners even though it doesn’t extend out to the sides. No one will notice! It looks fine!

If you want the stamp set and dies, buy the Cheerful Daisies Bundle and save 10%! But be sure to get the Fresh As a Daisy Designer Series Paper, too!

That’s all there is to this card! You could add some jewels or sequins if you wanted to. Or you can leave it as the Quick and Easy Fresh As a Daisy Card!

Stampin’ Up! At the Movies!

It’s Mother’s Day weekend so sit back, relax, and enjoy these Stampin’ Up! videos talking about some of the products in the new Stampin’ Up! Annual Catalog!

Be sure to watch George’s video below about the Stargazing Suite all the way to the very, very end! Looks like fun for kids to play with!

Wait until you see how the artist made the flowers on this designer paper! And all about the punches!

If you know Spanish, you’ll really enjoy this video and if you don’t know Spanish, you’ll really enjoy this video seeing this Suite!

And if your family doesn’t show you quite enough appreciation on Mother’s Day (or even if they do), just go to the Stampin’ Up! Online Store and order what you want!

Timeless Arrangements Kindness Card

Timeless Arrangements Kindness Card

This Timeless Arrangements Kindness Card is the result of my “playing” with my new Timeless Arrangements Bundle. I’ve used some of the stamp set greetings on other cards, but I hadn’t tried out all the die cuts for the flowers and foliage.

I knew I wanted to try out this Bundle but I really didn’t know what card I wanted to make. Not even the colors! So I stamped the flowers and leaves that were in the stamp set in Memento ink and colored them in with various Stampin’ Blends Markers. I stamped and colored quite a few not knowing how many I would use. After die-cutting those, I also diecut the leafy dies in various greens and even Crushed Curry for something different.

These leafy dies are interesting because several have a bar connecting a couple stems which I assume is meant to allow you to cut out several stems in one fell swoop and have them lined up at various angles and not a million little die cut pieces. Some of the ones I diecut I left as is and some I cut apart to place them exactly where I wanted them.

This card has a Berry Burst cardstock base with a layer of Bubble Bath cardstock. Before adhering the Bubble Bath layer I randomly stamped the little circles stamp with Bubble Bath ink just for a little texture in the background.

I used a Deckled Rectangle die for the centerpiece for the greeting and to use to attach all the foliage and flowers. I stamped the greeting in the Timeless Arrangements Stamp Set first in Berry Burst Ink. Then I just adhered the leafy pieces to the back and even sides of the greeting. You can play with the placement of the pieces first to see what you like, or just go for it and build it as you go! When I was finished with the piece, I popped it up on Stampin’ Dimensionals. It turned out I really liked that Berry Burst flower I had stamped placed right on the Deckled Rectangle greeting.

For a little sparkle, I added some Pastel Adhesive-Backed Sequins to the card. I put three gold sequins on the greeting itself and then three pink sequins on the card front.

You could use this card for Mother’s Day on Sunday or lots of other occasions. You can use less leafy pieces or even more if you really want to do it up really fancy!

This is the kind of stamp set and dies that you really need to take some time to place with, get acquainted with all the pieces and see how they work together or even separately!

SHOP STAMPIN’ UP! ONLINE HERE!

Last Day Tomorrow to Get the May Paper Pumpkin Kit!

Paper Pumpkin May 2023 Add On Cards

Tomorrow, Wednesday, May 10th, is the last day to join Paper Pumpkin and get the May 2023 Paper Pumpkin Kit. And this kit has something extra you can take advantage of if you like….an Add-On!

The Add-On is available RIGHT NOW in the Stampin’ Up! Online Store and will continue to be available after tomorrow, while supplies last, under the list of ProductsKits-Paper Pumpkin – and then Refills, Past Kits & More. It’s the “Exploring In Color Paper Pumpkin Cards & Envelopes”. You do have to be a Paper Pumpkin subscriber to purchase this Add-On, however!

These cards & envelopes use the new In Colors that were just introduced in the new Stampin’ Up! Annual Catalog recently! In the actual Paper Pumpkin Kit you will receive an ink spot with the Copper Clay ink.

About the Add-On:

Exploring In Color Cards & Envelopes

  • Available starting: May 2, while supplies last
  • Price: $10.00 USD

This add-on includes

  • 18 cards, 6 each of 3 designs
  • 18 coordinating envelopes
  • Finished card size: 4-1/4″ x 5-1/2″ (10.8 x 14 cm)
  • Coordinating Stampin’ Up! colors: Boho Blue, Copper Clay, Daffodil Delight, Moody Mauve, Mossy Meadow, Pebbled Path, Wild Wheat

I think these cards look beautiful! They would be very handy for those days when maybe you need to write a quick note or get a card in the mail right away and you don’t have time to make a card. But to purchase them, you must first be a Paper Pumpkin subscriber.

After subscribing to Paper Pumpkin, you can add the “Add-on” to your Stampin’ Up! order if you want to purchase some other products!

You can sign up and if you get busy one month, just go into your account and suspend it for that month, then go back in to change it back when you are ready for the next kit. Or if you find Paper Pumpkin is not for you, all you have to do is go into your account before the 10th of the month and cancel your subscription. No risk, no obligation, no phone call to make, no hassle.

If you love the Exploring In Color Paper Pumpkin Cards & Envelopes, get subscribed to Paper Pumpkin TODAY (or for sure tomorrow!!). Here is the information about the Kit. I say it’s a gift you give yourself every month to find a treat in your mailbox, a craft project ready to go as soon as you open the box. And it’s a treat just to open the box!

Here is the May 2023 Paper Pumpkin Kit! I love the box!

Paper Pumpkin May 2023 Snip

Say hello to mountain landscapes and the new In Colors! This month’s kit features nine outdoors-themed cards in our new 2023–2025 In Colors plus exclusive FREE stickers.

This kit includes:

  • All the supplies you need to create 9 cards, 3 each of 3 designs, plus 9 coordinating envelopes.
  • A 7-piece all-occasion stamp set that celebrates good friends and great adventures!
  • 1 Copper Clay (new In Color!) Classic Stampin’ Spot.
  • Twine and die-cut accents
  • FREE stickers to put on your projects or anything you want—water bottles, laptops, coolers, and more!
  • Finished card size: 4-1/4″ x 5-1/2″ (10.8 x 14 cm).
  • Coordinating Stampin’ Up! colors: Boho Blue, Copper Clay, Daffodil Delight, Moody Mauve, Mossy Meadow, Pebbled Path, Wild Wheat

Now you have all the information! Click on my personalized link below (you won’t even have to put in my name!) and sign up for Paper Pumpkin! Give it a try, at least, with this beautiful kit and get one of the new In Colors in the Ink Spot! With your first kit you will also get a special acrylic block on which to mount the stamps that come in your kit.

JOIN PAPER PUMPKIN TODAY!

Countryside Inn Little Bunny Card

Countryside Inn Little Bunny Card

When I first saw this particular paper in the Countryside Inn Designer Series Paper with the little bunnies, I immediately thought it would make a cute baby card! I’m not saying this card, the Countryside Inn Little Bunny Card, is necessarily a baby card, but I think it could be. I think the greeting “could” be for a baby card because when do you “Enjoy All the Little Moments” more than when you have a baby and watch that baby grow up?

I don’t usually do it this way, but for this card, I used Basic White cardstock for the card base, but instead of leaving a margin showing, I completely covered the front of the card with designer paper. I began with the paper that had the little bunnies on it. I ended up cutting the bunny DSP at 5 1/2″ x 3 1/4″ because I wanted to save as many bunnies as I could. I wanted the bunnies to be the focal point of the card so I wanted as much of the full bunnies to show. At first, I cut the paper at 3 1/2″ wide, but obviously, that didn’t leave much room on the top and bottom of the card. So I trimmed off the tiniest bit off the top and bottom so the tiniest bit of the bunnies’ feet were cut off on the bottom and the tiniest bit of one ear on the top. If you want to do it differently, you can vary your measurements.

Next, I chose Misty Moonlight cardstock for the narrow strip at the top and bottom of the bunny pattern. It just helps set off the bunny paper. It is one of the coordinating colors with this Countryside Inn Designer Paper. The other colors that would work are Boho Blue and Night of Navy. I didn’t care for Balmy Blue for this card, but it is listed as one of the coordinating colors. These two strips are cut at 5 1/2″ x 3/4″ and I used my Grid Paper to try to line up the paper as well as I could with 1/4″ showing at the top and bottom of the bunny paper. You could make it narrower. Honestly, I can’t stamp without my Grid Paper! Once you get used to it, you can’t do without it. There are two other choices for Grid Paper in the Online Store but I love the original with the measurements printed along the bottom and up the side. I have some other “prettier” grid paper but I write in my own measurements because that’s partly why I am using Grid Paper!!

If you flip the bunny paper over to the other side, the pattern I used at the top and bottom of the card is what is on the other side. I decided to just go with that pattern since it obviously went with the bunny paper if it was printed on the opposite side. You can cut strips of this DSP to 5 1/2″ x 1″ (or less) so that a little shows above and below the main panel.

To assemble, I first adhered the striped pattern to the top and bottom of the Basic White card base. I adhered the Misty Moonlight cardstock to the top and bottom of the bunny paper, then adhered that panel to the card base. I used the Multipurpose Liquid Glue on this card to give me that “wiggle room” to get the edges all lined up. With a card like this, sometimes one or more of the papers hang over the edge of the card base, but just use Paper Snips or a paper cutter to slice off that tiny bit along the edge.

For the greeting, I used this one in the Easter Bunny Stamp Set. This could be a baby card even without a specific baby greeting. So don’t worry if you don’t have the exactly greeting you want, there is always something else you can use if you look through your stamp sets! I stamped the greeting in Misty Moonlight ink and die-cut it with a die in the Timeless Arrangements Dies. There are other die choices you could make depending on your greeting. I wanted something small to not hide the bunnies! I also cut out an extra little bunny by hand that I popped up on some trimmed Stampin’ Dimensionals and adhered him right over one of the printed bunnies next to the greeting as well as a flower from another sheet of the paper.

It might seem like a lot of steps to this card, but it isn’t really. It took me a little while to design it and do the “math” to get everything the size I wanted, but you can just copy and not figure anything out!

If you like blue, you will really enjoy this Countryside Inn Designer Series Paper in the new Stampin’ Up! Annual Catalog! Maybe even if blue isn’t your favorite color, you will come to appreciate the different colors of blue and the cute patterns in all the papers in this pack! Go check it out in the Online Store HERE.

King Charles Coronation Card

King Charles Coronation Card

Today is the coronation of King Charles III of England, quite the occasion for a card, don’t you think? If I wanted to celebrate the coronation with a card, I would maybe make this King Charles Coronation Card with some purple and gold for royalty and a little bit of glimmer! Did you get up extra early to watch this historical event live?! Charles became King the moment his mother, Queen Elizabeth, died, but today is the official ceremony and festivities.

To make this card, I pulled out some retired sparkly and shiny paper because, after all, it’s for a King! The card base is Gorgeous Grape cardstock because purple is for royalty. Of course, there has to be a layer of gold foil. Next, I pulled out some Dazzling Diamonds Designer Paper to be the card front. What is more elegant than that?!

To decorate the card, I got the idea to use some purple sparkly paper for a fancy border. The paper is the retired Ombre Specialty Paper. There are several colors, but I used the darker purple color. I used the Elegant Border Dies to cut out the fancy border. I was starting out trying to make a vertical card, but once I changed it to horizontal and thought of using the Elegant Border Dies, it all fell into place! I suggest placing these dies with the cutting edge up and paper on top, opposite of how you might normally place a die and paper. I think some intricate pieces cut better that way.

For the greeting, I diecut a piece of Gold Foil and a smaller Basic White piece to layer. I used the Something Fancy Dies, which were the perfect size that I was looking for. For the actual greeting, I only looked at my current stamp sets and I found this sentiment in the Sentimental Park Stamp Set. Actually, there are lots of sentiments and partial sentiments that can be combined to form exactly what you want to say! I stamped the two different lines to form this greeting on the Basic White cardstock using Gorgeous Grape ink.

For some extra embellishment, besides all the sparkle and glimmer on the papers and gold foil, I added a bow made with the gold ribbon in the Gold & Silver 1/8″ Trim Combo Pack. And a few gold Festive Pearls completed the card.

Do you think King Charles III would be thrilled to receive this King Charles Coronation Card to celebrate this big occasion in his life?! What occasion could be bigger than becoming King?!

SHOP STAMPIN’ UP! ONLINE HERE!

Fresh As a Daisy Thank You Card

Fresh As a Daisy Thank You Card

We are getting a new floor in the kitchen so many things had to be moved out of the way – like my stamping stuff off the kitchen table and my stamping stuff off the dining room table to make room for kitchen stuff off the counters. The more we thought about it, the more we saw what was or could be in the way or might fall off the wall or get dirty somehow. Hence, this very easy card only required cardstock, designer paper, and a diecut scrap for the greeting, the Fresh As a Daisy Thank You Card! I saw this card idea in the catalog, then when I wanted to look at it again, I couldn’t find it! Finally, I remembered I saw it with the Timeless Arrangements Bundle, NOT with the daisies!

The card base is the new In Color, Wild Wheat, with a layer of another In Color, Copper Clay. I really liked adding that layer because I’m not really fond (yet) of the Wild Wheat, so the Copper Clay helped break that up a little bit.

The beautiful daisy card front is a piece of the Fresh As a Daisy Designer Series Paper. You’ll find this daisy bouquet as part of one of the sheets of paper. You just cut apart each individual square or rectangle of daisy goodness and then make something out of each section. I trimmed down this daisy piece so it would fit on the layer correctly.

The diecut piece is likely from the Stylish Shapes Dies. It was mixed in with a lot of other Basic White scraps but I wanted the greeting to be small so as not to cover up much of the designer paper. The greeting is from the Timeless Arrangements Stamp Set which has all kinds of greetings to mix and match and really fun dies of leafy things you can do all sorts of creative things with.

Be sure to look all through the new catalog for ideas, even back in the dies section there are extra card samples for inspiration!

SHOP STAMPIN’ UP! ONLINE HERE!

Paper Pumpkin with New In Colors!

Paper Pumpkin May 2023 Banner Colors

This is the Paper Pumpkin Kit for May 2023! This Exploring In Color Kit features outdoors-themed cards in our new 2023–2025 In Colors. It’s an easy way to get acquainted with the new colors. If you love color, the outdoors, or both, this is a kit you’ll want to get!

This is the treat you give yourself (Or someone else!) by subscribing and finding a Paper Pumpkin Kit to make in your mailbox every month. No risk, no obligation…you can skip a month or cancel any time right in your own account!

FREE STICKERS!
This kit includes a special bonus: FREE STICKERS! Look around and you’ll see stickers everywhere—on water bottles, laptops, and coolers. And, of course, on paper crafting projects! It’s an on-trend extra!

EXPLORING IN COLOR CARDS & ENVELOPES ADD-ON
This month, we’re offering a cards & envelopes add-on to keep the crafting adventure going! We’re sure you will love creating cards with the new In Colors and outdoorsy images, so we’re giving you opportunities to create even more. This add-on includes 18 cards, 6 each of 3 designs, plus 18 coordinating envelopes. This will give you lots of supplies to stay crafty and celebrate good friends and great adventures.

The add-on is available starting May 2 while supplies last, so don’t wait!

ABOUT THE KIT
Name: Exploring In Color

This kit includes:

  • All the supplies you need to create 9 cards, 3 each of 3 designs, plus 9 coordinating envelopes.
  • A 7-piece all-occasion stamp set that celebrates good friends and great adventures!
  • 1 Copper Clay (new In Color!) Classic Stampin’ Spot.
  • Twine and die-cut accents
  • FREE stickers to put on your projects or anything you want—water bottles, laptops, coolers, and more!
  • Finished card size: 4-1/4″ x 5-1/2″ (10.8 x 14 cm).
  • Coordinating Stampin’ Up! colors: Boho Blue, Copper Clay, Daffodil Delight, Moody Mauve, Mossy Meadow, Pebbled Path, Wild Wheat

ADD-ON
Exploring In Color Cards & Envelopes

  • Available starting: 2 May, while supplies last
  • Price: $10.00 USD

This add-on includes

  • 18 cards, 6 each of 3 designs
  • 18 coordinating envelopes
  • Finished card size: 4-1/4″ x 5-1/2″ (10.8 x 14 cm)
  • Coordinating Stampin’ Up! colors: Boho Blue, Copper Clay, Daffodil Delight, Moody Mauve, Mossy Meadow, Pebbled Path, Wild Wheat
Paper Pumpkin May 2023 Add On Cards
© Stampin’ Up! 2023

Last month when I told you about the new kit for May, Stampin’ Up! didn’t give us a full-color image of the kit, but now you can see how colorful and beautiful the cards will be with the new In Colors!

JOIN PAPER PUMPKIN HERE!

Note: Supplies may be limited toward the end of the subscription period.

OR

Purchase a Prepaid Subscription HERE with a regular Stampin’ Up Order!

Cheerful Daisies Hello Card

Cheerful Daisies Hello Card

It’s already the second day of the new Stampin’ Up! Annual Catalog! How time flies!! For this Cheerful Daisies Hello Card, I played around with the Cheerful Daisies Bundle on page 111 of the catalog. Buy the stamp set and dies together in the Bundle and save 10%.

I will say you can do lots of “playing” with this Bundle. First of all, you can stamp the daisies in all kinds of ways. You can stamp the large daisy outline in Black Memento Ink and then stamp the middle of the flower. You can leave the stamped flower as is or you can color it lightly with a Blending Brush or Sponge Dauber.

For the smaller daisies, you can stamp a solid color flower. Or you can stamp an outline daisy and then color it in with markers or whatever technique you like. You could also stamp the outline stamp and then do “two-step stamping” by stamping the solid flower inside the outline. It doesn’t have to be perfect! The two yellow daisies on my card are just stamped with the solid daisy stamp and then diecut.

There are several diecuts you can experiment with. The flowers, stems, and leaves are all separate so you can arrange the pieces however you like. There is one large die that I was a little confused about at first. It has one large flower, a small daisy, and sort of a half flower plus leaves. You can leave the trio together or you can snip the tiny connections and cut them apart. It’s very easy. Then you can leave everything all white or add some color to the parts. You can even layer some diecut pieces as I did on the large daisy on the lower right. I even diecut some green leaves so I could glue them over the white leaves of the diecut.

The greeting is from the Irresistible Blooms Stamp Set (available in the Online Exclusives category). I used a diecut to cut out the greeting. I didn’t have too much space so it is tucked a little behind the one flower.

The card base is Misty Moonlight cardstock with a layer of designer paper in the Countryside Inn Designer Series Paper. I thought the white and yellow daisies would look stunning against the dark blue.

Daisies are flowers that everyone loves. They are simple and familiar, so you will get lots of creativity out of this Cheerful Daisies Bundle in the new Stampin’ Up! Catalog!

SHOP STAMPIN’ UP! ONLINE HERE!

Shop the New Stampin’ Up! Catalog Today!

Stampin' Up! Annual Catalog 2023

It’s a beautiful day wherever stampers live because the brand-new, shiny Stampin’ Up! Annual Catalog for 2023-2024 is LIVE! It’s the day we have been waiting for! You can view the catalog online by clicking the photo above or the link below OR you can see all the products in the Stampin’ Up! Online Store HERE or in the link below!

Remember the virtue of patience when you try to shop today, with everyone trying to get a look at all the new products and trying to order! Hopefully, you won’t have any website problems but it often happens on a big release day like today! Just keep trying! You’ll get in!

Also, as excited as we are to get our orders, I have to warn you that shipping has been SLOW and is likely to be that way for a while with all the new catalog orders. You do have the option to expedite your order for an additional charge but that is on top of regular shipping so a bit pricey.

VIEW THE STAMPIN’ UP! CATALOG ONLINE HERE!

SHOP STAMPIN’ UP! ONLINE HERE!

There is one Spanish Suite available, if you are interested. Click the photo below to view the flyer or the link below to shop and see the Suite. You can purchase the products individually as well. Just Search for the name.

SHOP the TEXTURAS NATURALES SUITE!

HAPPY NEW CATALOG DAY!

Tea Boutique Orchid Oasis Thank You Card

Tea Boutique Orchid Oasis Thank You Card

I almost forgot I hadn’t posted this Tea Boutique Orchid Oasis Thank You Card yet, but here it is, just in the nick of time! On Monday, May 1, the Stampin’ Up! Annual Catalog and many of its great products will retire. I hate seeing many of them leave, but we always say that until the new products go live!

This easy card uses the Tea Boutique 6″ x 6″ Designer Series Paper, a great set of designer papers. Not only does it have teacup and teapot images, but there are plenty of more generic patterns, some with foliage, herbs, flowers, and other basic design patterns. So you can do a lot with this paper even if you aren’t making a tea-themed card or project.

That’s how I came to make this card. This pattern is a print of little envelopes holding flowers so you can use this paper for almost any occasion of card. There’s nothing about tea on this sheet of paper!

The card base is the In Color Orchid Oasis, then the layer of 4″ x 5 1/4″ designer paper. The greeting is stamped from the Cup of Tea Stamp Set (no longer available) with Orchid Oasis Ink, on Basic White, die cut, and then layered on Orchid Oasis cardstock diecut with the Layering Circles Dies. These dies are also retiring and are on the Last Chance list.

For an embellishment, I used the Fresh Freesia 3/8″ Open Weave Ribbon around the front with a separate bow tied and adhered with a Mini Glue Dot.

The greeting is popped up with Stampin’ Dimensionals. Since it is already higher up on the card, I added a flat diecut flower from the Cup of Tea Stamp Set. That way it doesn’t add any more bulk in the envelope for mailing.

If you want to use up any of your outgoing designer paper, just use this card design for an easy way to make a lot of cards, then just add greetings when you need the card! Be sure to search “Tea Boutique” in the Online Store and find three great bargains on the Last Chance Sale…the Tea Boutique Cards & Envelopes, the Tea Boutique Designer Paper, and the Teacup Dies.

The Last Chance Sale ENDS Monday, May 1st! New Catalog goes LIVE Tuesday, May 2nd!

SHOP STAMPIN’ UP! ONLINE HERE!

Daisy Notecard

Daisy Notecard

I needed multiples of a card, so I decided on this Daisy Notecard, to show off the new Fresh As a Daisy Suite! It’s coming on May 2nd, in the new Stampin’ Up! Catalog! Yes, next week is May and yes, next week is finally time for the new catalog, a day we stampers live for!

You can purchase official Note Cards & Envelopes which are great to have on hand, but this time I didn’t need envelopes so I just made my own note cards with Basic White cardstock. I just cut a piece of cardstock at 5″ x 7″, then scored at 3 1/2″ so that when folded the note card would be 3 1/2″ x 5″.

I wanted to use the new Fresh As a Daisy Suite so I played around with all the pieces until I came up with a design I liked and could somewhat easily make. It’s like when you design Christmas cards and want to make multiples of the same card. If you make it too fancy, it will take forever to make multiples. This one had stamping and die-cutting so it took a little time but I just relaxed and enjoyed myself!

The Fresh As a Daisy Designer Series Paper has many color combinations in the patterns to choose from. All the new In Colors are represented! It’s a long list of coordinating colors for this designer paper. I chose this pattern with greens in the background to be the layer on my note card. I cut it at 3″ x 4 1/2″. The cute label is in the Cheerful Daisies Dies. I like the shape and the stitched edge. I stamped the greeting in the Cheerful Daisies Stamp Set in Shady Spruce ink.

The daisy is stamped in Memento Ink and the center is stamped in Crushed Curry. There is a stamp to use for the flower center, but I discovered that if I stamped it twice, partially overlapping, it covered up the empty center space a little better and I liked the darker color. The daisy was die-cut. Some of the dies fit the daisies printed on the designer paper. You can even layer die-cut daisies for a little more texture. When you get the Cheerful Daisies Bundle (save 10%!) just play with it for a while and see how all the pieces work! The daisy is popped up with Stampin’ Dimensionals. The Suite also has the Adhesive-Backed Solid Gems in Copper Clay, Boho Blue, and Lemon Lolly.

I think the Fresh As a Daisy Suite will be a popular one because who doesn’t like daisies?

SHOP STAMPIN’ UP! ONLINE HERE!

Flowers & More Scraps Card

Flowers & More Scraps Card

As I was going through my designer papers, I had lots of scraps of this one that I was tempted to throw out, but then I got the idea to make this Flowers & More Scraps Card. You can vary the width of the strips and you can make them laid out vertically as on this card or horizontally. It’s really a fun way to use up your scraps!

The paper I used is the Flowers & More 12″ x 12″ Designer Series Paper. It’s a Host Reward in the Spring Mini that you can choose for your Stampin’ Rewards if you have an order of $150 or more. You’ll find it on page 90 and you’ll see it in the upper left-hand corner. It will be retiring along with the Spring Mini but if you want a huge pack of colorful and fun paper, get this!

I think it is easiest to use a backing of Basic White cardstock or even a color if you are leaving some spaces in between the strips and want to see the coordinating color. This way if you need to trim off a tiny bit on the sides or top or bottom you could do that before adhering to the card base.

These five strips are cut at 1″ x 4″ and layered on a 4″ x 5 1/4″ piece of Basic White cardstock. You can do the math and change the width, the number of strips, the length of the scrap piece, or whatever you want to do. My card has the tiniest little space in between the strips. It might work best to adhere the strips for the ends down first and then fit the other three into the empty space in between.

The card base for this card is Melon Mambo but this designer paper has SO many coordinating colors you could use almost anything. Here is another card I made not long ago with some designer paper for Sale-A-Bration, Dandy Designs.

For the greeting, I stamped “thanks” in Shady Spruce ink and diecut it with one of the Tailor Made Tags. Because it is retiring, I used the Evening Evergreen 3/8″ Windowpane Ribbon. It’s on the Last Chance Sale for only $3.00, less than half the regular price of $7.50. Even though I used different greens I think it still goes with the card.

So if you have used up a lot of designer paper and have small scraps, try a card like this Flowers & More Scraps Card. You can go crazy with the combinations of the paper on the card!

SHOP THE LAST CHANCE SALE HERE!