Tag Archives: birds

Flight & Airy Three Birds Card

Flight & Airy Three Birds Card

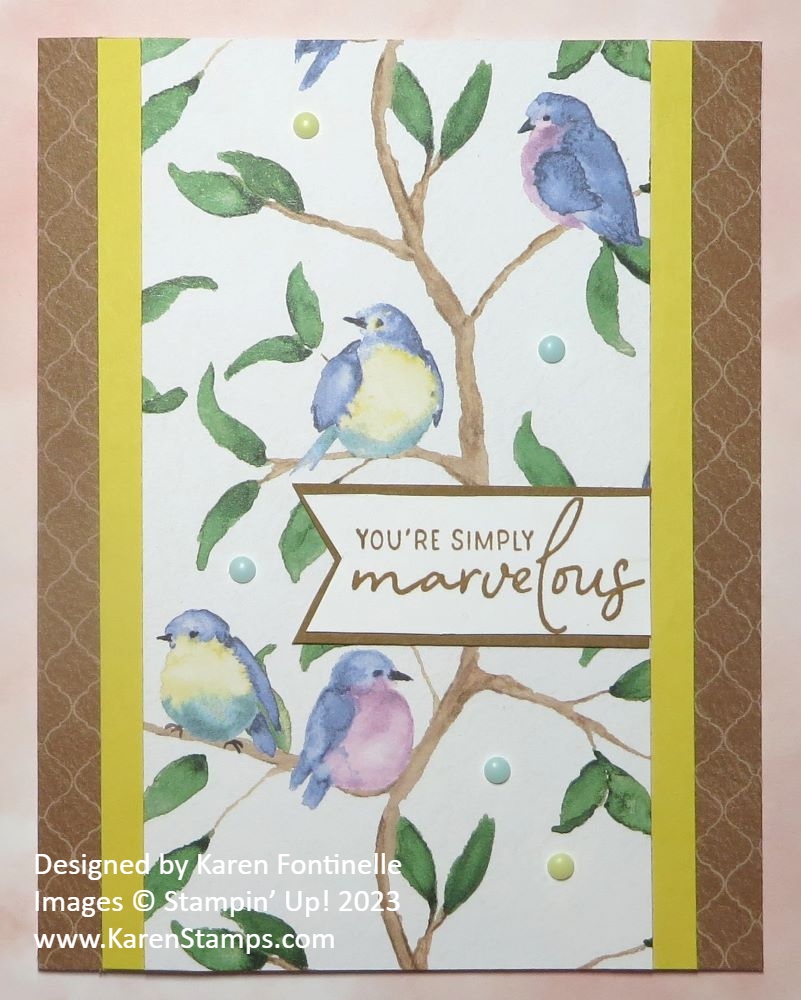
I’m surprised how much I have fallen in love with this designer series paper in the Sale-A-Bration Brochure! I have already made several cards with it and can’t wait to make more, like my most recent one that you see here, the Flight & Airy Three Birds Card! I’ve had this idea in my head, to put three birds on the card front, for a while so here it is.

The card base is Lost Lagoon, which is a very pretty color although I haven’t used it too much. It’s one of our retired colors, brought back in our Color Refresh last year with the newest Annual Catalog. When I looked in my cardstock package, I already had this card cut and folded. The right front side has just a little bit of the edge trimmed off so you can add designer paper to the inside edge of the card and it will show on the front! My card has 1/2″ of the front cut off. I’m sure you could do a wider margin if you wanted to.

Since the front of the card is 3 3/4″ wide, I cut a piece of the Flight & Airy Designer Series Paper at 5 1/4″ x 3 1/2″. I chose the Lost Lagoon colored paper with leafy designs and tiny little birds that you barely even notice. The strip on the inside of the card, from another pattern of the designer paper, is 5 1/4″ x 3/4″. You can vary that measurement to your liking.

This Flight & Airy Designer Series Paper is only available with a $50 Stampin’ Up! purchase and you get it FREE. Sale-A-Bration ends February 29 so you don’t have too much time left to order whatever you want from Stampin’ Up! as you normally would but then you get to choose FREE products for every $50 you spend from the Sale-A-Bration Brochure plus the extra products, mostly in the Annual Catalog. All of your choices will be shown online.

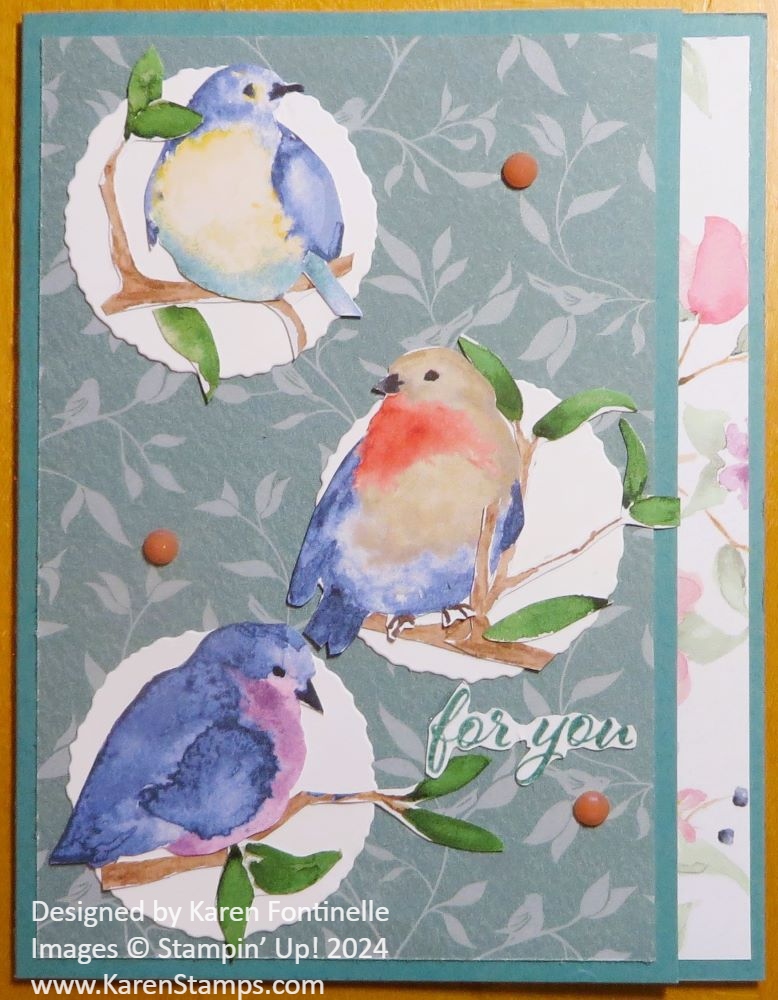
The birds, which I cut out by hand with my Paper Snips scissors, are from the designer paper with all the large birds. I cut out more than I wanted so I could see which ones I liked best for the card. It’s easy to just sit and cut things out while you are watching TV or relaxing for a little while! The branches (yes, a little more tedious!) I cut from another paper that had plenty of bare branches. I cut out a few extra leaves to use and could have cut out some flowers.

The birds and branches are adhered to three Deckled Circles die cut out of Basic White. The greeting I found in the Heartfelt Hexagon Stamp Set and stamped in Lost Lagoon. Since I didn’t have much space on the card for a greeting, I kept with the “fussy cutting” theme of the card and trimmed around the words to make it smaller! For a little embellishment, I added three Calypso Coral Opaque Faceted Gems, another FREE Sale-A-Bration product in the SAB Brochure on page 9. You might miss them because they are right in the fold of the brochure. Who doesn’t need a few more gems or jewels for cards and projects?!

Be sure to shop before the Sale-A-Bration deadline, February 29!

SHOP STAMPIN’ UP! ONLINE HERE!

Sour Cream Container Birds

Sour Cream Bird

Here’s a fun idea you might like to try for a Valentine treat or a fun little bird! The other day I saw a reel on Instagram of someone using short toilet paper rolls and forming them into a little bird shape. I thought it was very cute, but then I realized it looked like what most of us in stamping have made before, a sour cream container! I don’t know if real sour cream containers exist in this shape but I think they used to. It was kind of a twisted container, crimped at both ends. For years, we have made “sour cream containers” to hold candy for a holiday or party favor. After watching this reel of making this bird with a toilet paper roll, I thought why not use designer paper instead? Of course, you could also use cardstock and decorate that.

You can vary the size of your bird. Cut a paper rectangle about 4 1/2″ x 6″ or maybe a little smaller at 4 1/4″ x 5 1/2″. You can experiment with the size you want in the end. Apply Tear & Tape or Stampin’ Seal on one short side and one long size.

Sour Cream Bird Paper

It’s a little easier to roll the paper up if you have a curved surface or edge of a table or something just to get it loosened up to roll up easier. Remove the liner on the tape on both sides and make a roll to adhere to the other short side. You can overlap the edges however much you want. Then squeeze together the end that has the adhesive on it. Fold that adhered end up to make the bird’s tail feathers!

Sour Cream Bird Paper roll

Then squeeze the other end together but going in the opposite direction of the tail. If you are putting candy inside, put it in there now. When we made these as just a candy holder, we would adhere and/or crimp the edge. But for the bird, we still have some work to do. In the photo above, instead of squeezing the top and bottom of the open end together, you will push the sides together so that the end is going in a different direction than the top.

Before you adhere that end, cut along the edge in a curve. Then cut a little beak out of scrap paper. Cut a triangle out of Daffodil Delight and then fold in half to make a beak. Glue the inside and then glue the beak into that curved edge.

Punch out some black dots for eyes or just draw them on with a black marker. If you have a white gel pen, put a dot for the “whites of his eyes”.

For the wings, just punch out, diecut, or cut out by hand two hearts. Fold those in half and glue a folded wing onto each side of the bird. Don’t adhere the two sides together as you did for the beak.

Add a little glue to the inside edge after getting the bird all made, although it will be adhered at the point where the beak is.

That’s all there is to it to make these cute little birds! Just kind of a silly little project you can try on a Saturday afternoon!

Flight and Airy You’re Marvelous Card

Flight and Airy You're Marvelous Card

This Flight & Airy You’re Marvelous Card is made with brand new designer paper, and you can earn it for FREE with a $50 purchase during Sale-A-Bration. This Flight & Airy Designer Series Paper is wonderful! It has watercolored birds, foliage, flowers, and washes. These papers will make beautiful cards and projects for spring!

This card has a Basic White card base but instead of leaving a white margin around the layers, I covered the entire card front with designer paper. I started by choosing the sheet of paper with a vertical line of branches and birds. Although you might waste a bit of paper, it was like cutting out the Christmas design with the bears so that you could make a little scene on your card. I chose a section of birds that I liked and cut the strip of paper to include that area. From that full length of paper, I cut the section that I wanted to be on the front of the card. After I worked on the card, I trimmed that piece of designer paper to be just a little bit narrower. It ended up being 3″ x 5 1/2″.

The “other side” of that same paper was a Pecan Pie brown with crisscrossed lines. I liked it and wanted to use it with the birds section. As I played with making the front of the card, I wanted to add another color to brighten up the card a little bit, to bring out the colors of the birds. I chose Daffodil Delight to be just a narrow strip along the side of the designer paper.

I didn’t want to waste a lot of the designer paper, so I cut the brown pattern into two pieces at 3/4″ x 5 1/2″. I adhered those two strips to each side of the card, exactly on the edges, top and bottom. The Daffodil Delight strips, which are 1/2″ x 5 1/2″ were adhered to the sides of the bird paper with just 1/4″ showing. It helps to use Grid Paper to get everything even and straight. Then I adhered that whole section to the front of the card, making sure I had it even top and bottom and with equal amounts of the brown pattern showing on each side.

The greeting is stamped in Pecan Pie ink on Basic White. I diecut it with a Tailor Made Tag Die, but I found it too large for this card. I didn’t want to cover up any of the pretty birds. I ended up trimming that sentiment as narrow as I could, then flagging one end. Then I layered it on a piece of Pecan Pie cardstock and trimmed that as narrow as I could for a layer. Luckily, it fit exactly right on the card without hiding any birds!

You know if I have a new package of embellishments, I must use them! The colors aren’t all perfect matches, but close enough for matching shades of watercolors. I used the Rainbow Adhesive-Backed Dots. These are in the new Spring Mini Catalog on page 33.

Overall this is a pretty basic, easy card for you to make and fantastic when you can get free designer series paper! Plan your orders in January and February in $50 increments so you can take advantage of Sale-A-Bration!

SHOP STAMPIN’ UP! ONLINE HERE!