Tag Archives: Pattern Party Designer Series Paper

Pattern Party Colored Flowers Card

Pattern Party Colored Flowers Card

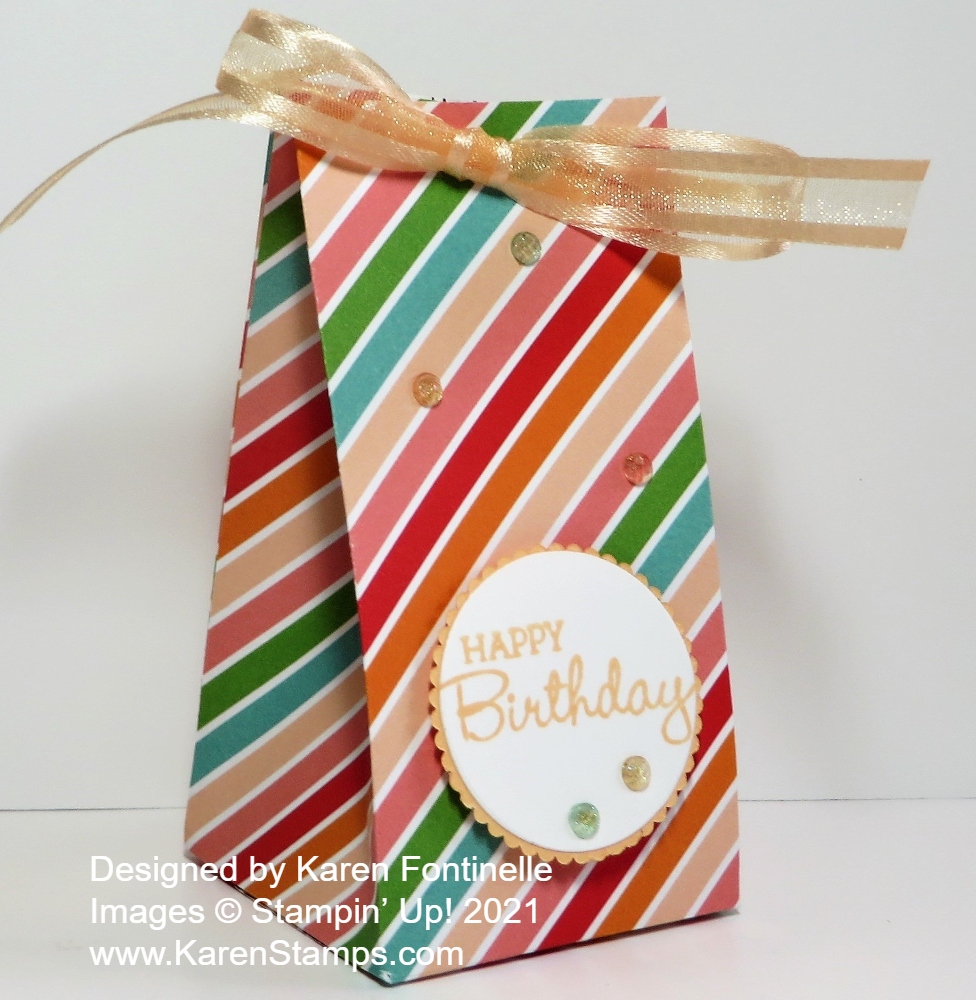
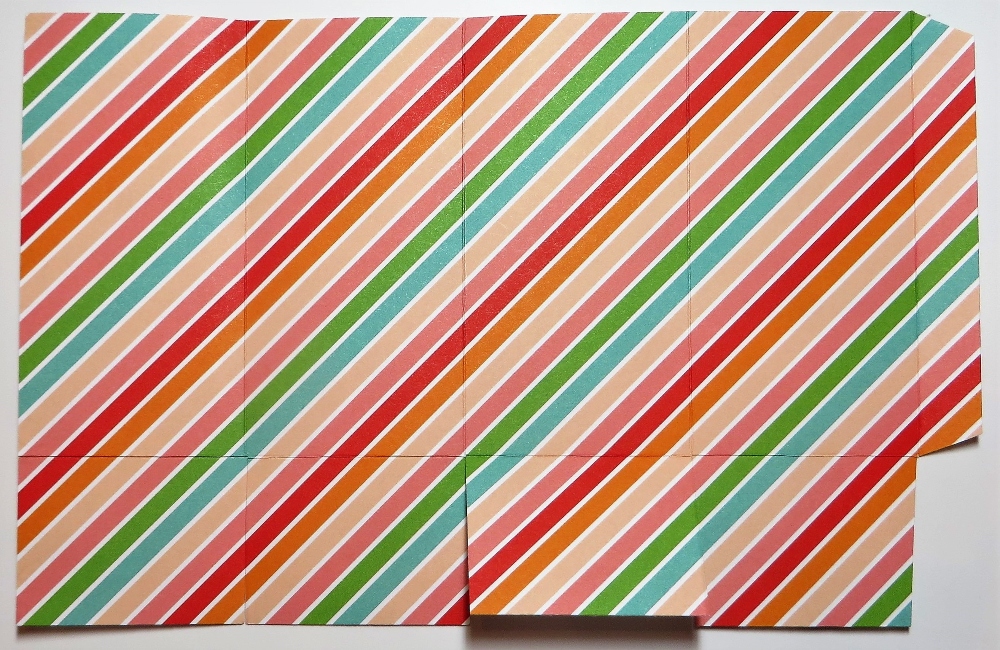
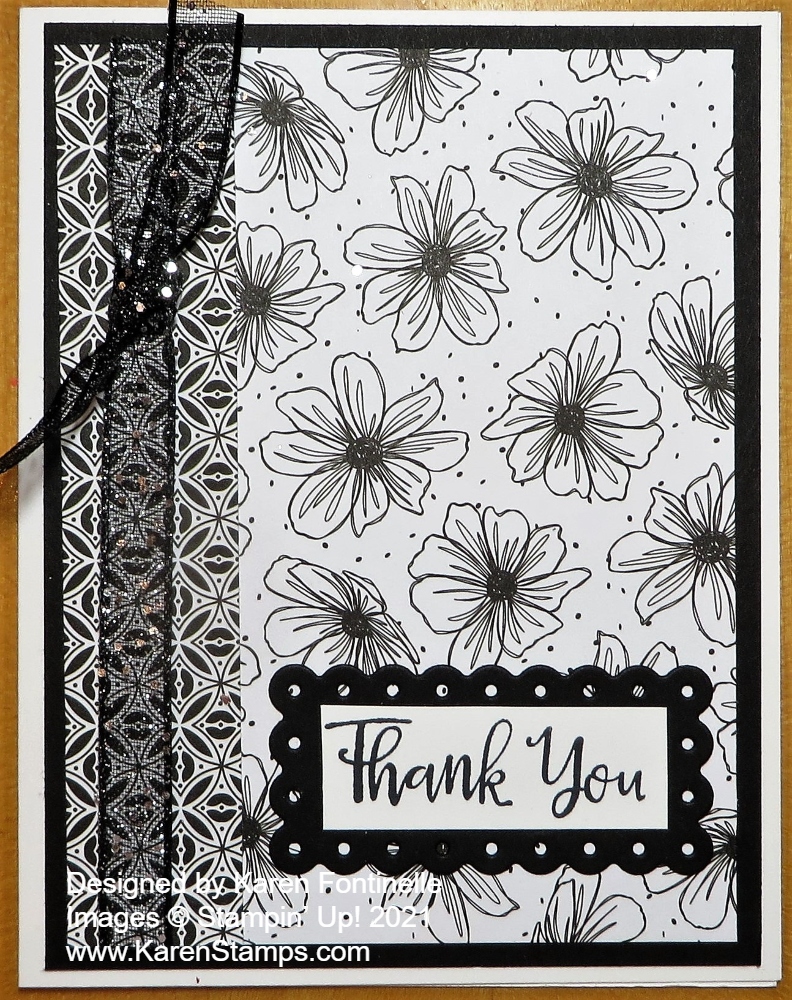
Do you recognize this designer paper? It is in the Pattern Party Designer Series Paper, a product available for your Stampin’ Rewards when your order total reaches $150 or more. It’s a huge pack of paper of 48 sheets, 12 different designs with 4 sheets of each design. It’s a really fun and useful package of paper, too, so you could actually combine orders with a friend and share this large package of designer series paper!

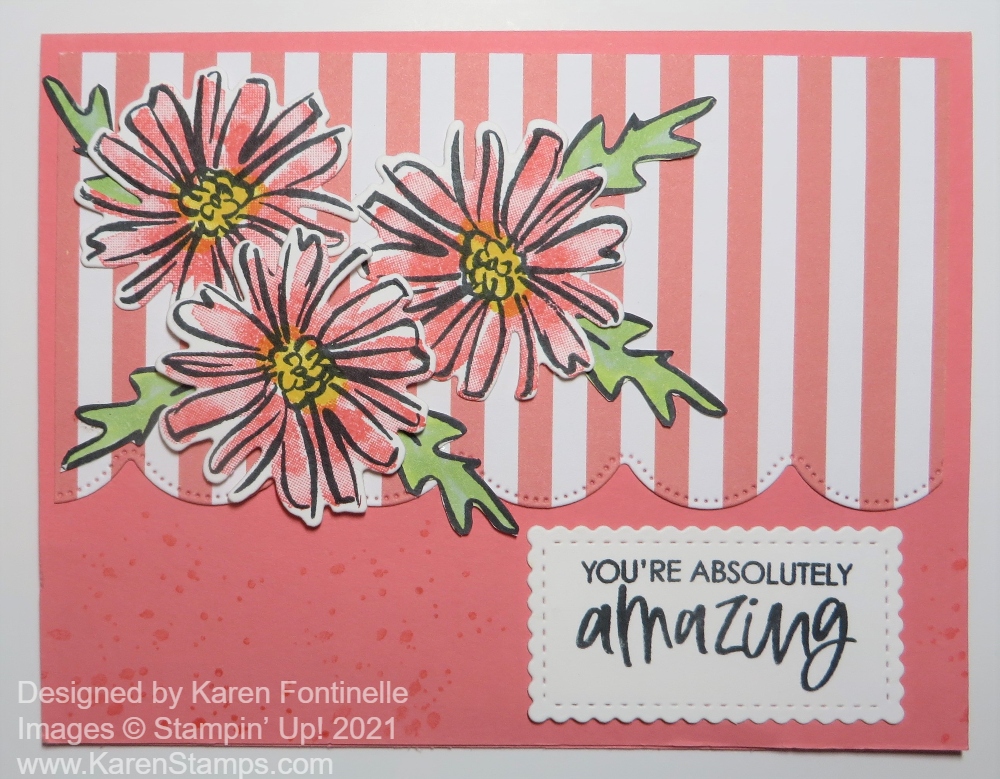
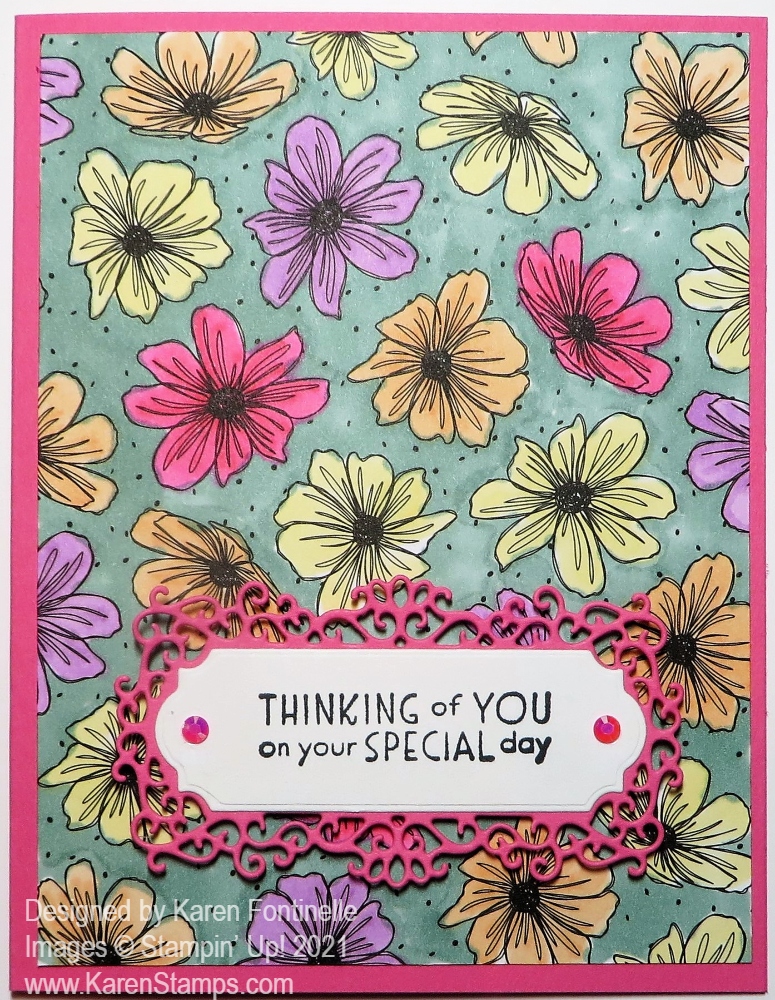
However, if you don’t recognize this designer paper, its because it comes in black and white in the Pattern Party package! I spent some time coloring in the flowers with Stampin’ Blends just for fun! Coloring is always a good stress reliever to take your mind off everything except hearing the sound of the marker on the paper and staying in the lines!

Pattern Party Colored Flowers Card and B&W

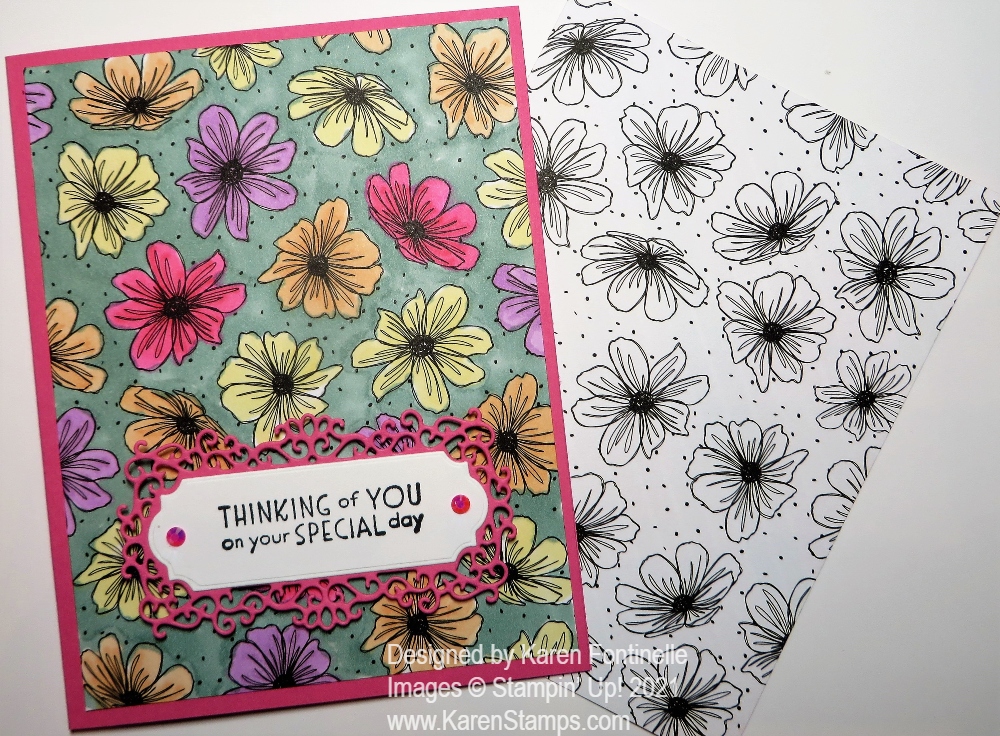
This card was very easy. I decided to color in the flowers with the new In Color 2021-23 Stampin’ Blends, at least the Pale Papaya, Fresh Freesia, Polished Pink. I also used Daffodil Delight for the yellow flowers. If you are daring, you can also color in the background, as I did. I used Soft Succulent to color the background. It’s best to use the narrow tip of the markers to color around the individual flowers and if you want, then you can use the brush tip for the open areas. It does take a little patience to color in the background so it is up to you. It looks fine leaving it white as well!

The card base is Polished Pink Cardstock. The greeting is stamped from the Inspired Thoughts Stamp Set. I used two dies in the Ornate Frames Dies for the greeting and the fancy layer in Polished Pink. Then I added two In Color Jewels in Polished Pink to the ends of the greeting. They have been out of stock but should be back soon, I hope!

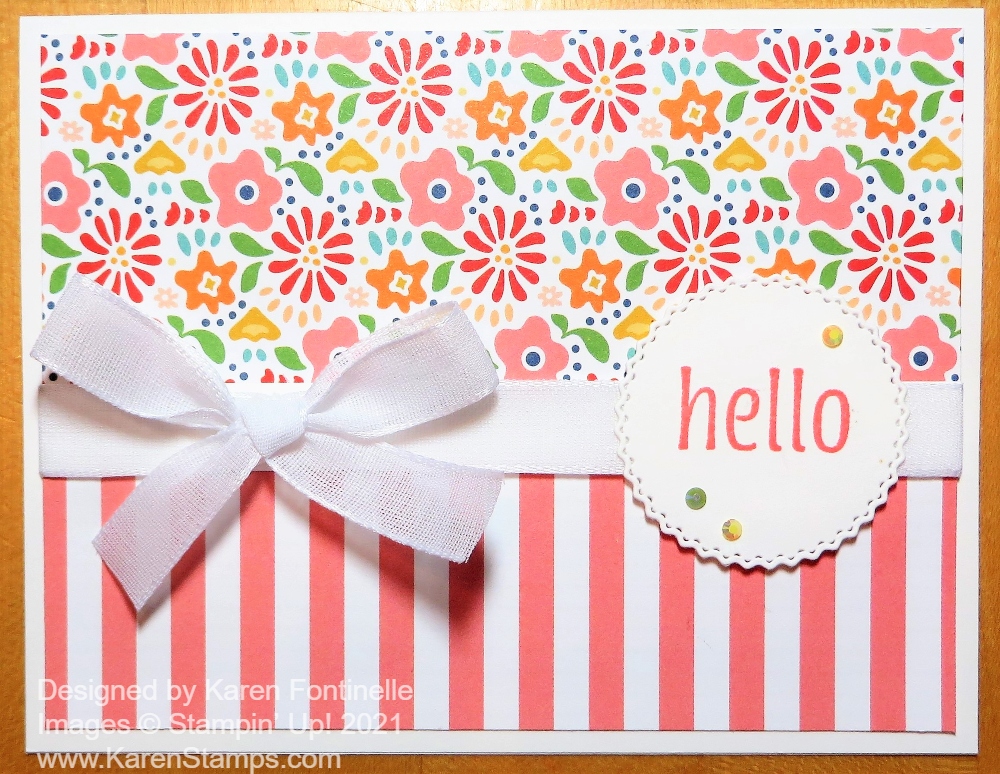
You may already have black and white designer paper from the Spring Mini, the True Love DSP, so you may have already tried this technique! Here is another card I made with just the black and white theme. Either way, colored or black and white, you will end up with a nice card! This Pattern Party Colored Flowers Card was fun to make if you want to take a little more time!

Pattern Party 2-4-6-8 Birthday Gift Bag

If you are able to get this Pattern Party Designer Series Paper, I think you will really enjoy using it as I did making this Pattern Party 2-4-6-8 Birthday Gift Bag! I thought this festive diagonal stripe would make a fun gift bag, at least for a small gift or treat, and certainly a 2-4-6-8 gift bag (or box) is easy enough to make!

The Pattern Party Designer Series Paper is an item you can choose as one of your Stampin’ Rewards with an order of $150 or more. That’s a big order but maybe some friends would like to go in on the order with you and you could divide up the paper because it’s a big package! Twelve different designs and four pages of each!

We’ve made this bag a bunch of times before but even I have to go back and review the directions. It is very easy though! Once you know how to do it, you can vary the size by using a larger or smaller piece of paper. Always be sure the pattern of the paper is going in the direction you want it to go in so you don’t end up with upside down flowers or animals or a stripe going sideways when you wanted it to go up and down.

For this gift bag, I started with a piece of paper 8 1/2″ x 5 1/2″. I just scored it at 2″, 4″, 6″ and 8″ going across the paper. Then I turned it and scored at 1 1/2″ for the bottom tabs of the bag. Trim off the little 1/2″ bottom piece and cut on the 2″, 4″, 6″, and 8″ score lines for the bottom flaps up to the 1 1/2″ score line. Difficult to see in the photo below but you can get the idea.

Pattern Party Small 2-4-6-8 Birthday Gift Bag scoring

Assemble the box, putting adhesive on that 1/2″ piece on the side. You can just fold over the other side of the bag with it laying flat on the table. You don’t have to try to maneuver it in your hands! Apply adhesive to the bottom flaps, first doing a “test” to see which way you want the flaps to go in before you glue. Then pay attention to where the seam is and try to have that face the back. Fold in the bottom flaps, trying to make the front of the bag look nice.

To decorate this bag, I stamped “Happy Birthday” in the Pansy Patch Stamp Set in Pale Papaya Ink. Then I die cut it with one of the Layering Circles Dies and layered it on a scalloped circle die in Pale Papaya Cardstock. It’s perfect fit! I needed something big enough to fit the greeting but not too big for the bag! I popped that up with two Stampin’ Dimensionals.

For the top of the bag, you can leave it open, or kind of squeeze in the sides and pinch the top together. Punch or poke some holes in the top for ribbon. I used the Pale Papaya 3/8″ Open Weave Ribbon to tie the top closed in a bow. Have I said how much I love that ribbon?! Then for a little extra, I added some of the Genial Gems on the greeting and on the bag. These come in two colors, Pale Papaya and Mint Macaron but I think you can use them even without matching colors.

Knowing how to make a 2-4-6-8 bag is something you should know how to do as a papercrafter! They are fun to make, not to mention useful when you need some cute packaging for a small gift or treat! Here’s a very similar one made for Valentine’s Day. Being able to make an easy gift bag just might save you a trip to the store!

SHOP STAMPIN’ UP! ONLINE!

Pattern Party Hello Card

Pattern Party Hello Card

After working with this Pattern Party Designer Series Paper the other day, I left these two patterns out on my table because I knew they would make a cute card like this Pattern Party Hello Card. It’s one of the easiest card designs you can make and yet it always looks good and can be for almost any occasion. Just change the greeting.

This easy card begins with a card base of Basic White Cardstock. I just cut the two patterned papers from the Pattern Party Designer Series Paper the width I liked them and so they would overlap by about 1/2″. It would be easier if you cut another piece of Basic White Cardstock on which to adhere the two designer papers for that layer on the card front. It would be easier to line them up and tie the ribbon around.

This Whisper White Faux Linen Ribbon, part of the Flowers For Every Season Ribbon Combo Pack, is rather sheer and I could see the paper seam underneath it. I didn’t like that look, so I use a scrap strip of Basic White Cardstock that was about the same width or narrower than the ribbon and adhered that over the seam of the two papers to the ribbon would look solid white without showing through to the paper. I just put the strip of ribbon across that white cardstock strip on the front and then adhered it to the back sides of the paper. This saves a couple of inches of ribbon if you were to tie ribbon all the way around the card. I tied the bow separately and adhered it with Mini Glue Dots. Now when you do that with a wide ribbon like this white one, you might want to tie a piece of twine around the ribbon right where you are going to adhere the bow. That narrows the ribbon at that point so it looks more real that the ribbon is tied onto that wide ribbon rather than just stuck on! But it’s not absolutely necessary.

You can add almost any greeting you want as long as it fits in the space. I stamped the “hello” from the Artistically Inked Stamp Set in Flirty Flamingo Ink. Then I die-cut it with the pretty scalloped circle die in the Tasteful Labels Dies. I added three 2021-23 In Color Jewels (155571) to the greeting for a little bling. These are out of stock at this moment but they will get more! They were obviously very popular! I know I have already used them a lot on cards!

Here is the other card I made with the striped pattern of the Pattern Party DSP. You can only get this paper with an order of $150 or more on which you would earn Stampin’ Rewards. Check pages 170-71 in the Stampin’ Up! Annual Catalog to read about Stampin’ Rewards.

I really like this bright, happy card made with this Pattern Party Designer Paper! You can make a card like this with whatever two patterns of designer paper you have in your stash at the moment and add a ribbon and a greeting!

SHOP STAMPIN’ UP! ONLINE HERE!

Color & Contour Pattern Party Card

Color & Contour Pattern Party Card

Once again, as I looked through the Pattern Party package of designer papers, this Flirty Flamingo stripe jumped out at me and screamed to be made into a card which resulted in this Color & Contour Pattern Party Card. I had almost forgotten this set of dies has this scalloped edge die in it which just helps to make this card! I love how this card turned out!

The card base is Flirty Flamingo Cardstock. The striped paper is from the Host Product in the new Stampin’ Up! Annual Catalog. This means that with an order of $150 or more, instead of choosing some other free merchandise in the catalog, you can go to the back of the catalog where there is this designer paper option (48 sheets!) and some other stamp sets, all that you can choose as your Stampin’ Rewards at a discounted price. I think this package of paper is going to be a hit because it’s something different (just stamp sets have been offered as Host Rewards) and you will love the paper patterns! Look for the Pattern Party Designer Series Paper on page 171.

The striped paper is die cut with a die in the Scalloped Contours Dies. You can purchase the Color & Contour Stamp Set and the dies in a Bundle and save 10%. I love the stitched look along the scalloped edge. Whether you purchase the stamp set or not, I would buy the Scalloped Contours Dies by themselves. They are that good!

I do have the Color & Contour Stamp Set and I do like the flowers in the set! You can do two-step stamping to color in rather abstractly the flowers, or you can color in the open design yourself with whatever coloring technique you like. Then you can cut them out with the dies. You can set on the set that the individual leaf has a very open design, but I just stamped it in Memento Ink, colored in with two colors of green Stampin’ Blends, and cut out the leaf itself, not the extra squiggle! The lower flower is popped up on Stampin’ Dimensionals and the other two and the leaves adhered right to the card. The flower center is stamped with Daffodil Delight Ink.

It IS a little tricky to line up the two-step stamp with the first stamped impression and then to line up the die with the flower. You could spend some time lining them up and then put a black mark on the stamp and on the die to remind you of how to line them up. But since the design is rather abstract anyway, it kind of doesn’t have to be perfect. For some of us, though, who like things “perfectly lined up”, well, we can fiddle with it and we can get it lined up!

The greeting is in the stamp set but I did use another set of dies to cut out the greeting. I used the Stitched So Sweetly Dies to get a smaller rectangle to fit at the bottom of my card. This is another set of dies that I have used a lot and recommend you have in your supplies!

Not one to leave well enough alone, I saw the “speckle” stamp in the set and thought maybe it would look interesting in the bottom portion of the card. Usually it is not a good idea to stamp something more on a card that is nearly finished and could potentially be ruined if you mess up, but I took a chance and it worked out! I inked the stamp with Flirty Flamingo Ink but stamped off before stamping on the bottom of the card.

On the inside of the card, I put a piece of Basic White for a layer and stamped one of the flowers, just the outline, in Flirty Flamingo Ink down in the right-hand corner. Later I can stamp a message on the inside of the card or write a personal note.

If you have a large order of $150 or more, remember that you can choose Stampin’ Rewards of 10% or more and remember that there are special Host choices in the back of the catalog, one being this year the Pattern Party Designer Series Paper. This is 48 sheets, 4 sheets each of 12 different designs. This card, the Color & Contour Pattern Party Card, shows off one of the pretty patterns in this package of paper! You will enjoy it I’m sure!

Shop Stampin’ Up! Online Today!

Black and White Pattern Party Thank You Card

Black and White Pattern Party Thank You Card

This Black and White Pattern Party Thank You Card is NOT the card I was planning to make AT ALL! It just happened! So when you start to stamp, you don’t really know what you are going to end up making! Even when you think you know!

I was planning to make a card with the Art Gallery Stamp Set, stamped on our new Linen Paper, and was looking for designer paper to go with the card, possibly. When I caught a glimpse of these two black and white patterns together in the package, that was it! I’ll do the Art Gallery card another time!

The card base is Basic White Cardstock with a layer of Basic Black. Then I just layered the two patterns of the Pattern Play black and white paper, one a narrow strip. I added a strip of the Black 3/8″ Glittered Organdy Ribbon and tied a knot with a smaller piece. I think it dresses up the card and makes it fun! I tried a bow but that seemed like too much with the glittery ribbon. It’s not a “fancy” card, just a fun one with the ribbon!

The “Thank You” greeting is stamped from the Peaceful Moments Stamp Set, one carried over into the new catalog. I die-cut it with the same die as the black layer underneath from the Scalloped Contours Dies. I could have measured the empty space in the middle of the black piece and then cut the white greeting piece down, but I cut the white die-cut and then used the little lines from the die-cut to cut the white piece.

I want you to know about the Pattern Party Designer Series Paper. It is a Host item which means you can only purchase it when you have a order of $150 or more. We often don’t pay that much attention to the Host items, there are also a few stamp sets, and these products are available to Hosts (or for your individual order) as Rewards at a reduced price from their value. This Pattern Party DSP is a package of 48 sheets of paper, 4 each of 12 double-sided designs. Lots of different coordinating colors and will be lots of fun to use! Just remember this package when you are placing a “Hostess” order of $150 or more. This term comes from when we had more home parties and the person holding the stamping party with her friends was the Hostess and got free merchandise based on the total for the party. Now with people ordering individually online, it also works for your own orders of $150 to choose Stampin’ Rewards. You will find this paper in the back of the catalog on page 171. You will love it!

This Black and White Pattern Party Thank You Card is easy to make but so striking with just the black and white design. You could use a plainer black or white ribbon on the side too. It would also be fun to color in the white flowers on another card! It reminds me of the True Love Designer Paper in the Spring Mini Catalog that is all black and white as on this card. Be sure to check out the Pattern Play DSP to see all the colors and patterns next time you have a large order or combine orders with friends!

Today is the LAST DAY to get the May Paper Pumpkin Kit in your mailbox with enough supplies to make 9 cards for ONLY $5.00, including shipping!! It’s a real “steal” with the baseball-themed cards so don’t “strike out” by missing it! If you have subscribed before but would like to try Paper Pumpkin again, the same email address may not work again but you could use another one. Use Promo Code HOMERUN0521.

Paper Pumpkin Batter Up Kit

JOIN PAPER PUMPKIN TODAY HERE WITH MY LINK!