
This Rainbow of Happiness Card is sure to brighten someone’s day and probably even yours as you make it! This Rainbow of Happiness Bundle is sure to be a popular item in the Spring Mini Catalog. There are so many different ways you can use the coordinating products.
I didn’t think this was going to be one of my best cards because I still don’t have my mojo back since Christmas and everything is still out of place since decorating! Plus the light I use for photographing my cards has konked out so I see some weird orange shadows underneath the popped-up clouds on this card! Even my coffee maker has broken, so what can you do?!
Even though this isn’t one of my best cards, I ended up thinking it was okay. This was my first try with this card and dies and I found out things didn’t match up the way I envisioned! But it proves you can kind of do your own thing with these stamps since they are photopolymer. They can be stretched a bit into the size or shape you want. You still want to be careful and not overdo it, but these stamps in particular can be maneuvered a little bit!
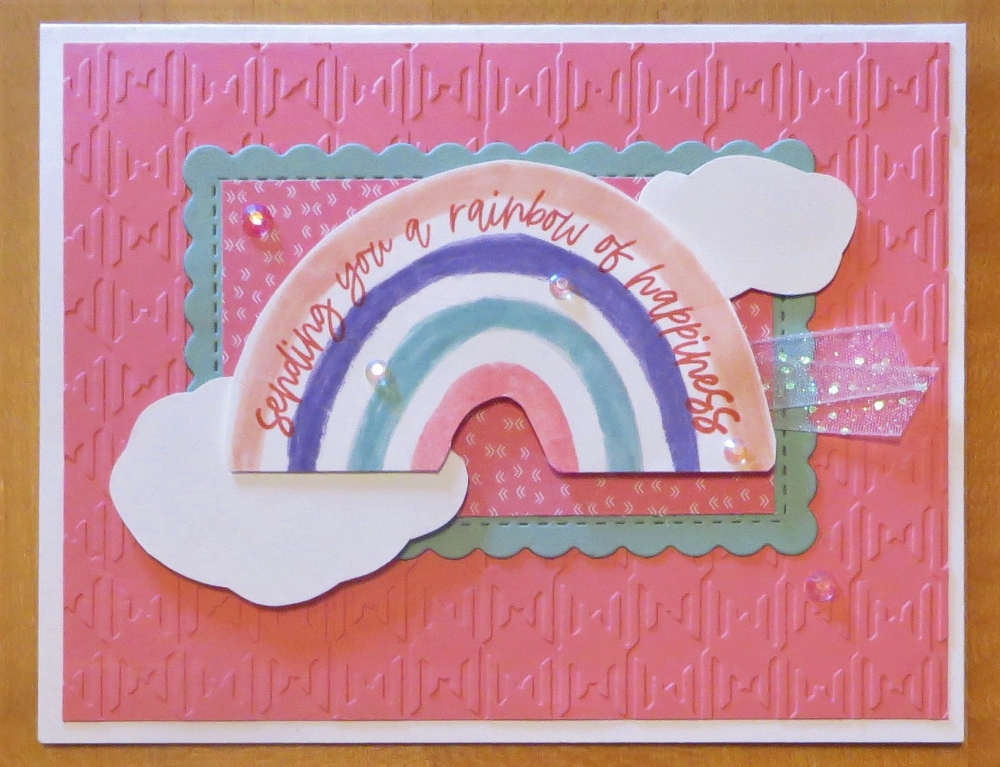
The card base is Basic White with a Flirty Flamingo cardstock layer. I decided to emboss this layer with the new Gingham Embossing Folder mainly to try it out and see how it looked.
The rainbow is stamped with the Rainbow of Happiness Stamp Set. I was slightly trying to copy the card sample on page 18 in the Spring Mini. I haven’t watched any videos yet on how people use these stamps and dies so I was just winging it! I used the four individual rainbow arcs on one large block (the largest one!) expecting to cut out the rainbow with the dies, but the dies were small, much to my surprise! But it was okay, I just cut out the rainbow with my scissors! To ink up the rainbow, I used my Stampin’ Write markers in Highland Heather, Petal Pink, Pool Party and Flirty Flamingo. (Flirty Flamingo is one of the Brights colors.) I just colored each marker on the parts of the rainbow and breathed on the stamps before stamping. Even though I tried to “prime” the new photopolymer stamps a few times first, using the markers, which are usually lighter anyway using this technique, the stamped rainbow came out a little sketchy! So I just used the markers themselves to lightly color over the rainbow. I intended to color over the rainbow with my Wink of Stella Brush, but that is old and not working right either! A new one is on my next order!
I used the sentiment in the stamp set to stamp the greeting right on the rainbow using Calypso Coral Ink. I like the way that looks! I wanted something that would coordinate well but not blend into the same colors of the rainbow.
To add some layers behind the rainbow, I die cut a piece of Mint Macaron cardstock with one of the Scalloped Contours Dies. Then I liked the look of a certain paper in the Sunshine and Rainbows 6″ x 6″ Designer Series Paper. You can earn this paper FREE during Sale-A-Bration with a $50 purchase. It’s very cute! Be sure you get it soon so you can use it with this Rainbow of Happiness Bundle. I die cut the paper with the same size Scalloped Contours Die but then I trimmed off the scallops so it would fit inside the stitching on the Mint Macaron die cut piece. I adhered those two layers together and adhered that piece to the card.
I don’t own the Cloud Punch yet (unless it is hidden under some other messes!) so I just cut out my own clouds so my card would look somewhat like the sample in the catalog I was copying. There are also cloud dies in the Brillliant Rainbow Dies in the Bundle.
The rainbow is popped up on Stampin’ Dimensionals® but you need to think about where the clouds are going to go underneath the rainbow if you are copying this idea and place the Dimensionals so they are out of the way if you are going to stick a cloud underneath! Both of my clouds are also popped up on Dimensionals. I also used a piece of the Glittered White Organdy Ribbon to tuck underneath.
For a finishing touch, I had to use the new Iridescent Rhinestones Basic Jewels. I placed three of the smallest jewels right on the rainbow and then two larger ones outside the rainbow. These are really pretty!
So there you have my first rainbow card! I’m looking forward to making more, hopefully, a little better, but as I said, I ended up being happy with this card! Sometimes you just have to keep working and the right design will eventually magically appear!