
I was excited to play with my new In Color Stampin’ Blends markers and cardstock, plus the new Artisan Sketched Garden Designer Series Paper, and I finally got the chance to make this Artisan Sketched Garden Happy Birthday Card. I have to say I love the look of this card! Sometimes you make a card, and you really like it!
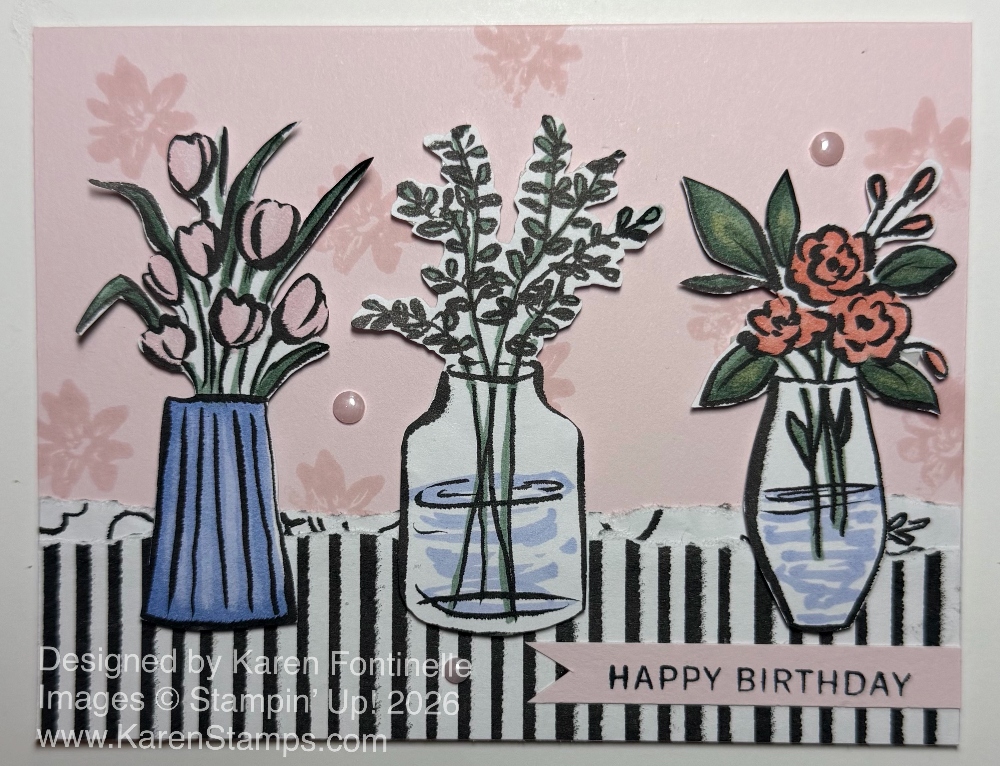
The card base is Barely Blush cardstock, one of the new 2026-2028 In Colors. It is a very light pink shade, and I’ll have to see how I like the ink color, but I think the light shade goes so well for this card. I didn’t add another layer of any paper for a background, but I felt like it needed a little something in the background. I decided to do a “watermark” look by stamping a small flower with the Barely Blush ink randomly on the card front. I only did a few, and when I stamped the flowers, I wished I had stamped off first. But as the ink dried, it became a lot lighter, so it worked how I wanted it. The flower was in the Paradise Garden Stamp Set.
I did see the idea for the black and white stripes and torn edges at the bottom of the card somewhere online and liked that look. This striped paper is the Artisan Sketched Garden Designer Series Paper. I measured a piece of the striped paper at 5 1/2″ x about 1 1/2″ or 1 3/4″. Remember, the tearing technique – hold the paper and tear toward yourself so that the side you want to show the torn edge is facing you. In this case, I took the torn piece, turned it over, and used that as a layer underneath the striped piece at the top. It is just stuck down a little bit behind the stripes.
For the flower vases, I cut some apart from the Artisan Sketched Garden DSP that I liked and colored them with my new In Color Stampin’ Blends. I used the Barely Blush for the flowers on the left, Crisp Cantaloupe for the flowers on the right and Peaceful Pine for all the green foliage. For the vases, I used Hydrangea Hue for the vase color with the pink tulips, and to look like some water in the clear glass vases in the middle and left. I just barely scribbled on some color. Hydrangea Hue is really a purplish blue, but I think it did fine as water, and mainly, I only wanted to use the new In Colors. I popped up the vases with Stampin’ Dimensionals, regular size and Minis. You could also glue them down flat. Or if you thought about it ahead , (I never do!), you could adhere a piece of Adhesive Sheets on the back of the DSP before cutting out the vases and turn them into stickers so you wouldn’t have to use adhesive on the narrow little foliage and flowers.
The greeting is stamped with the Lovely Arrangements Stamp Set. I wanted something small to fit on the card without taking away from the vases. It is stamped with Memento Black ink on a piece of Barely Blush cardstock and cut like a banner only on the left side. It is glued down flat, but could be popped up. For a finishing touch, I added three of the 2026-2028 In Color Dots in Barely Blush.
Be sure to check out the Artisan Sketched Garden Designer Series Paper on page 63 of the new Stampin’ Up! Catalog. We’ve had black and white paper before, (Here’s an old example!) and I think it offers a lot of creative options, whether you color on it in any one of a million ways or if you leave it black and white. Get some and try it out!