Little Delights Christmas Bulb Christmas Card

Little Delights Christmas Bulb Card

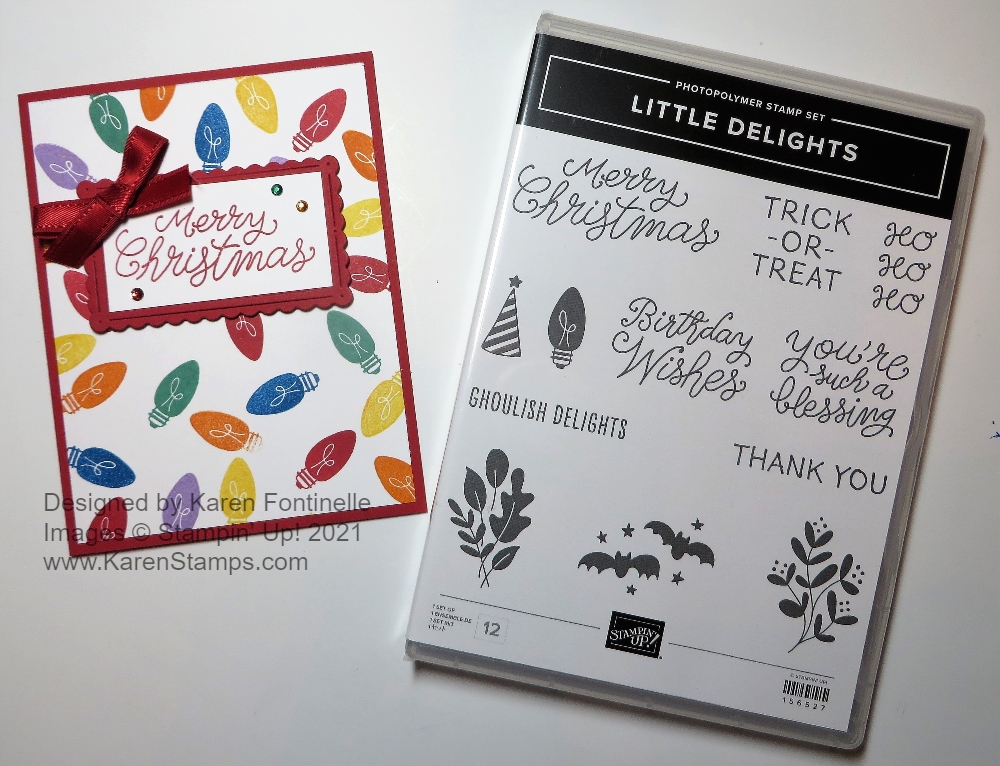
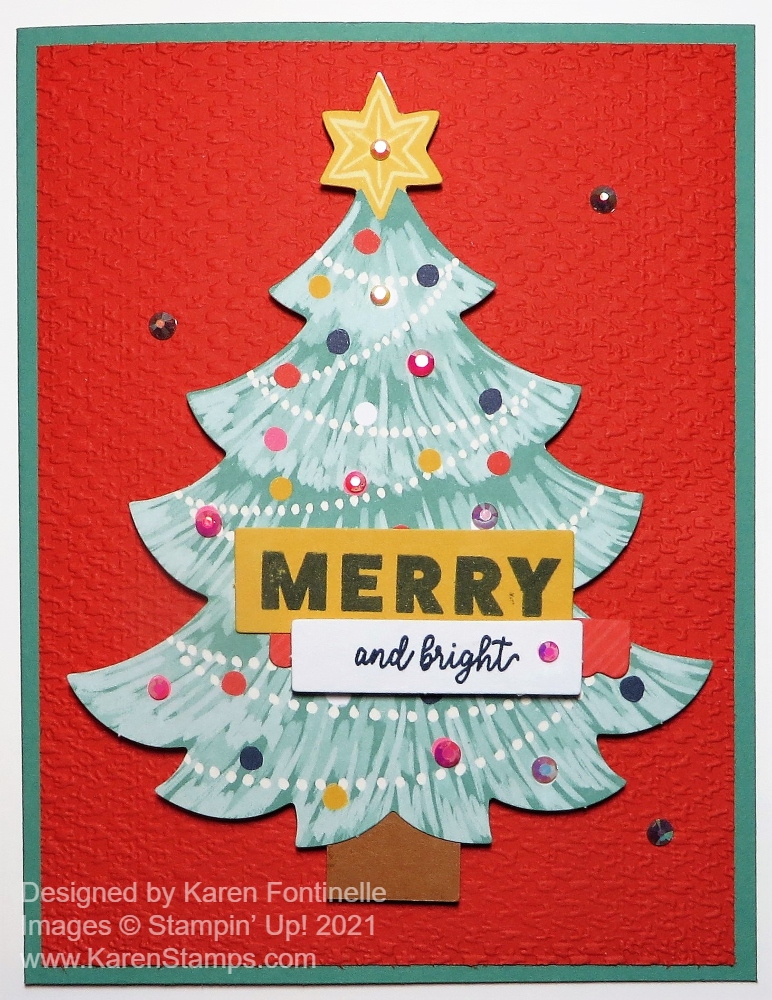
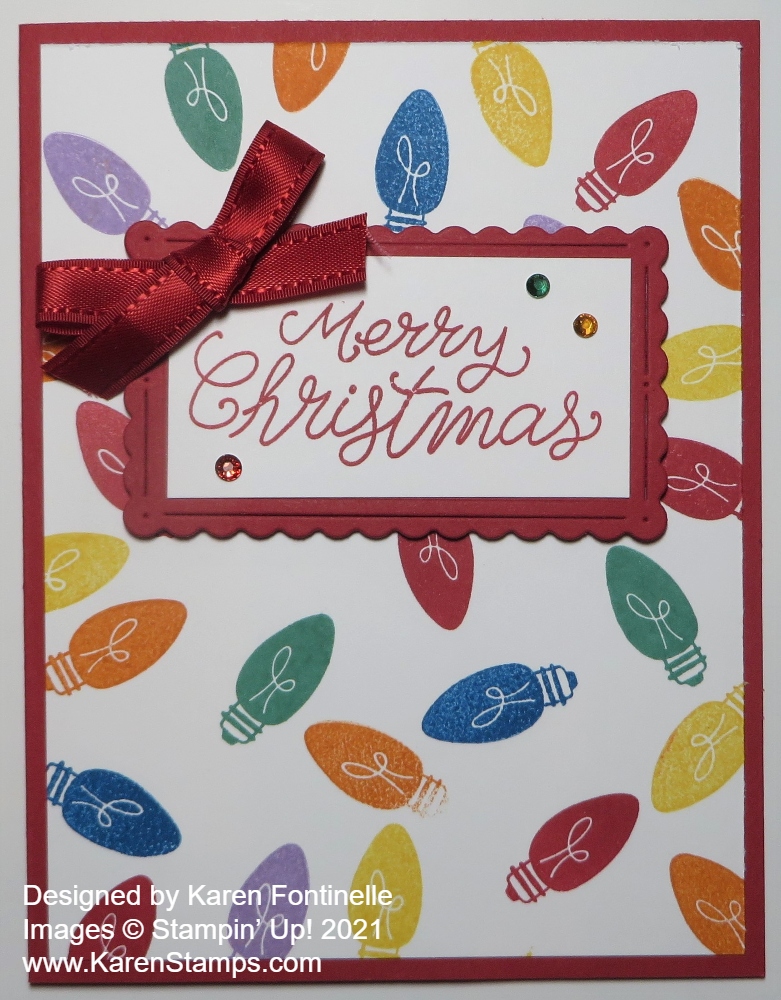
The longer I have the Little Delights Stamp Set, the more possibilities I see with it, like this Little Delights Christmas Bulb Christmas Card. All I needed was the little Christmas bulb stamp and the greeting! The only problem is that you can’t stop stamping the cute little bulbs!

The card base is Real Red with a layer of Basic White Cardstock. I just randomly stamped the Christmas bulbs in different colors. I used Real Red, Daffodil Delight, Just Jade, Pacific Point, Pumpkin Pie, and Highland Heather ink colors. After figuring out the greeting and the space it would take up, I added more bulbs so every color would have a good representation!

The die-cut greeting layer is Real Red cut from the Scalloped Contours Dies. I stamped the greeting from the Little Delights Stamp Set on Basic White and cut it to fit on the Real Red layer with my Paper Trimmer.

For some embellishment, I tied a little red bow from the Real Red 3/8″ Double-Stitched Satin Ribbon and adhered it to the corner of the greeting. I just love the font of that “Merry Christmas” sentiment! I also adhered some little Holiday Rhinestone Basic Jewels on the greeting as well!

If you wanted to jazz up the card even more, you could add Wink of Stella for a little glimmer of the Christmas bulbs! Or you could stamp fewer bulbs and connect them with a drawn line to look like a string of lights. Just play and see what you come up with!

The Little Delights Stamp Set is a cute one with several holiday images and greetings for cards and projects! These images and words are great for all kinds of stamping projects throughout the year!

Little Delights Christmas Bulb Christmas Card

Shop Stampin’ Up! Online HERE!

Blackberry Beauty Happy Fall Card

Blackberry Beauty Happy Fall Card

This is another card, the Blackberry Beauty Happy Fall Card you could use to send to someone for Thanksgiving! Normally I don’t like cattywampus card designs like this one, with the papers at an angle, but somehow I liked it on this card! I never make cards like this! But the colors with the gold foil look rich and elegant and perfect for fall and Thanksgiving.

The card base is Cinnamon Cider, one of the In Colors for 2020-22. The designer paper is the Blackberry Beauty Specialty Designer Series Paper. I didn’t use one of the papers with gold foil, I used a “plainer” one with a foliage/floral design.

Next, I turned to the Blackberry Beauty Ephemera Pack for other design elements. I loved this pack (and so did a lot of other people because it has been hard to get and is back-ordered as I write this! Usually packs like this are all gold foil pieces but this one of laser cut pieces are paper with color and gold foil accents. I loved the flower (looks like Queen Anne’s Lace) but I wanted it to stand out more. I cut out a piece of Cinnamon Cider that would fit behind the frame you see. To make it more interesting, I embossed it with the Tasteful Texture Embossing Folder. It just gives it a little something extra.

The frame and the piece the greeting is stamped on are also in the Ephemera Pack. After playing around with all the pieces for a while, I settled on this “askew” design! As I said, I usually don’t care for that look but that is what pleased me in making this card! I stamped the little label piece using Cinnamon Cider ink and just used part of the greeting in the Banner Year Stamp Set. The frame is popped up with some foam strips, like Dimensionals. The flower is also popped up inside the frame.

While I can’t believe we are already into November, my Halloween decorations are put away and my Thanksgiving ones are out! If you want to mail cards or make little treats for Thanksgiving, now is the time to do it before we are full-blast into Christmas! Enjoy this fall season! Remember to change your clocks tonight/tomorrow back to Standard Time!

Blackberry Beauty Happy Fall Card Closeup

SHOP STAMPIN’ UP! ONLINE HERE!

Make a Double Treat Holder

Treat Holder Front

I was looking for some kind of treat holder that could serve as a little favor maybe at your Thanksgiving table and I came across this idea, a Double Treat Holder. I think I first saw this idea years ago at a Stampin’ Up! Convention I attended (in person, back in the day!) and I know I have made some since then. It’s really a cute idea! There is a pouch on each side front and back and if you want to, you can even add a cookie or something in between the two sides! What a great treat idea!!

Oh, I just found a post I made about this first treat holder I saw at a “Regional” Stampin’ Up! event…..shorter and smaller than Convention! The design is a little bit different than this one, but it is the same idea! Check it out HERE.

This design is easy and uses a 6″ x 6″ piece of designer paper, or you could use a piece of cardstock. You do need a Paper Trimmer to score the fold lines or the Simply Scored scoring board. It is best if you can find a designer paper that on both sides it doesn’t matter which way the pattern goes. However, the treat partially covers up the paper and the recipient probably isn’t going to care if the pattern goes at a diagonal when it is meant to go straight! Hopefully I can show photos and describe the directions well enough here but you can find lots of videos online, too.

Fold the 6″ x 6″ designer paper in half as you see in the Paper Trimmer to form a triangle. After folding it into the triangle, you will score 1/2″ inside that fold. You can see the fold line is lined up at 1/2″ on the right side of the cutting track. Score and then turn the paper over to score at 1/2″ on the other side unless you can see the scoring well enough from just doing it on the front side. Just don’t tear your designer paper with too much pressure!

Treat Holder Folded Half

Now turn the paper so the fold line is at the top and score at 2 3/4″ on each end of the triangle and on each side of the paper if you need to.

Treat Holder Side Scoring

After creasing all the score lines, open up the paper and fold the side points in as you see below. You can also see three score lines in the middle. The middle one is actually the center fold line. I put my Bone Folder there just to hold it closed, but it is good to use a Bone Folder or whatever you have to get nice, good creases.

Treat Holder Sides Folded

Then just fold the top and bottom of that piece, with the pouches, backward to form the treat holder with the space in the middle. The center line is just flat in the middle and you fold on those outer score lines and match up the point at the top. Hold the top points together and use a hole punch to punch a hole for ribbon or staple or clip or whatever you want to do. No adhesive required until you decorate the front!

This is the backside of two treat holders using two different paper patterns. These were from the Pattern Party Host Designer Series Paper. A chocolate square or tea bag fit nicely in each pocket, front and back!

Treat Holder Back

Here is the view from the side where you could package up a cookie or two in a cello bag and stick it in the middle of the treat holder!

Treat Holder Inside

And to decorate the front of my treat holder I used images from the Banner Year Stamp Set! Then I die cut a circle and scalloped circle for a layer from the Layering Circles Dies to fit right on the front with a couple of gems! That’s the only place you need adhesive and I used Stampin’ Dimensionals on the back.

So fun! Let me know if you try them! A good way to use up some 6″ x 6″ designer paper or cut up a 12″ x 12″!

Treat Holder Front

If You Ever Wanted to Be a Stampin’ Up! Demonstrator…

Did you ever want to be a Stampin’ Up! Demonstrator when you grew up??! Well, the time is here….at least it will be tomorrow, Thursday, November 4th!

If you have thought about starting your own stamping business, this month will be the time! To become a Stampin’ Up! Demonstrator all you have to do is purchase the Starter Kit. You get to choose the Stampin’ Up! products you want in your kit (or you can go by their suggested list), plus Stampin’ Up! includes business supplies you may need. Normally, you choose $125 worth of products and pay $99….a bargain any day….but during November, you can buy the Starter Kit for only $75!! The kit ships FREE to you!

Why should you join? You’ll be part of the Stampin’ Up! community which is fun in itself, as I have been for many years! If you like meeting new people who share your love of stamping and creating, this is the place for you! Tangible benefits include early access to Stampin’ Up! products, exclusive perks, and an opportunity to earn additional income. The level of business you want to have is up to you. Some of the top Demonstrators have said they only went to a Stampin’ Up! party to support their friend, then bought the Starter Kit only to get the discount. Yet, they found an opportunity to sell to others and turned it into a great business for themselves and their families. Whether you want to work hard building a big business or have a smaller business with a few customers is up to you.

Check out the Stampin’ Up! information page about joining and then contact me with any questions. You can sign up online and receive your Demonstrator number in an email, then you are ready to go! You can use that number to sign in to the Demonstrator website and start looking at all the resources and training for new Demonstrators and even us old ones! Your Starter Kit will be shipped out pretty quickly and then you’ll have everything you need to get started.

I can help you get started no matter where you live, but if you prefer a local Demonstrator close to you, just scroll all the way to the bottom of the Stampin’ Up! website and click on Find a Demonstrator. Put in your address and see what names come up. Here is the link.

Think about it today and tomorrow you can JOIN!

JOIN STAMPIN’ UP! Nov. 4 – 30!

Eden’s Garden Is Here!

Eden's Garden Square Ad

The tale of the Garden of Eden transcends the boundaries of a single belief system. Numerous accounts and adaptations of Eden’s events have appeared in Christianity, Judaism, Islam, legends and lore, ancient mythology, and more! No matter how the story is shared, the essence of Eden remains the same: it’s a place of paradise. Filled with fruitful and flourishing foliage, stillness and serenity, and an air of mystery, Eden is an ethereal utopia!

And you can purchase these new products TODAY!

Enter and explore Eden with the Eden’s Garden Collection! This delightful and desirable collection includes early-release products from the January–June 2022 Mini Catalog—a bundle of stamps and dies that’s blooming with beauty and bounty. Plus, exclusive products you can’t uncover anywhere else—a pack of paper patterned with green and gold, a set of specialty sheets for gift-giving and textured touches, and a sparkling set of gleaming gems!

Just as the timeless tale can be told in a variety of versions, these paradisical products can be used to create projects for any occasion—and they make the perfect papercrafting companion.

PRODUCT DETAILS

EDEN’S GARDEN CLING STAMP SET 157823
Early-release product from the January–June 2022 Mini Catalog. $23.00


EDEN DIES 157831
Early-release product from the January–June 2022 Mini Catalog. $35.00

5 dies
Largest die: 5-1/4″ x 3-7/8″ (13.3 x 9.8 cm)
Coordinates with Eden’s Garden Cling Stamp Set

EDEN’S GARDEN BUNDLE 157832
Includes the Eden’s Garden Cling Stamp Set and Eden Dies; an early-release product from the January–June 2022 Mini Catalog. $52.00

EVER EDEN 12″ X 12″ (30.5 X 30.5 CM) SPECIALTY DESIGNER SERIES PAPER 159996
Exclusive specialty Designer Series Paper; available only during the Eden’s Garden promotion. $15.00 12 sheets: 2 each of 6 double-sided designs Evening Evergreen, gold foil, Soft Succulent. Only available while supplies last.


EVER EDEN 12″ X 12″ (30.5 X 30.5 CM) COTTON PAPER 159997
Exclusive cotton paper; available only during the Eden’s Garden promotion $8.00

10 sheets: 5 each of 2 colors
Evening Evergreen, Soft Succulent
Only available while supplies last.


GARDEN GEMS 159277
Exclusive embellishments; available only during the Eden’s Garden promotion. $7.00

140 adhesive-backed gems.
Round: 3 mm, 4 mm. Marquise: 8 x 4 mm.
Cherry Cobbler, Soft Succulent
Only available while supplies last.

EDEN’S GARDEN COLLECTION 160849
The entire exclusive, early-release collection!

Stems, sprigs, berries, and twigs abound in the beautiful and bountiful Eden’s Garden Collection! Explore the elegance of Eden with this exclusive, early-release collection. Only available while supplies last. You get all these things:

  • Eden’s Garden Bundle (10% off)
  • Ever Eden 12″ x 12″ (30.5 x 30.5 cm) Specialty Designer Series Paper
  • Ever Eden 12″ x 12″ (30.5 x 30.5 cm) Cotton Paper
  • Garden Gems

AVAILABLE TODAY, NOVEMBER 2, 2021!

SHOP NOW!

Blackberry Beauty Thanksgiving Card

Blackberry Beauty Thanksgiving Card

Can anyone believe it is November already? It’s time to put away the Halloween decorations, eat all the candy, and start thinking about Thanksgiving, so here is a Blackberry Beauty Thanksgiving Card to get you inspired!

This Blackberry Beauty Specialty Designer Series Paper is so beautiful that it has been hard to keep in stock. Every time Stampin’ Up! gets more in, it sells out again. Right now as I write this, this paper is not orderable but hopefully, they will get more in stock in about two weeks. I hope you already own this paper in the Holiday Mini Catalog so you can use it for fall and Thanksgiving projects!

It is very difficult to photograph this paper on a card. It has beautiful gold foil accents and the background is rather dark so the reflection for any lighting is terrible! The card base is actually Blackberry Bliss although in the photo it looks like black! The card layer is a full 4″ x 5 1/4″ piece of that leafy pattern.

Next, I cut a strip of a different pattern of the paper, a smaller foliage pattern in gold. It measures 4″ x 1 1/4″ and it is layered on a strip of Blackberry Bliss that measures 4″ x 1 1/2″. That is just adhered across the card, although from the photo it almost looks like the designer paper layers are separated with some Blackberry Bliss showing in between! That would also be a good way to make this card!!

The greeting, in the Banner Year Stamp Set, is embossed in Gold in the Metallics Embossing Powders on a strip of Blackberry Bliss. After deciding to use a Gold Foil layer from the Tasteful Labels Dies underneath the greeting, I ran the narrow embossed strip through the die just to make the ends match the Gold Foil. This greeting is popped up on Stampin’ Dimensionals®. I also added two of my new Brushed Metallic Adhesive Backed Dots to each end of that strip of designer paper.

For a final touch, I adhered some gold foil foliage from the Blackberry Beauty Ephemera Pack. This pack has really pretty pieces of all kinds in it, not just gold foil pieces. I hope you already have this, too, because I see it is back-ordered until mid-December. I wonder which ship lined up at the port it is on! Don’t you think about Stampin’ Up! products being delayed every time you see one of those news reports about the container ships at sea?!

I hope this Thanksgiving card, which could be used for other occasions as well, even something like a fall wedding, inspires you to make and send some more cards! Wouldn’t this designer paper be pretty and different for a wedding in the fall? Here is another small gift card and gift bag I made earlier using this pretty paper.

It’s early yet, but time to start thinking about your Thanksgiving plans and any cards you want to make to send to friends and loved ones. The holidays are upon us!

SHOP STAMPIN’ UP! ONLINE!

Halloween Candy Bars

Halloween Candy Bars

It’s the day before Halloween but if you are still looking for a Halloween treat idea, these Halloween Candy Bars are one of my favorite ideas! And it couldn’t be simpler!

No matter what size candy bar you have, just cover it with paper and decorate! That’s it! These three are regular-size Hershey Bars that come six in a package. You could, on a very smaller scale, wrap the little Snack Size bars in paper for trick-or-treaters, keeping it very simple. And if you have one of the really big, giant chocolate bars, you can wrap that too for quite a spectacular gift! In fact, for Christmas, there is a funny poem that goes along with one of those big chocolate bars on the subject of Christmas fudge.

For these chocolate bars, I cut my paper at 5 1/4″ x 4 3/4″. The exact size might depend on your candy bar. You can use designer series paper or cardstock. On two of these candy bars, I used the Cute Halloween Designer Series Paper. On the first one, I just used the orange and black stripe paper and cut out ghosts and skulls from other patterns to glue on. On the third candy bar, I simply wrapped the designer paper with pumpkins and black cats around and added a greeting from the Cutest Halloween Stamp Set, and punched it out with the Tailored Tag Punch. I also punched two Basic Black pieces to layer underneath the Pumpkin Pie stamped greeting.

The middle candy bar is wrapped with Highland Heather Cardstock. You might want to kind of bend and soften the paper a little to make it easier to wrap around the candy bar. Just run it over a curved edge, like a table or something you have. Or just kind of loosen it up with your fingers. In the middle, I wrapped around a strip of the designer paper and tied some Black Glittered Organdy Ribbon around in a bow. Then I cut out a black cat and a pumpkin from one of the sheets of paper and layered them on a die-cut Layering Circle Die with a scalloped edge.

There was absolutely no planning involved in decorating these candy bars so you know it is easy! I just knew I was going to use the Cute Halloween DSP. If you need a last-minute Halloween treat, try decorating some candy bars with whatever you have for Halloween!

Triangle Halloween Treat Box WIth Ghosts

Triangle Halloween Treat Box Front

This may look slightly fancy, but it is really an easy treat box to make! This one was especially easy since it was white cardstock and I just stamped ghosts and spiders on it!

You can vary the size once you know how to make this box, but these are the measurements of the sample I made. I used a piece of Basic White Cardstock that is 4″ x 8″. Actually, there is no reason you couldn’t make it 4 1/4″ x 8 1/2″ so you don’t have to cut off a 1/2″ strip! But you’ll see after you make it.

Score the strip of paper in the center at 4″. Then on each end, make a pencil mark in the center at 2″. This part may seem tricky, but it really is not. Place the paper on your Paper Trimmer so you can score at a diagonal from that 2″ center mark down to the center scoreline.   Just angle the paper on your Stampin’ Trimmer so that both the center score line and the center point on the end are on the track on the Trimmer and then score. See the diagram below.

Triangle Box Drawing

Crease all the score lines and see how your box will go together. Determine which area will be the top of the box and then you can stamp on it or decorate. I used the Cutest Halloween Stamp Set to stamp several ghosts and spiders. The greeting is stamped on a strip of Basic White and then I just flagged the ends with my scissors and adhered it with Mini Stampin’ Dimensionals.

With whatever hole punch you have (or a sharp object!) punch holes in the pointy end so that you can insert ribbon and tie it shut. Be sure to put your candy or gift inside first! I used the Black & White 1/4″ Gingham Ribbon.

Triangle Halloween Treat Box Tied

You can make these triangle boxes smaller or larger. Here is one I made three years ago! I think they are fun to make because they are really so easy and so versatile. You can make them for any occasion!

Triangle Halloween Treat Box WIth Ghosts

Even if you don’t have much time, you can make these pretty easily and quickly! Try one so you will have it in your repertoire!

HAPPY HALLOWEEN!

Cute Halloween Treats To Make

Cute Halloween Treats

If you want to make some quick and easy little Halloween treats either for friends or for trick-or-treaters, these Cute Halloween Treats are for you!! These were so fun to make and an easy way to use up some of your Halloween paper!

These are little things and we all know little things are so darn cute! Just cut a strip of cardstock at 1 3/4″ x 5 1/2″. Score the paper at 2 1/4″ and 3 1/4″. This makes a little space so it will sit flat and so it will hold a piece of candy inside. Those really good chocolate Nuggets work really well!

You could stamp a background on these or you could just cut a piece of designer series paper. I used my Cute Halloween 6″ x 6″ Designer Series Paper. You just need little pieces of designer paper. Mine are 1 1/2″ x 2″ to fit on the front. On a couple, I cut out a ghost and a pumpkin and popped those up on Stampin’ Dimensionals on the front of the designer paper. You can do anything you want to decorate these little treats!

Whatever candy you use inside, you might want to use a Glue Dot to hold it in place. You don’t want to use anything that would touch the candy inside so just be careful. Then punch two holes in the top and tie a ribbon through. Or you could use some other way to close them at the top like some little clip or even staple them closed.

You could also make this type of treat larger by making it wider and taller on the front and back. Just do the math and you can figure out what size you would want to make.

Once you make one or two I bet you can’t stop! They are easy and except for tying ribbon through little holes, they are quick to make!

Have some Halloween fun and make some little treats!

HAPPY HALLOWEEN!

Don’t Miss My 12 Weeks of Christmas!

12 Weeks of Christmas 2021

Have you been receiving my “12 Weeks of Christmas” holiday emails every Wednesday? If you haven’t, you need to sign up for my Stamping With Karen Mailing List! These special holiday emails I send out every year are a thank you to my subscribers who get a weekly email with the latest Stampin’ Up! news and project ideas with complete instructions PLUS these special 12 Weeks of Christmas emails with one new card idea, gift idea, or gift wrap/tag idea every week.

You have already missed the first 4 weeks of the 12 Weeks of Christmas emails, but you can still get on my list and get the rest of the emails. The next one, Week 5 comes out tomorrow, October 27. You missed Weeks 1-4 but you can still get Weeks 5-12! Sign up today and get Week 5 tomorrow! These emails usually get sent out at 1:00 pm CT every Wednesday in the weeks leading up to Christmas!

These are exclusive projects that I won’t be putting on my blog or social media. They are just for my email subscribers. I love sending out these emails and I hope they are fun for my subscribers to receive and that they make their holidays a tiny bit easier if they are looking for a card idea or some other creative idea for handmade gifts or even tags and bags for wrapping!

Please join us if you would like! Sign up today or before 1:00 PM CT on Wednesday, October 27 to begin receiving the 12 Weeks of Christmas holiday emails! (It is less than two months until Christmas! Yikes!!)

Just go to the red box here on my blog. If you are on your desktop computer, you should find it in the top right corner at the top of my blog post. If you are on your phone, you might have to scroll all the way down to find it. Or, click the link below to go to a special page with a signup box. Any way you do it, it works!

JOIN THE STAMPING WITH KAREN MAILING LIST!

Cutest Ghosts Halloween Trick-or-Treat Card

Cutest Ghosts Halloween Trick-or-Treat Card

The ghosts are really flocking around to get ready for Halloween on this Cutest Ghosts Halloween Trick-or-Treat Card! They look pretty friendly to me, though! I just love this stamp set, especially the cute little ghosts and the stamped eyes and arms! It’s really fun to play with making Halloween cards and projects.

I’ve done some random stamping before using only the black Memento ink, but on this card, I thought I would try using different colors. These cute ghosts and other Halloween images are in the Cutest Halloween Stamp Set. I still used Memento black ink, but I also used Pumpkin Pie and Highland Heather. I just stamped on Basic White, a smaller piece 5 1/4″ x 3″. At the bottom of the card front is a black and white striped pattern in the Cute Halloween 6″ x 6″ Designer Series Paper cut at about 5 1/4″ x 1 1/2″. I overlapped the stamped ghost piece over the striped piece. To cover the seam and help the ribbon show up better, I cut a Basic Black cardstock strip 1/2″ x 5 1/4″. Using my Grid Paper (which I can’t stamp without!), I lined up the papers so the two papers together would only measure 4 1/4″ and adhered those together carefully. Then I adhered the black strip over the seam. And then I added the Black 3/8″ Glittered Organdy Ribbon. Love this ribbon! It’s so pretty! I might not have added the bow, but as it happened, I had it tied already from another occasion when I didn’t use it and it just happened to be with the spool of ribbon. So I went ahead and used it! I adhered the bow with two Mini Glue Dots.

The greeting is a stamp in the Cutest Halloween Stamp Set. I stamped it on Basic White and die cut with a small die in the Ornate Frames Dies. The Highland Heather layer is a great matching layering die in the set. It’s always nice when there are dies you can layer in the same set!

For a little bling, I added the colored stars in the Cute Stars Adhesive-Backed Sequins. Almost forgot, I had also stamped the individual candy corn stamp in between the ghosts! I colored in the bottom tip with a Daffodil Delight Stampin’ Blend Marker. Maybe it should have been the top portion! Isn’t that a controversy about which end is which color on candy corn?? Anyway, that little candy corn was a fun thing to fill in the space in between the ghosts.

Here is another card where I stamped the ghosts only in black ink. I love this card, too, though!

Halloween is in less than a week! If you are mailing cards, get them in the mail today or tomorrow for sure! If you need other Halloween ideas, select the Halloween category on my blog in the right sidebar under Categories.

SHOP STAMPIN’ UP! ONLINE HERE!

Love, Santa Tag Kit Christmas Card

Love, Santa Tag Kit Christmas Card

The other day I had so much fun making all the tags in the Love, Santa Kit to be ready for holiday gift-wrapping! But if you didn’t need all the tags, you could use some (or all!) to make Christmas cards to send like this Love, Santa Tag Kit Christmas Card.

To make this card, I use clipped off the hole at the top of the tree that would hold the string to tie on a tag. You could also leave the hole and string attached and adhere it rather loosely to the card so that maybe the recipient would remove the tag and use it themselves or hang it on their Christmas tree. When I was growing up we used to get a Christmas card from someone who was quite wealthy and the fancy card could be used as an ornament on the tree! I’ll always remember that!

To make this card, I relied on the coordinating colors listed in the Love, Santa Tag Kit so I chose Just Jade for the card base and a layer of Poppy Parade. That layer I embossed using the Tasteful Texture 3D Embossing Folder. You wouldn’t have to do it but it adds a little “something”. Just because I wanted to, I added a tree trunk from Cinnamon Cider Cardstock to the base of the tree. Then I adhered the tree to the front of the card with Stampin’ Dimensionals®. If you thought, or you wanted, the recipient to remove the tree from the card and use it as a tag or ornament, I would just adhere it with maybe two Dimensionals, maybe even the Mini Dimensionals or cut the Dimensionals down to a smaller size, top and bottom, and tell them how to carefully remove the tag.

The tree tag already had some jewels adhered to it that came with the kit, but I also added some to the Poppy Parade layer of the card. I couldn’t resist! It’s for Christmas anyway and that calls for sparkle and glimmer wherever possible!

On the inside, adhere a layer of Basic White with a stamped message and maybe some other stamped image or strip of designer paper to decorate and sign your name or write your own personal message.

This Love, Santa Tag Kit is a fun one to work with because the tags are such “happy” and colorful images. Even though it is for making tags for gifts, as you can see, you can use some or all of them for card fronts and make some quick cards to send! Or use them on the extra Love, Santa Treat Bags! Even if you don’t want or can’t get the kit, you might be interested in these cute treat bags with images printed in white that coordinate with the tags and are food safe. If you are someone who makes special treats for the holidays to give to neighbors and friends, these bags would be perfect! Even if you have a regular gift, wrap tissue paper around it and put it in the cello bag and tie on a tag! I know a gift shop that gift wraps items like this.

It’s time to be shopping for supplies you need for Christmas cards, projects, and gifts! We should all be trying to get an early start on all our holiday tasks to keep ourselves from getting rushed at the last minute! If you already have the Love, Santa Tag Kit be sure to put it together and enjoy yourself!

SHOP STAMPIN’ UP!

Expressions In Ink Wedding Anniversary Card

Expressions In Ink Wedding Anniversary Card

If you want to make a truly beautiful card, just start with the Expressions In Ink Specialty Designer Series Paper, as I did with this Expressions In Ink Wedding Anniversary Card. I use the word “beautiful” not to brag about my card and not to just toss the term out there as an adjective describing a card. I think this designer paper is some of the most beautiful we have ever had.

The floral patterns and colors in this Expressions In Ink Paper are pretty enough themselves, then add the kind of alcohol ink look or watercolor look to the patterns, plus the gold foiling, and it is over the top! If you want to make a really simple card, just adhere a layer of this designer paper to the front of the card base, add a greeting, maybe a bit of ribbon if you like, and you are done!

This anniversary card was specially made for my daughter and son-in-law for their wedding anniversary. The card base is Mint Macaron (I think!). You can test which color you would like to use with this paper! Now this paper has a lot of white space throughout the 12″ x 12″ paper. I particularly wanted a lot of the blues and greens on this card and not so much the white, so I had to cut into the paper at the right portion to get the look I wanted.

The greeting is stamped in Just Jade Ink and is in the Forever Fern Stamp Set. I thought it was a good sentiment for an anniversary card and especially for this couple! Then the greeting was diecut with one of the Stitched Rectangle Dies.

Just for a little interest, there is a strip of a gold striped pattern in this designer paper at the bottom of the card. It just adds a little “something” to catch your eye.

I also added some gold foil leaves and foliage in the Expressions In Ink Ephemera Pack. Some I cut apart to get everything where I wanted it! I just tucked those in above and below the greeting. I didn’t want anything to interfere with the colors of the paper in the top area of the card. And of course, I added a little bling to the sides of the greeting. You can use whatever gems or jewels you like! Or place some around on the card. Whatever makes you happy!

Even in the midst of the beginning of the holiday season, don’t forget this beautiful Expressions in Ink Designer Paper! You still will need some “regular” cards like this Expressions In Ink Wedding Anniversary Card so make some cards using this pretty paper for birthdays, anniversaries, sympathy, thinking of you, any occasion you want.

SHOP STAMPIN’ UP! ONLINE HERE!

Easy To Make Love, Santa Tag Kit

Love, Santa Tag Kit Contents

I got my new Love, Santa Tag Kit the other day and got busy making all the tags yesterday afternoon! It only took about an hour to make them all and that was while simultaneously watching the Astros – Red Sox playoff game! (The Astros won 9 – 1 !!!!!) You can see the contents in the photo above….. an exclusive stamp set, a stamping block, ink spot, tags and pieces to stamp, adhesives, and even some gems! Plus the string to tie on to packages! It’s really a cute kit!

Each tag has a stamped greeting layered with other pieces for interest. There are even extra blank pieces to stamp in case you mess up! Just adhere the stamped greeting to each tag. The directions show you which kind of adhesive to put on the back of each piece.

Love, Santa Tag Kit 4 Tags

And when you get all twelve tags finished, three each of four designs, just tie on the string to be ready to go on packages! Or purchase the coordinating treat bags and use the tags on special treats or gifts you are giving.

The Love, Santa Treat Bags are beautiful, food-safe cellophane bags that are perfect to fill with scrumptious treats and goodies. The white-printed designs are festive like frosted windowpanes and directly coordinate with the Love, Santa Tags! You get 12 treat bags, 3 each of 4 designs.

4″ x 9-1/2″ (10.2 x 24.1 cm)
*Food safe

Available while supplies last

Love, Santa Tag Kit Finished Tags

And when the tags were all put together, I got out the gems in the kit. At first, I thought they only went on the “Joy” tag, but then I saw they actually went on all the tags! And I just used up ALL the gems, putting them on all the tags! But you could use only the 2-3 on each tag and save the extras for other projects, but I just wanted to use them all! Why not?!

You can even watch a video of putting the kit together with Sara Douglass!

If you are interested in this Love, Santa Tag Kit, or any of the other kits in the Stampin’ Up! Kit Collection just click HERE for the selection. These kits are great for beginners or even experienced stampers and crafters! Feel a sense of satisfaction, getting a dozen cute tags finished and ready for holiday gifts!