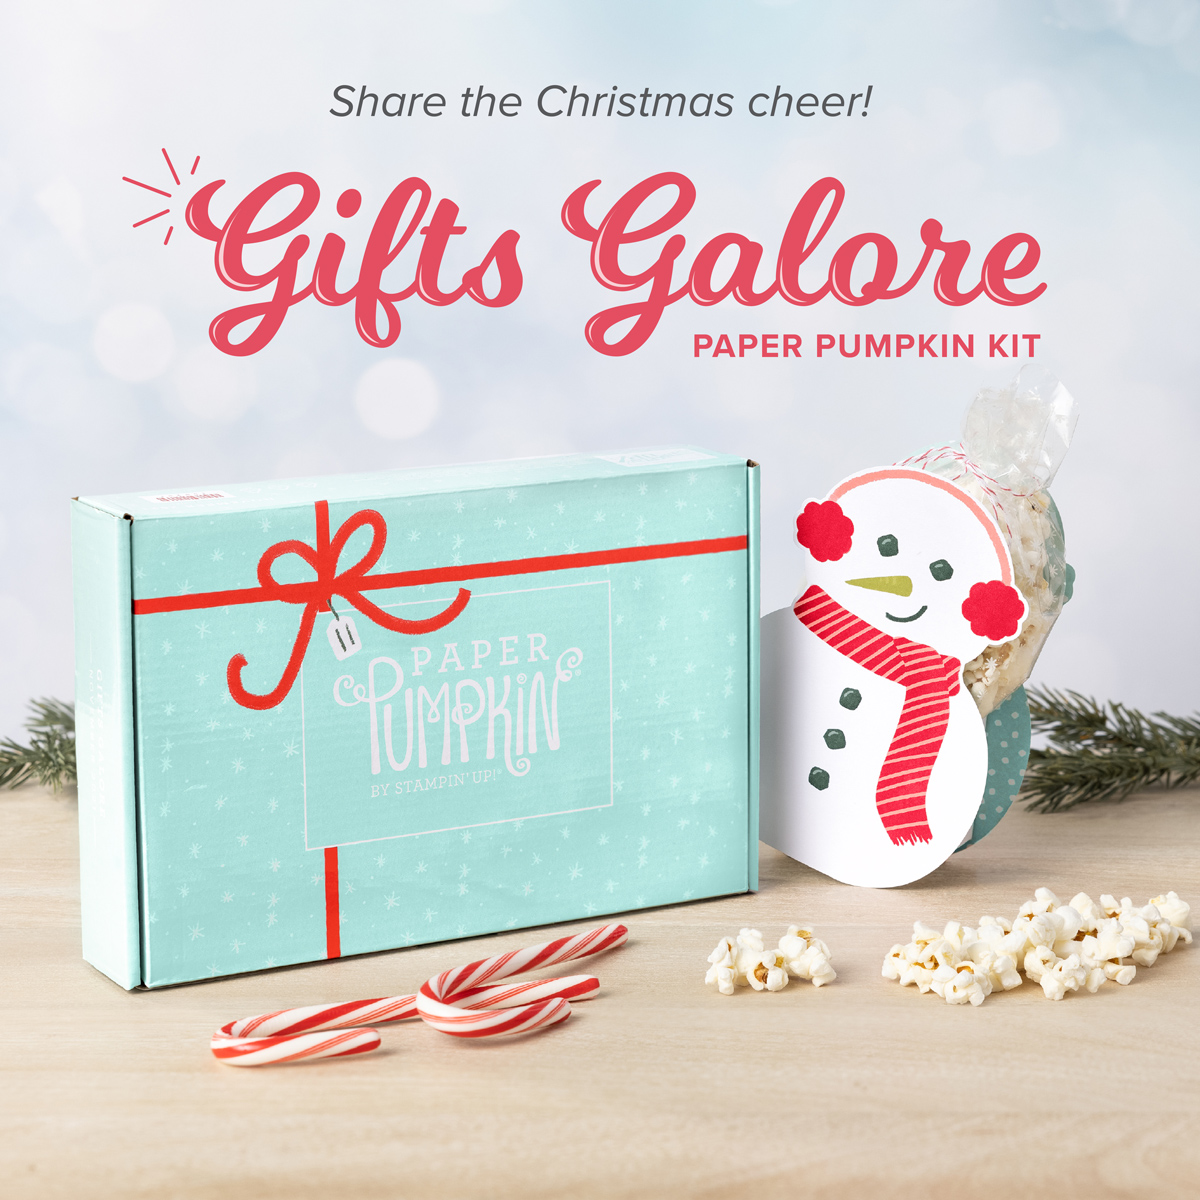
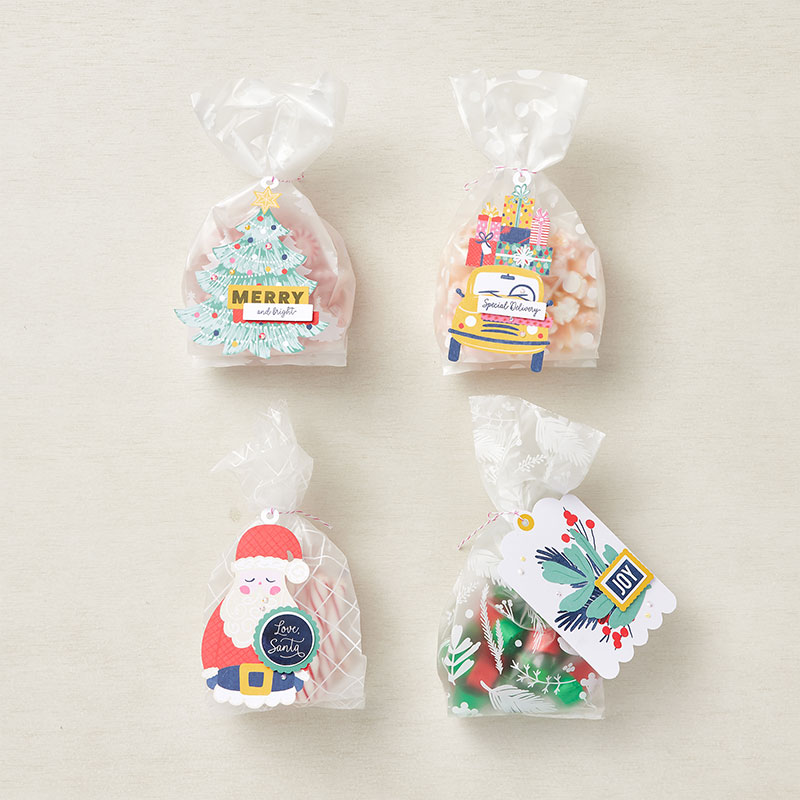
We all love to see piles of presents on Christmas morning. Make that your reality with the Gifts Galore Paper Pumpkin Kit! With classic Christmas sentiments, bright and festive colors, a sweet snowman, a tree with all the trimmings, or a playful pile of presents, you’ll have everything you need to make eye-catching treat packages that are sure to spread Christmas cheer. Each Gifts Galore box contains enough supplies to create nine treat packages—three each of three designs—and nine food-safe bags that are adorably styled for easy Christmas gifting. There’s plenty of joy to share with Gifts Galore!
DETAILS
Kit contains enough supplies to create nine treat packages—three each of three designs—and nine food-safe bags.
This all-inclusive kit includes printed die cuts, die-cut boxes, cellophane treat bags, adhesive, and more!
Includes an exclusive stamp set and a Classic Stampin’ Spot
Coordinating colors: Evening Evergreen, Flirty Flamingo, Old Olive, Pool Party, Poppy Parade
Every kit is guaranteed by Stampin’ Up! No risk, no obligation. Easy to try out!
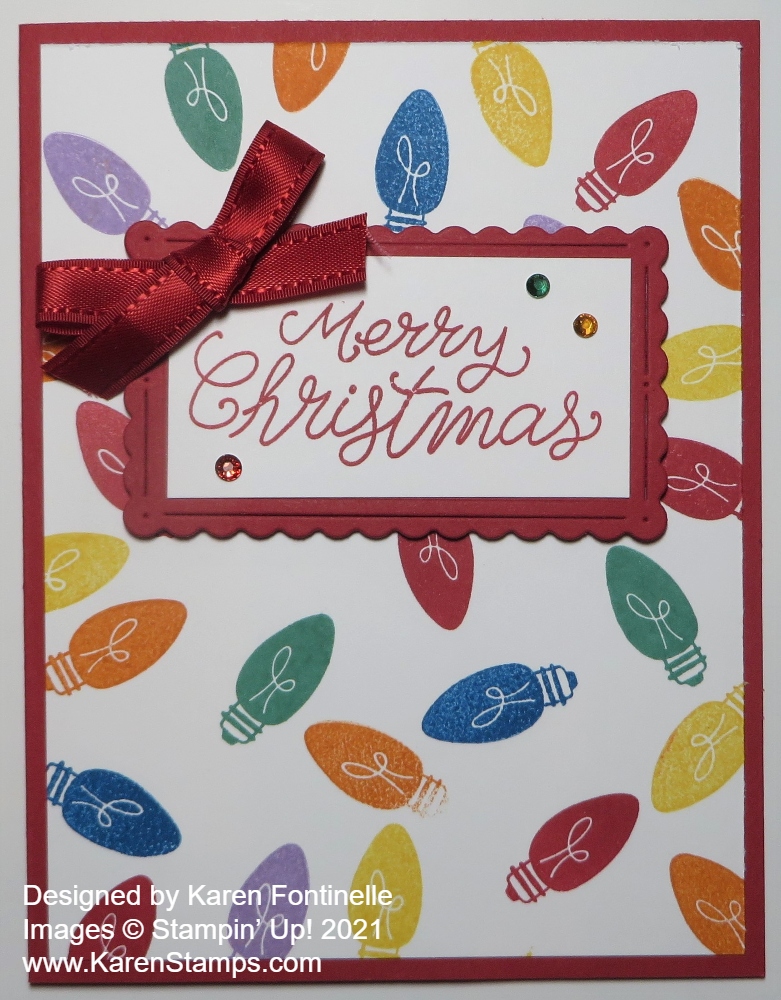
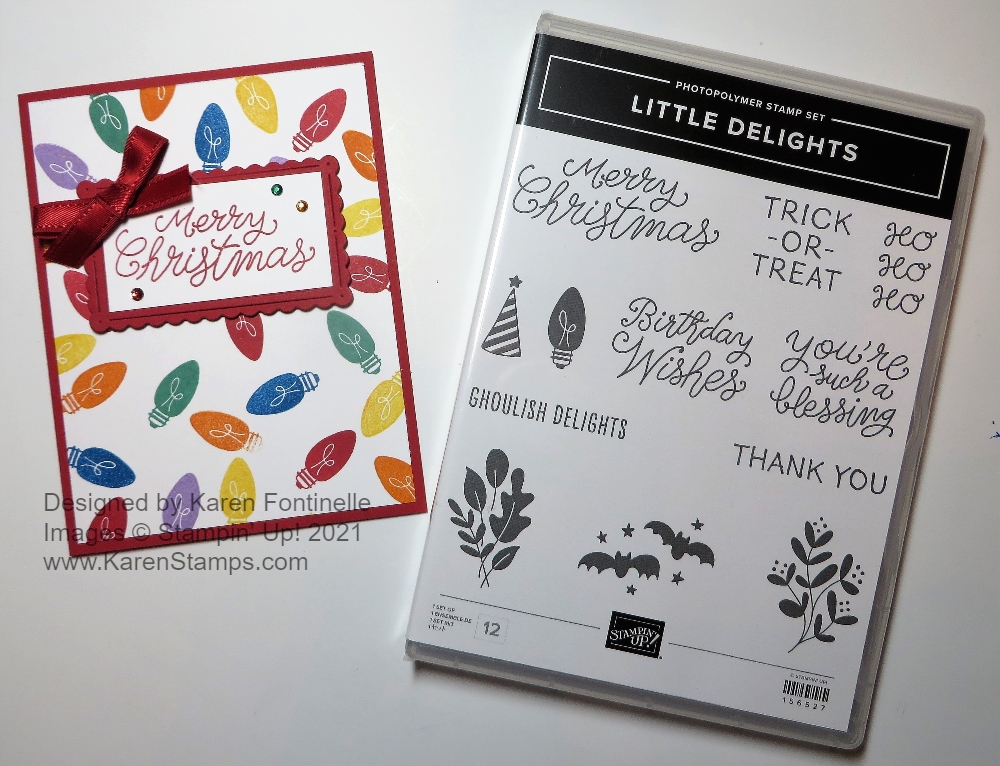
The longer I have the Little Delights Stamp Set, the more possibilities I see with it, like this Little Delights Christmas Bulb Christmas Card. All I needed was the little Christmas bulb stamp and the greeting! The only problem is that you can’t stop stamping the cute little bulbs!
The card base is Real Red with a layer of Basic White Cardstock. I just randomly stamped the Christmas bulbs in different colors. I used Real Red, Daffodil Delight, Just Jade, Pacific Point, Pumpkin Pie, and Highland Heather ink colors. After figuring out the greeting and the space it would take up, I added more bulbs so every color would have a good representation!
The die-cut greeting layer is Real Red cut from the Scalloped Contours Dies. I stamped the greeting from the Little Delights Stamp Set on Basic White and cut it to fit on the Real Red layer with my Paper Trimmer.
If you wanted to jazz up the card even more, you could add Wink of Stella for a little glimmer of the Christmas bulbs! Or you could stamp fewer bulbs and connect them with a drawn line to look like a string of lights. Just play and see what you come up with!
The Little Delights Stamp Set is a cute one with several holiday images and greetings for cards and projects! These images and words are great for all kinds of stamping projects throughout the year!
Have you been receiving my “12 Weeks of Christmas” holiday emails every Wednesday? If you haven’t, you need to sign up for myStamping With Karen Mailing List! These special holiday emails I send out every year are a thank you to my subscribers who get a weekly email with the latest Stampin’ Up! news and project ideas with complete instructions PLUS these special 12 Weeks of Christmas emails with one new card idea, gift idea, or gift wrap/tag idea every week.
You have already missed the first 4 weeks of the 12 Weeks of Christmas emails, but you can still get on my list and get the rest of the emails. The next one, Week 5 comes out tomorrow, October 27. You missed Weeks 1-4 but you can still get Weeks 5-12! Sign up today and get Week 5 tomorrow! These emails usually get sent out at 1:00 pm CT every Wednesday in the weeks leading up to Christmas!
These are exclusive projects that I won’t be putting on my blog or social media. They are just for my email subscribers. I love sending out these emails and I hope they are fun for my subscribers to receive and that they make their holidays a tiny bit easier if they are looking for a card idea or some other creative idea for handmade gifts or even tags and bags for wrapping!
Please join us if you would like! Sign up today or before 1:00 PM CT on Wednesday, October 27 to begin receiving the 12 Weeks of Christmas holiday emails! (It is less than two months until Christmas! Yikes!!)
Just go to the red box here on my blog. If you are on your desktop computer, you should find it in the top right corner at the top of my blog post. If you are on your phone, you might have to scroll all the way down to find it. Or, click the link below to go to a special page with a signup box. Any way you do it, it works!
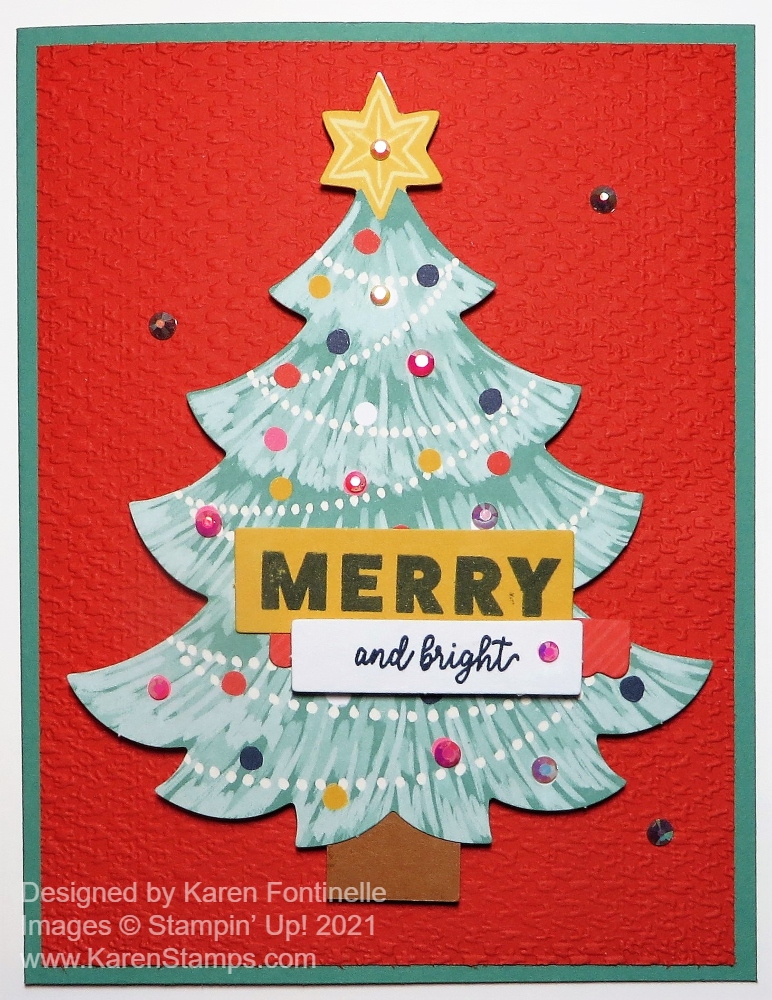
The other day I had so much fun making all the tags in the Love, Santa Kitto be ready for holiday gift-wrapping! But if you didn’t need all the tags, you could use some (or all!) to make Christmas cards to send like this Love, Santa Tag Kit Christmas Card.
To make this card, I use clipped off the hole at the top of the tree that would hold the string to tie on a tag. You could also leave the hole and string attached and adhere it rather loosely to the card so that maybe the recipient would remove the tag and use it themselves or hang it on their Christmas tree. When I was growing up we used to get a Christmas card from someone who was quite wealthy and the fancy card could be used as an ornament on the tree! I’ll always remember that!
To make this card, I relied on the coordinating colors listed in the Love, Santa Tag Kit so I chose Just Jade for the card base and a layer of Poppy Parade. That layer I embossed using the Tasteful Texture 3D Embossing Folder. You wouldn’t have to do it but it adds a little “something”. Just because I wanted to, I added a tree trunk from Cinnamon Cider Cardstock to the base of the tree. Then I adhered the tree to the front of the card with Stampin’ Dimensionals®. If you thought, or you wanted, the recipient to remove the tree from the card and use it as a tag or ornament, I would just adhere it with maybe two Dimensionals, maybe even the Mini Dimensionals or cut the Dimensionals down to a smaller size, top and bottom, and tell them how to carefully remove the tag.
The tree tag already had some jewels adhered to it that came with the kit, but I also added some to the Poppy Parade layer of the card. I couldn’t resist! It’s for Christmas anyway and that calls for sparkle and glimmer wherever possible!
On the inside, adhere a layer of Basic White with a stamped message and maybe some other stamped image or strip of designer paper to decorate and sign your name or write your own personal message.
This Love, Santa Tag Kit is a fun one to work with because the tags are such “happy” and colorful images. Even though it is for making tags for gifts, as you can see, you can use some or all of them for card fronts and make some quick cards to send! Or use them on the extra Love, Santa Treat Bags! Even if you don’t want or can’t get the kit, you might be interested in these cute treat bags with images printed in white that coordinate with the tags and are food safe. If you are someone who makes special treats for the holidays to give to neighbors and friends, these bags would be perfect! Even if you have a regular gift, wrap tissue paper around it and put it in the cello bag and tie on a tag! I know a gift shop that gift wraps items like this.
It’s time to be shopping for supplies you need for Christmas cards, projects, and gifts! We should all be trying to get an early start on all our holiday tasks to keep ourselves from getting rushed at the last minute! If you already have the Love, Santa Tag Kit be sure to put it together and enjoy yourself!
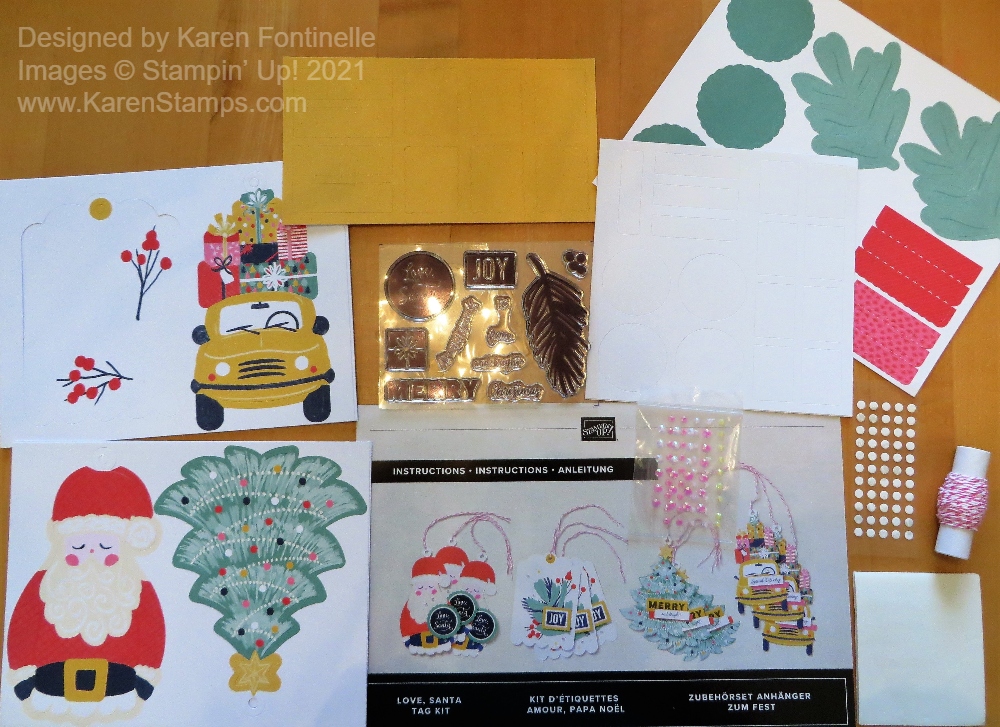
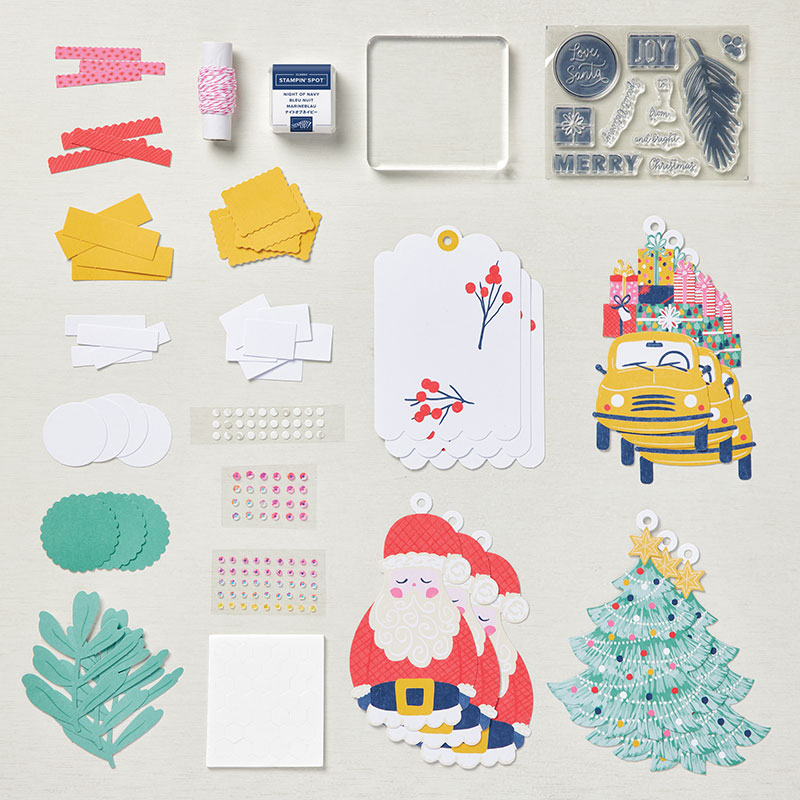
I got my new Love, Santa Tag Kit the other day and got busy making all the tags yesterday afternoon! It only took about an hour to make them all and that was while simultaneously watching the Astros – Red Sox playoff game! (The Astros won 9 – 1 !!!!!) You can see the contents in the photo above….. an exclusive stamp set, a stamping block, ink spot, tags and pieces to stamp, adhesives, and even some gems! Plus the string to tie on to packages! It’s really a cute kit!
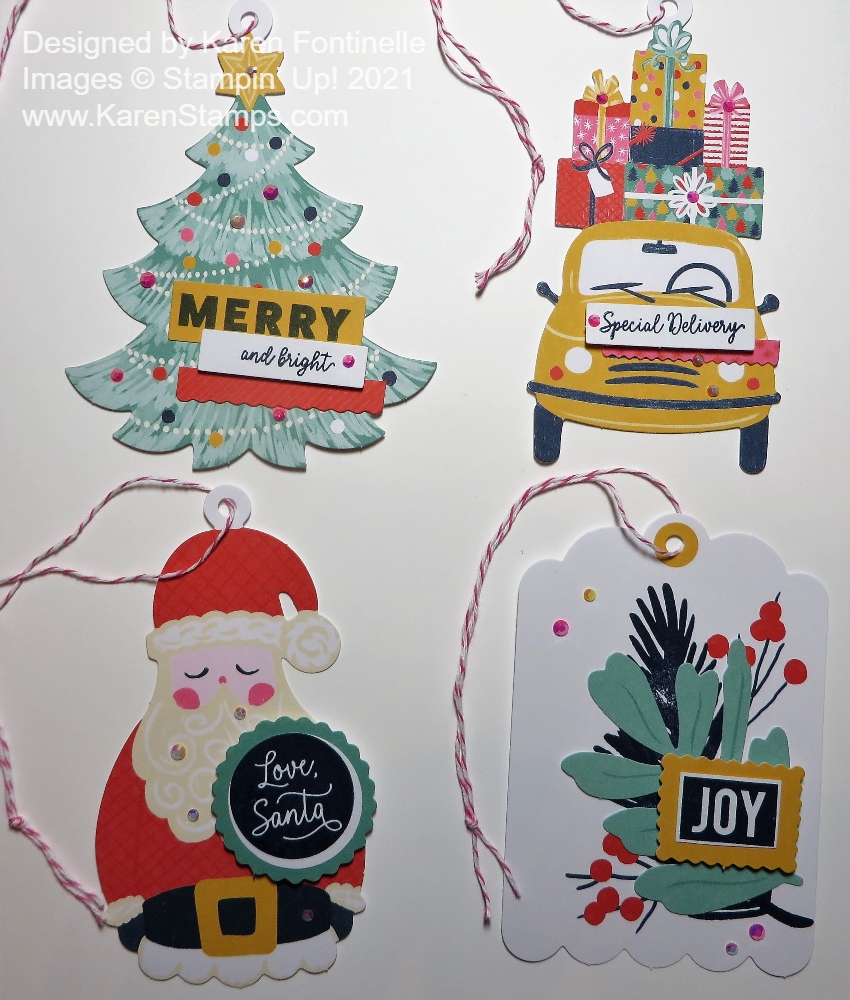
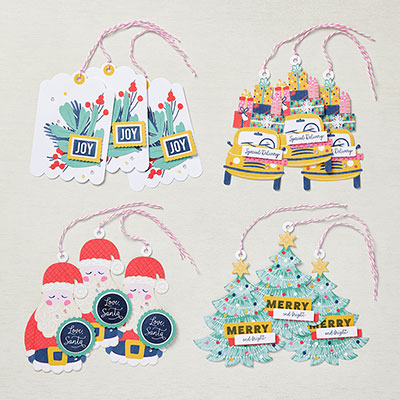
Each tag has a stamped greeting layered with other pieces for interest. There are even extra blank pieces to stamp in case you mess up! Just adhere the stamped greeting to each tag. The directions show you which kind of adhesive to put on the back of each piece.
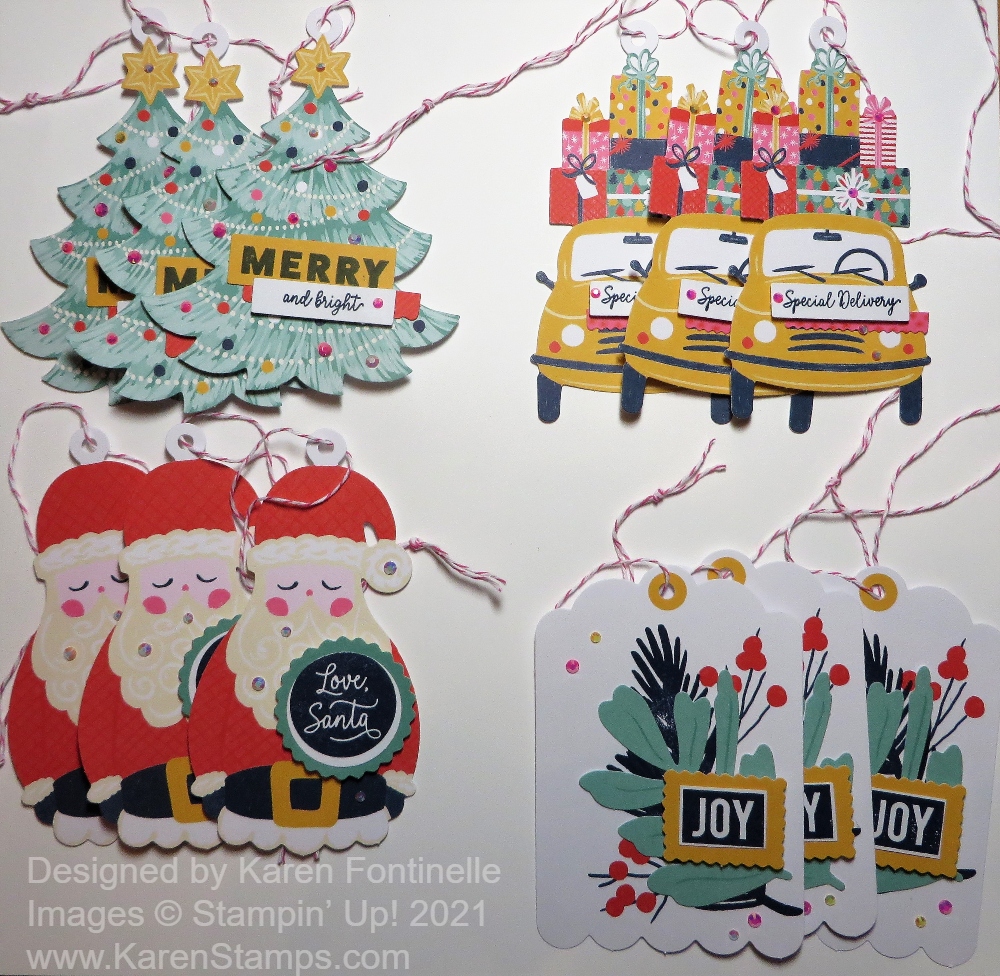
And when you get all twelve tags finished, three each of four designs, just tie on the string to be ready to go on packages! Or purchase the coordinating treat bags and use the tags on special treats or gifts you are giving.
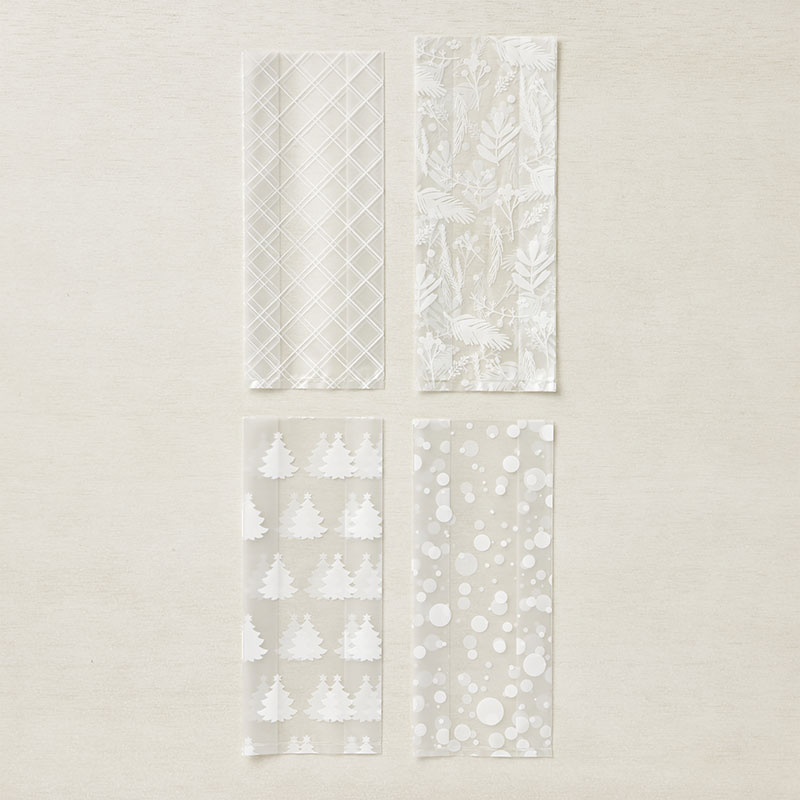
The Love, Santa Treat Bags are beautiful, food-safe cellophane bags that are perfect to fill with scrumptious treats and goodies. The white-printed designs are festive like frosted windowpanes and directly coordinate with the Love, Santa Tags! You get 12 treat bags, 3 each of 4 designs.
4″ x 9-1/2″ (10.2 x 24.1 cm) *Food safe
Available while supplies last
And when the tags were all put together, I got out the gems in the kit. At first, I thought they only went on the “Joy” tag, but then I saw they actually went on all the tags! And I just used up ALL the gems, putting them on all the tags! But you could use only the 2-3 on each tag and save the extras for other projects, but I just wanted to use them all! Why not?!
You can even watch a video of putting the kit together with Sara Douglass!
If you are interested in this Love, Santa Tag Kit, or any of the other kits in the Stampin’ Up! Kit Collection just click HERE for the selection. These kits are great for beginners or even experienced stampers and crafters! Feel a sense of satisfaction, getting a dozen cute tags finished and ready for holiday gifts!
This is another card that completely changed from the idea I had in my head and it all came about because I turned the “pretty” side over! I realized I hadn’t used the very pretty ornament print paper in the Whimsy & Wonder Specialty Designer Series Paper so I was going to make a card using that paper. But when I turned the paper over to cut out just a section that I needed for the card, this dark blue print side just jumped out at me and this Whimsy & Wonder Ornament Christmas Card was born! I pictured using a snowflake and one blue ornament plus a greeting somehow, but I couldn’t resist all the other ornaments either!
Just because I’m a Stampin’ Up! Demonstrator, don’t think that card ideas come to me magically. The placement of everything on this card just was not working out, so I finally had to give up, step back, and walk away for a few minutes. I googled this paper and although I wasn’t copying anything, I saw something that sparked the idea to put the snowflake and greeting in the lower right corner instead of the upper left. That seemed to make all the difference and I was able to complete the card design!
The card base is Basic White although you could use Misty Moonlight as the base with a thin margin of Basic White under the Misty Moonlight Designer Paper to help it stand out. I cut out several ornaments from the other side of the paper with my Paper Snips while I watched TV. If you wanted to make it easier, you could just cut out the outline of the ornament and not the ornament hanger portion because if you add a bow later, you can cover up that you cut that part off!
The snowflake is in the Wonderful Snowflakes package. These are quite pretty, plain white on one side and iridescent foil on the other side. I adhered the snowflake with the tinest drops of glue, but you do have some space in the center of the snowflake. Then if you are pasting anything over the snowflake, maybe that will help hold it down also.
The greeting is in the Whimsical Trees Stamp Set. I thought maybe the simple word would go well with the snowflake. I stamped it in Moonlight Mist Ink and die cut it with the small circle in the Tasteful Labels Dies. I played with different dies and cardstock colors on which to layer it and finally settled on this Blushing Bride pink. I used a small die in the Encircled in Beauty Dies. The snowflake is adhered flat to the card and the greeting is popped up on Stampin’ Dimensionals.
The ornaments are all cut out from the opposite side of this paper. I just adhered them with Stampin’ Dimensionals and adhered a little bow on each one with a Mini Glue Dot. The ribbon is the White 1/4″ Crinkled Seam BindingRibbon. I think a silver trim would also work well. Then for some bling I added some Silver Epoxy Essentials. I think they match well with the paper and look!
After a slow start on this card, I’m really happy with how it turned out. Be sure you check the “other side” of our beautiful designer papers because you just might find something special. And remember, a lot of the “other sides” can be used throughout the year, not just during the season the paper was designed for. This Whimsy & Wonder Ornament Christmas Card even uses both sides of the same paper by cutting out the pretty ornaments! Try it!
Some of my favorite Paper Pumpkin Kits are the holiday ones! I already love this box and can’t wait to see what the card designs are!
When you picture a peaceful Christmas, what comes to mind? Do you see snow outside your window, softly swirling through the sky? A tree trimmed with tinsel, a fire crackling nearby? Maybe you’re dreaming of decorating a holly jolly gingerbread house. Can you catch a whiff of Christmas cookies wafting through the air?
Whatever it is you think about when Christmas comes to town, picture a peaceful Christmas with the Peaceful Christmas Paper Pumpkin Kit! This glimmering and gleaming kit is your creative kickstart to Christmas cardmaking. With sprinkles of snow, shimmering silver skies, and heartwarming holiday wishes, you’ll have enough elements and embellishments to create 10 Christmas cards and coordinating envelopes.
Speaking of coordination, make even more Christmas magic with Peaceful Place products! Our stunning Peaceful Place Suite Collection (item 156277) pairs perfectly with the kit’s components. Brew a cup of cocoa, snuggle up with a soft blanket, and prepare for a cozy craft night in!
Details
The kit contains enough elements to create 10 Christmas cards—5 each of 2 designs—and coordinating envelopes. This all-inclusive kit includes printed card bases, die-cut paper pieces, embellishments, adhesive, and more!
October’s kit arrives in a cute collectible box covered with enchanting evergreen trees. Use this special, limited-edition box to store your holiday handicrafts, or transform it into a well-wrapped package for a present!
The kit’s contents pair perfectly with the Peaceful Place Suite Collection (item 156277). To continue your Christmas crafting, combine the kit’s components with the suite’s patterned paper, shimmery sequins, and more! Card size: 4-1/4″ x 5-1/2″ (10.8 x 14 cm) Envelope size: 4-1/2″ x 5-3/4″ (11.4 x 14.6 cm) Coordinating colors: Basic Gray, Real Red, Shaded Spruce, silver foil
Today there is a new kit in the Kits Collection at Stampin’ Up!, the “Love, Santa” Tag Kit! ( I just love making Stampin’ Up! Christmas tag kits and have even purchased extras on the Clearance Rack! (Be sure to check the Clearance Rack TODAY for new items added!!) You probably saw this kit in the Holiday Mini Catalog but it was not available until today!
LOVE, SANTA TAG KIT (158375) $19.00 USD | $26.00 CAD
Stampin’ Up! says:
“Santa’s back in a fun and easy tag kit to spruce up your Christmas gifting! The Love, Santa Tag Kit has everything you need to create 12 whimsically designed tags. That means you’ll find printed die-cut tags and labels, sequin embellishments, pink and white baker’s twine, an exclusive stamp set, a Night of Navy Classic Stampin’ Spot, and more in this all-inclusive kit! You can sleigh ride right in without the prep work.
And to make Christmas gifting even easier, the Love, Santa Treat Bags (158381) (available for purchase separately) are food-safe cellophane bags that coordinate with the Love, Santa tags! The treat bags come in a pack of 12—3 each of 4 festive designs. That’s right—figuring out how to dress up your gifts this year is no longer a “Claus” for concern! But don’t relax too soon as these products are based on availability!”
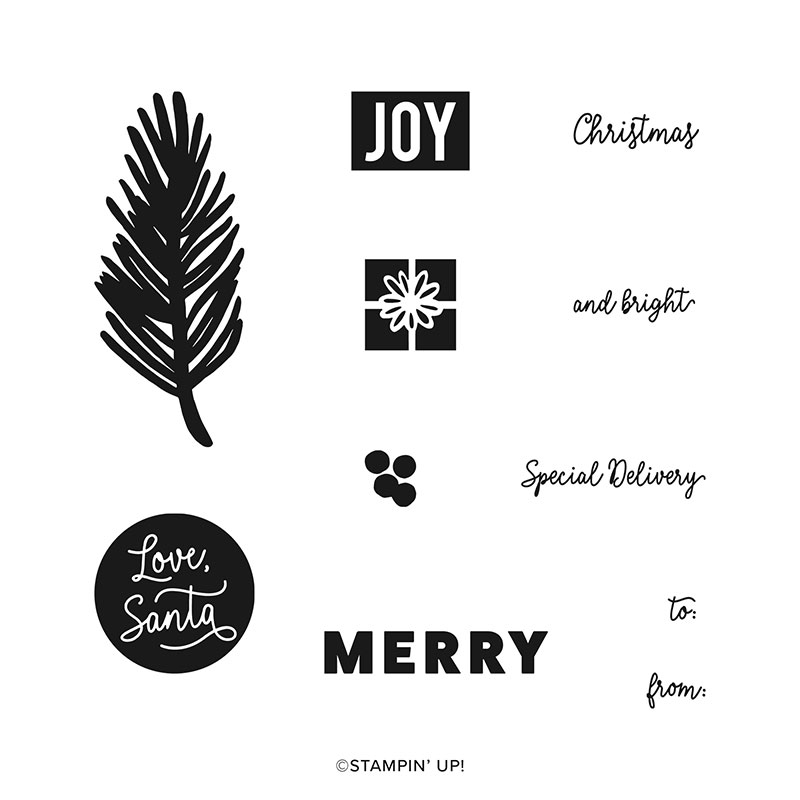
Here is the stamp set that comes in the kit!
DETAILS Kit contains enough supplies to create 12 tags—3 each of 4 designs. Includes printed die-cut tags, decorative die cuts, adhesive, embellishments, and pink baker’s twine. Features an exclusive stamp set and a Night of Navy Classic Stampin’ Spot. Finished tag size: approximately 2-1/2″ x 4-3/4″ (6.4 x 12.1 cm) Coordinating colors: Bumblebee, Just Jade, Night of Navy, Polished Pink, Poppy Parade
Add these printed cello bags to your order with the kit and you will be set for packaging treats or gifts and decorating with your cute new tags!
LOVE, SANTA TREAT BAGS (158381) $7.00 USD | $9.50 CAD
12 treat bags 3 each of 4 designs 4″ x 9-1/2″ (10.2 x 24.1 cm) Food safe
Watch Sara’s video about assembling this fun tag kit! Anyone can do it whether beginners or experienced crafters!
Order your kit today and get a head start on holiday tags! You know there is always going to be that last-minute moment when you realize you have run out of tags for gifts or when you need a quick gift right away! Just add one of these already made tags! Get some friends together who each order a kit and assemble them together for a Girls’ Night Out!
Today is the day my special 12 Weeks of Christmas 2021 holiday emails begin at 1:00 PM CT. I always look forward to sending these to my Stamping With Karen Mailing List subscribers every year as a thank you for being one of my subscribers! I hope they help with your holiday planning and project ideas!
Every week for 12 weeks you will be getting an email from me with a fantastic holiday project for you to make! It is completely FREE, but it is exclusive to people on my mailing list. You can use these ideas to make your holiday preparations easier! Just like in my regular weekly email, I will send a photo of a project, a list of supplies needed, and all the directions to make it.
In the first few weeks, I will send card ideas since it’s likely that is the first thing most of us will work on at this point. Next, come a few weeks of gift ideas, and finally, as we are doing Christmas shopping, some ideas for gift wrap, bags, and gift tags.
These are exclusive projects that I won’t be posting on my blog or anywhere else. I just want my subscribers to know that you are appreciated! If you are already on my mailing list, no need to do anything!
The only way you can get these special 12 Week of Christmas emails is to be on my Stamping With Karen Mailing List! If you are not on my Mailing List, you better get on it before 1:00 PM TODAY, otherwise, you are going to miss out! All you have to do is sign up in the red box in the upper right of my blog. If you are on your mobile phone, the red box may show up at the bottom of your phone.
Believe it or not, Christmas is not that far off, just a little over 12 weeks away, so it is time for my 12 Weeks of Christmas Holiday Emails to begin! These special emails will begin next Wednesday, September 29th!
Every week for 12 weeks you will be getting an email from me with a fantastic holiday project for you to make! It is completely FREE, but it is exclusive to people on my mailing list. You can use these ideas to make your holiday preparations easier!
This is a thank you gift for my mailing list subscribers that I like to do every year. Just like in my regular weekly email, I will send a photo of a project, a list of supplies needed, and all the directions to make it.
In the first few weeks, I will send card ideas since it’s likely that is the first thing most of us will work on at this point. Next, come a few weeks of gift ideas, and finally, as we are doing Christmas shopping, some ideas for gift wrap, bags, and gift tags.
These are exclusive projects that I won’t be posting on my blog or anywhere else. I just want my subscribers to know that you are appreciated! If you are already on my mailing list, no need to do anything!
The only way you can get these special 12 Week of Christmas emails is to be on my Stamping With Karen Mailing List! If you are not on my Mailing List, you better get on it before September 29th at 1:00 PM, otherwise, you are going to miss out! All you have to do is sign up in the red box in the upper right of my blog.
Some of my favorite Paper Pumpkin Kits are the holiday ones! I already love this box and can’t wait to see what the card designs are!
When you picture a peaceful Christmas, what comes to mind? Do you see snow outside your window, softly swirling through the sky? A tree trimmed with tinsel, a fire crackling nearby? Maybe you’re dreaming of decorating a holly jolly gingerbread house. Can you catch a whiff of Christmas cookies wafting through the air?
Whatever it is you think about when Christmas comes to town, picture a peaceful Christmas with the Peaceful Christmas Paper Pumpkin Kit! This glimmering and gleaming kit is your creative kickstart to Christmas cardmaking. With sprinkles of snow, shimmering silver skies, and heartwarming holiday wishes, you’ll have enough elements and embellishments to create 10 Christmas cards and coordinating envelopes.
Speaking of coordination, make even more Christmas magic with Peaceful Place products! Our stunning Peaceful Place Suite Collection (item 156277) pairs perfectly with the kit’s components. Brew a cup of cocoa, snuggle up with a soft blanket, and prepare for a cozy craft night in!
Details
The kit contains enough elements to create 10 Christmas cards—5 each of 2 designs—and coordinating envelopes. This all-inclusive kit includes printed card bases, die-cut paper pieces, embellishments, adhesive, and more!
October’s kit arrives in a cute collectible box covered with enchanting evergreen trees. Use this special, limited-edition box to store your holiday handicrafts, or transform it into a well-wrapped package for a present!
The kit’s contents pair perfectly with the Peaceful Place Suite Collection (item 156277). To continue your Christmas crafting, combine the kit’s components with the suite’s patterned paper, shimmery sequins, and more! Card size: 4-1/4″ x 5-1/2″ (10.8 x 14 cm) Envelope size: 4-1/2″ x 5-3/4″ (11.4 x 14.6 cm) Coordinating colors: Basic Gray, Real Red, Shaded Spruce, silver foil
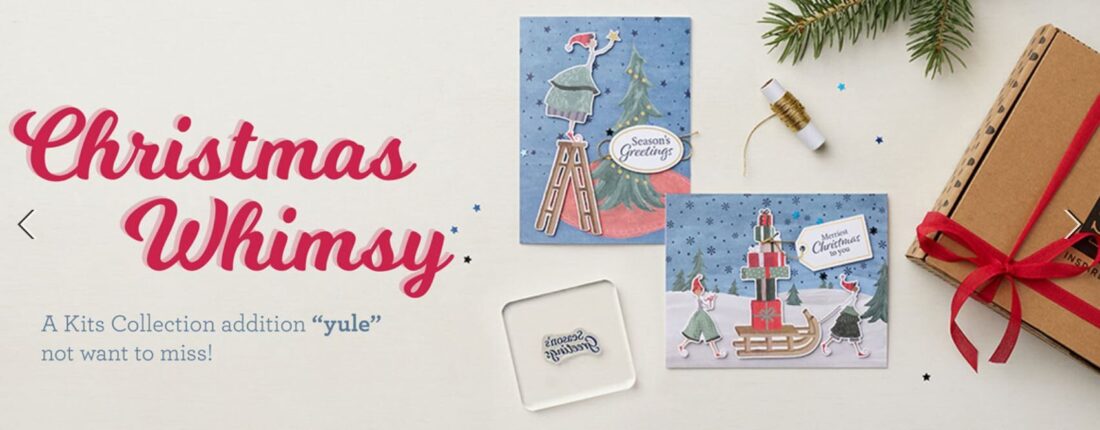
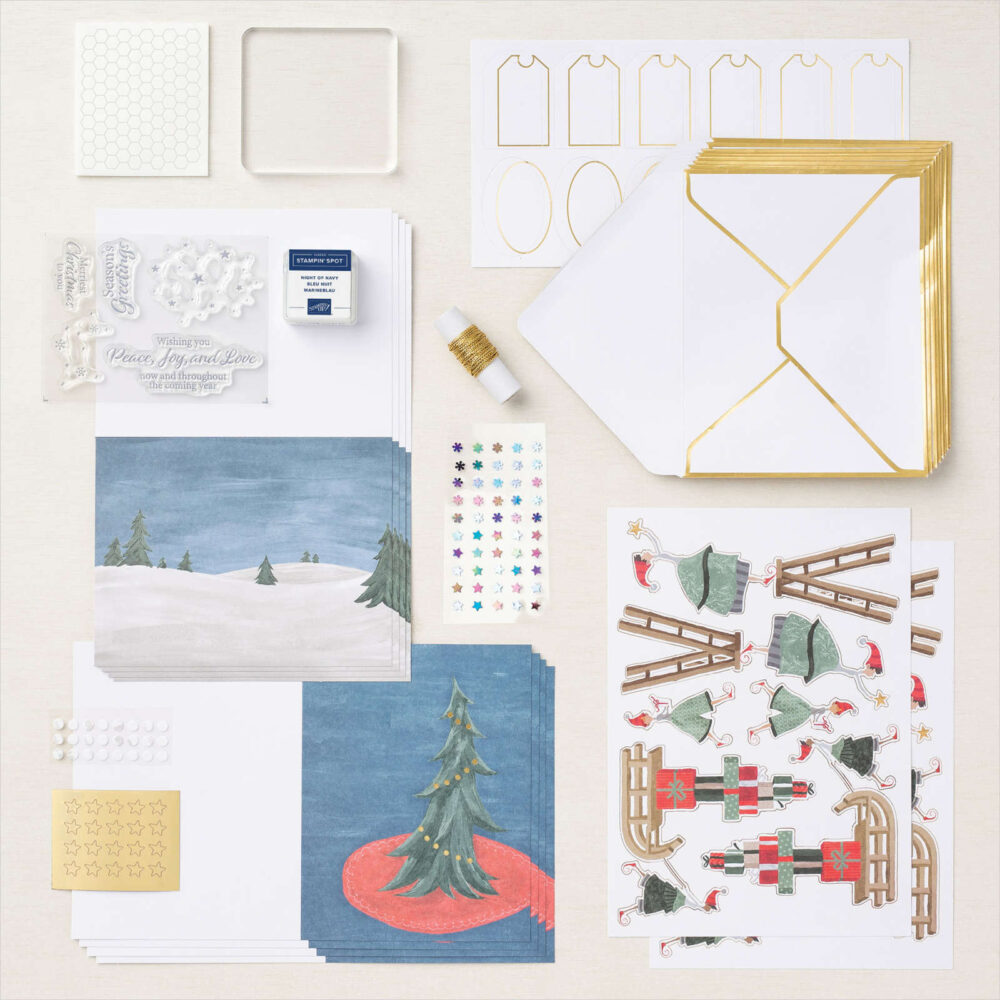
“Christmas Whimsy’ is a new kit in the Stampin’ Up! Kit Collection, just being released today! You probably noticed photos of it in the Holiday Mini Catalog on page 6, with another kit coming that is shown on page 7. I suppose they are releasing these a little later than the catalog to get a little closer to the holidays!
Christmas Whimsy is an adorably festive card kit with a modern design! Santa’s elves might be hard at work in the North Pole but with this all-inclusive kit, the hard work is done for you! All pieces are printed, die cut, and ready for you to craft. The simple steps of this kit are perfect for beginner crafters and kids, too! Grab a kit or two and gather around for a simple Christmas activity that everyone will enjoy. The kit contains everything you need to create eight elf-centric Christmas cards including printed card bases, die cuts, embellishments, an exclusive stamp set, a Night of Navy Classic Stampin’ Spot, and more!
DETAILS Kit contains enough supplies to create eight cards—4 each of 2 designs. Includes printed card bases, printed die cuts, adhesive, embellishments, gold foil die cuts, gold twine, and coordinating envelopes with gold foil accents. Includes an exclusive stamp set and a Night of Navy Classic Stampin’ Spot. Finished card size: 5-1/2″ x 4-1/4″ (14 x 10.8 cm) Coordinating colors: Balmy Blue, Basic Gray, Crumb Cake, Evening Evergreen, Gray Granite, Misty Moonlight, Poppy Parade, Real Red, So Saffron, Soft Succulent, Soft Suede
One thing I always enjoy making are gift bags out of plain shopping bags like this Peaceful Prints Kraft Christmas Gift Bag. Lots of times I can use ones I get at stores, even if they have the store name printed on the front because that printing gets covered up. Just remember, it is just like making a card, maybe a larger one, that you adhere to the front of the gift bag! It’s so much fun to make a personalized bag for any occasion!
For this bag, I used the Peaceful Prints Designer Series Paper. You only have this month left to get this paper, and you can get it FREE with a $50 purchase at Stampin’ Up! during Sale-A-Bration! I tried various layers of paper and cardstock and combinations before I settled on this! Sometimes you just have to keep playing and working until it all comes together!
I used a piece of the Peaceful Prints Designer Paper for the background piece. It is 7″ x 8″ and I liked the way it matched the trees. The background paper (5″ x 6″) has little deer and tiny trees on it and is layered on Real Red Cardstock (6 1/2″ x 5 1/2″). I decided to add trees, some die cut with Christmas Tree Dies out of the Peaceful Prints paper and some out of Garden Green Cardstock. I sponged a little Garden Green Ink on the cardstock trees. I used three different tree dies to make different size trees. Some are popped up on Dimensionals and some are adhered flat on the designer paper. The deer are cut out by hand with Paper Snips from the designer paper.
The greeting had to be a little bit small to fit in the space. It is in the Frosted Gingerbread Stamp Set. It is cut out with one of the Tasteful Labels Dies and layered on a small banner die also in the set. Make some of these ahead of time and you’ll be all set for gift-wrapping during the holidays!!
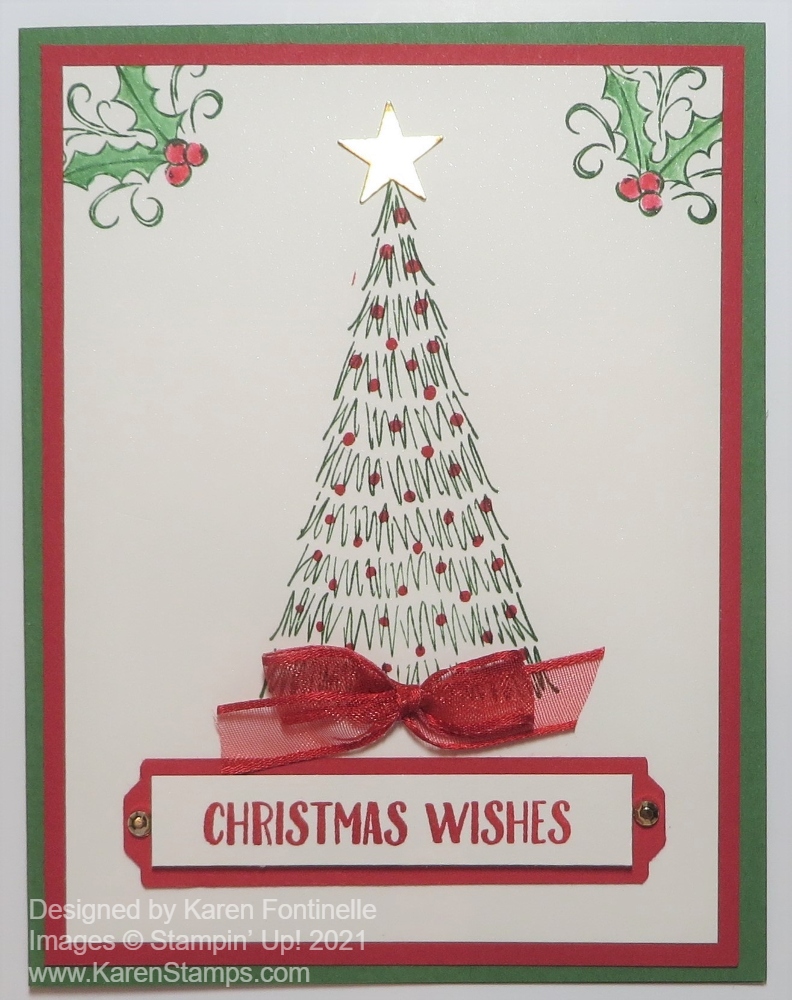
The Whimsy & Wonder Suite in the Stampin’ Up! Holiday Catalog uses soft pastel colors in it, but for this Whimsy & Wonder Traditional Christmas Card, I decided to just use the traditional Christmas colors of red and green!
The card base is Garden Green with a layer of Real Red Cardstock. Real Red has been my favorite color forever! If you buy a red somewhere else, like the big box craft store, you will find that their red does not compare to the perfect red of the Stampin’ Up! Real Red! I know because I bought a big package of red cardstock and envelopes when I first started stamping. When I saw how it compared to the Stampin’ Up! Real Red, I threw out the store-bought red paper!
The stamped layer is Shimmery White, my other favorite paper! It has just the slightest glimmer to it and works well with any medium, even some watercoloring. I stamped the tree from the Whimiscal Trees Stamp Set in Garden Green Ink. Old Olive would also look good. Then I overstamped it with the dots to look like little red ornaments or lights on the Christmas tree. I couldn’t resist stamping the holly and berries up in each corner of the card. I just stamped them in Garden Green and then went back in with a Blender Pen and added green ink to the leaves and red ink to the berries. Just very lightly and carefully because I didn’t want the initial stamping to smear.
The greeting is stamped from the Banner Year Stamp Set. It is stamped on Shimmery White and layered on a strip of Real Red, punched at each end with the Lovely Labels Pick a Punch. The greeting itself is popped up on Dimensionals but the Real Red punched piece is adhered directly on the card front. For some embellishment, I added the smallest Gilded Gems to each end of the red piece.
Since the tree doesn’t come with a trunk, I didn’t really like it just floating in the air, so I added a bow with the Real Red 3/8″ Sheer Ribbon. I might have preferred a really narrow ribbon but since this one is sheer, I thought it looked light enough to put in between the tree and the greeting. And since my tree needed a star at the top, I looked through my retired punches and found the right size little punch with a star and punched some Gold Foil.
The lesson here is that even though this stamp set, Whimsical Trees is “whimsical” doesn’t mean you can’t make it “traditional” with color and embellishment! Here is another card I made with the same stamped tree and the new Whimsy & Wonder Specialty Designer Series Paper in the less traditional colors. I love this card as is, but if you are looking for the red and green of Christmas, you can certainly use this tree and change up the colors. If you are looking for a more traditional Christmas card or at least a few for certain people, then try this Whimsy & Wonder Traditional Christmas Card with red and green!
This Painted Christmas Paper Christmas Cheer Card uses two different designer papers, at least a tiny bit of one! You can mix and match when you are making cards and projects. Most designer papers seem to have one side that is the “star of the show” and the other side is a more generic, plainer pattern. In this case, I don’t think the paper designs were quite as clear cut, but I would say this green side with evergreen boughs is the less popular side. The other side has pinecones. I was drawn to this side that coordinates with Garden Green and opted to put a red and black plaid reindeer on the card front.
The card base is Garden Green and I added a layer of Basic White underneath the designer paper just to help it stand out a little bit. I think it makes the whole card a little brighter. The designer paper is Painted Christmas in the Holiday Catalog on page 17. That paper design just caught my eye when I saw it in the package! Lots of pretty papers in that set!
For some fun, I cut out one of the red and black plaid deer on the Peaceful Prints Designer Series Paper. You will find this pretty holiday paper in the Sale-A-Bration Brochure on page 8. You’ll be happy to know you can earn it FREE with a $50 Stampin’ Up! purchase. This paper even coordinates with the Peaceful Deer Bundle in the Holiday Catalog.
This is a pretty easy card to make for the holidays. If you have the Deer Builder Punch you might be able to punch out some of the deer on the Peaceful Prints Paper if it is going in the right direction. But otherwise, just cut out by hand with the Paper Snips scissors. I like to leave a tiny bit of white margin around the edge. It keeps it from being too narrow and helps it show up a little bit.
Since the card base is a little dark, put a layer of Basic White inside the card. I stamped a “Merry Christmas” greeting in Real Red Ink from the Perfectly Plaid Stamp Set and stamped one of the trees down in the corner. This way you can write a little note and sign your name inside the card without it being on dark paper.
Be sure to check out the new products for fall, Halloween, and then the holidays in the new July-December 2021 Mini Catalog (Holiday Catalog)! Get what you want the most as soon as you can so you don’t run into any backorders! And remember, that if you spend $50 or more, for every $50 that you spend, you earn a FREE product in the Sale-A-Bration Brochure! A few are free with a $100 order or you can choose two at the $50 level. Let me know if you are interested in Stampin’ Up! products and would like copies of all the current catalogs!