
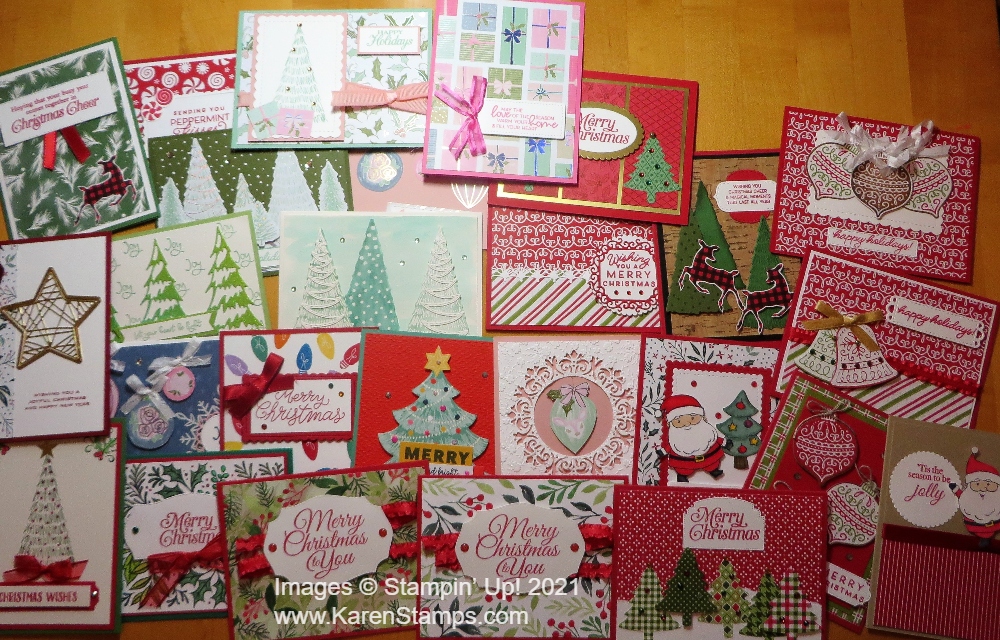
I wish you a very Merry Christmas with your family!

I wish you a very Merry Christmas with your family!
The Week Before Christmas (In a Stamper’s House)
‘Twas the week before Christmas, and the house was a hush
Save the stamping of rubber in a last-minute rush.
The cardstock was cut with precision and care
In hopes that a greeting would soon be stamped there.
The children were tucked in their beds around eight,
But now it’s ten-thirty… How’d it get so late?
And I in my PJs with bleary red eyes
Had finally arranged all the stamping supplies.
It started out simple. (It does every year.)
Just make a few cards for friends who are dear.
I pressed ink to paper. (It looked crisp and clean.)
A sprinkle of powder, heat to a sheen.
When what on my green Christmas card should appear?
Why, a tiny gold Santa with sleigh and reindeer.
On pigment! On powder! On heat from a gun!
Now ribbon and glitter! Can I make eighty-one?
“I can do it!” I said with all of my might
And looked at the clock – ’twas well past midnight.
I went straight to stamping out card after card.
“This might take all night, but at least it’s not hard.”
But after I finished, they looked a bit lame.
I didn’t want fancy, but these were too plain.
And then in a twinkling, a thought came to mind.
“I’ll just dress them up, and then they’ll be fine.”
So I went to my craft room and looked all around,
Then back to the table with all that I’d found.
My Fiskars I brandished (I wasn’t a quitter),
And soon I was covered in EP and glitter.
The cap of a marker I held in my teeth.
I’d lay in some color or maybe gold leaf.
My broad little face was all beaded with sweat,
But I wouldn’t give up – well, not at least yet.
There was glue on the table and ink on the floor.
I laughed at the sight though my fingers were sore.
I did not complain, just kept up my work.
When more things went wrong, I did not go berserk.
When finally finished, one card about six,
It looked pretty good after all of my tricks.
I’m keeping this one. My work on it shows.”
So clutching my card, up the stairs I arose.
I crawled into bed at the crack of dawn,
Creativity all spent motivation all gone.
But make no mistake, I promise one thing:
You’ll all get your cards, but not ’til next spring!
–Author Unknown
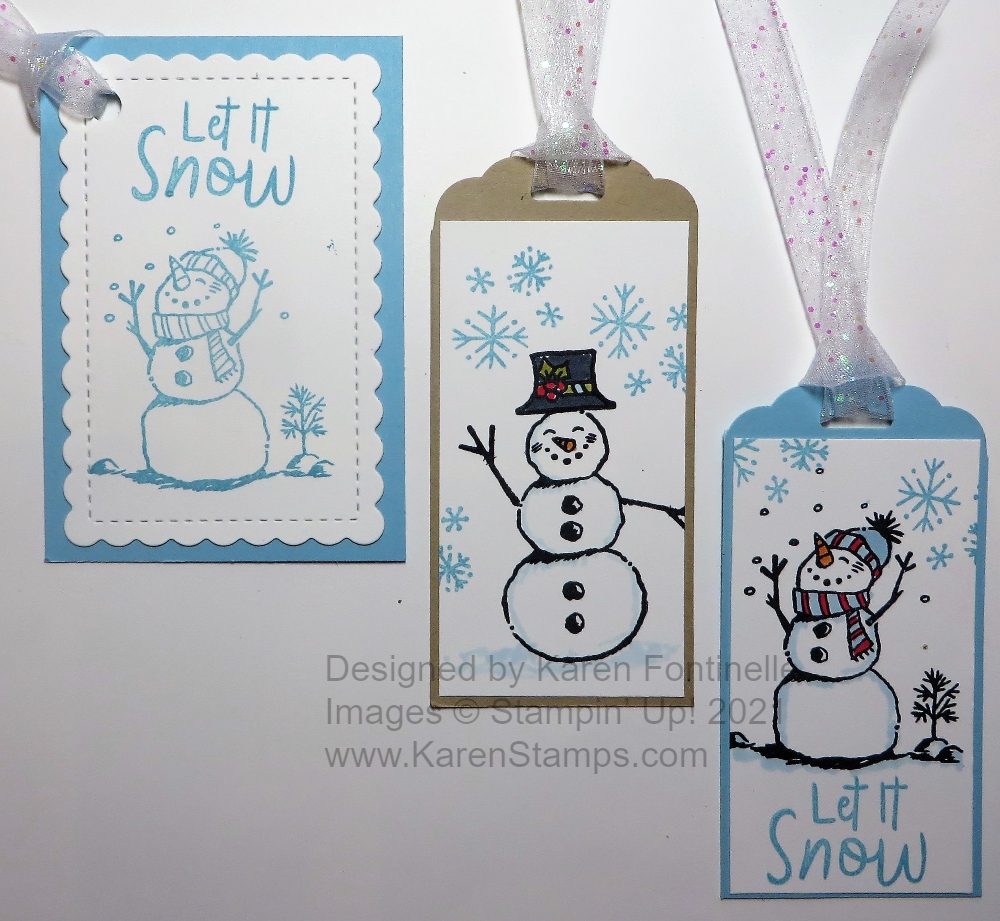
Here are some Quick & Easy Snowman Season Gift Tags that you can make here at the last minute if you run out of gift tags (as we often do!). I suddenly realized I hadn’t made anything with a snowman this season and this Snowman Season Stamp Set is so cute! It’s been around a little bit so I thought I better use it before it retires, although I hope it stays a little longer! And perhaps you already have this in your inventory so it would be easy for you to copy. You’ll find it in the Stampin’ Up! Annual Catalog on page 93. And notice the round tag on page 92, which, without seeing this page first, I was thinking of making a round tag like that one but I ran out of time to make one more!
The tag punch I used is retired but is very similar to the two tag punches Stampin’ Up! does carry right now, the Delightful Tag Topper Punch and the Fancy Tag Topper Punch. This type of punch is so handy to have so I recommend you have one kind or another in your supplies.
I just layered a piece of Basic White cardstock on the Balmy Blue and the Crumb Cake tag bases. The snowmen fit perfectly on this narrow piece. If you stamp with Memento Ink you can color in with Stampin’ Blends alcohol markers. Or you can stamp with Stazon and color in with Stampin’ Write Markers or some other coloring product, like Watercolor pencils or ink.
The first tag in the photo was the last tag I made. That’s where I was going to make the circle gift tag with dies but I already had this scalloped rectangle in the bag with Basic White cardstock so I just grabbed it and stamped on that piece, then layered it on Balmy Blue cardstock. Also, since I was short on time, I didn’t have any more time for coloring so I stamped the snowman and greeting in Balmy Blue ink and let it be monochromatic! Easy enough and looks just as good! I just punched a hole in the corner and tied on the ribbon.
The beautiful ribbon I used and went well with the snowmen I thought is the White 3/8″ Glittered Organdy Ribbon. It is a white sheer ribbon with a little glitter and glimmer in it! Really pretty!
Now that it is officially winter, I think the snowman gift tags are just perfect. For more ideas, check out the Snowman Season tags I made last year HERE.
Just a few more days until Christmas so make a few of these Quick & Easy Snowman Season Gift Tags just in case you need a few more gift tags at the last minute!
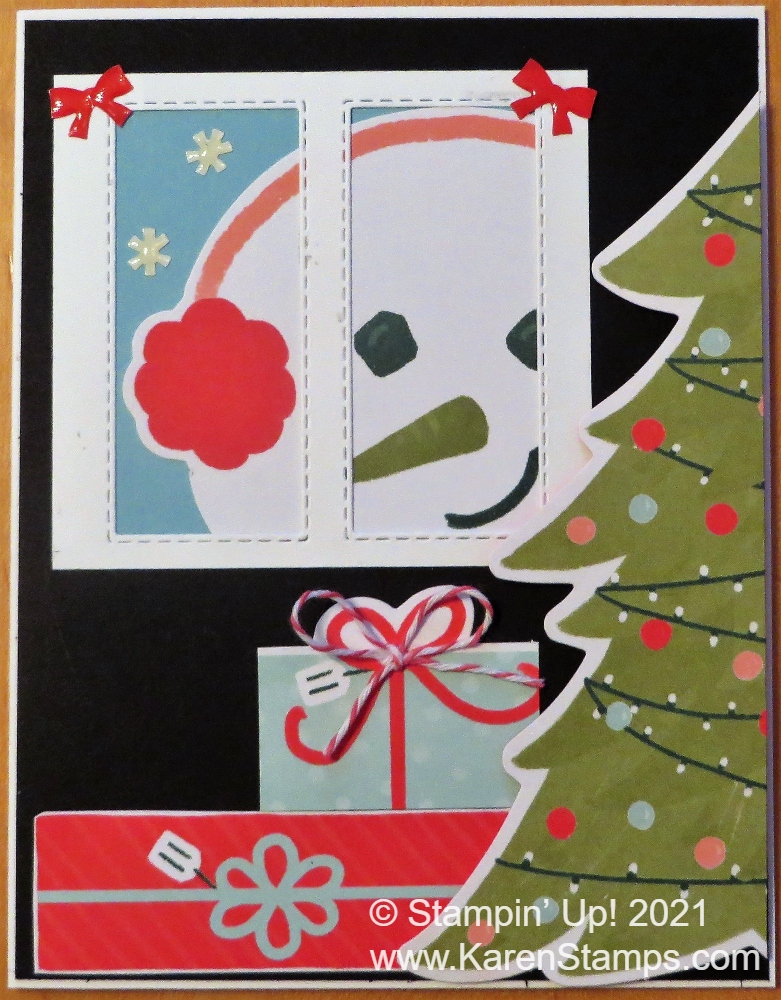
I admit to almost completely copying this Paper Pumpkin Gifts Galore Kit Snowman In Window card from someone on Pinterest, Bonnie Friday. I don’t know if she was the original person or not, but this was a card I saw “somewhere” online and then could not find it ANYWHERE later when I wanted it – until I found hers on Pinterest finally. The first time I saw this card, I believe the creator said she wondered if it looked a little “creepy” with the large snowman head peering in the window at the Christmas tree! Then there were more comments agreeing or disagreeing or laughing about that idea! That really caught my eye and made me giggle because I knew the perfect person to send a “creepy” Christmas card to just for fun!
This card is made from the contents of the November 2021 Paper Pumpkin Kit, Gifts Galore. This kit, in my opinion, is one of the best Paper Pumpkin kits! It contained very large die-cut images of this snowman, a Christmas tree, and packages. The design plan was to use two of the same images, front and back, on a small open box that would hold some kind of treats. Here is my post of the first treat holders I made as designed.
As always, stampers come up with alternative ideas for the materials in their kit. If they don’t need treat holders, they would rather make cards with the supplies or scrapbook pages or some other projects. And you can do that with your Paper Pumpkin Kit!
This card starts with a Basic White card base and a layer of Basic Black. The Christmas tree is cut a tiny bit more than in half. If you look at this sample, you can figure out where to cut it. I popped it up on Dimensionals and Foam Strips.
The snowman head is trimmed as shown so that it fits behind this “window”. This is a little tricky to figure out (maybe it won’t be for you, though!). I used a piece of Basic White and die cut two stitched rectangles out of it. You just have to make the sides wide enough so you can glue the snowman image behind it. I put a piece of Balmy Blue behind the snowman to look like the sky. Just fiddle with it and you’ll get it. The packages are cut from the piece in the kit. Most are pretty large. In fact, the top package I cut down from a larger package. Then I added a bit of the twine in the kit for a bow just for an embellishment even though there is a printed bow. In my retired stash, I had some stick-on bows and snowflakes so I added those just for fun! You could also add rhinestones or jewels to the tree. Do what you like!
I hope you get a kick out of the creepy snowman card made with the November 2021 Paper Pumpkin Kit Gifts Galore! If you still need cards or little projects, maybe you still have some pieces left in your Gifts Galore kit you can use!
If you are wrapping gifts right about now and you don’t have much time to stamp, for lots of fun I suggest making these 3″ x 3″ Gift Tags! On some presents, the hanging tags aren’t quite right or you’d like to write a little note, so make some of the gift tags or gift cards to enclose with your gift. You may even already have some 3″ x 3″ envelopes to put them in.
These are simply made with a 3″ x 6″ piece of any cardstock, scored at 3″ in the middle and folded to make the 3″ x 3″ card. Then embellish to your heart’s desire! I barely had to go to any work on these because I had some scraps, some greetings, some die cuts that I had made but hadn’t used just sitting on my table. All I had to do was make the card base and add some scraps of 2 3/4″ square designer paper or maybe just a strip, pieces from other designer paper that had already been cut out by hand or die-cut, and maybe a greeting or two! Add a few jewels if you like for some sparkle!
No need to go into the exact details of how I decorated these! I’m sure you also have scraps and pieces you can use or you can quickly stamp or cut some out! For sure these are super fun to make! I think you could make a ton of them in just half an hour or so!! If you want just a tag, just cut a 3″ x 3″ square of cardstock and write the “To: and From:” on the back of that. Punch a hole in the corner of these cards and put some ribbon or twine through to tie on your package unless you are using an envelope. Bet you can’t make just one!!
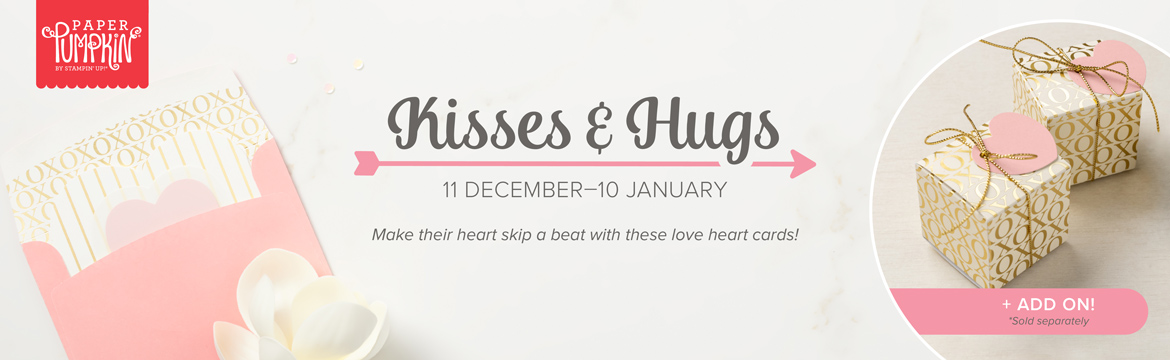
We all know that roses are red and violets are blue—it’s time that love-themed cards got an upgrade! The Kisses & Hugs Paper Pumpkin Kit will help you express that forever kind of love with heart-shaped cards that would make Cupid jealous.
The Kisses & Hugs kit is not bound to just Valentine’s Day, it works for all love occasions year-round like anniversaries, weddings, birthdays, or those “just because” days.
ABOUT THE KIT
Name: Kisses & Hugs (160148)
Details:
ADD-ON
Name: Kisses & Hugs Mini Treat Boxes (160147) $10.00 USD
Details:
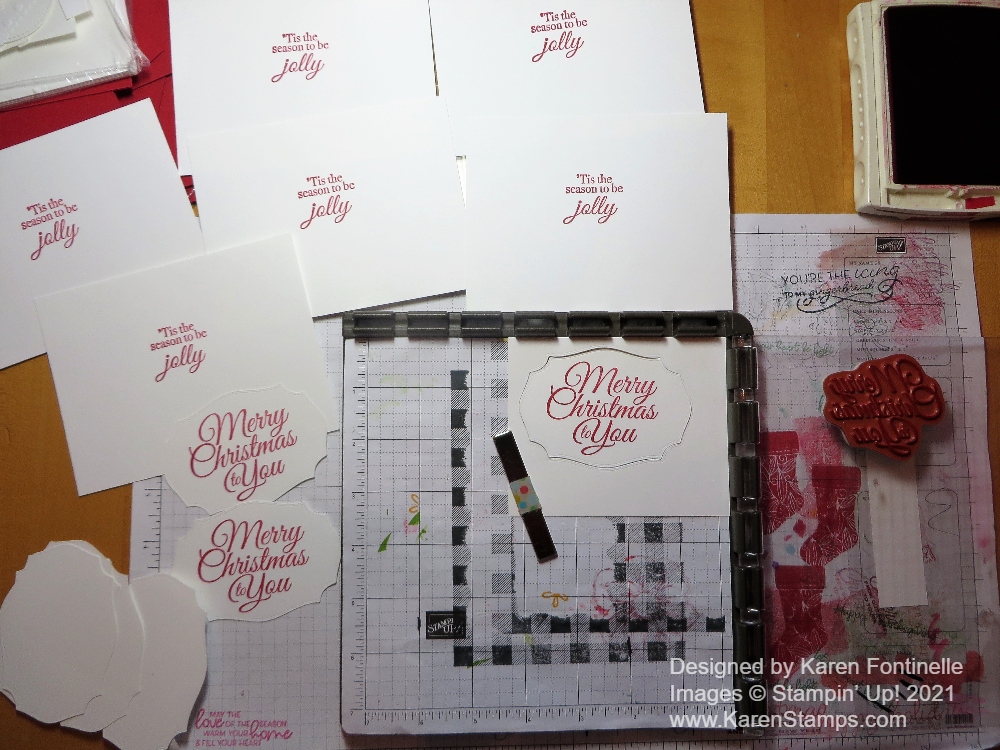
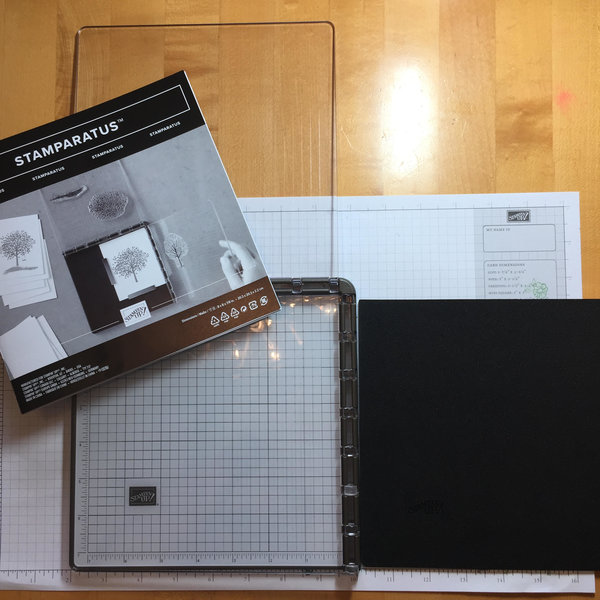
If you don’t own a Stamparatus yet, you need one! When you are making a lot of Christmas cards, you definitely need a Stamparatus! I keep mine handy and use it often but using it at Christmas is really the big time!
I like to make many different card designs and make several cards of that design, maybe five, maybe 10, whatever I feel like at the time. When you are stamping the same greeting over and over again for the inside of the card, if you spend a moment getting it straight and centered or however you want it on the inside of the card, then the stamp stays in the same place and you get perfect stamping every time.
As you can see in the photo, up above the Stamparatus, you can see I stamped at least six inside card layers. Next, I worked on stamping on die cuts I had made for the front of the card. Instead of hoping I stamped the greeting on the die cut centered and straight, I used the Stamparatus PLUS the negative of the die cut. I placed the negative in the corner of the Stamparatus and then made sure the stamp was in the right place to stamp right in the center of that die cut. Then leaving the negative in place, I could place a new die cut into that negative and then stamp. That made it quicker and easier to stamp the die cuts rather than stamping all over the cardstock and trying to line up the die to fit the stamped greeting properly. It worked great!
In my messy, real-life stamping photo above, you can see the used Grid Paper inside the open Stamparatus and the messy stamped large Grid Paper on my kitchen table. You can see the Merry Christmas stamp stuck on the plastic plate of the Stamparatus, ready to be inked up on the right.
Usually, when I am trying to make sure I have the stamp lined up exactly where I want it, I place a window sheet over the card stock and stamp on that first to make sure the words are straight and everything is centered. That way I can alter the stamp position and just wipe off the window sheet until I have it just right and THEN I’m ready to stamp right on the cardstock.
The Stampin’ Up! Stamparatus has a lot of features that I don’t think others on the market have. If you mess up and your image doesn’t stamp as well as you want, just reink and stamp again because the paper hasn’t moved. Use one of the magnets to hold your paper in place. Just be careful not to get those two magnets anywhere near each other!! I found that out the first time I used my Stamparatus!
It might be a good gift to ask Santa for this year to use next year! But if you want it right away, use the Expedited 2-day shipping for an extra $20 and hopefully, that will do it!

Today, Friday, December 10th is the last day to sign up for Paper Pumpkin to get the new Paper Pumpkin Kit, Lots of Fun, coming mid-December to your mailbox! And don’t you think in this busy season you deserve a treat for yourself in your mailbox?!
What’s not to “loaf” about a punny joke? It never hurts to have a little laughter, light-heartedness, and humor sprinkled into your schedule. If you’re a fan of fun, get a kick out of clever crafts, and can’t keep it together when you hear a classic knee-slapper, you’ll go bananas over this month’s cute ‘n’ quirky kit!
The Lots of Pun Paper Pumpkin Kit includes enough egg-citing elements to create nine cards and coordinating envelopes. From giddy gingham to splatters and stripes, this playful Paper Pumpkin kit features a fun and fresh look with one-of-a-kind patterns and designs! “Egg-cellent” for any occasion, reason, or season throughout the year, the kit’s pun-packed stamp set provides completely customizable characters for a very versatile crafting experience. Pair each stamp with its matching die-cut snack, then mix up the faces and accessories for an absolutely adorable accent! Pick up your friends and family with pun-filled projects. December’s delightful kit is sure to make ‘em smile!
ABOUT THE KIT
Name: Lots of Pun
Details: The kit contains enough elements to create 9 cards—3 each of 3 designs—and 9 coordinating envelopes. This all-inclusive kit includes printed card bases, die-cut paper pieces, embellishments, adhesive, and more!
The Lots of Pun Stamp Set is a builder stamp set! This means the included images can be mixed and matched to build a variety of unique characters with different looks and features.
Card size: 4-1/4″ x 5-1/2″
Envelope size: 4-1/2″ x 5-3/4″
Coordinating colors: Crumb Cake, Daffodil Delight, Early Espresso, Granny Apple Green, Pool Party, Poppy Parade
Includes a Classic Stampin’ Spot and exclusive stamp set.
If you’re too busy in December to make this kit, just wait until January and pull it out when you’re ready to enjoy something new and fresh!
Subscribe to Paper Pumpkin HERE at my link! Last Day Dec. 10th!
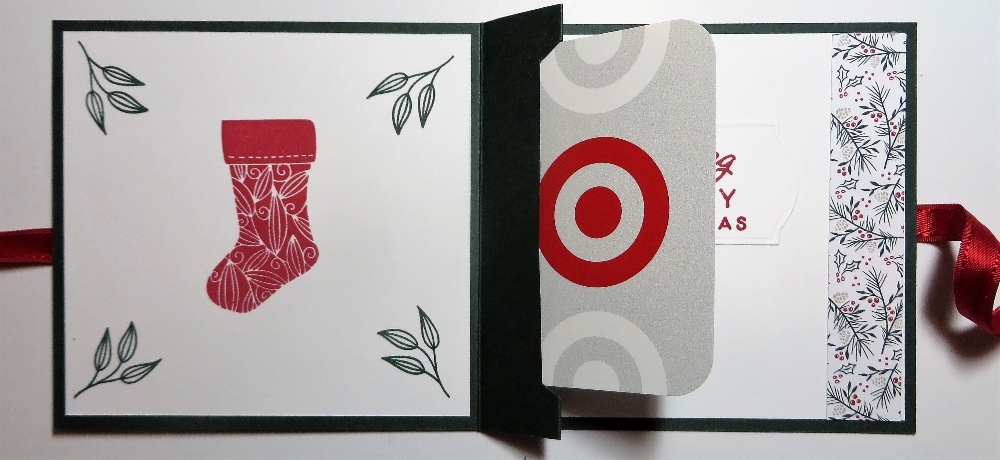
You know you will need at least a few gift card holders for holiday gifts, so here is one version you can easily make! It is basically a strip of cardstock, folded in the middle with a slit so that a gift card can be inserted, and then decorate and personalize for the occasion. You will need gift card holders throughout the year so keep in mind how easy it is to make your own rather than just using an envelope.
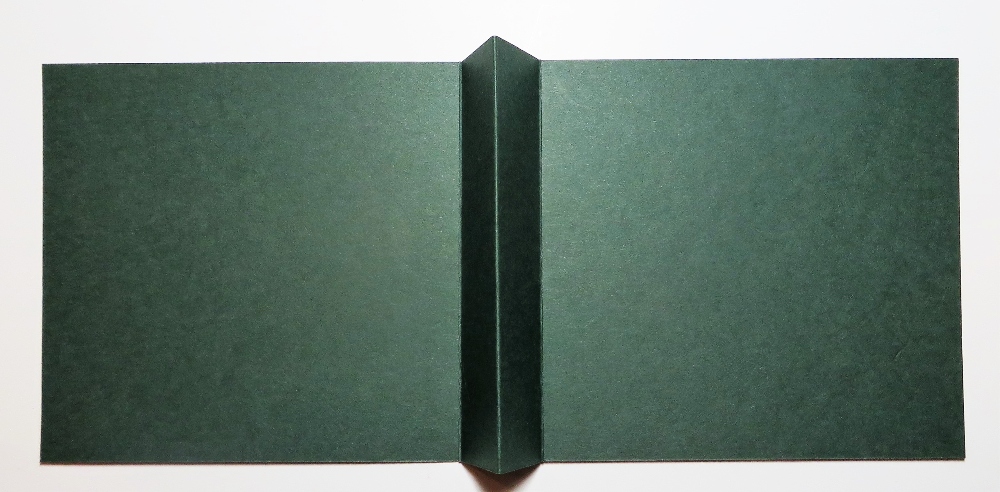
Start with a strip of cardstock that is 4 1/4″ x 11″. That is basically cutting a piece of cardstock in half, vertically. Score at 4 1/2″, 5 1/2″, and 6 1/2″. As you crease these score lines and use your Bone Folder on those folds, the center score line will be popped up (mountain fold) as you see in the photo above. This is where the gift card will eventually be held. It will be like a card opening on the side with this center fold inside the card.
The next step is to cut a slit in that center fold to hold the gift card. I used my retired Classic Label Punch which was so perfect for a project like this. If you do not have the Label Punch, use your scissors to cut your own opening or use something like a craft knife. The opening does not go all the way across, of course. You just need it to be wide enough to hold the gift card, so have your gift card or any card or credit card handy so you can measure correctly.
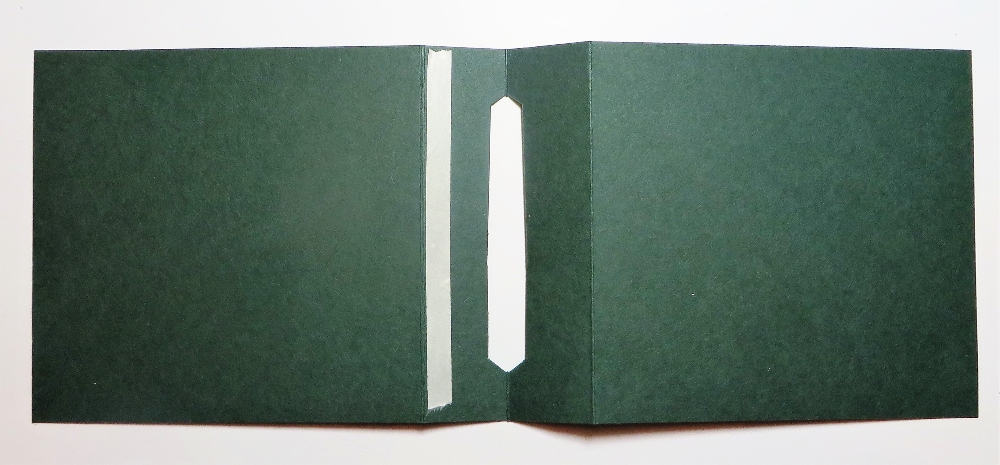
In this photo above, you can clearly see the opening I punched right on that center score line. It doesn’t have to be that wide and you can use scissors or die or whatever you have available. To hold that pocket closed, place a piece of Tear & Tape as close to the side score line away from the slit. You can insert the gift card so that you can see how the gift card fits in the slot. Then remove it, remove the liner from the Tear & Tape and fold back on the score line to adhere.
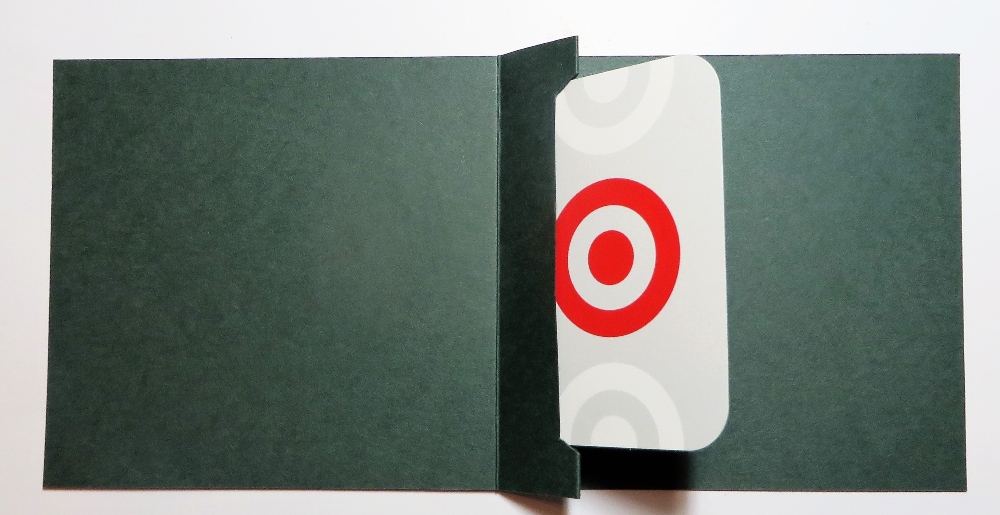
The gift card will fit in there far enough but not all the way down because of the tape. In this way, it can pop up when the card is opened!
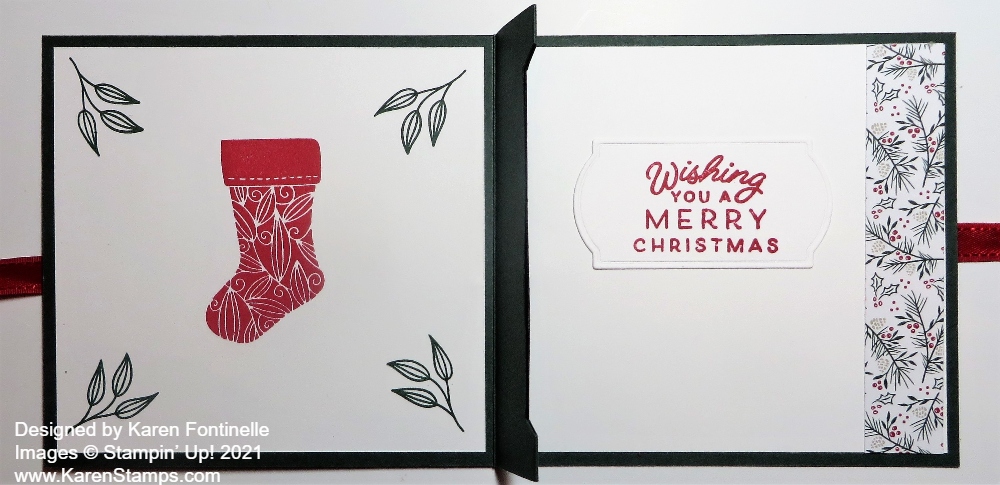
Now the fun part of decorating the inside. I cut Basic White layers of 4″ x 3 3/4″ for each side and stamped the left side with the stocking and leaves in the Tidings and Trimmings Stamp Set in Real Red and Evening Evergreen. On the right side, I already had a stamped and die-cut greeting in my scraps so I just adhered that to the center, plus a little strip of the Tidings of Christmas 6″ x 6″ Designer Series Paper on the right side that matches the front of the card.
In the photo above you can see how the gift card pops up when the card is opened. That makes it a special treat for the recipient!
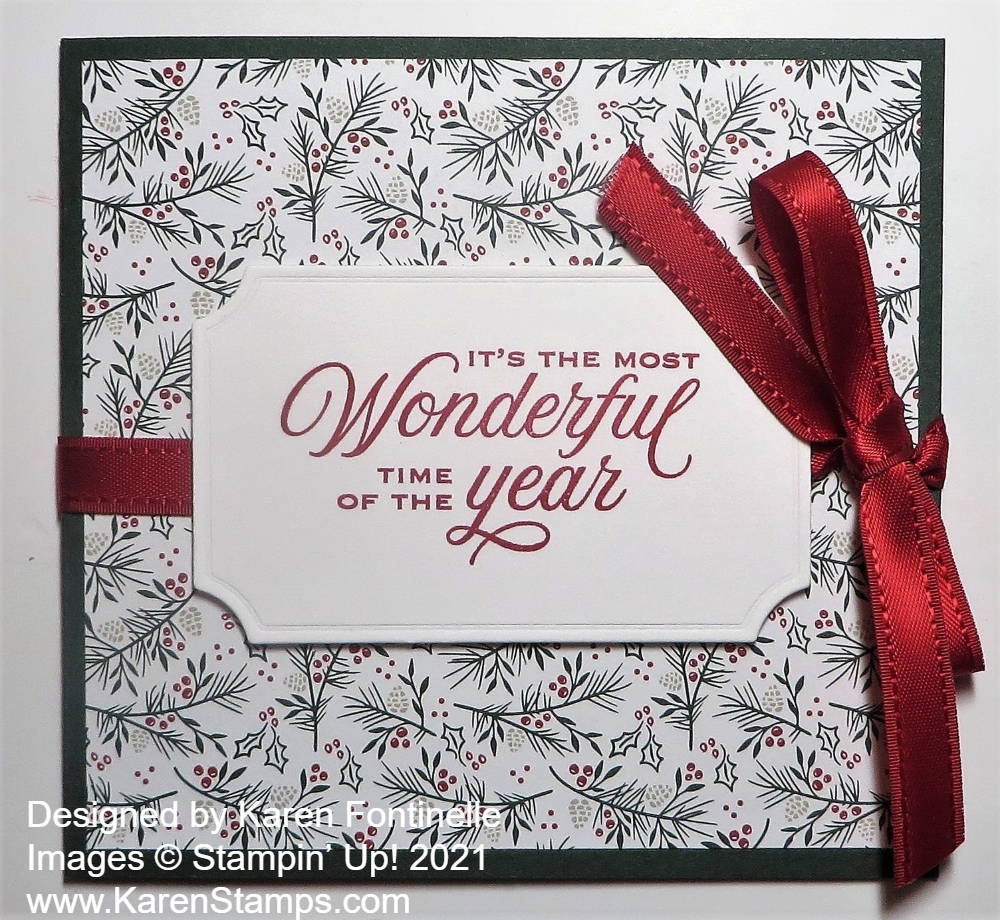
For the front of the gift card holder, which is essentially a card, I used a base of Evening Evergreen and a layer of Tidings of Christmas Designer Series Paper. The greeting is stamped in Real Red ink from the Tidings and Trimmings Stamp Set and die cut with one of the Tasteful Labels Dies. If you want to add ribbon to tie the card shut, when the greeting is adhered, just place the Stampin’ Dimensionals in the four corners of the die cut and not in the center. That way the ribbon can be slid underneath the popped-up greeting and tied on the side.
There are other designs for making gift card holders but this is one you can try! It looks very nice but keep in mind that it IS easy to make! Don’t let the pop-up slot in the middle scare you! For other occasions, just change the colors, paper, greeting and you are good to go!

HOT OFF THE PRESS! FREE SHIPPING ON WEDNESDAY, DEC. 8th from STAMPIN’ UP!
Your order must be $50.00 USD before tax to get free shipping!
Save your order until Wednesday if you can (unless it is under $50!).
Free shipping 24 hours only, beginning at 12:00 AM and ending at 11:59 PM (MT). (Stampin’ Up! Time!) Don’t start your order ahead of time, you must put it in during those hours to be eligible for FREE SHIPPING.
Remember, due to the global shipping crisis, nothing is guaranteed to arrive by Christmas!
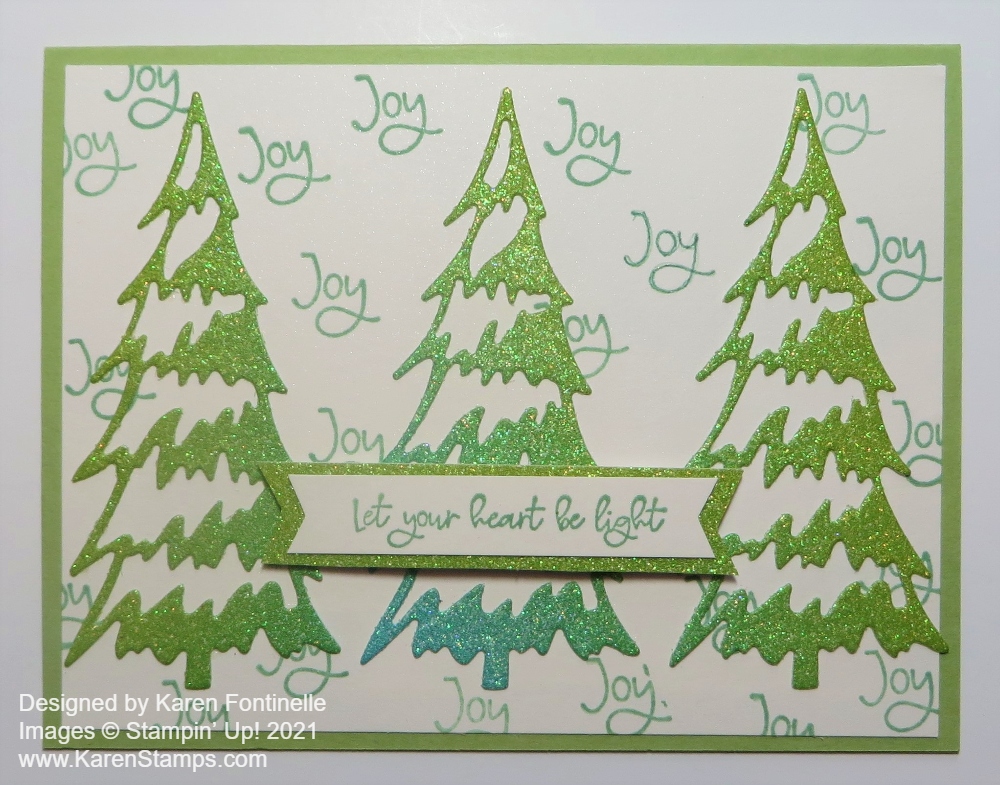
This Rainbow Glimmer Christmas Trees Card was sort of in my head, but then I started on two other projects first before deciding to give this idea a try! I thought it would be fun to use the Rainbow Glimmer Paper and try to get the ombre shades of the green color. The middle tree shows a different color at the base but the other two have slight variations in the green that doesn’t show up in the photo. I think it would be fun if this paper had narrower bands of colors so you could get more of an ombre effect on any projects. But, it is still really pretty and fun paper to use!
The card base is Mint Macaron with a layer of Shimmery White Cardstock. After cutting out and temporarily placing the trees on the card, I decided to try stamping the word “Joy” in the Whimsical Trees Stamp Set around in the background. There wasn’t a lot of empty space on which to do a little stamping so I’m not sure I like what I did. Maybe I do. What do you think??
The greeting is also in the Whimsical Trees Stamp Set and stamped with Mint Macaron. I layered it on a narrow piece of the Rainbow Glimmer Paper. I almost didn’t add a greeting since the card is a little busy already but I did! I really do like the Rainbow Glimmer Paper trees!
If you own the Christmas Trees Dies or will be purchasing them soon on the Last Chance Sale or the Whimsical Trees Bundle, note that there are two “pages” of dies in your package! I guess somehow I was only using what I saw when I pulled the dies out of the package and either forgot or never saw the rest of them! I wondered what happened to the trees that I used on this card that I had seen on other samples! So now I have lots more dies than I thought I had! Duh!
Remember the way these retirements work is that even if Bundles are carried over in the future to another catalog, they won’t still be Bundles. You might still be able to buy the stamp set and dies or whatever the individual components of the Bundle are, but you won’t get the 10% off discounted price. Be sure to check out the Last Chance Sale and the updated Clearance Rack to get the best chance of getting what you want lest anything sell out!
It was a rough morning because my website was not working so I couldn’t post my card until I went through two different Help Chats! Ugh! And even then they said it might work in a few minutes or it could take 24-48 hours globally! Thankfully it started working again after lunch!
Do some Christmas stamping this weekend! I hope to do that AND put up my tree! Wish me luck!

The Gingerbread & Peppermint Designer Paper has so many fun designs besides the gingerbread images! As it turned out, I had already used this pattern of the paper on another card earlier on, but since I love red, it was a natural draw for me to use it on this Gingerbread & Peppermint Ornament Trio Card.
The card base is Real Red, one of the coordinating colors of the Gingerbread & Peppermint 6″ x 6″ Designer Series Paper. After I got the idea to use the three ornaments, die-cut from the paper with the Gingerbread Dies, I thought they needed a white background to help them stand out from the red and white paper. I happened to find this die-cut from the Scalloped Contours Dies so I just used that. Since I was using that, I tipped the side ornaments in so they would fit better on that small background piece of Basic White.
The middle red ornament is glued straight on the card front, with the side ornaments popped up with Stampin’ Dimensionals®. I also tied small white bows with the Whisper White 1/4″ Crinkled Seam Binding Ribbon to put on each ornament. And then I had to add some Rhinestone Basic Jewels to each ornament in the center!
For the greeting, I used a sentiment in the Frosted Gingerbread Stamp Set. I wanted something small and simple since the rest of the card is pretty busy. I stamped the greeting on Basic White cardstock with Real Red Ink and then die cut it with a small Stitched Rectangle Die. I didn’t even layer it on anything, I just wanted it to be simple.
This Frosted Gingerbread Bundle (stamp set and dies) will be on the Last Chance List tomorrow along with the designer paper, so check out the promotion tomorrow, December 1st in the Online Store!
Here’s the new Paper Pumpkin Kit, Lots of Fun, coming mid-December to your mailbox! Several years ago when we were in Austin visiting our son, he took us to this pun festival at the O. Henry Museum. It was an outdoor gathering listening to this spoken word competition of monologues and random topics given to the contestants. Very quirky, but that’s Austin! If you like to groan at puns, this is the place for you! It actually was kind of fun!
What’s not to “loaf” about a punny joke? It never hurts to have a little laughter, light-heartedness, and humor sprinkled into your schedule. If you’re a fan of fun, get a kick out of clever crafts, and can’t keep it together when you hear a classic knee-slapper, you’ll go bananas over this month’s cute ‘n’ quirky kit!
The Lots of Pun Paper Pumpkin Kit includes enough egg-citing elements to create nine cards and coordinating envelopes. From giddy gingham to splatters and stripes, this playful Paper Pumpkin kit features a fun and fresh look with one-of-a-kind patterns and designs! “Egg-cellent” for any occasion, reason, or season throughout the year, the kit’s pun-packed stamp set provides completely customizable characters for a very versatile crafting experience. Pair each stamp with its matching die-cut snack, then mix up the faces and accessories for an absolutely adorable accent! Pick up your friends and family with pun-filled projects. December’s delightful kit is sure to make ‘em smile!
ABOUT THE KIT
Name: Lots of Pun
Details: The kit contains enough elements to create 9 cards—3 each of 3 designs—and 9 coordinating envelopes. This all-inclusive kit includes printed card bases, die-cut paper pieces, embellishments, adhesive, and more!
The Lots of Pun Stamp Set is a builder stamp set! This means the included images can be mixed and matched to build a variety of unique characters with different looks and features.
Card size: 4-1/4″ x 5-1/2″
Envelope size: 4-1/2″ x 5-3/4″
Coordinating colors: Crumb Cake, Daffodil Delight, Early Espresso, Granny Apple Green, Pool Party, Poppy Parade
Includes a Classic Stampin’ Spot and exclusive stamp set.
If you’re too busy in December to make this kit, just wait until January and pull it out when you’re ready to enjoy something new and fresh!
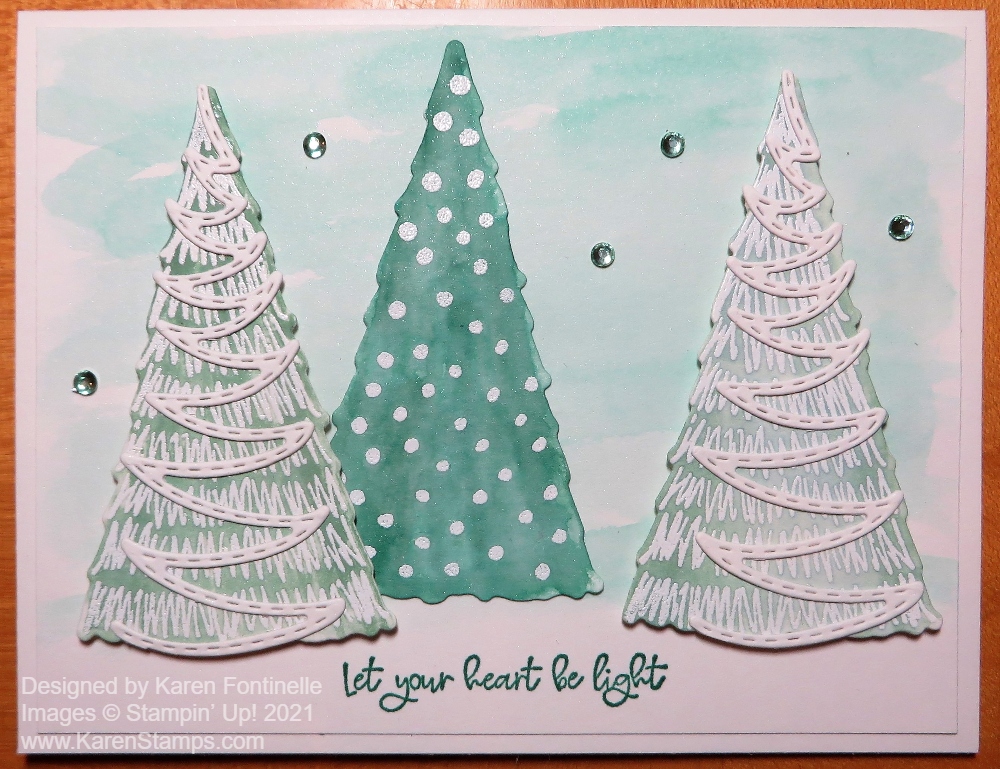
This card started out being an experiment of using white trees on a white layer on a white card, but it turned into this Embossed and Colored Whimsical Trees Christmas Card. That didn’t seem to be going like I imagined so I tried another technique of embossing and coloring the trees.
This white paper I used is my favorite, Shimmery White! If you look closely, in person, you can just barely see a little shimmer on the paper. It also works pretty well for a little watercoloring, as I used on this card. But the paper is so elegant, I think! I love using it.
To make this card, I started with a Shimmery White Cardstock card base with a layer of Shimmery White. On a separate piece of Shimmery White, I stamped two of the same trees and one different using Versamark Ink with the Whimsical Trees Stamp Set. Then I embossed with white embossing powder, which comes in the Basics Embossing Powders of three colors – white, black, and clear. You also need a Heat Tool to do embossing! Just hold the Heat Tool over the powder until you see it change! You will notice and it’s just magical! But it may take a minute until the Heat Tool gets hot enough after you turn it on.
After embossing the trees I die-cut them with the Christmas Trees Dies. I also die-cut the little ribbon decoration you can add to the tree. I cut out two of those for two of the trees. If you can think of it, this would be a good time to use the Adhesive Sheets so you don’t have to use glue.
After I decided the pure white trees on a white card weren’t going to work, I decided to use my Water Painter to add green color using an ink refill in the lid of the ink pad. Use it like a paintbrush except the water is already inside! Love these! I used Pear Pizzazz on two of the trees and Just Jade on the center tree. The embossing resists the ink so it still shows through. You can take a tissue and wipe any excess off the embossing if you need to. You could use any two or three green colors that you like. We have lots of choices!
When the trees were dry, I glued the ribbon piece onto two of the trees with tiny drops of glue.
For the background of the card, I used a watercolor background of Pool Party. I tried to apply it lightly with lots of water squeezed out of the Water Painter and a little bit of ink. I didn’t bring it all the way to the bottom so it would look like snow on the bottom of the card. Then I stamped a greeting with Just Jade ink at the bottom of the card with the Whimsical Trees Stamp Set.
After coloring the background and letting it dry, I adhered the trees, two popped up with Stampin’ Dimensionals and one flat on the card. I usually like to slip one partially underneath another one.
It was absolutely necessary (to me!) to add some bling but you could totally not do this. I added a few of the greenish rhinestones in the Holiday Rhinestones. You could add them to the trees instead if you liked.
So all in all, even though I changed my original idea, I really like this card and maybe I will make extras to send. It’s time to start cranking out those Christmas cards so that you can mail them extra early this year! Have fun!
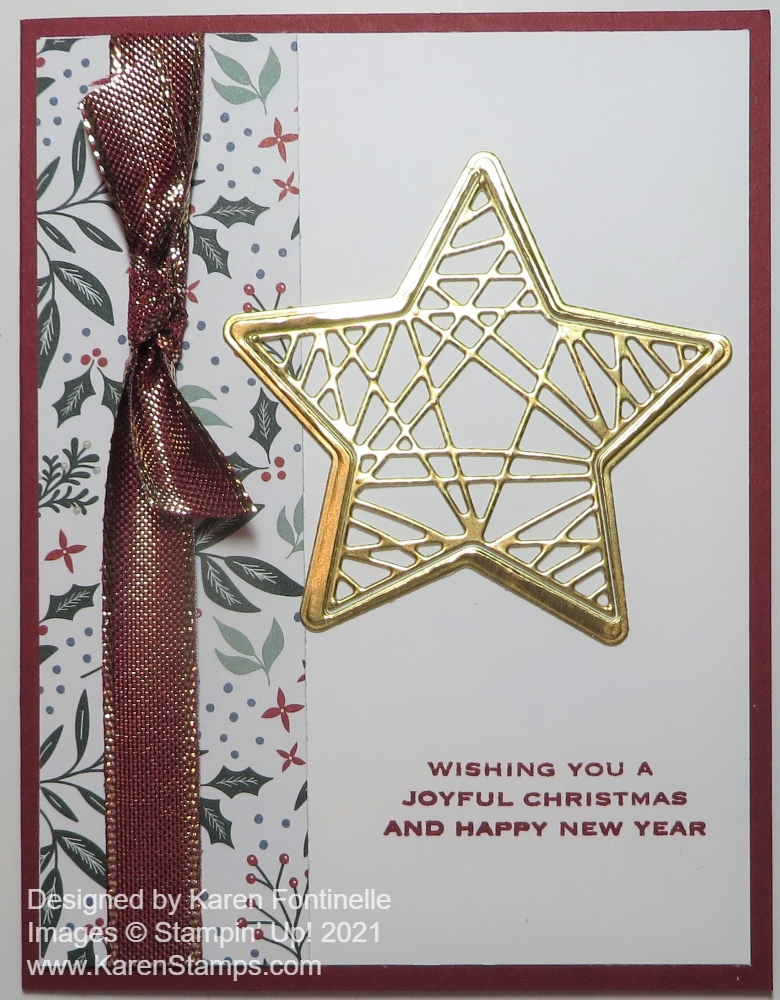
I was a little slow in discovering the Tidings and Trimmings Bundle in the Annual Catalog, but when I saw the die-cut stars I thought maybe I had to have it! I like how this Tidings and Trimmings Gold Star Christmas Card turned out even though I thought I was going to use a Christmas stocking and not the star! You never know where your card will end up!
First I got out the Tidings of Christmas 6″ x 6″ Designer Series Paper. There are a lot of pretty, traditional holiday designs in this paper. I happened to choose a scrap strip that just needed to be trimmed a little to fit on the Basic White layer. The card base is Cherry Cobbler which coordinates with the designer paper.
Before I ever got to try out a stocking on the front of the card, I decided to try a gold star. I love the designs of the large and smaller stars in the Christmas Tidings Dies. Just die cut the star using the outline around it. If you are smart, this is the perfect opportunity to use the Adhesive Sheets! I really wish I remembered to use these more often before die-cutting, particularly when it is an intricate design. Besides making it easy to adhere the image with the adhesive already on the back, but when you pull off the adhesive backing, it pulls out the stubborn little pieces that had not come out of the die-cut piece yet!
The greeting is stamped in Cherry Cobbler Ink at the bottom, slightly off to the right, on the front of the card. The greeting is in the Tidings and Trimmings Stamp Set. This is a great stamp set with its nice artwork and good sayings and words to put on your cards. You can purchase the Tidings and Trimmings Stamp Set and the Christmas Tidings Dies together in the Tidings and Trimmings Bundle and save 10%.
For a little extra embellishment, I tied on a piece of Cherry Cobbler & Gold 1/2″ Ribbon with just a knot. I think the gold trim on the ribbon goes with the gold star.
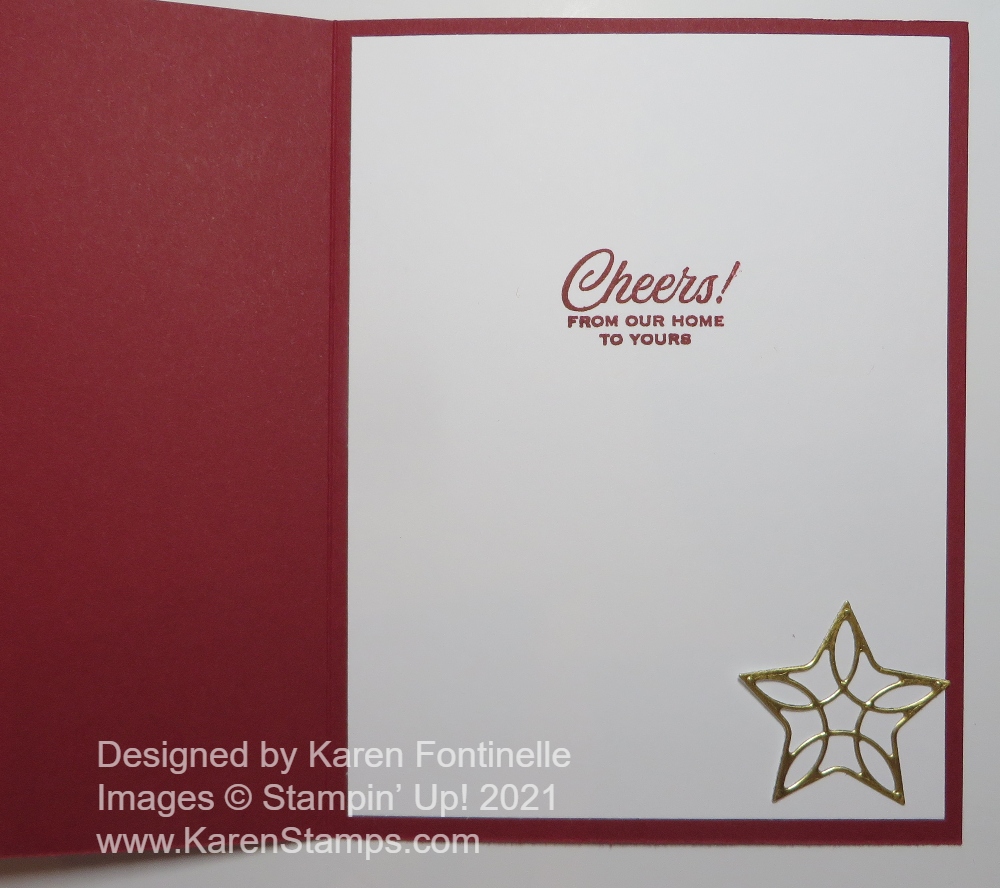
Once the card was all put together, I was really happy with it On the inside, I stamped another greeting and adhered a small die-cut gold star. At the Onstage Event this past weekend, Shelli and Sara reminded us not to send “naked envelopes”! If you want to make this card extra-special, stamp something on the envelope or use some of the designer paper to decorate the envelope flap! Just have fun with it!
Don’t forget about the Seasonal Sale going on for the last day today!! Purchase cardstock at 10% off, 15% off Stampin’ Up! ink pads, and 20% off dies in the Stampin’ Up! Annual Catalog! If you don’t own these Christmas Tidings Dies with beautiful star images, you can purchase them TODAY for 20% off!