Category Archives: Cards

Paper Pumpkin Kit May 2022 In Color Cards

Paper Pumpkin Kit May 2022 In Color Cards

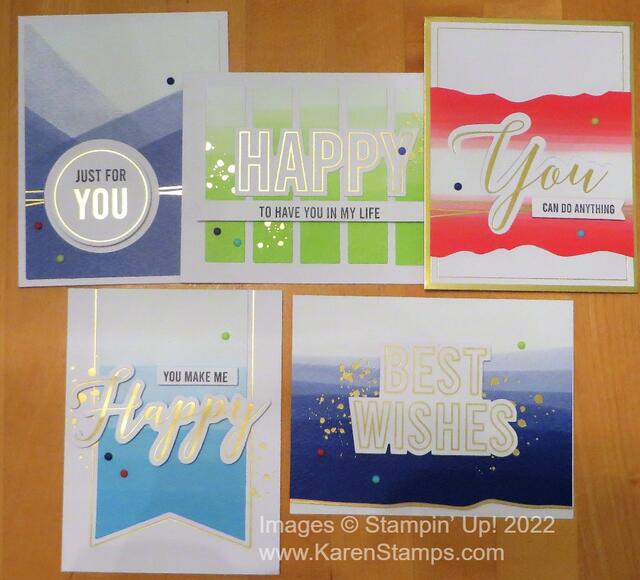
My Paper Pumpkin Kit for May 2022 finally arrived the other night. Our mail comes so late every day that it is almost night when it gets here. I swear sometimes they refuse to deliver my Paper Pumpkin Kit until they really have to! It did finally arrive and I made one of each of the cards as designed for the kit to see what they would all look like.

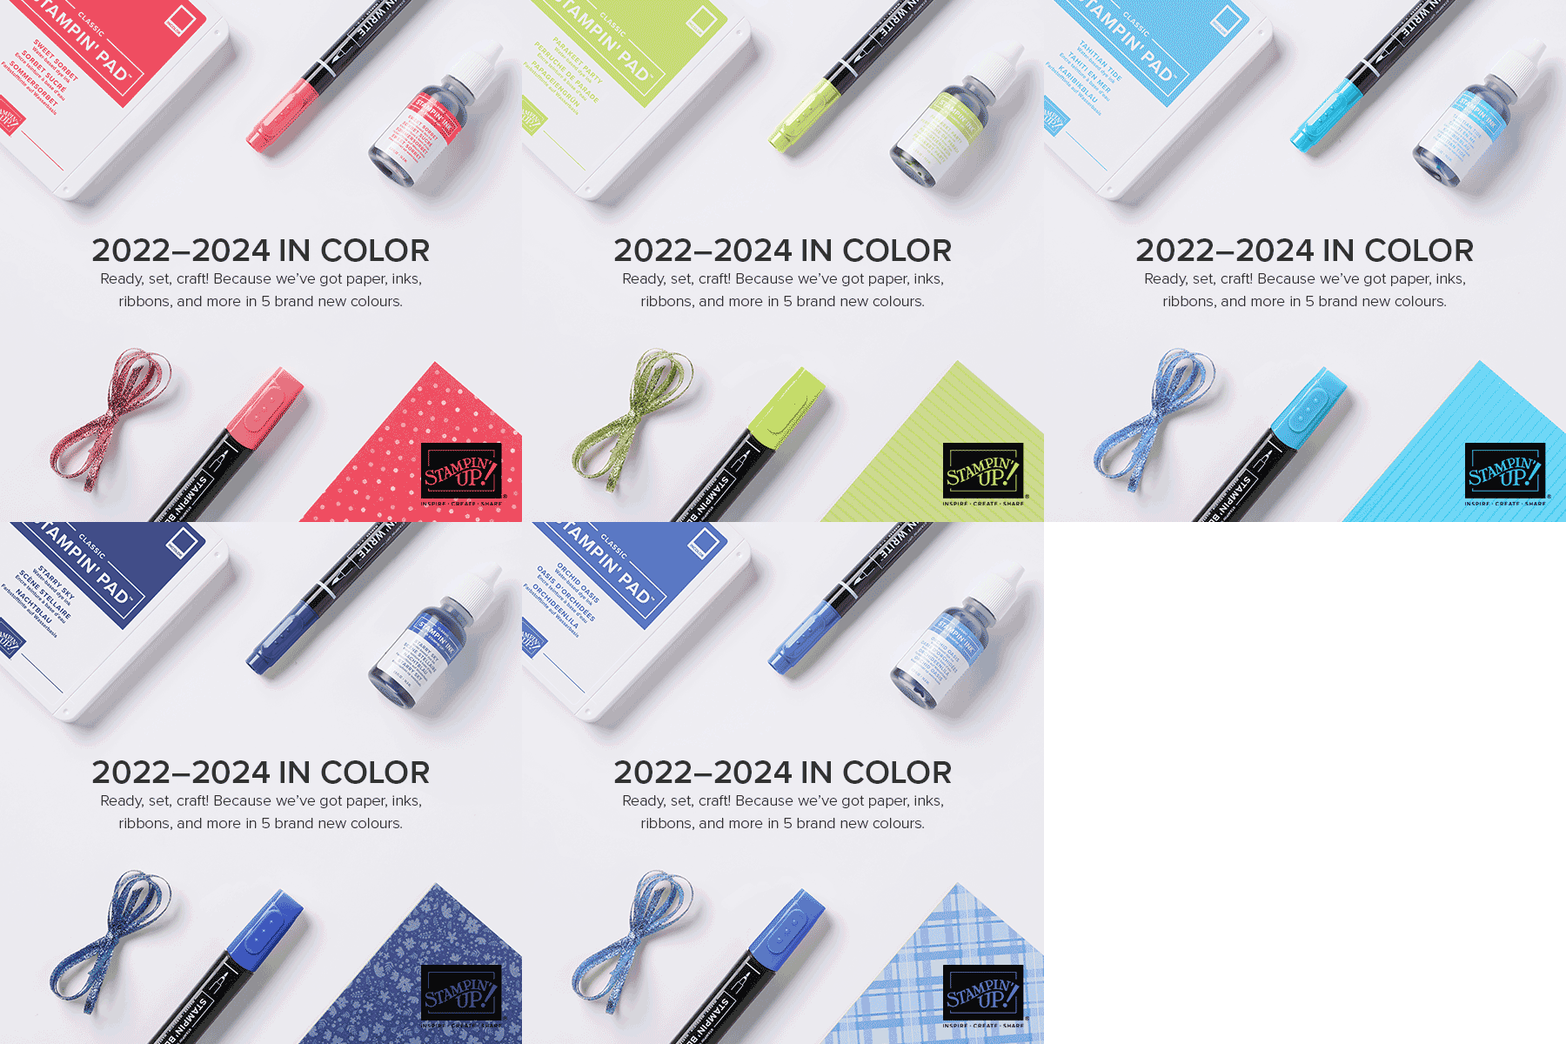
This is the kit we were looking forward to for everyone to have the chance to work with the new Stampin’ Up! 2022-2024 In Colors. The new In Colors are Sweet Sorbet, Parakeet Party, Tahitian Tide, Orchid Oasis, and Starry Sky. I really like this group of colors! Some years I’m not necessarily so thrilled, but these are nice and bright and colorful!

Paper Pumpkin kits are a subscription, a papercrafting kit that is mailed to you each month. Everything you need to make the project inside is included, except maybe scissors to open the wrapping on the supplies. Even appropriate adhesive is included! And with your first kit, you will receive a special Paper Pumpkin acrylic block on which to mount the stamps you will use. Each kit comes with an exclusive stamp set that you can use over and over again if you want to make other projects plus a small, square ink pad called a Stampin’ Spot. You can just tap it on your stamp and then clean off the ink with a damp paper towel or a baby wipe. Directions, of course, are included and you can watch a video of how to assemble the project. Mostly the kits are cardmaking kits but sometimes it is something different. It’s always a surprise but we have been getting sneak peeks in recent years!

These cards were very quick and easy to put together! Envelopes are included and have In Color inserts to give the recipient an extra boost of color when they open the envelope! Or maybe I should say preview. You can follow the directions exactly, especially if you are a new crafter, or you can change up the design or the wording however you like. It is your kit and your supplies! If you already have some stamping supplies, you might want to add some of your own cardstock or embellishments, but you don’t have to have anything extra.

I usually like to follow the directions to make the cards as designed and then if I want to I will make some extras of my own design or just change the greeting. Even if you are an experienced crafter, it is fun to just open the box and have some crafting time all planned out for you! No need to design anything yourself or bring out your own supplies!

The next Paper Pumpkin Kit is already taking sign-ups for June! The deadline is always the 10th of the month so that the kits can be mailed out immediately after that.

  • This month’s kit contains enough elements to create 9 cards—3 each of 3 designs—and 9 coordinating envelopes. This all-inclusive kit includes printed card bases, die-cut paper pieces, adhesive, and more!
  • The Pick of the Crop Paper Pumpkin Kit includes a Calypso Coral Classic Stampin’ Spot!
  • This kit’s stamp set is perfect for expressing your love, gratitude, and style. With sentiments that say “Love you a whole bunch”, “You’re the pick of the crop”, “You are the sweetest,” and so many more, you’ll be able to use this photopolymer stamp set for all of your summer projects.
  • This kit also includes specialty vellum pieces to add a fresh touch to your cards.
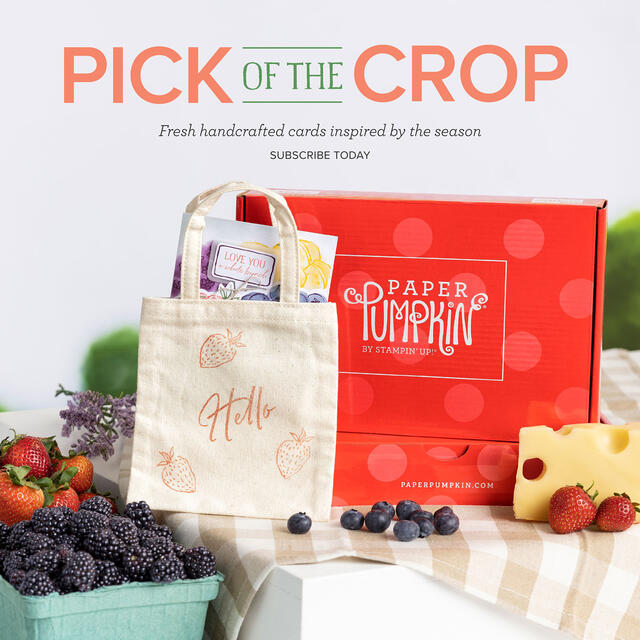
  • And you’ll get a Mini Shopping Bag (5-3/8″ x 6″) which can be used to hold a couple of cards for a unique craft element. (Additional bags will be available to purchase separately.)

JOIN PAPER PUMPKIN HERE BY JUNE 10th!

Stay In Touch With the Stamping With Karen Weekly Newsletters!

Email Newsletter

I’d like to invite you to join my Stamping With Karen Mailing List to keep up with news from Stampin’ Up! and to be inspired with new stamping projects, tips, techniques, and more from me! There is always something new with Stampin’ Up! from products to catalogs and early releases of new products and I know you’ll want to know all about it.

I send out a newsletter every Tuesday with at least one free project idea plus the latest Stampin’ Up! news and updates. Stampin’ Up! usually posts updates to Demonstrators every Tuesday morning so a newsletter on Tuesday from me has the news “hot off the press”!

Stampin’ Up! puts out an Annual Catalog once a year, plus two “Mini” catalogs a year {that aren’t so “mini”) plus the big promotion called Sale-A-Bration. These catalogs give you lots of products you will be excited about, want to learn about, and want to see all the ideas for cards and projects possible! Get on my Mailing LIst to keep up with these exciting events and know what to expect. If you’re one of my purchasing customers I’ll send you these catalogs free of charge when they come out.

Keep up with news about the new Paper Pumpkin Kit every month and subscribe if you want to join in the fun of having a project already planned and prepped for you in the cute Paper Pumpkin box! Always sign up or skip a month if you want by the 10th of any month.

As a special gift to my Mailing List subscribers, every year before the holidays I send out my “12 Weeks of Christmas” newsletters, with one new holiday project each week leading up to Christmas. These are ONLY for my subscribers and you won’t find them on my blog or anywhere else

If you are on my blog, you will see a red sign-up box in the top right corner where you can simply put your name (or first name) and best email. If you are on your phone, you probably need to scroll way down to get to the sidebar things. OR you can go to my sign-up page HERE.

When you do sign up, you will receive an email with a link to a free gift from me!

I hope you will enjoy the card and project ideas I send out in my weekly newsletter. Even if you never make the project, maybe just seeing ideas will do your crafty heart good! I know it does mine! I’m all about the ideas!!

Let’s stay connected and in touch with each other over our favorite thing to talk about…..stamping with Stampin’ Up!

Hues of Happiness Trio of Flowers

Hues of Happiness Trio of Flowers

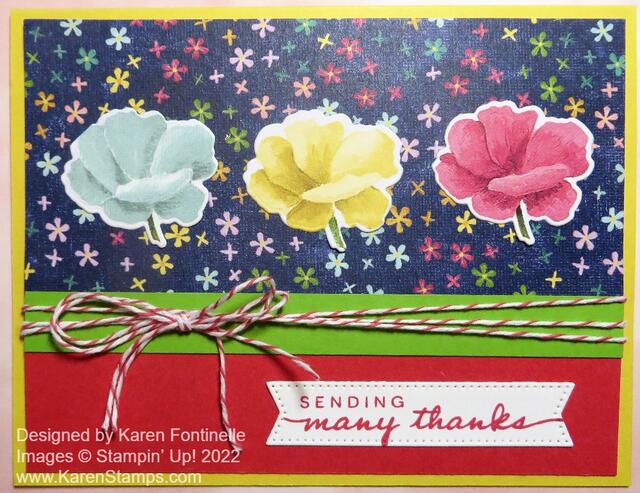
Is this Hues of Happiness Trio of Flowers card bright enough with all the colors??! I was actually making some other cards using the Hues of Happiness Designer Series Paper with all the flowers, and when I turned one piece over to apply glue I saw this dark blue pattern with the tiny flowers! I loved it and wanted to make something with that pattern.

I just started assembling the card itself without knowing what I was going to put on it! I decided on a Daffodil Delight card base, then a piece of the designer paper, plus Sweet Sorbet for the bottom portion. To cover the seam where the two pieces overlap I used a strip of Granny Apple Green. By then it was looking pretty bright!

I thought I would add some of my extra diecut flowers from the designer paper, but the ones I had cut out looked a little pale against the colors I had already used for the card. What to do? Cut out more flowers in deeper colors! I played around with those and thought the card design called for a more whimsical look. I happened to put these three single smaller flowers across the top and I liked that look! They are just glued down flat but they could have been popped up on Stampin’ Dimensionals. It would also be fun to use the Wink of Stella brush on them to give them a little sparkle.

The greeting is in the Happiness Abounds Stamp Set. I only used part of it, covering up the rest with a piece of washi tape (and remembered to remove it before stamping!!). Then I diecut it with a banner die in the Stylish Shapes Dies. I also wrapped the new In Color 2022-2024 Baker’s Twine in Sweet Sorbet around the middle of the card layer three times and added a separate bow tied with two pieces of the twine.

This is really an easy, basic card design but I think the bright colors make it stand out. A strip of Parakeet Party cardstock across the seam would have been even brighter but I thought I liked the look of the Granny Apple Green color better. You could use this same background paper with some other fun image on the top or middle portion of the card for a different look. Just play with your paper and stamps and you will always come up with something as I did with this Hues of Happiness Trio of Flowers card.

SHOP STAMPIN’ UP! ONLINE HERE!

Hues of Happiness Floral Card

Hues of Happiness Floral Card

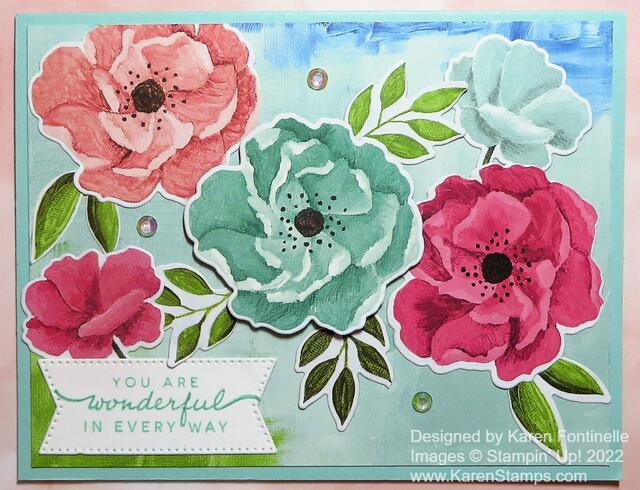
Did you know that a lot of the flowers and even leaves in certain papers in the Hues of Happiness Designer Series Paper can be diecut right from the designer paper?! It’s a fun new trick Stampin’ Up! has been doing with some of its designer paper patterns. I came up with this Hues of Happiness Floral Card idea just by looking through the designer papers and finding this “other side of the paper” that looked so soft and pretty with mostly light blue and just a touch of green and blue in the corners to use as the background layer.

The card base is Pool Party with a layer, as I said, from “the other side” of one of the gorgeous floral papers. When you have papers like this you hate to NOT use the side with the pretty flowers, but sometimes, it must be done! I cut the paper so that it was mostly the Pool Party shade of blue and then a watercolor area of a darker blue in the upper right corner and a green watercolor area in the lower-left corner. You can see the brushstrokes.

Next, I cut the floral paper into smaller pieces so I could die cut a lot of the flowers and leaves using the Blossoming Happiness Dies. I die cut more than I needed, but I can use the extras on another card. I didn’t realize I could diecut leaves as well! Then I laid them out on the card front, fiddled with them for a while to figure out the design I liked, and fiddled some more. Finally, I was satisfied and started gluing them down. The large center flower is popped up on Stampin’ Dimensionals. Then I placed the leaves around where they looked good.

The greeting is in the Happiness Abounds Stamp Set. I stamped it in Pool Party ink on Basic White and die cut it with one of the banner dies in the Stylish Shapes Dies. This is a new set of dies in the Annual Catalog in the shapes of circles, squares, and labels all with a stitched edge. Very useful! And for a final touch, I added some Iridescent Rhinestone Basic Jewels for a little sparkle.

When you have new designer papers, be sure to check if maybe the dies work on the images on the paper! Sometimes they do like on this Hues of Happiness Designer Paper that I could use on this Hues of Happiness Floral Card.

Cup of Tea Teabag Holder

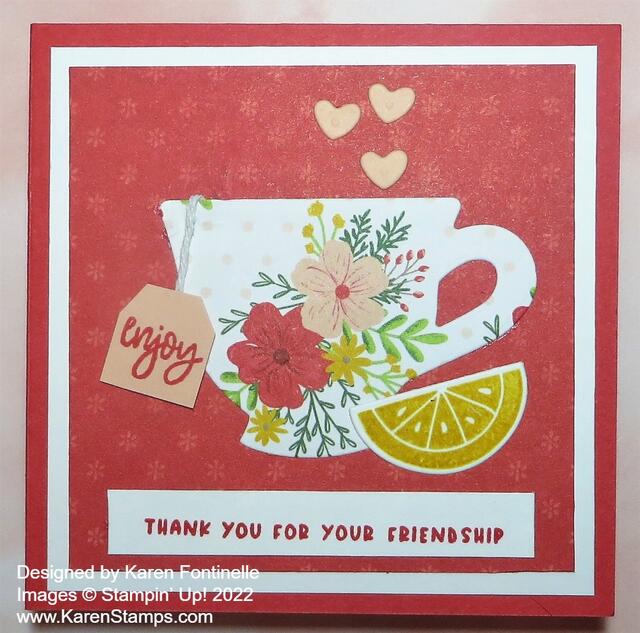
This Cup of Tea Teabag Holder is really an old project I have made many times through the years, but the Tea Boutique Suite Collection is perfect for it! As you will see, this little card opens up to be more than a card! It is a card but holds a teabag inside in a side pocket.

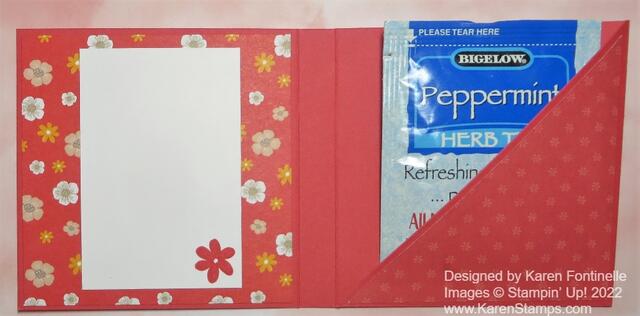
When you open the card, there is a decorated panel on the left on which you can write a message and on the right is space for a teabag or if you wanted, a piece of chocolate or another treat!

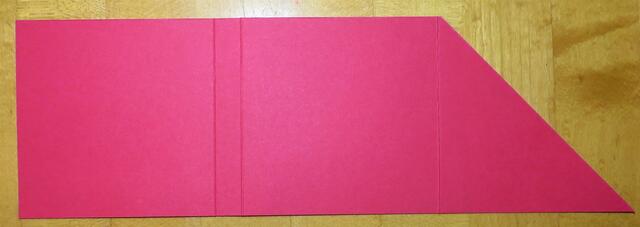
It’s really very easy to make one of these holders. Start with a piece of cardstock 11″ x 3 1/2″. I used one of the new In Colors, Sweet Sorbet. Score this strip of cardstock at 3 1/2″, 7″, and 7 1/2″. Crease all the folds. On the third section on the right, cut that piece on a diagonal as you see in the photo below. When you fold that diagonal over, that will make the pocket to hold the teabag.

Tea Bag Holder scoring

Now all you have to do is decorate the teabag holder however you like for the occasion.

For the cover of the teabag holder, I added a layer of Basic White, cut at 3 1/4″ x 3 1/4″ with a layer of the Tea Boutique 6″ x 6″ Designer Series Paper, cut at 3″ x 3″. The white helps the designer paper and the teacup stand out better.

The teacup is diecut from a floral pattern of the Tea Boutique Paper with the Teacup Dies. It reminds me of many old teacups I have from my grandmother. She used to have a tier table full of teacups and saucers that oddly enough, she said my grandpa brought home from birthday parties as favors! Then there is also a collection of handpainted teacups that my grandpa’s sister painted when my grandparents got married.

But back to making the teabag holder – the greeting is in the Cup of Tea Stamp Set. I wanted to use it because it was small enough to fit in the space. With the stamp set and dies, you can stamp and cut out the lemon slice, the little hearts, and even the tag on the teabag. There are two teabag dies so you could layer them, but the word “enjoy” only fits on the larger tag but I didn’t want that large of a tag on this project, so I just cut it down smaller by hand. I added a small piece of white baker’s twine to look like it is attached to the teabag inside the cup brewing tea.

On the inside panel, I just used another pattern in the Tea Boutique Designer paper, and added a small piece of Basic White on which to write a message or sign your name. I didn’t want to cover up much of that cute paper so I made it smaller than a regular layer.

To make the diagonal pouch on the right side, I used a piece of Tear & Tape just on the bottom of the diagonal. I also cut a piece of the designer paper in a 3 1/4″ square and then diagonally cut it to layer on the pouch.

This is really a fun project to make. The extra scoring in the center leaves space for the thickness of the teabag of candy, whatever you put in there. The only thing I forgot to do was put ribbon around the whole thing to tie it closed. You would likely adhere it underneath the layers so that it would tie on the side to hold it closed. But it’s okay as is, really. If it is presented in an envelope, it’s not going to fall open anyway until the person opens it themselves! There are no mistakes in stamping!

Perfectly Penciled Colored With Blending Brushes Card

Perfectly Penciled Colored With Blending Brushes

Even though I love this designer paper just in its black and white design, one of my first thoughts was one of the ways to add color would be to use Blending Brushes or some kind of sponge. It could be soft and intermittent or more precise, as far as this coloring could go.

This new black and white paper is the Perfectly Penciled Designer Series Paper. While black and white can be very stunning on their own, it also begs for the rather new trend of coloring in! Coloring takes us back to our childhood! I think of some times when my mother would sit down and color in our coloring books with my brother and me with crayons and we thought her coloring was perfection!

Stampin’ Up! has so many different ways you can color in stamped or printed images. With this designer paper, you don’t have to worry about which ink to use or if anything will smear. We have two different kinds of markers, Watercolor Pencils, ink and Blender Pens, ink and Water Painters, Pastels, and more. It’s all fun!

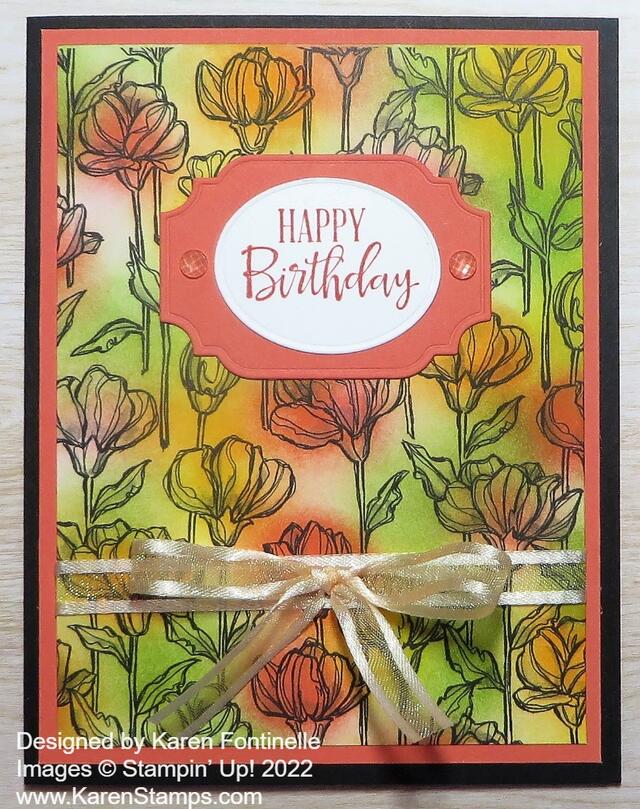
For this card, I colored this floral pattern of the Perfectly Penciled Designer Paper using ink pads and Blending Brushes. Blending Brushes come in a set of three. That’s all I have, at least at the moment. I have found that I can rub them on scrap paper really well after using a color and then go on to use another color. After using them, you can just wash out the ink, but if you wanted to use them over and over, you probably wouldn’t want to work with a wet blending brush. Some people like to have more so they can use a clean brush for every color.

For most of the flowers, I just rubbed the Blending Brush on the ink pad and lightly colored on the paper already cut into a layer for the card. After picking up some ink on the brush, be sure (usually) to lightly rub the brush on scrap paper so you don’t get too dark of a color on your image. After I had lightly colored some of the images, I decided to add a darker layer of color to some of the flowers. Obviously, with this method, you cannot color precisely on any image, which makes it easy because you don’t have to worry about going out of the lines! It’s all out of the lines! The colors I used for the flowers were Daffodil Delight, Calypso Coral, Mango Melody, and Granny Apple Green for the leaves. You can use any combination of colors you want. I also added a layer of Calypso Coral cardstock under the Perfectly Penciled paper. Before adhering, I added a piece of Pale Papaya Ribbon around the lower part of the paper. Even though I didn’t use Pale Papaya as a color, the ribbon looks perfect on the card. It blends in with the other colors and doesn’t compete with all the other pattern and colors happening on the card. I tied a separate bow and adhered it with a Glue Dot.

For the greeting, I stamped “Happy Birthday” in the Peaceful Moments Stamp Set in Calypso Coral ink. It is die-cut with the oval in the All That Dies set and then layered on a Calypso Coral piece also in the die set. For embellishment, I added an Elegant Faceted Gem to each side of the die-cut.

Since the card base is Basic Black, you will need to add an inside layer so you can stamp a greeting or write a personal message on the inside of the card. You could also make the card without the black card base and just use the Calypso Coral or whatever color you like.

If you want to see a card that is just left black and white, check out THIS POST of a card I made with the Perfectly Penciled Designer Series Paper.

Just play with this paper and see what you come up with as I did with this Perfectly Penciled Colored With Blending Brushes Card.

SHOP STAMPIN’ UP! ONLINE HERE!

Hues of Happiness Sending Thanks Card

Hues of Happiness Sending Many Thanks Card

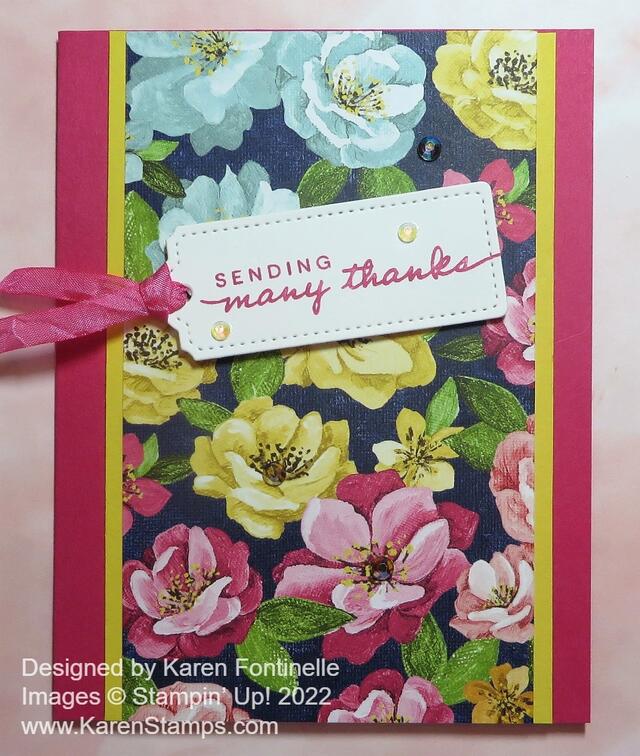
If you’d like a really easy card to make that shows off the beautiful designer series paper, this Hues of Happiness Sending Many Thanks Card would be a good one to make! Really all I had to do was look through the pack of paper to be inspired! It’s always a tough choice though with Stampin’ Up! papers to choose which one to use and even which side to use sometimes because they are all so pretty.

The card base is Melon Mambo because it’s one of the many colors that coordinate with this floral pattern in the Hues of Happiness Designer Series Paper. I just happened to think of putting the designer paper as a panel right in the middle of the card instead of on one side. The floral paper is 3 1/4″ x 5 1/2″. I could have left it like that but I decided to add some Daffodil Delight cardstock on each side.

The greeting is in the Happiness Abounds Stamp Set. I didn’t want to use the entire greeting so I colored in only the words I wanted with a Melon Mambo Stampin Write Marker. The greeting is die cut with one of the Tailor Made Tags Dies.

I didn’t have Melon Mambo ribbon and I needed something narrow to fit through the tag, so I colored a piece of the White 1/4″ Crinkled Seam Binding Ribbon with my Light Melon Mambo Stampin’ Blend marker. It’s real easy to do…just use the side of the marker to color over the ribbon. Just have a piece of scrap paper underneath! Then give it a little bit of time to dry or check with another piece of paper or paper towel or something to make sure no ink rubs off. You can color most any ribbon like this! The greeting tag is popped up on Stampin’ Dimensionals.

To embellish the card, I used a few Iridescent Rhinestone Basic Jewels on the flowers and on the tag. They always add a little sparkle!

I think the Hues of Happiness Designer Series Paper is some of the prettiest we’ve had! But we’ve had lots of pretty papers! It makes cardmaking easy when your supplies are such high quality!

Check out the entire Hues of Happiness Suite for the beautiful designer paper and the lovely stamp set!

New Paper Pumpkin Kit For June 2022!

Now isn’t that little bag adorable that you will receive in your Paper Pumpkin Kit for June 2022?! Be sure to sign up by June 10th so you don’t miss this kit!

You can also add a Prepaid Subscription to your Stampin’ Up! order in the Online Store for a certain number of months, from 1 to 12. This adds to your order if you want to reach Stampin’ Rewards!

“Give your card collection a reFRESH with this month’s Paper Pumpkin Kit! We’re talking FRESH ideas, designs, cards, and crafts. Each month we strive to deliver a seasonal selection, and this month is no different. It’s time to express your love, gratitude, and style with summer’s hottest trends in crafting.”

Plus, this month you can purchase additional mini canvas shopping bags for a fun twist on card packaging.

ABOUT THE KIT

Name: Pick of the Crop

This kit includes:

  • This month’s kit contains enough elements to create 9 cards—3 each of 3 designs—and 9 coordinating envelopes. This all-inclusive kit includes printed card bases, die-cut paper pieces, adhesive, and more!
  • The Pick of the Crop Paper Pumpkin Kit includes a Calypso Coral Classic Stampin’ Spot!
  • This kit’s stamp set is perfect for expressing your love, gratitude, and style. With sentiments that say “Love you a whole bunch”, “You’re the pick of the crop”, “You are the sweetest,” and so many more, you’ll be able to use this photopolymer stamp set for all of your summer projects.
  • This kit also includes specialty vellum pieces to add a fresh touch to your cards.
  • And you’ll get a Mini Shopping Bag (5-3/8″ x 6″; 13.7 x 15.2 cm) which can be used to hold a couple of cards for a unique craft element. (Additional bags will be available to purchase separately.)
  • Card size: 4-1/4″ x 5-1/2″ (10.8 x 14 cm)
  • Envelope size: 4-1/2″ x 5-3/4″ (11.4 x 14.6 cm)
  • Coordinating colors: Blackberry Bliss, Cajun Craze, Calypso Coral, Crushed Curry, Garden Green, Night of Navy, Soft Succulent 

Available for purchase on stampinup.com starting 13 June 2022:

Mini Shopping Bags Add-On

Item Number: 161922 

Item Price: $13.00 USD | $18.00 CAD

Add-on details:

  • You must be a current Paper Pumpkin subscriber to purchase this item.
  • Includes 4 mini canvas bags.
  • You can fit a couple of cards in each bag. Perfect for a fun twist on card packaging!
  • Stamp or color on the bags for a personalized touch.
  • Mini Shopping Bag size: 5-3/8″ x 6″ (13.7 x 15.2 cm)

JOIN PAPER PUMPKIN TODAY!

No risk, no obligation! Continue your subscription as long or short as you like. Skip a month now and then. Stampin’ Up! guarantees all Paper Pumpkin Kits.

Color & Contour Slimline Card For a Friend

Color & Contour Slimline Card For a Friend

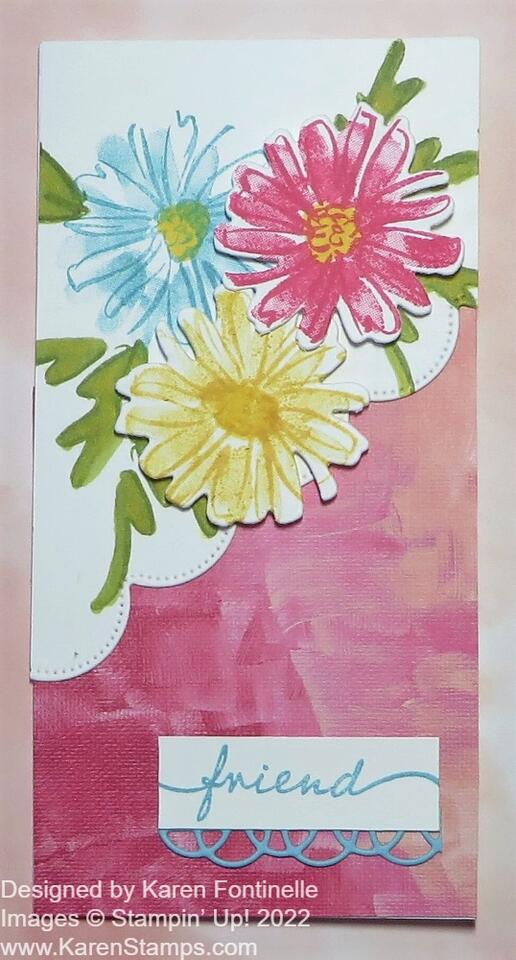
When you want to make a card, but you can’t think of an idea, just look in the Stampin’ Up! Catalog for inspiration! That’s what I needed to do to come up with a card recently and the catalog didn’t disappoint. This Color & Contour Slimline Card For a Friend is the result. I may have practically just opened the catalog to a random page or just paged through a little bit before finding this sample card on page 96. Something is bound to catch your eye when you do this! Maybe it will be a color, stamp set, or card design that gives you an idea. You never know. And oftentimes, I start out with one idea or copy one idea and end up with something completely different. This time I stuck pretty much to the sample I was copying.

First of all, this is a “slimline” card, kind of a new trend, a change from the normal size card we make. I cut a 6″ x 6″ piece of Basic White Thick Cardstock and scored it at 3″ so that the card base would be 3″ x 6″. Next, I tried to copy the scalloped edge that goes partly down the card front on a diagonal. There is a scalloped edge die in the Scalloped Contours Dies. I think I used the correct one but I think my dies got mixed up and this one was with another set of dies. (This is why it would be a good idea to scan the set of dies when you get them before you take them off the paper, so you know exactly what goes with each set!)

I just cut out a piece of Basic White cardstock that would fit on the front of the card and laid this scalloped die diagonally where I wanted it, looking at the sample in the catalog. I didn’t want it to start in the top right-hand corner, but come down a bit before the scallops started. And I wanted it to stop before it got to the bottom of the card.

The pinkish paper you see on the catalog sample and on my card is from the Hues of Happiness Designer Series Paper. It’s on the “other side” of one of the beautiful floral papers so it is difficult to use! The design on this side of the paper has other colors, too, so you may need to cut the exact section you want of the paper. You can even cut it shorter than 6″, just so it will fit under the scalloped piece when it is glued down.

The Balmy Blue flower from the Color & Contour Stamp Set is stamped directly on the white scalloped piece along with some of the leaves in the same stamp set. Then I stamped the Melon Mambo flower and the So Saffron flower on scrap paper and die cut those. These flowers are all two-step stamping and I will say it is difficult to line up the stamp design and it’s difficult to line up the die on the stamped flower. The die is easier, though! However, since the flowers are sort of an abstract design anyway, it doesn’t matter so much if you get the two-step stamping perfect! I colored in the leaves and the flower centers with Stampin’ Blends markers.

The greeting on the sample is on Balmy Blue cardstock and embossed in white with a partial greeting from the Color & Contour Stamp Set, but I chose the “friend” greeting from the Happiness Abounds Stamp Set. First I die cut the small scalloped rectangle in the Scalloped Contours Dies in Balmy Blue but I thought that looked like “too much” so I used the scalloped edge die in the Painted Label Dies for something light. I put my greeting near the bottom of the card since I didn’t make my card quite as wide as the sample. You could also add some gems to the card and I may go back and do that. Sometimes I forget before I take the photo for my blog!

Here’s another slimline card I made a little while back on my blog.

With a brand new Stampin’ Up! catalog, there are many, many untapped new samples to try out! Copy or just get some ideas when you look in the catalog. I hope you will try a card, maybe a slimline card like this Color & Contour Slimline Card For a Friend.

Last Day To Join and Get the May Paper Pumpkin Kit! Don’t Miss It!

Paper Pumpkin May 2022 Banner1

Today is the last day, May 10th, to sign up/subscribe/join Paper Pumpkin, the monthly kit that comes in your mailbox, to get this special kit! Even if you have never tried Paper Pumpkin before (or even if you did once before!), I suggest signing up to get this kit…and then you can keep up your subscription, skip a month or two, or cancel if you must. This kit is one of those extra-special ones that I would highly recommend (and I haven’t seen it!).

“Create magic with the NEW 2022–2024 In Colors with this Paper Pumpkin kit! With vivid pops of green and red and a range of blues, these colors are perfect for fun festivities. Send your best wishes or happy moments with the large bold lettering and gorgeous gold foil details. Plus, you can also send gift cards with the included coordinating gift card holders!”

Yes!! This kit has the new In Colors for you to see and try! And Sara Douglass, CEO of Stampin’ Up!, was involved in the design of this kit, which in the past has always meant good things! She suggested that she would like something so that she could send a gift card if she wanted so the coordinating gift card holders were included in the kit!

As an added bonus, every May Paper Pumpkin subscriber will get the chance to win a GOLDEN Voucher worth $25 USD | $34 CAD in Stampin’ Up! products! The winners will find their Golden Voucher in their May 2022 Paper Pumpkin box. This is the perfect time to snag coordinating In Color products from the new 2022–2023 Annual Catalog.

ABOUT THE KIT

Name: Celebrating In Color

This kit includes:

  • Celebrating In Color Photopolymer Stamp Set
  • Basic Gray Classic Stampin’ Spot®
  • Printed card bases
  • Printed In Color envelopes
  • Printed In Color gift card holders
  • Foiled die cuts
  • Printed die cuts
  • Adhesive-backed In Color embellishments
  • Tear & Tape Adhesive
  • dimensionals

Card size: 4-1/4″ x 5-1/2″ (10.8 x 14 cm)

Coordinating Stampin’ Up! colors: Orchid Oasis, Parakeet Party, Starry Sky, Sweet Sorbet, Tahitian Tide

If you are excited about this Paper Pumpkin Kit and want it to show up in your mailbox in mid-May, just click the link below to sign up! This is my personalized link so you won’t have to look for my name as your Demonstrator. All supplies are included in the box so even if you are new or don’t have your own supplies, you will get everything you need in this kit! And experienced crafters love having a project already designed that they can make right away, too! If you want to see and use the new In Colors, this Paper Pumpkin Kit is a great way to get started!

JOIN PAPER PUMPKIN TODAY!

Perfectly Penciled Black and White Hello Card

Perfectly Penciled Black and White Hello Card

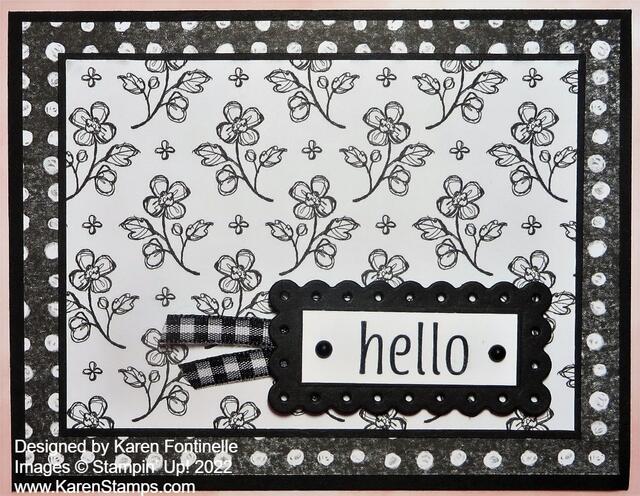
Today I wanted to play with the new designer paper, Perfectly Penciled, that has all black and white patterns. These papers are fun because you can leave them black and white or color them in with various techniques and materials. For this Perfectly Penciled Black and White Hello Card I simply layered the papers and added a greeting.

You’ll find this new designer paper in the new Stampin’ Up! Annual Catalog. It just came out last week so if you do not have a Demonstrator you are working with and would like a hard copy of the catalog, I’d be happy to help you if you send me your contact information. You can view the catalog online and the products in the Online Store as well.

The card base is Basic Black with a layer of one of the “other sides” of the designer paper, not the floral side. Then I cut a layer of a pretty floral pattern, but I wanted the dotted layer to show so I had to cut it down smaller to 4 1/2″ x 3 1/4″. Just to help it stand out a little bit from the background pattern, I added a Basic Black layer, just a tiny bit larger, about 1/16″ bigger on all sides.

I was tempted to get out my Stampin’ Blends and color in the flowers but I decided to keep this card black and white as was my original intention. I’ll try a colored version another time.

For the greeting, I simply reached for a stamp set and the first one on my shelf suited the purpose, Artistically Inked. I liked the not too large “hello” greeting and makes a good all-purpose card! You could add any greeting you wanted or needed to a card like this. First, I cut out a scalloped rectangle in the Scalloped Contours Dies (thankfully carried over to the new catalog because I like these dies and use them a lot!) from Basic Black. Then I just measured the inside area and cut out a Basic White rectangle to fit and stamped the word “hello” in Memento Ink.

I had debated what ribbon to use before I came up with the greeting. Was the Black & White 1/4″ Gingham Ribbon enough to stand out against the paper or should I break my black & white idea and use a colored ribbon? After deciding on how to design the greeting, I decided a small piece of the gingham ribbon would be just fine. I popped up the greeting and die cut piece on Stampin’ Dimensionals® and just let the end Dimensional hold down the ribbon.

Since I like to use jewels as a finishing touch, I used two Matte Black Dots on the greeting. I thought maybe I should use something sparkly but I do like just the black dots! So you never know!

With the card base being Basic Black, I needed to add a Basic White layer inside the card. To decorate it, I simply cut out by hand one of the same little flowers from the paper I used on the front of the card and glued it in the corner of the white cardstock. So cute!

As you look over all the very pretty papers we have in the new catalog, be sure to take a look at the Perfectly Penciled Designer Series Paper and see if that is something you’d like in your paper collection!

SHOP STAMPIN’ UP! ONLINE HERE!

A New Kit: A Million Thanks

SU Kit Collection A Million Thanks

Here’s a new kit for you in the Stampin’ Up! Kits Collection! It’s called A Million Thanks and from what I can see, I’d say it’s one of the prettiest kits I’ve seen!

Say “thank you” in style and dazzle with layers of dimensions with the versatile A Million Thanks Kit!

This kit has everything you need to create beautiful, all-occasion cards to express your gratitude. Mix & match card bases, sentiments, pre-cut die pieces, and embellishments to create expertly crafted cards with ease. This kit is just what your collection needs! With any kit, feel free to change up the design, however you like! These kits are easy enough for beginners and fun enough for experienced crafters! And you won’t need a closet full of supplies because they are all in the box (except for maybe scissors!).

Watch the Unboxing Video to see the contents and the finished cards you can make!

DETAILS


Kit Includes:

  • A Million Thanks Photopolymer Stamp Set
  • Acrylic Stamp Block
  • Classic Stampin’ Spot: Evening Evergreen 
  • Pre-designed projects 
  • Step-by-step instructions
  • Pre-cut pieces (No prep work! Get right to crafting)
  • Makes 9 cards: 3 each of 3 designs 
  • UV coating on card bases (looks like clear embossing)
  • Folded card size: 5-1/2″ x 4-1/4″ (14 x 10.8 cm) 
  • 9 pre-printed envelopes 
  • Enough adhesive to complete projects 
  • Printed die-cut sheets
  • 1 sheet of adhesive-backed black dot embellishments
  • A 9-7/8″ x 6-1/2″ x 2-3/4″ (25.1 x 16.5 x 7 cm) printed designer box for storage or crafting on the go

Coordinating colors: Basic Black, Blushing Bride, Crumb Cake, Evening Evergreen, Mossy Meadow, Pale Papaya, Pear Pizzazz 

Check out this new Kit and the others in the Stampin’ Up! Kits Collection HERE!

Sending Smiles Across the Miles Card

Sending Smiles Across the Miles Card

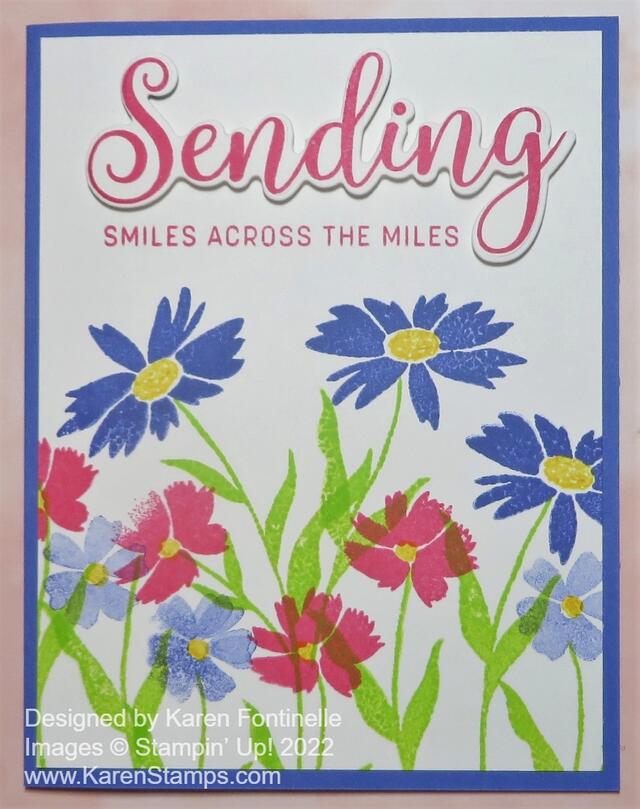
This Sending Smiles Across the Miles Card was fun to make with this brand-new stamp set! It’s mostly all stamping with one die-cut for the greeting! I didn’t really do such a great job of stamping, but most people wouldn’t notice and I still like the card! It could be interpreted as the “watercolor look”!

The card base is one of the new In Colors, Orchid Oasis with a layer of Basic White for the stamping. Sometimes it’s fun to “just stamp” like in the “olden days”! I used the new Sending Smiles Stamp Set. It’s great because it comes with several different stems for the flowers and several different flowers and sizes. All you have to do is stamp! I used Orchid Oasis ink for the large flowers and the same ink stamped off once for the small light purple flowers at the bottom. The pink flowers are Polished Pink. The flower stems are Parakeet Party ink. The flower centers are stamped in Daffodil Delight.

If I wanted to, I could have stamped and die cut the flowers. The dies that go with the Sending Smiles Stamp Set are the Sending Dies. You can purchase both the stamp set and dies in the Sending Smiles Bundle and save 10%!.

For the greeting, you can stamp the word “Sending” directly on the card. You can stamp the word on white cardstock in colored ink and die-cut, as I did. Or you can just die cut the word itself out of colored cardstock. I stamped my “Sending” in Polished Pink ink and then stamped the second part of the greeting in ink right below. It was the perfect fit! Lots of choices of greetings in the stamp set so I think this will be a useful set to own!

Check it out in the Stampin’ Up! Online Store!

SHOP STAMPIN’ UP! HERE!

Orchid Oasis Cup of Tea Card

Orchid Oasis Cup of Tea Card

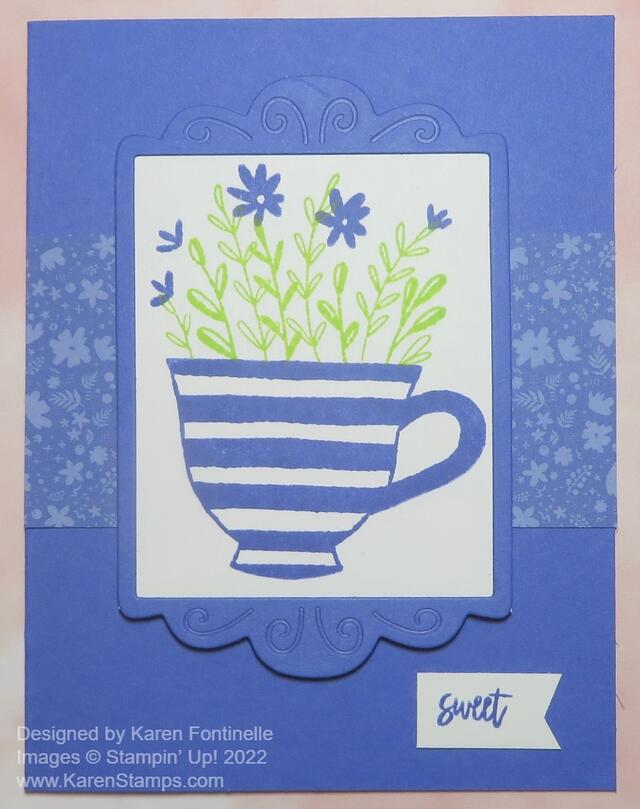
This Orchid Oasis Cup of Tea Card was fun and pretty easy to make! I’m loving playing with the new 2022-2024 In Colors, the new Cup of Tea Stamp Set, and the Fabulous Frames Dies.

The card base is the new In Color, Orchid Oasis, cardstock. This card is a little smaller than usual, 4″ wide by 5 1 /4″ long. I cut a piece of the In Color Designer Paper Assortment to put across the middle of the card. This one is 2″ x 4″. You could make it wider or even use a layer to cover the front of the card except for the margins.

The Fabulous Frames Dies has this one die that I used that I really like. It’s also cut out in Orchid Oasis cardstock. The center piece of that frame even is cut out so you will need to glue it somewhere on the inside of that frame. Actually, I kind of wish it would all stay in one piece, too! Then it would be easier to layer something in the center. As it is, the center piece comes out so on this card, after stamping the center piece, I had to glue it to the backside of the frame. My Multipurpose Liquid Glue was really cooperating and I was able to squeeze out just tiny lines or dots of glue along that very narrow frame edge and then place my stamped piece on it. I didn’t need to put glue on the top or bottom fancy frame areas because I was going to adhere the whole thing to the card front with Stampin’ Dimensionals.

The stamped piece on Basic White is stamped with Orchid Oasis ink for the cup, Parakeet Party for the leafy stems, and Orchid Oasis for the little flowers. I’m not sure I have completely figured out how to stamp those flowers to line up exactly with the stems. I got close, though. Maybe they aren’t supposed to line up! I don’t think it matters so just play!

For a little greeting, I just chose one of the small words in the Cup of Tea Stamp Set and stamped it on a narrow scrap strip of Basic White and then made a banner end with Paper Snips. (Or if you have the retired Tailored Tag Punch you can use the pointy end of that!)

There are lots of ways you could step up this card with “more” if you wanted to. You could add gems of some kind. You could die cut the cup and stems or flowers. Of course you could change out the colors and make it less monochromatic or tie on a tag with the little tag diecut and piece of twine. I was keeping this card rather simple although diecutting the frame and adhering the stamped piece took a bit of time.

Here is the first card I made from this Tea Boutique Suite.

I think you will really like these new In Colors. I recommend buying the assorted packs of cardstock so you get all the colors and then you can go back and order the individual colors you know you like. You can also buy an assortment of 12″ x 12″ cardstock!

Check out all the new products now that the new Stampin’ Up! Catalog has been released! If you are new and interested in Stampin’ Up! products and would like a catalog, just email me your name and address so I can send you a catalog. Or if you prefer, you can view it online HERE.

SHOP THE NEW STAMPIN’ UP! ANNUAL CATALOG HERE!

The New Stampin’ Up! Catalog Is Here!

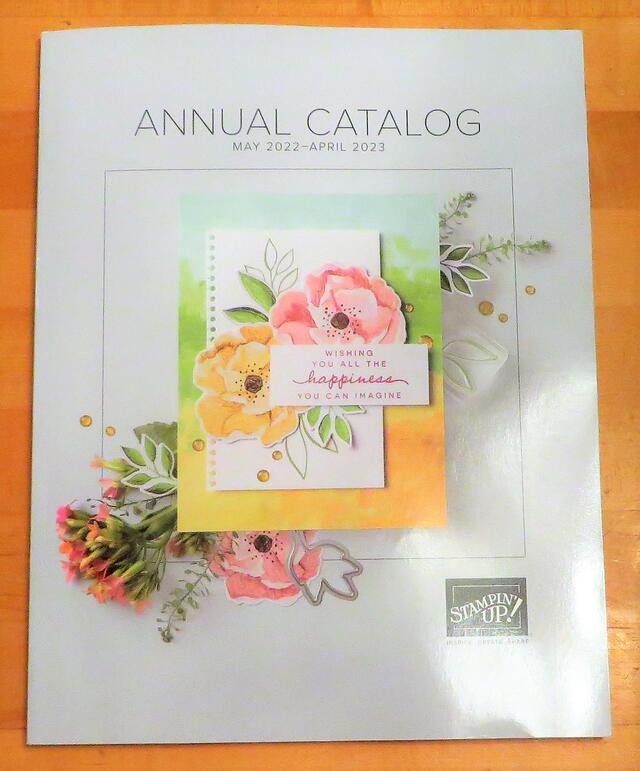
This beautiful new Stampin’ Up! Annual Catalog is LIVE today! The day has finally arrived! It’s a somewhat sad goodbye to the old, but so much excitement for the new catalog, ideas, and products! So much fun ahead! So much creativity ahead from all of us stampers! It’s a day to celebrate!

CLICK HERE TO VIEW THE NEW CATALOG ONLINE!

Here are a few Stampin’ Up! videos to give you more information about the new catalog products!

And don’t forget about the new In Colors! I love them! I suggest getting a couple of packages of the Assorted In Color cardstock (159204). That way you can try them all out and order more packages of the colors you know you will use a lot. An assortment of cardstock has 20 sheets, 4 sheets of each of the 5 In Colors. There is also a 12″ x 12″ assorted package.

CLICK HERE TO VIEW ALL THE NEW IN COLOR PRODUCTS!

HAPPY NEW CATALOG DAY!

ENJOY THE BEST SHOPPING DAY OF THE YEAR! GO SHOP!