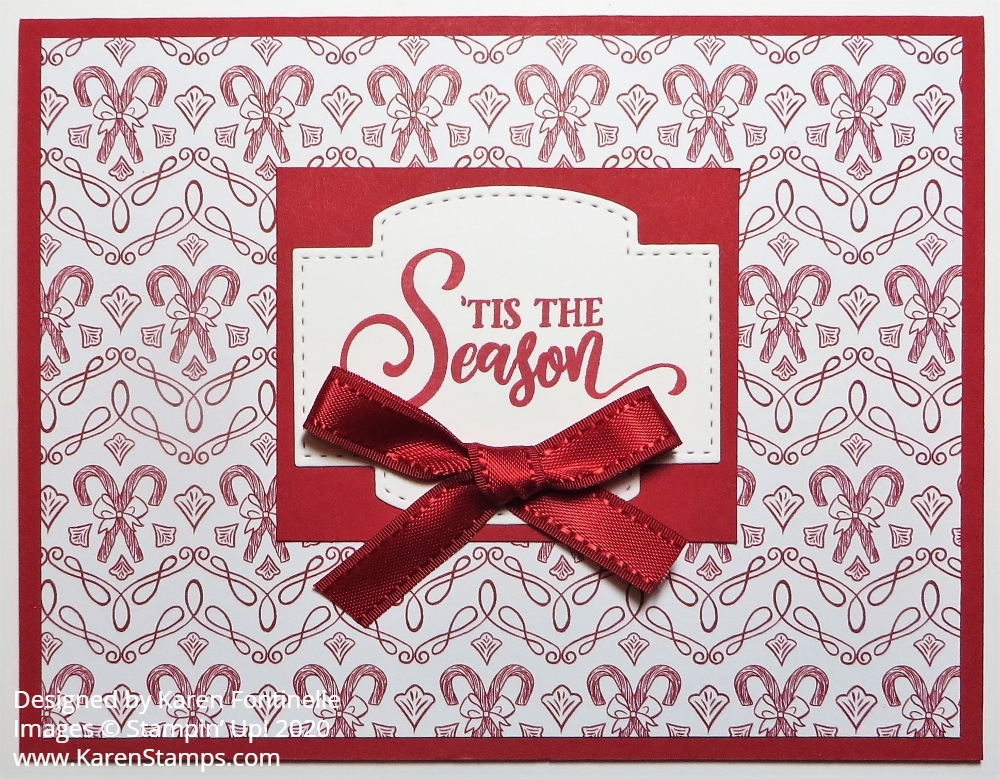
If you only had the ‘Tis The Season Designer Paper, I can’t imagine how many different Christmas cards you could make! And there are also generic patterns that you can use long after the holidays.
This was an easy card to design. I picked the candy cane print pattern of the ‘Tis The Season 6″ x 6″ Designer Series Paper. I also chose the red narrow-striped design for the bottom portion of the card. I adhered those two papers together using my Grid Paper to make sure everything lined up for the correct size. Then I was able to wrap around a piece of the Real Red 3/8″ Double-Stitched Satin Ribbon to cover the seam of the two papers.
The greeting is stamped in Real Red Ink from the Tag Buffet Stamp Set. I love the font and style of this writing in this stamp set! Even though it goes with the Tag Buffet Project Kit, it’s really a stand-alone kit for making any Christmas cards and projects. But I also love the Tag Buffet Kit tags!! You can see the ones I made HERE.
I looked through all my dies and decided on this shape for the greeting. It is in the Tasteful Labels Dies. It is large enough and has an interesting shape plus a stitched edge! For a little bling, I couldn’t resist adding some of the Red Rhinestone Basic Jewels. I’m not sure I like how I placed them. What do you think??
Then on each side of the greeting I tied two small pieces of the red ribbon just in a knot, not a bow. A bow would take up too much area and obscure the greeting.
The card base is Shaded Spruce. Since that is rather dark for the inside of the card, just add a layer of Whisper White. I just stamped a holiday greeting on it, but you can also add a strip of the designer paper along the bottom edge of the inside layer for a little decoration.
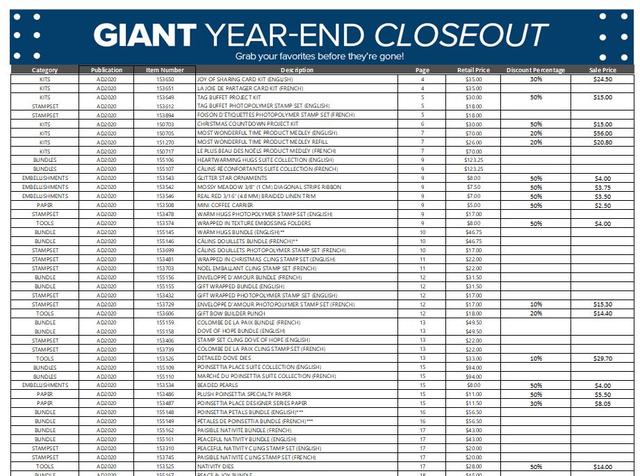
Tomorrow, Tuesday, December 8th is the first day of the Stampin’ Up! Giant Year-End Closeout. This is a list of the retiring products in the August-December 2020 Mini Catalog (otherwise known as the Holiday Mini Catalog!). These products will not be available after January 4th. However, they are only available while supplies last so don’t wait until January 3rd to get your favorite product you don’t own yet.
Actually, this ‘Tis The Season Designer Paper will be discounted 20% during the Closeout Sale! Check the list for the discounts and save!

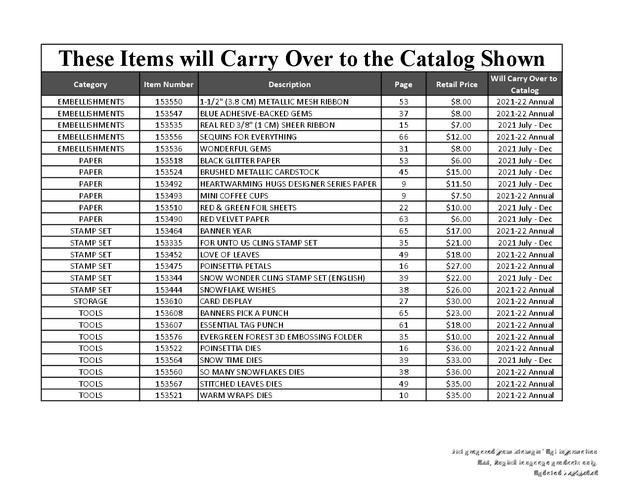
And these products will carryover into future catalogs. Click on the image below and see what is staying!