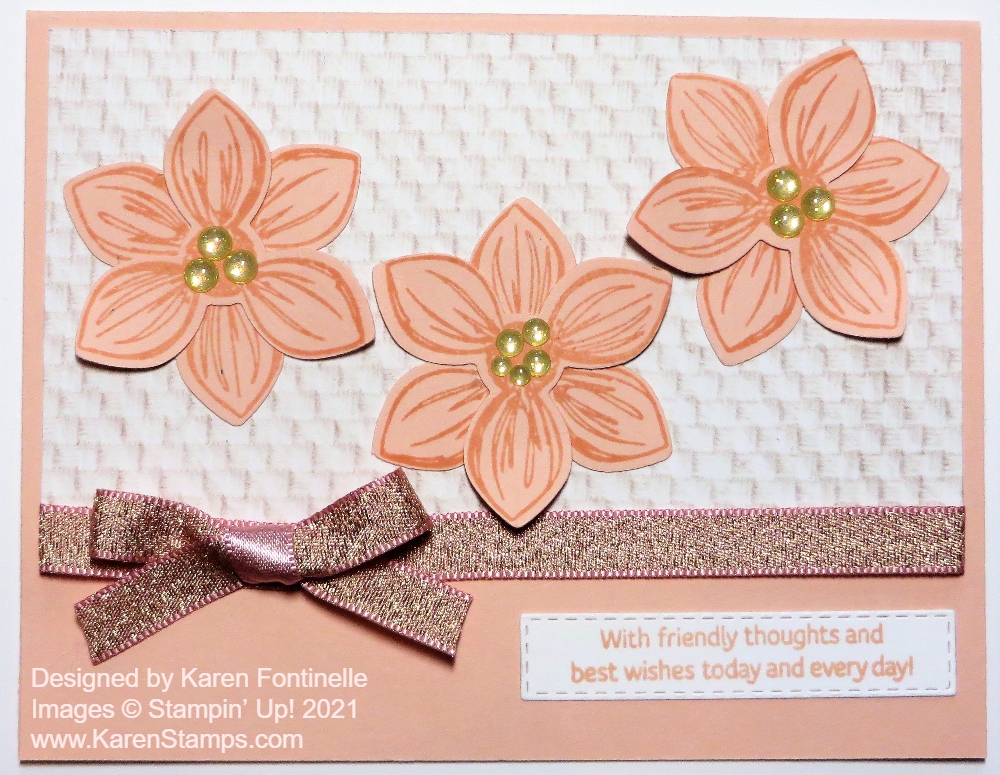
Author Archives: Karen Fontinelle

Last Day! Sale-A-Bration Darling Donkey

Sale-A-Bration Darling Donkey

Today is the LAST DAY for SALE-A-BRATION and this Sale-A-Bration Darling Donkey is kicking up his heels hoping you will remember to get your order in before Sale-A-Bration comes to a screeching halt tonight!

With every $50 Stampin’ Up! purchase you make, you can earn a FREE product in the Sale-A-Bration Brochure! No limits! Like this Darling Donkeys Stamp Set!

With a $100 purchase, you can earn one of two special products: the Berry Blessings Bundle or the A Touch of Ink Stamp Set. Or chose two of the Level 1 products.

With a $300 order, yours alone or shared with others, you can choose the FREE Punch Party Stamp Set.

And if you want to JOIN Stampin’ Up! as a Demonstrator, with your Starter Kit you will also receive 5 packages of upcoming 6″ x 6″ Designer Series Paper Packs included in your business supplies FREE!

Today is the last day to earn FREE product during Sale-A-Bration!

Think about stocking up on adhesives, cardstock, ink refills…some basics you need to reach your $50 or more!

OR purchase a Prepaid Paper Pumpkin subscription (or add on to your order!) to reach the sales amount you want!

This easy card is made with a card base of Granny Apple Green to match the leaves on the Flower & Field Designer Series Paper, another one of the Sale-A-Bration choices, by the way! I love this package of paper!

The Darling Donkey is stamped on Basic White Cardstock in Memento Ink and cut out with the Rectangle Stitched Dies. The greeting is also in the Darling Donkeys Stamp Set. I colored in the donkey with Stampin’ Blends in Crumb Cake and Smokey Slate. The bow is tied with the Braided Linen Trim. And I couldn’t resist adding two red Resin Hearts Embellishments!

If you would like this Darling Donkeys Stamp Set or the beautiful Flower & Field Designer Paper, be sure to shop at Stampin’ Up! today!

SHOP STAMPIN’ UP! ONLINE!

Flower & Field All-Occasion Card

Flower & Field All-Occasion Card

This Flower & Field All-Occasion Card was supposed to look exactly like a sample in the Sale-A-Bration Brochure, but this shows what can happen when you start copying something! Sometimes you change things a little or a lot!

I wanted to make a card with the Flower & Field Designer Series Paper and looked in the Sale-A-Bration Brochure for ideas. Right away the card in the bottom right of page 11 caught my eye. But when I looked through the package of paper, this black background with the Just Jade polka dots is the one that caught my eye!

As I toyed with maybe adding strips of Just Jade Cardstock as a layer under the top and bottom of the polka dot piece, somehow I came up with strips of this flowered pattern instead. I fiddled with the paper sizes until I had about 1 /4″ top and bottom margins on the Basic White Cardstock card base.

The greeting is stamped from the Lovely You Stamp Set. I wanted a greeting that was long in length. I used the same Bumblebee yellow polka dot scrap of designer paper that the brochure sample used to layer underneath the greeting. I used the Lovely Labels Pick a Punch to punch each end of the yellow polka dot layer.

Then for fun, unless you hate cutting with scissors, I cut out several white daisies from another pattern of the Flower & Field Designer Paper to adhere around the greeting. It was a little tedious, but not too bad! You can even consider cutting with Paper Snips relaxing! I popped up a couple of the daisies with Stampin’ Dimensionals.

For a finishing touch, I added a bow of Bumblebee 1/4″ Gingham Ribbon. You could also add some rhinestones or gem embellishments of any kind.

I absolutely love this Flower & Field Paper! If you do too, you can get it FREE during Sale-A-Bration with a $50 Stampin’ Up! purchase. But you have to hurry, because Sunday, February 28 is the last day of Sale-A-Bration! You don’t want to miss out on FREE products!

SHOP STAMPIN’ UP! ONLINE HERE!

Hydrangea Hill Floral Hello Card

Hydrangea Hill Floral Hello Card

I needed a “happy” card and when I looked through the Hydrangea Hill paper, this sheet of small bouquets and this other sheet with a more generic pattern of little white flowers caught my eye. Even my husband commented as he walked by that those were pretty colors! And that’s how this Hydrangea Hill Floral Hello Card was born!

The card base is Seaside Spray, one of the 2019-2021 In Colors. Not a color I have used much, I don’t think, but it’s pretty with this Hydrangea Hill Designer Series Paper.

Sometimes when I am using two designer papers together, I like to adhere them to another piece of cardstock just to make it easier for me to get them glued together and then be able to tie a piece of ribbon across the seam where the two papers meet. In this case, I adhered them to a piece of Basic White Cardstock with a 1/16″ margin on all sides rather than 1/8″. Then I added a piece of Seaside Spray 1/4″ Metallic Ribbon across the seam. I tied a separate bow and adhered it with Mini Glue Dots. You could also tie it right onto the base ribbon if you wanted or tie on a knot.

The greeting is stamped in Seaside Spray Ink on Basic White Cardstock. The greeting is from the Good Morning Magnolia Stamp Set. I didn’t want something too big to cover the flower bouquets so I chose a small greeting. It is die-cut from the Ornate Frames Dies. I cut another one in Seaside Spray for a little layer. It’s the same size so I just cut it in half horizontally and then let each half layer underneath a little bit at the top and bottom.

Here’s another card I made with the Hydrangea Hill DSP in much the same design. Put this paper on your Stampin’ Up! order along with some other things total $50 or more and take advantage of Sale-A-Bration before it ends Feb. 28!

This Hydrangea Hill Floral Hello Card is an easy one to make to showcase the pretty Hydrangea Hill Designer Series Paper!

SHOP STAMPIN’ UP! ONLINE HERE!

Easy Sale-A-Bration Paper Blooms Gift Bag

Easy Sale-A-Bration Paper Blooms Gift Bag

I like to recommend that stampers and papercrafters make some gift bags to have on hand like this Easy Sale-A-Bration Paper Blooms Gift Bag. It just might save you a last minute trip to the store when you want a cute gift wrap for a small gift or treat! It probably only takes about 5 minutes to make an easy gift bag and you can personalize it for the recipient or for the occasion.

When I looked through the Paper Blooms Designer Series Paper in the Sale-A-Bration Brochure, I assumed it would be all florals with some plain designs on the back. But this sheet of paper really caught my eye with these big circles of various colors all over the sheet! It looked so fun and I thought making a gift bag would be a good way to use it.

To make this gift bag, start with half a sheet of designer paper, 12″ x 6″. Using your Paper Trimmer or Simply Scored scoring board, score the paper going across at 3 1/2″, 5 1/2″, 9″ and 11″. Then turn the paper and score at 1 1/4″ and 5 1/2″. Pay attention to the design on your paper so it doesn’t come out upside down. If you are planning to turn that narrow scored area at 5 1/2″ (which leaves 1/2″ to turn down for the top edge and reveal the paper design on the inside), make sure that pattern is also going to work and go in the proper direction.

After scoring, cut on the score lines at the bottom up to the score lines going across. Cut off the smallest little area on the bottom of the bag flaps. You’ll see which part it is. That will leave a 1/2″ edge to adhere to the other side of the bag. Assemble the bag. I used Multipurpose Liquid Glue for that “wiggle room” it gives you but the Stampin’ Seal+ would also be good.

If you like, punch holes in the top edge and tie some ribbon through for little handles. I used the Seaside Spray 1/4″ Metallic Ribbon.

Here’s another gift bag I made a couple of years ago, decorated a little differently to give you another idea.

To decorate the bag a little bit, although it was cute as it was, I cut out some flowers from another sheet of the Paper Blooms Paper. These were easy flowers to cut out and I only needed these two!

If you like this paper, you can get it free with a $50 Stampin’ Up! purchase if you choose it for your Sale-A-Bration FREE product. Be sure to shop by Sunday, February 28th!

This is a quick and easy project to make with this paper. Follow these directions for this Easy Sale-A-Bration Paper Blooms Gift Bag and then you can make even more gift bags with other paper in your stash!

Oh So Ombre Strawberry Z-Fold Card

Oh So Ombre Strawberry Z-Fold Card

One week from today Sale-A-Bration 2021 will be over! Can you believe it! Your last day to earn any FREE Sale-A-Bration products is Sunday, February 28. Every year, while we really have fun with the Holiday Catalog, once the holidays are over, we look forward to the Spring Mini Catalog and Sale-A-Bration, Stampin’ Up!’s biggest promotion! It has been held every year since the early days of Stampin’ Up! The January-June Mini Catalog continues on, but Sale-A-Bration comes to an end on Sunday! Be sure to place your Stampin’ Up! orders as soon as possible to avoid the last minute rush and get your free stuff!

This card showcases one of the Sale-A-Bration options. It’s a Z-fold card in Granny Apple Green, which means half of the front of the card is just folded back to form a z-shape. I used the Oh So Ombre 6″ x 6″ Designer Series Paper on the card, free with a $50 Stampin’ Up! purchase. On the front panel, I used the design with the circles, and for the inside of the card, I used another sheet that just has solid ombre colors with no pattern. This way I can stamp a greeting or write a note inside on the plainer ombre paper.

Now if you spend $100, you can choose the Berry Blessings Bundle in the Sale-A-Bration Brochure for strawberry and berry patterned paper plus a berry stamp set. This Sweet Strawberry Stamp Set used on this card is in the January-June Mini Catalog but it coordinates with the set in the Sale-A-Bration Brochure. You can also purchase the Sweet Strawberry Bundle which includes the Sweet Strawberry Stamp Set and the Strawberry Punch, which is really fun! (As I write this, the Strawberry Punch is not available until the week of March 1, therefore the Bundle can’t be ordered until then!)

It was fun decorating the front of the card! The rectangle is die-cut from the Stitched So Sweetly Dies in Basic White. I stamped the image in the Sweet Strawberry Stamp Set of the strawberry plant leaves and blooms as the background on this die-cut piece. It is inked up in Granny Apple Green and stamped off, although it wasn’t all that faint. Then I stamped and punched a strawberry, some leaves and some Daffodil Delight blossoms and placed them over this image of the strawberry plant. Some are glued down flat and some are popped up on Stampin’ Dimensionals. The greeting is also from the same stamp set.

The leaf at the top over the greeting might not have been there except that I dropped one of the flower stamps with yellow ink on it right at the top of the die-cut piece. I knew I would figure out a way to cover it up and I liked adding the stamped and punched strawberry leaf up there! As we say, “There are no mistakes in stamping!”

This Oh So Ombre Strawberry Z-Fold Card turned out well, I think, in spite of no real plan when I sat down to stamp and has a bright, happy look to it because of the colors!

Don’t Miss Out on Stampin’ Up! Sale-A-Bration!

Berry Delightful Strawberry Card

Berry Delightful Strawberry Card

When I saw this particular strawberry paper in the package, I just fell in love and had to make this Berry Delightful Strawberry Card. It just seems to have a lovely watercolored look to it.

This is the last week to earn free products during Sale-A-Bration at Stampin’ Up! Monday, Feb. 28th is the LAST DAY! With every $50 purchase, you can earn a free product in the Sale-A-Bration Brochure. With a $100 you may choose two of the $50 choices or you may choose one of two $100 level choices, with this Berry Blessings Bundle being one of them! Earn the Berry Blessings Stamp Set and the Berry Delightful Designer Series Paper together in one Bundle!

This card is made with a Poppy Parade Cardstock base, with just a layer of the Berry Delightful Designer Series Paper. If you want something to brighten up these winter days, this paper is it! I also love the other side of this paper, as seen in this card I made for Valentine’s Day.

I used the Just Jade Gingham ribbon in the Flowers For Every Season Ribbon Combo Pack around the designer paper before adhering to the card base. The greeting is stamped in Poppy Parade ink from the Berry Blessings Stamp Set and die cut with a scalloped rectangle in the Stitched So Sweetly Dies. I popped it up with Stampin’ Dimensionals.

Since the strawberries on this paper are so pretty I cut one out with Paper Snips and popped it up on the corner of the greeting. Then I tied a little knot with the gingham ribbon. Very easy card and the paper makes it!

Sale-A-Bration is quickly coming to an end so check your Stampin’ Up! shopping list and see what else you need! Don’t forget to stock up on cardstock, adhesives, ribbons, whatever you need to help earn your free products!

SHOP STAMPIN’ UP! ONLINE HERE!

Fine Art Floral Thank You Card

Fine Art Floral Thank You Card

It was another cold day in Houston yesterday (although 40 degrees!) and a hard freeze during the night. At least our power has stayed on except for one evening. But instead of winter, I felt the need for a colorful, bright, springtime card! We will soon be back to warmer temperatures here.

This was actually an easy card to make even though with the die-cut greeting you might think it was harder than it is! The greeting is part of the Floral Gallery Dies. It is all one die but cuts out all the words separately. It would be handy to remember to use the Adhesive Sheets on the piece of cardstock so that when the words were die-cut, they would already have adhesive on the back. I never remember to do that, so I just put teeny tiny drops of the Multipurpose Liquid Glue on the back of the words. The good part of using this liquid glue is there is a little wiggle room to get the piece placed exactly where you want it. Be sure to save the little piece that is the dot above the letter “j” when you die cut. If you lose it, as I did, just put a tiny scrap under that part of the letter and die cut it again or just punch a dot.

The card base is Bumblebee Cardstock with a layer of the dark blue pattern in the Fine Art Floral Designer Series Paper. The die-cut words are Terracotta Tile in the previous In Color collection.

Here is another way to use just one of the die-cut words on a card along with a stamped greeting on this Fine Art Floral Thinking of You Card I made previously.

To finish the greeting, I stamped the words “thank you” in Night of Navy Ink from the Art Gallery Stamp Set on a scrap of Bumblebee Cardstock and cut out with a die in the same Floral Gallery Dies. Then I layered it on a strip of Terracotta Tile Cardstock and just flagged the ends. For a little pizzazz, I added two of the smallest Gold Glitter Enamel Dots.

Get the Art Gallery Stamp Set and Floral Gallery Dies together in the Art Gallery Bundle and save 10%!

All in all a very easy card to make and yet looks impressive! Just think of putting adhesive sheets on the FRONT of the words and then using the Gilded Leafing on the die-cut words! That would be impressive! I may try that! You can’t go wrong using this Fine Art Floral Paper on quick and easy cards like this Fine Art Floral Thank You Card.

SHOP STAMPIN’ UP! ONLINE HERE!

Winter Weather in Texas

If you have been keeping up with the news about Texas this week and the terrible winter weather we are having here, we have been in pretty good shape at our house. Other houses in our neighborhood have not been as lucky. Our power stayed on until last night just as we finished dinner but came back on in four hours!! Thank goodness! The temperature was also just above freezing so not as miserable as it has been for many people.

When I was wishing I could have some hot water for tea or hot chocolate, I wondered if I still had a fondue pot that was a wedding gift many years ago and I found it! We even had sterno so I was able to heat up a small amount of water in the fondue pot very quickly (to my husband’s surprise!). Just as I got half a cup of hot chocolate made, the power came back on.

Yesterday morning we had “precipitation” but lucky for us, our temperatures were above freezing so we just got rain. Areas north of us weren’t as lucky I’m sure. We did have sleet for a moment that we noticed. While thinking about the rain coming down and wondering if we could put out containers to capture the water, my husband said there was a lot of water running down the valleys on the roof. So I emptied some plastic storage containers and found others plus buckets and we placed those around the front side and back of the house. Then my husband would go out and check them, dump the water in the containers into a bucket and bring it to the door for me. I would then dump the water into our bathtub which was just partially filled with water and we filled that up for water for flushing the toilet! When you don’t have water or water pressure, you need to pour water into the toilet and it takes a lot! A couple of gallons! So you would use up bottled water pretty fast. So that was a great idea and we got a lot of water we wouldn’t have otherwise. And who knows how much we will need.

While we are used to prepping for hurricane season, I think this winter weather has made a lot of us think about preparing for a different kind of season. It may not happen like this again in years and years. Just like before a hurricane, I made sure all the dishes were washed in the dishwasher, that all the clothes were laundered, I knew we had a lot of bottled water, we had just gotten groceries. For hurricanes, we always make sure the gas tanks are full in the car because if the power is out, you can’t pump gas at the gas station and they aren’t opened. This storm, people were sitting out in their running cars to warm themselves up if they didn’t have power. People were standing in long lines yesterday to get their propane tanks replaced or refilled because that’s the only way you could cook. In hurricane season you can evacuate or you can likely leave or get a hotel room if your power goes out, but here, at least the first couple of days/nights the streets were too icy to be driving. People stood in line at the grocery stores when they opened to get food and especially bottled water. So overall we just didn’t imagine we would need the preparation we all know about for hurricanes.

The temperature is a couple of degrees above freezing today and next week it should be 70! How can that be?! Eventually, this will be in the past, although lots of people all over Texas are going to be needing plumbers and all kinds of help. And while we are concentrating on Texas, I know there is bad weather all over the country. I think 2020 just doesn’t want to let go! Another really cold hard freeze is predicted tonight and then things should improve. Stay warm, wherever you are!

Welcome Spring Bunny Card

Welcome Spring Bunny Card

With all the snow, ice, and cold weather, not just in Texas but all over the country, I thought it was time to think about spring! Tulips, bunnies, and a basket of eggs – that says spring quite well, I think!

I pulled out the Springtime Joy Stamp Set which is in the Spring Mini Catalog. It’s not part of a Bundle or anything, just a simple stamp set, so don’t miss it! It’s perfect for spring and Easter and other occasions.

I often like to stamp randomly on the cardstock to make a background myself rather than use designer paper so I stamped all over the background with the tulip stamp in Memento Ink and then colored in the tulips with Stampin’ Blends. I used Flirty Flamingo and Granny Apple Green for the tulips with a bit of Daffodil Delight on the green leaves.

The card base is Granny Apple Green with a Flirty Flamingo layer. The way I made this big color decision was when I pulled out the cardstock, these two colors were right next to each other! I thought it looked springy and bright so used them!

The bunny and the basket were stamped on a piece of Basic White Cardstock. I played around with various dies until I found something that fit around the bunny and could have a layer behind it. I chose these rectangles in the Stitched So Sweetly Dies to cut out the bunny and then to make a Granny Apple Green layer. I cut the basket of eggs out separately with my Paper Snips and popped it up like the bunny is holding the basket. The eggs were colored with Pool Party, Balmy Blue, and a bit of light pink.

The greeting is stamped with the spring sentiment in the Springtime Joy Stamp Set and then layered on a die-cut piece of Granny Apple Green. Here is another way I used the bunny in this stamp set by placing it on a gift bag.

If you purchase this stamp set early, you will have time to use it for spring and Easter, but the darling bunny and lamb could be used for baby cards and projects, also.

Although I found the winter weather we finally had in Houston after several years to be a little exciting and I’m always happy to see snow as long as my family and I are at home, I think we are all reaching our limit with this winter storm with power outages and such low water pressure you barely have water! Usually winter in Houston lasts one day but this one is something else! Time to think about spring! If you are snowed in, maybe it is time to make something for spring similar to this Welcome Spring Bunny Card.

SHOP STAMPIN’ UP! ONLINE HERE!

Houston Winter Storm 2021

Houston Winter Storm Feb 14-15 2021

This may not look like much to those of you farther north, but this is pretty rare for Houston, Texas, especially these really cold temperatures in this Houston Winter Storm 2021. We were warned for a couple of days that this was coming and to get prepared. I just kind of went by my hurricane preparations! Luckily we had just gotten a regular grocery order so we have plenty of food. Filled some pitchers and other containers with water, even though we have plenty of bottled water, just in case. Batteries, phones charged, tablets charged, etc. So far our power is still on, but lots of people do not have it which would be miserable.

The sleet didn’t start at my house until after dinner, in the dark, so we didn’t get to “see” it, but we could hear it. I was constantly running to the front or back door to see if it was snowing yet! Later on during the night it actually snowed but it was mostly over by the time I got up this morning. I did catch the last little band of snowflakes, so I can say that I DID SEE it snow! Too bad it all didn’t come in the daylight!

It’s bitter cold for here, 18 degrees! I know it is colder other places but this is really low for Houston. And it will get colder tonight into tomorrow, so even though we have some sunshine today, they say we won’t have melting. Surprisingly, there are barely any cars on the highways, but luckily it is a holiday so I’m sure that is keeping more people home.

Houston Winter Storm 2021 BBQ grill
Houston Winter Storm 2021 across the street

If there wasn’t ice underneath that snow, I would be out there playing in it! I may be old enough for Covid vaccines, but I’m still a child at heart!! But don’t want broken bones either, so I’ll just look from my door!! I can’t even go across the street to take a photo of our house!

And of course, if it is snowing, it really calls for baking chocolate chip cookies!!

It’s supposed to stay below freezing and get colder tonight. We’ve got a bit of sun but I guess it’s not going to do much! Good day for staying in and stamping!

I’m sure yesterday being Valentine’s Day had something to do with this winter storm! How many floods and hurricanes have we had on holidays the last few years?? And I guess with today being President’s Day, that just made it doubly worse!

If you are having winter weather (and most everyone is!), stay inside if you can, stay warm, stay healthy, and be careful!

Mini Curvy Keepsakes Box For Valentine’s Day

Mini Curvy Keepsakes Candy Box For Valentine's Day

Don’t forget about the cute little boxes you can make easily for some Valentine candy, even at the last minute! Any cardstock or designer paper you have will work, but for Valentine’s Day you might want to use some fancy designer paper!

This cute little box is made with the Mini Curvy Keepsakes Box Dies. You just need a piece of 6″ x 6″ paper for the box. Then you can also die-cut a little heart in the same set to tie onto the box. Just cut the paper, fold on the score lines, then assemble. Push down on the two handle pieces and fold over the two slit pieces to hold the box together. Be sure to put your treat in first!

I used the pretty Love You Always Specialty Designer Series Paper with the foil accents. The die-cut heart is Rococo Rose Cardstock. I tied it on with the Whisper White 5/8″ Polka Dot Tulle Ribbon. That’s all there is to it! You could use this little box for Valentine candy or maybe a little table decoration or party favor. You can get very creative with this Mini Curvy Keepsakes Box and make all kinds of creations.

This little Mini Curvy Keepsakes Box For Valentine’s Day matches the card I made with the Love You Always Specialty Paper here in this post! Make a matching set!

Valentine's Day Collage

Love You Always Fancy Heart Card

Love You Always Fancy Heart Card

This Love You Always Fancy Heart Card can certainly be for Valentine’s Day tomorrow or it can be for other occasions! I left off a greeting just to show that you can use this card design in multiple ways.

The card base is Blushing Bride because it coordinates with the beautiful designer paper I used on the card. The Love You Always Specialty Designer Series Paper is so pretty on this card. It’s always a little hard to photograph paper that has foil accents as this one does. You always get a little glare! But I think you can see the shine a little bit of the foil.

Can you tell that I used three strips of paper on this card front? I cut two strips from the light Blushing Bride pink paper and then a strip of the Rococo Rose darker pink paper. You can cut the sizes however you like. I have a very narrow margin around the edge of the card. You can cut the strips larger than you want them and then trim down to see what will fit on the card base. These strips were glued right down onto the card base.

The die-cut scalloped heart I just love and is in the Many Hearts Dies. I cut it out of Rococo Rose Cardstock. In the center is a plain die-cut Basic White heart overlaid with the floral heart die in the same set cut out of Blushing Bride. The Basic White behind the floral heart makes it show up against the Rococo Rose heart. I like the way it turned out.

For an embellishment, I tied a bow with the very pretty Blushing Bride 3/8″ Metallic Ribbon and adhered it to the top of the heart with a few Mini Glue Dots. The ribbon has one satin side and one metallic side so you get a little bit of both when you tie a bow!

You can add a greeting to this card, but I thought it looked pretty enough without one. It would make a special Valentine, or a gorgeous engagement, wedding or anniversary card. I always say hearts are for any time so you can get a lot of use out of heart stamps or dies!

If you don’t have contrasting designer paper to use on a card design like this, you can stamp different designs on strips of paper and use it the same way! Maybe this Love You Always Fancy Heart Card will give you an idea of a card to make for Valentine’s Day or some other occasion.

SHOP STAMPIN’ UP! ONLINE!

Die-cut Hearts For a Valentine

Die-cut Hearts For a Valentine

It’s time for making, sending, giving Valentines like this Die-cut Hearts For a Valentine card. I am so happy about this background designer paper on this card! This year we do not have a whole package of “Valentine” paper to use so I looked to see what I could maybe use. You can use this card for other times, not just Valentine’s Day.

Other years at Stampin’ Up! we have maybe had “Valentine” paper that had assorted hearts or a lot of red and white patterns. It wouldn’t HAVE to be for Valentine’s Day but it suggested it. So I looked through my packages of current designer paper and I found this red and white plaid paper in the Sale-A-Bration Berry Delightful Designer Series Paper in the Berry Blessings Bundle! It’s on the opposite side of a beautiful, soft-colored strawberry images. I wouldn’t have even thought to tell you this was a pattern in this package of designer paper, but when I found it, was thrilled to use it on my valentine card! It’s just a different look!

The coordinating color is Poppy Parade so I used that cardstock as a card base with this plaid paper as a layer. I stamped the center heart with Poppy Parade Ink from the Lots of Heart Stamp Set in the Spring Mini. It is just stamped on Basic White and then die cut with one of the Many Hearts Dies. If you want both the stamp set and dies, then get the Lots of Heart Bundle and save 10%! I also die-cut the “fancy” heart from the Many Hearts Dies and layered them. Then the hearts are popped up on Stampin’ Dimensionals.

The greeting, in the same stamp set, is stamped in Poppy Parade Ink and punched with the Lovely Labels Pick A Punch. I just adhered it flat on the card so I could add an embellishment that would not stick up too high for mailing. I wanted to use the Resin Hearts Embellishments, but the colors were white (which wouldn’t show up very well) or red (which might be okay but the rest of the card is Poppy Parade). I decided to try coloring the white hearts Poppy Parade with the Poppy Parade Dark Stampin’ Blends. It worked! I went over it a couple of times and around the sides a little bit. So the next time you want something to be a different color, try coloring with Stampin’ Blends!

Overall, this was an easy card to make for Valentine’s Day because it has hearts or any time because the greeting isn’t just for Valentine’s Day! Hearts can be for any time, also! And I do love the little Resin Hearts!

Shop Stampin’ Up! Online During Sale-A-Bration!

Valentine’s Day Chocolate Candy Holders

Valentine's Day Chocolate Candy Holders

These Valentine’s Day Chocolate Candy Holders have been around a long time and I probably make them every year! I’ll link to some other ones I have made a little later. Once you have the pattern and the idea, you can run wild with decorating them for any occasion! Maybe party favors, or a little favor at a dinner party (when we can have dinner parties again!), or a stocking stuffer at Christmas, or a treat in an Easter basket! Whatever you want to make!

These Valentine’s Day Chocolate Candy Holders are just a strip of cardstock wide enough to hold your candy, with a slit inside to hold the candy if that works or space to place the candy and maybe secure with a tiny bit of adhesive. The cardstock is scored so that it will fold but have space for the chocolate. Put some adhesive on the inside of the bottom of the strip with the punched slit, and adhere. Then decorate the front and tie a ribbon around to secure.

Here are the particulars, if you are interested, for these projects.

Start with a strip of cardstock cut at 9 5/8″ x 2 3/4″. Score at 2 3/4″ and 3″; 6 1/4″ and 6 1/2″. With these measurements, you could get three strips out of one sheet of cardstock. Fold and crease on the scored lines. Open the strip back up and you will see above and below the score lines, one section is shorter than the other. You want the longer section to be the one that folds up to the inside.

Once you have identified the longer section, use the Classic Label Punch on that flap, inserting as far as you can, centered, to punch the opening for the chocolate. Put a piece of Tear & Tape at the bottom of the strip so you can fold up that flap and adhere to the inside, not quite up to the score line. You will want to stand the candy holder on the table making sure the bottom is flat as you adhere that flap.

Valentine's Day Chocolate Candy Holder Inside

The pink holder on the left is made with Blushing Bride Cardstock with a piece of the Love You Always Specialty Paper (2 1/2″ x 2 1/2″) adhered to the front of the candy holder. Then I simply layered two die-cut hearts popped up on Stampin’ Dimensionals so I could tie a ribbon (the Blushing Bride 3/8″ Metallic Ribbon) around to hold it closed. There are some other patterns more like a matchbook where you just slide the top into the little fold-up pocket at the bottom. But even then, you might like a ribbon to hold it all together.

The red candy holder on the right is made the same way. It has a piece of Basic White Cardstock on top, decorated with a stamped and die-cut heart from the Lots of Heart Stamp Set and Many Hearts Dies. (Get both in the Lots of Heart Bundle and save 10%!). The greeting is also in that stamp set and is punched out with the Classic Label Punch that you used on the inside for the slit to hold the candy. The heart is popped up on Dimensionals, again, to allow room for the ribbon to wrap around the candy holder.

If you would like more ideas, here are a couple of candy holders I made last year. These are so much fun to make, I know you will enjoy this project! They are perfect, of course, for Valentine’s Day, with a nice piece of chocolate on the inside! Try your hand at my Valentine’s Day Chocolate Candy Holders because they are quick and easy to make when the holiday is getting close!

Playful Alphabet Valentine

Playful Alphabet Valentine

Express your love with some “X’s” and “O’s” plus hearts on a card like this Playful Alphabet Valentine. It requires some die-cutting and a little stamping, but it’s a fun card to make and I’m sure to receive!

The card base is Real Red with a layer of Basic White Cardstock. I cut it a little smaller than normal (5″ x 3 3/4″) to allow more of the Real Red card base to show. I also cut a strip of Basic White (5″ x 1″) layered on a wider strip of Real Red (5″ x 1 1/4″) for the center (or so) of the card on which to layer the X’s and O’s.

I used the Playful Alphabet Dies to cut out the X’s and O’s and adhered them to the Basic White Strip with tiny dots of Multipurpose Liquid Glue. For an extra embellishment, I die-cut two strips of hearts in the Many Hearts Dies.

The little red hearts at the top and bottom of the card are from the Lots of Heart Stamp Set. Normally I might stamp the little hearts randomly on the area where I want them to show, but with the strips of die-cut hearts having open hearts, I didn’t want stamping interfering behind them. I probably should have positioned the center portion of the card better so the hearts at the bottom weren’t so crowded. But I doubt the recipient will be as critical as we are of our own work! We should remember that as we are making and stamping our cards!

That’s all there is to this card. On the inside, you might add a Basic White layer either stamped with a few hearts in the corner or along the top or bottom, or maybe add another X and O for fun! You could just stamp a greeting on the Real Red in black ink, too.

On the front of the card, if you wanted to embellish more, you could add the little Resin Hearts or rhinestones at the beginning and ending of the X’s and O’s. I might have done that, but I also thought maybe the card was busy enough and didn’t need anything extra.

Valentine’s Day is coming soon so take some time to make some valentines for your family or maybe some to mail! Receiving your card might be the only Valentine celebration they have this year! Use this Playful Alphabet Valentine to give you some ideas for making your own valentines today!