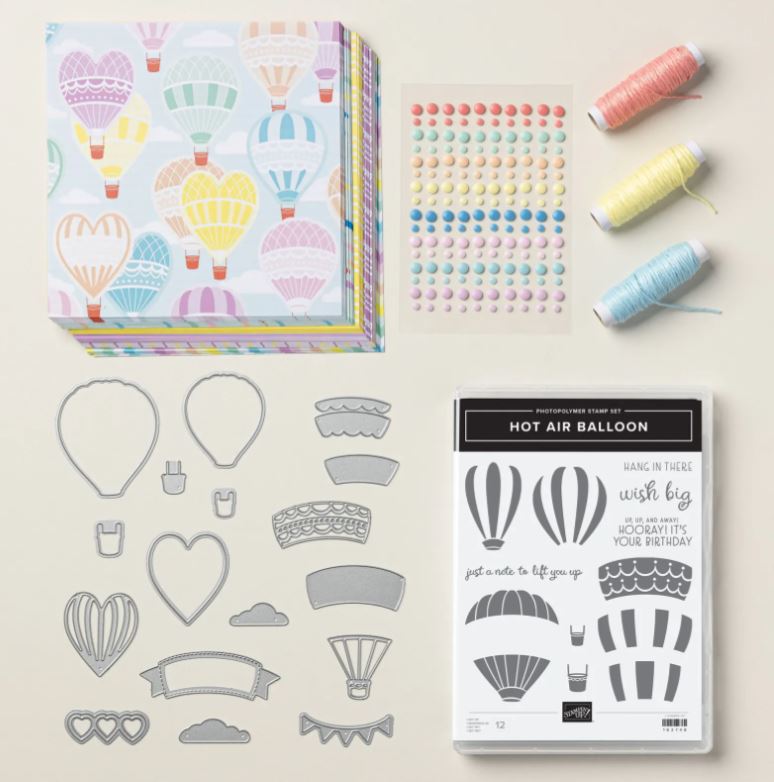
One of the popular Suites in the new Stampin’ Up! Spring Mini Catalog is this Lighter Than Air Suite! You will find this Suite on pages 32-34. If you like hot air balloons, you will love this Suite! I might like looking at hot air balloons, but I don’t think I want to ride in one so high up! I remember when we were first married, there was some event with several hot air balloons on the ground in a field and we could walk up and see them up close. There was one that you could get into the basket and just be lifted up a little bit, still anchored to the ground. Just a tiny little ride not far off the ground! I wish we would have tried that! It was a pretty safe way to test out a hot air balloon ride, just a little bit! One time, years ago, a hot air balloon landed in my parents’ neighborhood, right out on the street! Fortunately, it was a neighborhood street, not a heavily trafficked one, but I guess that is where the balloon needed to land. They certainly are pretty floating across the sky!
I love the soft colors in this Suite, especially in the Lighter Than Air 6″ x 6″ Designer Series Paper. This paper is pretty to use for many cards for many occasions or projects. There’s only one pattern with hot air balloons on it but the other patterns are very generic. There are stripes, dots, and many other patterns you can use for general cards, baby cards, birthday cards, and more!
I suggest getting this designer paper, Rainbow Dots, and Baker’s Twine if nothing else! Here is a card I made recently using the Lighter Than Air 6″ x 6″ Designer Series Paper and the Rainbow Dots. The pastel colors are so pretty, you can’t go wrong! Of course, there is a stamp set and dies to really indulge your love of hot air balloons. You can see lots of design ideas on pages 32 and 34.
Enjoy this Stampin’ Up! video telling you all about the Suite!
Remember, with every $50 you spend at Stampin’ Up! you will earn a FREE product during Sale-A-Bration through the end of February. There are no limits to how many products you can earn!
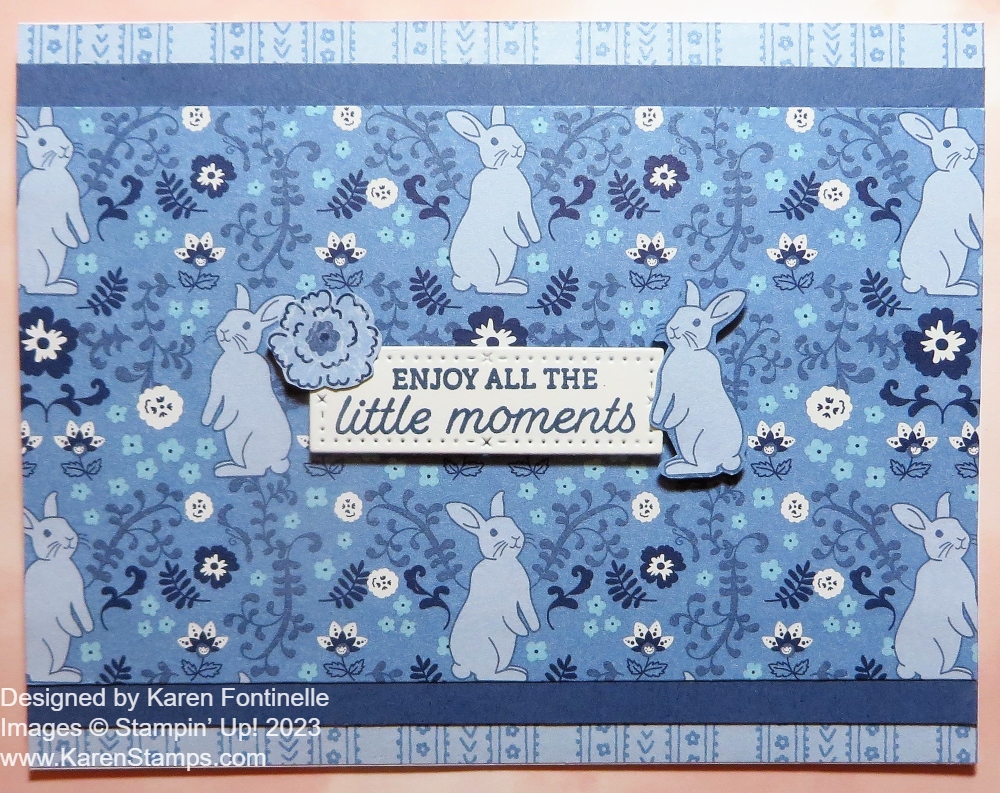
When I first saw this particular paper in the Countryside Inn Designer Series Paper with the little bunnies, I immediately thought it would make a cute baby card! I’m not saying this card, the Countryside Inn Little Bunny Card, is necessarily a baby card, but I think it could be. I think the greeting “could” be for a baby card because when do you “Enjoy All the Little Moments” more than when you have a baby and watch that baby grow up?
I don’t usually do it this way, but for this card, I used Basic White cardstock for the card base, but instead of leaving a margin showing, I completely covered the front of the card with designer paper. I began with the paper that had the little bunnies on it. I ended up cutting the bunny DSP at 5 1/2″ x 3 1/4″ because I wanted to save as many bunnies as I could. I wanted the bunnies to be the focal point of the card so I wanted as much of the full bunnies to show. At first, I cut the paper at 3 1/2″ wide, but obviously, that didn’t leave much room on the top and bottom of the card. So I trimmed off the tiniest bit off the top and bottom so the tiniest bit of the bunnies’ feet were cut off on the bottom and the tiniest bit of one ear on the top. If you want to do it differently, you can vary your measurements.
Next, I chose Misty Moonlight cardstock for the narrow strip at the top and bottom of the bunny pattern. It just helps set off the bunny paper. It is one of the coordinating colors with this Countryside Inn Designer Paper. The other colors that would work are Boho Blue and Night of Navy. I didn’t care for Balmy Blue for this card, but it is listed as one of the coordinating colors. These two strips are cut at 5 1/2″ x 3/4″ and I used my Grid Paper to try to line up the paper as well as I could with 1/4″ showing at the top and bottom of the bunny paper. You could make it narrower. Honestly, I can’t stamp without my Grid Paper! Once you get used to it, you can’t do without it. There are two other choices for Grid Paper in the Online Store but I love the original with the measurements printed along the bottom and up the side. I have some other “prettier” grid paper but I write in my own measurements because that’s partly why I am using Grid Paper!!
If you flip the bunny paper over to the other side, the pattern I used at the top and bottom of the card is what is on the other side. I decided to just go with that pattern since it obviously went with the bunny paper if it was printed on the opposite side. You can cut strips of this DSP to 5 1/2″ x 1″ (or less) so that a little shows above and below the main panel.
To assemble, I first adhered the striped pattern to the top and bottom of the Basic White card base. I adhered the Misty Moonlight cardstock to the top and bottom of the bunny paper, then adhered that panel to the card base. I used the Multipurpose Liquid Glue on this card to give me that “wiggle room” to get the edges all lined up. With a card like this, sometimes one or more of the papers hang over the edge of the card base, but just use Paper Snips or a paper cutter to slice off that tiny bit along the edge.
For the greeting, I used this one in the Easter Bunny Stamp Set. This could be a baby card even without a specific baby greeting. So don’t worry if you don’t have the exactly greeting you want, there is always something else you can use if you look through your stamp sets! I stamped the greeting in Misty Moonlight ink and die-cut it with a die in the Timeless Arrangements Dies. There are other die choices you could make depending on your greeting. I wanted something small to not hide the bunnies! I also cut out an extra little bunny by hand that I popped up on some trimmed Stampin’ Dimensionals and adhered him right over one of the printed bunnies next to the greeting as well as a flower from another sheet of the paper.
It might seem like a lot of steps to this card, but it isn’t really. It took me a little while to design it and do the “math” to get everything the size I wanted, but you can just copy and not figure anything out!
If you like blue, you will really enjoy this Countryside Inn Designer Series Paper in the new Stampin’ Up! Annual Catalog! Maybe even if blue isn’t your favorite color, you will come to appreciate the different colors of blue and the cute patterns in all the papers in this pack! Go check it out in the Online Store HERE.
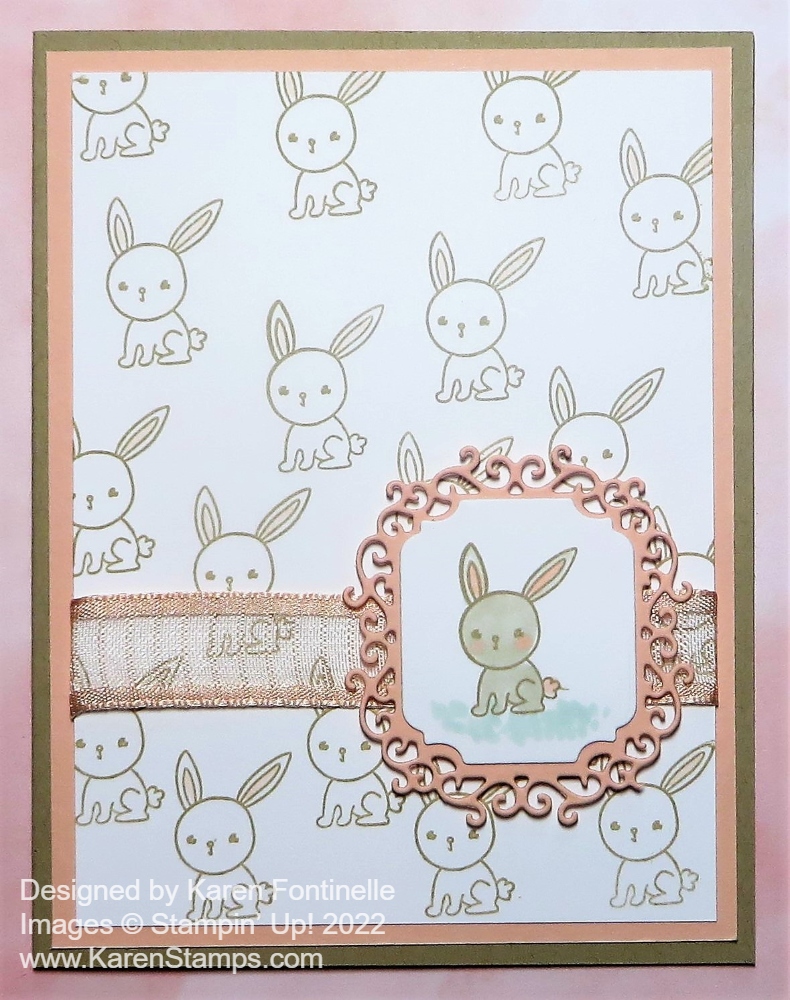
This Friends of the Forest Bunnies Easter Card is an easy one to make! But is it an Easter card?? Or is it a baby card?? Well, I made it as an Easter card but the whole time I was making it I thought this sweet bunny reminded me of baby cards! In fact, I was so taken with stamping the cute little bunny that I forgot about a greeting! But I’ll show you the inside and I think we don’t ALWAYS have to put a greeting on the outside.
This bunny is in the Friends of the Forest Stamp Set in the Spring Mini Catalog on page 19. This is not an “Easter” set but of course, the bunny is perfect for Easter. I did one of the things I like to do best … I randomly stamped the bunny on the Basic White layer to make my own designer paper! Or simply a pretty background! I used Crumb Cake ink and I went back and colored in the ears with the Light Petal Pink Stampin’ Blends Marker. I had to stop myself before I started doing even more coloring because I didn’t want all the bunnies colored.
The card base is Crumb Cake cardstock, although it looks darker in the photo. Then there is a layer of Petal Pink underneath the Basic White. You could use any pink and you could use a darker brown like Soft Suede. Or change up the color scheme altogether.
I actually copied myself making this card! I remembered a card in THIS POST that I had always liked so I updated it with this bunny!
I wanted a colored bunny to be the focal point so I stamped the bunny on Basic White and die cut with one of the dies in Ornate Frames that fits on the frilly die cut in the same set. This one is on Petal Pink cardstock and was already in my bag of cardstock so I must have diecut it before and didn’t use it! Just seeing it in with the other Petal Pink cardstock gave me the idea. It was the perfect size for the bunny!
The bunny is just colored with a Light Crumb Cake Stampin’ Blend Marker. I wanted to keep him light and didn’t do any blending with another color. I used the narrow tip of the Petal Pink marker to color the insides of the ears, the tail, and the cheeks. I could have stopped there but I added a bit of grass for him to sit in with the Light Mint Macaron marker.
To embellish the card a bit I simply wrapped around a piece of the Petal Pink 5/8″ Organdy Striped Ribbon. This has been one of my favorite ribbons so I am sad it is retiring on May 2, if not before. It is even on sale so check it out (or stock up!). The bunny piece, on the Ornate Frames diecut is popped up on Stampin’ Dimensionals®.
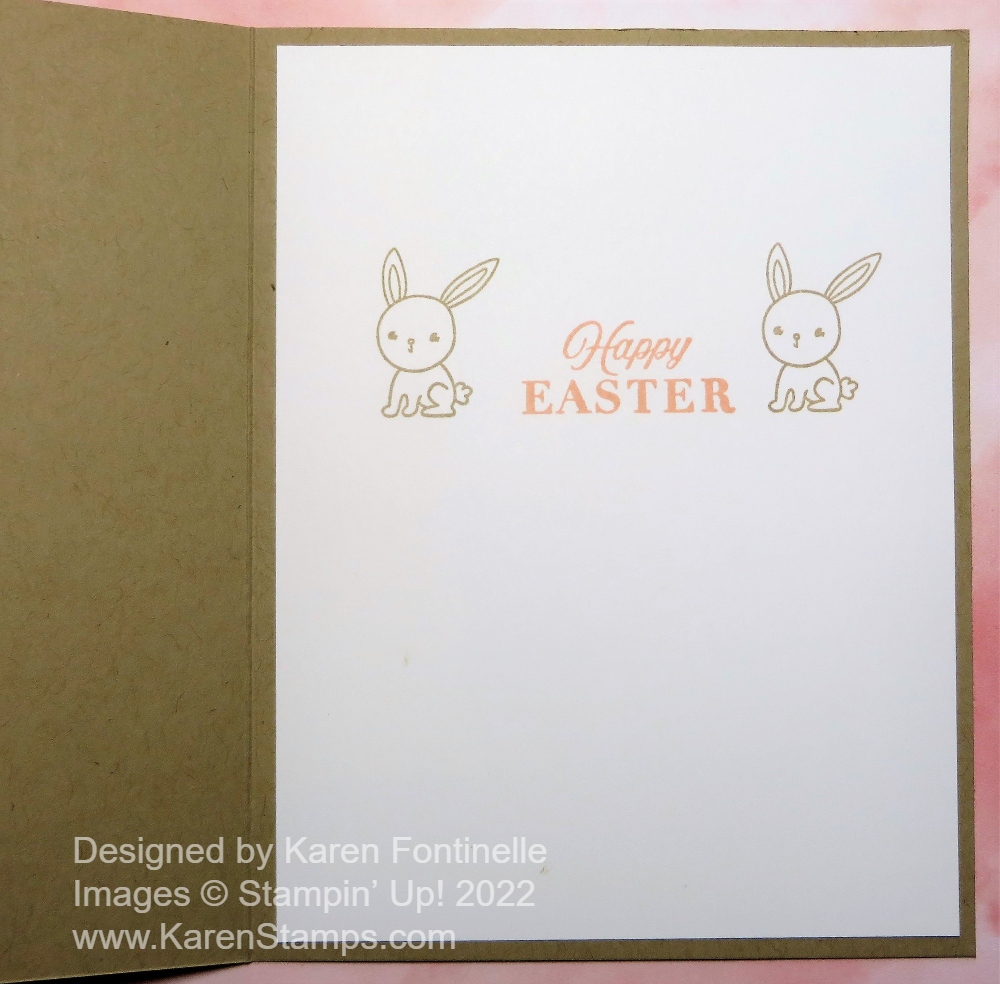
After I got this far on the card, I realized I didn’t have a greeting and no space for one. I guess I could have fit one on somehow, but sometimes I think a card is fine without a greeting on the front. Or sometimes I make a generic pretty card that I like and don’t want to put the greeting on until I need the card. That way I can add whatever the occasion calls for.
On this card, I got the idea to make the greeting inside a little fancier. I stamped the greeting from the Celebrating You Stamp Set. What a great set of greetings! It is in the Spring Mini Catalog but it is also carried over to the new Annual Catalog! Yea!! On each side of the Petal Pink greeting, I stamped the bunny in Crumb Cake ink to match the outside. I think it’s really cute! It’s common to stamp a little something inside the card or add some of the designer paper, but I like the idea of stamping something on each side of the greeting! I should color the inside of his ears with Petal Pink as I did on the front of the card.
Be sure to check out the Last-Chance products and sale on some of them in my Online Store! Get the goodies you want before they sell out!
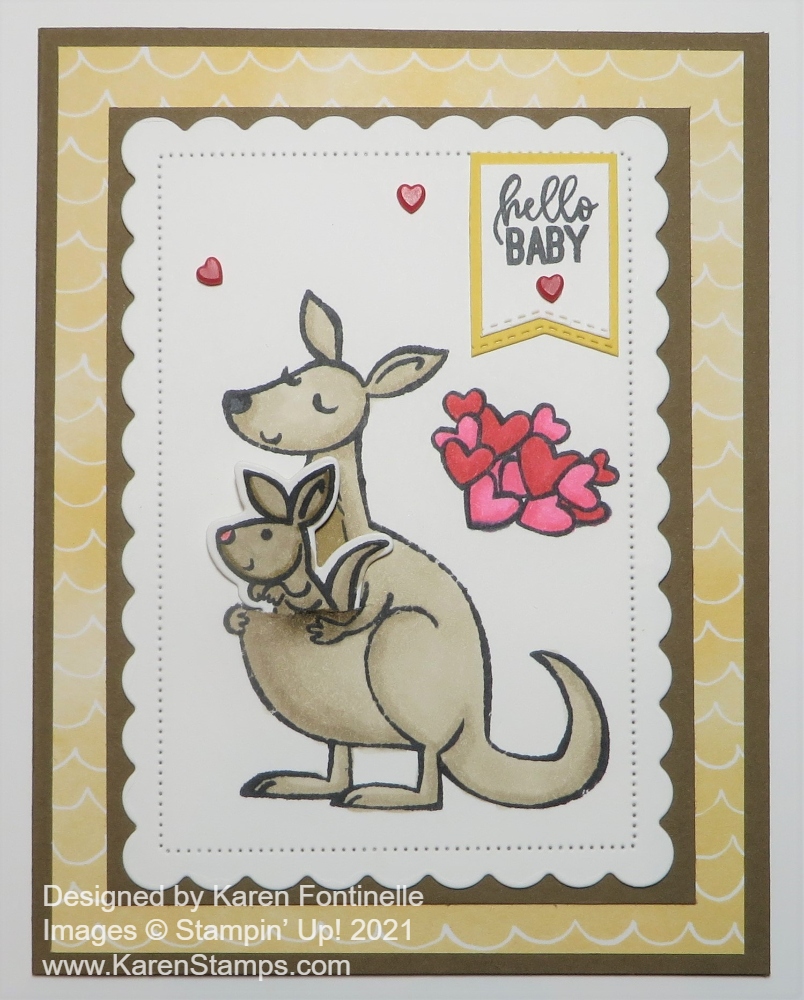
Who doesn’t love the image of a kangaroo and a baby in her pouch as on this Kangaroo & Company Baby Card? Although I’ve had this stamp set and dies for a while and thought it was such a cute set, I hadn’t been using it. If I had waited even longer, I could have gotten the dies on a steal right now on the Last Chance list for the January-June 2021 Mini Catalog! But you can still take advantage of this Bundle. Actually, it is a better deal to NOT buy the Bundle and to buy the stamp set and dies separately because the dies are 50% off, while supplies last!
This card uses the Kangaroo & Company Stamp Set (sold out now) and Kangaroo Dies. The stamp set comes with so many cute little stamps from hearts to packages to flowers, even a party hat. And many greetings to use for all kinds of occasions! So the kangaroo doesn’t have to be just for kids or babies! You can get by with just the stamp set and just do stamping or even cut things out by hand, but at the 50% off price for the dies, I think they are well worth it!
To make this card, I used a Soft Suede Cardstock card base and a layer of Daffodil Delight patterned paper in the Hand-Penned Designer Series Paper. I used one of theScalloped Contour Dies (one of the best dies sets we’ve ever had!) to cut out a Basic White scalloped panel and then stamped the kangaroo on it for the card front. I decided to add a layer of Soft Suede underneath to help it stand out from the designer paper.
A fun thing you can do with this kangaroo, is cut a slit in its pouch in which you can insert on of the stamps in the set, whether the baby kangaroo, flowers, heart, or whatever you want. You could maybe even write a message on the back so the recipient can pull it out of the pouch and read the message or insert it but adhere it with a Glue Dot or even a Stampin’ Dimensional to have it pop up a bit.
I colored the kangaroos with Stampin’ Blend, mostly in Light and Dark Crumb Cake and maybe a little Soft Suede. The group of hearts was stamped and colored in with Real Red and also Flirty Flamingo Stampin’ Blends. You can use whatever colors you like! So many choices!
The “Hello Baby” greeting is stamped and die cut with the die in the Tasteful Labels Dies. I also cut one in Daffodil Delight, then trimmed down the greeting die-cut to fit layered over the yellow die-cut. For some bling, I added some Resin Hearts Embellishments, 50% off now in the Last Chance Sale! For half-price, you can have a package of stick-on hearts to use for many occasions just as a little embellishment. The hearts come in white and red.
You could make this same card and just change the greeting and send it for occasions other than a new baby! The Kangaroo & Company Stamp Set is very versatile, cute and fun to use, so take a look at it in the Spring Mini Catalog before it retires and while they are still available, I would consider the half-price dies as well!
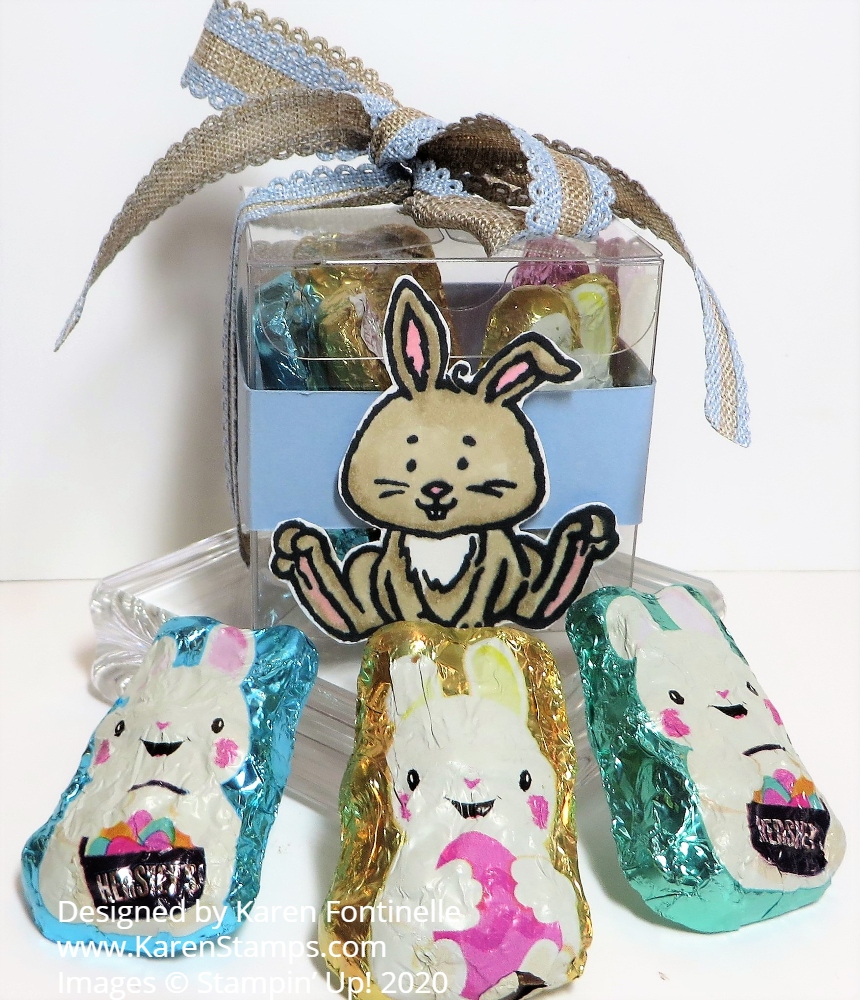
Which do you like better, the Easter Bunny Clear Tiny Treat Box or the chocolate bunnies?! Luckily, they go together so you can like both and not choose! Any time you need a quick and easy treat box, you can turn to the Clear Tiny Treat Boxes in the Stampin’ Up! Annual Catalog!
I intentionally made this Easter treat super simple. You can decorate these Clear Tiny Treat Boxes in many ways, of course. I started with the bunny in the Welcome Easter Stamp Set. It is stamped in Memento Ink and colored in with a Light Crumb Cake Stampin’ Blend marker and a bit of the Dark for shading. For the little bit of pink in his ears and bottom of his feet, I used a Light Flirty Flamingo Stampin’ Blend Marker.
Since the area on the front of the Tiny Treat Box is fairly small, I just cut out the bunny by hand. I wrapped around a 3/4″ strip of Seaside Spray Cardstock, one of the current In Colors, around the box. If you put the ends of the strip on the front of the box, the junction of those paper ends will be covered up by the image you put on the front of the box. You could also use ribbon, but since I was going to tie ribbon around the top of the box, I just used cardstock. You could also use some pretty border dies to die cut a strip going around the box. You can apply a little bit of Snail Adhesive to hold the strip in place. Then the bunny is popped up on Stampin’ Dimensionals on the center of the box front.
Be sure to fill the box first with candy treats or a small gift and then tie with a ribbon. This is decorative plus holds the lid of the box closed for sure. The ribbon I used is the Seaside Spray 1/2″ Scalloped Linen Ribbon. It is very pretty with the linen and the light blue! I just tied it around in a bow. You could also adhere just the ribbon and then tie a bow separately to adhere to the top of the box if you wanted the bow closer to perfect.
Here is a very similar design with a Clear Tiny Treat Box that I made for Halloween using a strip of designer paper around the box and a Halloween image cut out from designer paper with a ribbon tied around the box.
That’s all there is to it! You could also stamp a “Happy Easter” greeting or a “Happy Spring” greeting. Maybe it would be a party favor at a baby shower and that would be cute with the bunny! Keep a stash of these Clear Tiny Treat Boxes on hand to use for quick treats or gifts or order a quantity for a party or event. For a treat or even a little home decoration, try this Easter Bunny Clear Tiny Treat Box for this spring or Easter!
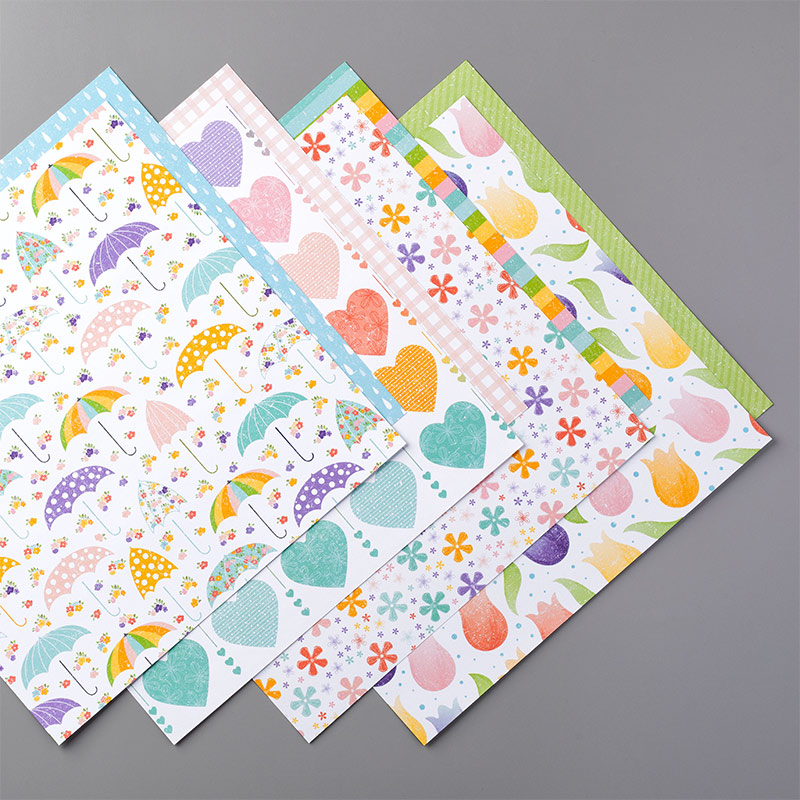
I don’t own this Under My Umbrella Bundle in the Occasions Mini Catalog, but of course, I wish I did! This Bundle will be perfect for spring (even if you have snow outside and can’t image spring!) with it’s flowers, rain boots, and umbrella images. Besides a “rain-themed” card you could make with an umbrella, as they show in the video you can turn the umbrella upside down and fill it with flowers for a happy card. Just think of how you could use it for wedding or baby showers, too!
And now, whether you have the Under My Umbrella Bundle or not, or want to order it, be sure to check out the Pleased As Punch Designer Series Paper, offered as one of the Coordination Products just released earlier this month! Looks very cute and has a long list of coordinating colors! While supplies last!
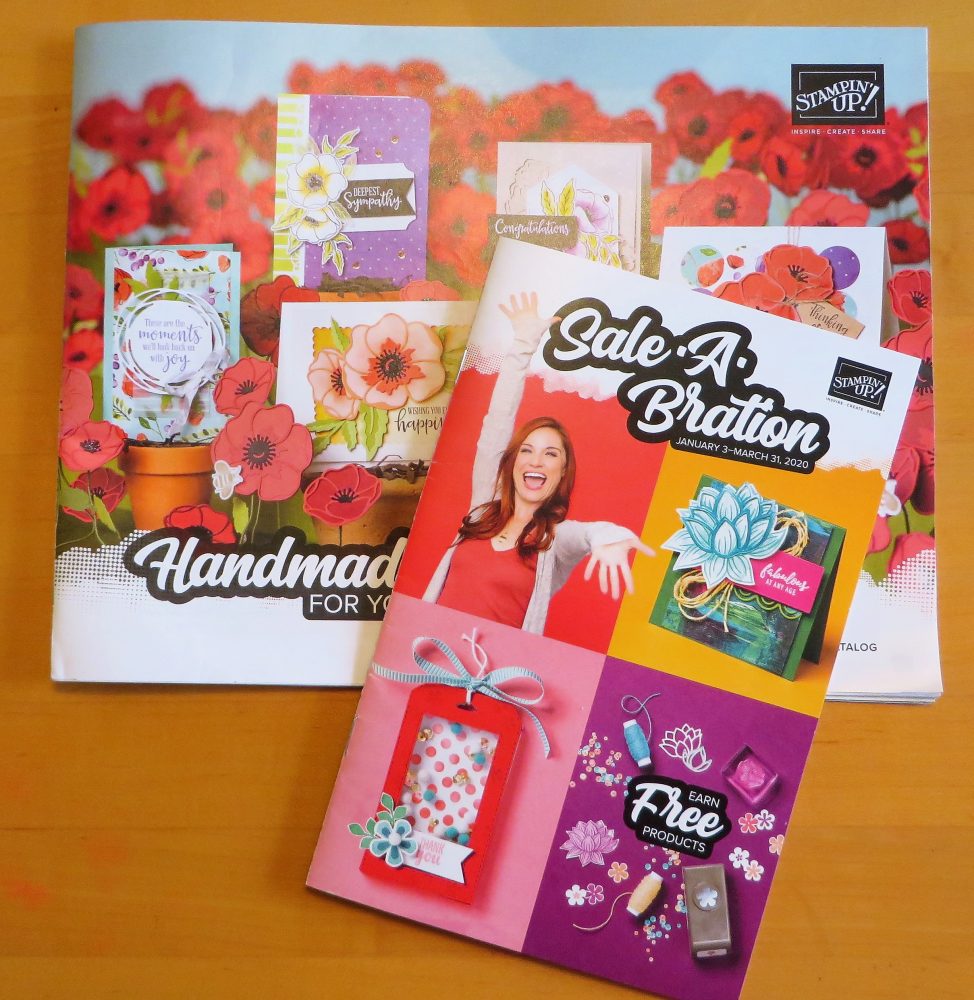
Today is the day we’ve been waiting for! Sale-A-Bration begins and with every $50 Stampin’ Up! purchase, you can choose a Sale-A-Bration product in the brochure! And to help you, the Occasions Mini Catalog is LIVE today with all new spring and summer products!
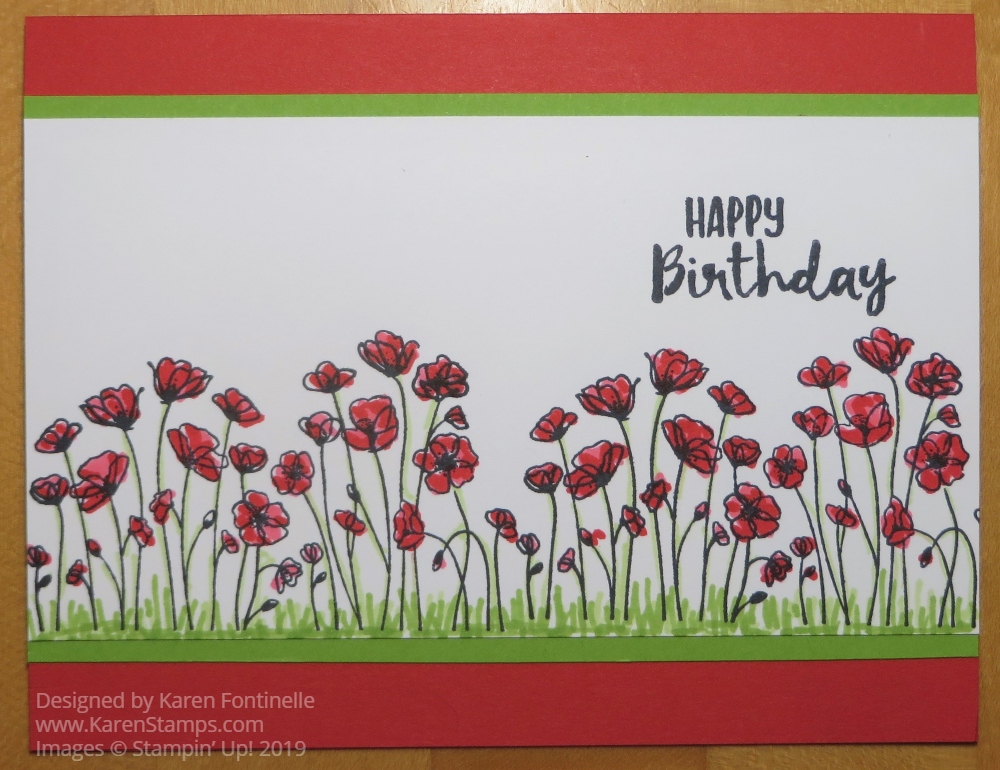
One of the products that I think will be the most popular is the Painted Poppies Stamp Set. I made this easy card with just some basic stamping and coloring by stamping the group of poppies twice and then quickly coloring in the flowers and grass with the Stampin’ Blends markers. I didn’t color “carefully”, I just dabbed some Light Poppy Parade marker on all the flowers and then went back and dabbed on a little bit of Dark Poppy Parade. I used Granny Apple Green Blends on the stems and drew in some grass.
The greeting on this card is from the Sending Thoughts Stamp Set, FREE with a $50 purchase during Sale-A-Bration! You will find it under the Sale-A-Bration category in the Online Store and in the SAB brochure. I simply stamped it in Memento Black Ink right on the card front to keep things simple! Sometimes we forget “simple”! The card base is Poppy Parade with a bit of Granny Apple Green Cardstock showing under the stamped image.
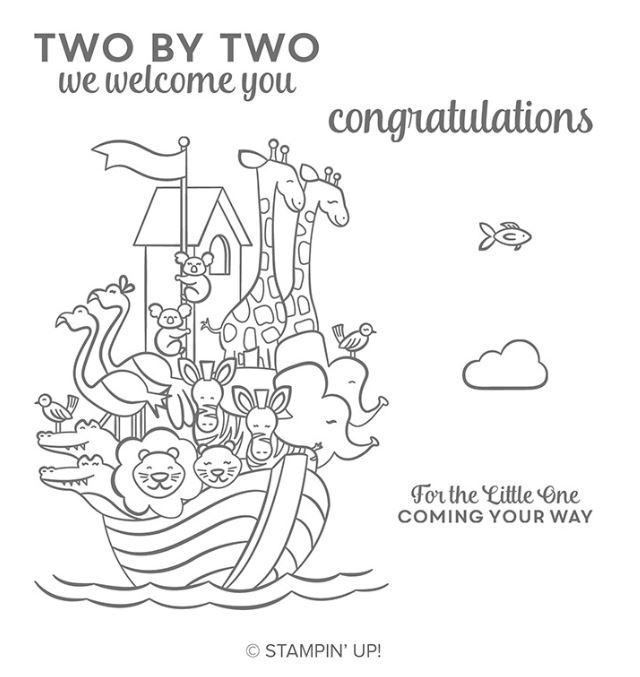
This Perfectly Paired Cling Stamp Set is the perfect Noah’s Ark Stamp For Rainy Houston. I wish I owned this stamp right now because we are having rainy weather in Houston……for days! No, it’s not a hurricane but there have been flooded roads, bayous, cars, and even houses just from heavy rainstorms. Luckily, we have been high and dry at our house!
All this rain was forecast ahead of time, but I don’t think it was forecast to be as bad as it was on Tuesday. I was expecting scattered showers and maybe a few thunderstorms so when it started on Tuesday afternoon I didn’t think much of it. I even texted my daughter and said we were getting a lot of thunder. By the time I had to pick up my husband at the bus, I was hoping I could drive two miles down the road and through the parking lot to get him. That worked fine but as we ate dinner, the sky REALLY opened up and the lightning and thunder were crazy….all night and during the night!
By then the news was showing the typical Houston flood scenes, cars stranded on highways and feeder roads, Good Samaritans pushing stalled cars out of the street (even a man in a new Mercedes!), and stories of kids stranded at school who were fed and were going to spend the night there! (What a bummer!) Way back when, two of my kids were stranded at school, I think Kindergarten and 4th grade, and were fed sandwiches and sent home on a school bus. While we waited anxiously for them to get home, they were having a great adventure on the bus watching the waves of water wash up into yards as the bus drove down the streets!
It continued to rain heavily all evening and through part of the night. We got at least 5″ in our backyard. Then the rain held off all day Wednesday until late evening when it all started up again. The people who were at the Astros baseball game got rained on inside because the heavy rain came through the cracks of the moveable roof! We got another 2 1/2″.
On Thursday morning as I was driving around my “Low Tire Pressure” light came on so I had to get the tire checked. Sure enough, there was a nail in it, so I had to get it patched. They were predicting rain by 1:00 pm so I just wanted this all to be done so I could get home before it flooded again!
Luckily I had grabbed my new Stampin’ Up! catalog that just came the day before to read in case I had to sit around and wait. Just before my car was done, two ladies sat down near me and I heard one say, “Do you do Stampin’ Up!?” When someone asks you that, you know they are familiar with Stampin’ Up! or they would have no idea! They saw my bag I had grabbed for my catalog and magazines with a Stampin’ Up! logo on it. Always fun to meet other stampers! Before we could talk long, my car was ready. That night it didn’t rain much at our house but other parts of town got the deluge!
No rain yesterday somehow, but it is forecast again for today. So far we have had the Seattle-like drizzle (can’t really see it but you can feel the fine mist on your face!) but could get storms this afternoon. Unless it goes south of us. We seem to be on the edge. But who knows. For all these years we have been lucky at our house on our street in the middle of the block, but I never rule out the possibility of something floody happening! You’d think if we made it through 35″ of rain during Hurricane Harvey we would never have to worry. But Tuesday night people’s houses in other neighborhoods flooded that had never flooded before.
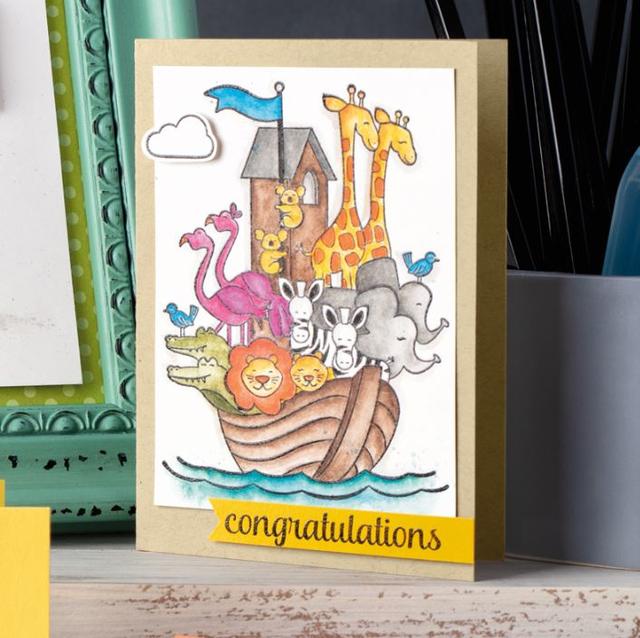
So if I had the Perfectly Paired Stamp Set, I might make a card like this one, a Stampin’ Up! sample, for days when we get too much rain. My husband even said, since we have had the Memorial Day Night Flood, the Tax Day Flood, and the 4th of July Flood, that if it continued to rain this weekend they would call it the Mother’s Day Flood! This stamp set is designed for a new baby so it would also be appropriate for Mother’s Day! It’s on the Last-Chance List so be sure to order it if you need a Flood Day stamp set!
It’s getting close to mid-May so you only have a couple more weeks of the Last-Chance List before those products retire. And don’t forget to check the Clearance Rack for some bargains as long as you are ordering!
And the Everything is Rosy Medley Collection is available only in May (and while supplies last). If you love Rose Gold, this is the collection for you. It’s the hottest trend right now! It looks pricey at first glance, but you have to consider you get the stamps, the dies, the papers, the accessories, and embellishments. AND you only have to enter one number #150059 to get it all! That’s what this collection is designed for…..the person who wants it all and can start creating with everything that coordinates!
Stamping is a good past time for rainy days and I know Houston is not the only place that has had tons of rain recently. It’s almost as good as baking cookies! So stock up now on any retiring sets and accessories you need before they are gone.
Also, keep in mind tomorrow is Mother’s Day so feel free to choose your own Mother’s Day gift at Stampin’ Up! That’s what you really want anyway, right?!
This Animal Expedition Kangaroo Little Hello Card came about quite by accident! While my mind is mostly on holiday projects, this Animal Expedition Designer Series Paper kind of jumped out at me. When I pulled out some Crumb Cake Cardstock to use with it, there were already two 4 1/4″ x 4 1/4″ card bases in with the cardstock so that’s what I used!
I don’t have a fancy cardstock storage system. I leave the paper in the plastic that it comes in (until it rips and falls apart!) and I stick cardstock scraps into the bag also. Then I just stack the packages by color family on a few plastic paper sorter things. It works for me. So if I made a card base and then didn’t use it, I just put it back in that package of cardstock to be discovered sometime when I do want to use it!
This card began with the Animal Expedition Paper and since I wanted to use the big kangaroo on one of the sheets of paper, I chose a sheet with a lot of greenery for the background layer. To cut out the kangaroo, I chose the Layering Ovals Framelits Dies. I chose a scalloped oval because it seemed to fit around the kangaroo better without cutting into some other animals on the paper. It did cut into two little birds although that hardly would have been noticeable, but I just cut out two birds by hand from the paper and adhered them over the partially showing birds. It gives it a little bit of a 3D look and makes it a little more fun.
Since I already had the two 4 1/4″ x 4 1/4″ card bases ready to go in my package of cardstock, I chose to go ahead and use one of those. Sometimes it is fun to use a different card size. For this size, just start with a piece of cardstock 8 1/2″ x 4 1/4″ and fold in half. The layer of designer paper is then 4″ x 4″.
For some embellishment on the card, I used the 1/8″ Shaded Spruce Ribbon in the Metallic Ribbon Combo Pack.I just adhered a piece around the center of the card and then tied two little pieces of ribbon onto each side.
The layered kangaroo piece is popped up on Stampin’ Dimensionals. The greeting is stamped from the Itty Bitty Greetings Stamp Set. I could have used lots of different greetings. I think this would make a cute baby card, for example. Or it could have been birthday or “thinking of you” or others. The greeting is punched out with the Classic Label Punch. Then I even used this punch to make the flagged ends of the greeting. It is popped up with the new Mini Stampin’ Dimensionals.
Pretty easy card to make and the Animal Expedition Paper is oh so cute! This Animal Expedition Kangaroo Little Hello Card would be fun to send to a friend in the mail!
Over the years I have made many of these mini baby albums for gifts! They are easy, not too big, and a nice place for new parents to keep at least a few photos of their precious child. Of course this kind of fold-out album could be made for any occasion, not just babies! You do, however, have to PRINT OUT some photos off your phone or camera to get the full effect! It’s great having photos on our phones, but it’s not the safest place and sometimes it’s better to have a little album to show someone or look through ourselves.
The only difficult thing about this album is that you need 12″ x 12″ paper. Stampin’ Up! just carries assortments these days, which is fine for most things. You can also purchase a full pack of Whisper White 12″ x 12″ cardstock and use that for the base of the album and then decorate to your heart’s content!
You’ll start with a piece of cardstock 12″ x 5″, scored at 3 1/2″, 4″, 9″ and 9 1/2″. This makes the back and the fold over front top and bottom pieces.
Cut two pieces 12″ x 4 3/4″ also out of the base color, which will be the pieces that open out to the sides of the album. Score these at 4 3/4″ and 9 1/2″. Crease all score lines on all the pieces back and forth. You will figure out which way you want the sides to fold in after you get them assembled into the album.
With the first 12″ x 5″ piece placed vertically, adhere the two side pieces into the center (the part that will be the inside of the back of the album). This will be the 2 1/2″ section of each piece that you will adhere just inside the score lines of that back piece. Then adhere a piece of 4 3/4″ x 4 1/2″ over that two ends to cover them up.
Now you are ready to start decorating! Determine which way you want your album to fold…..the shorter piece on top or the bigger piece, depending on how you are going to decorate it so you have your inside patterns going the right direction. Now use whatever designer paper, stamps, cardstock, stamping, embellishments you want to decorate each of the pages and the outside cover. On this sample you will see some retired paper and stamps, but when I make a gift or custom order for someone, I use whatever I have in my current or past stash that I think works!
These next two photos show the back sides of the fold out sections.
I made a belly band to hold the album closed. When you fit this around, whatever width you like, you don’t want it to be too tight because, after all, you have scored a 1/2″ space to make room for photos.
This is a really easy and fun album to make so I hope you will give it a try. Use what you have. Order some 12″ x 12″ paper from Stampin’ Up! and you will be all set to make these little mini fold-out albums!
The Animal Expedition Designer Series Paper is some of the cutest paper this year in the Stampin’ Up! Annual Catalog, and here it is used in this Animal Expedition Baby Card with the Eclipse Technique.
I was actually just playing around with this paper and the Eclipse Technique seeing if the letters for “BABY” would fit on a paper layer. When I changed to another design for something I was making, I thought I might as well make a baby card out of what I had already die cut!
There are MANY coordinating colors with this Animal Expedition Designer Series Paper! I always like to write the names of the coordinating colors on the back cardboard of the designer paper so I don’t have to grab my glasses to read the small print! I wrote and wrote and wrote the names of colors for this DSP! One of the colors is Crumb Cake, which I used for the card base. For the next layer, I used Soft Suede, which surprisingly isn’t on the list of colors! But I liked it.
The Eclipse Technique is when you die cut or punch out something and then replace that image where it was cut out but popped up on dimensionals so you can just barely see the color underneath. Oh how I love the Mini Stampin’ Dimensionals! It saves time cutting down the regular Stampin’ Dimensionals when you need a very small piece. In this case, I used the Large Letters Framelits Dies to spell out Baby.
For a little finishing touch, I tied a piece of the Shady Spruce Ribbon in the Metallic Ribbon Combo Pack around the card. You also get Petal Pink Ribbon in this combo pack.
This could be a baby card for a girl or boy, and the paper can be used for adults and older children as well – anyone! There is also a coordinating Bundle with stamp set and dies, the Animal Outing Bundle, that adds even more to your cardmaking and scrapbooking.
Remember the Stampin’ Up! Bonus Days that are going on during August! With every $50 you spend this month on an order (before shipping and tax) you will receive a coupon code via email (be sure to save that email and write down your codes!) to spend on an order in September! It’s kind of like Sale-A-Bration…. if your order is close to $50, go ahead and add a little something so you can earn a Bonus Days Coupon! (I printed out my email when I got it from my order so in case something happens to may email or computer, I will have a copy. Stampin’ Up! cannot replace any lost coupon codes!
Use a punch or other dies to try the Eclipse Technique and make a fun card like this Animal Expedition Baby Card Eclipse Technique.
Here is a quick and easy Easter Small Gift Card With Bunny to kind of go along with my little Easter basket from the other day! Maybe you will have a little gift or bouquet of flowers for a hostess and you will want just a little card to go along with the gift. Something like this will be perfect, easy for you to make, and suits the holiday!
For some reason I was in the mood for just a little card and a little Easter bunny! The card base starts out at 3 1/4″ x 6 1/2″, folded in half. This is Powder Pink Cardstock. The top layer is the Sweet Soiree Specialty Designer Series Paper, the same pattern I used on the Easter basket except the opposite side without the foil accents.
Just to make the designer paper stand out a tiny bit from the card base, I added a layer of Whisper White under the designer paper. The designer paper is cut at 3″ x 3″, so the Whisper White layer is 3 1/8″ x 3 1/8″. If you don’t do fractions, you just want it to fit in between the card base and the designer paper!
The punch art Easter bunny is almost the same as the one I made on the Easter basket, just smaller. For the body I used the 1 1/4″ Circle Punch and the 1″ Circle Punch for the head. The ears are punched with the Classic Label Punch, but I just rounded the pointy ends with my Paper Snips.If you own the retired Word Window Punch that would be perfect! Since these ears are so short, I just cut the Label in half for the two ears.
Just for a little definition, I sponged Powder Pink Ink around the edges of the bunny body parts and then glued the bunny together. The facial features are sketched out freehand with a black marker. (I did a better job the other day!). I popped up the bunny on the front of the card with Stampin’ Dimensionals.
For the greeting, until my next order gets here with some new Easter greetings, I used the Happy Easter from the Teeny Tiny Wishes Stamp Set. This is one of my favorite stamp sets of all time because it has greetings for everything! I use it all the time. It is just glued across the bunny.
As I look at the photo later, I wish I would have put a little bow on the bunny and maybe some Rhinestones or Pearls on the ends of the greeting! But I took the photo in a hurry before I thought of embellishing it. And yet, if you gave this card to someone, they wouldn’t think or know it was missing anything! They would love it just the way it is because you made it!
Bunnies aren’t just for Easter either! Could you see this with a different greeting for a baby card instead?? It would be adorable with your baby gift!
Get out your punches and paper and see what bunnies you can come up with. Make a small card like this Easter Small Gift Card With Bunny or make a full-size card with a larger bunny, but just have fun!
You might have thought the Basket Bunch Photopolymer Stamp Setwas only for Easter or spring, but no! The bunny in the stamp set is just too cute and I think is perfect for a baby card! A baby card for a baby boy with bunnies just by adding some blue touches or pink for a girl…or whatever pleases you.
This easy card starts with a card base of Soft Suede Cardstock, layered with a piece of Soft Sky Cardstock. Of course you could use any color that you like or that goes with a theme of a party or baby shower or with a gift. Then on a piece of Whisper White Cardstock I randomly stamped the bunny in Soft Suede ink. I could have colored in every bunny, but of course that would be a lot of coloring! I thought it would be fun to just color one like a spotlight on one bunny!
To color the bunny, I used the Stampin’ Up! Watercolor Pencils. I love the Watercolor Pencils even from back in my early Stampin’ Up! days with the original watercolor pencils. These current Watercolor Pencils are even better because they are in Stampin’ Up! colors. Just color lightly with the pencils, then go over the coloring with a Blender Pen. This softens and blends the color. I love using the Blender Pens!
For a little greeting on the card, I turned to one of my most useful stamp sets, Teeny Tiny Wishes. I’m SO glad this stamp set is not retiring! I have used it a lot over the years that it has been out. I prefer the wood-mount set with small images like these small words and phrases. The greeting is stamped on Whisper White and punched with the Classic Label Punch. Now to make a layer, just adhere this greeting to a larger piece of Soft Suede and then cut around it ….or vice versa, cut the greeting piece smaller after punching out a layer of the Soft Suede Cardstock. For a little accent, I used the little hearts in the Subtles Enamel Shapes package. I believe the twine I used is retired but I had it in my stash!
There is only about a week left of the Retiring Productsbeing available from Stampin’ Up! so don’t delay if there are products you want! Here is the math on the Basket Bunch Stamp Set and the Basket Builder Framelits Dies: Stamp set on sale for $16.80, Basket Builder Framelits Dies on sale $15.50 so the total for the stamp set and dies would be $32.30. The Basket Bunch Bundle actually costs $46.75 so in this case it would be cheaper to buy the stamp set and dies separately! Quite a savings for a stamp set that has a very useful and versatile basket stamp and die, flowers and dies, chicks, bunny and bow that can be used in SO many projects! As long as you can look up a product in the Online Store, it is still available, so that is a good way to check rather than look at the list or wonder.
I hope you enjoyed this way to use the bunny in the Basket Bunch Stamp Set to make a baby card for a baby boy or girl or maybe even just a young child’s birthday.
There are so many ways to use the Owl Punch by Stampin’ Up! and for those reasons I really hate to see the Owl Punch on the Retiring Products list. In looking back, I see that it has been around for many years, but the punch is so versatile I cannot believe that we will not have it available soon. If you do not already own the Owl Punch, I would urge you to grab one before they are gone. I’m sure most serious stampers already have one, but if you are new, you may not be famiiar with all the creativity this one punch affords.
The baby card I have posted above has been one of my most popular cards! All I did was punch out the portion on the Owl Builder Punch that would be the chest area of the owl. Yes, you can make baby clothes out of this piece of the Owl Punch! Click the link or the card photo above to go to the blog post for more information.
Here’s an anniversary card I made using the Owl Punch to make a couple of loving owls in silhouette! And I can’t tell you how many times I have punched those little hearts to use on various cards and projects!
The Owl Punch can also be used to make monsters for a birthday card! Just add some arms and scary faces! Click the link or the photo to go to my blog post for details.
If you have made a great project with the Owl Punch, click the “Leave a Reply” button at the top of this post and leave a comment! I’d love to hear!
These are just a few examples of ways to use the retiring Owl Builder Punch, and I can’t begin to tell you about all the creative ideas I have seen out there using the Owl Punch. Do a search online and you will find them. If you are so inspired, be sure to purchase the Owl Punch on the Retiring List before it goes away May 31.
Surely you have heard of the new baby giraffe the whole world has been watching and waiting for! I heard about it, but was not one who was constantly paying attention to the whole saga, but I did make a punch art card for the new baby giraffe! Apparently the baby giraffe was born in New York on Saturday, April 15. The little newborn baby giraffe is probably about 6 feet tall and likely would weigh about 100-150 pounds! Now that’s a baby!
While the New York giraffe made the headlines because the birth was live-streamed and millions of people watched, there was also a baby giraffe born in Houston, Texas several days before at the Houston Zoo! So it’s been a good month for baby giraffes!
To make my punch art new baby giraffe card I just used various circle punches, some retired, oval framelits, whatever I had. There are lots of examples of punch art animals online if you do a google search! I used the Owl Builder Punch for two sizes of the circles. I can’t believe the Owl Punch is retiring, it has been so useful over the years we’ve had it! There was no limit to what we could create with the Owl Punch. So be sure to grab one while they are still available!
The little piece of grass on the bottom of the card and the flower I happened to already have die cut from theBasket Builder Framelits Dies. The dies and Basket Bunch Stamp Set come in a Bundle, which is retiring as all Bundles are, but actually, since both items are on sale separately, it is a better deal to buy the stamp set and then buy the framelits, not in a Bundle!
I wanted some kind of greeting on the card, but I didn’t have much space left, so I came across the word “Celebrate…” in the Beautiful You Stamp Set so I used that. It fit perfectly in the space and was perfect since we are celebrating the births of baby giraffes!
Any time you need to celebrate something, even the birth of a giraffe in New York or in Houston, you can make a card for that! Isn’t stamping wonderful?!