Stampin’ Up! Seasonal Sale Begins TODAY!

Seasonal Sale Nov 2023 Flyer Info

Create more by spending less during the Seasonal Sale! Between November 14–16, you can get select products from the 2023–2024 Annual Catalog up to 20% off. Have your eye on something from our new color collection? Don’t miss your opportunity to shop the colors you’ve been craving during this phenomenal sale!

You can stock up on supplies for all your upcoming handmade projects or embrace the season of giving and buy something for your fellow craft enthusiasts. Make sure to act quickly on this limited-time-only deal!

  • 10% off ribbons and trims.
  • 15% off inks, including pads, refills, markers, and Blends. Bundles are not included.
  • 20% off papers, including cardstock, specialty paper, and Designer Series Paper.

Shop online to see the full selection of discounted products available.

This is a limited-time offer.

Discounts are automatically applied when sale items are added to any order, including for Starter Kits.

Some items may sell out due to high demand.

SHOP TODAY!

November 14 November 16!

Shining Christmas Ornament Card

Shining Christmas Ornament Card

I saw an idea for a card like this online somewhere and thought I would make this Shining Christmas Ornament Card in my own style. The card I saw used some striped paper cut out in a circle to make it look like an ornament on the front of a card.

For this Christmas card, I decided to use the Shining Christmas Designer Series Paper, which was on the Online Exclusives in the Stampin’ Up! store. It appears to no longer be available now but there are other papers you can substitute. And if you already purchased it, then you are set to make some shiny cards for the holidays! With any card that we see online, we have the option to copy it exactly or change it up with whatever products we have. Look through your papers (and not just the holiday ones) and see what paper you could substitute for this Shining Christmas paper if you do not have it. Some other striped paper or one with certain prints will work just as well. Maybe you have shiny paper left over from last year.

The coordinating colors for the Shining Christmas DSP are Mossy Meadow and Cherry Cobbler. I pulled out those two cardstock but I thought the card looked too dark. I got out Real Red to see if it would go okay and I liked it just fine. So you don’t have to stick with the coordinating colors of the designer paper!

The card base is Mossy Meadow with a layer of Real Red. I diecut the Real Red with the largest scalloped die in the Scalloped Contours Dies. Even though the ornament would be taking up most of the space, it still needed “something” so I stamped some small stars randomly with the Merry & Bright Stamp Set. I used Real Red ink for that watermark look but you can also use Versamark ink.

For the ornament, I cut out a circle from the Shining Christmas paper using the largest circle in the Stylish Shapes Dies. It has a stitched pattern around the edge but it barely shows on the paper. I liked this striped pattern but there are others I could have chosen. For the top of the ornament, you can diecut a silver foil ornament hanger using the Merry & Bright Dies. Or you can cut one out yourself from foil.

For the greeting, I wondered what would show up best and be the right size. I chose the Season’s Greetings sentiment in the Brightest Glow Stamp Set. I stamped it in Versamark ink on a scrap strip of Basic White and embossed it with silver powder and the Heat Tool. You can find copper, gold, and silver all in the Metallics Embossing Powder package so you are all set with whatever color you need! The greeting seemed to fit perfectly going across the ornament so I just put it through the same stitched circle die in the Stylish Shapes Dies so that the ends would match the ornament. It worked perfectly!

The ornament is popped up with Stampin’ Dimensionals. Then I added a bow made with the Silver & White 1/2″ Sheer Ribbon which I think looks perfect on the card! It embellishes the ornament but doesn’t take away from it because it is sheer and has a silver edge. This ribbon is currently unavailable but is due back in stock next week, the week of November 20.

I hope you are coming along with your Christmas cards and have lots of ideas! But if you need more, just keep in touch!

Remember, tomorrow is the Seasonal Sale at Stampin’ Up! on papers, ribbons, and inks! Check my blog post from the other day for more details or check the Online Store tomorrow, November 14-16th!

SHOP STAMPIN’ UP! ONLINE HERE!

Two Bee Mine Cards After OnStage 2023

Bee Mine I Love You Card

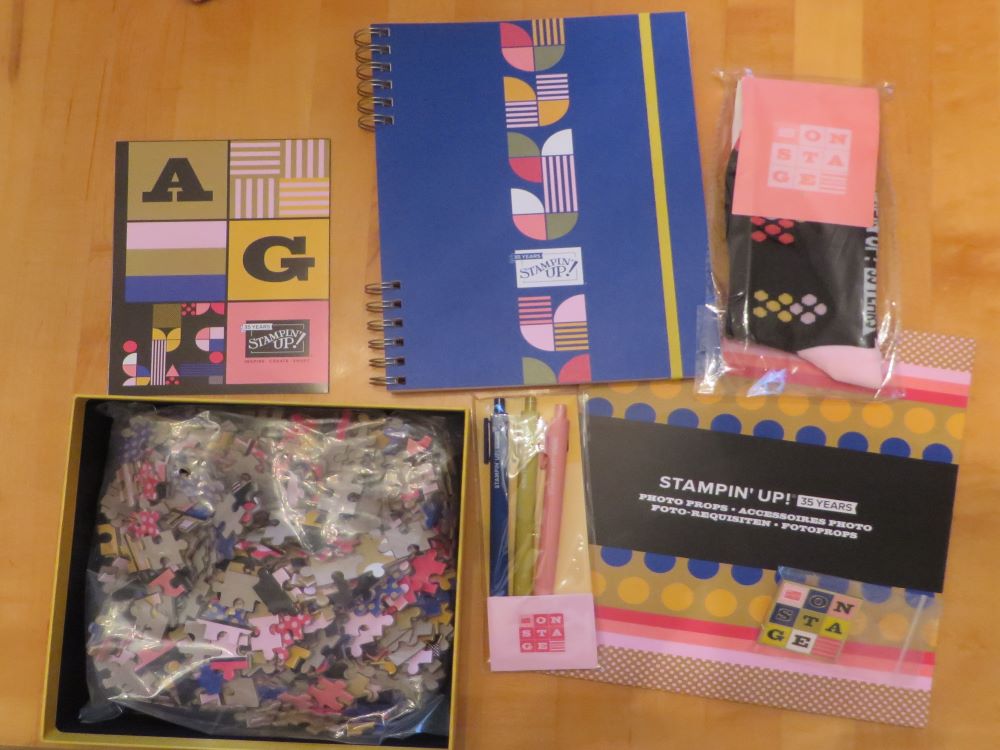
On Saturday Stampin’ Up! held a virtual event called Onstage 2023 for Demonstrators, somewhat like a mini-convention, to introduce upcoming Spring Mini Catalog products as well as the big promotion called Sale-A-Bration. One of the fun Suites they showed, stamped with, and allowed us to purchase ahead of the event is the Bee Mine Suite, coming in the January-April 2024 Mini Catalog. I hadn’t had a chance to use it beforehand, but after watching the event I opened the package and got stamping!

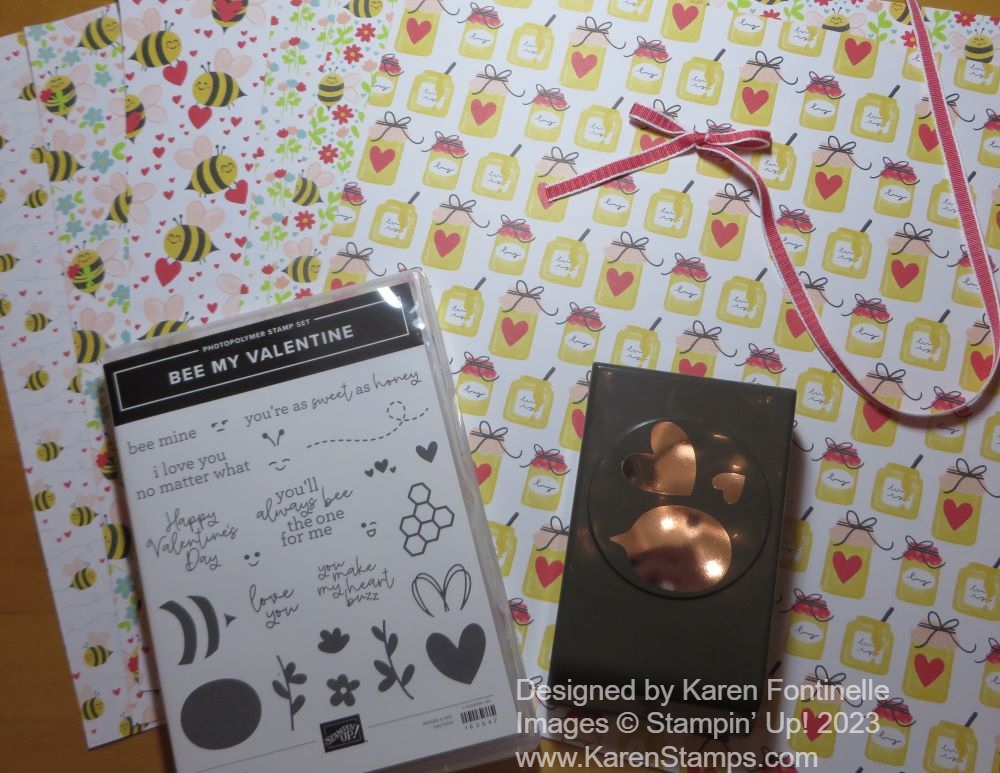
Here are some of the Bee Mine Designer Series Papers, the Sweet Sorbet 1/4″ Bordered Ribbon, the Bee My Valentine Stamp Set, and the Bee Builder Punch. There are also adorable Adhesive-Backed Hearts & Flowers (you’ll probably want more than one package!) and Square Pillow Boxes that I forgot to put in the photo. If you like bees, and they are popular these days, you will want this Suite! And if you are not “into” bees, you will find these papers and stamp set so cute you will love them anyway!

Bee Mine Suite

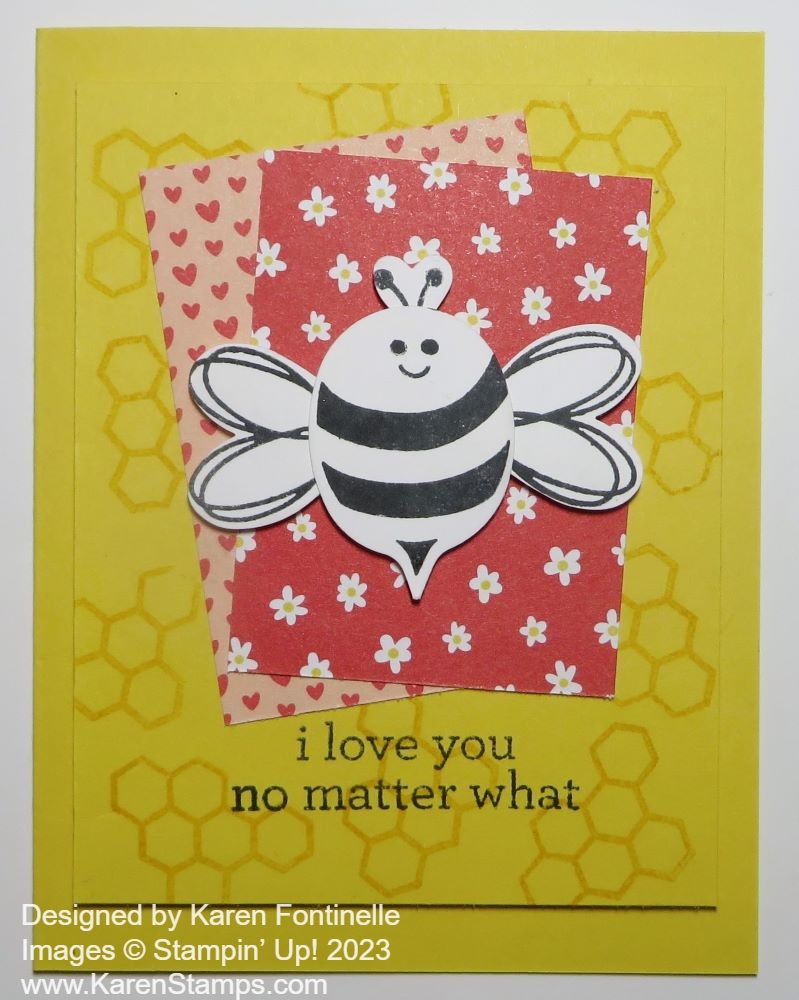
The card I posted was one that Shannon made during the online event yesterday. The card base is Daffodil Delight as is the first layer which is stamped randomly with the honeycomb stamp in Daffodil Delight ink. This layer is cut at 3 3/4″ x 4 3/4″. Be sure to stamp the greeting at the bottom before adhering that top layer. It is stamped in Memento ink and is in the Bee My Valentine Stamp Set.

The two layers of designer paper, the little hearts and the little white flowers, are cut at 2 1/4″ x 3 1/4″ and 2 1/4″ x 3″. They are both placed on angles and staggered, not lined up straight.

The bee is made by stamping on Basic White with Memento Ink and then punched out with the Bee Builder Punch. If you look at the bottom of the punch and line up your images somewhat in the same direction as they are arranged in the punch (and allow space in between images!) you will find punching them out a little easier. Or you can punch a template and then use that to place the stamps when you are stamping the images. You could color the bee or use yellow cardstock, but I was copying the card as Shannon made it. Then just put a drop of glue to adhere the wings to the body and the antennae to the top of his head. You can pop up the bee with Stampin’ Dimensionals and even place them on the back where the wings and antennae meet on the bee’s body to hold them in place perfectly.

Once you have everything adhered, use Stampin’ Dimensionals to pop up the Daffodil Delight finished layer on the card base. On the inside of the card, you could use a strip of designer paper or cut out a small bee from the paper to decorate the inside of the card.

Then I had to make another card right away because I just loved the designer paper! It is all so cute!

Bee Mine You Make My Heart Buzz Card

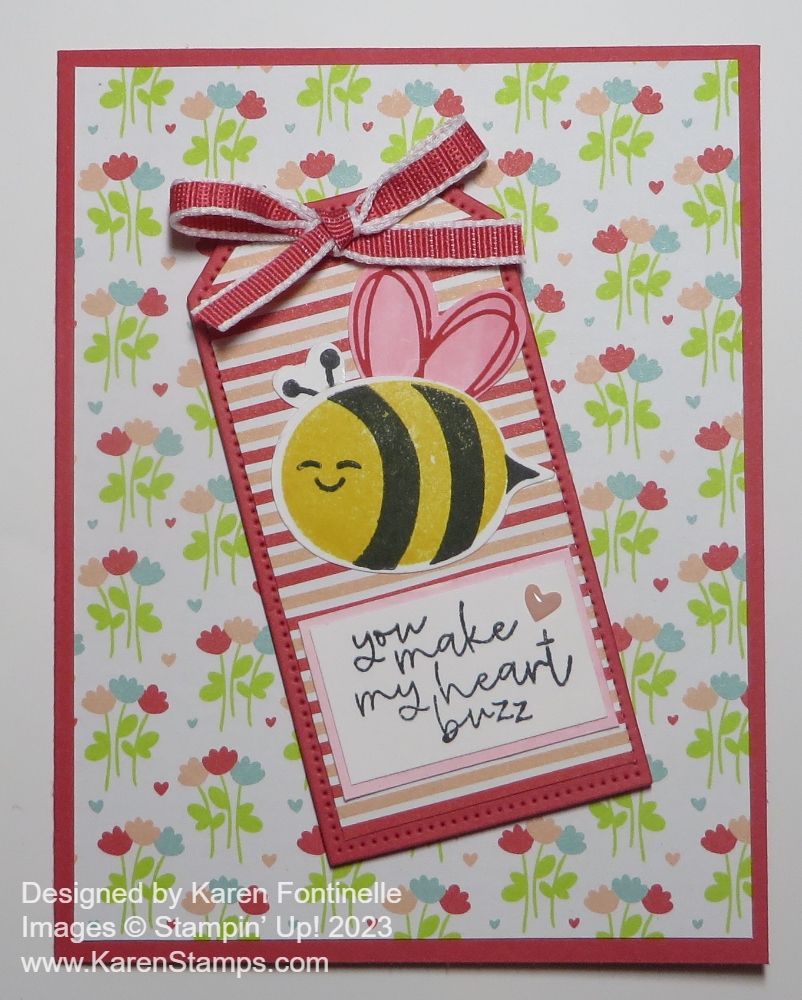
I love that Sweet Sorbet is one of the coordinating colors with the designer series paper because I haven’t used it in a while and I love that color! It is one of the In Colors from last year but on its second year right now in the Annual Catalog. I used Sweet Sorbet for the card base. Next, I chose this flowered pattern in the Bee Mine Designer Series Paper for the background.

For the focal part of the card, I decided to diecut the largest tag in the Tailor Made Tags Dies out of Sweet Sorbet. Then I cut another tag, the same size, out of the same paper but used the striped side. This striped pattern I trimmed down with my Paper Trimmer just inside the stitched perforations to make it a layer on the Sweet Sorbet.

The bee body is stamped with Daffodil Delight ink on Basic White (or you could just use Daffodil Delight cardstock) and then the stripes and antennae are stamped in Memento ink. The face is another tiny stamp. There are several faces to choose from!

I stamped the wing in Sweet Sorbet for something fun, but first I watercolored a piece of Basic White with Sweet Sorbet ink and one of the Water Painters. Then it was punched out with the Bee Builder Punch and adhered to the top of the bee body along with the antennae. The bee was adhered flat to the tag along with the stamped greeting. I felt like the greeting needed a little layer, so I watercolored another little piece of Basic White with the Sweet Sorbet ink and trimmed a tiny layer behind the greeting. The whole tag is popped up on Stampin’ Dimensionals.

To embellish the tag, I tied a bow with the Sweet Sorbet 1/4″ Bordered Ribbon and adhered it on the top of the tag over the hole (I didn’t thread it through) with Mini Glue Dots. I also used just one tiny Petal Pink heart in the Hearts & Flowers embellishments to the greeting.

There you have two card ideas you can make with the Bee Mine Suite when it becomes available in January! If you want it sooner, sign up to be a Demonstrator and be able to preorder select products before January! And remember, Sale-A-Bration will be coming up in January at the same time. When you spend $50 you get to choose one FREE Sale-A-Bration product! With a $100 purchase, you can choose a Level 2 item or two Level 1 products. Your choice! It’s a VERY popular promotion Stampin’ Up! has been doing almost forever! Lots to look forward to in January!

Stampin’ Up! Seasonal Sale Nov. 14-16!

Seasonal Sale Nov 2023 Flyer Info

Create more by spending less during the Seasonal Sale! Between November 14–16, you can get select products from the 2023–2024 Annual Catalog up to 20% off. Have your eye on something from our new color collection? Don’t miss your opportunity to shop the colors you’ve been craving during this phenomenal sale!

You can stock up on supplies for all your upcoming handmade projects or embrace the season of giving and buy something for your fellow crafting enthusiasts. Make sure to act quickly on this limited time only deal!

  • 10% off ribbons and trims.
  • 15% off inks, including pads, refills, markers, and Blends. Bundles are not included.
  • 20% off papers, including cardstock, specialty paper, and Designer Series Paper.
  • Shop online to see the full selection of discounted products available. This is a limited time offer.
  • Discounts are automatically applied when sale items are added to any order, including Starter Kits.

SHOP BEGINNNG TUESDAY, November 14 THRU November 16!

Country Wreath Christmas Card

Country Wreath Christmas Card

If you want a pretty easy Christmas card idea, I recently made this Country Wreath Christmas Card with an up-and-coming young stamper! The beautiful designer paper in the background makes it, I think!

The card base is Real Red and has a top fold, so if you want that, cut the cardstock at 4 1/4″ x 11″. Score at 5 1/2″. Or you can make it a sidefold card as we most often do. The paper is in the Joy of Christmas Designer Series Paper in the Holiday Mini Catalog. I think it is a beautiful pattern with the holly and other leaves and red berries! It is cut at 4″ x 5 1/4″.

The wreath in the Country Wreaths Stamp Set is stamped in Old Olive ink and the bow in Real Red ink. These stamps have the Distinktive texture that Stampin’ Up! designed for some of their stamps. If I were going it over I would stamp and diecut the bow and adhere it to the stamped wreath. If you wanted another upgrade to your card you could also stamp and diecut the wreath. But if you were making a lot of cards just stamping is a lot quicker and easier!

After stamping the wreath, you can cut the Basic White cardstock with the Paper Trimmer or diecut it with any of the stitched shapes. Then layer on a piece of Real Red. The greeting is stamped from the same Country Wreaths Stamp Set. It’s a great stamp set that we have had for at least a year I think, that covers several seasons.

You can stamp red berries from the stamp set on the wreath, but it’s more fun to add some red rhinestones or other red gems! If you don’t have any, use the Stampin’ Blends markers to color the Iridescent Rhinestone Jewels, for example, before putting them on the card. Just color on the sheet they are adhered to, let the ink dry for a second, and you are good to go with whatever color gems you want. I used Stampin’ Dimensionals to pop up the wreath on the card front.

On the inside of the card, add a layer of Basic White to stamp or write your personal greeting. You may want to add a strip of the same or coordinating designer series paper to add some interest inside!

Get the November Paper Pumpkin Kit Today!

Paper Pumpkin November 2023 Sq Ad1

The November Paper Pumpkin Kit, the papercrafting kit that comes to you in the mail every month, is called “Warm Wishes” and is a kit to make holiday treat boxes! Always fun things for the holidays! The holiday Paper Pumpkin Kits are usually my favorites.

You only have today and tomorrow left to sign up for Paper Pumpkin to receive this month’s kit! Friday, November 10th is the last day, and soon after that Stampin’ Up! will begin sending out the kits that you will receive in your mailbox! What a treat!

I always say Paper Pumpkin is the gift you give yourself (and maybe someone else too!). It actually seems like a gift when you open it, especially the holiday kits with the specially decorated box. Inside you’ll see the little ink spot and the exclusive stamp set. Then wrapped in tissue paper, just like a gift, is a package with all the materials you need and the instructions!

“Light up the Christmas season with this month’s Paper Pumpkin kit! With traditional Christmas home designs and warm Christmas wishes, spread the light of Christmas with a gift box! Plus, you can get the Warm Wishes Cards & Envelopes Add-On to take your Christmas crafting even further (available while supplies last).” (You can only purchase these cards and envelopes if you are a Paper Pumpkin subscriber.

Kit Details:

This kit includes:

8 boxes; 4 each of 2 designs
1 Mossy Meadow Stampin’ Spot
Iridescent glitter accents on paper
Precut paper pieces
Linen thread
Treat bags
Warm Wishes photopolymer stamp set


Completed box size: 4-1/4″ x 4-1/2″ x 1-1/2″ and 4/1/4″ x 3-3/4″ x 1-1/2″


Coordinating Stampin’ Up! colors: Balmy Blue, Blueberry Bushel, Cherry Cobbler, Crushed Curry, Daffodil Delight, Lemon Lolly, Mossy Meadow, Night of Navy, Old Olive, Pecan Pie, Real Red

Sign up for a Paper Pumpkin subscription today!

No risk, no obligation. Cancel or Skip a month now and then if you need to.  Sign up by November 10th! 

As a bonus you can purchase when you are a subscriber:

Paper Pumpkin Add-On

ADD-ON DETAILS

Warm Wishes Cards & Envelopes (163985)
 

While supplies last.
$14.00 USD

This add-on includes:
• 20 Cards & Envelopes 
• Iridescent glitter accents on paper
• Folded card size: 5″ x 7″ 

These look like beautiful cards AND envelopes that will help you get your Christmas cards out to the mailbox quickly!  Just add a nice greeting to the card and stamp or write a personal message inside!

SUBSCRIBE to the November Paper Pumpkin by November 10th! Click HERE!

New Online Exclusive Products Today!

New Online Exclusives Nov 7 2023 Ad Online

There are new Online Exclusives available today in the Stampin’ Up! Online Store!  This is a way for Stampin’ Up! to release new products without waiting for the next catalog so we get a wider choice of new things! You can always check under “Online Exclusives” under Products to see what is available!

MEANDERING MEADOW SUITE COLLECTION 162745 $82.50

***Currently Unavailable because of the Adhesive-Backed Dragonflies and Birds not being available, but you can order the Bundle and other pieces separately.

FLUFFIEST FRIENDS BUNDLE 162850 $54.00

THREE COLOR GLIMMER 12″ x 12″ SPECIALTY PAPER 162813 $10.50 USD
6 Sheets. 2 each of 3 colors. 
Petal Pink, Pretty Peacock, Highland Heather 

SIMPLY SPARKLING BUNDLE 162871 $43.00

SOFTLY SAID CLING STAMP SET 162906 $25.00

FEATHERED FLIGHT CLING STAMP SET 162726 $24.00

OF ART & TEXTURE PHOTOPOLYMER STAMP SET  162687 $24.00

Check them ALL out on the Online Exclusives!

Bright & Beautiful Gate Fold Birthday Card

Bright & Beautiful Gatefold Birthday Card

It has been a while since I have thought of using this Bright & Beautiful 6″ x 6″ Designer Series Paper! But when I got the idea of this Bright & Beautiful Gate Fold Birthday Card I was so happy to get this paper back out and pick which papers I wanted to use on this card! We get so caught up in the newest products that we sometimes forget what we already have!

This birthday card is easy and can be for many other occasions with just a change of greeting and maybe colors or papers. To make this gatefold card, start with a card base of 11″ x 4″. Cut a sheet of cardstock lengthwise instead of horizontally the way we usually do it. I used Blueberry Bushel for this card.

Score the card at 2 3/4″ from each end. Or you can score at 2 3/4″ and then 8 1/4″. Crease and fold the score lines, making sure the flaps meet evenly in the center.

To decorate, cut two panels of designer paper for the front that are 2 1/2″ x 4″. Adhere to each of the two front panels. Or you can stamp on the panels.

On the inside, you could just put a Basic White layer of cardstock to stamp or write a greeting or message, but I decided to use another pattern in the same designer paper that has yellow stripes. I also stamped the circle greeting and cupcake in the Circle Sayings Bundle. I colored in the cupcake with Stampin’ Blends and stamped “Celebrate” in Blueberry Bushel ink and then punched it out with the circle punch. On the cupcake, I added some Adhesive-Backed Glitter Sequins in Old Olive. I also added some punched stars to the inside after I finally found my little retired star punch!

On the front of the card, I die-cut a Blueberry Bushel rectangle with the Radiating Stitches Die. For the center, I just measured and cut out a rectangle to fit inside out of Basic White cardstock with my Paper Trimmer. The birthday greeting is from the Biggest Wish Stamp Set and is stamped in Berry Burst ink.

To go along with the star paper, I dug out some retired dies, So Many Stars to diecut some interesting stars to use on this card. There is also a star die in the Merriest Trees Dies that I used. Use whatever you have!

When you adhere this greeting piece to the front of the gatefold card, find the midpoint and make sure you only apply adhesive to the side that attaches to the left side of the card. It, of course, does not get glued down all the way across so make sure you don’t have any glue in the wrong place that is going to make something else sticky!

This is the kind of easy card that you can change up in different ways and make something that looks completely new!

SHOP STAMPIN’ UP! ONLINE HERE!

New Kit! The Best Destination Kit!

The Best Destination Kit Ad

Stampin’ Up! just added a new Kit to the Kits Collection in the Online Store. This new kit is called the Best Destination Kit! The Kits Collection provides a selection of different crafting experiences for everyone from cards to other kinds of projects. New kits are added frequently and provide an easy way for you and your friends or family to order kits and get together for some crafting fun!

Plan a crafting getaway today with the Best Destination Kit! This kit lets you make nine peek-a-boo tri-fold cards with a colorful, nostalgic, travel vibe—perfect for friends who might be embarking on a fun adventure, setting new goals, or maybe just need a vision of a picture-perfect day. Some trips are worth the splurge—especially if they come in a box!

The Best Destination Kit

DETAILS
This month’s kit includes:

Enough supplies to create 9 cards—3 each of 3 designs
9 coordinating envelopes
Best Destination Photopolymer Stamp Set
One Gorgeous Grape Ink Spot
Printed card bases, printed die cuts, adhesive, embellishments, and a clear block
Finished card size: 5-1/2″ x 4-1/4″
Coordinating colors: Balmy Blue, Boho Blue, Cajun Craze, Calypso Coral, Coastal Cabana, Crushed Curry, Daffodil Delight, Early Espresso, Flirty Flamingo, Fresh Freesia, Gorgeous Grape, Granny Apple Green, Misty Moonlight, Pecan Pie, Petal Pink, Pretty Peacock, and Shaded Spruce

Here are the contents. Besides the cards and envelopes, you get an ink spot and exclusive stamp set plus adhesive.

The Best Destination Kit Contents

Here is the exclusive stamp set in the kit.

The Best Destination Kit Stamps

Maybe you know someone who is going on a special trip soon or in the new year. These cards might be a fun gift for you to give to them, all made up, so they can send out notes about their great trip to their family or friends. Or maybe you have your own trip coming up….or you can dream about a trip as you make these cards! Enjoy the creative experience

SHOP THE STAMPIN’ UP! KITS COLLECTION!

THE BEST DESTINATION KIT 163186

$20.00 USD

Get the 12 Weeks of Christmas Today!

Christmas Truck

Every year I send out the 12 Weeks of Christmas holiday emails only to my Mailing List subscribers as a thank you for following me on this stamping journey! They also get a newsletter every Tuesday with Stampin’ Up! news and offers plus at least one stamping project idea or tip. But when we start counting down to Christmas, I send out a special email on Wednesdays with an exclusive holiday project that I don’t post anywhere else!

We are already on Week 5 of the 12 Weeks of Christmas!! You missed the first four weeks, but you can still get the rest of the holiday emails if you sign up right now before 1:00 PM CT today!

Here’s how to get on my Mailing List! If you are on a computer, you probably will see a red box on the right side at the top. Just fill in your name and best email address.

If you are on your phone, you may have to scroll to the bottom of the screen.

Or just click here to go to my Mailing List Sign Up page!

Last Minute Past Halloween Ideas!

If you are still looking for last-minute Halloween ideas, here are a few from past years! You can update with our newer products or maybe you still have some of these older products from years past! Whatever you like! Click the title above the photo to go to that blog post for directions. Don’t miss the last idea at the bottom of the post – a new one I had to stick in because it’s so fun! I usually make one of these every year! Save that paper towel roll!

Make a Cute Halloween Votive Candle Holder

Make Easy Sour Cream Containers for Halloween Treats

Make Easy Sour Cream Containers for Halloween Treats

Halloween Chocolate Candy Treat Bag

Halloween Chocolate Candy Treat Bag

Triangle Treat Box For Halloween

Triangle Treat Box For Halloween

Halloween Night Candy Bars

Halloween Night Candy Bars

Witch’s Boots

Here’s an updated idea I made this year but I’ve made lots of these in the past!

I didn’t stuff any candy in there yet but I will! The Witch’s Boots are made with a paper towel roll cut in half. Wrap the roll in designer paper or cardstock. I used the Merry Bold & Bright Designer Paper, the pattern with the stripes that look like socks! Yes, you can use Christmas paper for a Halloween project!

Take a piece of Basic Black Cardstock however high you would like it to be to wrap around the bottom of the roll to start making the “boot”. Cut it so the ends meet in the center of the front of the boot and then you can fold back the top corners. Make it tall enough to add the buckle, especially if you want a big one.

Cut a piece of Basic Black in a long triangle to make the bottom of the boot. You want it to be as wide as the roll but you can trim around it to make it rounded in the back. You can cut it longer than you want and then curl up the toe with just a pencil or something however you like it.

You can make a cheater buckle by just adhering a square of black in the center of a square of Gold Foil. Then put some candy in a cello bag or add it to the “boot” as is. Just have fun with this idea

I hope these ideas are helpful and fun for you! Each one of these is my favorite thing that I love to make! (Maybe, especially, decorating these large candy bars??!!!)

Have fun and be safe on Halloween Night!

More Last Minute Them Bones Halloween Cards!

Them Bones Halloween Cards

The other day I made a few more Halloween cards, partly to use up as much of the Them Bones Designer Series Paper by Halloween as I can! Some of the patterns I can use for Thanksgiving and beyond, but the skeletons and tombstones, not so much! It’s also about trying not to hoard all the beautiful Stampin’ Up! paper that takes up space in my house after all these years!

I’ll just give a general description of each card.

Top left: This card uses the diagonal striped blue paper on “the other side” of the pattern with the little bats flying around. Layered on that is the spotlight panel (with a layer of Basic Black) that is part of the one sheet with a lot of different scenes that you cut apart. I cut out one of the skeletons and adhered him in the spotlight, from the moon I suppose, as if he is dancing. The “Happy Halloween” greeting is from a past Paper Pumpkin Kit stamp set. You can use what you have. I added some Black Classic Matte Dots to the greeting and some Iridescent Rhinestone Gems.

Top Right: This card uses one of those panels on a big sheet, plus I added pumpkins from the Pick of the Patch Stamp Set. The greeting is stamped with the Alphabest Stamp Set and punched out with the Best Label Punch.

Bottom Left: This card also uses that blue striped paper for the background. I added pumpkins, a skeleton, and a punched out moon from the large paper with tombstone scenes that can be cut apart.

Bottom Right: A super easy card to make by just cutting out the Trick or Treat panel on the sheet with all the different panels. It is layered on a piece of the orange plaid designer paper. I just added a bow made from Glittered Organdy Black Ribbon (retired). You could use the Black and White Gingham Ribbon or anything else you like.

If I have time I may even make some Halloween cards to hand out to the Trick or Treaters along with their candy!

I hope these ideas help you if you are still making Halloween cards or if you, too, want to use up your Halloween Them Bones paper!

Them Bones Skeleton Triangle Treat Box For Halloween

Them Bones Skeleton Triangle Treat Box

One of my favorite types of treat boxes is this triangle treat box. You can make them for any occasion such as this Them Bones Skeleton Triangle Treat Box For Halloween. This kind of treat box is really so easy to make! You will be surprised if you haven’t made one yet!

You can vary the size of these triangle boxes. All you have to do is follow the basic pattern. You can use cardstock or designer paper. You can leave the cardstock plain, stamp on it, or add designer paper or embellishments. And these boxes aren’t just for candy or food. They can hold a small gift, or even money or a gift card.

Here is the basic pattern and the size I used for this Halloween Triangle Box. I used a piece of Them Bones Designer Series Paper to make this box. Obviously, cardstock would be a little bit sturdier if you needed that. My paper is cut at 4″ x 8″. If your paper has a pattern you need to pay attention to which way you cut the paper so the pattern won’t be sideways or something.

Triangle Box Drawing

After cutting the paper to the size you want, the rest is scoring. The blue lines on the diagram above are the score lines. Score the length of the paper in half, so if your paper is 4″ x 8″, score at 4″ in the middle. Measure the mid-point on the ends (2″) and lightly mark with a pencil.

The “tricky” part is scoring on the diagonal but it is easy. In that awkward position with your Paper Trimmer, score from that 2″ middle point at one end down to the middle score line which will be on a diagonal. Do that on both sides of one end, then turn the paper and score at the other end in the same way. When you do it, you’ll see how it goes. Here you can see the other side of the paper, which I could have used instead of the bones pattern. You can see what the score lines look like, really from midline to midline. Then you’ll punch holes in each corner, preferably holding the ends together when you do it so they match up.

Triangle Treat Box Scored

After you do the scoring, crease all the score lines and fold the box together to see how it goes. Then hold the ends together on each side and use a hole punch of whatever size you like to punch holes through the two papers on each side. After you decorate your box and put the treat inside, you can tie the box together with ribbon or twine.

This box is simply decorated by cutting out the skeletons from another sheet of paper in the Them Bones DSP and adhering them to the box. You could also add a greeting or some other embellishments. I tied my box closed with the Black & White 1/4″ Gingham Ribbon.

Here is what the box looks like from the side:

Them Bones Skeleton Triangle Treat Box Side

Here’s a triangle box I turned into a Witch’s Hat for Halloween….nine years ago! Wow!

Try one and you will see how easy it is to make a triangle treat box. And you just might need one or more for Halloween night maybe for family treats or for a few special trick-or-treaters!

Happy Halloween in a few days!

OnStageAtHome2023 Gift Box!

OnStageAtHome2023 Box

Stampin’ Up! is having a virtual event on the second Saturday in November called OnStageAtHome 2023 and I was one of the lucky “several thousand” people who registered early enough to get this free gift box! It just arrived late yesterday and was so much fun I had to show you all the things in it!

You still have time to sign up to be a Demonstrator with Stampin’ Up!, get the special deal offered until October 31, and get to “attend” this virtual mini-convention on your computer FREE of charge! You will automatically be registered, and even if you can’t attend, you can watch a recording later. (But you won’t get a gift box, sorry!) And get previews of the upcoming Spring Mini Catalog!

OnStageAtHome2023 Box Inside

Inside is a 500-piece jigsaw puzzle and all kinds of things!

OnStageAtHome2023 Box Contents

Even a pair of Stampin’ Up! socks!! There are pens, a pin, photo props, and a quality notebook with little stickers!

OnStageAtHome2023 Box Open
OnStageAtHome2023 Notebook

OnStageAtHome2023 Box Props

I knew it was coming, but it was such a nice surprise when it arrived on my porch! I just had to show you all the goodies! And now I have a new pair of socks to wear! And don’t all of us papercrafters just go crazy over notebooks and pens?!! I always have!

We are all still very much in holiday mode, but it won’t be long until we’ll be looking forward to a change of pace and be ready for new spring products! It will be fun at this virtual OnStage to see what some of the new products will be! One of the best perks of being a Demonstrator!

Home For the Holidays Refill Kit Available!

Home For the Holidays Refill Kit

If you missed the October Paper Pumpkin Kit, Home For the Holidays, you can order it in the Stampin’ Up! Online Store! You must be a subscriber, though! OR maybe you just want more cards to make if eight weren’t enough! This is the Refill Kit which means you get all the materials you need to make the cards except for the ink spot and the stamp set. But you won’t need the stamp set if you have any Christmas greetings. You can use what you have or write it out on the greeting piece.

This card kit is beautiful and comes with layers of houses and trees to adhere on to the card base popped up with included dimensionals. It’s an easy kit to make! You will end up with eight cards, four cards each of two designs plus matching envelopes. As a bonus, the kit contains a bottle of glitter glue to use on the snow on the cards!

CLICK HERE to see my blog post when I spent a relaxing afternoon making up this Paper Pumpkin Kit!

Home For the Holidays Refill Kit Contents

If you are interested in this kit, order it soon while it is available! It will certainly speed up your holiday cardmaking!

SHOP STAMPIN’ UP!