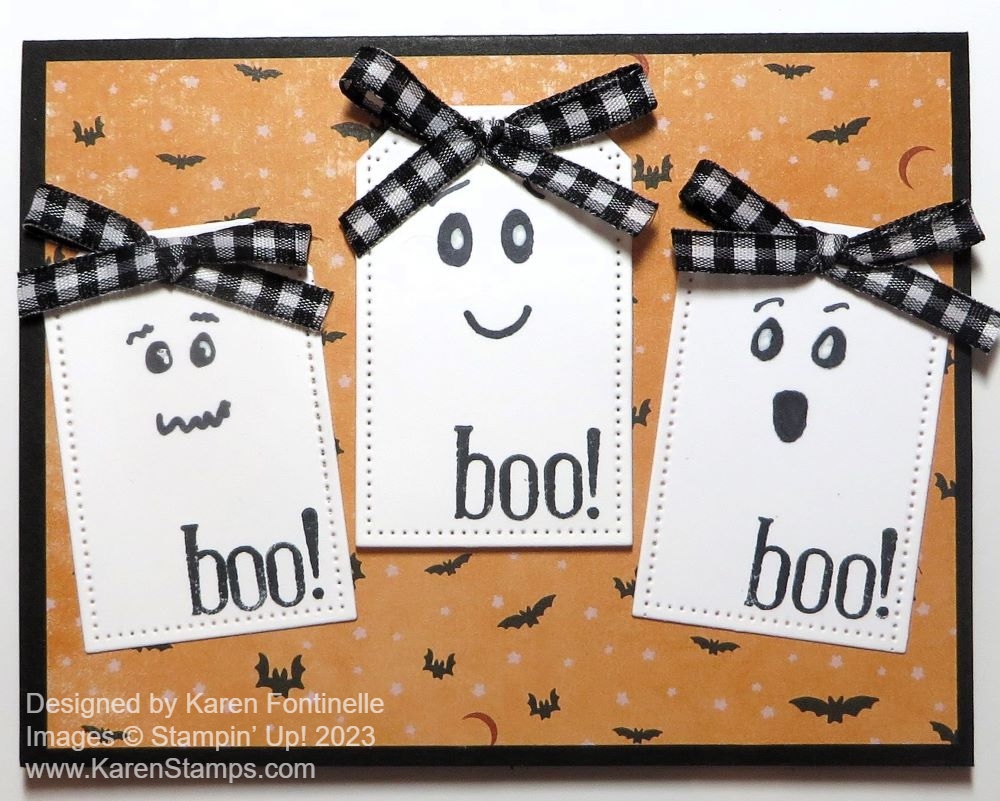
I got the idea for this Trio of Ghosts Halloween Card from something I saw online, probably on Pinterest. It was a group of little tags that looked like ghosts! That gave me the idea to make tags that looked like ghosts but put them on a card! Why not have fun making a Halloween card?!
This card base is Basic Black with a layer of the Them Bones Designer Series Paper. I chose the pattern with the tiny bats because they are flying with the ghosts! You could make similar ghosts in any number of ways depending on what you have on hand to use. For my ghosts, I used the Tailor Made Tags Dies but I made them shorter than the die. If the die is longer than you want, roll the die through as far as you want it, then take it out of the machine. Scoot the die up so it is where you want the bottom of the tag to be but align it with what is already diecut. You will be able to feel it when it fits perfectly. Just try it and you will figure it out!
I drew on faces with a Stampin’ Blends Black marker. If you have a small hole punch you could punch out the black eyes to adhere instead of drawing and add that little white highlight with a gel pen.
The “boo” is stamped with the Alphabest Stamp Set and Memento ink. You wouldn’t have to add that but I thought it was cute! The center ghost is popped up with Stampin’ Dimensionals.
At the top of each ghost, I tied a little bow with the Black & White 1/4″ Gingham Ribbon and adhered it with a Mini Glue Dot. Each bow covers up the little tag hole but you could also tie ribbon through the hole instead of a bow.
If you had “googlie eyes” you could adhere those on the ghosts instead of drawing on the eyes.
There you have another idea for a Halloween card! We are almost out of time!
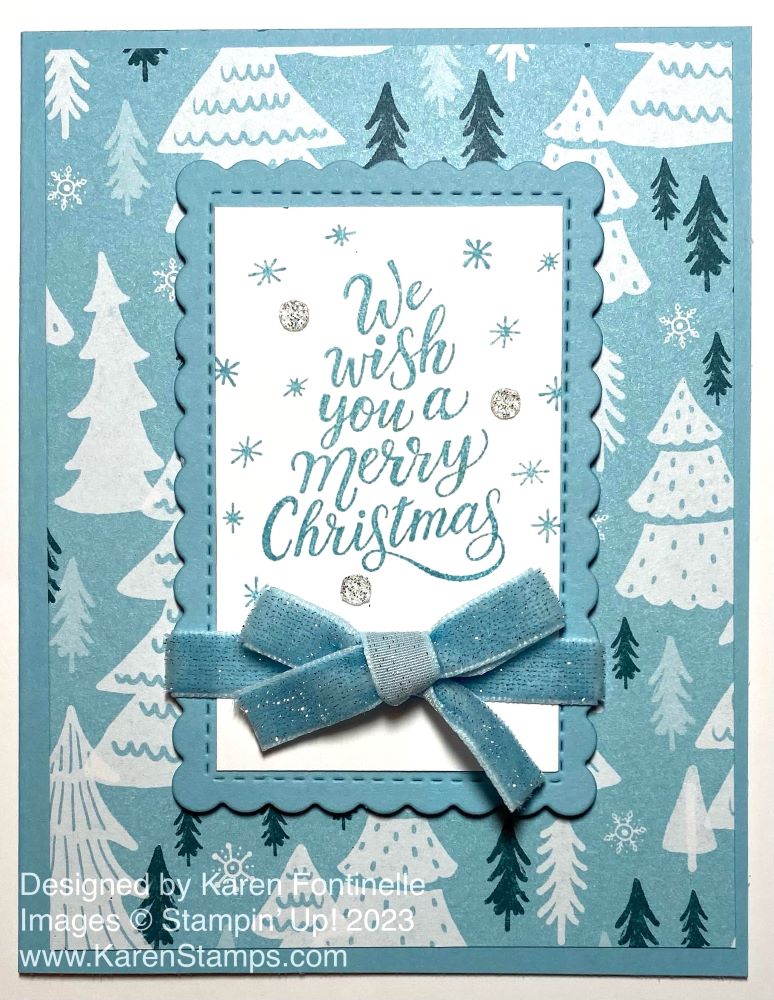
I had a different idea for this A Walk in the Forest Merry Christmas Card, but I like how it turned out. In fact, I liked it so much that as long as I had all the materials out, I made several more cards just like this one for my Christmas card stash. I modified it a little bit which I’ll tell you about later.
The card base is Balmy Blue and the designer paper layer is in the A Walk In the Forest Designer Series Paper. You’ve probably seen this paper used in cards online but you may have missed it in the Stampin’ Up! Holiday Mini Catalog. You’ll find the description of this paper at the top of page 5. If you stop and read the “Making a Difference” paragraph on that page, you’ll see that Stampin’ Up! will donate $3 for every package sold to support organizations dedicated to spreading cheer and providing support to those in need.
In the center, I used a Scalloped Contours die to cut a scalloped rectangle and also cut a piece of Basic White to fit inside the rectangle. I just measured and cut it with my Paper Trimmer. I stamped the greeting and some tiny snowflakes that are in the Merriest Trees Stamp Set in Balmy Blue ink. On this card, I wrapped around a piece of Balmy Blue 3/8″ Sparkle Ribbon and added a bow separately, adhered with Glue Dots. The whole greeting piece is popped up on Stampin’ Dimensionals. Then I added some white Adhesive-Backed Glitter Sequins.
On the extra cards I made, I decided to adhere the center piece flat on the card since they will be mailed. If your card gets too thick, that’s a problem when you mail it. These cards still have some bulk with the bow because the ribbon is velvety with sparkles! Beautiful but a little thicker! On these extra cards, instead of the Glitter Sequins, I added the Balmy Blue sequins in the Pastel Adhesive-Backed Sequins. They look pretty as well!
Hope you have an early start on your Christmas cards! If you need more holiday ideas, sign up for my Mailing List in the red box here on my blog to get my 12 Weeks of Christmas emails every Wednesday with an exclusive idea each week!
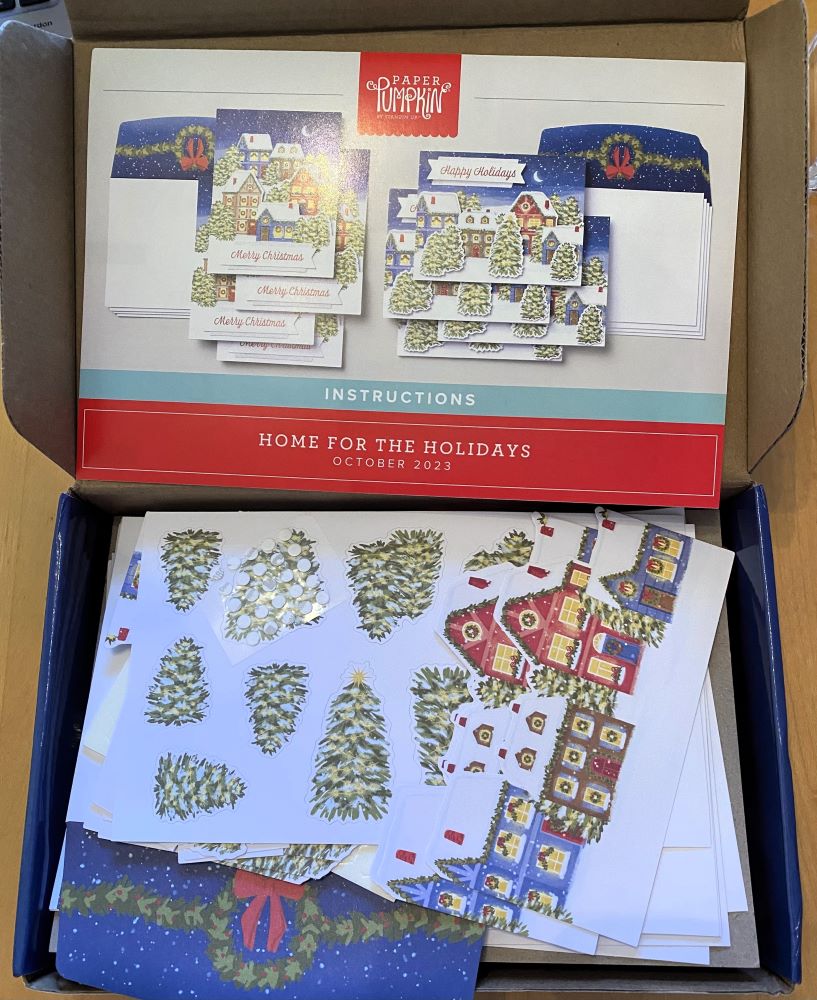
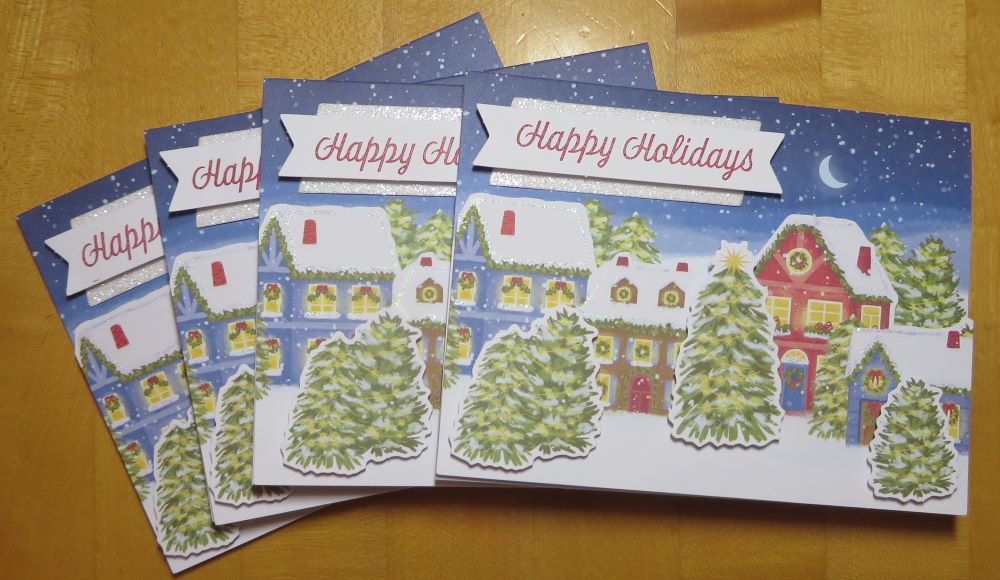
I always love the Paper Pumpkin holiday kits and this Paper Pumpkin Home For the Holidays Kit is no exception! It all starts with the beautiful box that you can save and use for packing away some Christmas items after the holidays and know that it will be easily recognizable! The contents of the box were all wrapped up in red tissue paper. I like to say that getting a Paper Pumpkin Kit in the mail is a gift you give yourself and each kit is certainly made to look like a gift that you will enjoy opening!
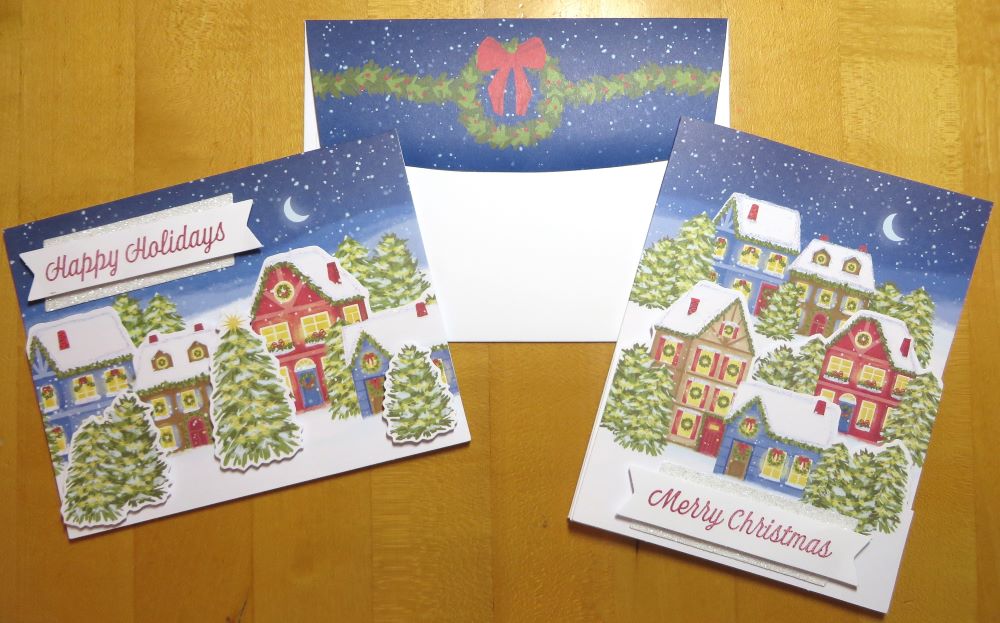
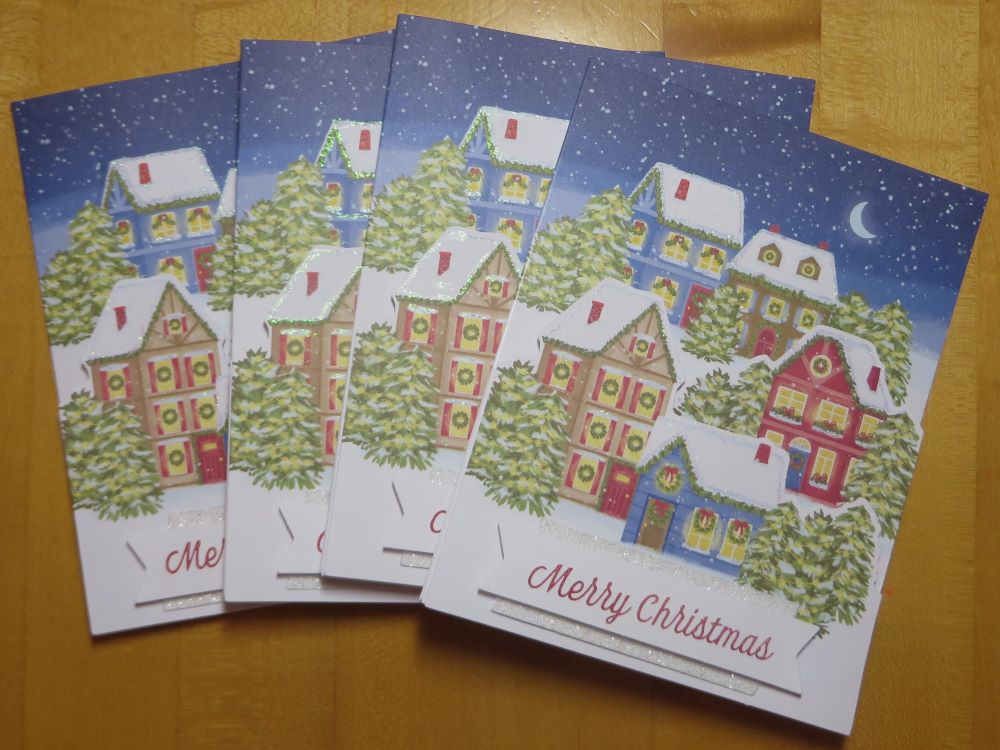
This kit made eight Christmas cards, four of each of two designs. The only stamping was for the greeting which was popped up over a piece of glitter paper. There were extra cutouts of houses to layer on the card front, plus some evergreen trees. For a special bonus, there was a bottle of glitter glue to apply along the roof lines of the houses and on the windows. The scenes are really beautiful and easy to put together. If you hate using dimensionals and peeling off those little backing papers, this kit might not be for you! There are a lot of “popped up” things on these cards! There is also a nice sentiment to stamp inside the cards.
Here is one card design. The houses are the layer that you add with dimensionals, which are provided in the kit. Then you add the trees popped up as well, plus the greeting at the top.
Here is the second card design. This one has two separate pieces to adhere with dimensional to create layers of the decorated houses. The greeting is placed at the bottom of the card. And then the extra-fun part of outlining the houses wit the glitter glue.
Possibly Stampin’ Up! will find they have extra Paper Pumpkin Kits and will add them to the Online Store. If you would like one, just sign up for a Paper Pumpkin subscription first and then purchase your kit plus maybe the add-on Cards & Envelopes.
The November Paper Pumpkin Kit (sign up by November 10th to get this kit!) looks like it continues the same beautiful theme but this time you make small gift boxes for a little treat, gift or whatever you want to enclose.
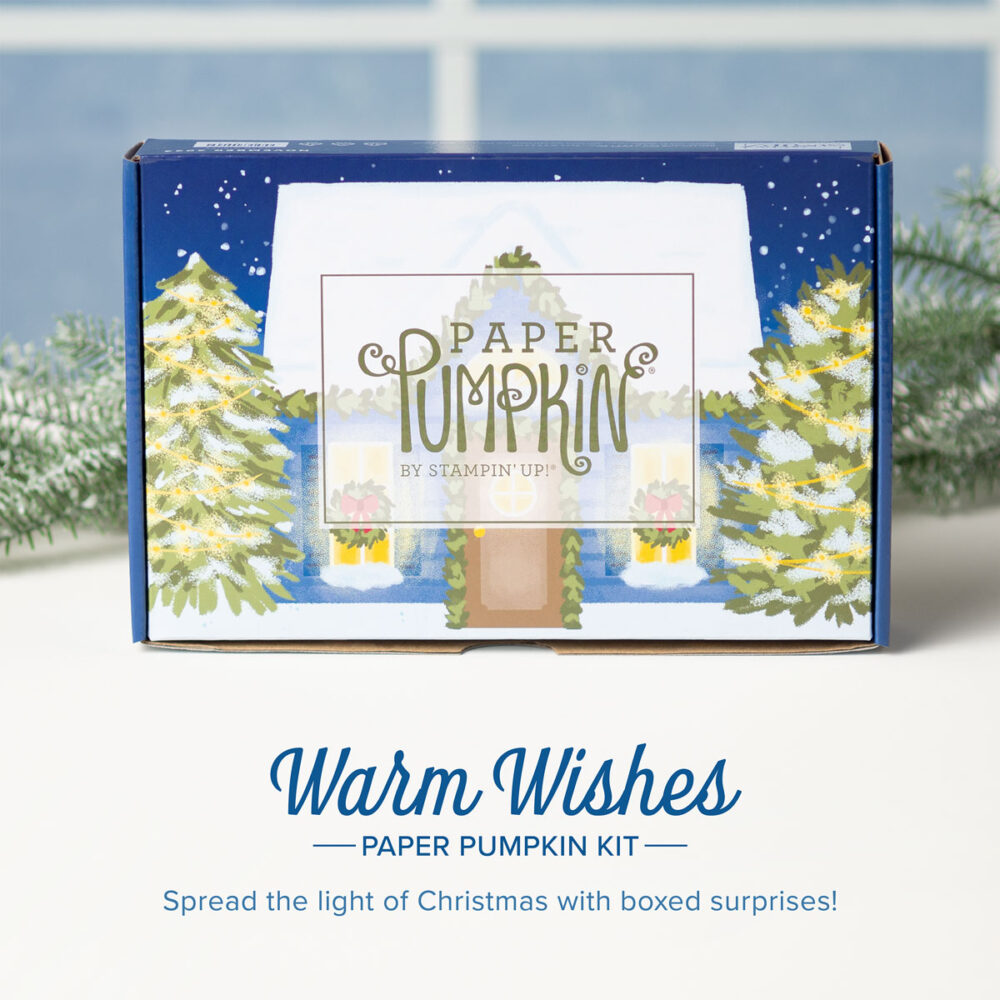
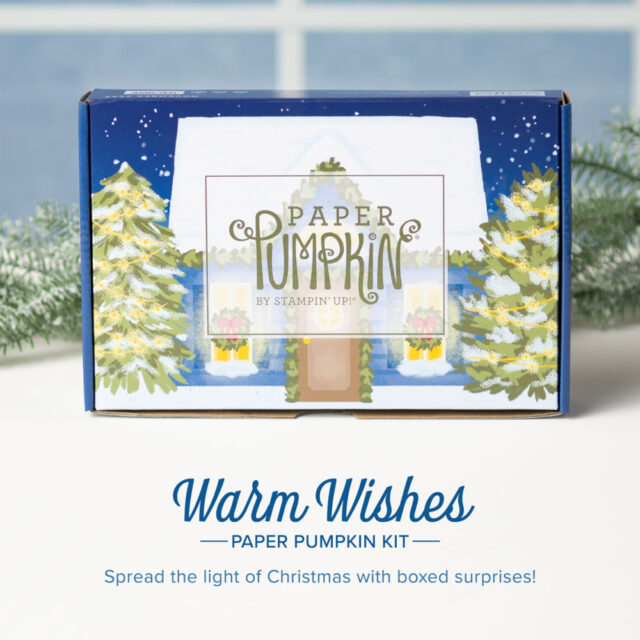
This next Paper Pumpkin kit, for November 2023, is called Warm Wishes and comes in a decorative box very similar to the October kit.
Here are the details of the Warm Wishes Paper Pumpin Kit:
-8 boxes; 4 each of 2 designs -1 Mossy Meadow Stampin’ Spot -Iridescent glitter accents on paper -Precut paper pieces -Linen thread -Treat bags -Warm Wishes photopolymer stamp set -Completed box size: 4-1/4″ x 4-1/2″ x 1-1/2″ and 4/1/4″ x 3-3/4″ x 1-1/2″ -Coordinating Stampin’ Up! colors: Balmy Blue, Blueberry Bushel, Cherry Cobbler, Crushed Curry, Daffodil Delight, Lemon Lolly, Mossy Meadow, Night of Navy, Old Olive, Pecan Pie, Real Red
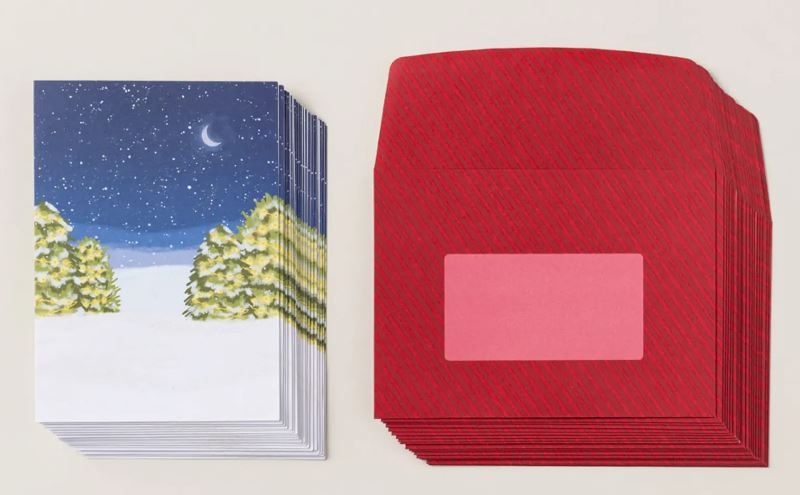
This kit even has an add-on of extra cards and decorated envelopes, the Warm Wishes Cards & Envelopes, which you can purchase only if you are a Paper Pumpkin subscriber. The card bases have iridescent glitter accents. All you have to do is add a stamped greeting if you want to keep it simple!
The week after the 20th of the month, after they try to process any credit cards that didn’t go through the first time around the 10th of the month if they have any extra kits or refills, they will post them in the Online Store. So if you have to have this easy Christmas card kit, sign up for Paper Pumpkin to get the November Kit (by November 10th), and then you can purchase any of the available Kits or Refills. Refills typically only contain the package of materials, not the stamp set or ink spot.
No risk, no obligation to continue your subscription for any certain length of time! Try it now and get in on at least one of the holiday kits to help with your Christmas wrapping! You can always skip a month if you want to or cancel. Just go into your account by the 10th of any month if you want to make any changes.
The other day when I was making a Christmas card for my 12 Weeks of Christmas email, I had planned to use this star pattern in Crushed Curry that you see on this Merry Bold & Bright Christmas Tree Card. You’ll find it in the Merry Bold & Bright Designer Series Paper. I was going to use it for the background of my card. But when I flipped it over to apply adhesive, I saw the colorful diagonal stripes and couldn’t resist. I applied the adhesive to the star pattern and used the striped side on my card. So this card makes up for not using the star pattern the other day! Also, this pattern could be used at any time during the year! Perfect for birthdays and other happy cards, kids or adults!
I could have used Crushed Curry for the card base, but I really wanted to use Real Red cardstock for the card. I planned to diecut a Christmas tree with the Merriest Trees Dies but then I spied this dotted paper in the Merry Bold & Bright Designer Series Paper. I diecut it to see how it would look and I liked it!
The greeting is in the Merry & Bright Stamp Set. I stamped it in Real Red ink on Basic White and diecut it with a banner shape in the Stylish Shapes Dies. Just to set it off a little bit, I also diecut a Real Red banner of the same size and cut it in half horizontally so I could adhere the halves to the top and bottom of the greeting.
To embellish the tree I die cut a star out of the Merriest Trees Dies and adhered it with tiny drops of Multipurpose Liquid Glue. You could use Adhesive Sheets before diecutting if you think of it! I also used the Adhesive-Backed Glitter Sequins to decorate the tree.
As I write this, the Merriest Trees Dies are unavailable but due back in stock the week of November 6th. The Glitter Sequins are also unavailable but due back in stock the week of November 13th. I love these Glitter Sequins but there are many other gems and jewels you probably have in your collection that you can use instead. I looked through my pile a couple of times before I decided. If there is an out-of-stock item you are waiting on, be sure to keep checking ahead of schedule (or ask me for any updates) because frequently products come back in stock early and sometimes even sell out again.
Maybe this card is a little less traditional for Christmas but I think I like it and maybe will make more for my holiday cards! I really do love this Merry Bold & Bright Designer Series Paper, probably mostly because I love Christmas lights so I love the Christmas lights on the designer paper!
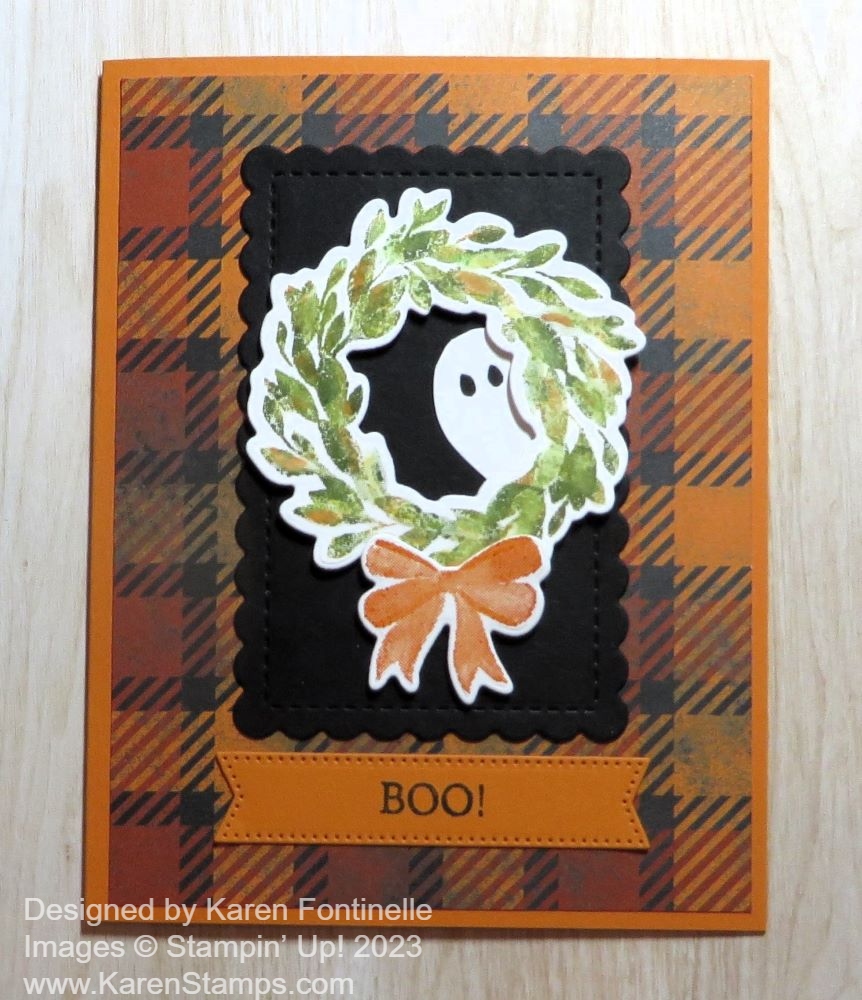
For this Halloween Ghost Wreath Card, I chose a stamp setyou might already own that you can use for Halloween. It’s the Cottage Wreaths Stamp Set that can be used for many occasions. Along with the greetings in the stamp set and the extra stamps, you can use this stamp set for Thanksgiving, Halloween, and Christmas. Or make the wreaths generic and use them for any occasion year-round.
I used a Pumpkin Pie cardstock card base for this card to go with the plaid pattern in the Them Bones Designer Series Paper. Sometimes we overlook the generic patterns in a themed designer paper package that can be used in many other ways.
For the wreath, I colored on the entire wreath stamp using Stampin’ Write Markers (not Blends) to get the multicolored look. I used a couple of different greens, a yellow, and an orange. Start with the lightest color because the markers will overlap; that way, you won’t get other colors on your markers. If you do, just scribble on scrap paper to get back to the original color. This stamp set is one of the “Distinktive” stamp sets that Stampin’ Up! developed to add a special texture to the stamped image. That’s why it doesn’t look totally flat and solid as we are used to, it looks more shaded just by stamping, not just by coloring. I used one of the Country Wreath Dies to cut out the wreath and the stamped bow.
For a little background to help the wreath stand out, I cut out a scalloped rectangle of Basic Black using the Scalloped Contours Dies. This is glued down flat on the card and the wreath is popped up on Stampin’ Dimensionals. The greeting is in the same stamp set and is stamped on Pumpkin Pie, then die cut with a banner in the Stylish Shapes Dies. I originally planned to place it across the middle of the wreath but changed my mind.
To make the wreath perfect for Halloween on this card, I folded a small piece of Basic White cardstock in half and cut out half a heart shape like you did when you were a kid! You could use a small heart punch or die as well. Cutting it myself was quicker! Then I cut the heart shape in half and put eyes on the ghost. I placed the ghost inside the wreath, just peeking out a bit!
Sometimes you make a card and you’re especially happy with it even if you didn’t have a great plan starting out! This card is one of those! I really like the colors of the paper and how the wreath turned out, and of course, especially the peeking ghost!
There are less than two weeks to make and send or give Halloween cards and treats so we have to get busy! Hope this idea helps!
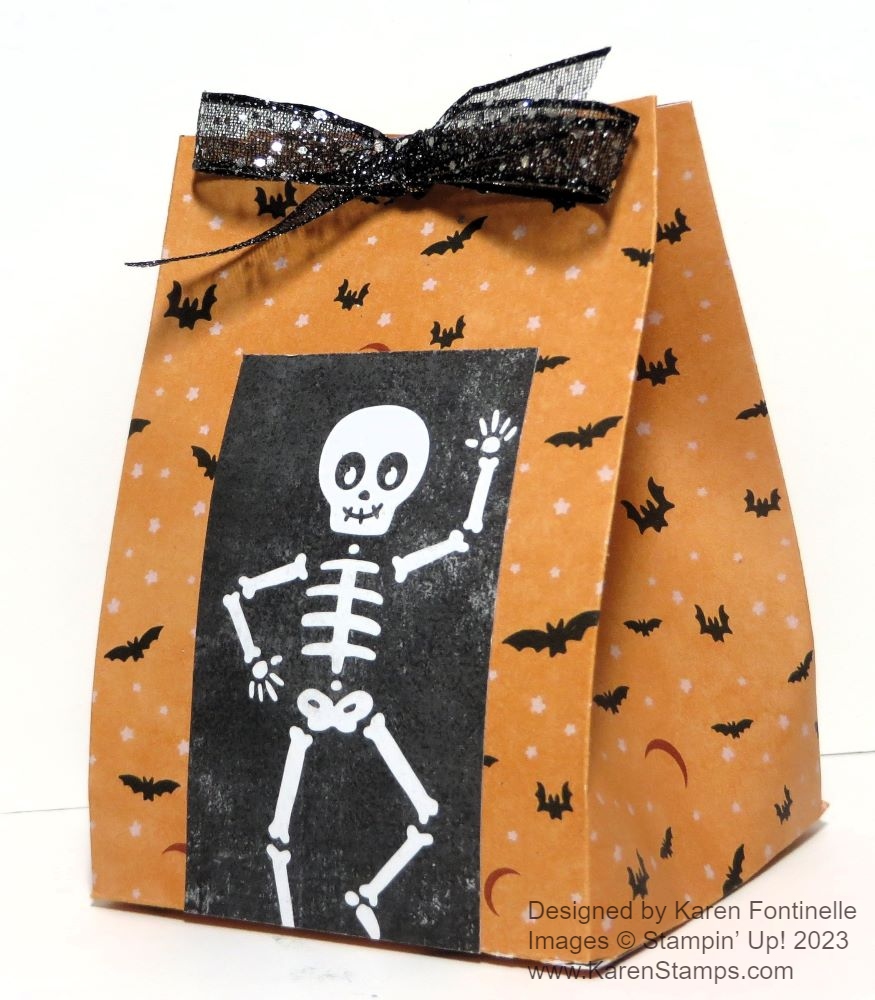
Here is a quick and easy candy or treat holder you can make! It’s the Them Bones Halloween Treat Bag and you can copy this exactly or make it and decorate it however you like! It only took a few minutes to make!
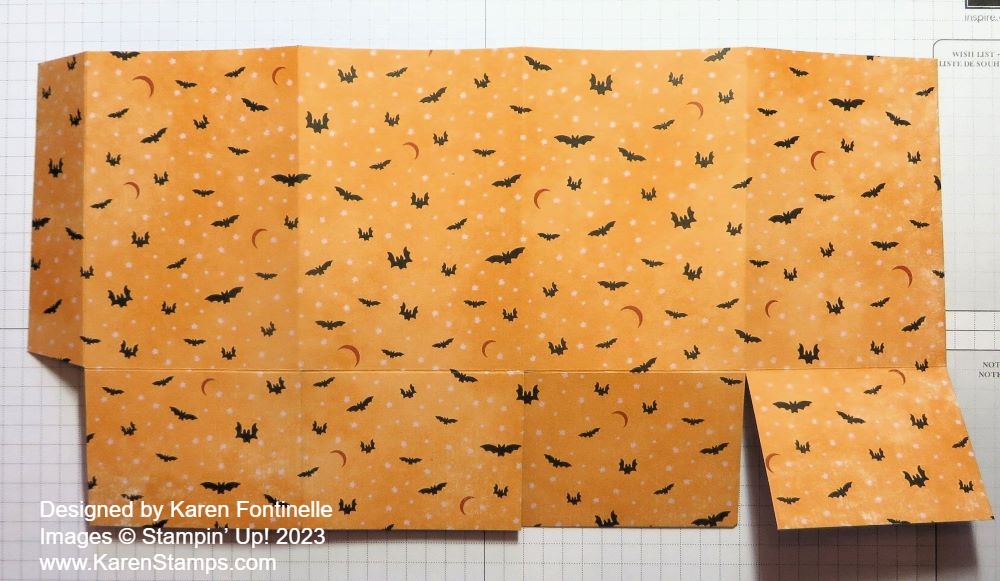
Start with a piece of cardstock or designer paper that is 12″ x 6″. Keep in mind that 2″ of that will be the bottom flaps, so if you want your treat bag taller, you need to add more height so maybe you would want to cut the paper 12″ x 8″. I used the batty pattern in the Them Bones Designer Series Paper in the Stampin’ Up! Holiday Catalog.
Using the Paper Trimmer or Scoring Tool you will score the paper so it can be folded into the bag shape. Pay attention if your paper has a pattern so you don’t end up with it upside down! Place the paper vertically so you can score the bottom flaps at 2″. Then turn the paper so the 12″ length goes across the top, horizontally. Score at 1″ 3 3/4″, 6 1/2″, and 9 1/4″.
Crease and fold all the score lines and use a Bone Folder to get a sharp crease. Cut out the small section at the bottom as you see in the diagram above (the light blue area). Cut up on all the bottom score lines for the flaps just up to the 2″ score line.
You can pretty well see from my paper above how it is scored, creased, and the bottom flaps cut apart. If you flipped the designer paper over, you would put adhesive on that narrow strip on one side and it adheres to the straight side on the other end of the paper.
Fold everything to form into the treat bag. Make sure you see how it all goes together before you start glueing! Add some strong Seal+ or Tear n Tape on that narrow section above the cut off piece. Then just fold the other end over flat on the table so it all lines up. This is easier than trying to hold it in your hands! Next, glue the bottom flaps together. Push your Bone Folder or something down inside the bag so you can push those bottom flaps together after they have been adhered to get a strong bond.
Before you decorate the bag, look and see where the paper is adhered together to form the bag shape so that you can put that in the back so it’s not so visible. Then decorate the front of the bag however you like. I cut out a rectangle with a skeleton on it that fit perfectly on the front of the bag. You could add a greeting or some jewels. I decided I liked it as is.
With this pattern, you can leave the top of the bag open if you like. Before adhering anything, you could even fold the top edge of the bag down if you wanted to show the inside design of the paper. I didn’t want my bag to be much shorter than it is so I didn’t do that. But if you want to put your treat inside and then close it up, you can add some kind of clip or punch two holes in the top with a punch and put a ribbon through. I used this Black Glittered Organdy Ribbon (retired) but the gingham ribbons we sell now would be cute also. To close the top of this bag, just push in the sides and work with it until you get the top edges even and the sides and bottom how you want them.
As I said before, you could use any paper and decorations to make these little bags for any occasions to hold treats or a small gift! Once you get the hang of making these little bags and boxes with your stamping supplies, you will open up another way to be creative!
Yesterday was an exciting morning in Texas and many other places and surprisingly, Paper Pumpkin helped us see the Eclipse 2023. We had beautiful, perfect weather (after a long, very hot summer!) with clear blue skies. If you had rain or clouds you probably didn’t get to see it.
This was an annular eclipse where the moon blocks the view of the sun from the earth. In a total eclipse, the moon entirely blocks the sun. In this annular eclipse the moon is farther away from the earth so it appears smaller and when it blocks the sun, it doesn’t completely cover the sun which leaves a “ring of fire” around the edge. We didn’t see that here in Houston, but we had about 85% coverage. We could have driven a few hours farther southwest and had better coverage.
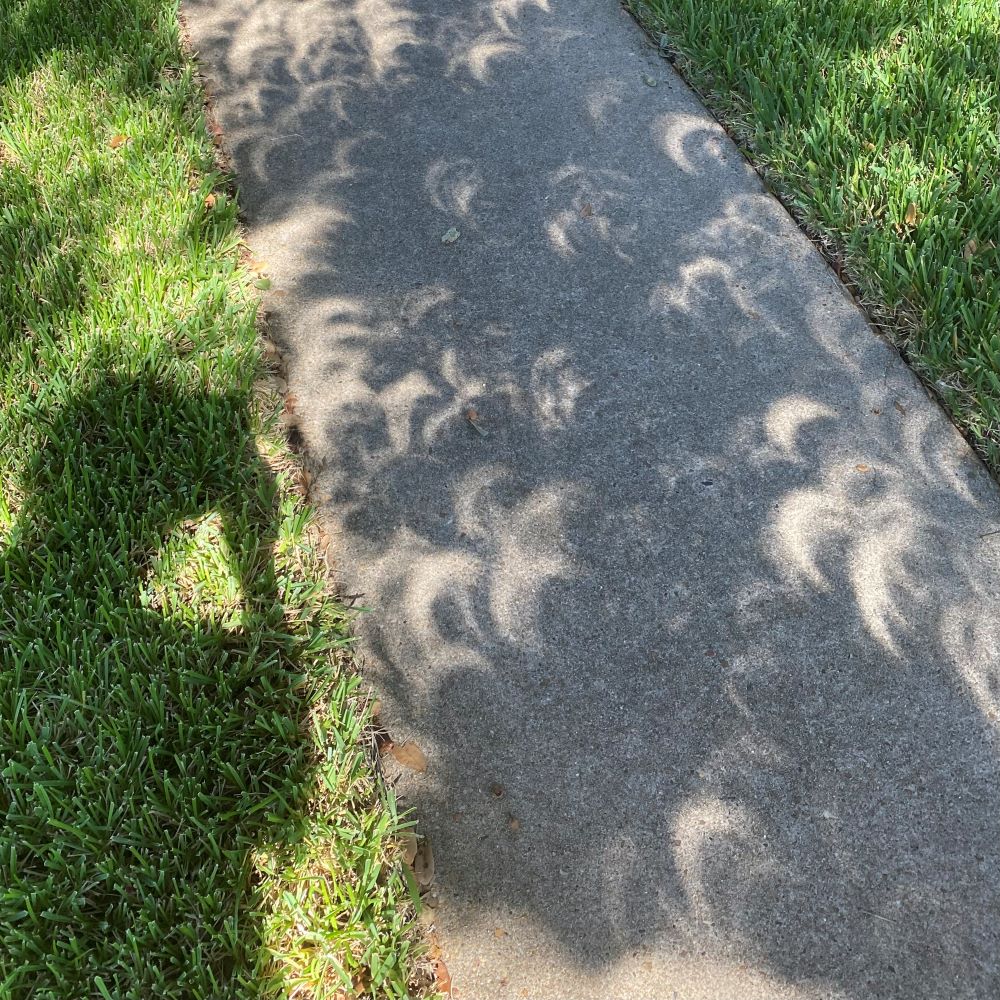
Of course we all know you shouldn’t look directly at the sun during an eclipse. We didn’t have the special glasses so we had to use other methods to see the eclipse. First of all, the easiest thing is to look at the sidewalk at the shadows of the leaves from the trees. You can very clearly see the shape of the eclipse.
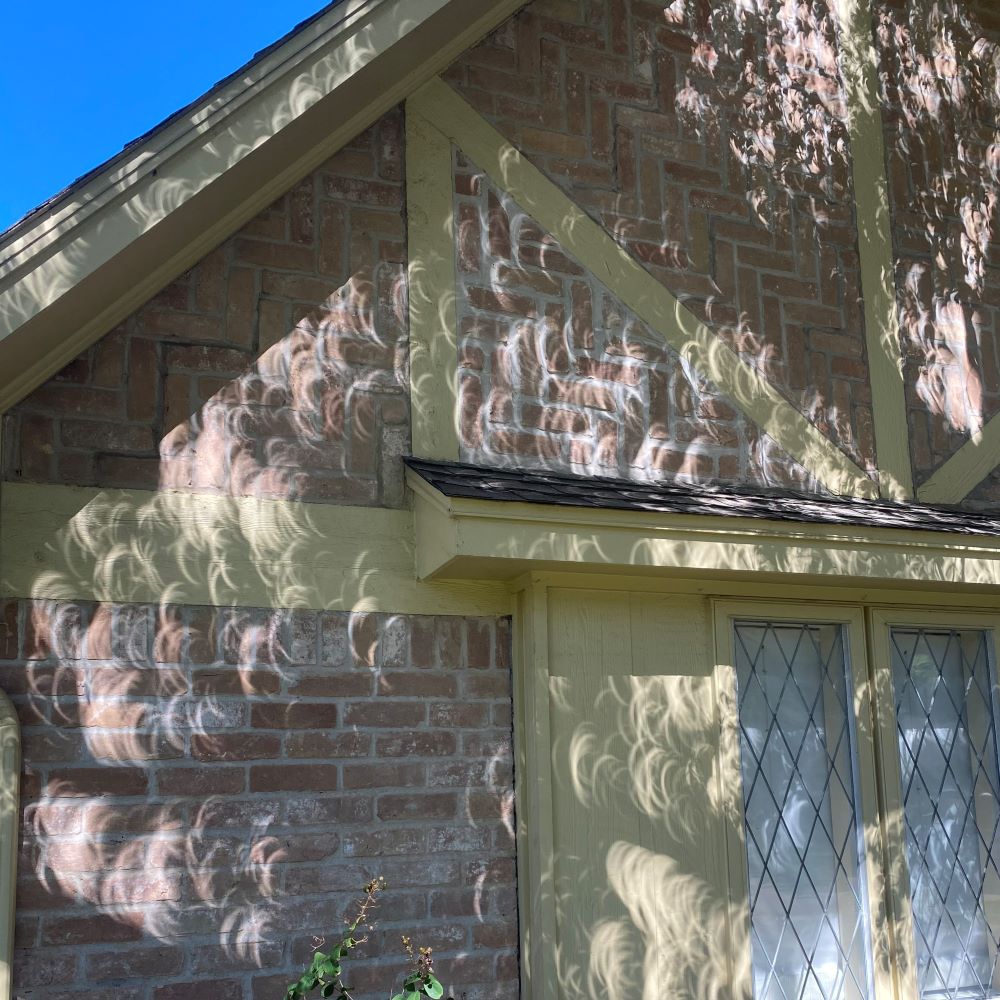
As time went on there were more and more shadow, in the street, up to our front porch, everywhere! Probably our favorite one was the shadows on the front of the house and the roof.
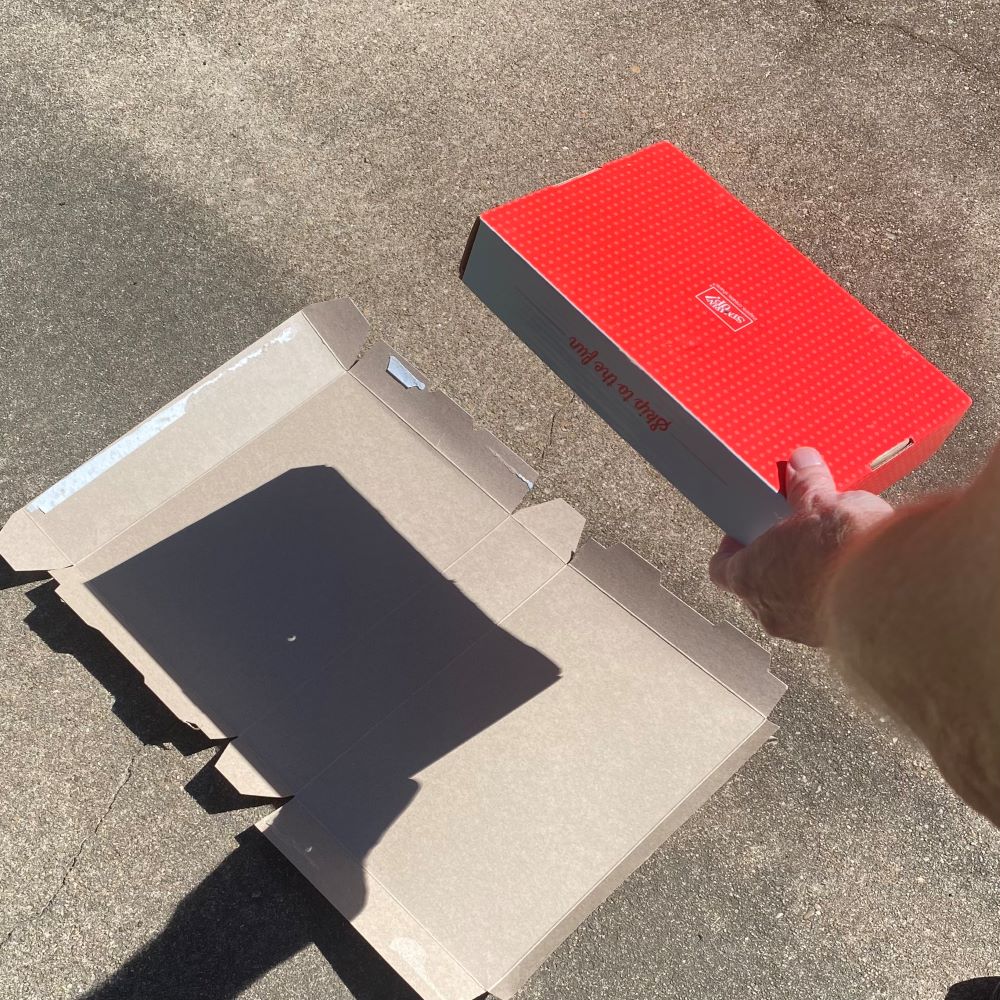
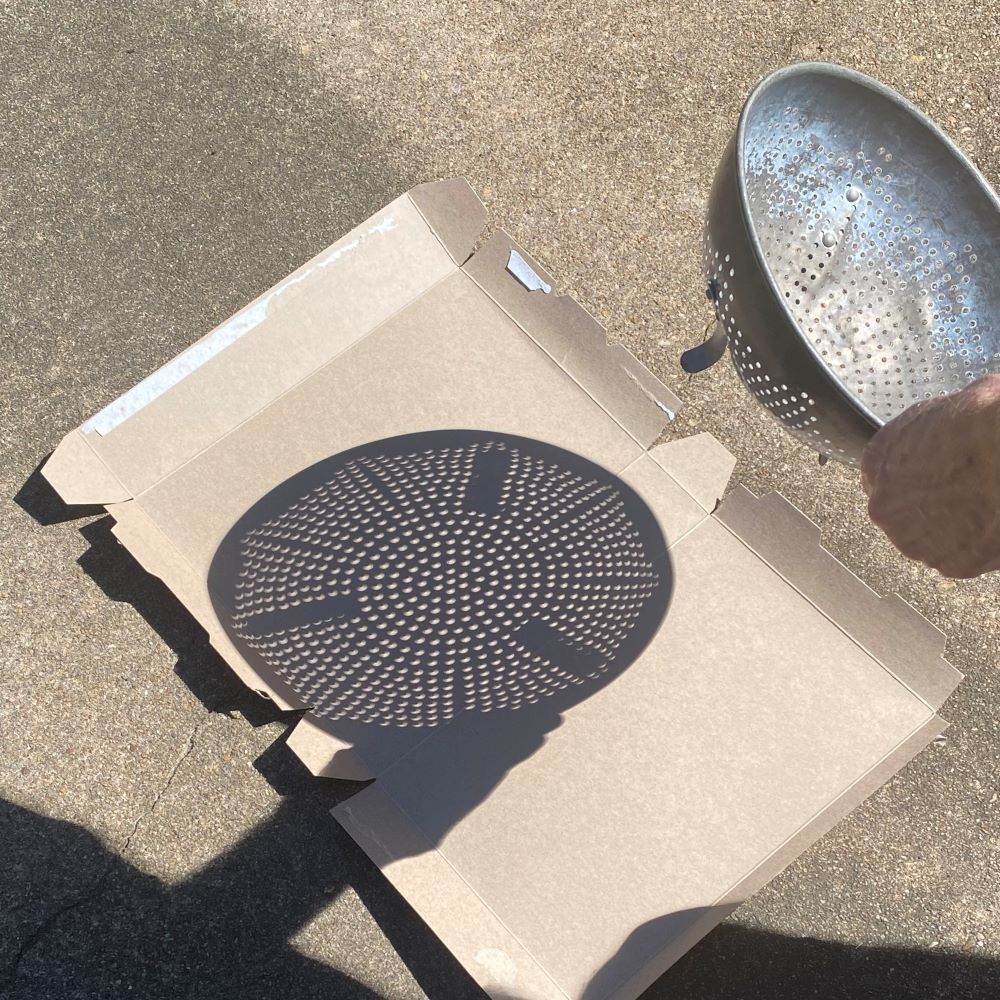
Then my husband was playing around out on the patio in the backyard. I had been working on finishing up some old Paper Pumpkin kits so I had some empty boxes on the dryer inside the box door ready to go out in the recycle bin. My husband grabbed one and did the old pinhole trick of punched a small hole in the box and focusing it on a box on the ground. I realized he was using a Paper Pumpkin box so I got the idea to post it on my blog!
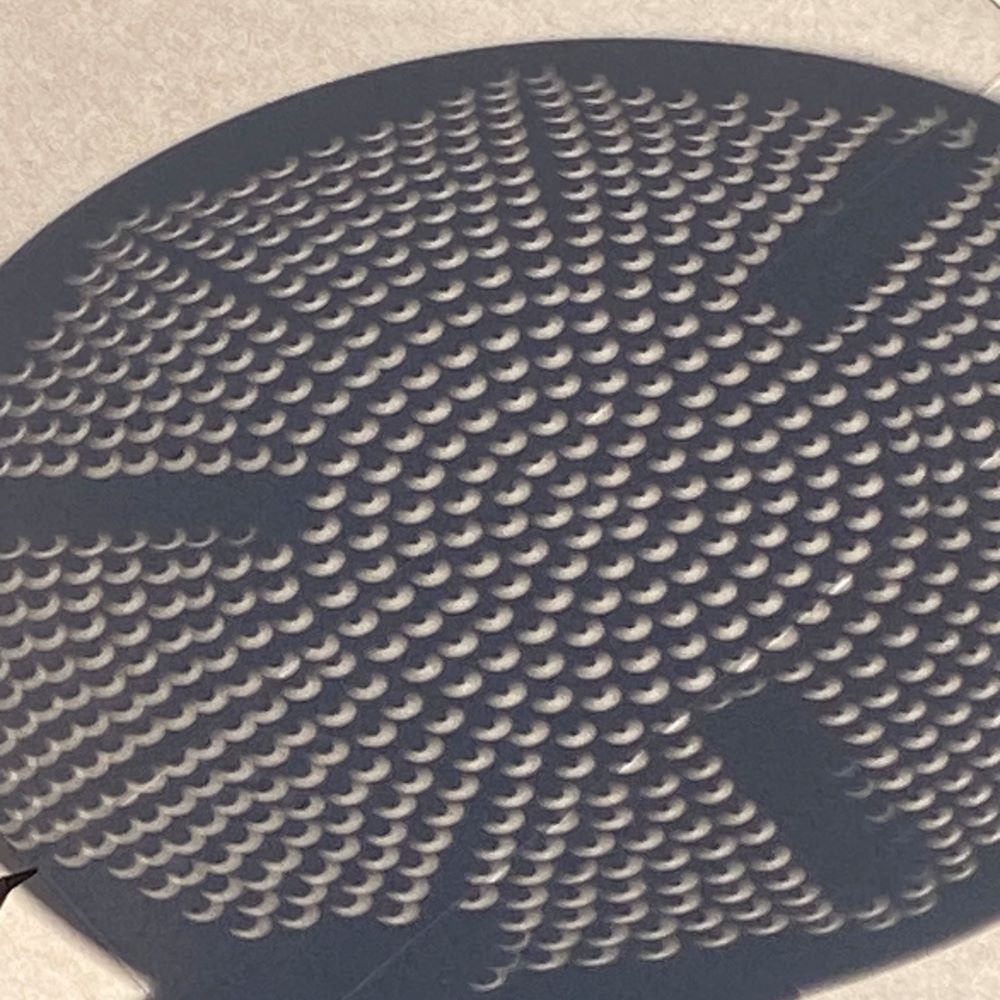
Then he also brought out my mother’s old colander that I still use and that made a fantastic artistic pattern!
I think this is really cool! Of course, the photo isn’t as sharp as it was seeing it in person but you get the idea!
That was our exciting morning of tracking the eclipse from around 10:30 am to the maximum eclipse around noon, and then ending around 1:30 pm. Besides viewing the eclipse, it was fun to see other neighbors outside and get to chat with them! Usually we are inside our airconditioned houses, but as I said the weather yesterday was perfect for being outside!
So next time there is an eclipse, grab an empty Paper Pumpkin box and let it help you see the shapes of the eclipse without endangering your eyes!
Get your Paper Pumpkin box HERE with a fun papercrafting project inside. All the materials you need are included except scissors. No risk, no obligation! Try it out for at least one month and see if you enjoy it! It’s fun to get a Paper Pumpkin Kit in your mailbox once a month!
Here is the November Paper Pumpkin Kit! Make treat boxes for the holidays! Or use the materials to design your own projects! Sign up by November 10th!
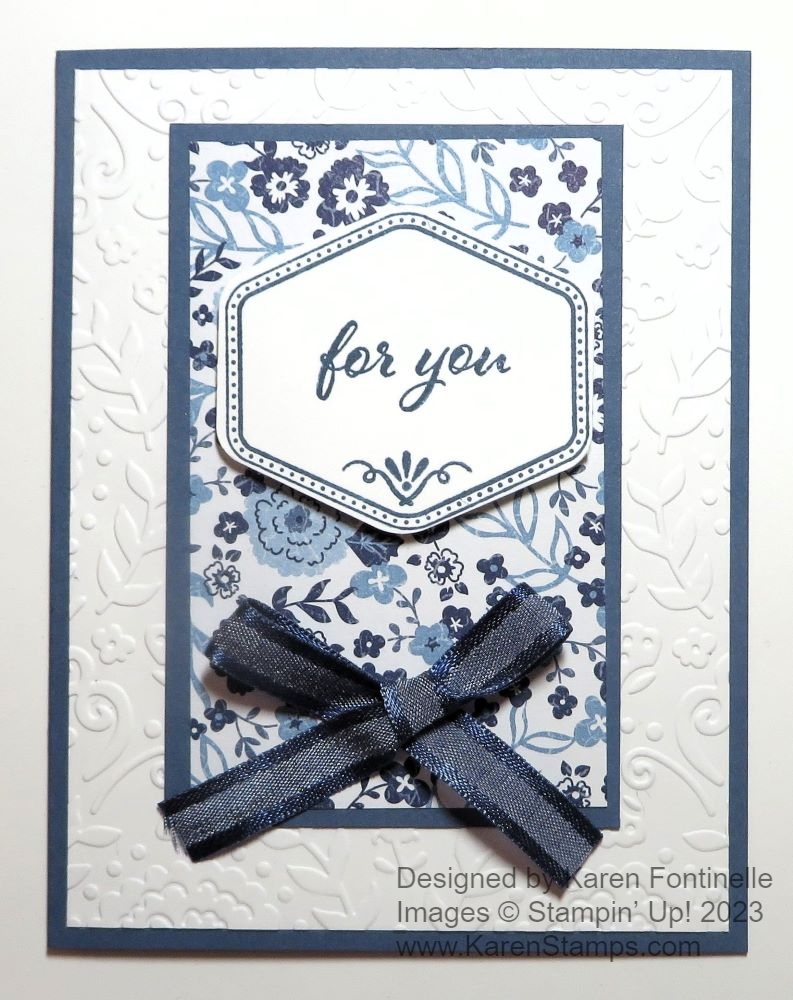
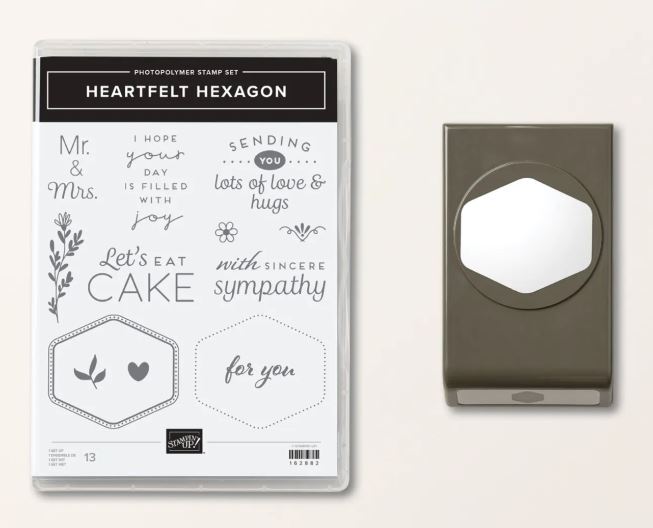
The idea for this Heartfelt Hexagon For You Card came from copying my own card from a while back! I was looking through my stash of cards and found this one I’d made before and thought I’d just copy it using a new punch!
Stampin’ Up! released this Bundle ahead of World Card Making Day last weekend. It was one of the sets they used during the virtual event to make a card. My order didn’t come in time for that so this is the first time I’ve played with the stamp set and punch.
It looks like a great stamp set to use with a punch you can use a lot! The punch can be used without the stamp set in many ways. You can punch out other images, words, or just paper shapes. Choose from a simple dotted border or one with a little more fancier border. Here is my first tip – when stamping the simple dotted border, just use a light touch. Stamp it and get out! Don’t keep pressing on the stamp because you will automatically wobble it and the dots will be blurry! When I looked closely at my stamped image the first time I realized my little dots were not perfectly shaped anymore. Then I remember hearing another Demonstrator give that tip…or maybe it was on the virtual event.
The next tip is to be cautious when you pull the hexagon outline off the case or off the stamping block. You don’t want it to get out of shape. If it does, you can lay it stamping image down on the table, let it settle for a moment, and then place the block on it to pick it up. That way it will be in its natural shape. My stamp really played games with my eyes or my brain! If I laid it down on the table not in the same position as the punch, it looked all wonky to me and I thought I’d stretched it completely out of shape. It was the weirdest thing! All I had to do was turn it a bit and it was correct!
The card base is Midnight Muse with a layer of Basic White. I embossed the Basic White with the Countryside Blossoms Embossing Folder. Most of the design doesn’t show but I like the little leaves along the side plus just a peak at the rest of the folder’s design.
The center layer is Midnight Muse measuring 2 3/4″ x 4 1/4″ I used the Countryside Inn Designer Series Paper for the layer. It measures 2 1/2″ x 4″. All of that is adhered flat on the card.
I stamped the fancier border on Basic White with Misty Moonlight ink and punched it with the Heartfelt Hexagon Punch. It is stamped with a greeting in the same stamp set along with the little design. Just that little design adds so much, I think! I popped up the hexagon with Stampin’ Dimensionals.
For a finishing touch, I tied a bow with the Night of Navy 3/8″ Bordered Ribbon and adhered it on the card with Mini Glue Dots. If I made the same card again, I might move the ribbon up to the bottom of the hexagon, but it’s okay as is. This is really a pretty basic card without frills but still looks nice. You could add some jewels or gems or sequins if you wanted to. Certainly you can change the greeting for other occasions.
Just search for Heartfelt Hexagon Bundle or the Item number 162889 and it will come up. Or just search for hexagon. I think it is just listed under Products, no special category. This is a Bundle that I think you want. The stamp set is versatile and useful and so is the punch so you will get a lot of use out of both!
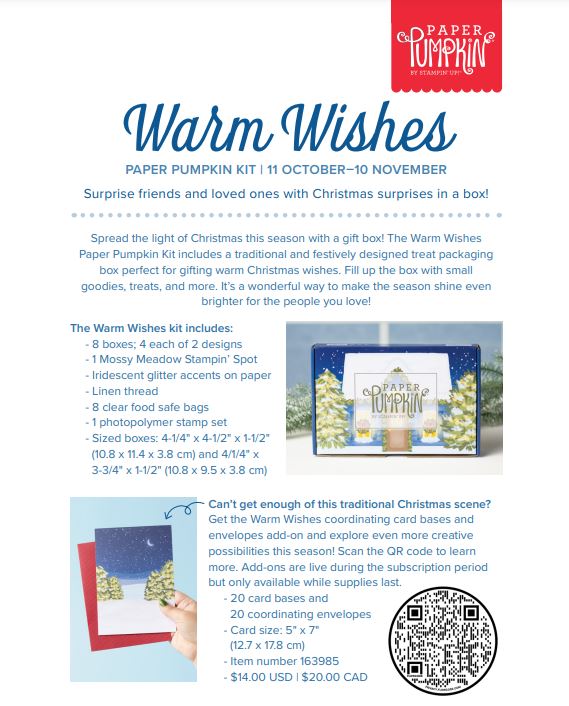
Just as soon as the current month’s Paper Pumpkin goes out in the mail, the next day we find out what the next Paper Pumpkin Kit will be! The November Paper Pumpkin Kit, the papercrafting kit that comes to you in the mail every month, is called “Warm Wishes” and is a kit to make holiday treat boxes! Always fun things for the holidays! The holiday Paper Pumpkin Kits are usually my favorites.
“Light up the Christmas season with this month’s Paper Pumpkin kit! With traditional Christmas home designs and warm Christmas wishes, spread the light of Christmas with a gift box! Plus, you can get the Warm Wishes Cards & Envelopes Add-On to take your Christmas crafting even further (available while supplies last).” (You can only purchase these cards and envelopes if you are a Paper Pumpkin subscriber.
Kit Details::
This kit includes:
8 boxes; 4 each of 2 designs 1 Mossy Meadow Stampin’ Spot Iridescent glitter accents on paper Precut paper pieces Linen thread Treat bags Warm Wishes photopolymer stamp set
Completed box size: 4-1/4″ x 4-1/2″ x 1-1/2″ and 4/1/4″ x 3-3/4″ x 1-1/2″
Coordinating Stampin’ Up! colors: Balmy Blue, Blueberry Bushel, Cherry Cobbler, Crushed Curry, Daffodil Delight, Lemon Lolly, Mossy Meadow, Night of Navy, Old Olive, Pecan Pie, Real Red
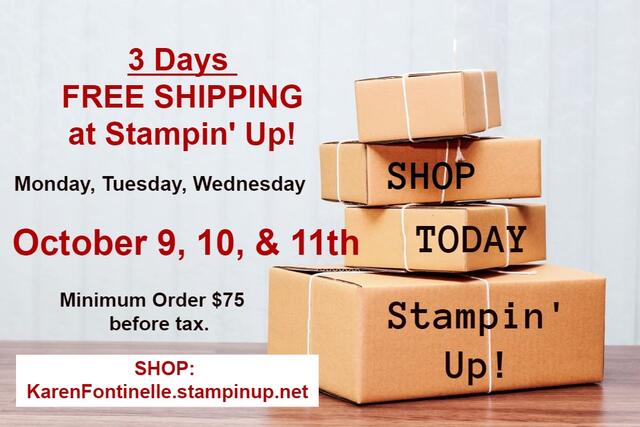
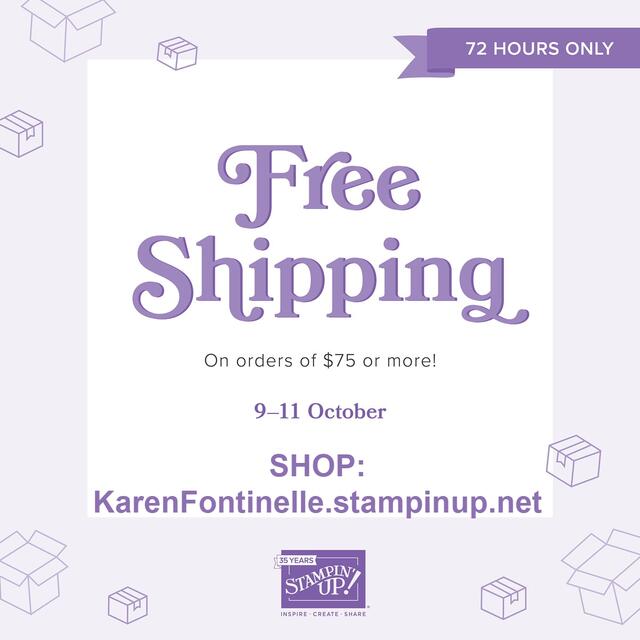
Special Note! Today, October 11th, is the LAST DAY for FREE SHIPPING (with a $75 minimum order!). Don’t miss it!
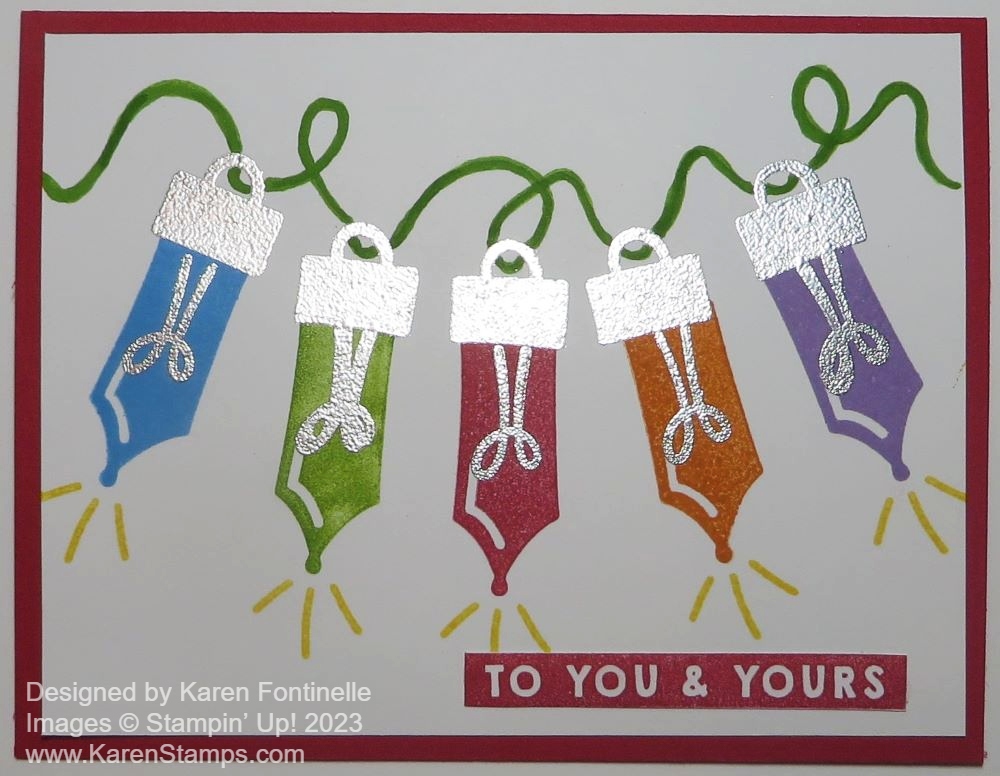
For this Merry & Bright Lights Christmas Card I wanted just to stamp the little light bulbs and see what I could do without die-cutting or cutting out. It turned out to be a fun card to make! I used the Merry & Bright Stamp Set in the Stampin’ Up! Holiday Mini Catalog on page 9. You can purchase the whole Merry, Bold & Bright Suite if you want all the fun things! I especially love the Merry Bold & Bright Designer Series Paper! I didn’t use it on this card, but I’ve used it on others.
The card base is Real Red but you can choose any color to match the color you use on the card. The stamping of the lights is done on Basic White. I used Azure Afternoon, Granny Apple Green, Real Red, Pumpkin Pie, and Highland Heather ink to stamp the small bulbs. I love that this stamp set gives you two styles of Christmas bulbs to choose from!
After stamping the bulbs, I used Versamark ink to stamp the metal portion of the bulb and then used Silver embossing powder to heat emboss it. I also embossed the little filament inside the light bulbs with silver to make them stand out.
For the wire holding all the bulbs on the strand, I used a Granny Apple Green Stampin’ Write Marker and drew a curvy line connecting all the bulbs and looking like they are ready to be strung on the Christmas tree or outdoors on the house. I just free-handed the line but first I drew it with the tip end of the marker, then went over it with the brush tip. If you are unsure about freehanding this wire, draw it with pencil first and then go over it with the marker. You don’t have to be fancy, just make a line going through all the lights.
There also is a stamp to denote the brightness of the light bulbs, so I stamped that in Daffodil Delight at the tip of each bulb.
I used the greeting inside the stamp set and then cut it out along the colored edges and adhered it near the bottom corner of the card.
On the inside of the card, on Basic White cardstock, I stamped a greeting in different colors using the word stamps in the stamp set. Fortunately, they came out pretty straight and even! Then I stamped a Pumpkin Pie light bulb with a Smoky Slate light base. The filament inside the bulb is stamped with the same color as the bulb, Pumpkin Pie, but it shows up because it is a narrow image. Then I drew another green wire as I described above.
Certainly this Merry & Bright Stamp Set is a fun one to use!
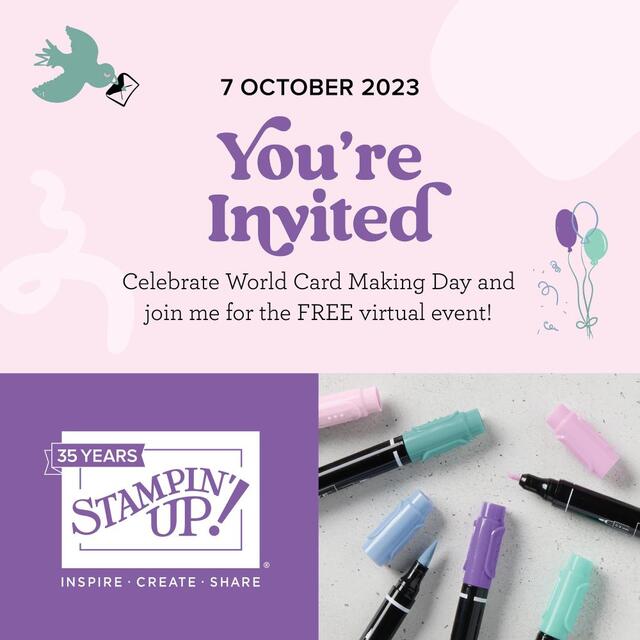
To continue celebrating World Card Making Day, after their fun virtual stamping event on Saturday, Stampin’ Up! is offering FREE SHIPPING for not just one day, but for 3 DAYS!!
I almost forgot that I had this paper and forgot where it came from! However, it was fun to use it to make this Shining Christmas Trees Card! This is a super easy card to make yet looks elegant enough to send out for your Christmas cards. It is good for making multiples. You don’t want something too complicated to make if you are mailing out 50 Christmas cards or whatever the number is!
One of the coordinating colors for this paper is Cherry Cobbler. Really the only other colors are Mossy Meadow and White! So that is easy! I used Cherry Cobbler for the card base and then added the Christmas tree patterned paper.
The greeting is stamped from the Brightest Glow Stamp Set (one carried over online from last year. It is stamped in Cherry Cobbler ink. I love the look of this greeting and have used it a lot. It was then diecut using a label shape in the Something Fancy Dies. This is one of those basic, very useful die sets. Then I cut the next larger shape out of Cherry Cobbler for a layer underneath the greeting. For a little embellishment, I adhered a bow tied with the very pretty Gold & Vanilla 3/8″ Satin Edged Ribbon.
If you didn’t have or didn’t care for Cherry Cobbler, I think you could use Real Red and no one would notice or chastise you! On the inside, add a white layer so you can stamp a message or write a note. Maybe adhere a strip of the same designer paper at the bottom or down the side of the inside layer for a little surprise decoration when the person opens the card!
I’m sure you could add some sparkly gems to this card, maybe just Iridescent Rhinestones because they would add sparkle without taking away anything from the card. But surprisingly, I just stopped after I added the ribbon!
Join everyone online this afternoon at the virtual
Stampin’ Up! World Card Making Day Event!
It is for EVERYONE and it is FREE!
Follow along, stamp along, or just watch for fun and relaxation as Stampin’ Up! provides just under three hours of stamping and creating three unique cards.
AND….After the World Card Making Day Event, Stampin’ Up! is having three days of FREE SHIPPING with a $75 order. Free Shipping will be Monday, Tuesday, & Wednesday, October 9-11, 2023! After the event, make out your Shopping List and pick up a few things without paying shipping. Your order must be $75 in merchandise before tax.
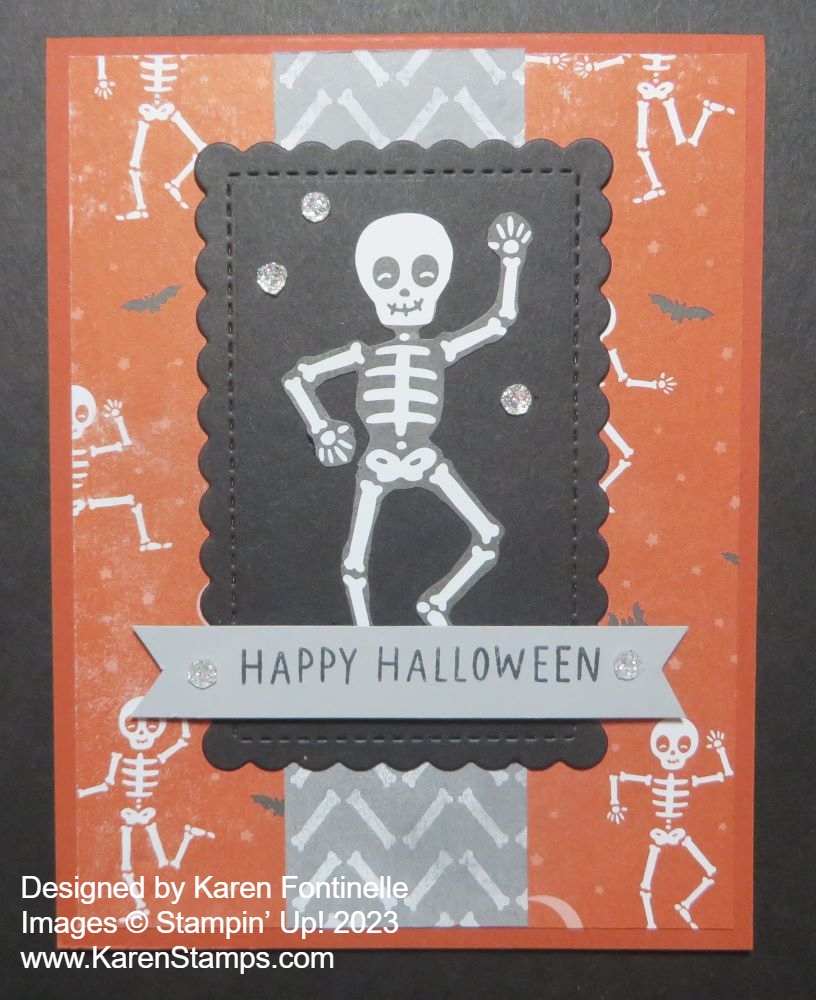
Here’s a fun Halloween card, the Them Bones Skeleton Happy Halloween Card, that I came up with playing around with the Them Bones Designer Series Paper. This paper has cute skeletons to use one way or another on Halloween projects. There is even the paper I used that has a design made of bones!
The card base is made with Cajun Craze cardstock. I cut it at 4 1/4″ x 11″ and scored at 5 1/2″ with the fold at the top. Then I added a layer of the Them Bones Paper with a bunch of little skeletons dancing around!
I cut a 1 3/4″ x 5 1/4″ strip of designer paper with the bones pattern to use somewhere on the card, likely on the side. But I tried it down the center of the card, and I liked that. By chance, there was already a black cardstock scalloped rectangle just the right size, cut with the Scalloped Contours Dies, in my package of cardstock so I just used it!
Since I don’t own the Bag of Bones Dies in the Them Bones Suite, I simply cut out the skeleton from another piece of the Them Bones Designer Paper with my Paper Snips. If you hate fussy cutting, then you need the dies and there are lots of fun dies to use in this set!
The greeting is stamped on Smoky Slate cardstock with Memento Black ink. The greeting is from the Paper Pumpkin Kit from September 2022 that happened to be lying on my table. I liked the one line that I could stamp on a narrow strip with flagged ends to pop up over the bottom of the skeleton’s legs. There is also a “Happy Halloween” greeting in the Pick of the Patch Stamp Set.
I added some Adhesive-Backed Glitter Sequins in white around the skeleton and on the ends of the greeting banner. You’ll find these in the Beary Christmas Suite but you can use them in lots of places, not just Christmas.
This card design could also be used on the front of a treat bag for Halloween or even as part of a scrapbook page. There are so many options with this Them Bones Designer Series Paper in the Holiday Mini Catalog! I think it was backordered recently but it is back in stock as I write this so grab it soon if you would like it!
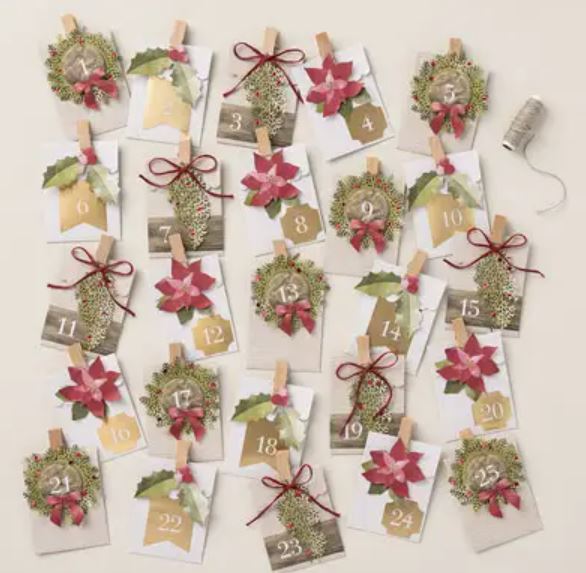
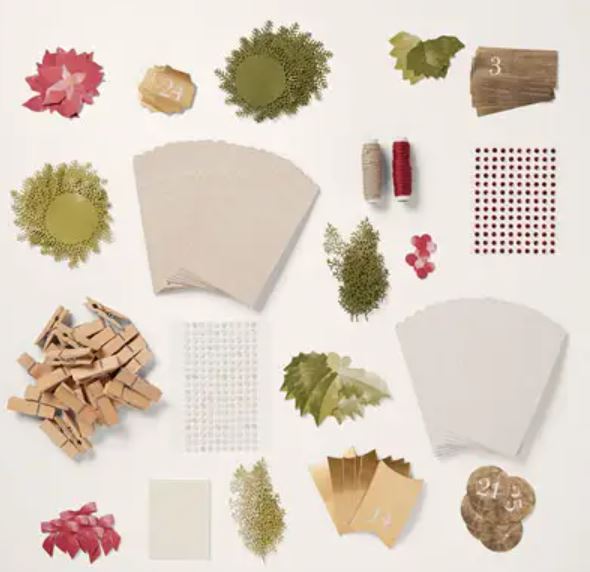
There’s a new holiday kit in the Stampin’ Up! Kits Collection! Bring the spirit of Christmas into your home with the Rustic Christmas Countdown Kit.
This kit has everything you need to create 25 individual envelopes that you can fill with small treats, kind messages, and more. With seasonal greenery, fun accent pieces, and gold detailing, you’ll be able to make and display your own unique hanging advent calendar anywhere you’d like. What a simple and easy way to count down the days ’til Christmas!
This kit includes:
-Enough supplies to create 25 individual envelopes -Printed die cuts, printed labels, adhesive, embellishments, clothespins, and twine -Folded envelope size: 4″ x 3″ (10.2 x 7.6 cm) -Coordinating colors: Cherry Cobbler, Crumb Cake, Mossy Meadow, Old Olive
You can use this kit for an Advent Calendar or maybe you will think of an alternate way to use this kit for your family. Maybe you will want to make it and give it as a gift to another family. Lots of possibilities! It looks like a beautiful kit and something different! Check it out!
Watch Sara Douglass show you how the Rustic Christmas Countdown Kit goes together!