Tag Archives: Stampin' Blends

Nature’s Sweetness Flowers and Foliage Card

Nature's Sweetness Flowers and Foliage Card

It took me a little while to figure out this card because I just am not very organized yet this New Year with stamping! My supplies are not in the right place after the holidays and I’m not sure which new products I have! But eventually, this Nature’s Sweetness Flowers and Foliage Card came together!

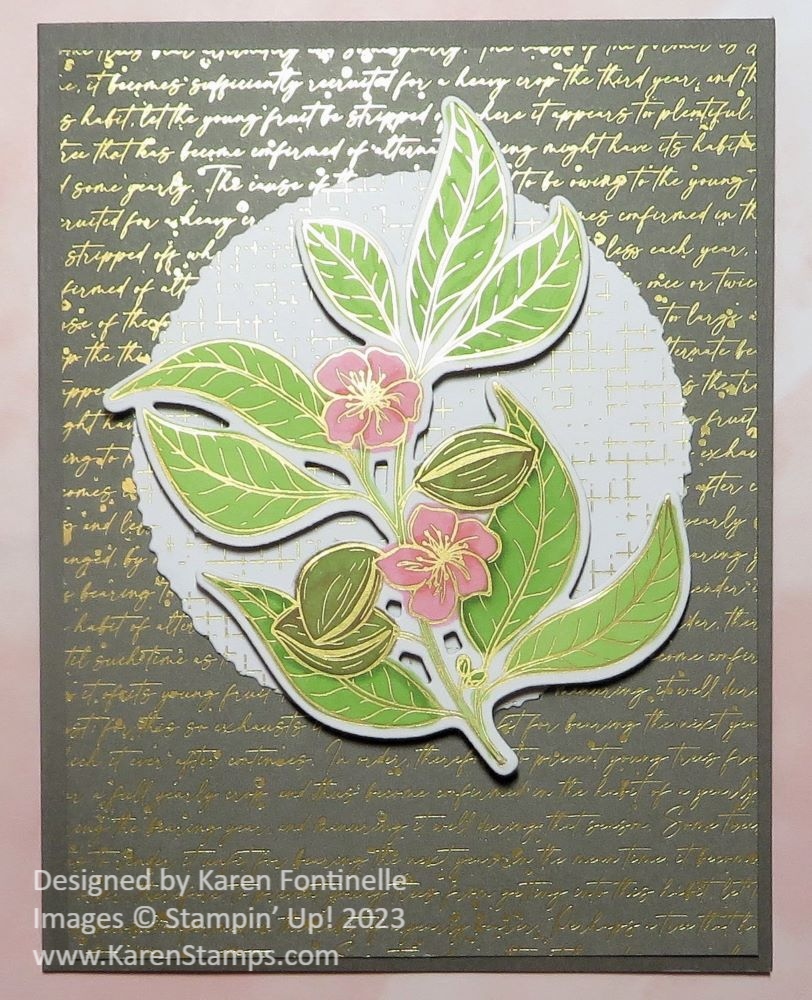
This Nature’s Sweetness Specialty Designer Series Paper is very pretty and very interesting with its gold foil accents on many pages and different designs than we usually have. This paper has images of plants and pages that look like they came from vintage almanacs and field journals. I think this is some paper and a Suite that might be difficult for some of us to know how to use but turns into something we end up loving! The entire Nature’s Sweetness Suite is featured on pages 40-43 in the new Spring Mini Catalog.

To make this card, I started with a card base of Pebbled Path cardstock to match the layer of designer series paper that has a very tiny cursive writing pattern in gold on it. It’s a vibrant design, I think.

On another piece of paper printed with foliage and flowers, I cut out a section that is now the focal point of the card. I colored in the leaves and flowers with Stampin’ Blends, mainly Granny Apple Green and Flirty Flamingo. Then I used the Lovely and Sweet Dies to cut out this foliage piece. I thought it probably needed a little background to help it stand out. I used the Deckled Circles Dies to cut out this piece from another of the Nature’s Sweetness Designer Paper. It’s kind of a grid design on the paper. The foliage piece is popped up on lots of Stampin’ Dimensionals.

Since I couldn’t settle on a sentiment or where to put one on this card, I made the executive decision to not put a sentiment. I can add one later, but really, I like the card as it stands right now. Rather elegant but simple! I can stamp a greeting inside on a Basic White layer I added or write a personal message. I stamped one of the other foliage images in the Lovely & Sweet Stamp Set on the inside layer of the card, down in the corner.

If you decide to try this interesting Suite, just play around with all the elements and you will find lots of opportunities for creativity!

SHOP STAMPIN’ UP! ONLINE HERE!

Zany Zoo Brights Z-Fold Birthday Card

Zany Zoo Brights Z-Fold Birthday Card

Sometimes you have an idea for a card but it doesn’t work out. Instead, something else “calls to you” and you come up with a completely different card than you imagined you would make. In this case, this Brights 6″ x 6″ Designer Series Paper caught my eye and I couldn’t resist! I already had some Poppy Parade cardstock out for my original idea, and I found a Z-Fold card base ready to be used in that package! Poppy Parade is one of the many colors in that designer paper pack so I had my card idea in my head! At least, the basics.

To make a Z-Fold card, you will fold the right half of the front of the card back toward the fold on the left. You’re folding the card front back on itself. Start with a piece of cardstock 5 1/2″ x 8 1/2″. Score at 2 1/8″ and 4 1/4″. Fold and crease in half, then fold at the 2 1/8″ score line so when you view the card from the top it looks like a “Z”.

To decorate the card, I cut a Poppy Parade diagonally striped piece of designer paper at 2″ x 5 3/8″ or you can make the measurements 1/8″ smaller at the width and length if you want more of the cardstock to show in the margins. On the inside, I cut a piece of the heart pattern at 4 1/8″ x 5 3/8″. It’s optional to add designer paper to the inside panel on the left of the card. It would be the same measurements as the striped pattern on the front panel.

For the card’s focal point, I thought it would be fun to use the Zany Zoo Stamp Set to go with the bright colors! I picked this cute little guy holding the balloons for a birthday! He is stamped with Memento Ink on a piece of Basic White that is diecut with one of the Countryside Corners Dies. I hadn’t done any coloring in a little while, so I got out my Stampin’ Blends alcohol markers and colored him in with Light and Dark Pecan Pie Stampin’ Blends and a little gray on his front. The balloons are colored with Poppy Parade, Tahitian Tide, and Parakeet Party Blends. The greeting is in the Zany Zoo Stamp Set and I got it to just fit on the piece!

I thought I would like layers of the colors I used for the balloons so I diecut a piece of Parakeet Party, Tahitian Tide, and Poppy Parade. But I didn’t want to make it all TOO big. I cheated a little and used my Paper Trimmer to try to, as evenly as possible, trim off a little of the Poppy Parade layer so I could use the regular-size die for the Tahitian Tide layer. Otherwise, the Poppy Parade would have been the same size as the Tahitian Tide and then the Tahitian Tide layer would have had to be the next largest die up (which might have been the largest one) and that was going to take up a lot of room on the card front.

When whatever your focal point is on the front of the card, you only want to glue half of it to that folded-back front section. So carefully figure out which side the glue will go on and try to center that part as best you can.

If you want a panel on the inside of the card, over a print as I have on this card, cut a shape the same size as the largest layer on the front so it doesn’t stick out and show when the card is closed. Then lay it face down on the back side of the focal piece, apply glue, and make sure it stays in place lined up with the front of the card, then close the back of the card over to the inside panel gets adhere to the inside of the card but stays hidden behind the front piece. You’ll understand when you do it!

For the inside of my card, I stamped a birthday greeting from the Cheerful Daisies Stamp Set and also some confetti with the stamp in the Zany Zoo Stamp Set in the same colors of ink I had already used on the front of the card – Poppy Parade, Parakeet Party, and Tahitian Tide. On the front of the card, I added some Iridescent Rhinestone Jewels for some sparkle.

Z-Fold cards are easy to make and for sure should be in everyone’s repertoire!

Unfortunately, this Brights 6″ x 6″ paper is backordered until the week of September 25 at this time, but many of you may already own it and of course, you can use whatever designer paper you have for the card that you want to make!

Here is a view of the card when opened.

Zany Zoo Brights Z-Fold Birthday Card open

I hope you will be inspired to try a Z-Fold card. Make it as simple or fancy as you like! Keep checking, maybe this Brights DSP will come back in stock sooner! Don’t forget to use your Bonus Coupons if you earned some in July. Use your Bonus Coupons by August 31.

SHOP STAMPIN’ UP! ONLINE HERE!