Yes, today is Father’s Day so if you are in need of a last-minute card, here are some ideas for “masculine cards”. These aren’t cards with brand new products so you might have them in your stash! Just change the greeting, but maybe these card ideas will spark ideas for you to make a quick card at the last minute!
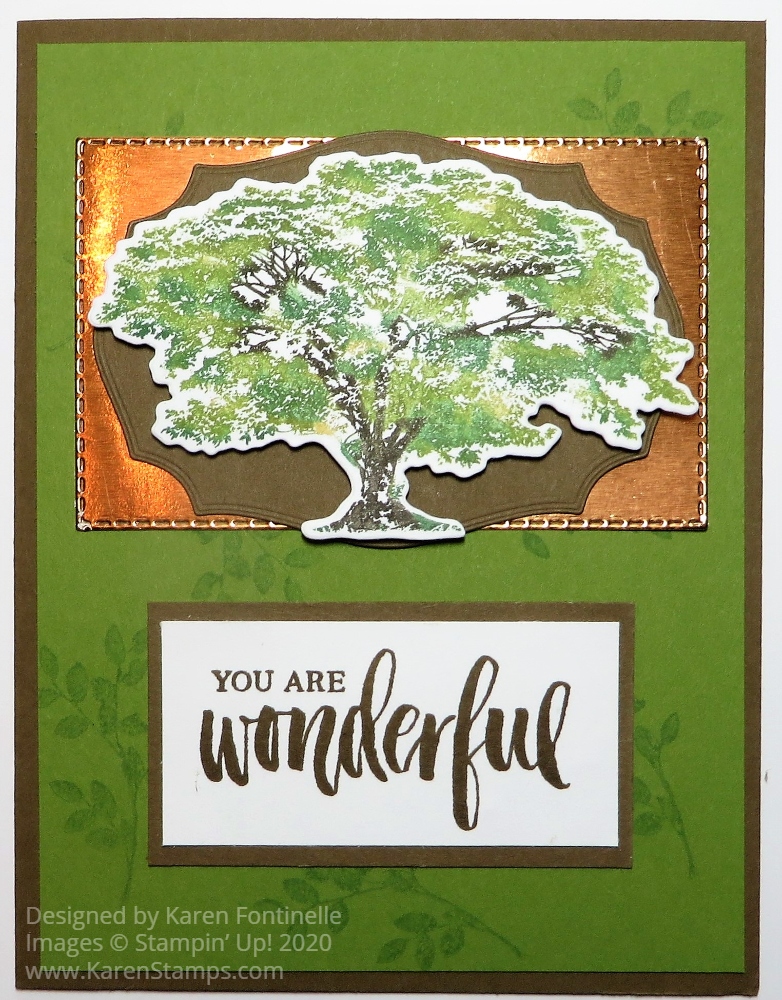
I chose a stamp set that you may already have in case you are wanting to make a good Father’s Day card for Sunday or a masculine card for any other occasion. Not that it has to be for a man. This is the Rooted In Nature Stamp Set, I suppose the substitute for Lovely As a Tree, not that there will ever be a substitute for Lovely As a Tree!
This card just uses a card base of Soft Suede Cardstock with a layer of Old Olive. After playing around with the card design a little, I stamped a few leaves from Rooted In Nature randomly on the Old Olive. I actually used Mint Macaron Ink stamped off to get a light color. Usually, I would use the same color of ink but today I tried something different.
The tree is inked up with Stampin’ Write Markers! I just chose several colors of green markers plus Delightful Daffodil yellow. I usually like to put a little yellow in with the green when making leaves or trees. I just kind of scribbled on all of the colors starting with the yellow and then light to darker green colors. I added some Early Espresso marker for the branches. Be sure to “huff” (breathe) on the stamp when you color with markers to moisten the ink before stamping. I think my tree turned out pretty well! It’s always a bit of a surprise because you can’t entirely tell what you are going to get as you are putting down the marker colors!
The greeting is stamped from the Rooted In Nature Stamp Set in Soft Suede Ink on Whisper White Cardstock and layered on Soft Suede Cardstock. If you wanted to make the card even easier, you could just stamp the tree on Whisper White and cut it into a rectangle one way or another and layer it on another piece. No die-cutting involved!
This is a good card to make and have on hand in your stash. Leave off the greeting and add one when you are ready to send the card. Maybe you have a Happy Father’s Day greeting for Sunday! But this greeting would work great for a Father’s Day card as well! And you could even use some of the other greetings in the stamp set.
Be sure you get a Father’s Day card made today to give to Dad tomorrow!
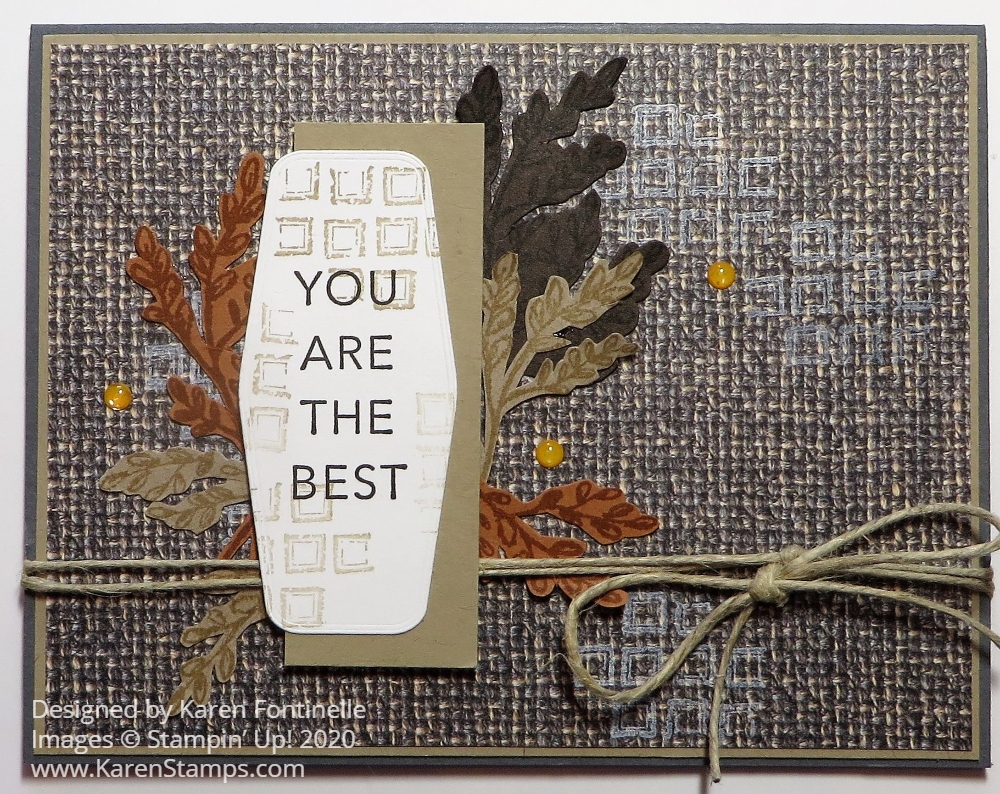
Father’s Day is coming up on Sunday, June 21, 2020, and this In Good Taste Masculine Father’s Day Card might be one you would want to make. Or just keep it in mind for any masculine card occasion. I actually used a sample in the new Stampin’ Up! Catalog on page 124 to copy. You can use the samples in the catalog for ideas and inspiration whether you copy exactly or change it up to something slightly different or a lot different!
We often think we don’t have enough ideas or the right stamps or supplies for masculine cards. I think if you take a good look at the In Good Taste Designer Series Paper you will find many of the patterns that would be perfect for a masculine card, not to mention any other cards! For this card, I looked through the pack of papers several times before settling on this particular paper. It’s a brown and gray (I think!) tweed, maybe like you would find on a carpet or rug or of course a piece of fabric. Every sheet of this In Good Taste DSP looks real! You will probably at least once touch the piece of paper to make sure it’s not really 3D! The paper is designed from great photographic images!
Once I had my designer paper pattern chosen, I chose Basic Gray Cardstock for the card base with a layer of Crumb Cake with just a thin margin before adhering the designer paper.
To decorate the card, I used the Tasteful Touches Stamp Set. I stamped the little squares on the one stamp on the card front in just a couple places with White Craft Ink, but it didn’t turn out very well! Then I stamped the greeting on a piece of Whisper White Cardstock and die cut with one of the Tasteful Labels Dies. I thought it looked a little plain so I stamped those same squares on it with Crumb Cake Ink (I think stamped off first.). And in copying the catalog sample (except I turned the card sideways) I added a piece of Crumb Cake, just a scrap, partially behind the greeting.
Since I liked the stamp with the sprig of leaves, I stamped that on several different browns. I actually thought there was a die to cut them out, but I had to cut them out by hand! I wasn’t even sure what I would do with them, but ended up, as you can see, sticking them to the sides of the greeting.
The right side of the card looked a little bare so I tied some retired twine around the card. I thought it was Linen Thread at first but it is thicker so it is some un-named twine! And since I can’t resist, I added a few of the In Color Enamel Dots in the Bumblebee color.
And that’s it! A card you can use for Father’s Day for one of the men in your life. It has lots of different textures to make it interesting. You could keep the card the same and change the greeting. Use a “Happy Father’s Day” stamp or something for a birthday or graduation for a boy. Lots of masculine card ideas just because of the paper. And of course the paper can be used on cards and projects for anyone!
If you don’t own this In Good Taste DSP yet but want to make something like this card, use an embossing folder to give the front of the card some texture or do some random stamping on the card. Then just continue on and make something with the look and feel of this In Good Taste Masculine Father’s Day Card!
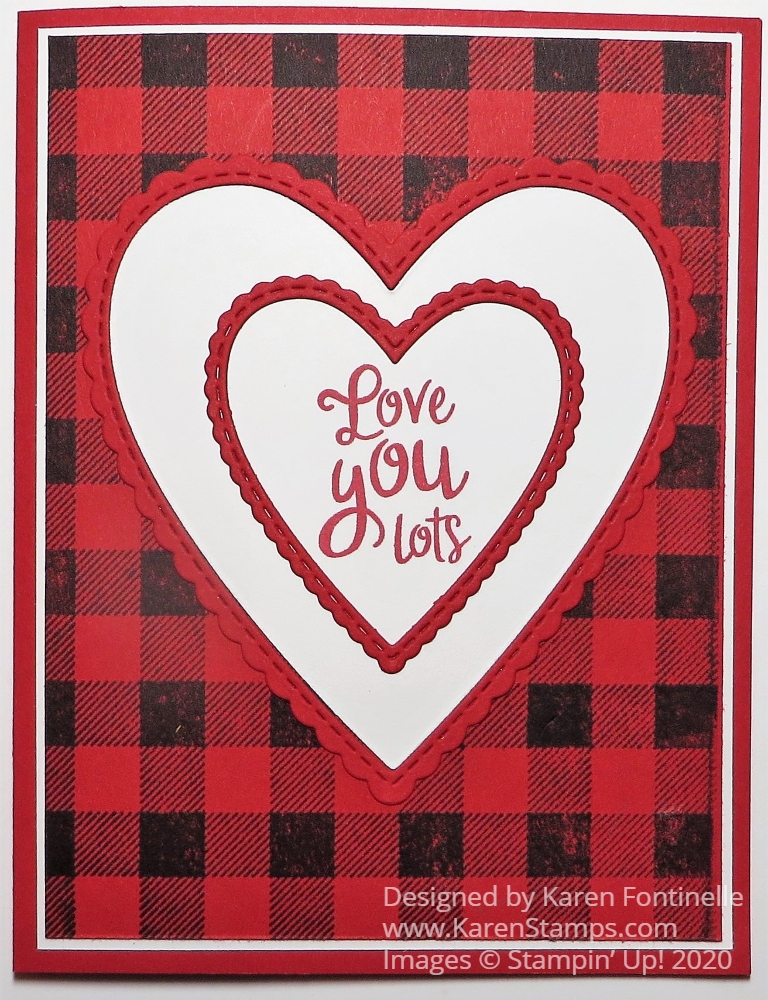
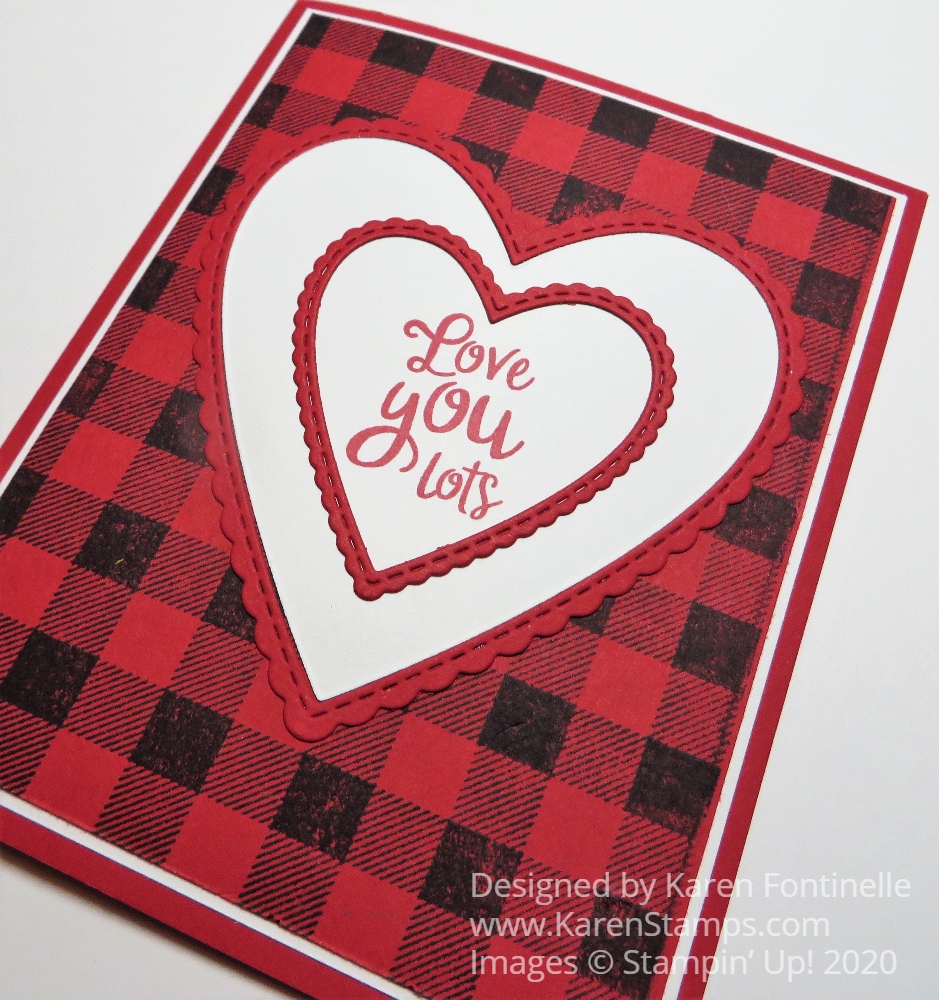
Today is Valentine’s Day and you might be needing a card for, of all people, your husband! I’ve made other valentines, but now at the last minute, it’s time for a valentine for a husband! This one could certainly be for other people as well, but this one is going to my husband!
I’ve seen some valentines using black and white or red and black checks and really like the look, so that’s where I started with this card. I love the Buffalo Check Stamp so I used that with Memento Black Ink on Real Red Cardstock. I also used my Stamparatus because this is actually a large background stamp and sometimes difficult to get it to stamp thoroughly. I was glad I did because I didn’t get full coverage the first time! The Stamparatus saves you in cases when this happens so you can just stamp again in the exact stamp spot!
I added a very narrow margin of Whisper White under the Buffalo Check layer just to help it stand out a little from the Real Red card base since I knew I’d be using Whisper White on the front of the card.
After playing around with some different hearts, labels and designs, I settled on these die-cut hearts from the Stitched Be Mine Dies. The greeting is from the Heartfelt Stamp Set in the Occasions Catalog.
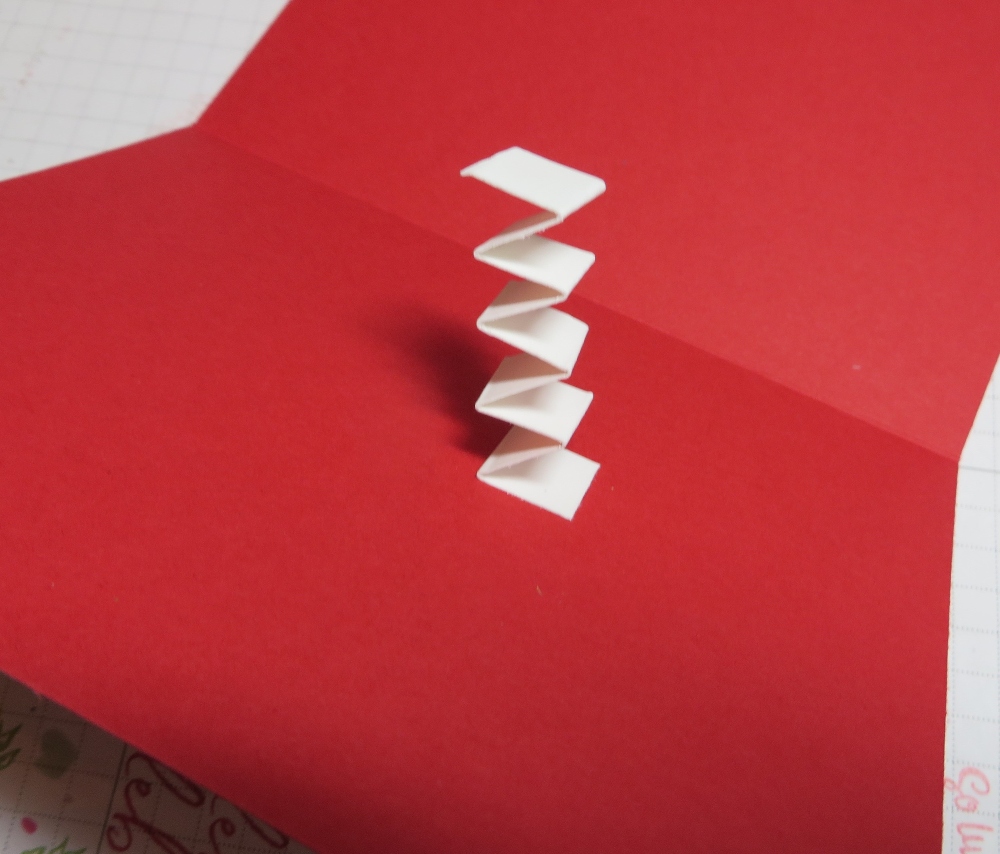
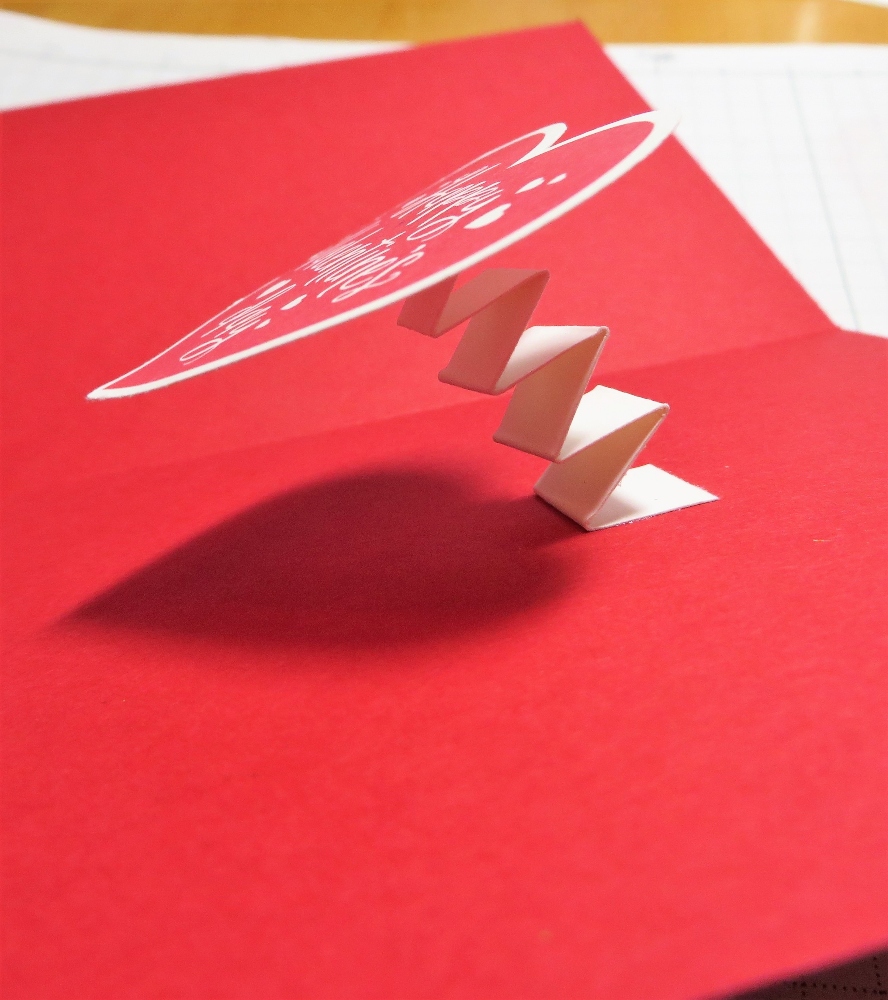
And when I went to stamp something on the inside of the card, this idea “popped” into my head! I don’t know why! It could probably be fancier or better or whatever, but my husband is only going to look at it once and put the card down on his table so it really doesn’t have to be fantastic!
I already had a stamped and punched “Happy Valentine’s Day” heart from the Heartfelt Stamp Set, so I just glued that on top of the accordion-folded strip of Whisper White.
I didn’t measure or do anything, just pulled out a strip of Whisper White scrap I saw laying on the table! Hopefully after being trapped in an envelope all day, it will pop up when my husband opens his card!
Now get off your computer and go make a Valentine for your husband…or boyfriend…or whomever! Here’s another Valentine made with the Be Mine Dies I used on this card if you’d like some more ideas!
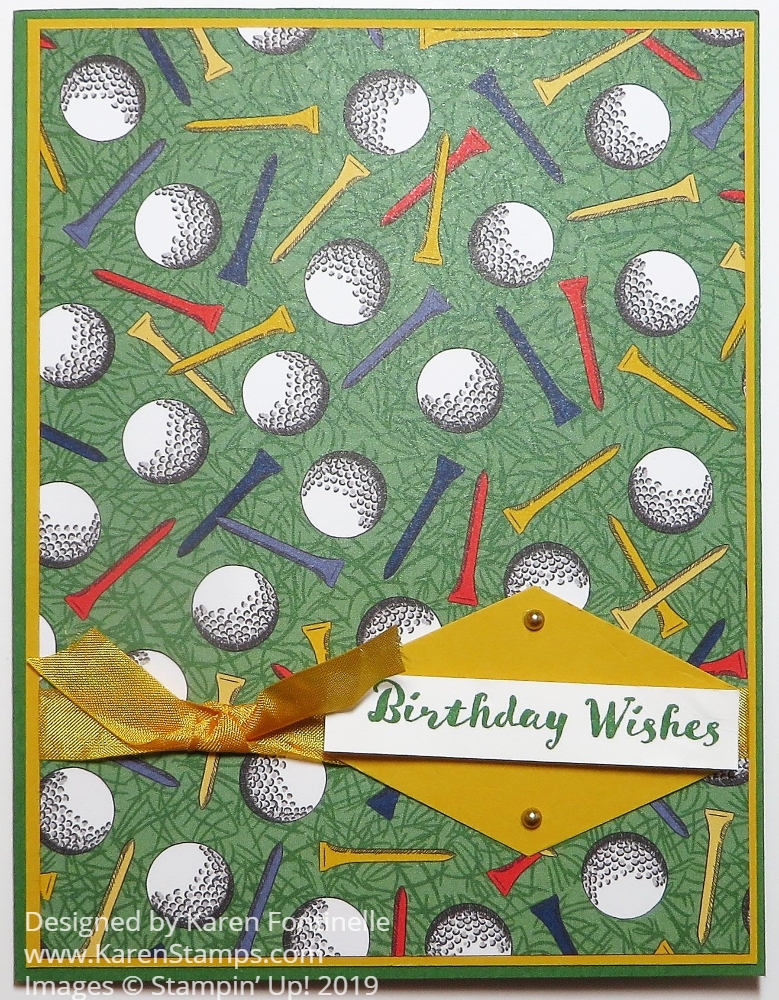
Here is a great birthday card for a golfer, quick and easy to make and you can easily vary the card design. While we are often looking for a masculine card, this one is for any golfer, women golfers, children golfers, anyone who enjoys the game! The golf balls and tees on the green just make for a perfect golfing card with other possibilities for the greeting.
The paper is new in the Occasions Mini Catalog. It’s the Country Club Designer Series Paper. Now not every golfer, probably most, are not Country Club members but this paper is for everyone! Besides golfing images, there are nice plaids you can use on golfing cards or other kinds of cards. So it is a good paper collection to have on hand.
My card has a Garden Green base with a layer of Crushed Curry, both coordinating colors with the designer paper. I just wrapped a piece of the Crushed Curry 3/8″ Crinkled Seam Binding Ribbon around the designer paper before adhering to the card. Then I just added a knot to the left side of the greeting.
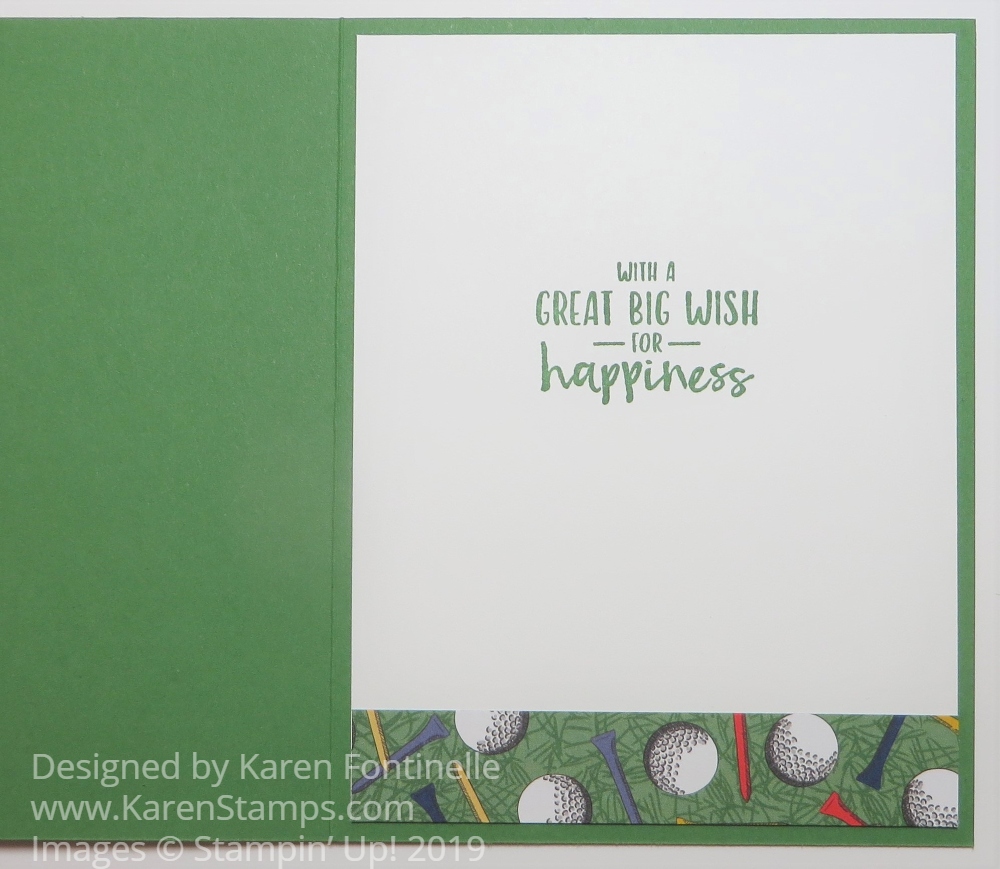
The greeting is stamped on a strip of Whisper White and layered on the Tailored Tag Punch. The greeting is popped up on Dimensionals but the tag is adhered flat on the card. Then I added a couple of embellishments to the tag. A quick and easy card for the golfer!
Here is the inside. It is fun to add a strip of designer paper to the inside. I wish I would have used the other side, the plaid design. That would have been cute but I was too fast with the glue!
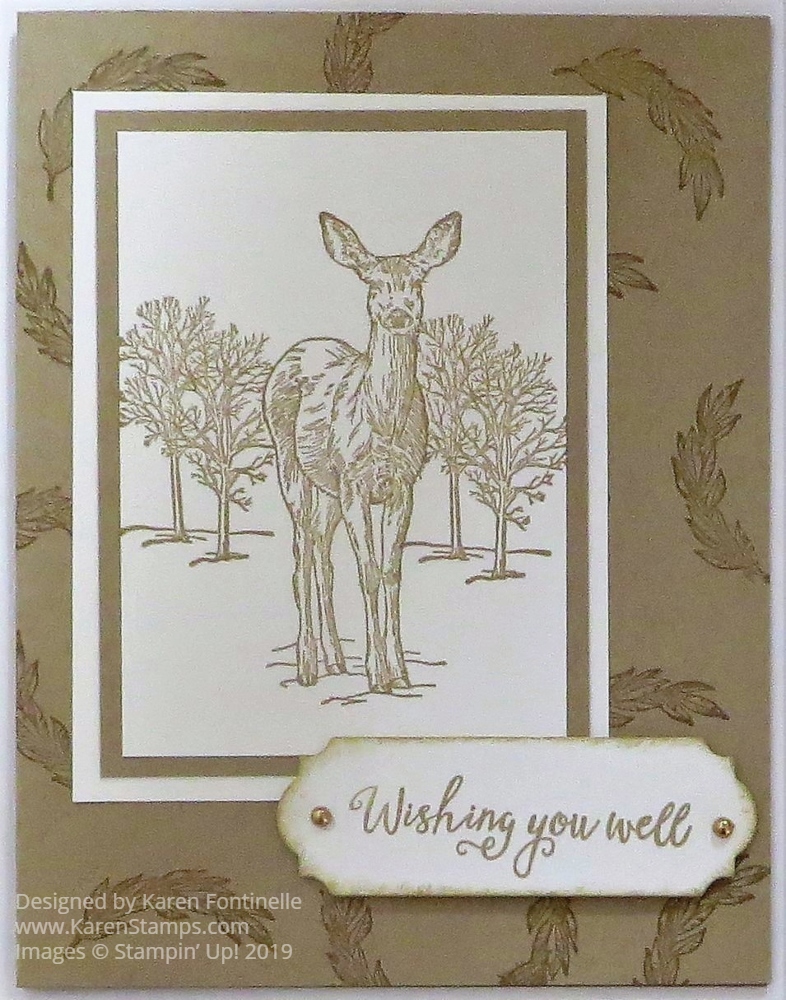
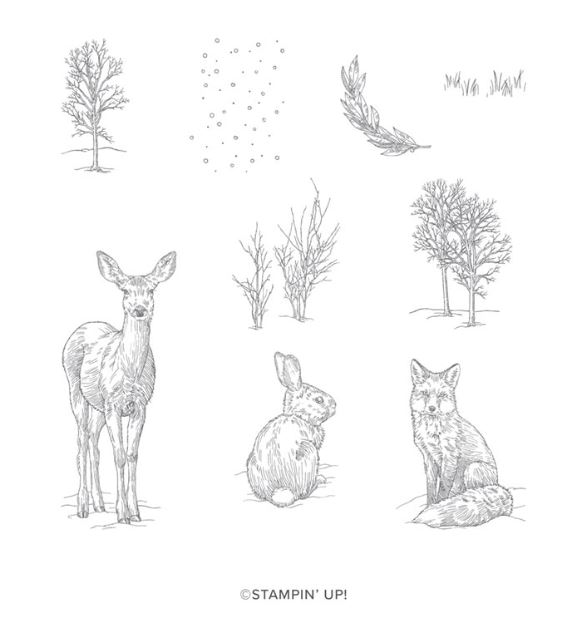
This Nature’s Beauty Monochromatic Deer Card shows an easy way to make a card using this beautiful stamp set. Enjoy using this Nature’s Beauty Stamp Set while knowing that a portion of every stamp set sold goes to mental health organizations. Enjoy your hobby while helping other people!
You can make cards for many occasions with this Nature’s Beauty Stamp Set. That bunny is perfect for baby cards or Easter. Everyone loves deer so you have that covered for many cards. Even just the little trees will be fun to use.
To make this card, I used Crumb Cake for everything. The card base is Crumb Cake Cardstock with some stamping of Crumb Cake Ink. You could also use Versamark Ink for that same color or watermark look. The deer and trees are stamped on Whisper White Cardstock with Crumb Cake Ink. The greeting is stamped in Crumb Cake Ink with a little sponging around the edges.
The greeting is stamped and then die cut with one of the Ornate Frames Dies. The greeting itself is from the Gather Together Stamp Set. Just for a tiny bit of bling, I added two gold dots (that I think are retired!).
To stamp the deer with the trees behind him, stamp the deer on the Whisper White Cardstock, then stamp him preferably on a piece of sticky note and cut out. The “sticky” will help hold the “mask” on the cardstock in place. Place the mask over the deer then stamp the trees, even overlapping onto the sticky note because that is protecting the deer. Remove the mask and see how the masking technique worked! Save the mask in your stamp set so you can reuse it, no matter how messy it looks!
If you are looking for masculine cards or for someone who likes nature, this stamp set is perfect, not to mention making any kinds of cards you like with it. I think it is a nice change from all the florals and more “common” type of stamp sets. My son became fascinated with foxes after going to some national parks or other similar places were he saw foxes. One place was even some kind of preserve for foxes and people gather at a distance to take photos. So sometime I will make him a fox card!
If you don’t have time for coloring and all that, for any card that you are making, remember the monochromatic way of stamping…..just one color, no coloring!
Shop for the Nature’s Beauty Stamp Set on the back inside cover of the Holiday Catalog and in the Stampin’ Up! Online Store!
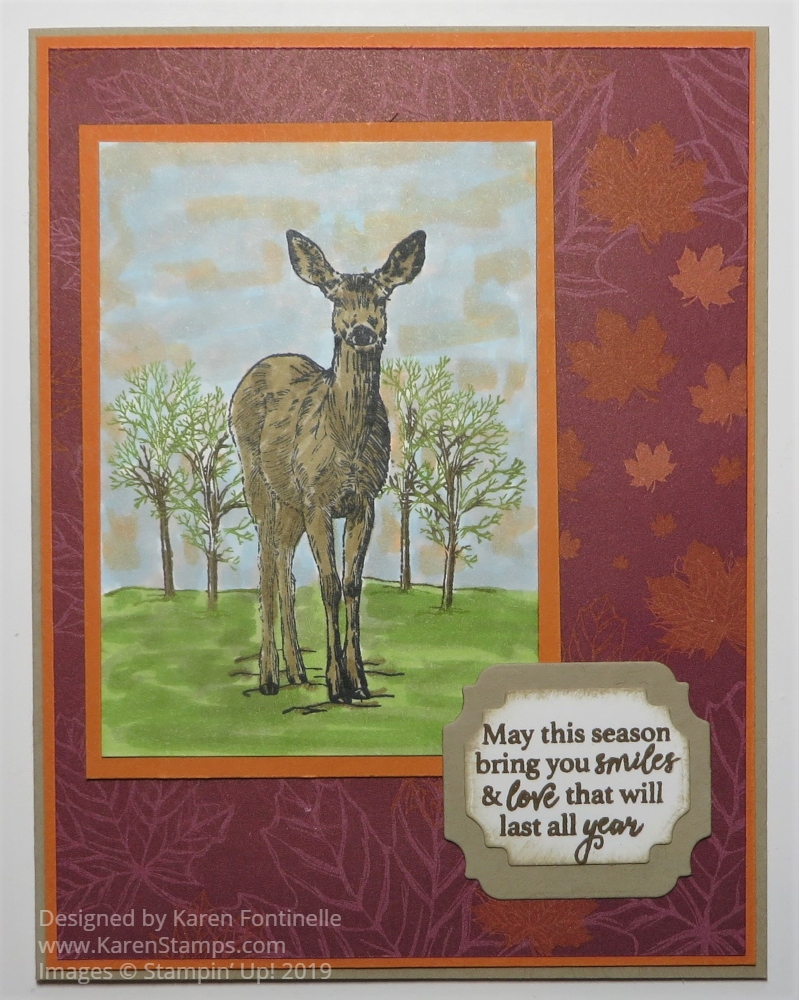
Sometimes you feel a little bit pleased with yourself when you make a card that turns out better than you expected and this card is one of those! I wasn’t really exactly sure what I was going to do with this stamp and probably expected to make a less colorful card. When I saw this paper I decided it would be a card for fall with the autumn colors.
This stamp is from the Nature’s Beauty Stamp Set, found on the inside of the last page of the Holiday Catalog. You might not have even noticed it way back there, but there is something important about this stamp set! Stampin’ Up! is donating $3 of every sale to mental health organizations. So while you can have fun stamping and using this set, you will know you are making a difference in the lives of others.
I stamped the deer in Memento Black Ink because I knew I would color him in with my Stampin’ Blends markers. That led to coloring in the sky a little bit with about three different colors. When you do this, when you start out it looks like you are making a scribbly mess! But just keep going and as the colors blend together it will likely turn out fine. I started with just kind of scribbling in with Balmy Blue Light, then some Pumpkin Pie Light, and some Gray Granite Light. As I said, it looks like the sky is going to not turn out, but then it does. I really like the way it looks now! You can experiment with whatever colors you have or you like.
The deer is colored with the Crumb Cake markers and maybe I added a bit of Soft Suede. After I stamped the deer on the Whisper White piece of cardstock, I stamped again on a piece of scrap paper, then cut it out just inside the stamped lines. This gave me a “mask” to place directly over the deer to I could stamp the trees on each side of him without stamping over the deer. To stamp the trees, I used my Stampin’ Write Markers, two colors of green on the leaves and then a dark brown for the trunk and a few branches. I colored directly on the stamp so I could have the greens on the leaves and the brown on the tree trunk. The grass I colored the same way as the sky with just a couple of green shades.
The designer paper is from the Come To Gather Designer Series Paper. When I saw this orangish paper with the colored and outlined leaves I knew it would be perfect with the deer. The greeting is stamped in Early Espresso Ink on Whisper White that is sponged a little bit around the edges with Crumb Cake Ink and layered on a piece of Crumb Cake Cardstock. Both the die-cut shapes are from the Ornate Frames Dies. The greeting is in the Gather Together Stamp Set.
The card base is Crumb Cake with layers of Pumpkin Pie Cardstock. Even though Pumpkin Pie is not one of the coordinating colors with this designer paper, I thought it looked good on the card and brought out some of the lighter orange colors.
You could send this card to someone any time from now on through Thanksgiving. It would make a great masculine birthday card or just a card with a note inside, also.
Consider putting this stamp set, Nature’s Beauty, on your order and know that you and your stamping may be a part of helping someone.
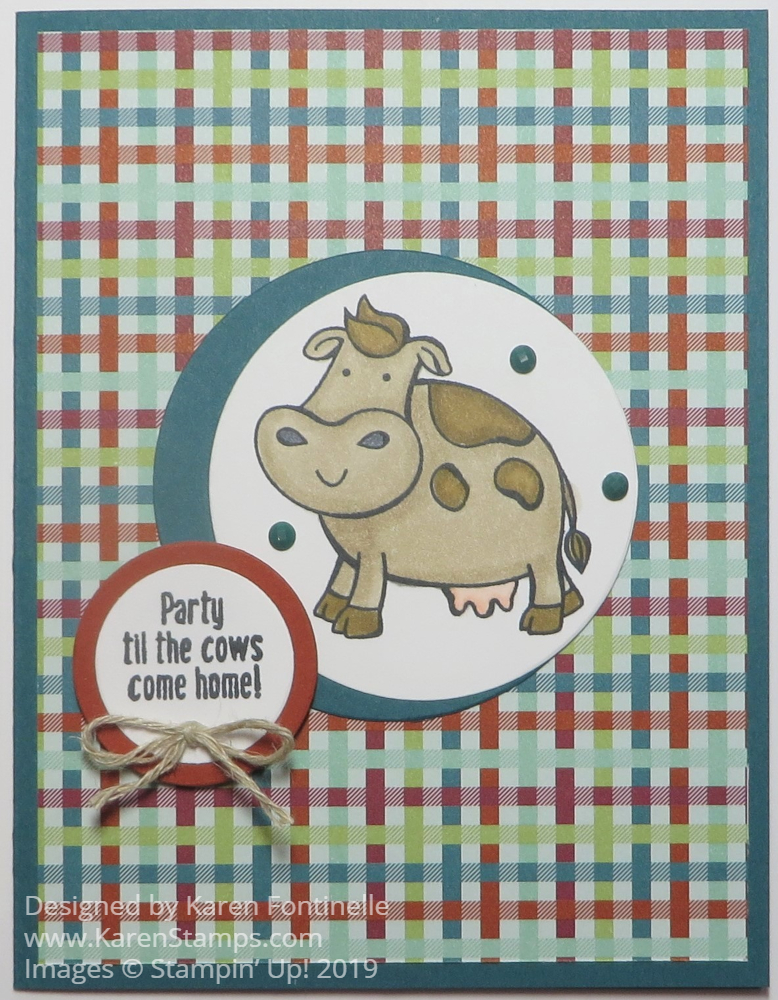
Often times we rack our brains to think of a good masculine card, I don’t know why! I guess more stamps and papers are geared toward women so we find ourselves at a loss when we have to make a card for our husband, son, grandfather, uncle, etc. It took me a while of looking online to come up with this idea, the Over The Moon Masculine Birthday Card, for my brother’s birthday. Not that he has anything to do with cows, but the Over The Moon Stamp Set is so cute I wanted to use it for a whimsical birthday card!
The card base is Pretty Peacock with a plaid design in the Come to Gather Designer Series Paper. The cow is stamped in Memento Ink and colored in with Stampin’ Blends markers. Have I ever said before how much I LOVE coloring with these markers??! I love coloring with these markers! I find it very relaxing! Coloring is good therapy!
After the cow was stamped, I die cut it with a circle in the Layering Circles Dies. Then I cut a slightly larger circle in Pretty Peacock and layered the cow on top of that but not centered. I saw that idea somewhere online and thought I would try it for something different.
I thought the greeting in the set was perfect for a birthday so I stamped and die cut that and layered on a circle of Cajun Craze. I found a little scrap of Linen Thread and tied a small bow for the greeting and stuck it on with a smooshed up Mini Glue Dot. And for a finishing touch, I added three 2019-2021 In Color Faceted Dots in Pretty Peacock.
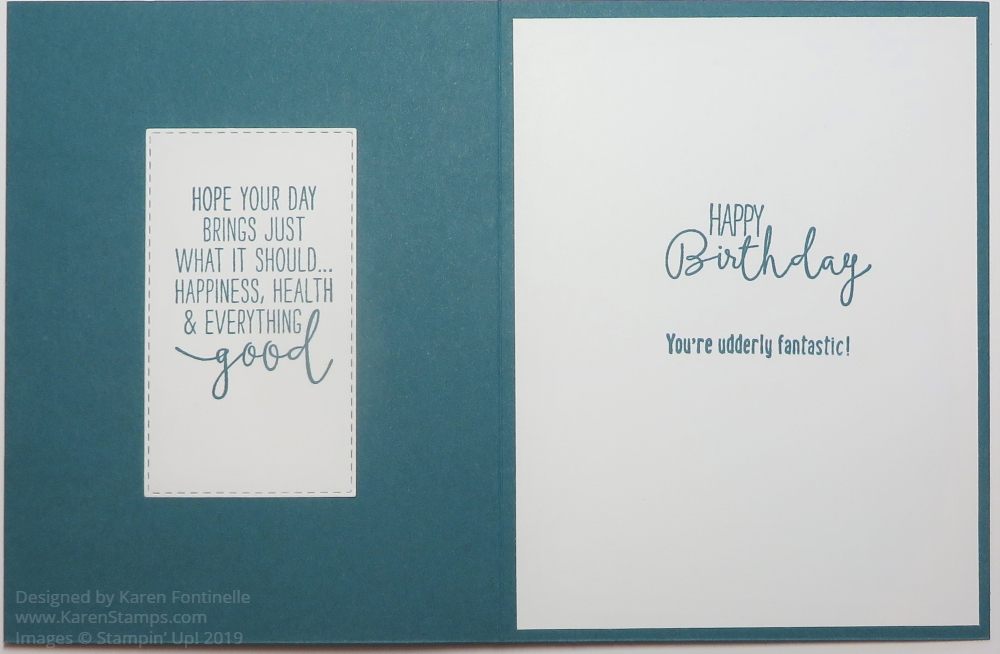
Here is how I stamped and decorated the inside of the card.
The greetings are from the Special Celebrations Stamp Set and you can guess which one is from the Over The Moon Stamp Set with the cows! Since I wanted to use the long greeting but not fill up the inside of the card, I opted to stamp it and then die cut it with the Stitched Rectangles Dies so I could add it to the inside front cover of the card.
The Over The Moon Stamp Set was one I did not think I needed until I saw some cards made with it. I think it is fun making cards with this stamp set. It’s probably a good idea to have at least one “funny” stamp set in our collection! Check it out in the Stampin’ Up! Online Store!
If you have procrastinated, here are some past Father’s Day card ideas made with stamp sets you might already have. Just change them up according to what supplies you have! You know the father in your life will appreciate it! Better than Hallmark!
Click photo to read post!
If you have this Tailored Tag Punch in your stash, use whatever paper you have to make something like this card. Or just use strips of designer paper for a background. Add a greeting!
Click photo to read post!
Surely you have the Lovely As A Tree Stamp Set that just retired! It’s very easy to make a card like this one with that stamp set!
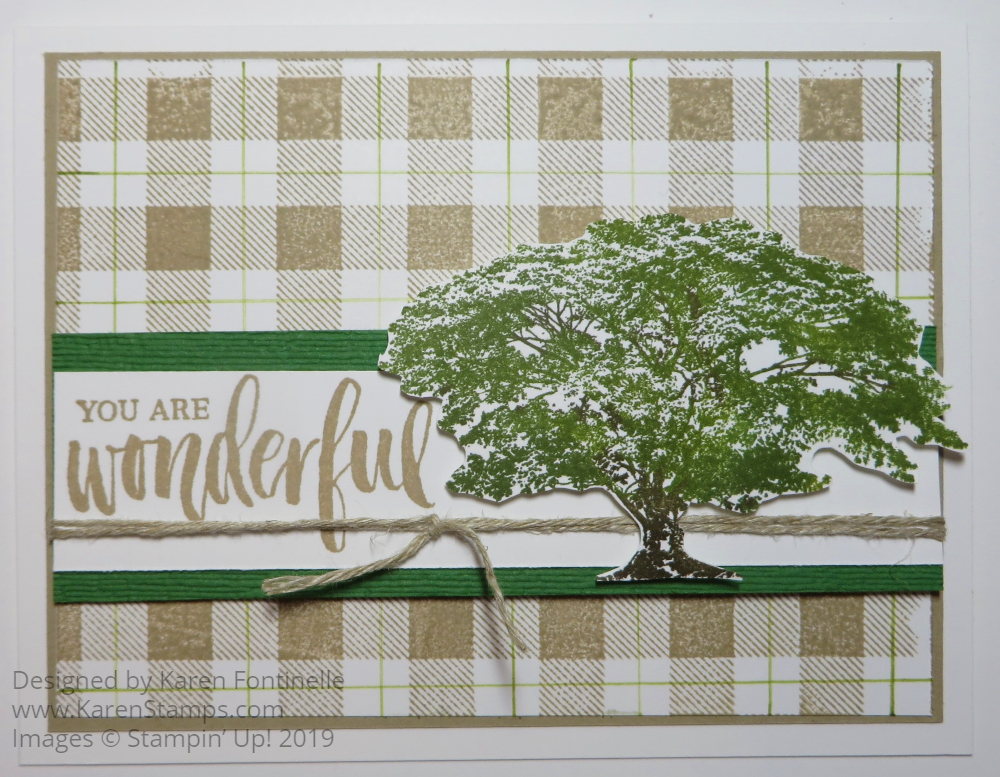
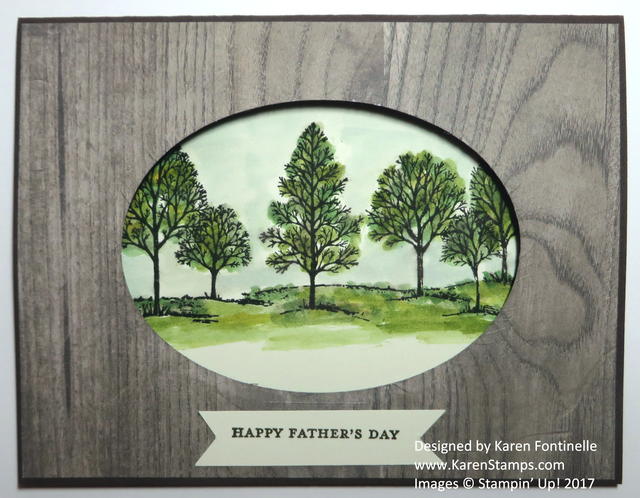
Father’s Day is this Sunday, June 16th, so it is time to make a Father’s Day card for your father or husband or whoever you want to celebrate on this day. This card, Father’s Day Masculine Card With Rooted In Nature, I will probably give my husband, but as you can see, it could be for anyone anytime! You can say it’s a “masculine” card but really it could be for anybody. We just often feel challenged to make a card for men for some reason.
You can barely see in the photo, but the card base is Whisper White with a little extra margin before I added another layer of Whisper White stamped with the Buffalo Check stamp for a checked background. This was then layered on a piece of Crumb Cake with a narrow margin showing.
After I stamped the Buffalo Check design, I used a ruler and an Old Olive Stampin’ Write Marker to draw lines in between the checks for a little extra color and interest.
The greeting and the tree are from the Rooted in Nature Stamp Set. I don’t think I have a “Happy Father’s Day” stamp in my current stamp sets (and I didn’t want to dig in my retired stuff!) so this sentiment will be fine (and truthful!). It is stamped in Crumb Cake ink on a Whisper White strip, then layered on a piece of Garden Green Cardstock that was embossed with the Subtle Embossing Folder. I tied around a piece of Linen Thread (or a scrap of something I found that I think is Linen Thread!) and then popped up the tree on Stampin’ Dimensionals.
About the tree…..I inked up the tree not with ink pads but with a marker and Sponge Daubers! I chose several green ink pads, from light to dark, and used individual Sponge Daubers to tap on the tree leaves. It’s difficult to see where you have “daubed” on the ink and it looks like I mostly covered the lighter ink with the darker. But I like the tree anyway. Then I colored in the trunk with the Early Espresso Stampin’ Write Marker and tried to find a few branches inside the leaves to ink up. I think it turned out fine!
As I said, I have most likely made this card for my husband for Father’s Day on Sunday, unless I make another one I like better. He opens the card, looks at it, then puts it down (and I get a hug and kiss!). Then a few days later, I pick it up off his table and put it with my other sample cards I have made! But I think you can see that while this card will work for Father’s Day or a birthday card for a man in your world, this card could be for anyone anytime. I wanted to use a stamp set from the old catalog in case you don’t have your new stamp sets yet. Maybe you have this one!
And if you need another idea with this Rooted in Nature Stamp Set, here is another “masculine” card I made for a birthday, but again, just put on a Father’s Day greeting (or something similar) and you have a great Father’s Day card! And if you have Lovely As a Tree (retired), that’s another great stamp set for making a Father’s Day card!
Today is Super Bowl LIII, the New England Patriots playing the Los Angeles Rams, so if you would like to make a card for your favorite football fan, here are some Super Bowl Football Card Ideas from years past!
Super Bowl 2017 Punch Art Football Game Card
One of the most popular punches of all time (I would think!) was the Owl Punch, used to make these football players out on the field! Just using a couple of narrow strips of paper can make a card look like a football field.
A Football Card For Super Bowl LI in Houston, Texas
A couple years ago we were so excited and proud in Houston to host the Super Bowl! Maybe someday our Houston Texans will actually be IN the Super Bowl! Maybe!
Super Bowl 2017 Card With Punch Art Football Helmets
Make some football helmets for your card with a few punches! Use your team colors!
Super Bowl Sunday 2016 Football Owl Punch Card
Here are these owls again playing football! Substitute one of our current animal stamps if you don’t have the Owl Punch in your stash!
This Rooted in Nature Masculine Birthday Card was fun and interesting to make and you could use it for other occasions as well. I hadn’t used this stamp set and designer paper yet (amazingly!) so I looked in the Stampin’ Up! Annual Catalog for inspiration. This card is my take on one of the samples in the catalog! Can you tell which one?
I wasn’t planning to make it a birthday card and I planned to use one of the greetings in the Rooted in Nature Stamp Set. And this is why you should always check everything in your Stampin’ Up! order when you get it! I’ve never had this happen before, and honestly, rarely have any problems with my orders. Rooted in Nature is a two-pack stamp set with so many stamps. I had only used the tree from the first pack. Then I opened the second case for the greeting I wanted to use. That sheet of rubber was the same as the stamps in the first case!! The labels for the stamps were correct and the cover on the case was correct….just the stamps weren’t! Of course I called Stampin’ Up! and of course, they are sending me a correct set!! So I had to choose a greeting from another set! And I remembered I needed a birthday card for my nephew!
The card base is Cajun Craze and then there is a layer of the Nature’s Poem Designer Series Paper. Too bad it doesn’t show up more! I should have made the top layer a little smaller! I chose Shimmery White Cardstockfor the stamping because I knew I would be doing some watercoloring in the background and Shimmery White holds up to the water. Regular Whisper White Cardstock is likely to pill or get rough from the water.
I stamped the tree with Mossy Meadow Ink, trying not to get the tree trunk inked up and then used a Soft Suede Marker to color directly on the rubber for the tree trunk. Sometimes I stamped directly but usually I stamped off once or even twice. Then I stamped one tree and die cut with the Nature’s Roots Framelits Dies.It is adhered with Stampin’ Dimensionals to pop it up.
Before adhering the tree, I watercolored the background with some Balmy Blue Ink and Soft Suede for the ground. I used my Aqua Painter and just tiny bits of ink in the lids of the ink pads. So fun!
For the greeting, I chose a birthday greeting in the Beautiful Bouquet Stamp Set because it was the right size for the space. It is die cut with a Layering Oval Dieand layered on a piece of Tranquil Tide cardstock die cut with a scalloped oval die in the same set. For a little extra, I cut a small piece of the 5/8″ Burlap Ribbonto go under the greeting.
This card shows that even though what you thought you had planned to make, various factors, including maybe your creativity, may change that! In this case, partly my own idea of stamping more trees than the sample in the catalog and then not having the greeting I thought I was going to use changed the original idea of the card! But now I have a birthday card for my nephew that I might not have had otherwise! (Also a good idea to check your birthday book of dates before the middle of the month to see what birthdays are coming up!)
Remember, Bonus Days are going on, so if you were interested in the Rooted in Nature Bundleof stamps and dies, you would save 10% with the Bundle and also get a $5 coupon code to use with Stampin’ Up! in September (when the Holiday Catalog goes live!) This has been a very popular Bundle, I’m just slow in getting around to using it! You can make many cards like this Rooted in Nature Masculine Birthday Card.
Happy Father’s Day to the wonderful dads out there…….the dads of our own kids and our own fathers and grandfathers!
If you need some last minute Father’s Day card ideas today, you might want to check out my blog post from a year or two ago with some of my past ideas HERE.
If you are in a big hurry, if you have a stamp with a tree (like Lovely As a Tree or Sheltering Tree) you can make a nice Father’s Day card. Or some stars or hearts or an old alphabet stamp set to spell Dad……lots of ideas you can make in a hurry.
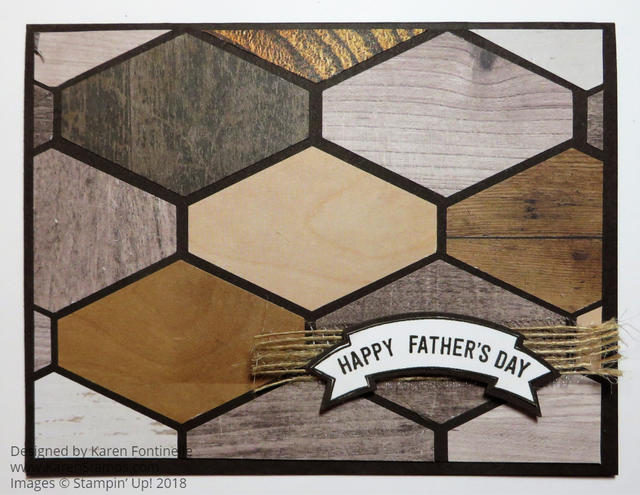
If you need a Father’s Day card on Sunday and you have the Tailored Tag Punch, you can make a fun card like this Tailored Tag Punch Father’s Day Wood Tile Card. I don’t know who thought of this idea of using the Tailored Tag Punch like this, but it is perfect for a Father’s Day card or any masculine card.
The card base is Early Espresso but the pieces are also layered on a piece of Early Espresso. I used the Wood Textures Designer Series Paper Stack for the paper punched with the Tailored Tag Punch to make the “wood tiles”. You can start anywhere placing the punched pieces. Just leave a little bit of space in between each of them to form your pattern. For the very small spaces around the edges, you can just punch an end in the punch and glue onto the Early Espresso piece. It’s easiest if you let the pieces hang off the edge and trim them later when placing them so you don’t have to cut smaller pieces.
Choose the pieces so they contrast or whatever effect you are going for. I just chose different shades of the wood colored paper and kind of balanced them out.
For the greeting, I stamped the banner from Thoughtful Banners and then added the words, slightly curved, onto the block. Luckily, they just fit! When I punched the banner, stamped on Whisper White, it left a fair amount of white space, so I trimmed that off, which narrowed the banner, then I could punch out an Early Espresso banner on which to layer the stamped banner. It still needed something, so I grabbed a piece of 5/8″ Burlap Ribbon which I loosened up a bit by pulling off the two outer large threads. It just adds a little texture to the card.
You could use other cardstock or other papers for the tiling. Let your imagination go! And change the greeting for whatever occasion. But if you need a Father’s Day card idea, try this Tailored Tag Punch Father’s Day Wood Tile Card.
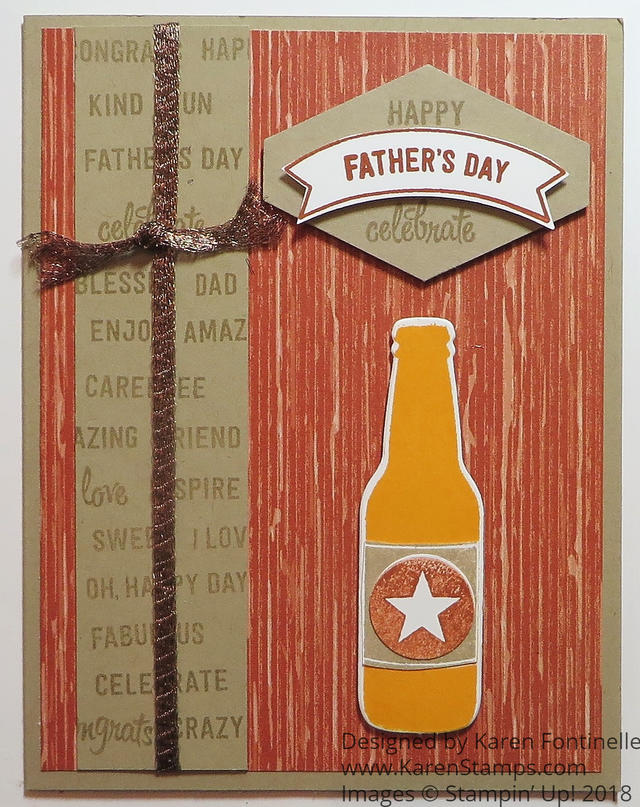
Did you make a card for Father’s Day yet? Father’s Day is Sunday, June 17th! Although masculine cards seem to be a bit more difficult to make, I think there are actually lots of ideas to use with the products in the Stampin’ Up! Catalog now. I had several different ideas I planned to try for a Father’s Day card, but once I looked in our inspiration book – the Stampin’ Up! Catalog – I found two ideas that I decided to combine! Look on page 56 at the top.
I was thinking of using the Bubble Over Photopolymer Stamp Setfor my husband’s card and making the bottle look like a beer bottle since he likes to try different kinds/flavors of beer. When I looked in the catalog at the page with that stamp set, I saw the sample on page 56 plus the actual Father’s Day card made by using stamps from the Thoughtful Banners Stamp Set. This sample actually shows that you don’t need a “Father’s Day stamp set” to make a Father’s Day card! I thought it was clever how they stamped a lot of words on the piece of cardstock from that stamp set. You could choose the words that describe the man you are making the card for or you could even just stamp “Father’s Day” all up and down the paper.
To make my card, I chose Soft Suede for the card base and used a piece of theNature’s Poem Designer Series Paperfor the layer. The bottle is stamped with the new Mango Melody ink on Whisper White and die cut with the Bottles & Bubbles Framelits Dies. I stamped the bottle a second time in Crumb Cake Ink, just the middle, so I could cut out that center section and adhere it to the bottle. For a decoration for the bottle (rather than a label) I stamped in Cajun Craze ink and punched with the 3/4″ circle punch the star stamp.
The Crumb Cake cardstock is stamped with a whole bunch of stamps on the acrylic block! I just chose words from the Thoughtful Banners Stamp Set that would be appropriate for a Father’s Day card. I tied a piece of the 1/4″ Copper Trim ribbon around the stamped piece, tied on another piece in a knot, and frayed the ends a little.
For the greeting I stamped the banner with the Thoughtful Banners stamp set and punched out with the Duet Banner Punch.Since I was using the sample in the catalog as an example, I punched out the Crumb Cake cardstock with the Tailored Tag Punch and stamped the extra words on it above and below the banner.
The greeting and the bottle are popped up with Stampin’ Dimensionals and the Mini Stampin’ Dimensionals. Don’t forget about these minis because they are very handy on small pieces.
If you start early on a Father’s Day card, you can come up with more than one idea and choose which one will be best! Sunday will be here before we know it! Time to make a Father’s Day Card!