Today, June 30th, is the last day to take advantage of the great offer of an EXTRA $25 in Stampin’ Rewards with an order of $250 or more! If you have a long list for the new Stampin’ Up! Catalog, you might want to take advantage of this offer today! To begin with, you would earn $25 in regular Stampin’ Rewards with a $250 order and then you would get to spend an extra $25 on top of that! So with a $250 order or more, you get to choose $50 in free merchandise right away on your Stampin’ Rewards!
You can collect orders from some friends to get a large enough order, or think ahead to the holidays! Maybe there is a card kit or craft supplies that anyone can use like ribbon, scissors, adhesive, or notecards that you can give as a gift! And don’t forget to shop the Clearance Rack if you need a little more to add!
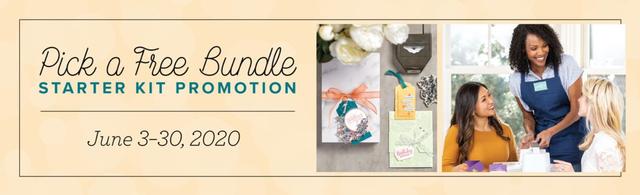
If you have thought about becoming a Stampin’ Up! Demonstrator and starting your own business, today is the last day to take advantage of the Pick a Free Bundle Promotion! Any day is a good day to join Stampin’ Up! but if you want a little extra in your Starter Kit, do it today!
To become a Stampin’ Up! Demonstrator, you simply purchase the Starter Kit for $99, but you choose $125 worth of product to put in it! You also receive catalogs and business supplies and a Paper Pumpkin Kit. And today you will also choose a Bundle for your kit!
Click HERE to read about joining and then feel free to ask me any questions! If you would like to sign up under a Demonstrator local to you, click on “Find a Demonstrator” in the top black bar. Otherwise, I can help you from afar!
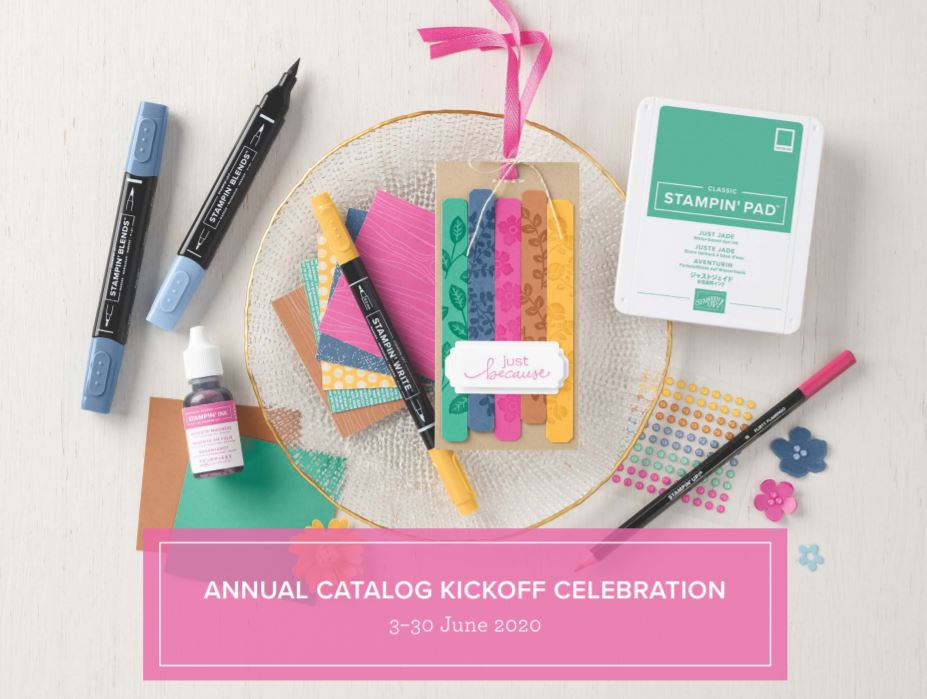
The new Stampin’ Up! Catalog is less than a month away from going live on June 3rd so there is no better time than NOW to stay in the loop and find out the latest from Stampin’ Up! To do that, sign up for my Stamping With Karen Mailing List and get an email every Tuesday with any Stampin’ Up! updates and also stamping ideas from me!
If you are on my blog, you will see a red sign-up box in the top left corner where you can simply put your name (or first name) and best email. If you are on your phone, you probably need to scroll way down to get to the sidebar things. OR you can go to my sign up page HERE.
Be sure to check your email for your FREE GIFT from me for signing up!
I send out a weekly email every Tuesday afternoon with the latest Stampin’ Up! news and offers plus stamping ideas with a supply list and directions. Even if you never make the project, maybe just seeing ideas will do your crafty heart good! I know it does mine! I’m all about the ideas!!
It’s time to Change Your Clocks For Daylight Savings Time Tonight! You know what that means…..one less hour to stamp! Spring is coming so you must “spring forward” before you go to bed tonight or officially at 2:00 am tomorrow. I suppose in the digital age now we don’t all have this many clocks to change twice a year, or at least if you are of a younger age! My kids say, “What clocks?” when I ask if they changed their clocks! Their phones and computers automatically update and that’s all they need.
I remember when they used to do a story on the news about daylight time and they would go to a clock shop and show how many clocks the proprietors would have to reset!
Daylight Savings Time seems to be controversial these days. But whichever side you’re on, I look at it as a harbinger of Spring.
Do some extra stamping today to make up for that hour you’re going to lose tonight!
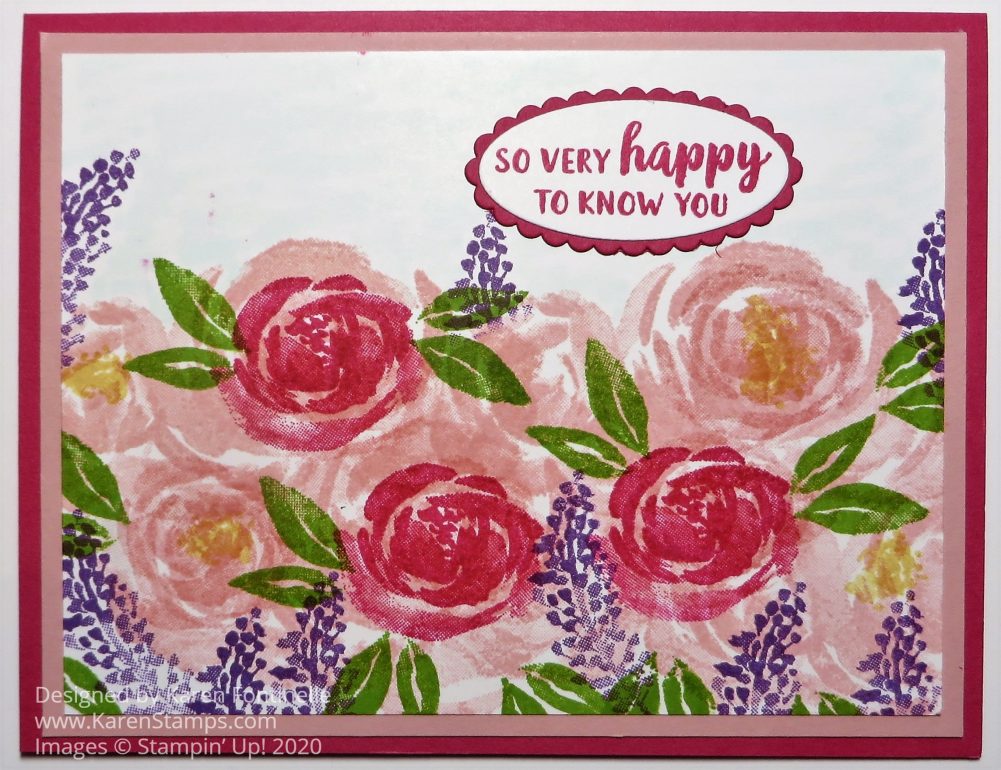
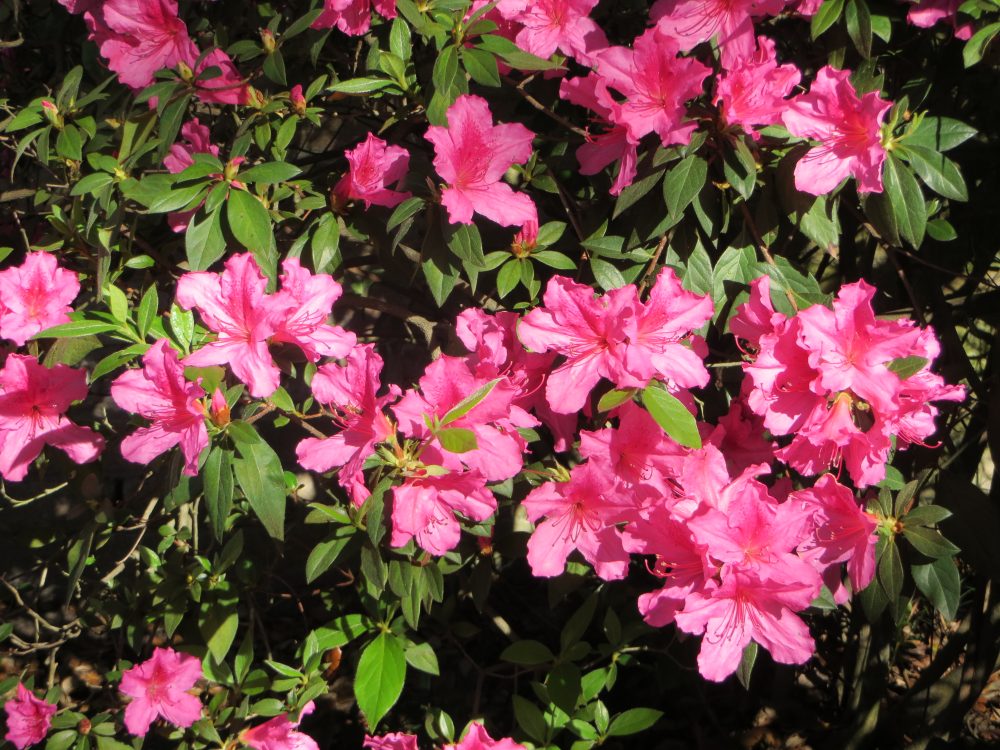
This weekend begins the River Oaks Garden Club Azalea Trail 2020 that we always like to go to so I made this Beautiful Friendship Pink Flowers Card to commemorate what we will likely see on the Trail. Actually, our yard is looking like this with our azaleas and even our Bluebonnets blooming. However, our home and garden aren’t quite like the ones we will see on the Azalea Trail! Those homes and gardens on the Azalea Trail are beautiful and today the weather should be beautiful!
Some people have been dusting off a stamp set from the Stampin’ Up! Annual Catalog that I hadn’t seen in a while but makes beautiful cards really with just stamping unless you want to make it fancier. Sometimes I forget if I actually own it or wish I had it! It’s on my shelf, I own it, thank goodness! It’s the Beautiful Friendship Stamp Set and has beautiful flower images and very nice sayings. It made me think of the flowering azaleas in our yard with various shades of pink (even on the same bush somehow!) and the bluebonnets blooming in the backyard.
For this card, I started with a card base of Melon Mambo, with a layer of Blushing Bride underneath the Whisper White top layer. I simply stamped the large grouping of blooms in Blushing Bride a couple of times in two rows. You can also overstamp, with the single flower stamp, in the same color to add more layers on the flower as I ended up doing to fill in some of the white space in between the petals. Then I stamped that smaller flower image in Melon Mambo because our azalea bushes sometimes have a few blooms of a different lighter or darker color than what the bush is supposed to be! For the bluebonnets, I stamped the springs of tiny flowers in Gorgeous Grape ink. The leaves are stamped in Granny Apple Green ink. With one of the smaller stamps, I added a bit of So Saffron to the centers of some of the flowers. I like the look of a bit of yellow on the card.
The sentiment is from the same Beautiful Friendship Stamp Set. I cut it out with the Layering Ovals Dies as well as the Melon Mambo scalloped oval. Before I added the sentiment, I colored in the background very lightly with my Light Pool Party Stampin’ Blends marker just to look a little like blue sky, although I think it washed out in the photo.
If you wanted to add anything to this card, you could color over some of the flowers with the Clear Wink of Stella Glitter Brush to add a little bit of shimmer. You could also, or separately, add a few pretty sequins mixed in with the flowers.
Here’s a card I made last year, even simpler, with the Beautiful Friendship Stamp Set. Add this stamp set to your Stampin’ Up! order and get closer to earning Sale-A-Bration rewards!
I hope this Beautiful Friendship Pink Flowers Card makes you think of spring wherever you live, whether you are experiencing it or not because spring is coming!
This Stampin’ Up! card is made with the Lily Pad Dies, available during Sale-A-Bration for FREE with a $100 purchase. Just because something says “lily pad” doesn’t mean it has to look like lilies in a pond! If you have an order of $100 or more, you can choose two free $50 items or you can get this higher valued $100 selection.
These dies go with the Lily Impressions Designer Series Paper and the Lovely Lily Pad Stamp Set. These are also Sale-A-Bration choices at the $50 level! So lots to choose from! The Lovely Lily Pad stamps are extra-special because they are reversible! This whole collection of products is really quite interesting. Wait until you hear about the designer paper!
Watch the Stampin’ Up! video below to learn about the Lily Pad products!
Just purchase $50 in Stampin’ Up! products and you can earn one FREE Sale-A-Bration product! No limit to the number of products you can earn so think of your order in $50 increments. You don’t want to get to $48 on your order and miss out on Sale-A-Bration! Sale-A-Bration is going on now through March 31.
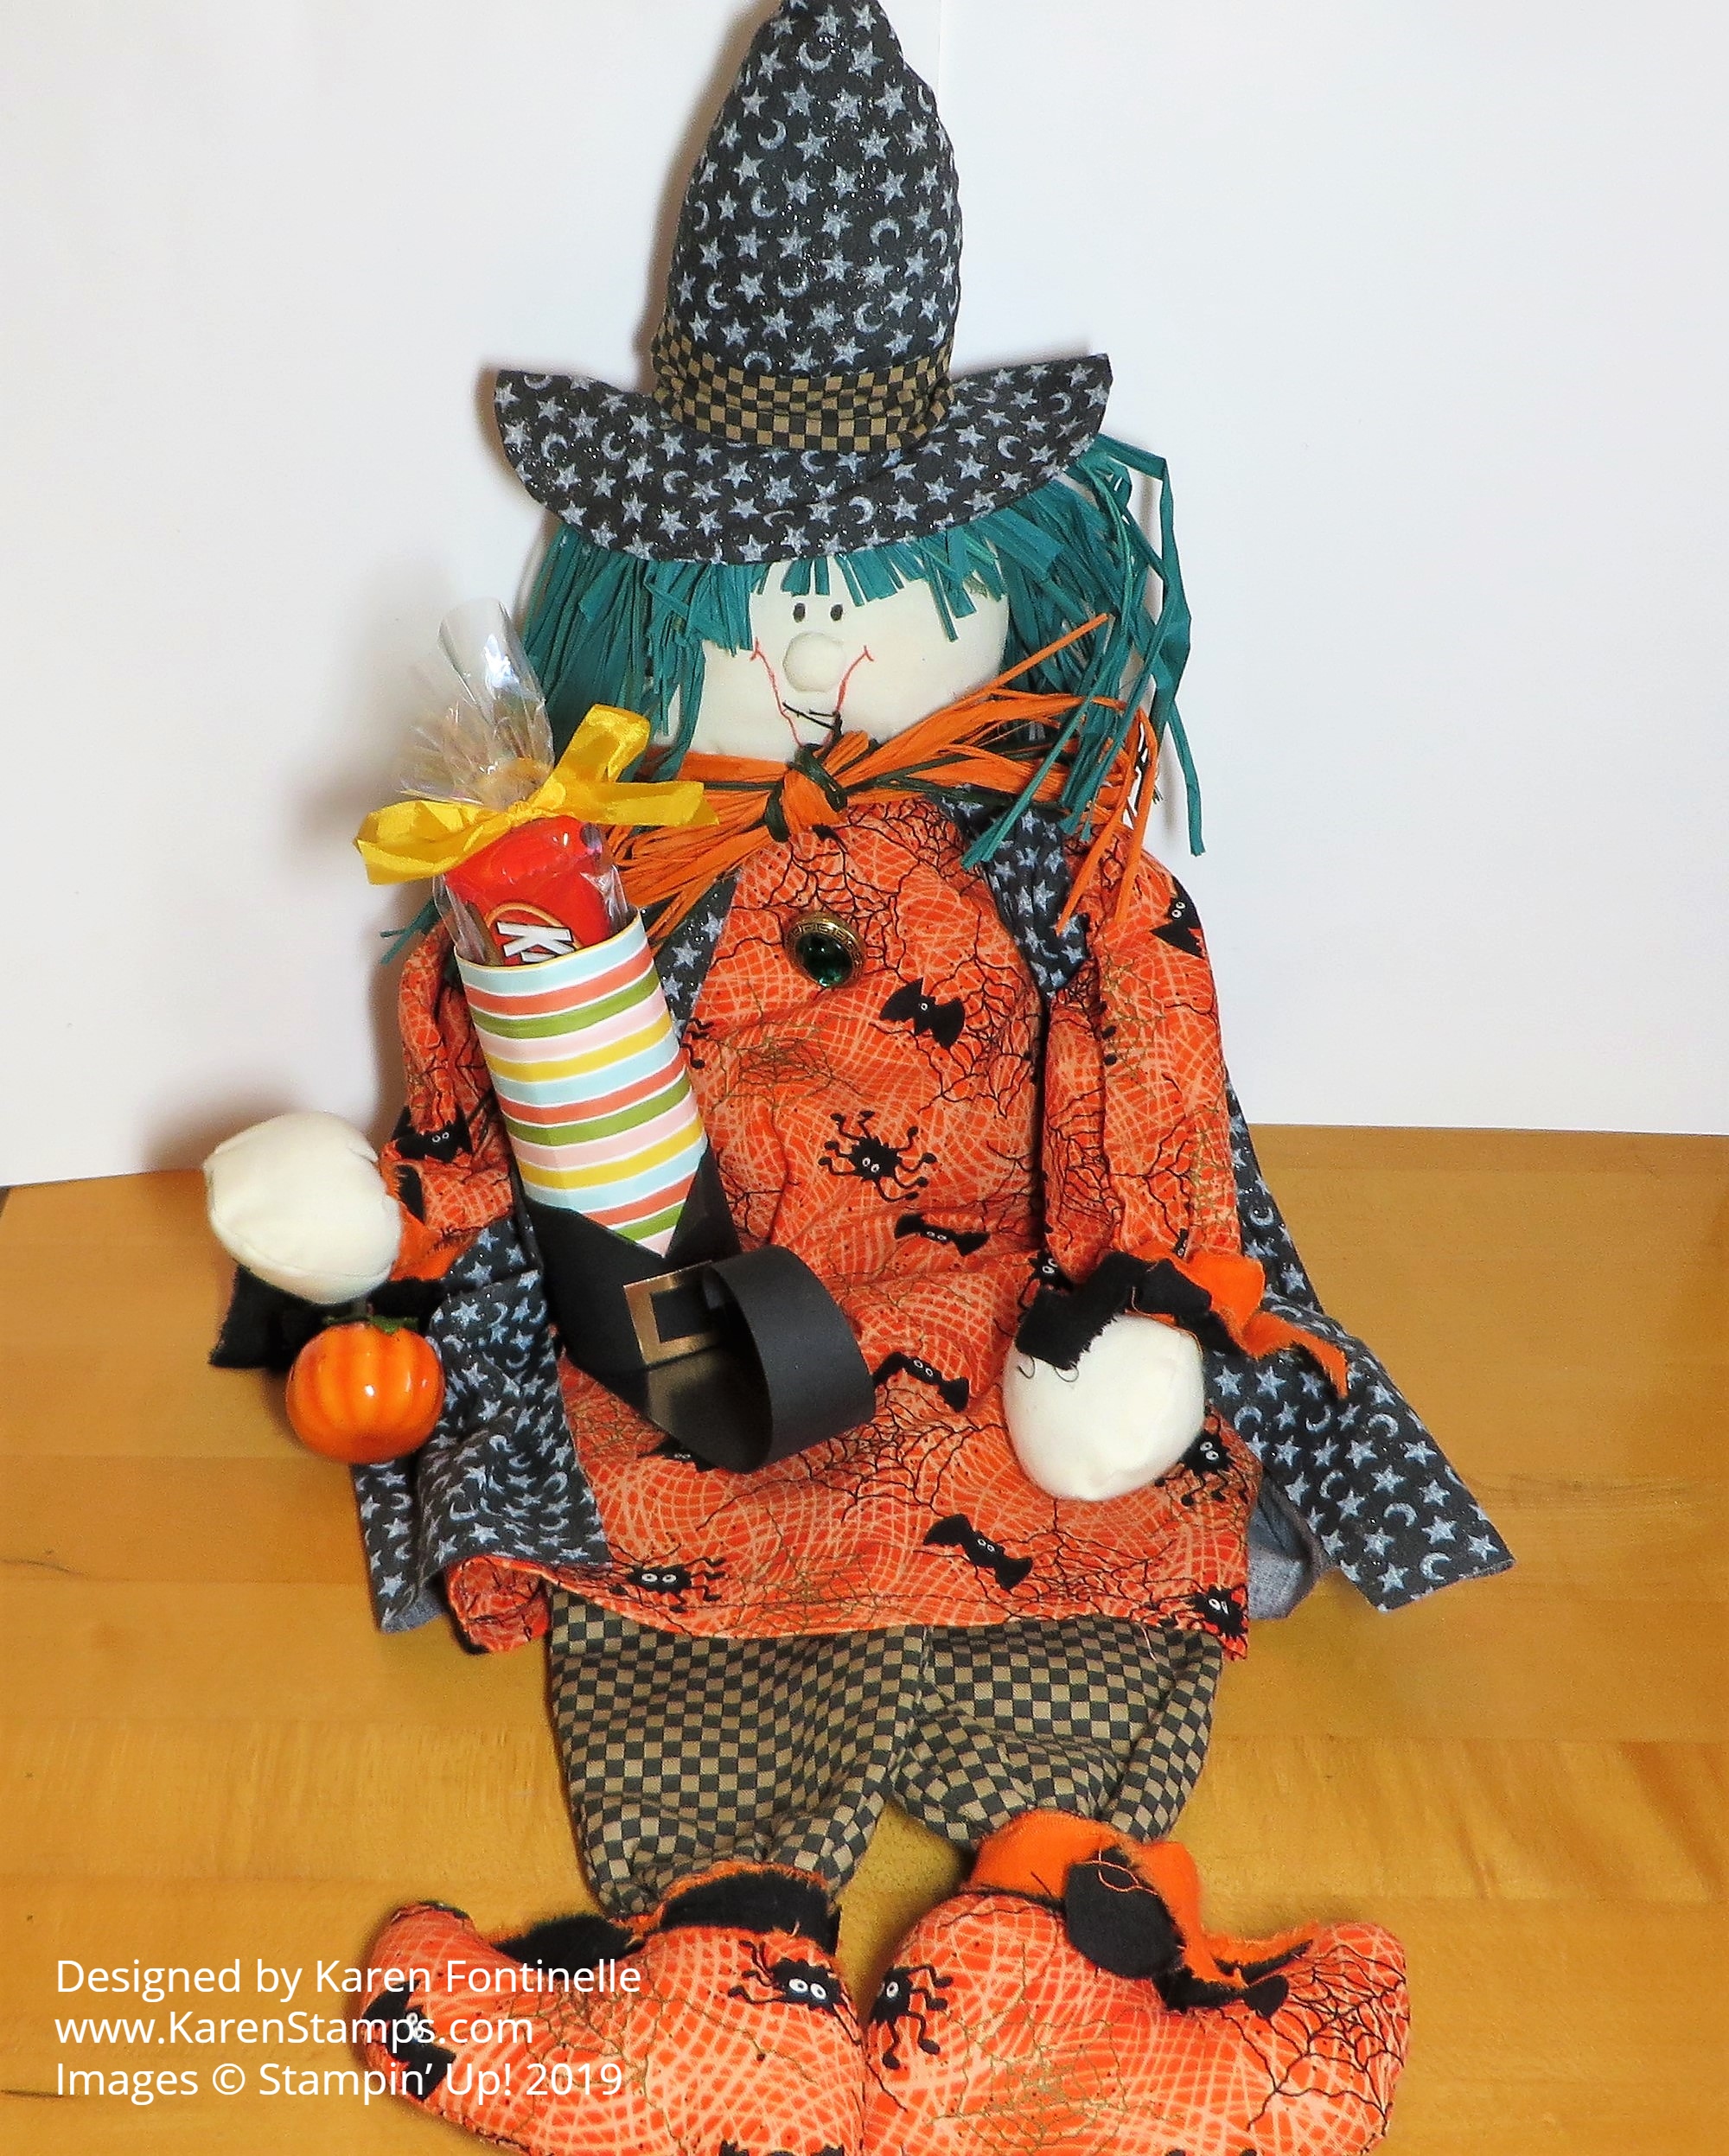
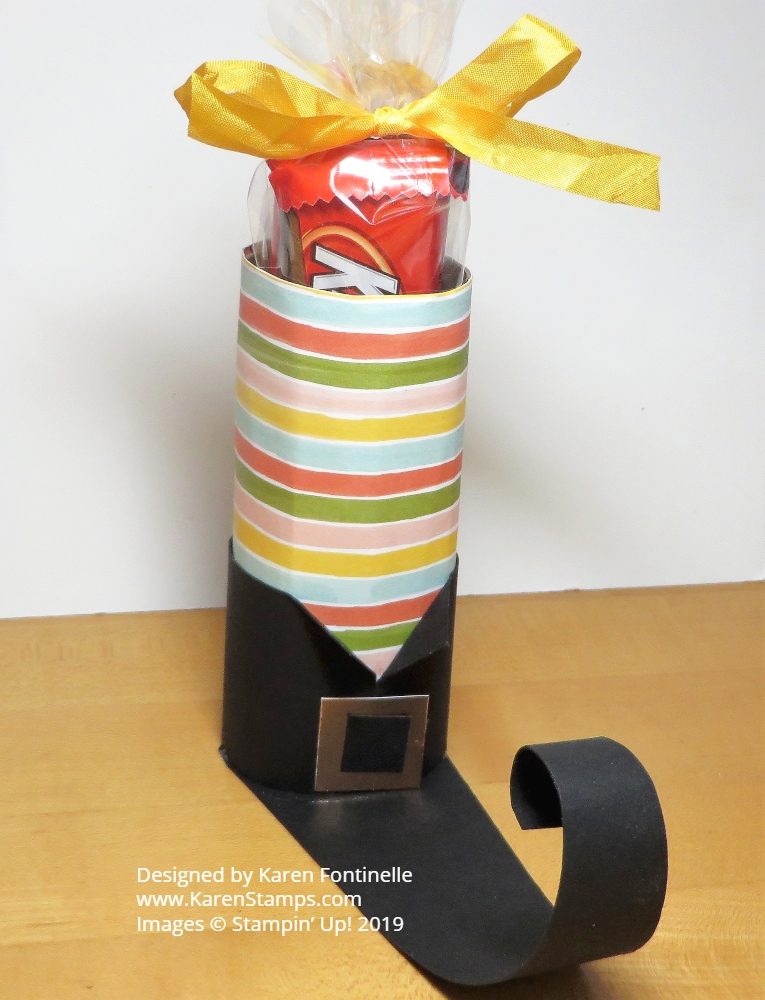
This Halloween witch is ready with her Halloween Witch Boot Candy Favor! I’ve made these for several years now and they are very simple to make. The witch isn’t simple, just the candy treat! The witch I made (lots of them!) back in my crafting and craft show days from a pattern I probably bought at the International Quilt Show held annually in Houston back before I ever heard of Stampin’ Up!
The Witch’s Boot is easy to make. Just grab an empty toilet paper roll or cut down a paper towel roll or whatever roll you have. Wrap some designer paper around that you think looks like a sock. Then make a boot collar for the base. It just wraps around and meets in the middle. Then fold back the corners. The only thing to watch for is to make it wide enough so you can add a buckle. Then add a long strip for the base of the boot that is only as wide as the toilet paper roll. Narrow it down diagonally on each side and curl the tip if you like. No measurements, you can just do it for your size roll.
To make an easy buckle, just cut a square of some kind of foil (I used Copper on this one) and then make a smaller black piece for the center to look like it is going through the buckle.
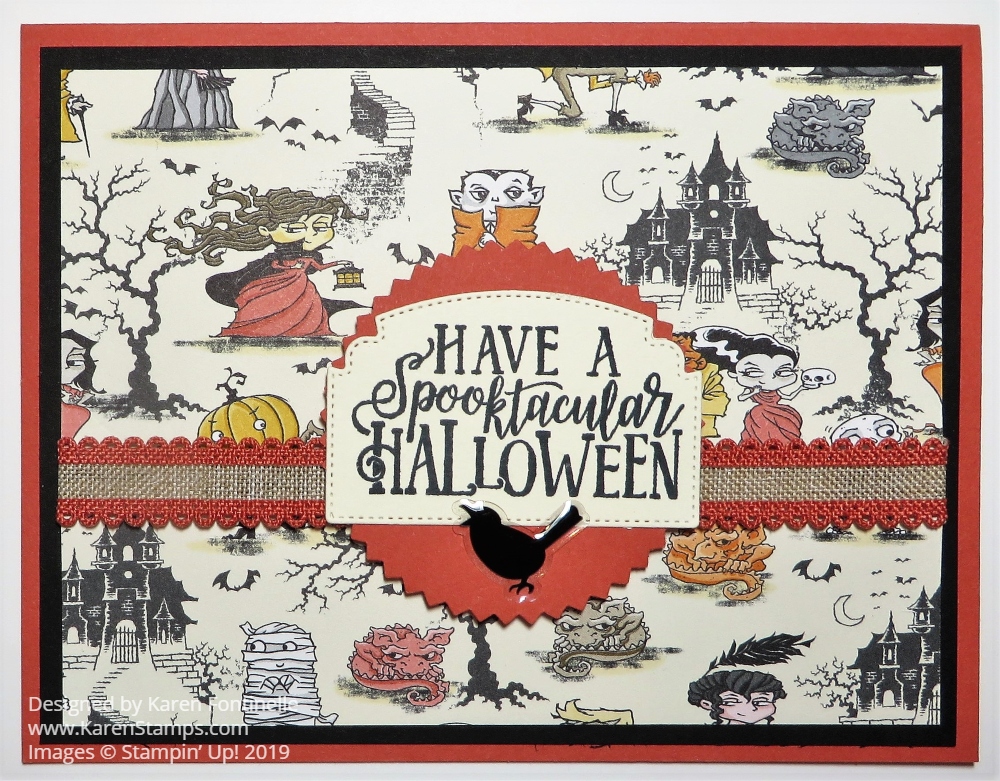
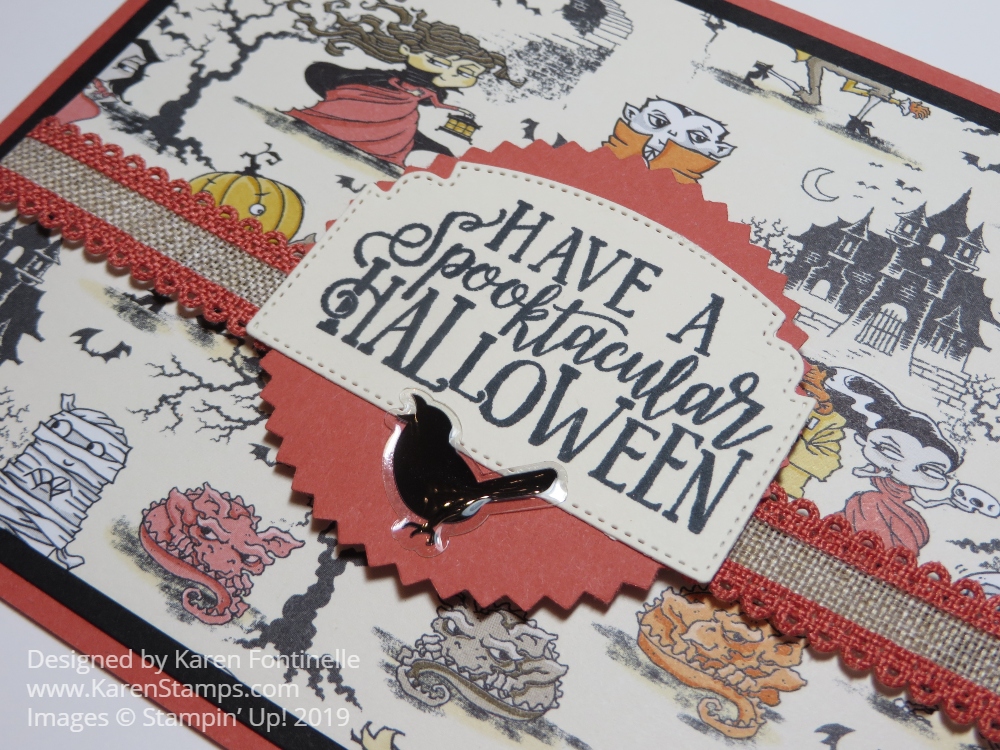
In between watching several baseball games and one Texans football game, I’ve spent some time making Halloween cards with the Monster Bash paper like this Spooktacular Bash Terracotta Tile Halloween Card. The Houston Astros have made their way to the American League Championship Series as have the St. Louis Cardinals (our hometown team) so we have been watching a LOT of baseball including the division games they got these two teams here. So it was fun to have some breaks stamping and making Halloween cards!
One of the coordinating colors for the Monster Bash Designer Series Paper is Terracotta Tile, one of the current In Colors. Since I haven’t used this color very much and the matching ribbon, I chose this color for the card base. The designer paper pattern is a cute one with little haunted houses and Halloween characters! I layered it on a piece of Basic Black to help it stand out.
The ribbon is wrapped around the designer paper and adhered on the back. It is the very nice Terracotta Tile 1/2″ Scalloped Linen Ribbon. You can use it to dress up a fun card like this one or use it on a fancier card. I’ve even cut it down the middle to use just the scalloped edge to decorate a card.
The greeting is stamped with the Spooktacular Bash Stamp Set. I really like this greeting and used it on a lot of cards! It is stamped on Very Vanilla cardstock which I think goes better with this card than Whisper White. Then it is die-cut with one of the Ornate Frames Dies. I love this particular shape that goes with this greeting so well!
Then I took a long time to decide how to layer the die-cut greeting on something! I just couldn’t find the right thing. Finally, I looked at my punches and chose the Starburst Punch. The greeting seemed to fit fine over the Starburst shape with a little room left for one of the blackbirds in the Monster Bash Enamel Shapes. I think the bird gives an appropriately spooky look to the card, right?! It’s fun to stick it on, anyway! A cute embellishment for a Halloween card!
All you have to do is change the designer paper pattern and the greeting if you want for another design for a Halloween card. It is fun making cards and treats with this Halloween paper and all the spooky, whimsical characters! The backside of some of the papers will also make very nice non-Halloween cards!
Make some Halloween cards this week and give them to your family or send them to friends who enjoy Halloween!
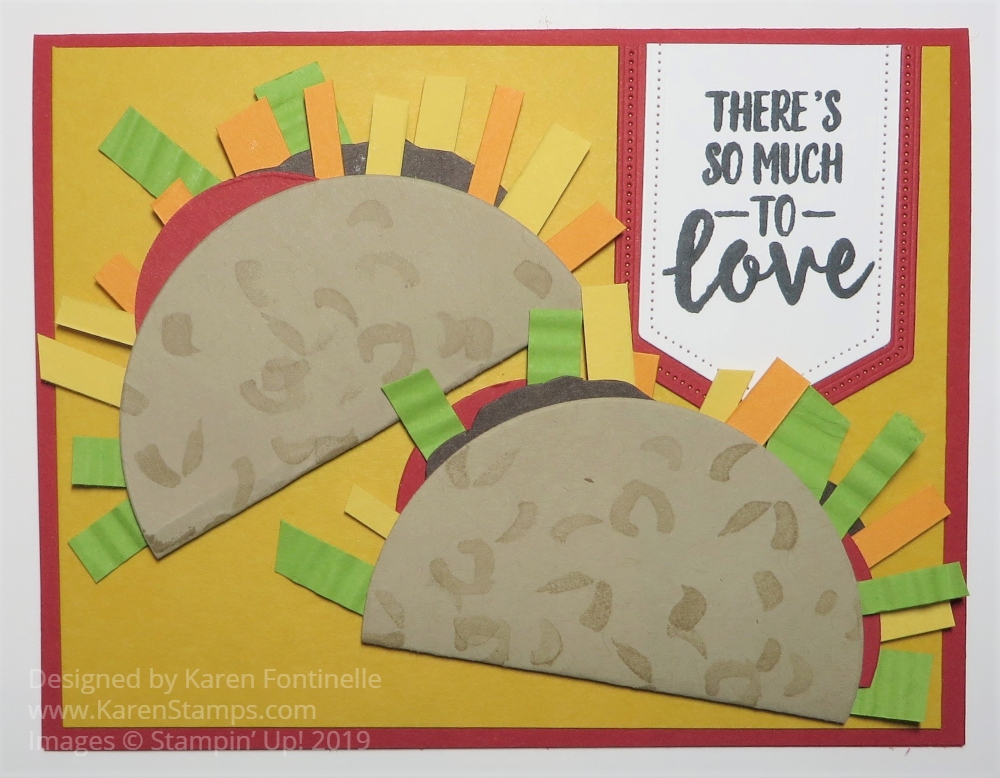
As you can see, I think you can make a card for just about any occasion in the world, even a card for National Taco Day, October 4! When I heard about National Taco Day, I wondered what kind of card I could make. Our family is a big fan of Mexican food or Tex-Mex as it is mostly known here in Houston, Texas.
We’ve had a favorite Mexican restaurant here for almost 40 years! When we came here on our house-hunting trip, some friends who had already been transferred here took us to this little hole-in-the-wall Mexican restaurant nearby. I was not thrilled, admittedly, because we were on an expense account and could have been eating at a finer restaurant! I really don’t remember if I liked the food or not or how that came about. I remember the friend telling us that people stood in line for a table to eat here. This was proven another night later as we drove past and saw, indeed, a line of people out the door IN THE RAIN waiting for a table! Crazy, I thought! After we moved here though, we became addicted to Mexican food, especially at this place and still can barely go a few weeks without eating Mexican somewhere. There are more choices now, more expensive ones, and we go to those places but we always return to our first Mexican restaurant, which has in recent years built a much larger restaurant that is still always packed. And 99.9% of the time I get the Cheese Enchiladas!
This card may make you hungry! It was really pretty easy to make. The card base is Real Red with a layer of Crushed Curry Cardstock, some bright Mexican colors. To make the tacos, I started with two Crumb Cake large die-cut circles, each folded in half, one not quite in half so it would look larger. I stamped the outsides with a stamp from Abstract Impressions Stamp Set (an odd choice, right?). I just wanted something that would look like a little texture.
For the taco “ingredients”, I just cut some Early Espresso curvy pieces to look like taco meat, some Real Red circles cut into smaller pieces for tomato pieces and yellow and orange strips for shredded cheese. For the lettuce, I cut strips of Granny Apple Green Cardstock crimped with my Crimper, but you can also just smoosh them up in your hands so make them look like lettuce. I put Stampin’ Dimensionals inside each taco to pop up the outer shell a little bit.
The greeting, strangely enough, is also from the Abstract Impressions Stamp Set. After wondering what I would put for a greeting on the card, this greeting in this stamp set popped out at me and I thought I could just omit the words “About You”. I stamped and layered it on die-cut pieces from the Stitched Nested Labels Dies.
Now it is time to go have some tacos! Here is a list I came across of where you can get free tacos or some special offer. Or you can make this easy, crazy, fun card for National Taco Day!
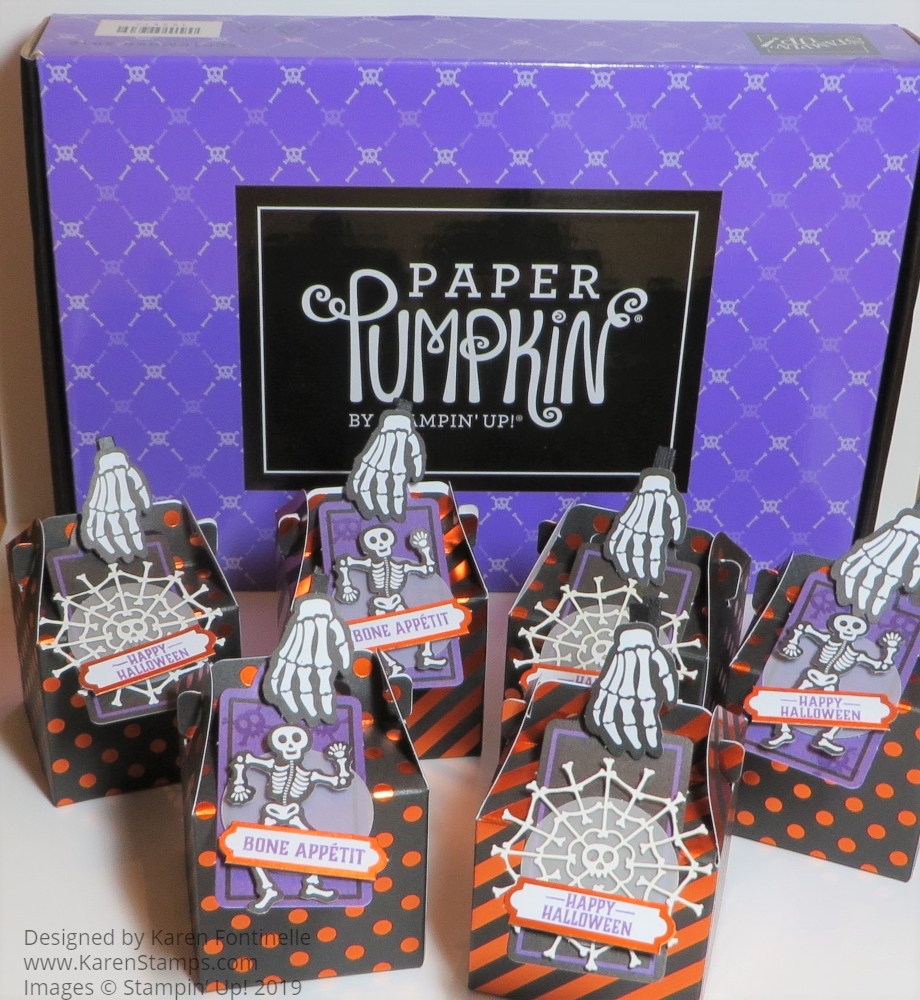
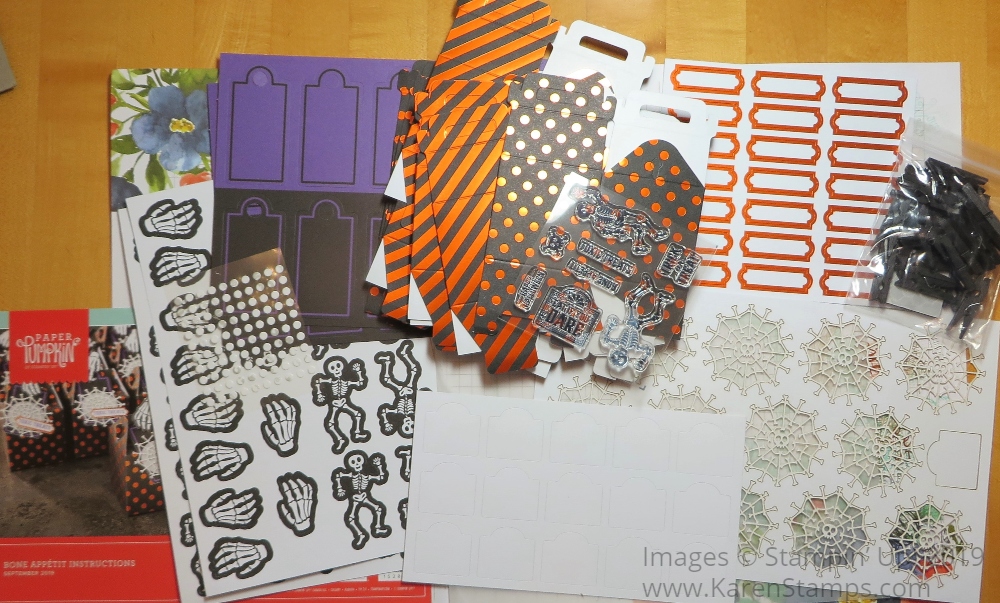
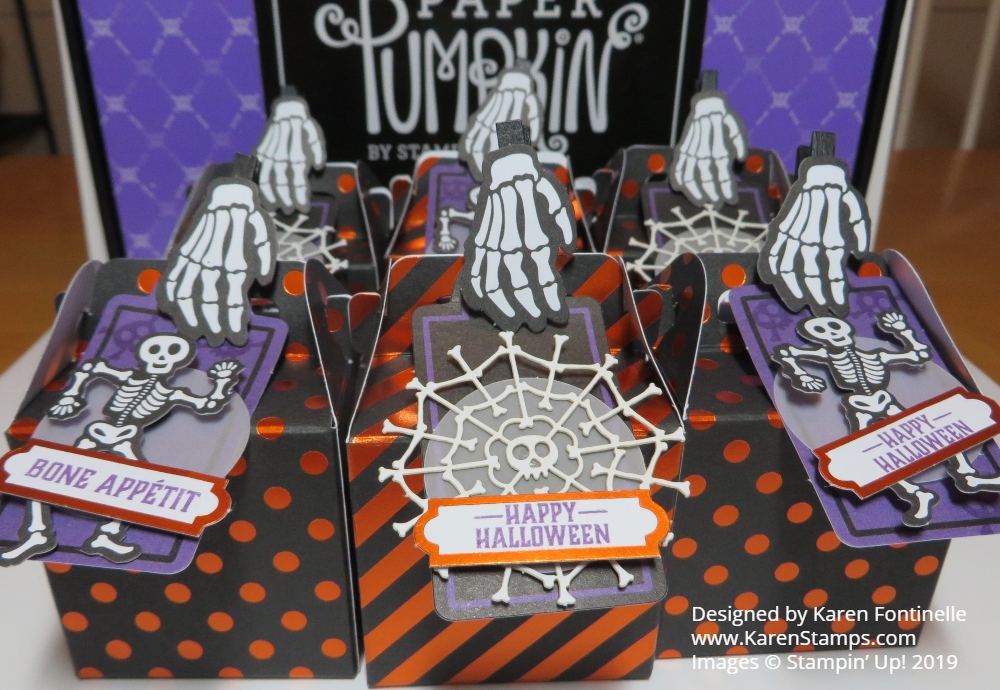
I had so much fun making up this Paper Pumpkin September 2019 Kit with Halloween Treat Boxes yesterday while watching the Houston Texans lose another football game that they didn’t need to lose. It was good I had a distraction! I really enjoyed making this kit and not just because it was a Halloween theme!
Paper Pumpkin is a monthly papercrafting kit made by Stampin’ Up! that comes to you in the mail when you subscribe. You may think you do not want to be committed to a “subscription” but there really is no pressure or risk to a Paper Pumpkin subscription. You can go into your account at any time before the 10th of any month and “skip” a month or two if you like. If you want to cancel, just cancel. I consider it a gift to myself each month to receive this special box in my mailbox!
The presentation of the kit is wonderful, too! They don’t just throw all the materials in the box. All the materials are packaged up and wrapped in tissue paper just like a gift. There is also an exclusive stamp set and small ink spot. I think one of my favorite parts about the Paper Pumpkin Kit is opening it up and laying out all the materials provided in the kit! I love to see all the pieces I have been given!
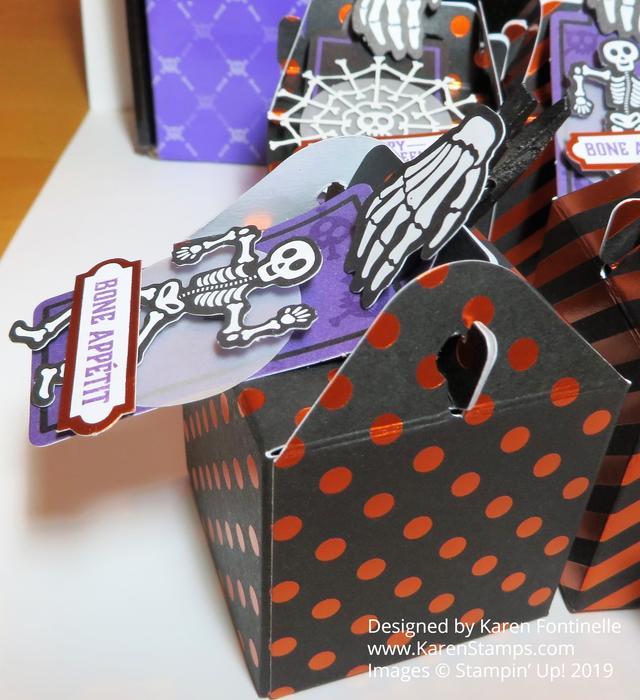
In this September Kit you can see the pamphlet with directions (there is also a helpful video online for each kit), the stamp set, the treat boxes, the various tags, the embellishments for the boxes, the bag of little black clothespins, the adhesive dots and even some black mini dimensionals to pop up some of the pieces.
I didn’t close up all my boxes yet, just some to see what they would look like and to show you in this blog post. I don’t want to have to undo all of them when I actually put candy or treats inside closer to Halloween! I got 20 boxes to make in this kit. I made 16 and am deciding if I want to make some alternative projects instead of all the boxes! Obviously it is your kit so you can use the materials however you like in any month! Sometimes I do half and half….make half as designed and make some other projects that I see online for something different!
Here is a closeup of some of the boxes so you can see the decorated Halloween tags that are then clipped onto the handle of the box with a small black clothespin! The skeleton hand is adhered to the front of the clothespin with the glue dots. Such a cute project! Maybe you can see the clothespin clipped to the top of the box in this side view below.
If you are interested in trying Paper Pumpkin, it is just the right time because the next two month’s kits will coordinate for the holidays! The October 2019 Kit will be 10 cards and the November Kit will be 24 holiday-themed gift tags of 4 various sizes and designs. Sounds like fun to me! I can guarantee you will be glad to have 10 extra cards, even if you are making some on your own, just in case! I know I always have a few more people I want to send cards to. And we all will need gift tags!
The cost of each monthly kit is $22 plus tax but that includes shipping. In your first kit, you will receive an acrylic block made for Paper Pumpkin with which to mount the stamps. In all the kits you will receive an exclusive stamp set, an ink spot, adhesives, and all the materials to make the project, whatever it is! No need to design something yourself or order supplies you don’t have……it’s all in the box! Just open and craft! And of course, you will have the stamp set and ink spot to use in the future. In fact, the ink spots are great to use with the Stamparatus!
October is coming up tomorrow and the important date to remember is October 10th! And then November 10th, if you don’t subscribe in October! But I suggest subscribing by October 10th so you receive both kits and will be ready for Christmas! Do it today so you don’t forget!
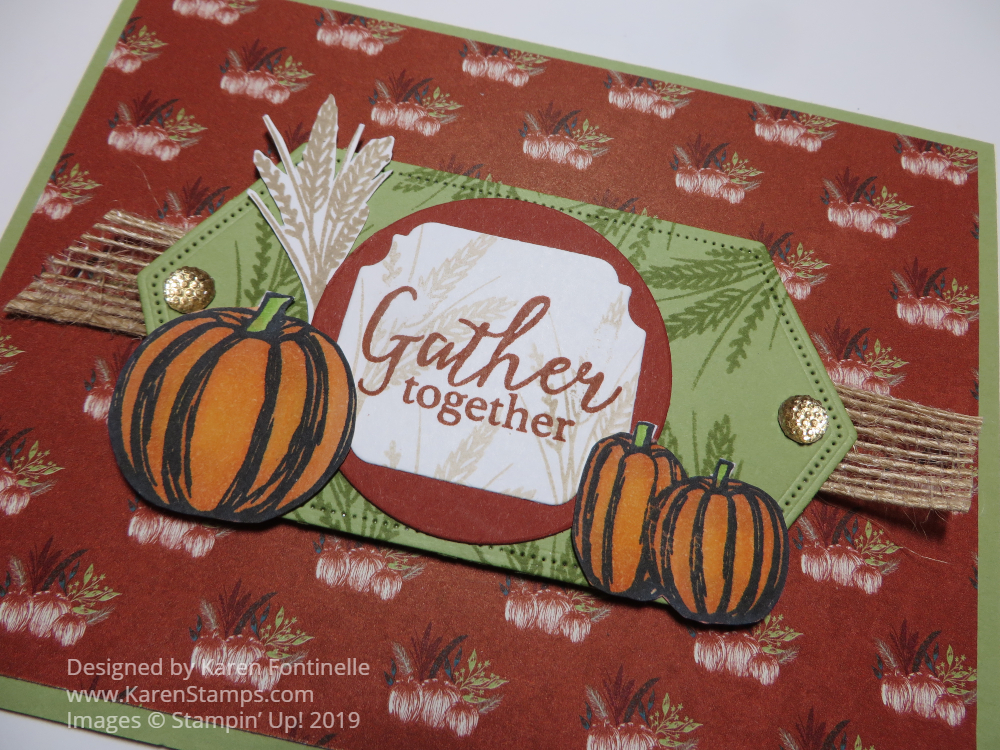
I’m celebrating today with this Gather Together Fall Card on the First Day of Fall even though in Houston, Texas we are a LONG way from it feeling like fall! If only!! Maybe someday before Christmas the weather will cool off so that we can walk outside and feel comfortable! But being able to make cards and projects with stamps, ink, and paper to express the feeling of fall does help a little bit!
This card starts with a base of Pear Pizzazz Cardstock with a layer of designer paper in the Come To Gather Designer Series Paper Package. This print has tiny little pumpkins with wheat and grass in the background with a Cajun Craze colored background.
I began with the greeting in the Gather Together Stamp Set. I stamped the greeting with Cajun Craze Ink and then die cut it with one of the dies in the Ornate Frames Dies. I layered it on a die cut circle of Cajun Craze to help it stand out a bit more. For the background I die cut a piece from the Stitched Nested Labels Dies in Pear Pizzazz and stamped some wheat randomly for some interest in the background. I adhered two pieces of 5/8″ Burlap Ribbon to each end of this piece. The pumpkins are stamped and colored with Stampin’ Blends and then cut out with Paper Snips (you can also purchase the Gathered Leaves Dies). I also stamped the wheat in Crumb Cake In and cut it out by hand as well. This whole focal point of the card is popped up on Stampin’ Dimensionals®.
That’s all there is to this card. It made me feel cooler just making it! LOL! This would be a great card to send for a Thanksgiving greeting or even just a card to mail during the autumn season!
Yesterday was a very wet day in Houston – actually, the third wet day in a row in Houston, which you probably heard about on the news. On Tuesday there was a tropical depression in the Gulf of Mexico which got named Imelda pretty quickly, which I did not take as a good sign that they named a storm! That means it reached certain criteria and that usually isn’t good!
We knew we would get rain, but we needed rain, so at least for the first day it would be good. It all would depend on where you lived and where this storm went how much rain anyone would get. Unfortunately, even the first day coastal towns and towns east of Houston got a lot of rain and flooding. The second day Houston thought the storm had moved on and we dodged a bullet….but then we got big storms late in the day from the heat. Then yesterday, or even the night before for lots of people, the city of Houston itself got plenty of rain, flooding highways and roads and houses. You saw all the pictures on TV. It’s a terrible situation but one we have seen often in all the years we have lived here. We’ve just been lucky, so far, that we haven’t been stranded somewhere on the road or had water get in the house. When Houston gets too much rain, this happens, and often it is difficult to predict or these storms have a mind of their own, no matter how hard the weather people work to get it right.
So for today, let’s just relax and watch some Stampin’ Up! videos for Holiday Catalog products!
You saw the fall birthday box I made for my husband for his birthday instead of a card yesterday in THIS POST. There are SO MANY ideas for these Mini Curvy Treat Dies Boxes, you won’t believe the cute ideas creative people come up with! I made one Halloween pumpkin one with my daughter but have to make some more here at home.
A great addition to our stamping supplies, I think, are these So Many Stars stamps and dies in the Holiday Catalog. You can purchase the So Many Stars Bundle and save 10%, which includes the So Many Stars Stamp Set and the Stitched Stars Dies. Stars are not at all just for Christmas! You can use them for any celebratory occasion like birthdays, graduations, and many more. The stars I have had in the past I have used a lot.
Be sure to notice the Mercury Glass Designer Acetate in the Holiday Catalog on page 33 at the bottom. You could easily overlook it. See in this video how they die cut the acetate and then layer it on a white background. I think this Mercury Glass is very interesting to use for lots of projects! Certainly something very different that we haven’t had before!
Enjoy your day and set aside some Holiday Catalog reading and browsing time for your pleasure and inspiration!
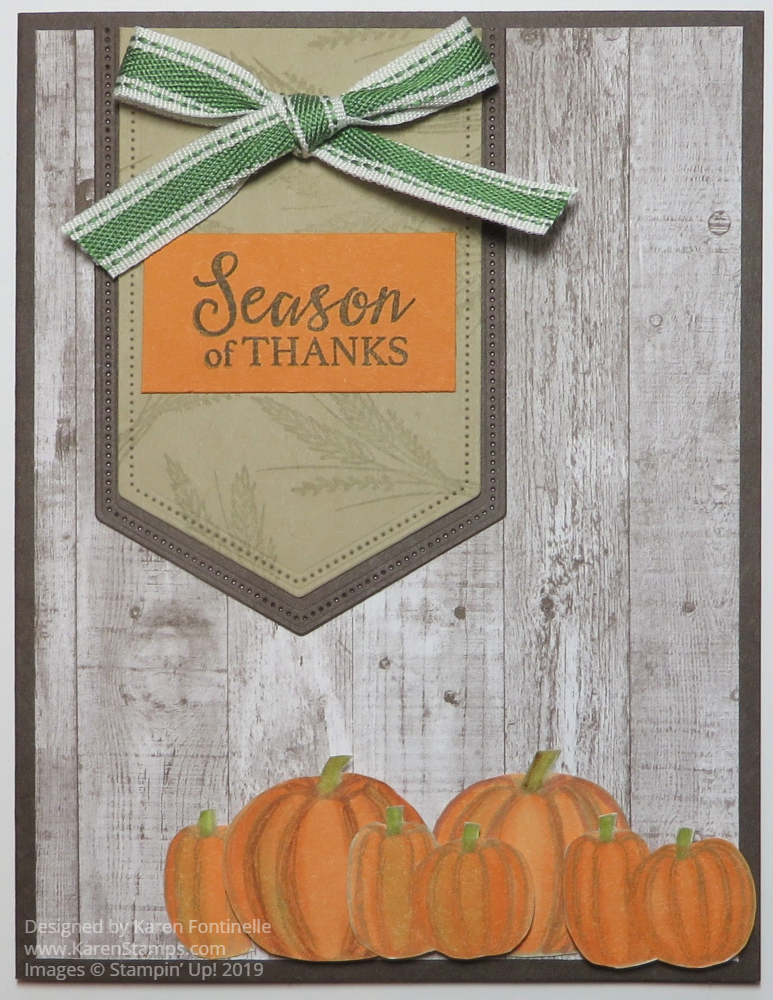
Sometimes I just get out some paper and stamps and have no idea where the stamping will lead and what will turn out, but today this Gather Together Pumpkin Card is what came out of some stamping, coloring, and paper cutting!
Who doesn’t love pumpkins, especially as fall is approaching?! Nothing says fall, and eventually Halloween, like pumpkins! These pumpkin stamps are in the Gather Together Stamp Set in the Holiday Catalog. I decided to stamp the pumpkins with Sahara Sand Ink so there wouldn’t be the bold, black lines of Memento Ink that I would normally use. I did go ahead and used Stampin’ Blends to color in the pumpkins and it seemed to work okay. I started with the Pumpkin Pie Light and Dark colors but added a bit of Light Cajun Craze for some contrast. The stems I first colored with a bit of Soft Suede Blends, but I also tried to add just a bit of Old Olive green and a bit of the Light on the pumpkins. Some pumpkins are popped up with Stampin’ Dimensionals.®
There is a set of dies that go with this stamp set, Gathered Leaves Dies. I haven’t purchased these yet, but they would be great for making the embossed leaves. I wish I would have ordered them! Since I don’t have the dies, I just hand cut the pumpkins with my Paper Snips. You can, however, save 10% if you purchase the Gather Together Stamp Set and the Gathered Leaves Dies in a Bundle, the Gather Together Bundle.
The card base is Early Espresso Card Stock with a layer of the wood grain pattern in the Come To Gather Designer Series Paper. For the banner with the greeting, I die cut a piece of Sahara Sand Cardstock with the Stitched Nested Labels Dies and just cut off the top to line up with the top of the card. The Sahara Sand is layered on a die-cut of Early Espresso. The greeting is just cut to fit on the banner. By the way, the banner was first stamped with the wheat-looking stamp for a little something in the background.
Once I got the banner made with the greeting and then added the Garden Green 3/8″ Double-Stitched Ribbon tied in a bow, that’s when I was satisfied with what I was creating! Sometimes it just takes playing around and then having that “moment” when you know you have something you like. You will find this pretty ribbon in the Toile Tidings Suite, but there is no reason why you can’t use it for fall and Halloween.
There is so much to like about the Come To Gather Suite. You can make cards for fall, Thanksgiving, and even maybe Halloween! Such pretty colors in the designer paper and even some wooden elements, the Tags & Feathers Elements, that you can use for stamping or embellishing. Think of many creative projects you can use with these products as well, some pretty home decor and other things. Fall is such a great time of year! I will be glad when it feels like fall in Houston, Texas!
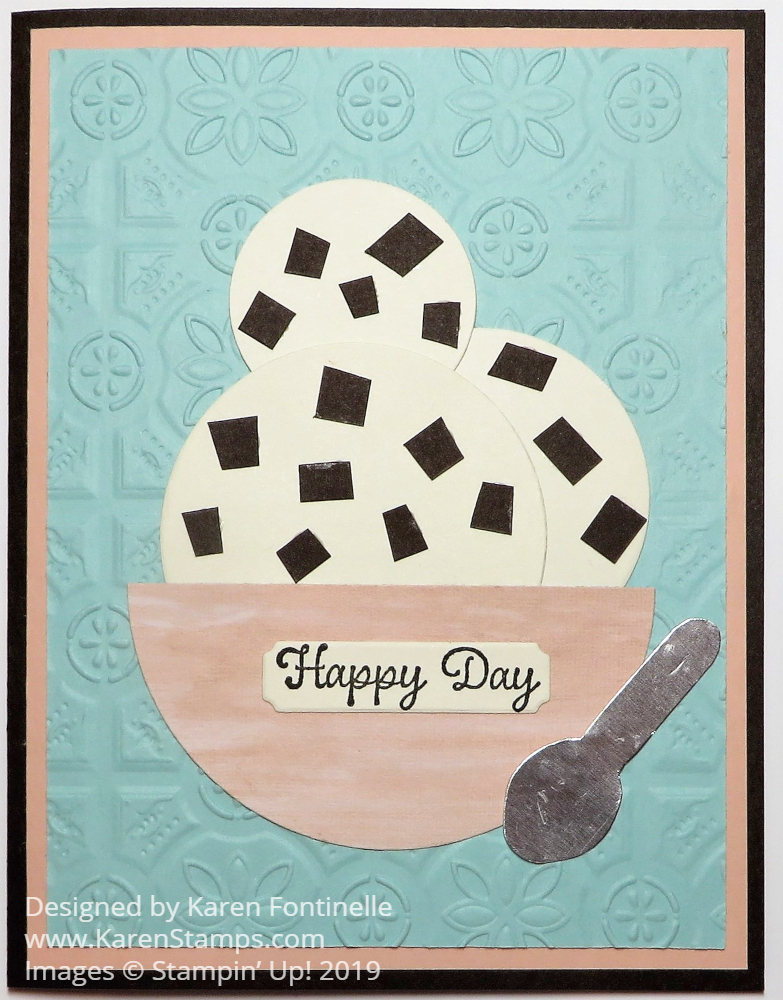
What could be better than A Summer-Themed Card for National Ice Cream Day except for a real bowl of ice cream?! With temperatures as hot as they have been lately around the United States (and always in Houston, Texas!) there’s nothing like a cold bowl of ice cream.
My father loved his dish of ice cream almost every night after dinner. I think what we had growing up was actually something called ice milk. I still remember the translucent plastic container it came in. My mom saved a lot of them and they were perfect for putting cookies in or other things. So I think I got my love of ice cream from my father!
When we lived in Oklahoma when we were first married my favorite was Chocolate Almond ice cream from Braum’s. Little did I know that there would be something better waiting for me when we moved to Houston! Blue Bell Ice Cream!!! There is no other ice cream any better (if you ask us!). When Blue Bell had to shut down production a couple of years ago, we tried many other brands but nothing compared. People even had signs in their yards wanting Blue Bell to come back or that they would rather take a chance on eating it instead of watching cartons being thrown out at the stores! That’s devotion!!
In honor of National Ice Cream Day today, I made a bowl of my favorite flavor, Blue Bell Chocolate Chip! You don’t always have to have an exact stamp set to make a card. Sometimes you can just use punches or dies or parts of punches, dies, or stamps to make what you want. My ice cream scoops are cut from Very Vanilla Cardstock in different sizes of Layering Circle Dies. The bowl is a circle of a piece of pink in the Perennial Essence Designer Series Paper. After cutting the circle, I cut it in half to look like a bowl. The chocolate chips are just little pieces of Early Espresso Cardstock. It looks good enough to eat! I’m always hungry for Chocolate Chip!
Since I knew I would be using Early Espresso for the chocolate chips, I chose it for the card base, with a layer of Petal Pink and then Pool Party. To add some interest, I decided to emboss the Pool Party layer with the Tin Tile 3D Embossing Folder. I thought maybe it looked like a kitchen wall in the background! The spoon is made with Silver Foil Paper and the Perennial Flower Punch! I cut a strip of the Silver Foil wide enough but not too wide, to fit into the punch, fed from the top, to get just the petal portion punched. From that, I trimmed off the rest to round the tip a little and make the spoon handle! Kind of fun to come up with that!
I found the greeting in the Itty Bitty Birthdays Stamp Set. What greeting do you use for National Ice Cream Day? “Happy Day” seemed just right for eating ice cream!
I love some of the other Blue Bell flavors too, like Homemade Vanilla and Moo-llennium Crunch. But Chocolate Chip can’t be beat! Sometimes I like to add pecans on top.
An ice cream treat seems to always be something special, one that cools us off on a hot summer day! If you think about it, you probably have special memories of ice cream! Did you ever walk down to a corner store to buy an ice cream bar? Was there an ice cream truck that drove through your neighborhood ringing a bell or playing a tune for all the kids to run out and want to buy ice cream for a dime or a quarter? Did you have homemade ice cream made in an ice cream freezer with ice and salt?
All of these things make it important to celebrate National Ice Cream Day! It also shows how important our stamping and papercrafting is that we can make almost anything or commemorate almost anything with our crafting supplies!
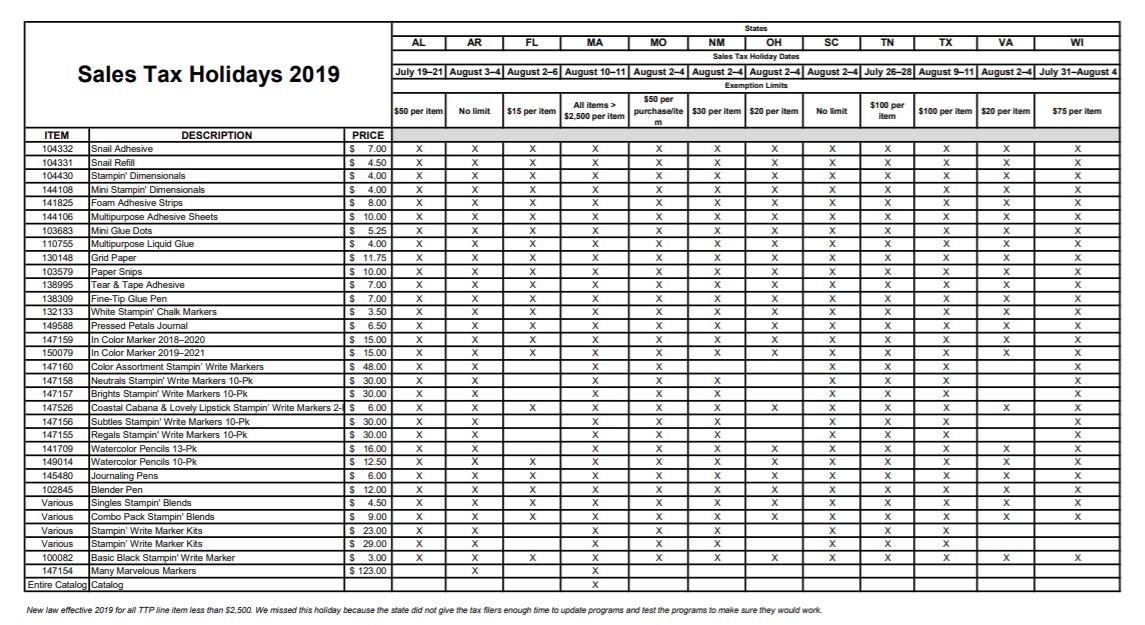
Sales Tax Holidays are coming in at least a few states and some are in July! These sales tax holidays are to help with buying back to school supplies and clothes. Depending on the sales tax in your state it might not be very much, but if you buy a lot it can add up. At a minimum, it saves you a little bit of money. Of course it is not just back-to-school parents and students that get to use this Sales Tax Holiday! Anyone can as long as you buy eligible items.
I suppose since some of the Stampin’ Up! products can be used for school supplies (and how many times have we moms had to share our craft or stamping supplies with family members for school, Scout or other projects?!). Even if you don’t have a child going back to school, if you order during your state’s tax holiday you can take advantage of this savings.
Just some examples of Stampin’ Up! products that “may” qualify (depends on your state) are adhesives, markers, Stampin’ Blends (yea!), In Color Markers, Grid Paper, the new Pressed Petals Journal, Paper Snips, Watercolor Pencils, and more. Zoom in and look over that chart!
To read this Sales Tax Holiday chart, click HERE and even then you may have to zoom in on your computer screen to be able to read it. You will have to check the dates and items for your own state. Note that Alabama starts July 19-21 and Tennesee and Wisconsin are later in July. Several begin almost right away in August. Just sayin’….be ready! You can plan ahead if you are going to order.
However, remember the Bonus Days in July where you get a $5 coupon to spend in August with every $50 purchase of merchandise. Those early July states can double-dip!
I’m still thinking that school just got out for the summer (because once your kids are grown, except for school crossings when you are driving, your life doesn’t revolve around school schedules anymore) but I have already seen Back-to-School supplies out in the store! And even crazier, someone on Instagram said Halloween items are going out in craft stores already!
So it is coming up on Back -to-School time and you may be able to save a little bit of money during the Sales Tax Holidays on “your” school supplies for stamping!