What could be better than A Summer-Themed Card for National Ice Cream Day except for a real bowl of ice cream?! With temperatures as hot as they have been lately around the United States (and always in Houston, Texas!) there’s nothing like a cold bowl of ice cream.
My father loved his dish of ice cream almost every night after dinner. I think what we had growing up was actually something called ice milk. I still remember the translucent plastic container it came in. My mom saved a lot of them and they were perfect for putting cookies in or other things. So I think I got my love of ice cream from my father!
When we lived in Oklahoma when we were first married my favorite was Chocolate Almond ice cream from Braum’s. Little did I know that there would be something better waiting for me when we moved to Houston! Blue Bell Ice Cream!!! There is no other ice cream any better (if you ask us!). When Blue Bell had to shut down production a couple of years ago, we tried many other brands but nothing compared. People even had signs in their yards wanting Blue Bell to come back or that they would rather take a chance on eating it instead of watching cartons being thrown out at the stores! That’s devotion!!
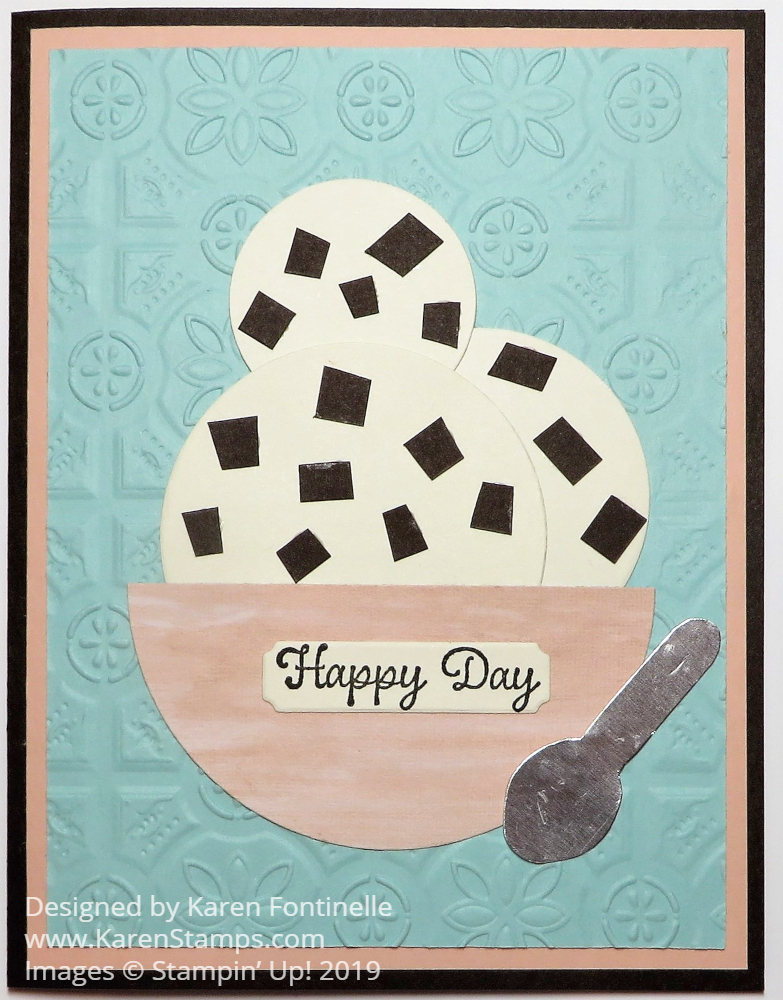
In honor of National Ice Cream Day today, I made a bowl of my favorite flavor, Blue Bell Chocolate Chip! You don’t always have to have an exact stamp set to make a card. Sometimes you can just use punches or dies or parts of punches, dies, or stamps to make what you want. My ice cream scoops are cut from Very Vanilla Cardstock in different sizes of Layering Circle Dies. The bowl is a circle of a piece of pink in the Perennial Essence Designer Series Paper. After cutting the circle, I cut it in half to look like a bowl. The chocolate chips are just little pieces of Early Espresso Cardstock. It looks good enough to eat! I’m always hungry for Chocolate Chip!
Since I knew I would be using Early Espresso for the chocolate chips, I chose it for the card base, with a layer of Petal Pink and then Pool Party. To add some interest, I decided to emboss the Pool Party layer with the Tin Tile 3D Embossing Folder. I thought maybe it looked like a kitchen wall in the background! The spoon is made with Silver Foil Paper and the Perennial Flower Punch! I cut a strip of the Silver Foil wide enough but not too wide, to fit into the punch, fed from the top, to get just the petal portion punched. From that, I trimmed off the rest to round the tip a little and make the spoon handle! Kind of fun to come up with that!
I found the greeting in the Itty Bitty Birthdays Stamp Set. What greeting do you use for National Ice Cream Day? “Happy Day” seemed just right for eating ice cream!
I love some of the other Blue Bell flavors too, like Homemade Vanilla and Moo-llennium Crunch. But Chocolate Chip can’t be beat! Sometimes I like to add pecans on top.
An ice cream treat seems to always be something special, one that cools us off on a hot summer day! If you think about it, you probably have special memories of ice cream! Did you ever walk down to a corner store to buy an ice cream bar? Was there an ice cream truck that drove through your neighborhood ringing a bell or playing a tune for all the kids to run out and want to buy ice cream for a dime or a quarter? Did you have homemade ice cream made in an ice cream freezer with ice and salt?
All of these things make it important to celebrate National Ice Cream Day! It also shows how important our stamping and papercrafting is that we can make almost anything or commemorate almost anything with our crafting supplies!