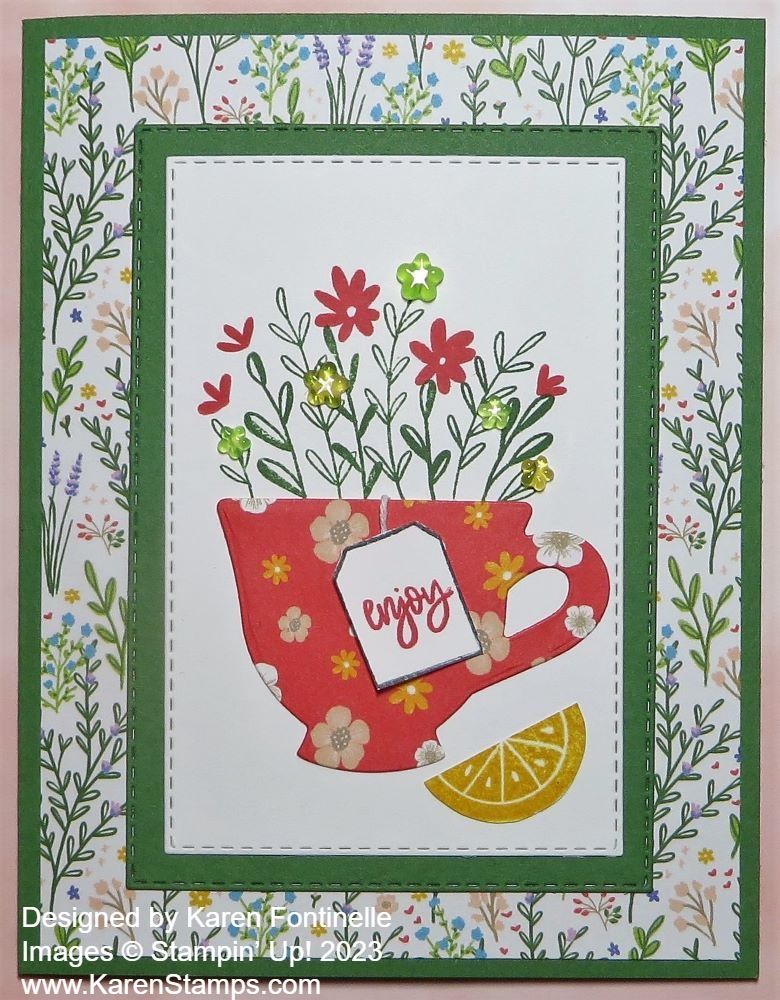
Category Archives: Cards

Scenic Garden Friend Card Two Ways

Scenic Garden Friend Card

If you really stock up on stamping supplies, you may earn this special stamp set for free, Scenic Garden, during Sale-A-Bration! It’s a tranquil stamp set of images – a park bench, a gate, flowers – but it might scare you with all the tiny coloring you think you have to do! But there are ways around that!

For this first card, I did color in the stamped images. But I find that when I use the Stampin’ Blends markers, they just glide so smoothly it is easy to color with them. I love to use them. And you just do not have to be perfect when you are coloring.

You could use other techniques as well, like using Watercolor Pencils, or ink and Water Painters. Soft Pastels would be very pretty, too! To cheat on the background, I used the “backside” of one of the papers in the Dainty Flowers Designer Series Paper, one of the FREE papers you can earn during Sale-A-Bration with a $50 purchase. The “main” side is all florals and greenery, but some of the other sides are pastel backgrounds that look like watercolors. That gave my card what looked like a sky and grass background without even having to color anything.

The card base is Orchid Oasis (I think I used!) with a layer of Soft Saffron. The greeting is from the Framed Florets Stamp Set stamped in the same Orchid Oasis (?) ink on Basic White and then die cut with one of the Deckled Rectangle Dies.

Scenic Garden Monochromatic Card

If coloring is not your thing, just make a monochromatic card, as I have shown many times! For this card I simply stamped the bench, flowers, and stepping stones plus the greeting all in the same color on Shimmery White Cardstock.

The card base is Fresh Freesia cardstock with a layer of the dotted Fresh Freesia pattern in the Dainty Flowers DSP. I made a wider margin with that so you could appreciate the designer paper underneath the card front. The greeting is in the Celebrating You Stamp Set. When you design a card this way, all you have to do is stamp and no coloring is required!

I love the Shimmery White cardstock and don’t think it gets the attention it deserves! I think it has been around forever and is certainly one of my favorites. It is great for stamping and also stands up better to a little water and watercoloring than regular Basic White cardstock. If you look closely, you can see a little shimmer on the paper! It’s difficult to photograph but see if you can notice it in the closeup below.

Scenic Garden Monochromatic Shimmery White

There are only about two weeks or less left of Sale-A-Bration so check your inventory of supplies and see what you need so you can get in on the party and earn some FREE stamping products. Go to the Online Store HERE to see all the Sale-A-Bration choices because extra ones were added besides what is in the Sale-A-Bration Brochure! Happy Shopping!

Don’t Miss the February Paper Pumpkin Kit!

Paper Pumpkin Jan 2023 Kit Sq Ad 1

ONLY A FEW DAYS LEFT TO SIGN UP!

Brighten someone’s day with the new Sunshine & Smiles Paper Pumpkin Kit! Subscribe by February 10th to get this special, brand new kit with some exclusive crafting benefits!

Each kit includes nine cards, three each of three designs, with peek-through windows on the card fronts! The bright colors and furry friends are the perfect way to make someone’s day!

This kit is unique for its suite coordination! It coordinates perfectly with the Rain or Shine Suite Collection (160556) from the January–April 2023 Spring Mini Catalog. It’s the perfect time to get some extra product and get creative with your crafts!

ABOUT THE KIT

Name: Sunshine & Smiles

This kit includes:

  • Everything you need to create 9 radiant cards—3 each of 3 designs—and 9 coordinating envelopes.
  • A sweet springtime photopolymer stamp set.
  • A Mango Melody Stampin’ Spot
  • A fun peek-through window scene on each card!
  • Cute precut critters and labels, fun raindrop embellishments, and more! 

Finished card size: 5-1/2″ x 4-1/4″ (14 x 10.8 cm)

Coordinating Stampin’ Up! colors: Balmy Blue, Cajun Craze, Coastal Cabana, Daffodil Delight, Flirty Flamingo, Mango Melody, Old Olive, Shaded Spruce

The two little die add-ons originally offered unfortunately are no longer available.

Click HERE to sign up for the monthly Paper Pumpkin Kit under my name by February 10th! Don’t delay!

If you want to put a Prepaid Paper Pumpkin subscription Kit on your Stampin’ Up! order to perhaps earn rewards or for Sale-A-Bration, here is a chart explaining Prepaid Kits.

Paper Pumpkin Kit February 2023

Be sure to order and set up your account and put in your code they will email you by February 10 to receive this February Kit. Later, you will receive the next month’s kit.

Let me know if you have any questions! If you already are on a monthly subscription and you want to take advantage of the Prepaid option you can do that! Just put in the code and after you use up your Prepaid subscription, your account will revert to your monthly subscription automatically.

JOIN PAPER PUMPKIN HERE by February 10, 2023!

SHOP PREPAID PAPER PUMPKIN SUBSCRIPTIONS HERE!

Layered Stripes Wonderful Card

Layered Stripes Wonderful Card

Like my card from yesterday, I will ask if this Layered Stripes Wonderful Card is a Valentine or just a “regular” card. What do you think? I think it could be either one! It’s Real Red so it certainly could be for Valentine’s Day! The greeting could be for Valentine’s Day OR just a nice greeting to send to someone any day!

This card is stamped with the large background stamp in the Spring Mini Catalog called Layered Stripes. You’ll find it on page 28. I forget what compelled me to buy this stamp because I think I would normally skip over it. And now I finally got around to playing with it! I used my Stamparatus to stamp it to get a solid image. If I needed to stamp it more than once, I could do that since the Stamparatus holds it in exactly the same place. The stamp is actually larger than a layer you would use on a card. You could have the background stamp stamp-side up, apply ink, and then lay the piece you want stamped on top of it carefully. Or you can stamp the image on a larger piece of paper and then trim it down to the size you want it.

My card base is Real Red and I added a layer of Basic White to help the stamped stripes stand out a little bit more against the white instead of the red card base. The greeting is from the Celebrating You Stamp Set and then diecut with one of the Stitched Rectangle Dies. I also cut out the next larger rectangle in Real Red so have a layer. I still had to play around with it on the card to see how the greeting was going to look the best because obviously the background of the card is pretty bold.

Finally I settled on using the Real Red layer behind the greeting but I adhered it over a piece of White 3/4″ Frayed Ribbon. (You can choose this ribbon (2 spools!) FREE during Sale-A-Bration with a $50 purchase of Stampin’ Up! products.) The greeting is popped up on Stampin’ Dimensionals. I also added a small bow of Real Red Ribbon in the Real Red & Burlap Ribbon Combo Pack. And for a little sparkle, I added three small Iridescent Rhinestone Jewels. I love these things! They go with just about anything and always add a nice touch to your project.

I think there are other fun techniques to use on a stamp like this Layered Stripes background stamp, like applying different colors to the stripes for one. It will be fun to experiment with I’m sure!

Remember, there were some extra products added to the list of Sale-A-Bration products to choose from with $50 or more purchases and a couple special ones with a $100 purchase instead of two $50 Level products. Check out the flyer below! To see ALL the Sale-A-Bration choices, click HERE to see them in the Online Store. Remember Sale-A-Bration ends on February 28, 2023.

New SAB Products Feb 2023

Country Floral Lane Heart Punch Card

Country Floral Lane Heart Punch Card

Is this Country Floral Lane Heart Punch Card a Valentine or an all-occasion card? I think it could be either one! Hearts aren’t just for Valentine’s Day so this could be a “Thinking of You” card…but it could be a Valentine! So make it whatever you like! Of course, you can change the greeting for your specific occasion!

I chose a Mossy Meadow card base since that is one of the coordinating colors of the designer paper. Over that, I added a layer of Basic White cardstock to set off the designer paper a little better.

The paper is the Country Floral Lane Designer Series Paper in the Spring Mini. The papers aren’t strictly for Valentine’s Day so you can use them later in the year, too! For this card, I used the pink floral pattern with a dark green background on the top half of the card and the pink little hearts paper for the bottom portion. These two patterns are actually the two sides of the same sheet of paper! The top portion measures 3 3/4″ x about 3 3/8″. The pink hearts paper is 3 3/4″ x 1 3/4″. The pink paper overlaps the top portion just a tiny bit. Be sure to wrap the ribbon around to the back at the seam to cover the two papers meeting before you glue it down to the Basic White layer. The ribbon is the Petal Pink 3/8″ Soft Polyester Ribbon which is beautiful and really soft.

For the greeting, I found this one in the Celebrating You Stamp Set. It is stamped in Mossy Meadow ink on Basic White. Then punched out with the plain heart in the Heart Punch Pack with a Petal pink scalloped layer with the scalloped heart. These two punches come together in the Stampin’ Up! Annual Catalog in the Heart Punch Pack. If you missed out on the Country Bouquet Punch (it is due back in April!) these heart punches will be fun to use instead.

The heart is popped up on Stampin’ Dimensionals and I added a small Iridescent Rhinestone Basic Jewel on the point of the heart. I think it is the perfect finishing touch!

SHOP STAMPIN’ UP! ONLINE HERE!

Country Floral Lane Valentine With Heart Punch Pack

Country Floral Lane Valentine With Heart Punch Pack

With all the excitement over the Stampin’ Up! January-April 2023 Mini Catalog (the Spring Mini), we often forget about the Annual Catalog. It’s easier to look at the newest catalog and all the shiny new products. But now that it is time to make Valentines, I remembered the Heart Punch Pack in the Annual Catalog! It’s a shame the Country Bouquet Punch will not be available in time for Valentine’s Day, but maybe you have the Heart Punch Pack you can use instead (or other past heart punches and dies).

This Country Floral Lane Valentine With Heart Punch Pack card is an easy card to make. It starts with a card base of Petal Pink cardstock. I added a layer of designer paper in the Country Floral Lane Designer Series Paper, the Petal Pink with little white hearts.

The hearts are punched with the Heart Punch Pack. This is two heart punches, one with scalloped edges that can act as a layer underneath the plain heart. It’s great to have the two punches for layering and for the two designs. The scalloped heart is Petal Pink and the plain is Basic White. A greeting is stamped with Petal Pink ink from the Country Bouquet Stamp Set.

To help the heart stamp out I die cut a Basic White square from the Stylish Dies. You can use any square shape. The two hearts are adhered together, then popped up on Stampin’ Dimensionals.

But before I adhered the hearts to the square I added some White 1/4″ Crinkled Seam Binding Ribbon back and forth behind the heart. I usually like to put down some Stampin’ Seal on the back so I can stick down the ribbon and then add Dimensionals to help hold it down as well as to pop up the piece.

Trying to keep the card simple, but wanting just a little something else to add to the card, I added a frosted Heart Pearl. In this package are three “colors” of pearls – Glossy White, Milky White, and Pearl White. I just put the heart at the bottom of the heart and then stopped myself from adding any more! It’s so much fun to add some embellishments to a card!

This is just an easy, basic Valentine. Change the colors, the paper, or even the greeting to make more cards!

SHOP STAMPIN’ UP! ONLINE HERE!

New Sale-A-Bration Choices For You!

New SAB Products Feb 2023

Stampin’ Up! has added more products for you to choose from with a $50 order and even one more choice for a $100 order!

In case you are new, Sale-A-Bration is one of Stampin’ Up!’s biggest promotions of the year. It’s overflowing with opportunities for customers and Demonstrators, and filled with fun for everyone, even if you would like to join Stampin’ Up! during this time and get an extra-special deal!

Just shop Stampin’ Up! as usual and when you have all your merchandise entered, choose the free Sale-A-Bration gifts you have earned! Think of shopping in $50 increments to get the most bang for your buck! If you reach $100, you have the choice of one $100 Level product or two $50 Level products! If you spend $150 or more on your order, besides the FREE Sale-A-Bration gifts, you also receive Stampin’ Rewards starting at 10% of your merchandise total. With a $300 order, you will also receive the Host stamp set, Scenic Garden FREE.

Lots of fun choices when you shop with Stampin’ Up!

Click HERE for the Flyer of the NEW CHOICES of products TO EARN!

SHOP STAMPIN’ UP! ONLINE HERE!

Country Floral Lane Punched Red Hearts Valentine

Country Floral Lane Punched Red Hearts Valentine

This Country Floral Lane Punched Red Hearts Valentine uses a little bit of several things for this card in the Country Floral Lane Suite in the Spring Mini Catalog 2023. (As I write this, this Suite is back-ordered until mid-April because the Country Bouquet Punch unfortunately is unavailable until then, as well as the Bundle. The ribbon combo will be available in about three weeks. But other items are available individually.)

This card has a Sweet Sorbet card base with a Basic White layer. Just add some designer paper and a little stamping and you have a Valentine! Each side of the Basic White layer has a 1/2″ x 5 1/4″ strip of the Country Gingham 6″ x 6″ Designer Series Paper.

In the middle of the card, I punched five hearts from the cute print with little white hearts in the Country Floral Lane Designer Series Paper. Since these modern hearts have a slight curve to them, if you want some hearts to curve in the opposite direction, just punch from the other side of the paper! With this paper, pay attention to the pattern so you don’t get the hearts upside down! Just play around with how you like the hearts placed.

Next, I did a little stamping. The center white heart is punched out and then stamped (or you can do it the opposite way!) with a greeting in the Country Bouquet Stamp Set. You can punch out the heart itself first or stamp the heart outline and even the greeting inside it and then punch it out. I wish there was a larger heart for layering, but there isn’t so I just punched out a Sweet Sorbet cardstock heart and let it peek out over the top of the white heart. It adds a little something but nobody would notice the entire heart isn’t layered underneath. The white heart is popped up with Stampin’ Dimensionals.

For some risky stamping (could have messed up the whole card!), I stamped the little outlines of two hearts around in some of the empty spaces on the card using Sweet Sorbet ink. Fortunately, it all worked out! No messes! For a little bling, I added some Rhinestone Basic Jewels.

I forgot to take a photo, but on the inside of the card, I stamped “Happy Valentine’s Day” on a layer of Basic White and then punched out two hearts – one with the gingham like on the side of the front of the card and one with the tiny white hearts like the hearts on the front of the card and just layered them side by side on the lower right-hand corner. That makes the inside very cute!

Time to make Valentines! February is almost here! Not everything has to be red, white, or pink so use your creativity!

SHOP STAMPIN’ UP! ONLINE HERE!

Country Bouquet Punched Hearts Valentine

Country Bouquet Punched Hearts Valentine

If you like punching, this Country Bouquet Punched Hearts Valentine is for you! Just grab some cardstock or designer paper and start punching hearts to your heart’s content! January is just about over (who would have thought?!) and February will be here next week so it’s time to be making lots of Valentines!

This card uses Shimmery White cardstock for both the card base and the layer. I could have added a colored layer underneath the Shimmery White layer, but sometimes I like the white-on-white look. I love the Shimmery White cardstock because it really does have just a tiny bit of shimmer that you can see up close.

Then I chose several colors to use for the hearts. I used Flirty Flamingo, Blushing Bride, Highland Heather, Pool Party, So Saffron, and Soft Sea Foam. Some hearts I used from one side and some from the other to get them going in different directions. The Country Bouquet Punch punches a large heart but also a smaller one at the bottom so I also got a collection of small hearts. That gave me the idea to fill in the spaces with small hearts! There still was some empty space that I thought could use something. I got out the matching Dark Stampin’ Blends and used the bullet tip to make three dots randomly around in the empty spaces. You wouldn’t have to do this step but it just added a little extra color.

I used a greeting in the Country Bouquet Stamp Set, which you can purchase as a Bundle with the Punch. It is stamped with Flirty Flamingo ink on Shimmery White. I diecut it with a banner die in the Stylish Shapes Dies. Then to have a little extra layer without covering too much of the card, I diecut the smaller banner and layered the greeting on top. The whole thing is popped up on Stampin’ Dimensionals.

And why not add a few Heart Pearls on the card with punched hearts all over it?! It’s almost always good to add a little bling or sparkle!

Hope you like this valentine idea that you can make easily with the Country Bouquet Punch!

SHOP STAMPIN’ UP! ONLINE!

Love Cats Valentine Card

Love Cats Valentine Card

This Love Cats Stamp Set in the Spring Mini is just a cute stamp set you should have! It’s just a basic stamp set – no dies, no matching designer paper, no ribbon, no anything else – just a stamp set for you to simply stamp and use your creativity to develop something as simple or as fancy as you want! Valentine’s Day will be here sooner than we can imagine so it’s time to get going on some Valentine cards although you could use these cat stamps for just regular cards, too!

This card has a Real Red card base (my favorite color!). The Basic White layer is stamped with cats in Smoky Slate ink. I would say “randomly” but since the stamp is pretty big, it was a little difficult to get the cats spread out all over the cardstock as I like to do with other smaller stamps for backgrounds. But this was the idea I had in my head so I went with it. When you do this, always fill in the edge spaces even with a partial stamp.

Next I stamped a cat in Smoky Slate on a scrap piece of Basic White and cut it out by hand to place somewhat how I have the cat on this card. But it didn’t stand out so I stamped another cat in Memento ink in black and I like that better. I actually placed him on the Basic White diecut circle so that his tail would align with the Smoky Slate tail stamped on the card front. You may or may not be able to do this, I wouldn’t worry about doing it, but for my card it didn’t look like an extra tail sticking out from the cat! The circle is die cut with one of the Stylish Shapes Dies and layered on a scalloped Layering Circles die in Real Red. I also very carefully inked up the three little hearts with a Real Red Stampin’ Write Marker and stamped those above the cat. This piece is popped up on Stampin’ Dimensionals after a piece of Real Red ribbon in the Real Red & Burlap Combo Pack in the Spring Mini.

For the greeting, I stamped one in the set in Real Red ink on a scrap of Basic White. I thought about diecutting it in some way, but decided to just cut each word apart and adhere it to the focal point with the cat.

I wasn’t quite sure what to do with the stamped gray hearts – just leave them as is or color them in or what. I decided to color in the small gray heart with the Real Red Stampin’ Write Marker and added a few freehand small hearts randomly. They were easy enough to draw myself! Not being one to leave well enough alone, I colored a few Iridescent Rhinestone Basic Jewels with a Dark Real Red Stampin’ Blend marker and placed three of those jewels in some of the empty spaces on the background.

This card may sound like a lot of steps but you already have the design to copy so you only have to make it! Here is another Love Cats card I made using designer paper that you may like. You still have time to order this stamp set and have it in time to make Valentines. Even if you are not a cat lover, this set is too cute! Enjoy!

SHOP HERE AT STAMPIN’ UP! ONLINE!

Playing In The Rain Fox Card

Playing In the Rain Fox Card

When I decided to make several cards for my blog and for my stamping newsletter with this Rain Or Shine Suite in the Spring Mini Catalog because they were forecasting some bad weather here in Houston, I didn’t realize what was coming down the pike, as they say. We were fine at our house, no worries, but we did have really heavy rain in the afternoon and the wind was blowing like crazy. The TV was beeping with those loud buzzes of weather warnings, and text messages about thunderstorms, possible tornadoes, and street flooding possible. We got a little less than two inches of rain and a couple of dead branches knocked off our big tree, but that was all. However, on the other side of town a damaging tornado struck and we learned a new term, “Tornado Emergency”. Apparently, it’s been around several years but never used in Houston. I think basically it means a real tornado has been spotted on the ground and you better take cover NOW! So lots of people today are having to figure out how to get their lives back in order after suffering through some pretty bad damage over in southeast Houston.

However, this foxy guy must live on our side of town where we just had light rain in the morning and no damage in the afternoon. It’s actually a slight copy of the sample in the Spring Mini, but not exactly. The card base is Mango Melody with a layer of “the other side” of the Rain Or Shine 12″ x 12″ Specialty Designer Series Paper. I love this plaid with just the even lines in Mango Melody. Even though it is “raining” on the card, the color and paper design makes it look “happy”!

The “rainy” piece of designer paper is cut at 2 1/4″ x 5 1/4″. If you can’t see it in the photo, the raindrops have a special coating on them to make them shiny, as do some other images in this pack of paper. Just adhere this rainy paper to the left on the card front.

The little fox is stamped in Memento ink from the Playing In the Rain Stamp Set. I colored him in with Stampin’ Blends Markers. I used Cajun Craze and Ivory for the fox, Mint Macaron for his jacket and hat, and Highland Heather for his umbrella. There is a die for him in the Playing in the Rain Dies. Get the stamp set and dies in the Playing in the Rain Bundle and save 10% by buying them together. He is popped up on Stampin’ Dimensionals just off the edge of the rain paper.

The greeting is in another stamp set, Celebrating You. It was the perfect size to be die cut with the almost square die in the Stitched Rectangles. It is adhered flat on the card.

For finishing touches, I cut out a line of flowers from the flower paper in the Rain Or Shine DSP and adhered it to the bottom of the rainy paper. Two butterflies were cut out with the Playing in the Rain Dies and I colored on them a little bit with Stampin’ Blends. The teeny tiny flowers stuck around the card are the Loose Daisy Embellishments. They are very teeny tiny so besides gluing them down with a teeny tiny drop of glue, you could also use them in a Shaker Card. Did I mention they are small?!

This was a fun card to make and I daresay the whole Rain Or Shine Suite Collection is fun! The dies have extra pieces like a fence, butterflies, grass, a kite, and unopened umbrella and more. You really can plan a “scene” for your card or project using all these fun products!

SHOP STAMPIN’ UP! ONLINE HERE!

Dainty Flowers Thinking of You Card

Dainty Flowers Thinking of You Card

One day I realized I had made a card for my weekly newsletter featuring this Dainty Flowers Designer Series Paper, this oval design, but had not put one on my blog! So it was time to make another card, this Dainty Flowers Thinking of You Card, using one of these easy panels on a sheet of the designer paper. You won’t find an easier way of making a pretty card than using certain portions of this designer paper.

The card base is Rich Razzleberry (even though it looks black in the photo!) (but it could be black!). The Fresh Freesia layer is another pattern in the Dainty Flowers Designer Paper. I really wanted to use it as a layer against the Rich Razzleberry and I was able to cut down the oval to the right size to fit. The Fresh Freesia polka dot layer is 4″ x 5 1/4″ and the piece with the floral oval is 3 5/8″ x 4 7/8″. The oval is a little difficult to cut at the normal size layers we like to use, but you can just play around with it. Trim it a little bit on one side or the other or just have different margins on the card. It’s all okay!

For the greeting, I wanted to cut out an oval for the center of the flowers. But we don’t have the oval dies anymore that we used to layer! However, I found this oval in the Fabulous Frames Dies and it fit pretty well. Originally, I planned to use white for the center and Fresh Freesia for the frame that fits around the oval but the frame seemed like too much. Then I stamped on a Fresh Freesia center and didn’t add a frame and I liked that just fine! The greeting is from the Go To Greetings Stamp Set.

For some finishing touches, I added a Brushed Brass Butterfly on the greeting plus added some Pastel Adhesive-Backed Sequins scattered on the card. To add a little something to the greeting, I tied a small bow with the Fresh Freesia 3/8″ Open Weave Ribbon and adhered it with a Glue Dot. These ribbons for the 2021-2023 In Colors are such pretty ones!

This Dainty Flowers Designer Series Paper is one of the FREE products you can earn through February 28 during the Stampin’ Up! Sale-A-Bration promotion! Just spend $50 or more and choose a free product in the Sale-A-Bration Brochure. It also coordinates with the Dainty Delight Bundle in the Spring Mini Catalog on page 55 so check that out also!

SHOP STAMPIN’ UP! ONLINE HERE!

Dandy Designs Thanks Card

Dandy Designs Thanks Card

I was accumulating quite a few scraps of designer paper after cutting the paper down to size, so I thought I would use the strips of paper to make this Dandy Designs Thanks Card. It’s a good way to use up scraps and you can do lots of different designs with scraps! This is just one example.

I’ve made some cards using the Dandy Designs Designer Series Paper and noticed I had this little pile of scraps. This paper is so cute I would hate to waste much of it! You can only get this big pack of paper (48 sheets, 4 each of 12 different designs) during Sale-A-Bration 2023 with a $100 purchase of Stampin’ Up! product. You’ll find it on page 14 of the Sale-A-Bration Brochure. There are several different patterns like polka dots, stripes, and plaids. It’s the kind of paper that you can use for almost anything!

This card starts with a card base of Coastal Cabana. I realized I don’t use this color very often but it’s one of the coordinating colors for the Dandy Designs Paper. I used a regular size Basic White layer ( 4″ x 5 1/4″) on which to adhere the strips of DSP. With the size that they are cut, if I left just a “smidge” of space in between the strips, they would fit perfectly. The top and bottom strips are even with the edge of the Basic White. The designer paper strips are 1″ x 4″. If you don’t get the edges lined up close to perfect, just use your Paper Trimmer along any edges that need to be evened up…or just use scissors to cut off any overhanging edges.

For the greeting, I chose “thanks” in the Biggest Wish Stamp Set. After having trouble with my Coastal Cabana ink, I just used Memento Black instead! I diecut the word with one of the Tailor Made Tag Dies. I decided to use the Black & White 1/4″ Gingham Ribbon for something different, but I colored it with the Light Granny Apple Green Stampin’ Blend marker to help it match the card colors. The tag is just adhered flat to the card because I knew I would add some embellishments since there was space and I didn’t want it to stick up too high off the card.

I used the 2022-2024 In Color Matte Decorative Dots to jazz up the tag. They are the current In Colors and I used the Tahitian Tide smallest blue dots and the Parakeet Party green dot. They still go with the card even if they aren’t perfect matches.

Time is flying! We are already into the third week of January and I am still finding Christmas decorations I missed when I was putting everything away! Don’t wait too long so you can get your hands on the new products in the Spring Mini Catalog and earn some FREE products during Sale-A-Bration!

SHOP STAMPIN’ UP! ONLINE HERE!

Dainty Flowers Just For You Card

This paper is the Dainty Flowers Designer Series Paper that you can earn FREE during Sale-A-Bration with only a $50 purchase. I knew some of the patterns were in this pastel watercolor design. It is on the back of two of the floral sheets….but oh how we hate to cut up paper when we also love the other side! But it had to be done, to see what I could make with the watercolor side of the paper!

This layer of designer paper is the “other side” of the sheet with the floral ovals and the stems of flowers in the center of that paper. Those floral ovals make beautiful, super easy cards so it’s hard to use the other side of the paper instead! But I did!

The card base is Old Olive, layered with Blushing Bride, and then the designer paper. Since I had to cut into those floral designs on the other side, I decided to really cut into the stems of the flowers. The term “fussy-cutting” really applied to how I cut out these flowers! You really need a small type of scissors like the Stampin’ Up! Paper Snips. You need some small, sharp scissors to twist and turn your way through these tiny flowers! Of course, I did not cut into every single little area of this design and you could not cut into so many areas as I did. But I do like the way it turned out. I used the Multipurpose Liquid Glue to put tiny dots on this piece in as many places as I could to adhere the flowers to the card front.

I wanted the greeting to be smaller than it is on the stamp in order to fit into the space on the card so I stamped each word after inking it with the Blushing Bride Stampin’ Write Marker (not the Stampin’ Blends marker). I was careful to clean the stamp well after each word and tried to line it up as well as I could. I think it turned out pretty well. Then I diecut the greeting with the oval in the All That Dies. The greeting is in the Go To Greetings Stamp Set. It’s a great stamp set for greetings you will need often and they are in different sizes and fonts! So versatile and so clever!

When I got out the dies to cut out the greeting, I noticed the little flag ends I could also die cut so I cut those out of Blushing Bride cardstock. Since the space on the card was small, I even trimmed down the length of the flags to fit on each side of the oval. I just glued those on to the back of the oval and popped up the whole thing on Stampin’ Dimensionals. I added three Iridescent Pearl Basic Jewels scattered on the card front. I might have added two on the greeting but since it is already popped up, I didn’t want to add some other things sticking up that poke holes in envelopes when you mail them.

Just keep in mind that “the other side” of the designer papers of the patterns we love often can also make beautiful cards! Get this Dainty Flowers Paper FREE during Sale-A-Bration through the end of February or while supplies last so don’t wait too long!

SHOP STAMPIN’ UP! ONLINE HERE!

Country Floral Lane Hearts Valentine Card

Country Floral Lane Hearts Valentine Card

It’s less than a month until Valentine’s Day so I guess it is time to get busy making some cards! This Country Floral Lane Hearts Valentine Card is pretty easy to make! As usual, it turned out a little different than my original idea!

This card is made with products in the Country Floral Lane Suite. The card base is Sweet Sorbet, one of the coordinating colors in the designer papers in the Suite. The little strip of hearts on the left side of the card is a pattern in the Country Floral Lane 12″ x 12″ Designer Series Paper. I adhered it to the Basic White cardstock but didn’t adhere it to the card base until I added the ribbon first.

For the hearts, I intended to stamp different colors of hearts but then I grabbed the Country Bouquet Punch and punched out the bottom row of hearts and leaves on the designer paper. I decided not to use the leaves that punched out from the paper, just the hearts. The top and bottom hearts are popped up on Stampin’ Dimensionals and the middle one is adhered flat on the card front.

I did do some stamping with the pair of little hearts in Sweet Sorbet ink. After attaching the White 1/4″ Crinkled Seam Binding Ribbon to the card and tying on a bow, I adhered the card front to the card base. At first, I wasn’t sure how a greeting was going to fit on this card, but I stamped the “Happy Valentine’s Day” greeting in the Country Bouquet Stamp Set on an already die-cut banner from the Stylish Shapes Dies. It just fit! I adhered it with Stampin’ Dimensionals across the middle of the card. Then, yes, I had to add three Iridescent Rhinestone Jewels for a little sparkle!

There you have it, my first Valentine card of the year! It’s time to get started!

SHOP STAMPIN’ UP! ONLINE HERE!