Monthly Archives: April 2022

Encircled In Friendship Easter Card

Encircled In Friendship Easter Card

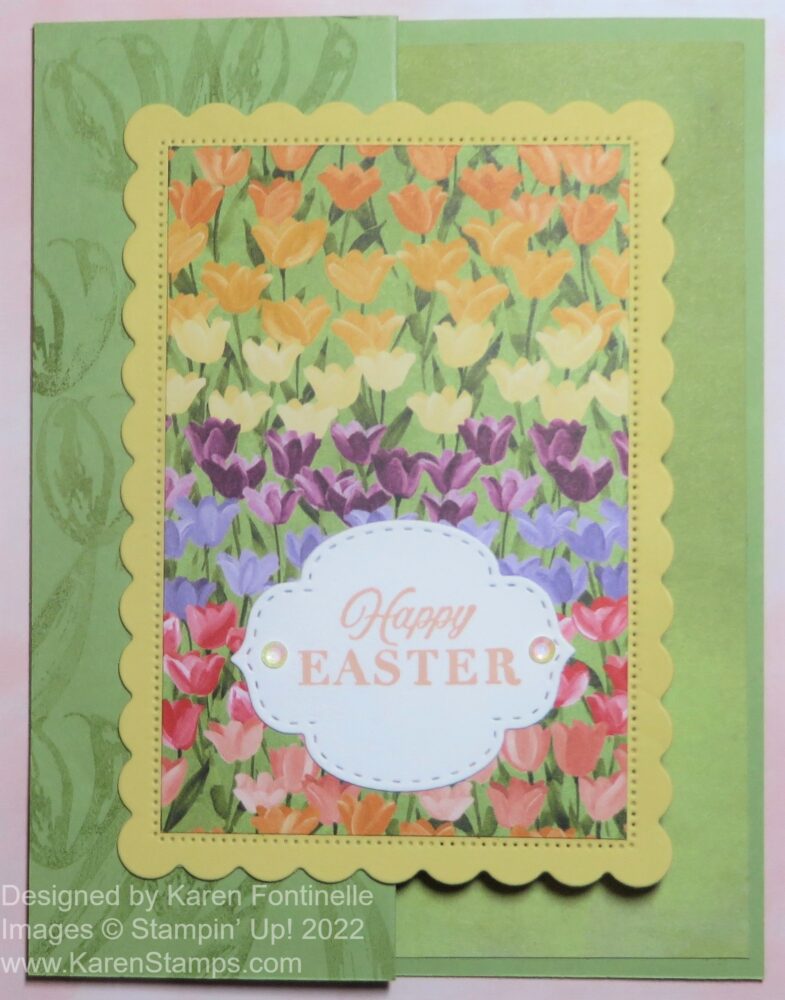
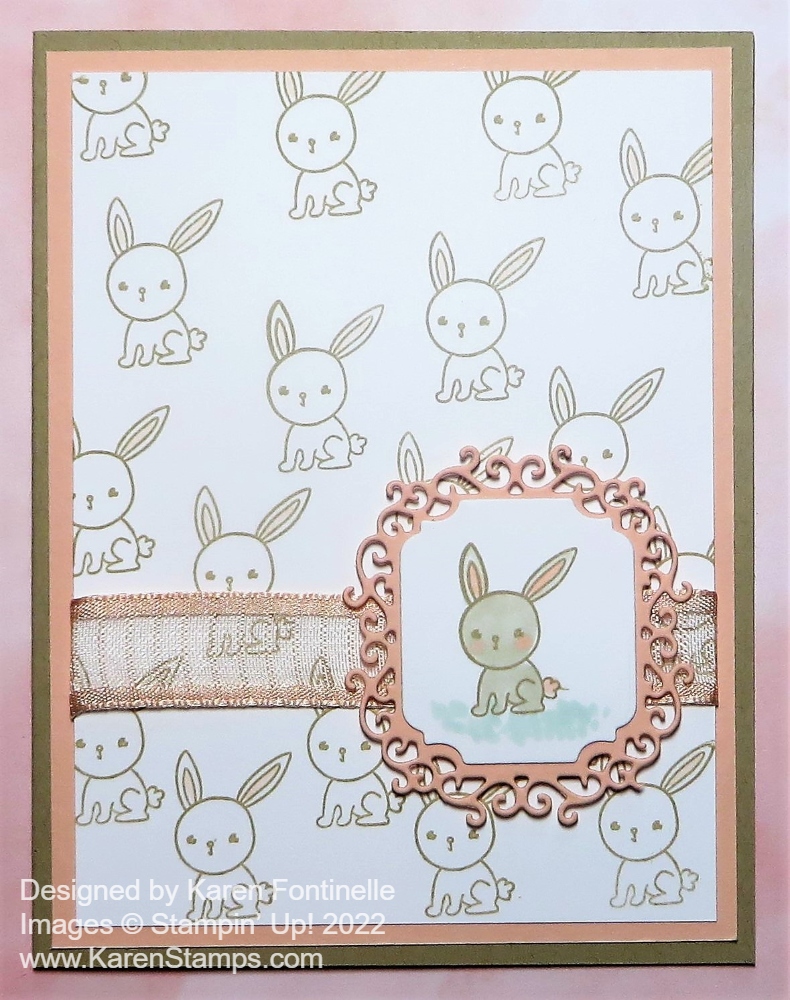
This Encircled In Friendship Bundle of stamp set and dies was one of the prettiest sets, I thought, yet I didn’t use it quite enough and now it is retiring in May. The stamp set is already gone, but the Encircled in Beauty Dies are still available as I write this and that’s really the main thing you need to make a card similar to my Encircled in Friendship Easter Card. The flowers in the center were in the stamp set, but you can stamp any flowers, image, or greeting to put in the center of the beautiful die.

The card base is Basic White with a layer of Polished Pink, one of the current In Colors. These colors are sticking around for another year! I decided to emboss the Polished Pink with the Ornate Floral 3D Embossing Folder. This folder is retiring on May 2 and I recommend it as a pretty and useful folder for a background with a little texture you can use frequently. Lucky for you, it is also discounted on the Last Chance Products Sale! So check it out!

The fancy circle die is cut from Basic White with one of the Encircled in Beauty Dies. For the center portion, I stamped the flowers in the Encircled in Friendship Stamp Set (retired) in Polished Pink. You could also stamp them in Memento Ink or Stazon and color them in with Stampin’ Blends markers or any coloring tool. I thought I would like to have a special layer behind this floral circle, so I die cut with a Layering Circles die that was just a little bit smaller than the center of the die and then a larger circle out of Gold Foil. My fancy die was already cut out or I could have used the center of it.

The greeting, in the Celebrating You Stamp Set, was also stamped in Polished Pink ink and die cut with this cute die in the Meadows Dies. I had also die cut a little banner die in the Tasteful Labels Dies (another product I use frequently and will miss when it retires but it is discounted now!) to see which shape greeting I would like best with the fancy die cut above. I thought the Meadows Die would be too much but I liked it!

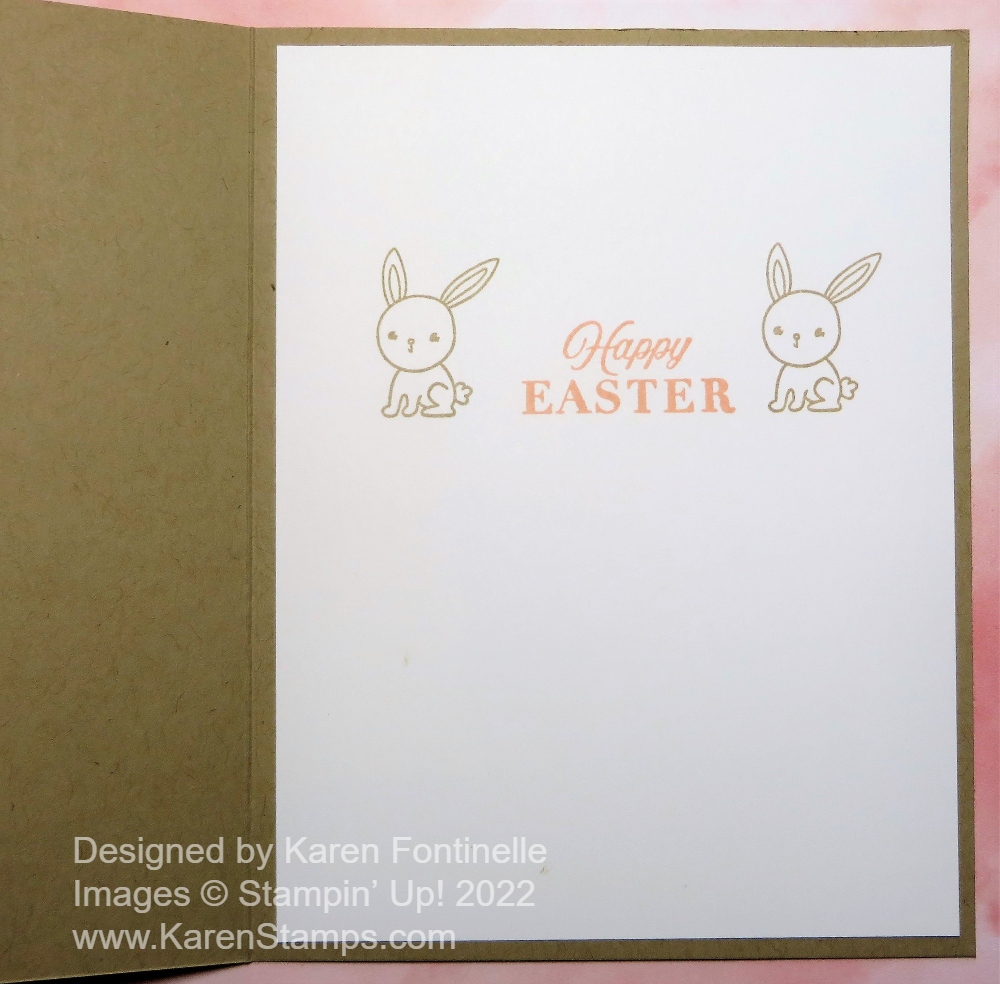
For a finishing touch, I tied a bow with the White 3/8″ Glittered Organdy Ribbon. When I pulled this ribbon out to try, I wasn’t sure it would work but once I placed the bow under the circle I loved how it looked! Being sheer is didn’t overpower the front of the card but I thought the pink glitter in the ribbon was perfect for an Easter card. This wouldn’t have to be an Easter card. The greeting on the front is generic so could be for almost anything, but on the inside, I stamped “Happy Easter” from the same Celebrating You Stamp Set.

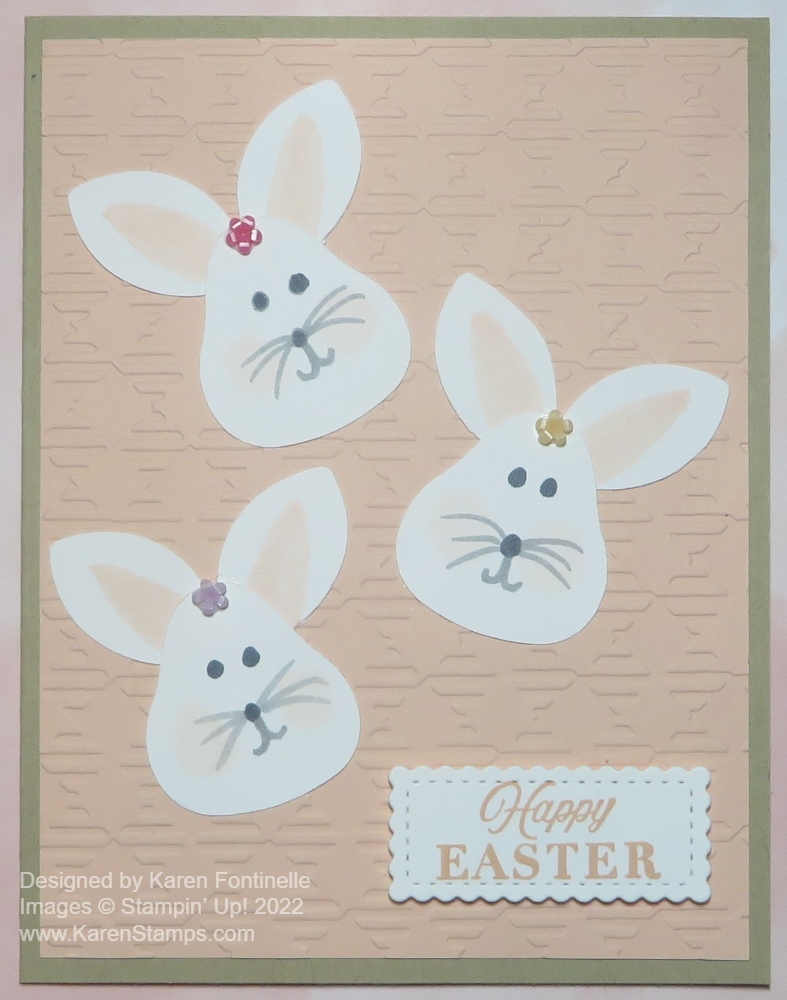
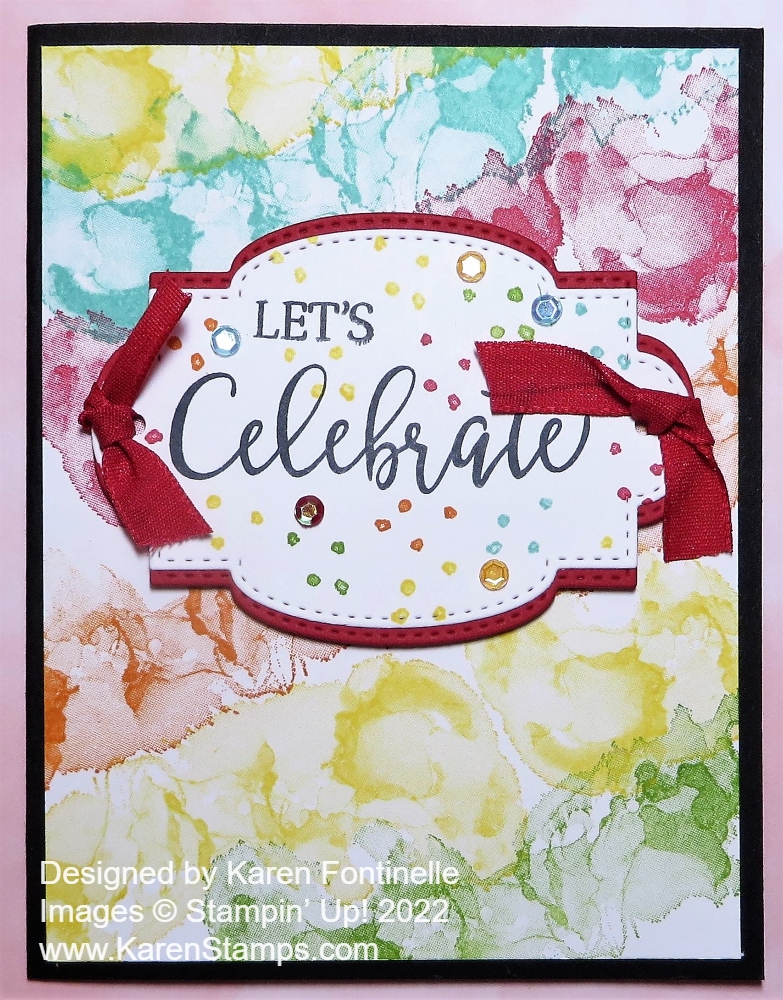
Here’s another card I made with this Bundle. On that card, I used another fancy die as a layer under the stamped flowers, so you can use one or more of the pretty dies!

If you already own the Encircled in Beauty Dies, make some cards with the fancy dies. I would recommend using Adhesive Sheets on the back of your paper before die-cutting to make gluing them down easier. Otherwise, just use teeny tiny dots of Liquid Glue on the back, preferably using your Silicone Craft Sheet to keep the glue off everything else. If you don’t already own these pretty dies, take a look at them in the Stampin’ Up! Annual Catalog on pages 70 and 169. Use this Encircled in Friendship Easter Card for Easter or for other special occasions!

Flowering Fields Z-Fold Tulips Easter Card

Flowering Fields Z-Fold Tulips Easter Card

As I looked through my package of the Flowering Fields Designer Series Paper looking to see if a certain pattern was in there, I saw this print of tulips and decided I had to make an Easter card with it right away! As I scored the card in half, I decided to make it a Z-fold card and that’s how this Flowering Fields Z-Fold Tulips Easter Card came about! You never know when you start out what you will actually end up with!

This card was so easy really. I often add pieces of designer paper at least on the folded back front portion but this time I just stamped the smallest tulip in the Flowering Tulips Stamp Set. I used the same Pear Pizzazz ink as the Pear Pizzazz cardstock but I stamped off once on scrap paper because I wanted that light, watermark look down that side panel. I didn’t use the second step of stamping another tulip petal on top of the first because not much was going to show anyway and I just wanted that light look. I did stamp a few leaves to fill in some space.

I die cut a scalloped rectangle from the Scalloped Contours dies (retiring soon!) in So Saffron for the background layer to the tulip paper. For the designer paper, I just measured with a ruler inside the scalloped rectangle and cut out that size rectangle of DSP to fit inside the area. Mine was just a “smidge” under 4″ (about a 1/16th inch less) and about 2 5/8″ wide. If you want to tie a ribbon around that piece, do it before you adhere it to the scalloped rectangle of course.

The greeting is stamped on a die-cut piece from the Stitched So Sweetly Dies (also retiring soon!). I just glued it flat on the card as I am likely to mail this card. I couldn’t resist adding two Iridescent Rhinestone Basic Jewels to the sides of the greeting.

For the inside of the card, to add some interest, I adhered “the other side” of one of the designer papers without a particular pattern except for the shading of colors. This particular piece barely makes a difference in the look from the cardstock, but it’s there and makes a prettier finished look I think.

For the inside, I die-cut a Basic White scalloped rectangle, one size smaller than the card front to adhere inside the card on which to stamp another greeting or write a message and sign the card. You could use one the same size as the front but you would have to line it up perfectly so it wouldn’t stick out from underneath the front card design.

Here is another Z-Fold card I made recently for Easter using the Flowering Tulips Stamp Set instead of the designer paper.

I’ve made lots of Z-Fold cards and I always say they are so easy to make (just fold back the card front!) yet they make such a nice presentation! The recipient will think you are so clever and creative to make such a fancy card! The only difficult part is not to put glue all over the back of the front piece, just on the half that will be adhered to that Z-fold.

Be sure to check the Last-Chance Products list in the Stampin’ Up! Online Store to see what will be retired on May 2 and what is still available. Not everything is discounted, but some things are so grab what you “need”!

Reminder Today is the last day to sign up for Paper Pumpkin to get the April “Change Is Beautiful” Kit!

A Trio of Punch Art Bunnies Easter Card

Trio of Punch Art Bunnies Easter Card

I saw this idea for the punch art bunnies on our Demonstrator group on Facebook but I think I saw the same idea somewhere else online too recently. I thought it was so clever, I went straight for my punches and started making bunnies which turned into this A Trio of Punch Art Bunnies Easter Card!

This “punch art” as we often call something created using different punches that are different than what the punch is meant to be. I don’t know how people come up with these creative ideas, but they do! And the rest of us can copy!

To make these cute little bunnies, just use the Strawberry Builder Punch and the Ladybug Builder Punch. Punch the strawberry shape to make the bunny head. Punch the Ladybug wings to make the bunny ears! I left them attached but I suppose you could cut them apart if you wanted the ears to have different spacing. That’s all there is to it! Isn’t that a fantastic punching idea?!

Strawberry and Ladybug Punches For Bunny

I colored in the pink on the ears with the Dark Petal Pink Stampin’ Blends. I used the Light Petal Pink color to color some cheeks on the bunnies. The faces are just drawn on with the pointy tip of the Basic Black Marker.

The card base is Crumb Cake cardstock with a Petal Pink layer. I embossed that layer with the Gingham Embossing Folder. The background needed some texture and this folder is good for some generic texture! But it also kind of reminded me of the weaving on an Easter basket so that, of course, went with the bunnies!

The greeting had to be simple and not take up too much space. I wasn’t sure it would fit on this smallest rectangle die in the Stitched So Sweetly Dies, but it did! These dies are retiring on May 2 which I hate! I used these dies a lot. I planned to layer the greeting, “Happy Easter” in the Celebrating You Stamp Set on top of a die-cut Crumb Cake rectangle but it was too big for the card and I like just the Basic White greeting better along with the bunnies.

I adhered the bunnies straight to the card because I wanted to add the tiny little Loose Flower Flourishes on the bunny heads and I didn’t want the flowers to stick up too much if I wanted to mail the card. Luckily these teeny flowers are pretty low so hopefully, they can go through the mail. I always add a piece of paper towel or maybe crimped computer paper to cover embellishments in the envelope to protect them from the post office machines.

Try making some of these bunnies! Bet you can’t make just one! You could use a brown or gray cardstock or maybe even the right pattern of designer paper. Just have fun with it!

SHOP STAMPIN’ UP! ONLINE HERE!

Join Paper Pumpkin By April 10

Time is running out! The last day to join Paper Pumpkin and receive this April 2022 Kit, Change is Beautiful, is Sunday, April 10th

Growing through life can also mean growing pains. Whether people are climbing their career ladder or moving out for the first time—change can be simultaneously thrilling and scary—but isn’t that what makes life beautiful? Because new beginnings, after all, are simply new adventures. Let your loved ones know you’ll be there to support them through all of life’s chapters! 

The Change is Beautiful kit contains enough supplies to create 9 stunning cards with a unique folding technique to commemorate moments of change. The designs are inspired by the natural cycles of change found in nature. 

ABOUT THE KIT

Name: Change Is Beautiful

This kit includes:

  • Change is Beautiful Photopolymer Stamp Set
  • Melon Mambo Classic Stampin’ Spot®
  • Printed card bases
  • Printed envelopes
  • Printed, shaped die cuts
  • Iridescent sea glass
  • Dimensionals

Card size: 4-1/4″ x 5-1/2″ (10.8 x 14 cm)

Coordinating Stampin’ Up! colors: Balmy Blue, Basic Black, Bermuda Bay, Crushed Curry, Evening Evergreen, Granny Apple Green, Melon Mambo

Don’t miss out on this kit! Paper Pumpkin is a gift you send yourself (or a loved one or friend!) once a month. Wouldn’t it be great to find a treat just for you in your mailbox?! No planning, no missing supplies, just open the box and start crafting! Even adhesives are included. Follow the directions or use the contents to put your own spin on the project. Easy for anyone, even beginners, and no big stash of craft supplies required!

JOIN PAPER PUMPKIN TODAY!

Expressions in Ink Thanks Card

Expressions in Ink Thanks Card

I have loved this Expressions In Ink Designer Series Paper and thought I would just make a simple card with it to enjoy the paper some more before it retires. Yes, it is on the Last Chance List but is still available as I write this so grab some if you want to stock up or finally get it. I made this basic Expressions In Ink Thanks Card because it is easy and it really shows off the gorgeous paper with gold foil accents.

The card base is Mint Macaron to match the leaves on the designer paper. There are several greens in the whole package of paper, actually quite a long list of coordinating colors that go with the paper. I intended to use the opposite side of the paper for the bottom portion of the card, but the papaya-colored florals on the front were too pretty to cover up even a small area!

I adhered a piece of the 3/8″ Fine Art Ribbon across the front of the card. This is a beautiful soft, natural ribbon with shiny gold threads in it. It is easy to tie and use since it is soft. I tied a separate bow and adhered it to the card using Mini Glue Dots. This ribbon is on sale right now on the Last Chance List so get some before it retires!

The greeting is in the Artistically Inked Stamp Set which may no longer be available. You can use any greeting you would like for the occasion. It is stamped in Pale Papaya Ink and die cut with one of the Tasteful Labels Dies. These dies are another thing on the Last Chance List, retiring soon, while supplies last. I hate to see these go! The greeting is adhered with Stampin’ Dimensionals®.

The photo of this card really doesn’t do it justice! If you could see it in person it is so pretty! It’s all about the paper! Here is another card I made with this same paper design but with a lot more embellishment.

Be sure to check the Last Chance Sale and list of retiring products from the current Annual Stampin’ Up! Catalog because, as you can see, some products are selling out already. Not everything is on sale but some things are. You can also check the Clearance Rack any time you are ordering to see if any bargains there are for you!

SHOP STAMPIN’ UP! ONLINE TODAY!

Coming Tomorrow! New Kits Collection Kit!

Kit Collection Kindness

A new kit in the Stampin’ Up! Kits Collection will be released tomorrow, April 6th, in the Stampin’ Up! Online Store! Stampin’ Up! introduced the Kit Collection last year and will continue this year with more and more new kits! These kits are designed for the new or beginning crafter, but of course, they can appeal to every crafter! For the beginning crafter, the kits are easy to understand and make and all the supplies are included. For experienced crafters, it’s a project already designed and ready to make and can be changed up if desired.

This new kit is called the Kindness Cards Kit. It’s not in the store yet today but will be tomorrow so check back. This heartfelt kit focuses on touching, thoughtful messages of kindness. It includes everything you need to create eight coaster cards—plus a cute travel-sized tin to hold it all. Each card is a story of kindness you can create and share. (Love the tin to hold the cards!!)

Kit Collection Kindness Contents
Kit Collection Kindness Stamp Set

I’ve heard of stampers making a few small cards to carry with them and then when they are shopping or eating out or wherever they are, if they get great service or just want to, they hand out one of the cards to the person. It’s like a “random act of kindness”. Sometimes they even include a piece of candy or a little something. That’s where the tin comes in handy in this kit so that you can carry some cards with you and keep them pristine in your purse!

DETAILS

Kit includes:

  • 8 small coaster cards, 2 each of 4 designs
  • 8 envelopes
  • Carrying tin
  • Finished card size: 3″ x 3″ (7.6 x 7.6 cm)

Coordinating colors: Basic Gray, Bermuda Bay, Daffodil Delight, Flirty Flamingo, Pale Papaya, Pool Party, Soft Sea Foam

Beginning tomorrow, April 6th, you can add this Kit Collection to your order! Who couldn’t use a Kindness Card from you to brighten their day?!

Triangle Box Easter Bunny Treat

Triangle Box Easter Bunny Treat

These triangle boxes are so fun and easy to make. I have made lots of them over the years for different holidays or occasions but I may not have ever made one for Easter like this Triangle Box Easter Bunny Treat. All you need is a piece of paper and then score it according to directions. You can vary the size of the paper depending on what size treat box you want. Put some candy or a small gift inside for a fun treat!

My Basic White cardstock is cut at 4″ x 8″. Use the diagram below to see how to score, but it is simple! At each end of the cardstock, put a light pencil mark at the halfway point which in this case would be 2″. Score the paper in half at 4″. Then in that awkward manner, with your Paper Trimmer, score from that 2″ middle point at one end down to the middle score line which will be on a diagonal. Do that on both sides of one end, then turn the paper and score at the other end in the same way.

Triangle Box Drawing

Now fold and crease all the score lines. You will see how it will fold together to make the triangle box. Determine which side will be the front or top of your box that you will want to decorate and how the flaps will go so that the top view of the box will have the fold of the flaps showing and not the open side. Once you see how it folds together how you like, you can use any hole punch to punch holes in the sides near the top. You want the two holes on each side to align. This is how your paper should look creased and with holes punched.

Triangle Box diagram

To decorate my Easter Bunny treat box, I used punches that are retired now but you can use whatever you have. There is the Double Oval Punch or maybe you have retired punches and dies that you can use….or simply cut out by hand! For the ears, I punched a large oval for the white ear and then I found the 2021-23 In Color Shimmer Vellum that I have and have barely used! It’s on the Last-Chance List and even on sale! To attach the ears to the box, I simply scored a bottom portion of the ears and folded then adhered each to the box. You can use Multipurpose Liquid Glue but you will have to hold it in place for a few moments.

For the eyes, I punched 1/2″ circles with my old punch and colored in the black portion. I had originally drawn them right on the box but later I smeared the ink somehow so I covered that mess up with the punched eyes! “There are no mistakes in stamping!” I think it looks better this way! The nose is a little larger than I planned on but I used one of the hearts in the Sweet Hearts Dies. I had to have something a little large since I attached these whiskers. If you have been papercrafting for any length of time you probably have a heart die or punch somewhere in your stash or you can just cut one by hand. The mouth is just drawn on with the Black Stampin’ Blend marker.

Triangle Box Easter Bunny Treat Side

After putting your treat or gift inside the box, you can tie it closed with either an inconspicuous piece of ribbon or do as I did and use a larger bow that matches my bunny colors that looks somewhat like a bow tied on the bunny’s head! My pink colors are the In Color Polished Pink in the paper and ribbon. The ribbon is the 3/8″ Open Weave Ribbon. Such pretty ribbon in all the In Colors! Luckily these In Color ribbons are carrying over into the new Annual Catalog!

Triangle Box Easter Bunny Treat Top

That’s it for making a triangle box! Here is another example in THIS POST. Just decide on the size of paper you want to use, score in half, score on the diagonal to each end from that scoreline, punch holes if you want to be able to tie it shut, and decorate as I did in this Triangle Box Easter Bunny Treat.

Create With Friends Celebrate Card

Create With Friends Celebrate Card

Here’s a fun, colorful card that I made just to use the Create With Friends Stamp Set that I’ve had but hadn’t used much. Unfortunately, after making this card, the stamp set is already sold out and retired. But you can still use this card design and just substitute the greeting with something else you have.

After making the multicolor front of the card, I used Basic Black for the card base. Black really makes those colors stand out but you can use whatever goes with the colors that you choose. I made this interesting background using the stamp in the Artistically Inked Stamp Set. This stamp set is the Distinktive design which adds texture right to the stamp. I just chose several colors to use on the front of the card and stamped on a slight diagonal. I used Daffodil Delight, Pumpkin Pie, Granny Apple Green, and Real Red. A group of Subtles would be good too!.

The greeting was stamped on Basic White and die cut with one of the Stitched So Sweetly Dies. This set of dies is retiring soon. I also used the same die to cut out a Real Red piece of cardstock and cut that in half horizontally to layer underneath the white greeting. I also punched a hole on each side of the die cut so I could tie on some Real Red Faux Linen Ribbon. Before tying on ribbon I decided to stamp the dots in the Artistically Inked Stamp Set in all the colors I used in the background. Plus I had to add a few little Artistry Blooms Self-Adhesive Sequins. The greeting is popped up with Stampin’ Dimensionals.

Even though you can no longer purchase the greeting stamp set, you can still get the Artistically Inked Stamp Set and will continue to be able to buy it in the next annual catalog! That is great news to still have that stamp set available to us! So many artistic things you can do with the “Artistically Inked” stamp set!

Shop the Last Chance Sale and all the Stampin’ Up! products HERE!

Friends of the Forest Bunnies Easter Card

Friends of the Forest Bunnies Easter Card

This Friends of the Forest Bunnies Easter Card is an easy one to make! But is it an Easter card?? Or is it a baby card?? Well, I made it as an Easter card but the whole time I was making it I thought this sweet bunny reminded me of baby cards! In fact, I was so taken with stamping the cute little bunny that I forgot about a greeting! But I’ll show you the inside and I think we don’t ALWAYS have to put a greeting on the outside.

This bunny is in the Friends of the Forest Stamp Set in the Spring Mini Catalog on page 19. This is not an “Easter” set but of course, the bunny is perfect for Easter. I did one of the things I like to do best … I randomly stamped the bunny on the Basic White layer to make my own designer paper! Or simply a pretty background! I used Crumb Cake ink and I went back and colored in the ears with the Light Petal Pink Stampin’ Blends Marker. I had to stop myself before I started doing even more coloring because I didn’t want all the bunnies colored.

The card base is Crumb Cake cardstock, although it looks darker in the photo. Then there is a layer of Petal Pink underneath the Basic White. You could use any pink and you could use a darker brown like Soft Suede. Or change up the color scheme altogether.

I actually copied myself making this card! I remembered a card in THIS POST that I had always liked so I updated it with this bunny!

I wanted a colored bunny to be the focal point so I stamped the bunny on Basic White and die cut with one of the dies in Ornate Frames that fits on the frilly die cut in the same set. This one is on Petal Pink cardstock and was already in my bag of cardstock so I must have diecut it before and didn’t use it! Just seeing it in with the other Petal Pink cardstock gave me the idea. It was the perfect size for the bunny!

The bunny is just colored with a Light Crumb Cake Stampin’ Blend Marker. I wanted to keep him light and didn’t do any blending with another color. I used the narrow tip of the Petal Pink marker to color the insides of the ears, the tail, and the cheeks. I could have stopped there but I added a bit of grass for him to sit in with the Light Mint Macaron marker.

To embellish the card a bit I simply wrapped around a piece of the Petal Pink 5/8″ Organdy Striped Ribbon. This has been one of my favorite ribbons so I am sad it is retiring on May 2, if not before. It is even on sale so check it out (or stock up!). The bunny piece, on the Ornate Frames diecut is popped up on Stampin’ Dimensionals®.

After I got this far on the card, I realized I didn’t have a greeting and no space for one. I guess I could have fit one on somehow, but sometimes I think a card is fine without a greeting on the front. Or sometimes I make a generic pretty card that I like and don’t want to put the greeting on until I need the card. That way I can add whatever the occasion calls for.

On this card, I got the idea to make the greeting inside a little fancier. I stamped the greeting from the Celebrating You Stamp Set. What a great set of greetings! It is in the Spring Mini Catalog but it is also carried over to the new Annual Catalog! Yea!! On each side of the Petal Pink greeting, I stamped the bunny in Crumb Cake ink to match the outside. I think it’s really cute! It’s common to stamp a little something inside the card or add some of the designer paper, but I like the idea of stamping something on each side of the greeting! I should color the inside of his ears with Petal Pink as I did on the front of the card.

Friends of the Forest Bunnies Easter Card Inside

Be sure to check out the Last-Chance products and sale on some of them in my Online Store! Get the goodies you want before they sell out!

SHOP STAMPIN’ UP! ONLINE HERE TODAY!