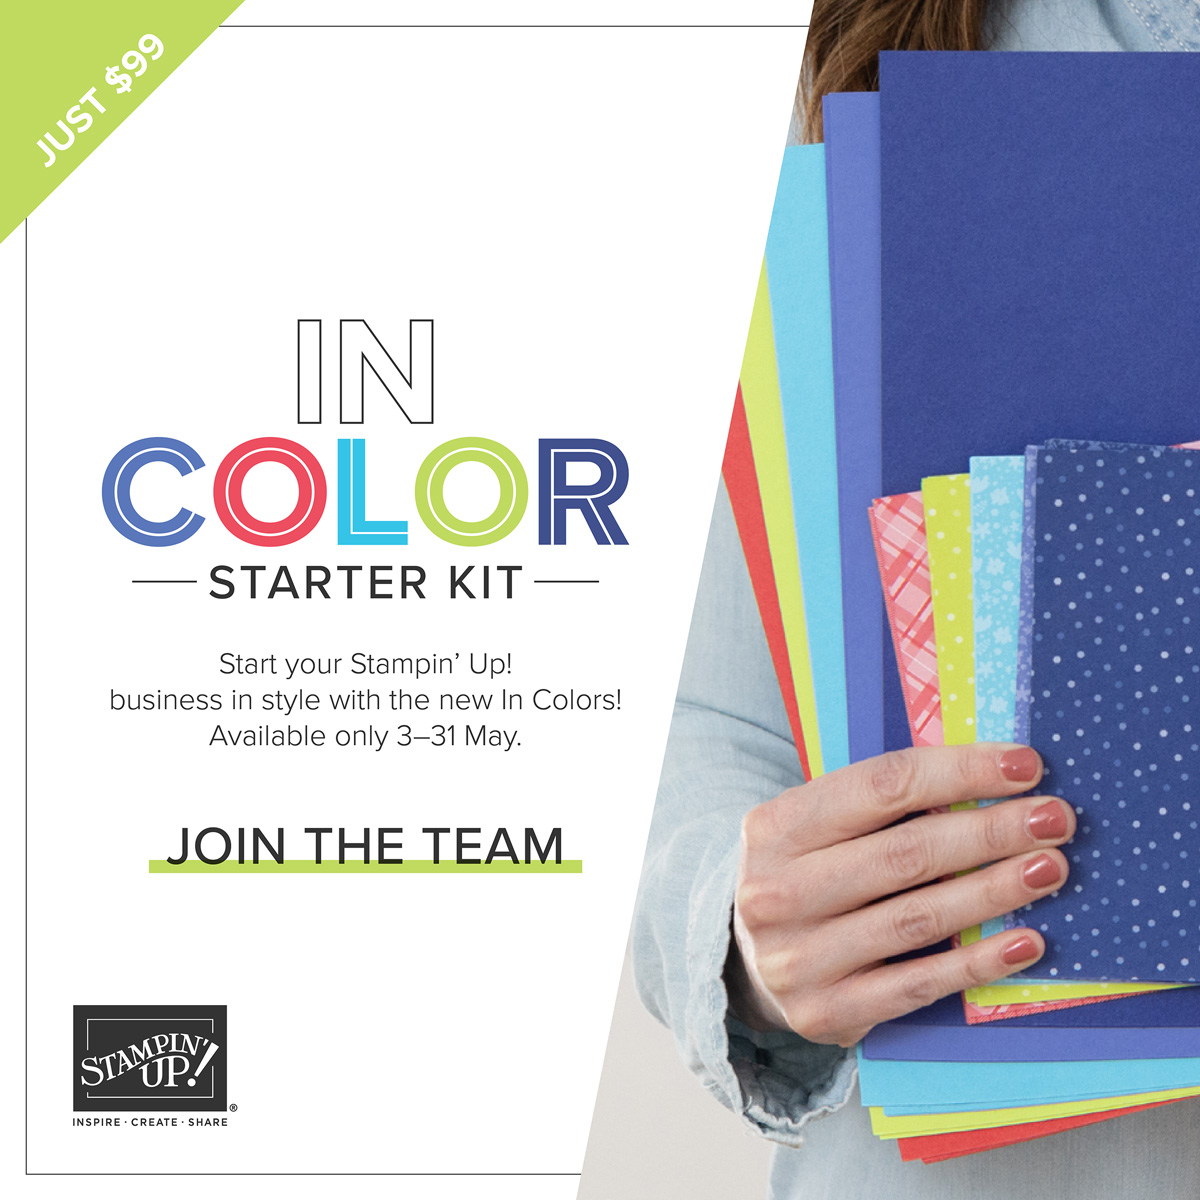
If you have been thinking about being a Stampin’ Up! Demonstrator, next week would be a good time to join!
To be a Demonstrator and join Stampin’ Up!, all you have to do is purchase the Starter Kit! You pay only $99 and get $125 worth of products and business supplies in your kit. During the month of May, starting May 3, the same day the new catalog goes live, you can join and get some extra goodies in your kit for the price of $99 plus tax. No shipping!
From May 3 – 31 get the new In Colors in your Starter Kit as well FREE!
Start your own stamping business just by purchasing the Starter Kit for $99 and get these In Colors extras for free! You also get a free Paper Pumpkin Kit, plus business supplies to help you get started!
Just choose $125 in products of your choice and pay $99 + tax! Get a discount on your own purchases and get in on all the Stampin’ Up! fun! Earn some money (the amount up to you!) while making new friends who enjoy this wonderful craft of ours!
Click the JOIN NOW button below, read over the information, and then let me know what questions you have!
This Enjoy The Moment Birthday Card is made with the Enjoy The Moment Stamp Set that is retiring on Monday, May 2. This is an odd stamp set to me! I would generally say I don’t like this stamp set … yet, when I have made cards with it, I really like the card! Probably a lot of people don’t even know what the images are in the stamp set. They are nuts, seeds, and pods…I guess! Anyway, there is something about this stamp set that is fun even though I don’t care for it!
The card base is Garden Green cardstock. I don’t use this color very much, but I had already chosen this green and white floral pattern of paper in the Hand-Penned Designer Series Paper (now retired) for the background layer. Then I just stamped three of the images from the stamp set, and cut them down 1 1/2″ wide and just long enough. I layered those on the Garden Green cardstock and hoped they would fit okay on the card without doing the math! They did! I just used Garden Green ink to keep it monochromatic and simple.
I adhered the images flat on the card. You could pop them up on Dimensionals if you wanted to. The birthday greeting is in the same stamp set so I stamped that in Garden Green ink also and cut it out with the little banner die in the Tasteful Labels Dies. These dies are retiring on May 2 and are even discounted so you can save about $6 on these dies right now. These have been some of my most-used dies. I hate to see them leave. This greeting I did pop up on Stampin’ Dimensionals.
On the inside of the card, since the cardstock is rather dark if I wanted to write something inside the card, I added a Basic White layer on which I stamped another image in the upper left corner and added a strip of the same designer paper across the bottom. Now the inside carries the same look to the inside and is ready for stamping or writing a personal note or message.
I think this set was used in a virtual Stampin’ Up! event a while back. I know I wouldn’t have just bought it on my own. But as I said, each card I have made I have enjoyed! So, are there really any “bad” Stampin’ Up! stamp sets??!! I even used one of the seed pod (?) images to look like fireworks on THIS CARD last July.
I think Stampin’ Up! should have included these live oak tree pollen things we have here in Texas that have caused so much allergy suffering by those allergic to the pollen. For weeks now, our live oak trees have been shedding this yellow dusty pollen and leaves and now these “catkins” have been falling and are all over yards and sidewalks. Along with the falling leaves from the trees, these catkins, which are male flower parts, are just everywhere. You can leave them and have your yard completely covered or rake them up into bags and hope the yard waste garbage truck comes by. In almost a few minutes, you will have to rake again! There is your science lesson for today!
If you are interested in plants and nature, you might like this Enjoy the Moment Stamp Set (it’s even on sale!) but be sure to order it soon as Monday, May 2 is the last day for this stamp set.
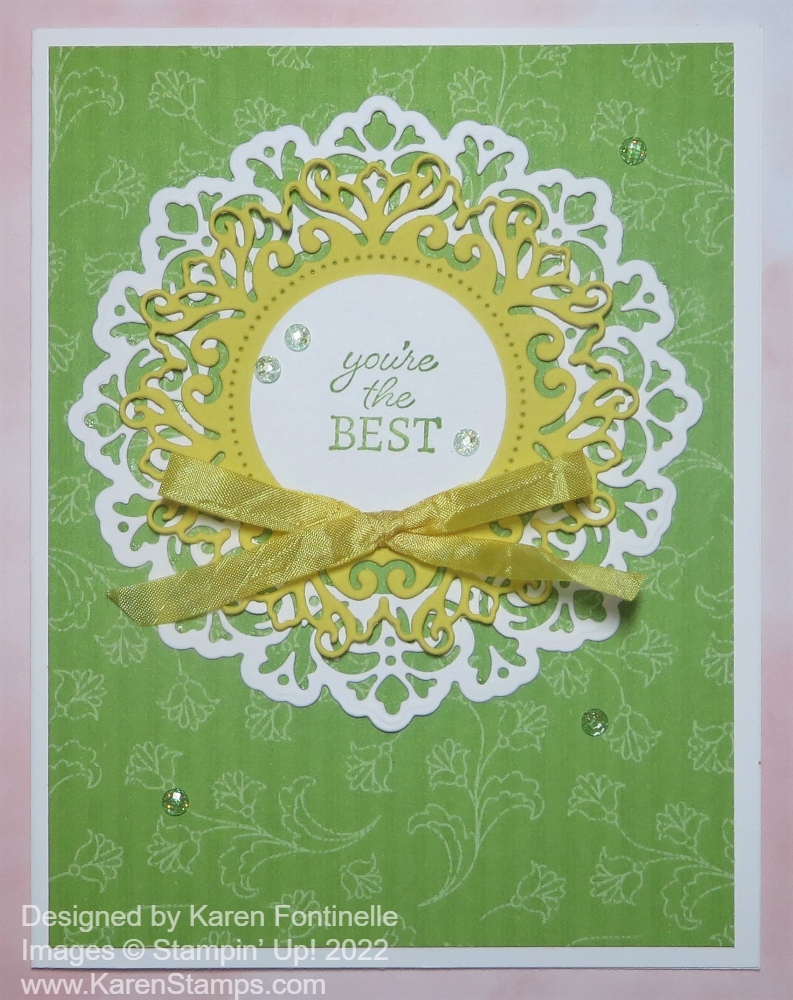
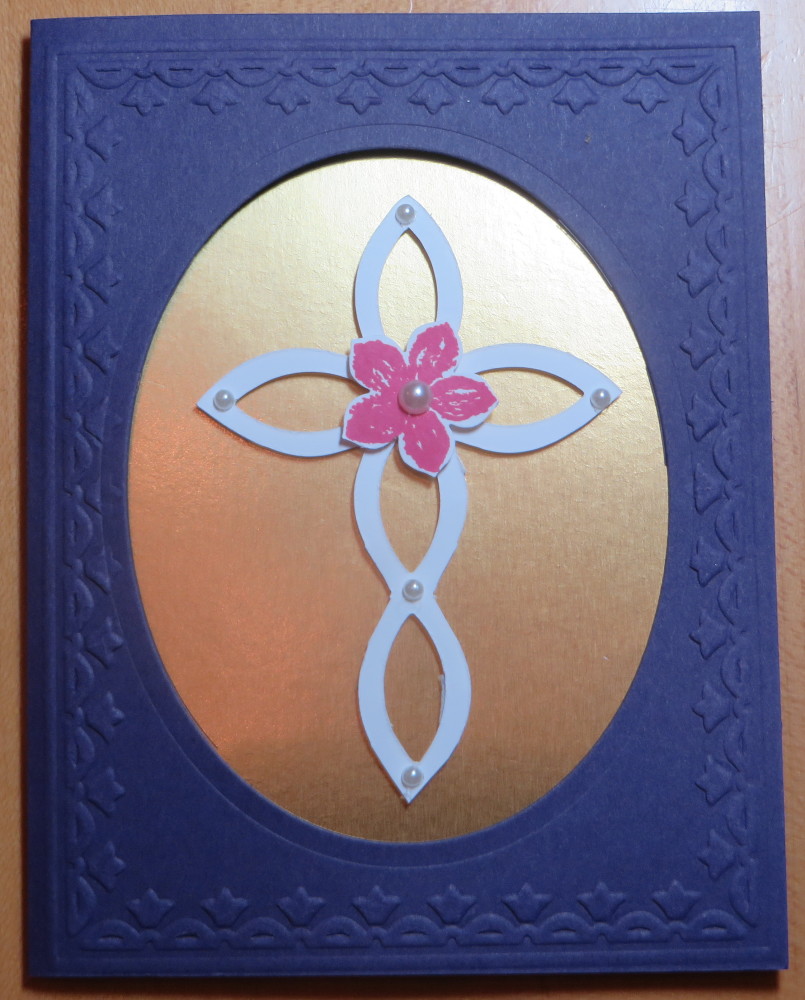
This Encircled In Beauty You’re the Best Card is made with the Encircled in Beauty Dies which are retiring on May 2, 2022. They are such pretty dies I can’t believe they are leaving! You can use one or more die cuts for the card front. There are several to choose from of different sizes in the package.
The card base is Basic White. I originally thought I would use Granny Apple Green but it seemed like too much. The designer paper, this Granny Apple Green floral page, is from the Host Stampin’ Reward that has been available in this current catalog. It is called Pattern Party Designer Series Paper and was available if you had purchased at least $150 on your order for the cost of $18. However, there is something similar in the new catalog called Design a Daydream Designer Series Paper. The catalog description is incorrect. The catalog states the quantities of Design a Daydream 12″ x 12″ Host Designer Series Paper as 12 sheets: 2 each of 6 double-sided designs. This is incorrect. The correct quantities are 48 sheets: 4 each of 12 double-sided designs. I loved my Pattern Party Designer Paper so I’m looking forward to the new designer paper for a Host order.
Using the Enriched In Beauty Dies I cut out a Basic White larger one and a smaller Daffodil Delight and layered them. I also used a retired 1 1/2″ Circle Punch to make a Basic White center. I actually thought it kind of looked like a fancy flower and I almost added a stem and leaves to make it look like a flower!
The ribbon is the White Crinkled Seam Binding Ribbon that I used for a bow, but I colored it first with a Dark Daffodil Stampin’ Blends Marker. Just make sure you have scrap paper underneath the ribbon because the color is likely to bleed through to the other side. I tied the bow and adhered it to the card with a Glue Dot.
Since the Genial Gems are retiring (also discounted!), I used a few of those up by the greeting and around on the card. The greeting is stamped from the Encircled in Friendship Stamp Set, which is retired and no longer available apparently.
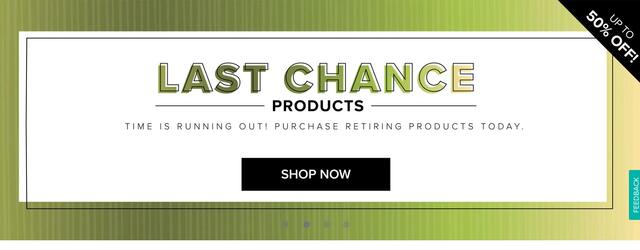
Check out the Last Chance List in the Stampin’ Up! Online Store before more products disappear! As I write this the fancy Enriched in Beauty Dies are still available and then you can use them with a variety of other products. Here is a card I made previously with the die set and stamps that might give you another idea.
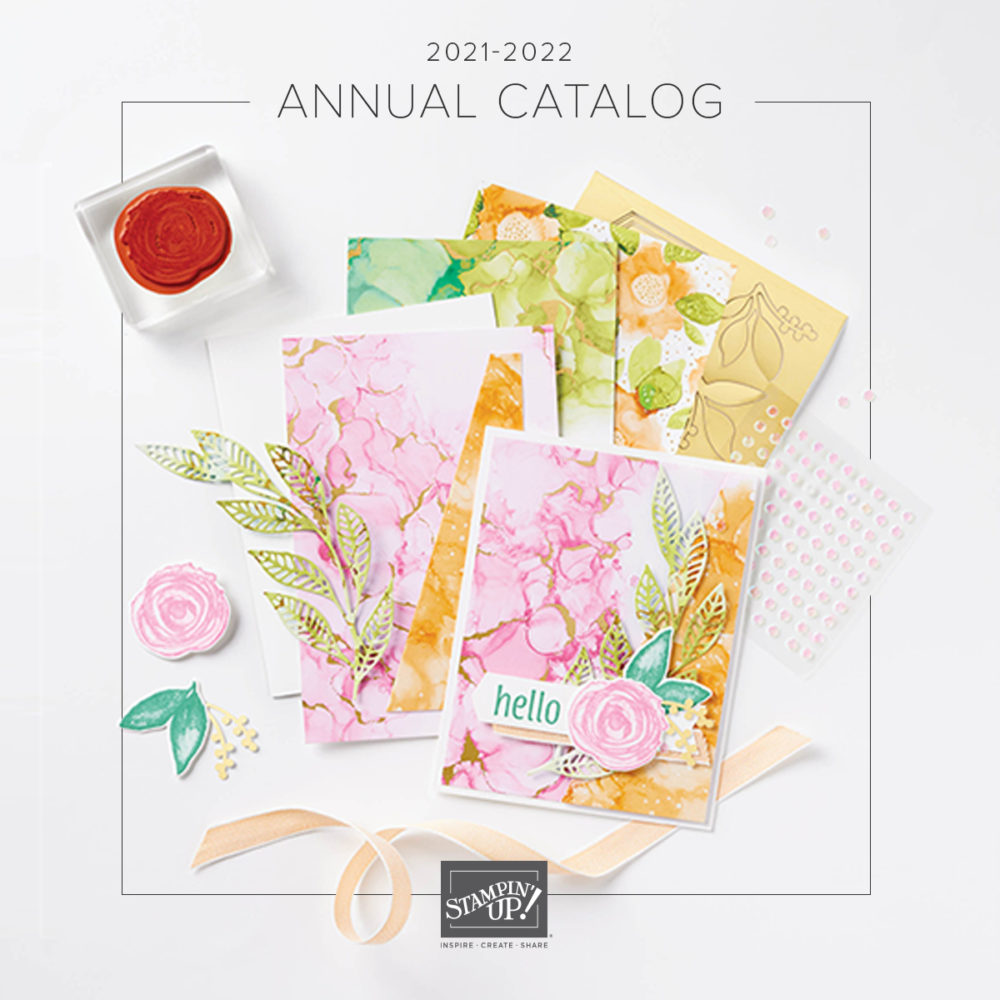
This is it! The 2021-22 Stampin’ Up! Annual Catalog ends next Monday, a week from today, on May 2, 2022. Time flies when you are stamping and browsing the wonderful Stampin’ Up! catalogs! This outgoing catalog seemed so beautiful and so full of wonderful papercrafting products, loved the beautiful cover, and yet, now we will have a new catalog next Tuesday that we are just as excited about! Each new Stampin’ Up! catalog is like opening a new box of crayons…..except we have much higher quality products than crayons to use now!
If you are looking for any outgoing In Colors, I see cardstock still available and some Stampin’ Blends, designer paper, embellishments, and more still available. These colors would be Cinnamon Cider, Bumblebee, Just Jade, Misty Moonlight, and Magenta Madness. If you wanted any of these colors or if you have them but want the “accessories” to go with them, it’s time to order them!
Not too many stamp sets are left in English, but if you like French, you are in luck!
If you need embossing folders or dies, there are some good ones to choose from. Check out the embellishments that are left, a lot are discounted!
It’s time to shop the Last Chance Retiring List, some products on sale and some not, plus the Clearance Rack if you want some more bargains! Get them while you can!
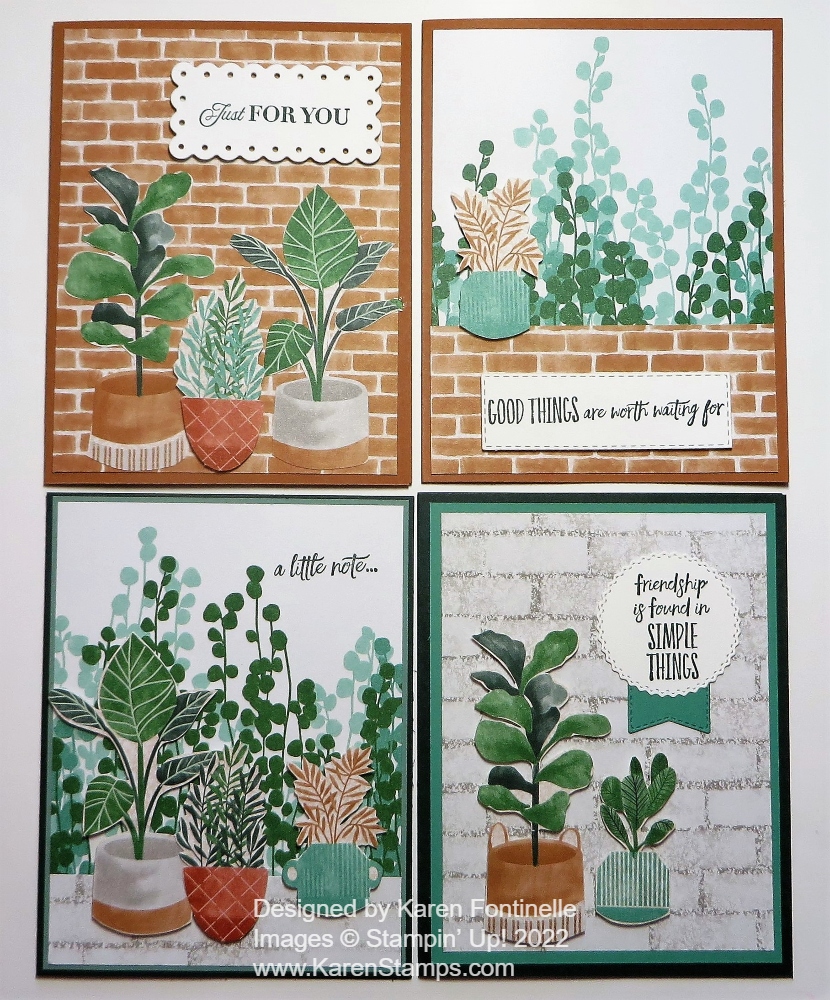
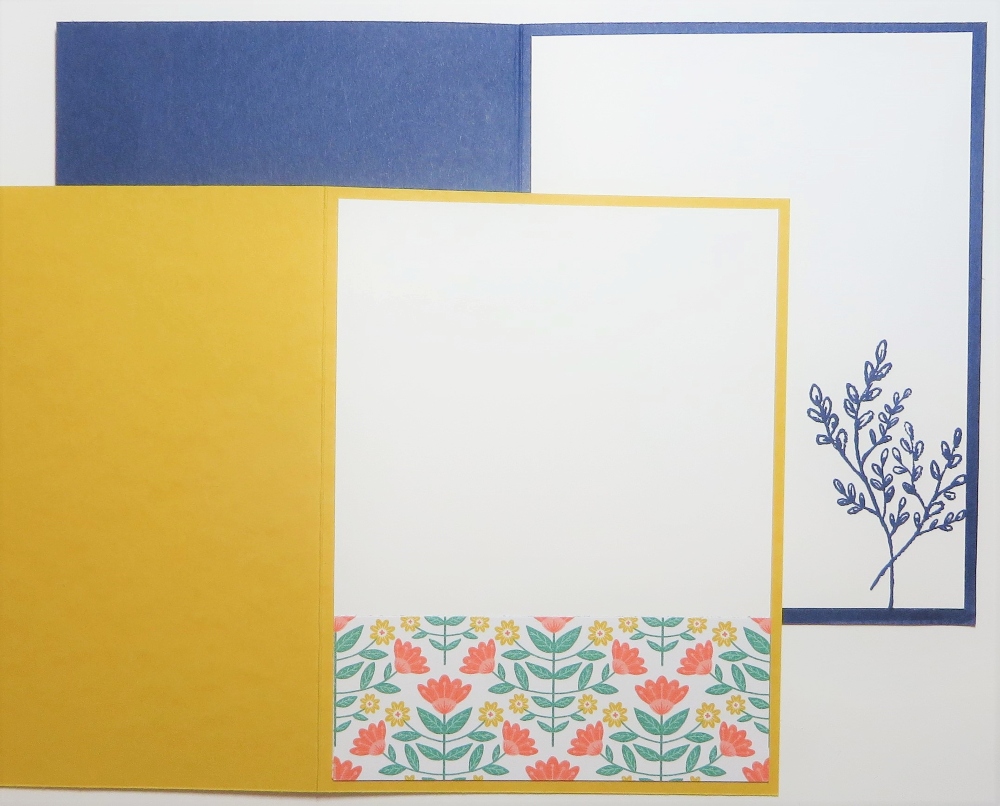
Once I started making cards with the Bloom Where You’re Planted Designer Series Paper, I was on a roll! This paper is retiring on May 2nd, while supplies last, so I wanted to have some fun with the paper I had left. All I did was use the designer paper as either a background for the card or I cut out the plants and pots to decorate the cards. If you don’t own the dies, you can just cut things out! Many people find it relaxing, actually!
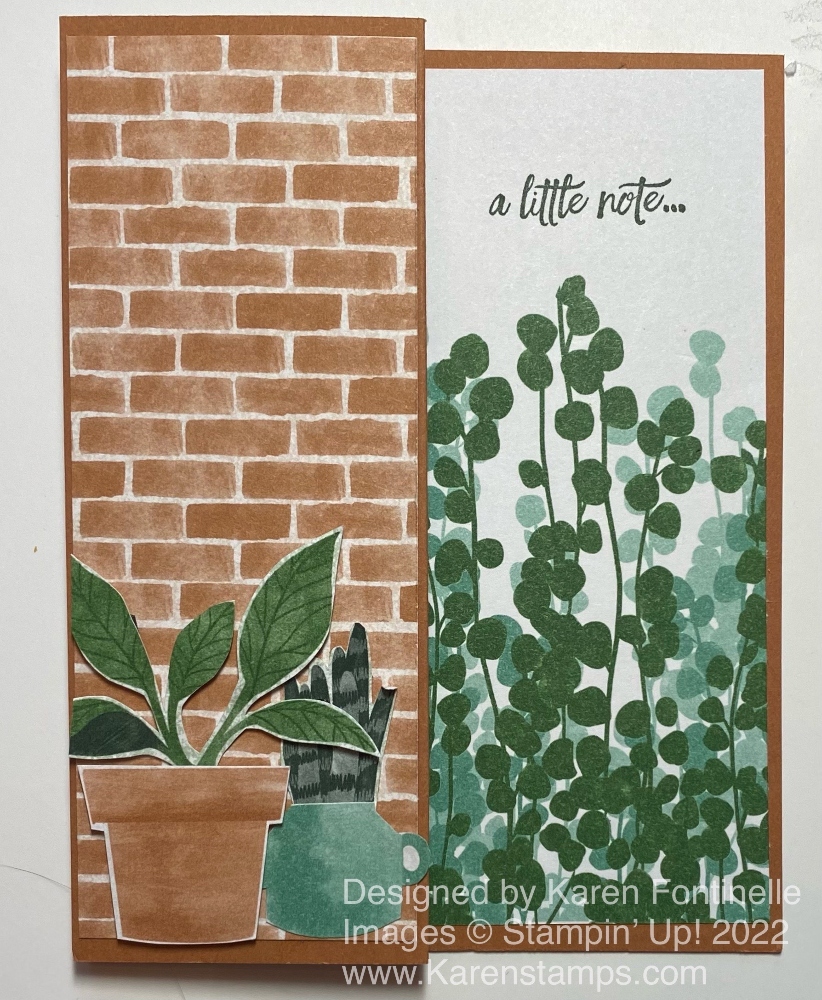
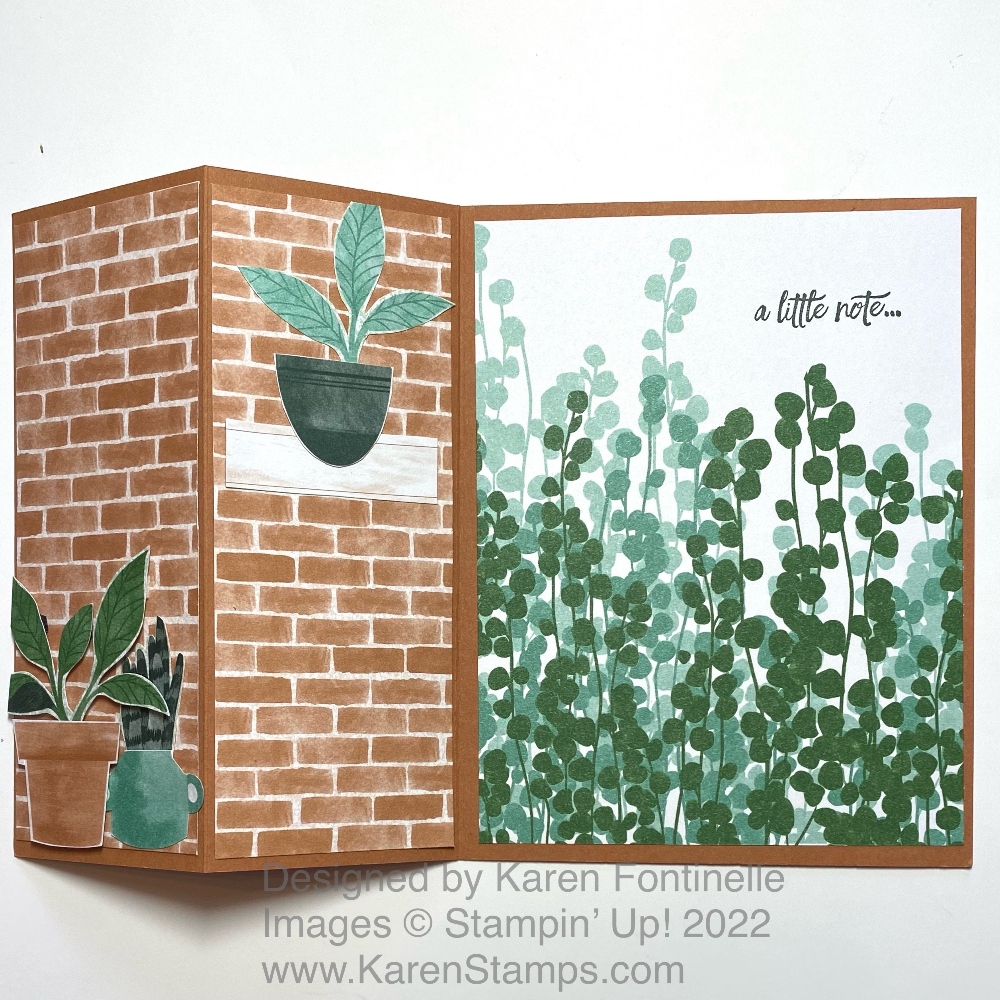
This card turned out to be a Z-Fold card so I saved it for today. A Z-Fold card always looks extra-special in my opinion! I used Cinnamon Cider for the card base. After making the normal card base, just score the front of the card at 2 1/8″ and fold that back. That makes the Z-Fold.
For decorating the front panel, I used the brick pattern in the Bloom Where You’re Planted Designer Paper. I just cut it to fit that panel, at 2″ x 5 1/4″. I carried the brick pattern into the inside of that same panel inside the card. To make it a little more interesting, a used a scrap of another paper with a wood floor pattern to make a “shelf” for a plant.
For the inside of the card, I used this greenery panel with just enough white space for a greeting, from the Enjoy the Moment Stamp Set. The right side of it shows from the outside with the Z-Fold but when you open the card, you see the whole pattern.
To decorate the card, I cut out some plants in pots for the front and for the shelf on the inside. Often on a Z-Fold card, we put a piece – a circle or a rectangle or square halfway on the front folded panel which covers the greeting on the inside of the card. On this card, I put a piece of Basic White on the back with a scrap strip of the brick patterned paper on the bottom edge. There I can stamp or write a message when I send the card.
If you like this Bloom Where You’re Planted paper and want an extra package or want your first package, be sure to grab it before it retires on May 2!
As I looked through the Last Chance Products to see what retiring products were still available I saw this designer paper and ended up, unplanned, making all these cards plus one more I saved for tomorrow! These are the Bloom Where You’re Planted Fun Cards to Make! They WERE fun to make and I only have the paper, not the dies or stamp set. My little Paper Snipswere perfect for all the cutting I did.
The card bases were made with either Evening Evergreen cardstock with Just Jade or Soft Succulent on the green ones. The other two were made with a card base of Cinnamon Cider. I just looked through the Bloom Where You’re Planted Designer Series Paper and inspiration came! So many cute plants, pots, and backgrounds to use! All the plants and pots are hand-cut with my Paper Snips. I don’t try to be perfect AT ALL. If there are a bunch of little leaves, I just wiggle my scissors back and forth as I go along the sides. For the larger leaves, I may trim closer around each leaf but not necessarily in between or all the way down to the pot. They say turn the paper, not your scissors. Some people say they hate to cut things out but it’s a mindless activity you can do while watching TV or just sitting at your craft table. If you don’t try to be perfect it is not that hard! So let go of perfectionism! In fact, years ago at a Stampin’ Up! convention, they suggested when cutting out images leave just a small margin around the image, that way you don’t have to be perfect! And sometimes it helps the cut out image stand out from the background better. Do what makes you happy!
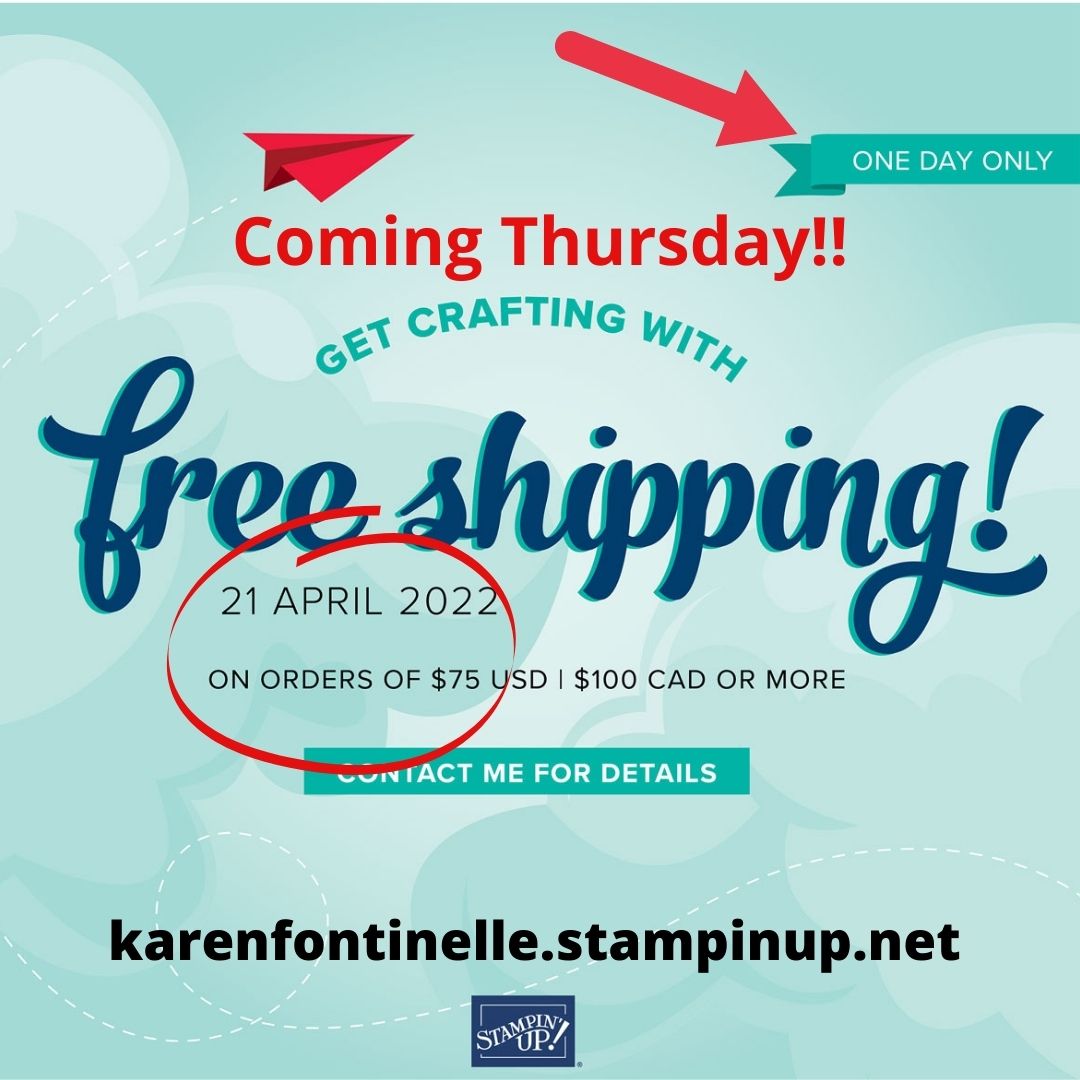
Today, Thursday, April 21, Stampin’ Up! is offering FREE SHIPPING
on all orders of $75 or more!
It’s a great opportunity to stock up on basics like cardstock, adhesives, and embellishments not to mention any of the Last Chance products that will be retiring in less than two weeks!
Prices have increased in the new upcoming Stampin’ Up! Annual Catalog so get the current price on the basics plus free shipping! For example, cardstock has increased from $8.75 to $9.25; ink pads from $7.50 to $8.00; ink refills from $3.75 to $4.00; and Basic White cardstock from $9.75 to $10.25. Nothing too earth-shattering, but all those little bits add up if you need to replenish your supplies!
Here are the details:
ORDERING INFORMATION:
Free shipping applies after the qualifying amount (per market) has been met.
The minimum qualifying amount to receive free shipping is $75 USD | $100 CAD or more (before tax).
If you are using a coupon code or product credit, please remember that they are non-commissionable and will lower the order’s retail amount. The order must still meet the qualifying threshold to be eligible for free shipping.
Free shipping only applies during the 24-hour period the promotion is live in each market; this means that the order must be opened and closed on 21 April 2022.
With the exception of month-to-month Paper Pumpkin subscriptions, all Stampin’ Up! products qualify for the promotion.
Prepaid Paper Pumpkin subscriptions are eligible for FREE shippingunder the same rules as all other Stampin’ Up! items during the promotion.
Month-to-month Paper Pumpkin subscriptions are NOT eligible for free shipping. Subscriptions billed and shipped this month will be charged for the normal amount ($23.50 USD shipping included) + tax.
The free shipping promotion does not cover the additional cost of expedited shipping.
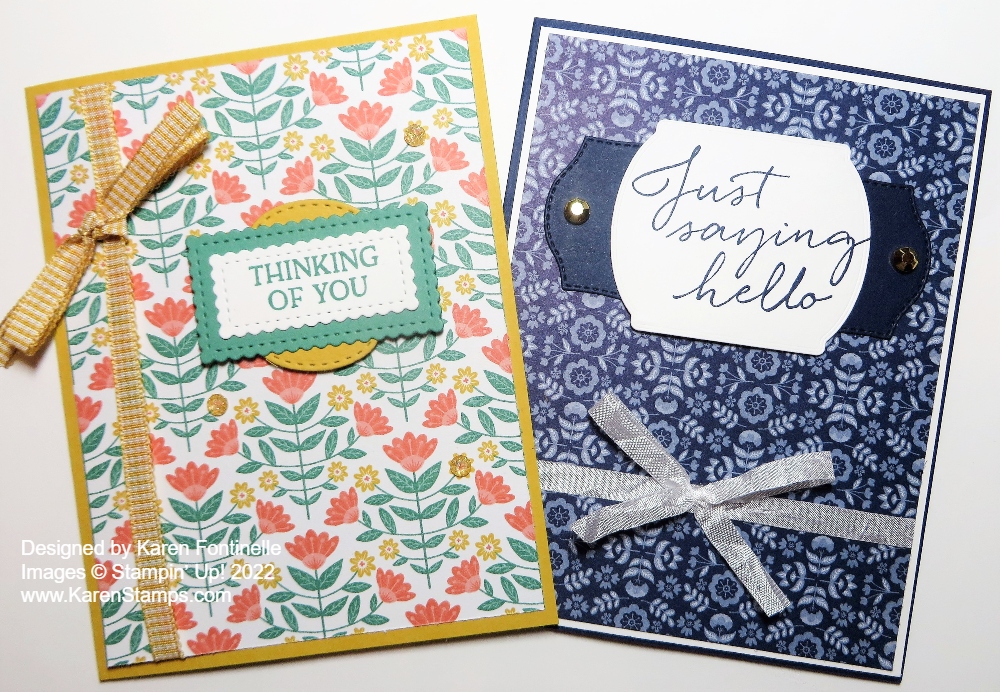
One of my favorite designer papers in the current Stampin’ Up! catalog turned out to be the Sweet Symmetry Designer Series Paper. It took me by surprise, actually! I didn’t order it originally, but I suppose I saw someone’s sample card or project that caught my eye, and then I had to have the paper! I found it to be just a fun, happy, pleasing paper to work with!
Before this paper retires in less than two weeks, I thought I would make a couple more cards. It is still available on the Last Chance List as I write this. You will find it on pages 112-113 in the Annual Catalog. There was also the In Symmetry Stamp Set but that appears to be sold out unless you would like the French version!
These two cards I made are easy to make and show off the Sweet Symmetry paper. They are both just a basic design with a greeting and a little bit of embellishment.
I first was inspired to make the Night of Navy card on the right. That dark pattern just caught my eye. I made the card base Night of Navy with a layer of Basic White under the designer paper just to help show it off. The greeting is stamped in Night of Navy ink on Basic White from the Tasteful Touches Stamp Set and die cut with one of the Tasteful Labels dies. I used another Tasteful Label Die for a layer underneath the greeting. The Tasteful Touches Stamp Set is retiring on May 2. The Tasteful Label Dies are also retiring and are also discounted! I used these dies a lot, especially the circles and hate to see this set go. For a little embellishment, before adhering the layers, I wrapped around a piece of the Whisper White 1/4″ Crinkled Seam Binding Ribbon and adhered a separate bow with a Mini Glue Dot. For a final little embellishment, I used two Gilded Gems on each side of the greeting. The Gilded Gems are retiring and are discounted, too!
The “Thinking of You” card is made with the same Night of Navy paper but it’s the other side! For this card, I used Bumblebee cardstock for the card base and the bright, happy floral design for the card front. Before adhering the designer paper, I tied a piece of the Bumblebee 1/4″ Gingham Ribbon around the designer paper and tied on a bow. This pretty ribbon is retiring and is discounted. The greeting is stamped in Just Jade ink from the Blossoms in Bloom Stamp Set (retired). It’s only available in French now. The greeting is layered on dies from the Stitched So Sweetly Dies. These dies, sadly, are also retiring but have been some of my favorite ones to use. I couldn’t resist using a few Genial Gems, retiring soon but discounted.
Here is a photo of how I decorated the insides of the cards.
Here are a whole BUNCH of Sweet Symmetry thank you cards I made in THIS POST!
Remember that tomorrow, Thursday April 21 will be FREE SHIPPING for an order of $75 or more!
Free shipping at Stampin’ Up! is coming on Thursday, April 21, 2022!
What a great surprise! This Thursday, with an order of $75 or more, you can get Free Shipping on your order (before tax). It’s a great opportunity to stock up on basics like cardstock, adhesives, and embellishments not to mention any of the Last Chance products that will be retiring in less than two weeks!
Here are the details:
ORDERING INFORMATION:
Free shipping applies after the qualifying amount (per market) has been met.
The minimum qualifying amount to receive free shipping is $75 USD | $100 CAD or more (before tax).
If you are using a coupon code or product credit, please remember that they are non-commissionable and will lower the order’s retail amount. The order must still meet the qualifying threshold to be eligible for free shipping.
Free shipping only applies during the 24-hour period the promotion is live in each market; this means that the order must be opened and closed on 21 April 2022.
With the exception of month-to-month Paper Pumpkin subscriptions, all Stampin’ Up! products qualify for the promotion.
Prepaid Paper Pumpkin subscriptions are eligible for FREE shipping under the same rules as all other Stampin’ Up! items during the promotion.
Month-to-month Paper Pumpkin subscriptions are NOT eligible for free shipping. Subscriptions billed and shipped this month will be charged for the normal amount ($23.50 USD shipping included) + tax.
The free shipping promotion does not cover the additional cost of expedited shipping.
Let me know if you have any questions! Make your list but don’t start your online order until Thursday or it might not give you the free shipping. Remember, the minimum order is $75. Check the Last Chance List and Clearance Rack, too!
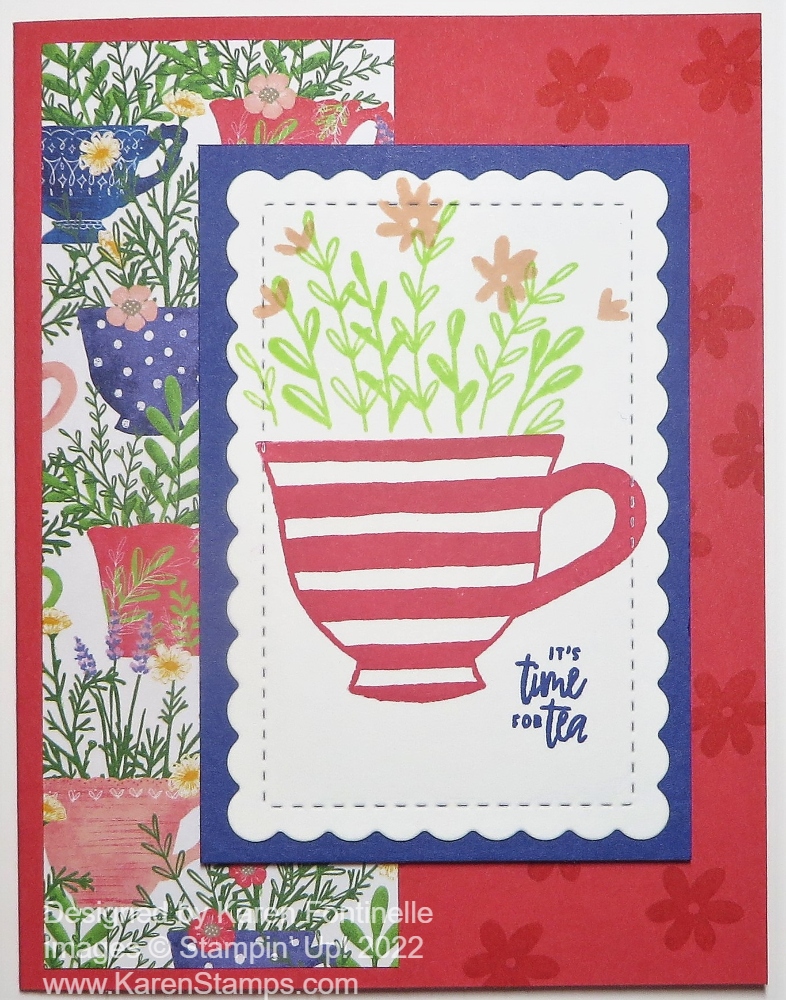
After waiting ALL day Saturday for UPS to deliver my Stampin’ Up! preorder, it finally arrived after 9:00 PM but at least it got here! I present to you my first card out of all the things! I couldn’t wait to see and use the new In Colors so I chose this stamp set and designer paper to make my Sweet Sorbet Cup of Tea Card. There are dies in the Tea Boutique Suite but for this first card, I kept it rather simple.
The card base is the very pretty color I love already, Sweet Sorbet. I also really wanted to use the new Tea Boutique 6″ x 6″ Designer Series Paper, so I simply picked the pretty teacup print on the top of the package! I decided to simply cut a strip about 2″ wide by 5 1/4″ to put on the left side of the card.
The striped teacup is stamped in Sweet Sorbet ink on a scalloped rectangle in Basic White in the Scalloped Contours Dies. After the cup was stamped, I stamped the leafy stems with the new Parakeet Party ink. I dared to stamp the row of little flowers without much thought in Petal Pink ink but didn’t get it lined up right. If I didn’t mention it, you probably wouldn’t notice it or think that it was “wrong”. There are several greetings in the Cup of Tea Stamp Set, some larger and some really small to fit on the little tag stamp and die! I just stamped the greeting next to the cup. Now that I see the sizes of things, I would probably stamp the cup a little lower on the diecut. The diecut piece is layered on the new Starry Sky dark blue In Color. The whole piece is then popped up on Stampin’ Dimensionals®.
On the inside of the card, I added a layer of Basic White with a 1″ strip of the “other side” of this same designer paper on the left side of the white layer. That way it is easier to write a message or stamp on the inside of the card.
This Tea Boutique Suite is going to offer lots of great cardmaking opportunities! There is even a matching set of Tea Boutique Cards and Envelopes to which you can add stamping, paper, and/or die cuts.
Who doesn’t enjoy a cup of tea now and then so they will certainly enjoy a Cup of Tea card!
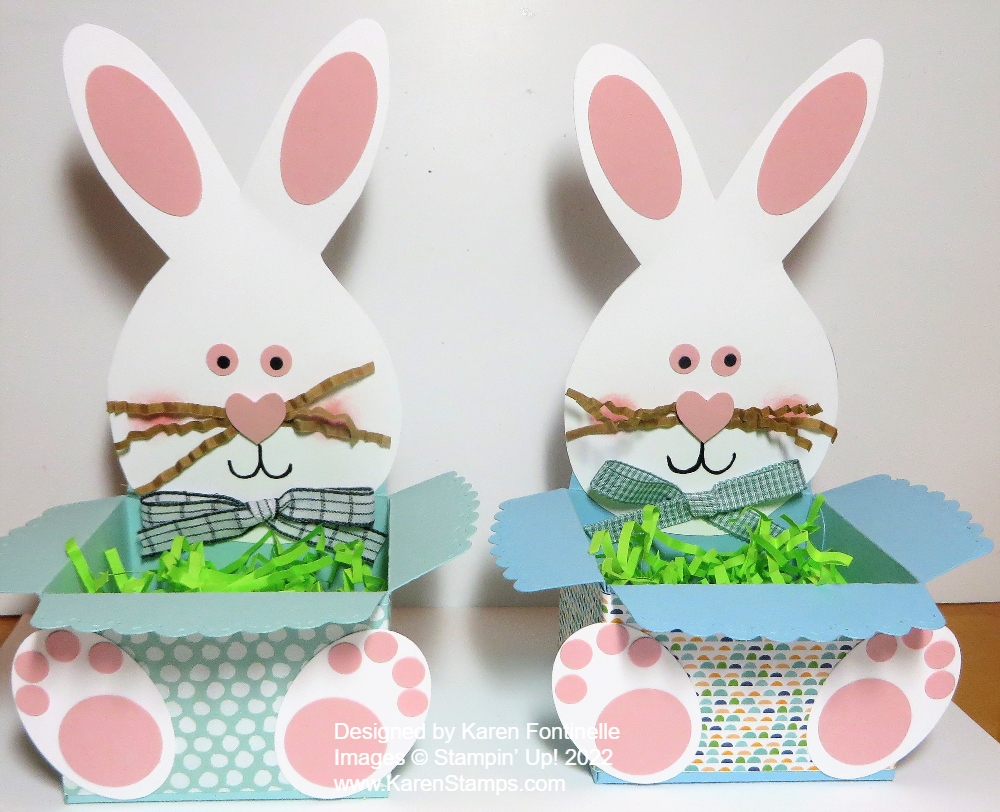
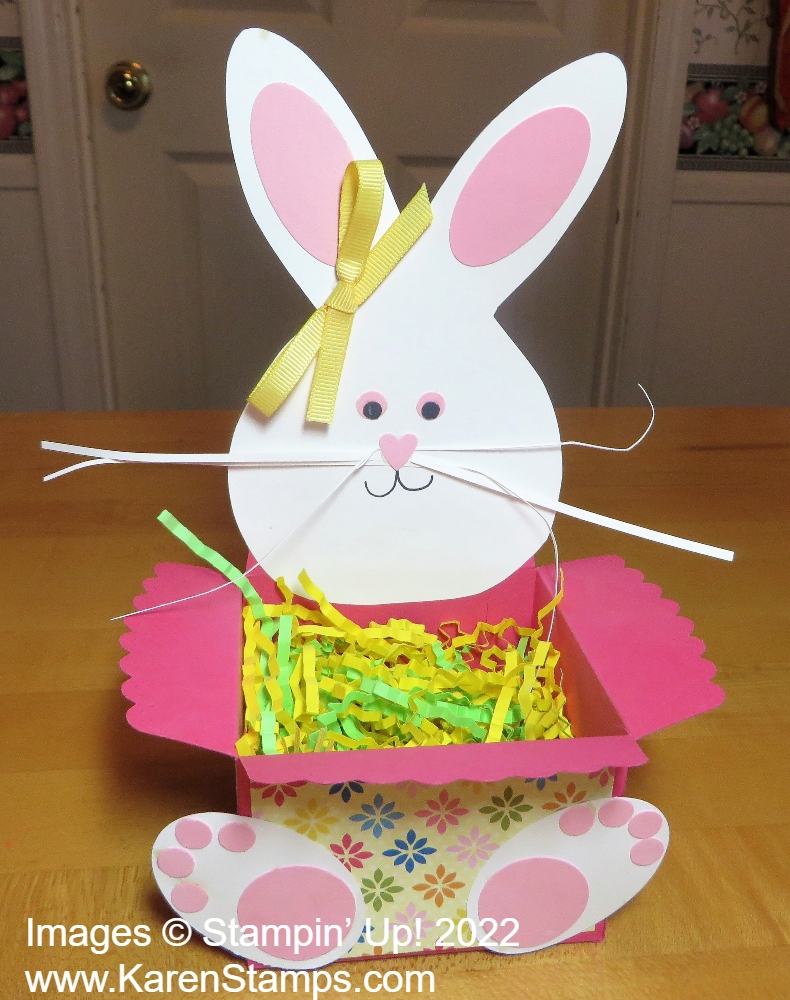
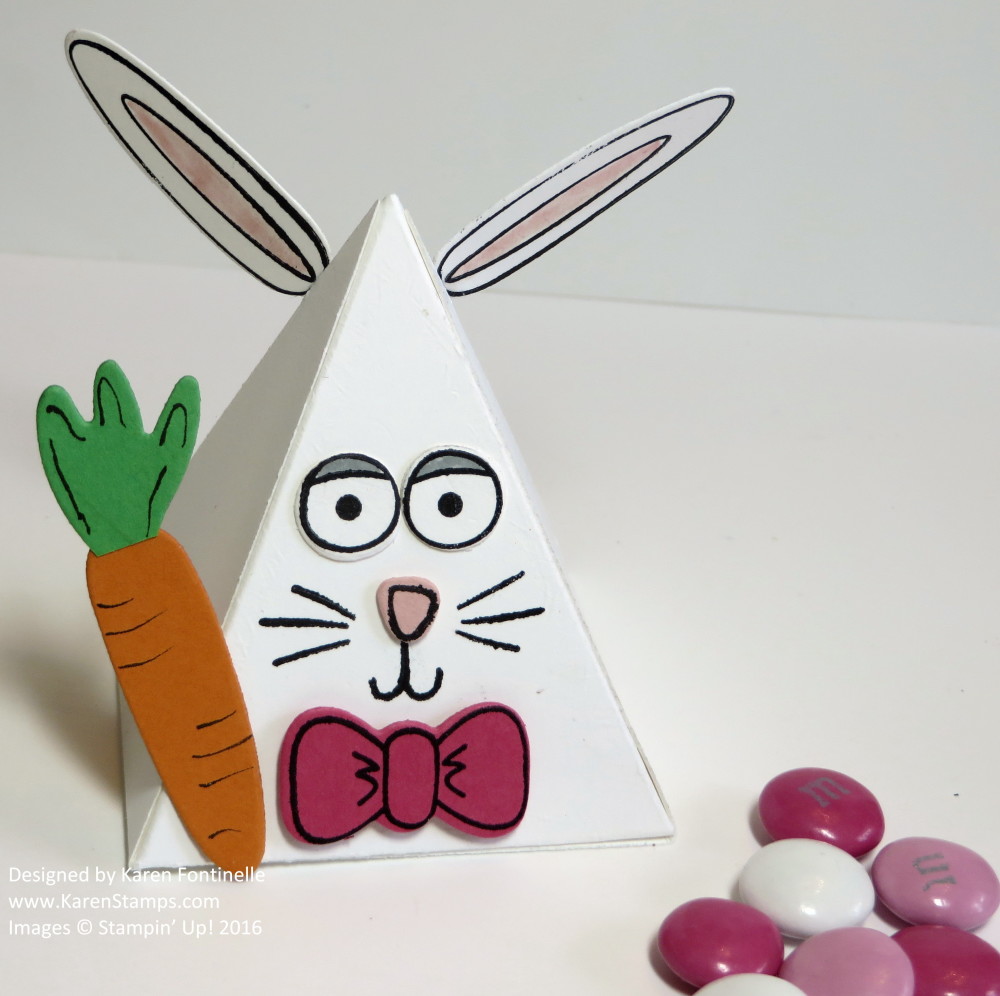
I was asked to make two Easter treat baskets for two little boys. I had kind of a normal little basket idea with a handle (made of cardstock, of course, not a real basket! but when I got home, I saw one of my Easter decorations on my fireplace mantel that I made years ago. I just copied myself and made these two Easter Bunny Treat Baskets! Plenty of room to put some chocolate candy and other treats inside!
To make these baskets, I pulled out a lot of my retired Stampin’ Up! products! The main thing I used was the Sizzix Scallop Envelope Die, I think it is called. It was one of those first dies we had with our Big Shot, the black thick platform kind of die with the cutting blades inside the die. I cut four pieces, cut off one tab on one side of the envelope piece, laid them side by side, adhered them together, and folded in the bottom flaps to form the basket. So if you have been die-cutting for a long time, you may have this die. We could make a lot more things than just an envelope with this die. The bunny on the back of the basket is simply a sketched bunny shape. There may be a template somewhere online. I traced the one I’d already made on my basket. The bunny feet on the front of the basket are made with the retired large oval punch, the 1″ circle punch, and some smaller punched circles. There were several punches I had that could make those, like the Owl Punch and the Gingerbread Man Punch (not sure that’s the correct name). For the ears, I punched oval shapes but you could color them in with a marker. The face can just be drawn in or just small circle punches for the eyes, a small heart, or a circle for the nose. Add a little blush to the cheeks! Draw on some whiskers or use some crinkled strips of paper or this crinkled shred that I happened to have.
If you do not have the Scallop Envelope Die, just make some little kind of square box. Just take a square piece of paper, score it like a tic tac toe board, fold and crease, then cut the flaps at the bottom and the top down to the horizontal scoreline. Fold in all the sides to form a box.
There are so many ways to make bunnies, too! If you are uncomfortable drawing a bunny like mine and cutting it out, just use some circle or heart shapes to put one together! Use dies or cut freehand.
Since these were boy bunnies, I tied bows and attached them to the bunny chins rather than on their ears! You could also make kind of a paper necktie if you wanted! Just have fun with the project! Nothing has to be perfect!
Here is my original bunny I made a few years back I guess!
If you need one more Easter idea, this Easter Bunny Treat Basket might be just the thing to inspire you!
In case you are looking for some last-minute Easter ideas, here are a few I made in the past! Maybe it’s something different than what we’re all seeing right now or maybe you have these older stamp sets and products. Just pull them out and start creating! Or update with your current products! It’s all fun! Just click on the title to go to the blog post.
Well, that’s probably more ideas than you need but it was fun for me going down Easter Memory Lane! So many cards and treats over many years and seeing them always brings back wonderful memories because stamping is always so much fun! If you need more or different ideas, just select Easter in the Categories drop-down box under the catalogs.
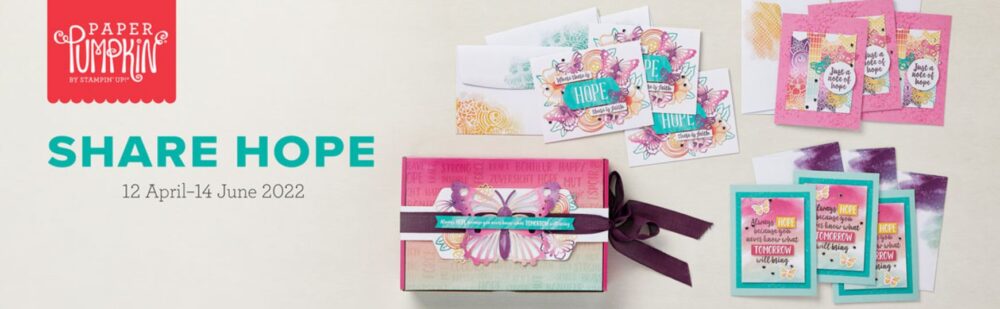
April has been designated as the National Month of Hope in the United States to help spread hope around the world. Stampin’ Up! is celebrating the National Month of Hope in North America with our Share Hope Offer, which runs from mid-April to Mid-June! The Paper Pumpkin Hope Box will be available to purchase at a discounted price between 12 April and 14 June 2022. Even non-subscribers can get in on this limited-time offer. It’s the perfect way to reach out to those who need a ray of sunshine and some kindness! Share hope by making and giving hope cards or by donating a Hope Box to someone in need, or to a hope-related organization that’s dear to your heart.
Here are the cards you can make although you can always change up the designs! Decorate the Paper Pumpkin Box to hold the finished cards if you wish!
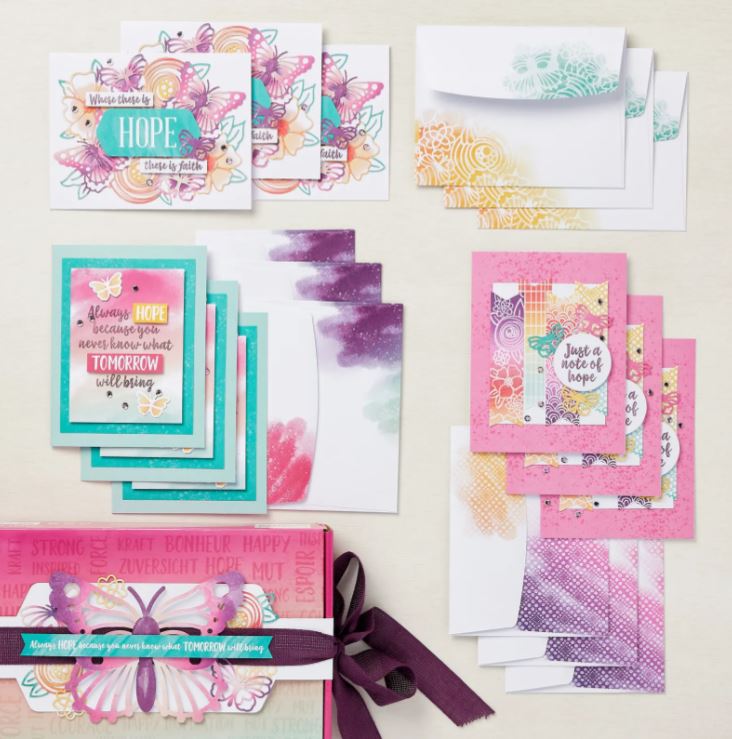
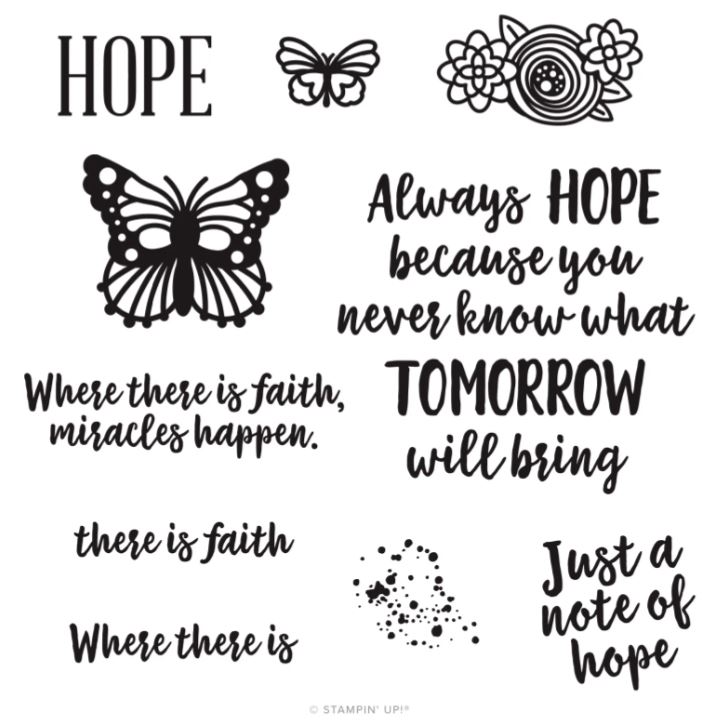
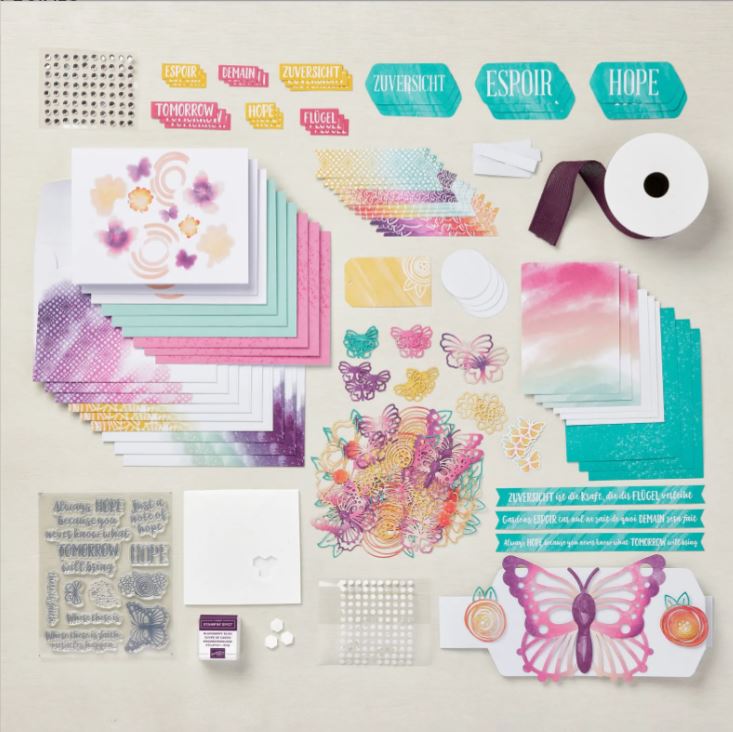
Here is the stamp set included in the Past Kit (but not in the refill.
Here are the contents of the Past Kit. The refill kit does not include the stamp set, the ink spot, or the ribbon.
DETAILS
Offer available while supplies last between 12 April and 14 June 2022.
Available to all customers and demonstrators. Special exception: a subscription is NOT required.
50% discount on refills. Regularly $10.00 USD. Discounted price is $5.00 USD. (Note: Ribbon not included in refill.) Item 159345 Hope Box Refill Kit (Refill Kit does not include the stamp set or ink spot.)
Block not included in past kit. If you are donating a kit, you will need to add a clear block. Supply item 148288 Paper Pumpkin Clear Stamp Block $2.00 USD | $2.50 CAD
This is a great opportunity to try out Paper Pumpkin if you haven’t yet! No subscription is required to purchase this kit! You can buy the entire kit (called the Past Kit because it was offered recently). Normally, only subscribers are allowed to buy the Past Kits and Refills.
If you don’t need the stamp set, ink spot, and ribbon, then order the Refill and get all the materials to make the cards for only $5.00!!! You can use whatever stamp set and ink you already have.
Whether you are into the theme or not, this is a beautiful kit at a great price for you to get all these goodies with which to make cards or any other projects! You will find these items under Shop Products > Kits-Paper Pumpkin >Refills, Past Kits, & More.
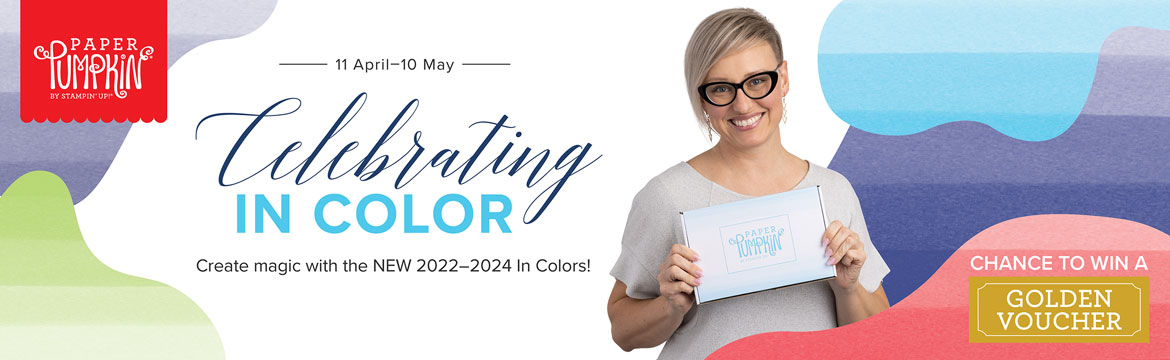
I am so excited about this May Paper Pumpkin Kit for all of you! Even if you have never tried Paper Pumpkin before (or even if you did once before!), I would suggest signing up to get this kit…and then you can keep up your subscription, skip a month or two, or cancel if you must. This kit is one of those extra-special ones that I would highly recommend (and I haven’t seen it!).
“Create magic with the NEW 2022–2024 In Colors with this Paper Pumpkin kit! With vivid pops of green and red and a range of blues, these colors are perfect for fun festivities. Send your best wishes or happy moments with the large bold lettering and gorgeous gold foil details. Plus, you can also send gift cards with the included coordinating gift card holders!”
Yes!! This kit has the new In Colors in it so you can test them out (unless you have already ordered them by the time you get your kit!) How great is that?!! And Sara Douglass, CEO of Stampin’ Up!, was involved in the design of this kit, which in the past has always meant good things! She suggested that she would like something so that she could send a gift card if she wanted so the coordinating gift card holders were included in the kit!
And how about THIS!
“As an added bonus, every May Paper Pumpkin subscriber will get the chance to win a GOLDEN Voucher worth $25 USD | $34 CAD in Stampin’ Up! products! The winners will find their Golden Voucher in their May 2022 Paper Pumpkin box. This is the perfect time to snag coordinating In Color products from the 2022–2023 Annual Catalog that will go live on 3 May 2022 in the online store!”
Now that makes an already exciting Paper Pumpkin Kit extra exciting! (I don’t know what the odds of winning are, though, but some subscribers are going to win!) May as well hope it is YOU!
If you are excited about this Paper Pumpkin Kit and want it to show up in your mailbox in May, just click the link below to sign up! This is my personalized link so you won’t have to look for my name as your Demonstrator. All supplies are included in the box so even if you are new or don’t have your own supplies, you will get everything you need in this kit! And experienced crafters love having a project already designed that they can make right away, too! If you want to see and use the new In Colors, this Paper Pumpkin Kit is a great way to get started!