Country Floral Lane Valentine With Heart Punch Pack

Country Floral Lane Valentine With Heart Punch Pack

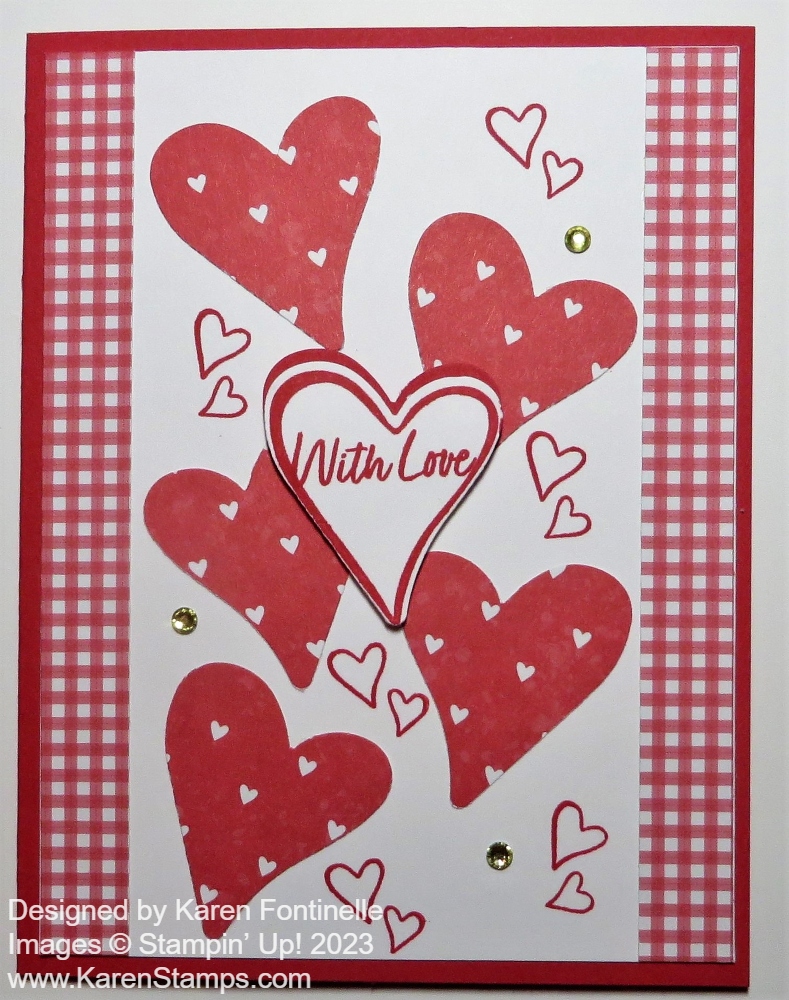
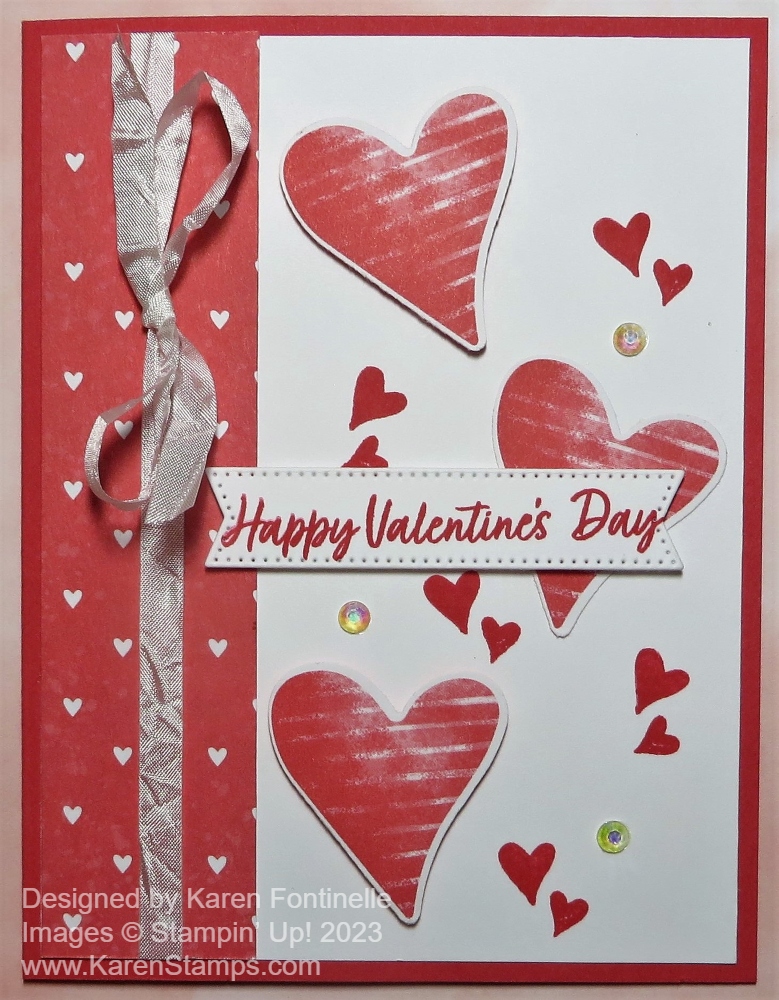
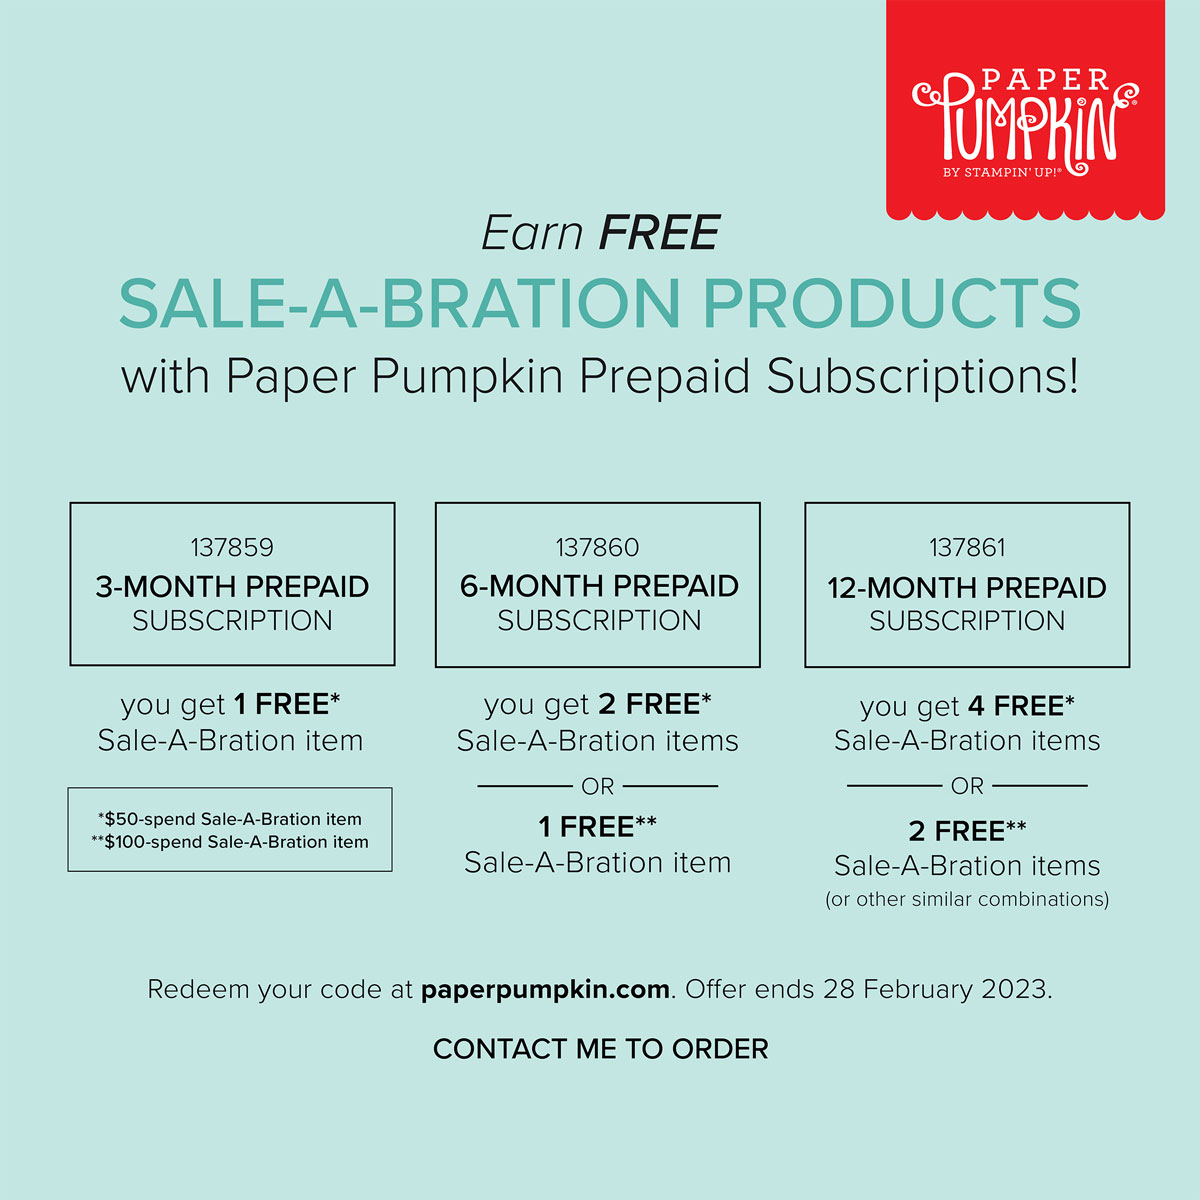
With all the excitement over the Stampin’ Up! January-April 2023 Mini Catalog (the Spring Mini), we often forget about the Annual Catalog. It’s easier to look at the newest catalog and all the shiny new products. But now that it is time to make Valentines, I remembered the Heart Punch Pack in the Annual Catalog! It’s a shame the Country Bouquet Punch will not be available in time for Valentine’s Day, but maybe you have the Heart Punch Pack you can use instead (or other past heart punches and dies).

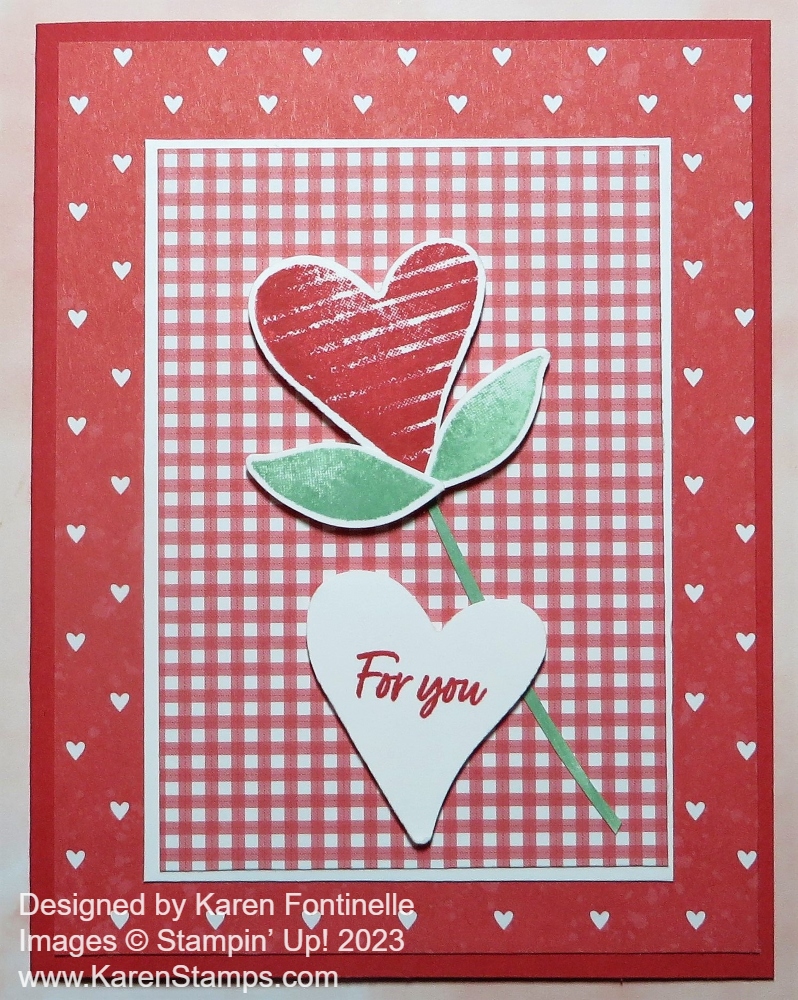
This Country Floral Lane Valentine With Heart Punch Pack card is an easy card to make. It starts with a card base of Petal Pink cardstock. I added a layer of designer paper in the Country Floral Lane Designer Series Paper, the Petal Pink with little white hearts.

The hearts are punched with the Heart Punch Pack. This is two heart punches, one with scalloped edges that can act as a layer underneath the plain heart. It’s great to have the two punches for layering and for the two designs. The scalloped heart is Petal Pink and the plain is Basic White. A greeting is stamped with Petal Pink ink from the Country Bouquet Stamp Set.

To help the heart stamp out I die cut a Basic White square from the Stylish Dies. You can use any square shape. The two hearts are adhered together, then popped up on Stampin’ Dimensionals.

But before I adhered the hearts to the square I added some White 1/4″ Crinkled Seam Binding Ribbon back and forth behind the heart. I usually like to put down some Stampin’ Seal on the back so I can stick down the ribbon and then add Dimensionals to help hold it down as well as to pop up the piece.

Trying to keep the card simple, but wanting just a little something else to add to the card, I added a frosted Heart Pearl. In this package are three “colors” of pearls – Glossy White, Milky White, and Pearl White. I just put the heart at the bottom of the heart and then stopped myself from adding any more! It’s so much fun to add some embellishments to a card!

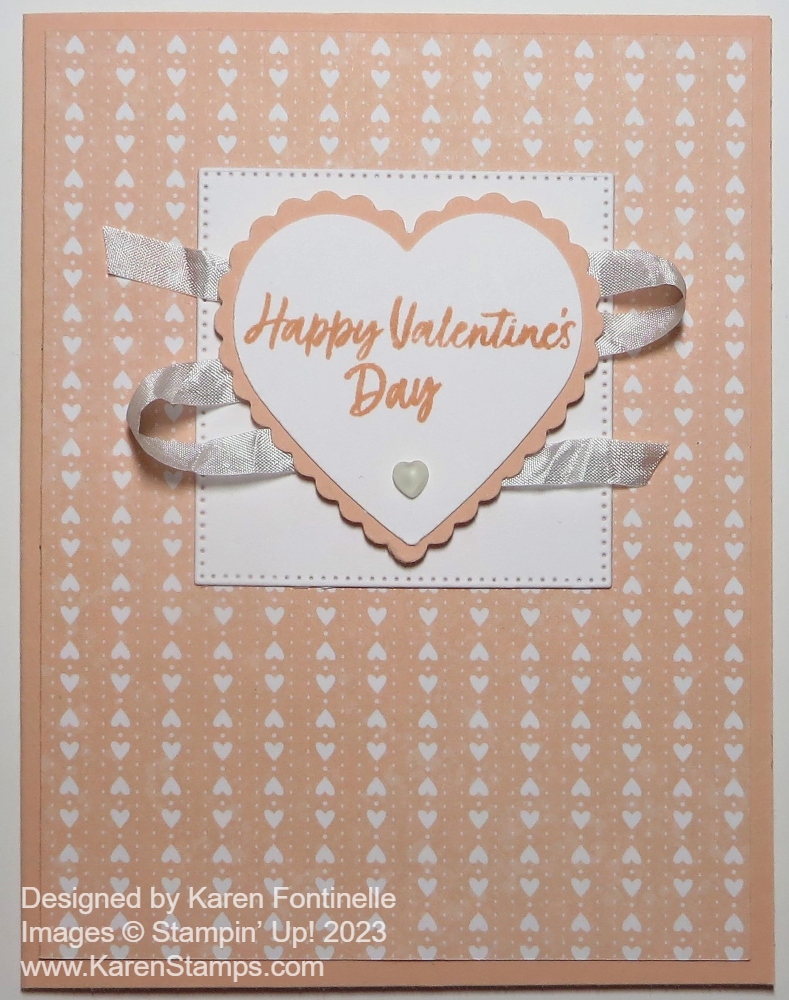
This is just an easy, basic Valentine. Change the colors, the paper, or even the greeting to make more cards!

SHOP STAMPIN’ UP! ONLINE HERE!

New Sale-A-Bration Choices For You!

New SAB Products Feb 2023

Stampin’ Up! has added more products for you to choose from with a $50 order and even one more choice for a $100 order!

In case you are new, Sale-A-Bration is one of Stampin’ Up!’s biggest promotions of the year. It’s overflowing with opportunities for customers and Demonstrators, and filled with fun for everyone, even if you would like to join Stampin’ Up! during this time and get an extra-special deal!

Just shop Stampin’ Up! as usual and when you have all your merchandise entered, choose the free Sale-A-Bration gifts you have earned! Think of shopping in $50 increments to get the most bang for your buck! If you reach $100, you have the choice of one $100 Level product or two $50 Level products! If you spend $150 or more on your order, besides the FREE Sale-A-Bration gifts, you also receive Stampin’ Rewards starting at 10% of your merchandise total. With a $300 order, you will also receive the Host stamp set, Scenic Garden FREE.

Lots of fun choices when you shop with Stampin’ Up!

Click HERE for the Flyer of the NEW CHOICES of products TO EARN!

SHOP STAMPIN’ UP! ONLINE HERE!

New Wreath of Blooms Kit Feb. 1st

Wreath of Blooms Kit Collection photo

Stampin’ Up! has a brand new Kit for you tomorrow, February 1st, in their Kit Collection!

The Wreath of Blooms Kit is a special addition to the Kits Collection; it comes with everything you need to make your very own home decor piece!

Available starting 1 February 2023, the Wreath of Blooms Kit is such a fun way to try new crafting techniques and create something special for your home! You’ll get an 8″ diameter wreath to fill with blossoms. Roll and shape the precut paper pieces to make three-dimensional flowers. Pin them together with brads and glue them to the wreath. Then hang it for all your friends and family to see!

You will need a hot glue gun to adhere the flowers to the wreath. Glue gun not included.

A Kit in the “Kits Collection” is different from Paper Pumpkin Kits. Paper Pumpkin is a monthly subscription whereas the kits in the Kit Collection in the Stampin’ Up! Online Store are simply kits to purchase with your regular order.

DETAILS


This month’s kit includes: 

  • One 8″ (20.3 cm) diameter chipboard wreath.
  • Precut paper pieces that can be rolled and shaped into three-dimensional blossoms.
  • Multicolored brads to keep everything together.
  • Thick twine to hang your wreath.
  • Enough adhesive* to complete the project.
  • Coordinating colors: Cajun Craze, Calypso Coral, Crumb Cake, Garden Green, Night of Navy, Pear Pizzazz, Petal Pink, So Saffron, white.

TOMORROW, you will find this kit in the Menu under Kits Collection.

Wreath of Blooms Kit Collection Contents

Country Floral Lane Punched Red Hearts Valentine

Country Floral Lane Punched Red Hearts Valentine

This Country Floral Lane Punched Red Hearts Valentine uses a little bit of several things for this card in the Country Floral Lane Suite in the Spring Mini Catalog 2023. (As I write this, this Suite is back-ordered until mid-April because the Country Bouquet Punch unfortunately is unavailable until then, as well as the Bundle. The ribbon combo will be available in about three weeks. But other items are available individually.)

This card has a Sweet Sorbet card base with a Basic White layer. Just add some designer paper and a little stamping and you have a Valentine! Each side of the Basic White layer has a 1/2″ x 5 1/4″ strip of the Country Gingham 6″ x 6″ Designer Series Paper.

In the middle of the card, I punched five hearts from the cute print with little white hearts in the Country Floral Lane Designer Series Paper. Since these modern hearts have a slight curve to them, if you want some hearts to curve in the opposite direction, just punch from the other side of the paper! With this paper, pay attention to the pattern so you don’t get the hearts upside down! Just play around with how you like the hearts placed.

Next, I did a little stamping. The center white heart is punched out and then stamped (or you can do it the opposite way!) with a greeting in the Country Bouquet Stamp Set. You can punch out the heart itself first or stamp the heart outline and even the greeting inside it and then punch it out. I wish there was a larger heart for layering, but there isn’t so I just punched out a Sweet Sorbet cardstock heart and let it peek out over the top of the white heart. It adds a little something but nobody would notice the entire heart isn’t layered underneath. The white heart is popped up with Stampin’ Dimensionals.

For some risky stamping (could have messed up the whole card!), I stamped the little outlines of two hearts around in some of the empty spaces on the card using Sweet Sorbet ink. Fortunately, it all worked out! No messes! For a little bling, I added some Rhinestone Basic Jewels.

I forgot to take a photo, but on the inside of the card, I stamped “Happy Valentine’s Day” on a layer of Basic White and then punched out two hearts – one with the gingham like on the side of the front of the card and one with the tiny white hearts like the hearts on the front of the card and just layered them side by side on the lower right-hand corner. That makes the inside very cute!

Time to make Valentines! February is almost here! Not everything has to be red, white, or pink so use your creativity!

SHOP STAMPIN’ UP! ONLINE HERE!

Country Bouquet Punched Hearts Valentine

Country Bouquet Punched Hearts Valentine

If you like punching, this Country Bouquet Punched Hearts Valentine is for you! Just grab some cardstock or designer paper and start punching hearts to your heart’s content! January is just about over (who would have thought?!) and February will be here next week so it’s time to be making lots of Valentines!

This card uses Shimmery White cardstock for both the card base and the layer. I could have added a colored layer underneath the Shimmery White layer, but sometimes I like the white-on-white look. I love the Shimmery White cardstock because it really does have just a tiny bit of shimmer that you can see up close.

Then I chose several colors to use for the hearts. I used Flirty Flamingo, Blushing Bride, Highland Heather, Pool Party, So Saffron, and Soft Sea Foam. Some hearts I used from one side and some from the other to get them going in different directions. The Country Bouquet Punch punches a large heart but also a smaller one at the bottom so I also got a collection of small hearts. That gave me the idea to fill in the spaces with small hearts! There still was some empty space that I thought could use something. I got out the matching Dark Stampin’ Blends and used the bullet tip to make three dots randomly around in the empty spaces. You wouldn’t have to do this step but it just added a little extra color.

I used a greeting in the Country Bouquet Stamp Set, which you can purchase as a Bundle with the Punch. It is stamped with Flirty Flamingo ink on Shimmery White. I diecut it with a banner die in the Stylish Shapes Dies. Then to have a little extra layer without covering too much of the card, I diecut the smaller banner and layered the greeting on top. The whole thing is popped up on Stampin’ Dimensionals.

And why not add a few Heart Pearls on the card with punched hearts all over it?! It’s almost always good to add a little bling or sparkle!

Hope you like this valentine idea that you can make easily with the Country Bouquet Punch!

SHOP STAMPIN’ UP! ONLINE!

Love Cats Valentine Card

Love Cats Valentine Card

This Love Cats Stamp Set in the Spring Mini is just a cute stamp set you should have! It’s just a basic stamp set – no dies, no matching designer paper, no ribbon, no anything else – just a stamp set for you to simply stamp and use your creativity to develop something as simple or as fancy as you want! Valentine’s Day will be here sooner than we can imagine so it’s time to get going on some Valentine cards although you could use these cat stamps for just regular cards, too!

This card has a Real Red card base (my favorite color!). The Basic White layer is stamped with cats in Smoky Slate ink. I would say “randomly” but since the stamp is pretty big, it was a little difficult to get the cats spread out all over the cardstock as I like to do with other smaller stamps for backgrounds. But this was the idea I had in my head so I went with it. When you do this, always fill in the edge spaces even with a partial stamp.

Next I stamped a cat in Smoky Slate on a scrap piece of Basic White and cut it out by hand to place somewhat how I have the cat on this card. But it didn’t stand out so I stamped another cat in Memento ink in black and I like that better. I actually placed him on the Basic White diecut circle so that his tail would align with the Smoky Slate tail stamped on the card front. You may or may not be able to do this, I wouldn’t worry about doing it, but for my card it didn’t look like an extra tail sticking out from the cat! The circle is die cut with one of the Stylish Shapes Dies and layered on a scalloped Layering Circles die in Real Red. I also very carefully inked up the three little hearts with a Real Red Stampin’ Write Marker and stamped those above the cat. This piece is popped up on Stampin’ Dimensionals after a piece of Real Red ribbon in the Real Red & Burlap Combo Pack in the Spring Mini.

For the greeting, I stamped one in the set in Real Red ink on a scrap of Basic White. I thought about diecutting it in some way, but decided to just cut each word apart and adhere it to the focal point with the cat.

I wasn’t quite sure what to do with the stamped gray hearts – just leave them as is or color them in or what. I decided to color in the small gray heart with the Real Red Stampin’ Write Marker and added a few freehand small hearts randomly. They were easy enough to draw myself! Not being one to leave well enough alone, I colored a few Iridescent Rhinestone Basic Jewels with a Dark Real Red Stampin’ Blend marker and placed three of those jewels in some of the empty spaces on the background.

This card may sound like a lot of steps but you already have the design to copy so you only have to make it! Here is another Love Cats card I made using designer paper that you may like. You still have time to order this stamp set and have it in time to make Valentines. Even if you are not a cat lover, this set is too cute! Enjoy!

SHOP HERE AT STAMPIN’ UP! ONLINE!

Playing In The Rain Fox Card

Playing In the Rain Fox Card

When I decided to make several cards for my blog and for my stamping newsletter with this Rain Or Shine Suite in the Spring Mini Catalog because they were forecasting some bad weather here in Houston, I didn’t realize what was coming down the pike, as they say. We were fine at our house, no worries, but we did have really heavy rain in the afternoon and the wind was blowing like crazy. The TV was beeping with those loud buzzes of weather warnings, and text messages about thunderstorms, possible tornadoes, and street flooding possible. We got a little less than two inches of rain and a couple of dead branches knocked off our big tree, but that was all. However, on the other side of town a damaging tornado struck and we learned a new term, “Tornado Emergency”. Apparently, it’s been around several years but never used in Houston. I think basically it means a real tornado has been spotted on the ground and you better take cover NOW! So lots of people today are having to figure out how to get their lives back in order after suffering through some pretty bad damage over in southeast Houston.

However, this foxy guy must live on our side of town where we just had light rain in the morning and no damage in the afternoon. It’s actually a slight copy of the sample in the Spring Mini, but not exactly. The card base is Mango Melody with a layer of “the other side” of the Rain Or Shine 12″ x 12″ Specialty Designer Series Paper. I love this plaid with just the even lines in Mango Melody. Even though it is “raining” on the card, the color and paper design makes it look “happy”!

The “rainy” piece of designer paper is cut at 2 1/4″ x 5 1/4″. If you can’t see it in the photo, the raindrops have a special coating on them to make them shiny, as do some other images in this pack of paper. Just adhere this rainy paper to the left on the card front.

The little fox is stamped in Memento ink from the Playing In the Rain Stamp Set. I colored him in with Stampin’ Blends Markers. I used Cajun Craze and Ivory for the fox, Mint Macaron for his jacket and hat, and Highland Heather for his umbrella. There is a die for him in the Playing in the Rain Dies. Get the stamp set and dies in the Playing in the Rain Bundle and save 10% by buying them together. He is popped up on Stampin’ Dimensionals just off the edge of the rain paper.

The greeting is in another stamp set, Celebrating You. It was the perfect size to be die cut with the almost square die in the Stitched Rectangles. It is adhered flat on the card.

For finishing touches, I cut out a line of flowers from the flower paper in the Rain Or Shine DSP and adhered it to the bottom of the rainy paper. Two butterflies were cut out with the Playing in the Rain Dies and I colored on them a little bit with Stampin’ Blends. The teeny tiny flowers stuck around the card are the Loose Daisy Embellishments. They are very teeny tiny so besides gluing them down with a teeny tiny drop of glue, you could also use them in a Shaker Card. Did I mention they are small?!

This was a fun card to make and I daresay the whole Rain Or Shine Suite Collection is fun! The dies have extra pieces like a fence, butterflies, grass, a kite, and unopened umbrella and more. You really can plan a “scene” for your card or project using all these fun products!

SHOP STAMPIN’ UP! ONLINE HERE!

Dainty Flowers Thinking of You Card

Dainty Flowers Thinking of You Card

One day I realized I had made a card for my weekly newsletter featuring this Dainty Flowers Designer Series Paper, this oval design, but had not put one on my blog! So it was time to make another card, this Dainty Flowers Thinking of You Card, using one of these easy panels on a sheet of the designer paper. You won’t find an easier way of making a pretty card than using certain portions of this designer paper.

The card base is Rich Razzleberry (even though it looks black in the photo!) (but it could be black!). The Fresh Freesia layer is another pattern in the Dainty Flowers Designer Paper. I really wanted to use it as a layer against the Rich Razzleberry and I was able to cut down the oval to the right size to fit. The Fresh Freesia polka dot layer is 4″ x 5 1/4″ and the piece with the floral oval is 3 5/8″ x 4 7/8″. The oval is a little difficult to cut at the normal size layers we like to use, but you can just play around with it. Trim it a little bit on one side or the other or just have different margins on the card. It’s all okay!

For the greeting, I wanted to cut out an oval for the center of the flowers. But we don’t have the oval dies anymore that we used to layer! However, I found this oval in the Fabulous Frames Dies and it fit pretty well. Originally, I planned to use white for the center and Fresh Freesia for the frame that fits around the oval but the frame seemed like too much. Then I stamped on a Fresh Freesia center and didn’t add a frame and I liked that just fine! The greeting is from the Go To Greetings Stamp Set.

For some finishing touches, I added a Brushed Brass Butterfly on the greeting plus added some Pastel Adhesive-Backed Sequins scattered on the card. To add a little something to the greeting, I tied a small bow with the Fresh Freesia 3/8″ Open Weave Ribbon and adhered it with a Glue Dot. These ribbons for the 2021-2023 In Colors are such pretty ones!

This Dainty Flowers Designer Series Paper is one of the FREE products you can earn through February 28 during the Stampin’ Up! Sale-A-Bration promotion! Just spend $50 or more and choose a free product in the Sale-A-Bration Brochure. It also coordinates with the Dainty Delight Bundle in the Spring Mini Catalog on page 55 so check that out also!

SHOP STAMPIN’ UP! ONLINE HERE!

Dandy Designs Thanks Card

Dandy Designs Thanks Card

I was accumulating quite a few scraps of designer paper after cutting the paper down to size, so I thought I would use the strips of paper to make this Dandy Designs Thanks Card. It’s a good way to use up scraps and you can do lots of different designs with scraps! This is just one example.

I’ve made some cards using the Dandy Designs Designer Series Paper and noticed I had this little pile of scraps. This paper is so cute I would hate to waste much of it! You can only get this big pack of paper (48 sheets, 4 each of 12 different designs) during Sale-A-Bration 2023 with a $100 purchase of Stampin’ Up! product. You’ll find it on page 14 of the Sale-A-Bration Brochure. There are several different patterns like polka dots, stripes, and plaids. It’s the kind of paper that you can use for almost anything!

This card starts with a card base of Coastal Cabana. I realized I don’t use this color very often but it’s one of the coordinating colors for the Dandy Designs Paper. I used a regular size Basic White layer ( 4″ x 5 1/4″) on which to adhere the strips of DSP. With the size that they are cut, if I left just a “smidge” of space in between the strips, they would fit perfectly. The top and bottom strips are even with the edge of the Basic White. The designer paper strips are 1″ x 4″. If you don’t get the edges lined up close to perfect, just use your Paper Trimmer along any edges that need to be evened up…or just use scissors to cut off any overhanging edges.

For the greeting, I chose “thanks” in the Biggest Wish Stamp Set. After having trouble with my Coastal Cabana ink, I just used Memento Black instead! I diecut the word with one of the Tailor Made Tag Dies. I decided to use the Black & White 1/4″ Gingham Ribbon for something different, but I colored it with the Light Granny Apple Green Stampin’ Blend marker to help it match the card colors. The tag is just adhered flat to the card because I knew I would add some embellishments since there was space and I didn’t want it to stick up too high off the card.

I used the 2022-2024 In Color Matte Decorative Dots to jazz up the tag. They are the current In Colors and I used the Tahitian Tide smallest blue dots and the Parakeet Party green dot. They still go with the card even if they aren’t perfect matches.

Time is flying! We are already into the third week of January and I am still finding Christmas decorations I missed when I was putting everything away! Don’t wait too long so you can get your hands on the new products in the Spring Mini Catalog and earn some FREE products during Sale-A-Bration!

SHOP STAMPIN’ UP! ONLINE HERE!

Dainty Flowers Just For You Card

This paper is the Dainty Flowers Designer Series Paper that you can earn FREE during Sale-A-Bration with only a $50 purchase. I knew some of the patterns were in this pastel watercolor design. It is on the back of two of the floral sheets….but oh how we hate to cut up paper when we also love the other side! But it had to be done, to see what I could make with the watercolor side of the paper!

This layer of designer paper is the “other side” of the sheet with the floral ovals and the stems of flowers in the center of that paper. Those floral ovals make beautiful, super easy cards so it’s hard to use the other side of the paper instead! But I did!

The card base is Old Olive, layered with Blushing Bride, and then the designer paper. Since I had to cut into those floral designs on the other side, I decided to really cut into the stems of the flowers. The term “fussy-cutting” really applied to how I cut out these flowers! You really need a small type of scissors like the Stampin’ Up! Paper Snips. You need some small, sharp scissors to twist and turn your way through these tiny flowers! Of course, I did not cut into every single little area of this design and you could not cut into so many areas as I did. But I do like the way it turned out. I used the Multipurpose Liquid Glue to put tiny dots on this piece in as many places as I could to adhere the flowers to the card front.

I wanted the greeting to be smaller than it is on the stamp in order to fit into the space on the card so I stamped each word after inking it with the Blushing Bride Stampin’ Write Marker (not the Stampin’ Blends marker). I was careful to clean the stamp well after each word and tried to line it up as well as I could. I think it turned out pretty well. Then I diecut the greeting with the oval in the All That Dies. The greeting is in the Go To Greetings Stamp Set. It’s a great stamp set for greetings you will need often and they are in different sizes and fonts! So versatile and so clever!

When I got out the dies to cut out the greeting, I noticed the little flag ends I could also die cut so I cut those out of Blushing Bride cardstock. Since the space on the card was small, I even trimmed down the length of the flags to fit on each side of the oval. I just glued those on to the back of the oval and popped up the whole thing on Stampin’ Dimensionals. I added three Iridescent Pearl Basic Jewels scattered on the card front. I might have added two on the greeting but since it is already popped up, I didn’t want to add some other things sticking up that poke holes in envelopes when you mail them.

Just keep in mind that “the other side” of the designer papers of the patterns we love often can also make beautiful cards! Get this Dainty Flowers Paper FREE during Sale-A-Bration through the end of February or while supplies last so don’t wait too long!

SHOP STAMPIN’ UP! ONLINE HERE!

Country Floral Lane Hearts Valentine Card

Country Floral Lane Hearts Valentine Card

It’s less than a month until Valentine’s Day so I guess it is time to get busy making some cards! This Country Floral Lane Hearts Valentine Card is pretty easy to make! As usual, it turned out a little different than my original idea!

This card is made with products in the Country Floral Lane Suite. The card base is Sweet Sorbet, one of the coordinating colors in the designer papers in the Suite. The little strip of hearts on the left side of the card is a pattern in the Country Floral Lane 12″ x 12″ Designer Series Paper. I adhered it to the Basic White cardstock but didn’t adhere it to the card base until I added the ribbon first.

For the hearts, I intended to stamp different colors of hearts but then I grabbed the Country Bouquet Punch and punched out the bottom row of hearts and leaves on the designer paper. I decided not to use the leaves that punched out from the paper, just the hearts. The top and bottom hearts are popped up on Stampin’ Dimensionals and the middle one is adhered flat on the card front.

I did do some stamping with the pair of little hearts in Sweet Sorbet ink. After attaching the White 1/4″ Crinkled Seam Binding Ribbon to the card and tying on a bow, I adhered the card front to the card base. At first, I wasn’t sure how a greeting was going to fit on this card, but I stamped the “Happy Valentine’s Day” greeting in the Country Bouquet Stamp Set on an already die-cut banner from the Stylish Shapes Dies. It just fit! I adhered it with Stampin’ Dimensionals across the middle of the card. Then, yes, I had to add three Iridescent Rhinestone Jewels for a little sparkle!

There you have it, my first Valentine card of the year! It’s time to get started!

SHOP STAMPIN’ UP! ONLINE HERE!

Dainty Flowers Fresh Freesia Cards

Dainty Designs Fresh Freesia Cards

Today these Dainty Flowers Fresh Freesia Cards are basically two cards for the price of one! By that, I mean that I actually planned to make the bottom card you see above, but as I laid down that floral design on the Fresh Freesia card base, I loved the way the full piece of designer paper with that floral pattern looked so I thought I would make that card, too! Besides, both cards are super easy to make!

The Dainty Flowers Designer Series Paper is one of the most popular items to choose from when you earn a free Sale-A-Bration product with a $50 purchase! But when we think of that paper, we think of the designs with more multicolored floral patterns, especially the ones you can cut apart and easily make cards, such as the oval design. For these cards, I chose one of the less popular paper patterns with purplish flowers.

Both cards use Fresh Freesia cardstock for the card bases. I cut the designer paper on the top card at the usual 5 1/4″ x 4″. I thought I would cut a portion off the bottom so I could overlap the polka dot patterned paper as I did on the bottom card. But just placing that piece of designer paper on the Fresh Freesia cardstock, I really couldn’t do anything except use it as it was! So easy! I adhered a piece of Fresh Freesia 3/8″ Open Weave Ribbon across the bottom portion, adhered on the back, and then adhered the whole piece to the card base. Then I tied a separate bow and adhered it to the ribbon with Mini Glue Dots.

For the bottom card, I stuck with my original idea. The top designer paper is 5 1/4″ x 2 3/4″ and the polka dot paper is 5 1/4″ x 1 3/4″. I like the two papers to overlap a bit so I can adhere them together where they overlap, then cover the seam with a ribbon or strip of cardstock. For this card, I used the White 3/4″ Glittered Organdy Ribbon. This ribbon is so pretty anyway, but the little iridescent pink glitter in it perfectly matches this card! I tied a separate bow and adhered it to the card with Mini Glue Dots.

The top card uses a birthday greeting in the Framed Florets Stamp Set. It is stamped in Fresh Freesia ink and then diecut with the stitched circle die in the Stylish Shapes Dies. I also added a scalloped circle die in Fresh Freesia cardstock for a layer behind the greeting from the Layering Circles Dies. For a little sparkle, I added three Iridescent Rhinestone Basic Jewels, one on the birthday greeting and two in the upper corner of the card.

On the second card, I stamped another greeting also in the Framed Florets Stamp Set and die cut with a label shape in the All That Dies. This time I used my Dark Fresh Freesia Stampin’ Blend marker to color three of the Iridescent Rhinestone Basic Jewels and just added them at the bottom of the greeting. This greeting is popped up on Stampin’ Dimensionals.

So there you have two card ideas, very easy ones to make at that, using the purple floral paper in the Dainty Flowers Designer Series Paper!

Remember, for every $50 you spend on Stampin’ Up! products, you earn a FREE Sale-A-Bration product in the special brochure! And lots of people are choosing the Dainty Flowers Designer Series Paper so if you are interested, don’t wait too long to order!

SHOP STAMPIN’ UP! Here!

Rain or Shine Just For You Card

Rain or Shine Just For You Card

There are a lot of fun products in the Stampin’ Up! Spring Mini Catalog and one of them is the Rain Or Shine Suite Collection, especially the Rain or Shine Specialty Designer Series Paper. Not only do some of the sheets have cute characters on them, as I used on this Rain or Shine Just For You Card, but each sheet has a touch of a glossy coating, even on the raindrops, to add a little shine and interest!

To make this card, I started with choosing one of the whimsical characters on the designer paper and it happened to be this brown bunny dancing in the rain! It is a killer to cut into this cute paper but it must be done! I cut out this bunny leaving as wide a margin as I could around him and tried to find a die to cut him out for the card. One circle die just missed on one side so I ended up just trimming him out with my Paper Trimmer into a rectangle. Next, I tried to find a diecut to layer my rectangle on but nothing was a perfect fit. When I tried turning this Stylish Shapes square die, I thought my bunny fit perfectly on the diecut and was a different look!

The card base is Flirty Flamingo cardstock as is the square layer under the bunny. The background layer of the card is the opposite side of the designer paper with the characters. That piece was difficult to cut and use since I knew the cute animals were on the other side not seeing the light of day! But those are the sacrifices we papercrafters have to make with double-sided paper!! I love the striped pattern so I had to use it! To help it stand out a bit I added a layer of Basic White first on the card base. I popped up this die cut with Stampin’ Dimensionals and then the bunny is adhered flat on the square.

The greeting is from the Celebrating You Stamp Set. I love a greeting like “Just For You” or “Thinking of You” because you can use that on SO many kinds of cards. This greeting is stamped in Flirty Flamingo ink and die cut with a banner die also in the Stylish Shapes Dies. It is popped up on Stampin’ Dimensionals.

For a finishing touch, I added two pinkish sequins in the Pastel Adhesive-Backed Sequins to the side corners of the square diecut. Although you can’t see it in the photo, the shiny coating is on the pink jacket of the bunny, on the raindrops, and outlining the rain puddle. The little flowers were also scattered on the designer paper with the characters so I cut some out by hand and adhered them on the sides of the rain puddle. I thought they added just another tiny little something to the design of the card.

Here is another card, my first card I made with this Suite, using the turtle and actually diecutting him using one of the many dies.

You really must check out the Rain or Shine Suite and choose all or some of the products for making fun and happy cards that not only will brighten the recipients day when they receive it but will brighten your day as you create these cards and projects with these products!

SHOP STAMPIN’ UP! TODAY!

New Paper Pumpkin Kit For February 2023!

Paper Pumpkin Jan 2023 Kit Sq Ad 1

Brighten someone’s day with the new Sunshine & Smiles Paper Pumpkin Kit! Subscribe by February 10th to get this special, brand new kit with some exclusive crafting benefits!

Each kit includes nine cards, three each of three designs, with peek-through windows on the card fronts! The bright colors and furry friends are the perfect way to make someone’s day!

This kit is unique for its suite coordination! It coordinates perfectly with the Rain or Shine Suite Collection (160556) from the January–April 2023 Spring Mini Catalog. It’s the perfect time to get some extra product and get creative with your crafts!

And for the first time ever, Paper Pumpkin is offering a dies add-on! There are so many possibilities with this month’s kit, you do not want to miss it!

ABOUT THE KIT

Name: Sunshine & Smiles

This kit includes:

  • Everything you need to create 9 radiant cards—3 each of 3 designs—and 9 coordinating envelopes.
  • A sweet springtime photopolymer stamp set.
  • A Mango Melody Stampin’ Spot
  • A fun peek-through window scene on each card!
  • Cute precut critters and labels, fun raindrop embellishments, and more! 

Finished card size: 5-1/2″ x 4-1/4″ (14 x 10.8 cm)

Coordinating Stampin’ Up! colors: Balmy Blue, Cajun Craze, Coastal Cabana, Daffodil Delight, Flirty Flamingo, Mango Melody, Old Olive, Shaded Spruce

ADD-ON

Sunshine & Smiles Dies (Available for purchase starting 11 January, while supplies last)

Item number: 162486

$6.00 USD / $8.25 CAD

This add-on includes:

  • One coordinating frog-shaped die: 1-1/8″ x 7/8″ (2.9 x 2.2 cm)
  • One coordinating flower bouquet die: 1-1/8″ x 7/8″ (2.9 x 2.2 cm)

*Please note that you will need a Stampin’ Cut & Emboss Machine to use the die add-on.

This looks like a fun Paper Pumpkin Kit! Sign up now for a monthly kit beginning February 10th, mailed out mid-February. OR purchase a Pre-Paid Paper Pumpkin subscription in the Online Store with your regular Stampin’ Up! order. Earn Sale-A-Bration rewards with these prepaid subscriptions:

Paper Pumpkin Kit February 2023

JOIN PAPER PUMPKIN HERE by February 10, 2023!

SHOP PREPAID PAPER PUMPKIN SUBSCRIPTIONS HERE!

Country Bouquet For You Card

Country Bouquet For You Card

Once again, the Stampin’ Up! catalog was the inspiration for this card. I noticed a sample on page 8 in the new Stampin’ Up! Spring Mini that is really a candy bar treat holder, but I made this Country Bouquet For You Card instead of a treat holder.

This card uses the two kinds of designer paper in the Country Floral Lane Suite plus the Country Bouquet Bundle. If you want it “all”, as they say, just order the Suite Collection (160390)! That saves you from entering all the product numbers!

The card base is Sweet Sorbet with a layer of the paper with tiny white hearts in the Country Floral Lane Designer Paper. Then I added a smaller layer of the Sweet Sorbet gingham pattern in the Country Gingham 6″ x 6″ Designer Series Paper. It is 2 7/8″ x 4 1/8″. To help it stand out a bit, I adhered that gingham paper to a layer of Basic White that is 3″ x 4 1/4″.

The heart and leaves in the Country Bouquet Stamp Set are stamped with Sweet Sorbet and Mint Macaron inks then punched with the new Country Bouquet Punch. You can purchase the stamp set and the punch in a Bundle and save 10%. You can swipe some green ink on a scrap of Basic White and then cut out a stem or just cut it out of cardstock. The heart and leaves are popped up on Stampin’ Dimensionals. The stem is adhered flat on the card.

The plain Basic White heart is just punched out and then stamped with a greeting in the Country Bouquet Stamp Set. This card could be a Valentine or it could just be an all-occasion card to send a happy greeting to a friend or loved one.

You can keep this card simple as is, or add some jewel embellishments of some kind or more hearts or whatever you like!

This Country Floral Lane can definitely be for Valentine’s Day but it can easily be for any cards. Check out this card I made on the first day of the Spring Mini.

Buy the Suite and add a little more and get TWO $50 Level free products during Sale-A-Bration or choose a special $100 Level free product! You will be all set for making valentines to send! Maybe instead of making a card like this Country Bouquet For You Card try making a treat holder like the sample in the catalog!

SHOP STAMPIN’ UP! ONLINE HERE!