Love Cats Head Over Heels Card

Love Cats Head Over Heels Card

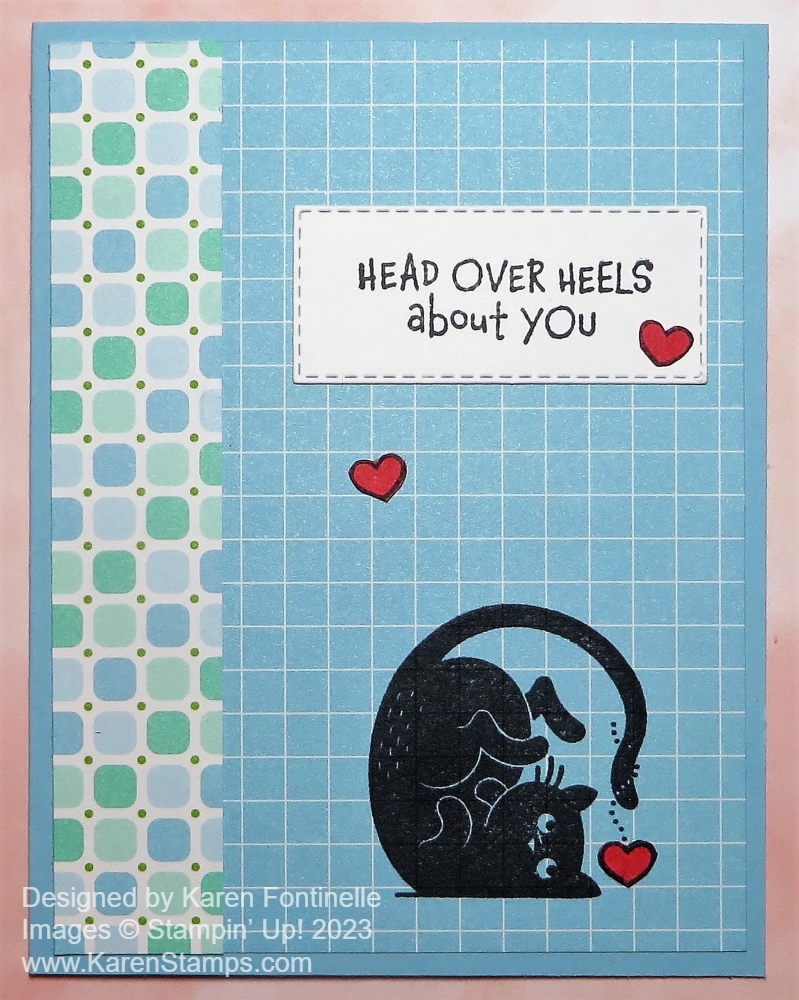
This Love Cats Head Over Heels Card came about because my Love Cats Stamp Set just came yesterday so I quickly made a card with it! I’m a dog person, not a cat person except for some occasional cute cats we see around the neighborhood. But this stamp set has fun cats and is irresistible! Whether you make Valentines or other cards with this set, you will have fun making them and the recipients are sure to love them whether they are dog or cat lovers! Cute is cute!

This card has a Balmy Blue cardstock card base. The paper comes from a fantastic deal during Sale-A-Bration! The designer paper on this card is the Dandy Designs Designer Series Paper and is available to you FREE with a $100 purchase! Most Sale-A-Bration products are earned with a $50 purchase but a few are there for your larger orders if you want to choose them. This pack of paper has very versatile, pleasing designs that you can use for cards, scrapbook pages, and all kinds of projects. You get 48 sheets, 4 each of 12 designs! The paper on this card is the Balmy Blue pattern on one side and the blues and greens on the other side.

I thought I would try stamping the cat right on the designer paper so I chose a pattern that wasn’t a busy one. I strongly recommend you use your Stamparatus so that in case you don’t get a good, dark image of the cat the first time, you can stamp again (and again!) to get a solid-colored image. Or make sure your ink pad is well-inked! The “other side” of the designer paper is adhered along the side of the card.

The greeting is in the Love Cats Stamp Set. I stamped it on Basic White and cut it out with one of the Stitched Rectangle Dies. I think it looks fine even without being on a layer.

I decided to stamp the little heart on the cat stamp again on Sweet Sorbet Cardstock and then cut it out. I glued it carefully over the stamped heart with the cat to add a little more color to the card. I probably could have colored it in on the card but I liked the cutting-out idea! Then I stamped and cut out two more Sweet Sorbet hearts to use as embellishments on the card. I think those add just the right amount of interest and color!

That’s all there is to this fairly easy card! There are lots more fun ideas to use with this Love Cats Stamp Set!

SHOP STAMPIN’ UP! and SALE-A-BRATION!

Time to Sign Up For Paper Pumpkin!

Paper Pumpkin Key to My Heart Jan 2023 Banner

It’s time to sign up for Paper Pumpkin, the monthly papercrafting kit that comes to your mailbox each month! It’s the gift you give yourself….or someone else who would enjoy making a craft project but doesn’t have the supplies or ideas or doesn’t want a lot of supplies! (What?!)

Tomorrow is the last day, January 10th, to sign up and receive this January Paper Pumpkin Kit, Key To My Heart, that will be sent to you mid-month. OR put a Prepaid Subscription on your regular Stampin’ Up! order (which counts toward Sale-A-Bration and any Host Rewards) and set up your account online by the 10th.

Seal your love this season with the Key to My Heart Paper Pumpkin Kit! This month’s kit represents the tradition of locking a padlock on a bridge to symbolize unbreakable love. It comes with everything you need to make 9 darling love-themed cards—3 each of 3 designs. You can make something heartfelt for someone special to you this season.

Plus, this month there is a special add-on! The add-on is a heart-shaped treat box. These Heart Boxes are easy to put together and will take your crafting even further. Add-ons are live during the subscription period but are only available while supplies last. Act quickly, and don’t miss out on these Heart Boxes filled with love!

ABOUT THE KIT

Name: Key to My Heart

This kit includes:

  • This month’s kit includes everything you need to create 9 love-themed cards—3 each of 3 designs. It has coordinating envelopes, special padlock and key die cuts, adhesives, Vellum, and more!
  • This month’s kit has a unique love-theme photopolymer stamp set! With special sentiments and images that represent the tradition of locking padlocks on a bridge, there are so many ways for you to express your devoted love.
  • The Key to My Heart Paper Pumpkin Kit also comes with a Fresh Freesia Classic Stampin’ Spot.
  • This kit also has a special add-on to take your crafting even further, the Heart Boxes (162417)!
  • Finished card size: 4-1/4″ x 5-1/2″ (10.8 x 14 cm)
  • Coordinating Stampin’ Up! colors: Calypso Coral, Fresh Freesia, Mango Melody, Petal Pink. The designs are accented with gold foil. 

ADD-ON

Heart Boxes Add-On

Add-on number: 162417

Price: $11.00 USD

The add-on includes:

  • 10 treat boxes
  • Key and label stickers
  • Box size: 3″ x 4″ (7.6 x 10.2 cm)
  • Coordinating Stampin’ Up! colors: Petal Pink with gold foil

Join Paper Pumpkin today and receive the monthly kit or purchase the Prepaid Kit(s) on your Stampin’ Up! order and set up your account. You will receive an email that tells you exactly how to do that. No risk! Cancel easily at any time if Paper Pumpkin is not for you OR simply skip a month now and then if necessary!

Send My Paper Pumpkin!

Dandy Designs Sending Sunshine Card

Dandy Designs Sending Sunshine Card

If you are looking for a happy card, I’d like to suggest using the Dandy Designs Designer Series Paper as I did on this Dandy Designs Sending Sunshine Card. It’s a mix of new and old. The paper is new in the Sale-A-Bration Brochure. The stamp set used is the Sending Smiles Stamp Set from the Stampin’ Up! Annual Catalog.

How do you get this giant package of paper? Dandy Designs is 12″ x 12″ paper, 48 sheets, 4 each of 12 designs and you may earn it with a purchase of $100 during Sale-A-Bration. Sale-A-Bration is an annual promotion of Stampin’ Up! which we all love! With every $50 purchase of any Stampin’ Up! merchandise, you will earn a free product in the Sale-A-Bration Brochure with some items being earned with a $100 purchase. You may choose either one of the $100 Level products or two of the $50 Level products.

This card begins with the Calypso Coral card base and is layered with the brightly flowered pattern in the Dandy Designs Designer Paper. There is a diecut scalloped rectangle in the Scalloped Contours Dies in the center of the card with a layer of Basic White cardstock.

The flowers and stems are stamped with the Sending Smiles Stamp Set. I used the colors Calypso Coral, Mango Melody, and Petal Pink with Old Olive flower stamps. They were all cut out with the Sending Dies.

The greeting is also stamped in Calypso Coral ink on Basic White and diecut from the same set. The secondary greeting is stamped with Granny Apple Green and die cut with a long rectangle in the Sending Dies.

The flowers and the die cut “Sending” are all popped up on Stampin’ Dimensionals and Mini Stampin’ Dimensionals. For a final touch, I added three Iridescent Rhinestone Basic Jewels, probably my favorite embellishment to use!

If you do have a large Stampin’ Up! order during Sale-A-Bration, I think you will enjoy using all the pretty patterns in the Dandy Designs package!

SHOP STAMPIN’ UP! ONLINE HERE!

Stampin’ Up! At the Movies With the Spring Mini!

Grab a snack and enjoy these Stampin’ Up! videos describing and showing some of the new products available now! They are sure to get your creative juices flowing!

These videos will give you a good idea about some of these new products in the January-April 2023 Spring Mini Catalog. It’s always fun to get a good look at Stampin’ Up! products!

And when you spend $50 or more, you will earn a FREE Sale-A-Bration product. No limits! Think of shopping in $50 increments so you can earn as many Sale-A-Bration products as you can!

Happy Shopping!

New Spring Catalog! New Country Floral Lane Card!

Country Floral Lane Friend Card

Today is the day!! The new Stampin’ Up! January – April 2023 Mini Catalog (otherwise known as the Spring Mini) is LIVE TODAY!

PLUS it is the first day of Sale-A-Bration! January 5 – February 28, 2023.

With every $50 you spend whether from the Stampin’ Up! Annual Catalog, the Spring Mini, and even the Clearance Rack, you earn a FREE Sale-A-Bration product in the Brochure.

Stampin' Up! Spring Mini Catalog and Sale-A-Bration

View the Spring Mini Catalog PDF here and Sale-A-Bration Brochure!

Go check out the new products in the Online Store HERE!

The first Suite you will find in the Spring Mini is the Country Floral Lane Suite. The card I made above is a fairly close copy of one of the samples in the catalog on page 8. I didn’t really know where to start with my new products I was able to pre-order as a Demonstrator (one of the best perks!) so when that happens, one idea to get your creativity going is to copy a sample in the catalog. You can keep it the same or change it up a bit. But in the midst of the holidays, it was a challenge!

This card has a Basic White card base and the designer paper covers the entire front. This is the Country Gingham 6″ x 6″ Designer Series Paper. In the center of the card I used a pattern from the Country Floral Lane 12″ x 12″ Designer Series Paper, layered on a piece of Sweet Sorbet cardstock. The designer paper is 3 1/8″ x 4 3/8″ and the cardstock is 3 1/4″ x 4 1/2″.

The heart and leaves are stamped and punched out with the Country Bouquet Punch. The little heart is punched out of Sweet Sorbet cardstock. The greeting is in the Country Bouquet Stamp Set also. I just stamped it on a Basic White rectangle and layered it on a small piece of Balmy Blue.

The hearts and leaves are popped up on Stampin’ Dimensionals with a piece of Linen Thread under the small heart. I also stamped two sprigs of leaves with Mossy Meadow ink and cut them out by hand. Then I added some sparkle with the new Pastel Adhesive-Backed Sequins.

My daughter was still here visiting over Christmas and she had this card in the pile of cards she was taking home with her! When she asked if she could have all these cards, I said “Not this one! It’s brand new! It’s not even on my blog yet!” So what did I do? I made another card just like it for her to take home!

It’s a cute card and by changing up the gingham patterns, you can make a card with the same design but a completely different look! I know the gingham paper is going to be fresh and fun to work with on many cards!

Look around online or in your catalogs and then GO SHOPPING!

It’s a good day when there is a new Stampin’ Up! Catalog!!

Last Day For the Holiday Mini!

All good things must come to an end and the Stampin’ Up! Holiday Mini certainly was a “good thing”! Seems like yesterday that I was excited about the Sweetest Christmas Suite with the candy canes and red & white glimmer paper, not to mention the cute Sweetest Christmas Designer Paper. This was the first card I made, copying from the sample in the catalog. Loved it!

Sweet Candy Canes Christmas Card

But it wasn’t time for Christmas yet, so I played with the fall Hello Harvest Stamp Set and dies (sold out) and the Rustic Harvest Designer Paper. The paper is gorgeous, but even prettier if you add some color to the pumpkins with Stampin’ Blends!

Hello Harvest First Day of Fall Pumpkin Card

Since I love Halloween, I had to have several Halloween stamp sets! Loved the Best Witches and the Scary Cute Bundle. Besides cards, I even made a little scene in a wooden frame for Halloween!

Best Witches Haunt It Halloween Card
alloween Scary Cute Shadow Box

Earlier in July, Stampin’ Up! had an online stamping event using the Splendid Thoughts Bundle and the beautiful Splendid Day Designer Paper. Something a little different but so pretty, especially the paper!

Splendid Thoughts Sale-A-Bration Card and Envelope

For kind of a whimsical Christmas card, I liked the Jingle Jingle Jingle Stamp Set. No dies, just pure stamping and coloring if you wanted to. What’s not to love about a stamp set called “Jingle Jingle Jingle”?!

Jingle Jingle Jingle Christmas Card With Bells

After a while, I also had to order some of the products in the Lights Aglow Suite, such as the Twinkling Lights Dies, the Lights Aglow paper, the Festive Foils paper, and the Gold & Vanilla ribbon. Too many pretty ideas for Christmas cards out there!

Lights Aglow Christmas Tree Card

And besides all the Christmas cards, it was fun to use the Sweetest Christmas Suite to decorate a shopping bag and turn it into a Christmas gift bag.

Candy Cane Christmas Gift Bag

That was just a little walk down Memory Lane with the Stampin’ Up! Holiday Mini Catalog 2022! But today is your last day to purchase anything you’ve gotta have from that catalog! Tomorrow, January 5th begins the Spring Mini. A few things will be carried over that we will see again but most of the products will be retired. Shop the Last Chance Sale today!

Last Two Days For the Last Chance Sale!

Stampin' Up! Last Chance Sale

Just a reminder that January 4th, coming up on Wednesday, will be the last day for the July – December 2022 Holiday Mini Catalog! It was so exciting when this catalog came out, with the holiday ideas for fall and Christmas swirling in our heads, not quite believing that Christmas would ever really get here! And now it’s all over and we are ready for new things!

Some products from the Holiday Mini are discounted up to 60% off, some are not discounted at all but this will be your last chance to get them!

It’s time to look through the Holiday Mini ONE MORE TIME and make sure you have what you want! There are still lots of good choices left!

SHOP THE LAST CHANCE SALE HERE!

And don’t forget to check out the Clearance Rack where you will for sure find bargains!

SHOP THE CLEARANCE RACK!

Have fun!!

Playing in the Rain Turtle Card

Playing in the Rain Turtle Card

It’s a new year and almost time for a new Stampin’ Up! Spring Mini Catalog, so here’s a new Playing in the Rain Turtle Card! This little turtle isn’t playing in the rain but some of his friends are in the Rain or Shine Suite Collection in the new catalog coming January 5th! That’s right, just a few more days until a new Stampin’ Up! catalog goes LIVE and we all love that!

Plus, it will be Sale-A-Bration 2023, the biggest promotion that Stampin’ Up! has annually! With every $50 you spend, you earn a FREE product in the Sale-A-Bration brochure, no limits! With a $100 purchase there are a couple of special items you could choose instead of two $50 level items but it’s all your choice. Just think in increments of $50 if you can when you shop to get as many free products as you can! (Before tax and shipping, of course!)

This Rain or Shine Suite was one that I chose during the Demonstrator pre-order because the little animals in the stamp set and designer paper were so cute and fun! And we all need to make some “fun” cards to send out to bring a smile to someone’s face, not to mention our own as we make the card! The Suite contains a Bundle of stamps and dies, a Raindrops Embossing Folder, tiny little daisy embellishments, and very cute designer paper with some images having a UV Coating that adds some shine.

To make this card, I used one of the sample cards on the catalog pages to copy. That card is a “slimline” card, taller and narrower than most cards. My card is the usual size so it looks a little different. Sometimes using a card sample in the catalog is a good way to get your creativity flowing.

This card has a Balmy Blue card base I use a strip of the Rain or Shine Specialty Designer Series Paper which has the sky, clouds and flowers. I trimmed it down and separated the clouds and flowers to fit my card the best. I wanted the turtle to be standing in the field of daisies with the sky behind him so I have two pieces of paper on the card front. After I trimmed off a little of the top of the sky portion I noticed the other side had the Mango Melody plaid design. The catalog sample uses a wider piece but I just used it across the seam of where my sky and flowers meet.

The turtle, in the Playing in the Rain Stamp Set, is stamped with Memento Ink and colored with Stampin’ Blends in Old Olive and Granny Apple Green. The little daisy is colored with Daffodil Delight and a center of Cajun Craze. I was prepared to cut him out with scissors, but there is a die in the Playing in the Rain Dies! There are lots of fun dies in this set to play with! You can buy the stamp set and dies in the Playing in the Rain Bundle and save 10%! (Notice the same name for the stamp set and dies??!)

The greeting is stamped with Mossy Meadow ink and die cut with a small scalloped Layering Circles die. I thought it would be fun to add a bow to the Mango Melody strip. For embellishments, I used the very small Loose Daisy Embellishments on the greeting.

As I looked at the sample card in the catalog again, I noticed that they had some popped-up clouds in the sky and I felt my card needed a little something in the top portion. I was prepared, again, to hand-cut some clouds out of the designer paper, but lo and behold, there is a die that cuts out a certain group of three clouds from the paper!

Clouds Die
Clouds Die on DSP

Be sure to take care lining up the die so you don’t cut off the UV coating that outlines the cloud shape. After cutting out the clouds, I popped them up on the top of the card. I could have popped them up directly over the printed clouds on the paper.

Although it’s supposed to be a rainy, stormy day here in Houston, I chose to make this sunny, happy day card. Whether you choose rain or shine with this suite, you will be making a cute card! Get ready for the January-April 2023 (Spring Mini) Catalog to go live on Wednesday, January 5th, and for Sale-A-Bration to begin the same day! Circle that date on your calendar for sure!

Make a Card For New Year’s 2023

Happy New Year! Happy New Year’s Eve anyway! It’s time to make a card for New Year’s! I haven’t done any stamping since I finished my Christmas cards at the last minute with my kids home for a week or more. Also, most of my stamping stuff is moved into another room due to Christmas decorating so it’s not handy to be stamping right now. I hadn’t even played with my new Spring Mini and Sale-A-Bration things that I was able to preorder as a Demonstrator.

Since today is New Year’s Eve, I thought it was time to try to make an appropriate card. I had various ideas but nothing seemed quite right. I thought I was heat emboss several flowers with gold powder that would make them look like fireworks for New Year’s Eve. I got out all my embossing stuff to do that and came across an actual “Happy New Year’s” greeting in the Brightest Glow Stamp Set. Then I came across this Festive Foils Specialty Designer Series Paper that I had seldom used even though I think it’s beautiful. I thought it looked festive enough for a New Year’s Eve card, especially if I embossed the greeting in gold!

I found this diecut in the Painted Labels Dies and I thought it would make a perfect layer for the greeting. I stamped the greeting on Basic White with Versamark Ink and used the Heat Tool to emboss with Gold Embossing Powder. Then I die cut it with this swirl in the Painted Labels Dies. I also cut one out of Basic Black cardstock and cut out the center of the white swirl with the embossed greeting. I simply layered it on the black swirl and it’s large enough for the center of the card. The paper is fancy and the greeting is fancy. That’s enough for this card….well, except for a few Adhesive-backed Seasonal Sequins!

If you need to take a card to a New Year’s party, this would be a good one to make and take! Have a safe and happy New Year’s Eve!

Join My Stamping Newsletter Mailing List!

Mailing List Mailbox

I’d like to invite you to join my Stamping With Karen Mailing List to keep up with news from Stampin’ Up! and to be inspired by new stamping projects, tips, techniques, and more from me! There is always something new with Stampin’ Up! from products to catalogs and early releases of new products and I know you’ll want to know all about it.

Every Tuesday, I send out a newsletter with at least one free project idea, tip, or technique plus the latest Stampin’ Up! news and updates. Stampin’ Up! usually posts updates to Demonstrators every Tuesday morning so a newsletter on Tuesday from me has the news “hot off the press”!

Stampin’ Up! puts out an Annual Catalog once a year, plus two “Mini” catalogs a year {that aren’t so “mini”) plus the big promotion called Sale-A-Bration in January. These catalogs give you lots of products you will be excited about, want to learn about, and want to see all the ideas for cards and projects possible! Get on my Mailing List to keep up with these exciting events and know what to expect. If you’re one of my purchasing customers I’ll send you these catalogs free of charge when they come out.

Keep up with news about the new Paper Pumpkin Kit every month and subscribe if you want to join in the fun of having a project already planned and prepped for you in the cute Paper Pumpkin box! Always sign up or skip a month if you want by the 10th of any month.

As a special gift to my Mailing List subscribers, every year before the holidays I send out my “12 Weeks of Christmas” newsletters, with one new holiday project each week leading up to Christmas. These are ONLY for my subscribers and you won’t find them on my blog or anywhere else. We just finished this year’s “12 Weeks” right before Christmas!

If you are on my blog, you will see a red sign-up box in the top right corner where you can simply put your name (or first name) and best email. If you are on your phone, you probably need to scroll way down to get to the sidebar things. OR you can go to my sign-up page HERE.

When you sign up, you will receive an email with a link to a free gift from me!

I hope you will enjoy the card and project ideas I send out in my weekly newsletter. Even if you never make the project, maybe just seeing ideas will do your crafty heart good! I know it does mine! I’m all about the creative ideas!!

Let’s stay connected and in touch with each other over our favorite thing to talk about…..stamping with Stampin’ Up!

Last Minute Christmas Gift Wrap Ideas

Gift Wrap Ideas

It’s Christmas Eve and if you don’t have your packages wrapped yet or ran out of wrapping paper, you might need these last-minute Christmas gift wrap ideas! I was afraid we might run out of wrapping paper so I did several presents without the fancy stuff just in case!

For the first one, I just used a plain white shopping bag, tied on a nice tag from either a Paper Pumpkin Kit or a Stampin’ Up! Kit from a previous Christmas. So handy to have those gift tags already made up! Put that on your summertime list and you’ll be ready! I just tied on a nice tag and with the colored tissue paper inside the bag it looks great!

I started out thinking I should use some of the brown paper we have from Amazon and other packages. One Etsy gal I have ordered from wraps her customers’ purchases in this paper and ties yarn around! Such a nice presentation, especially for a purchase! I didn’t have yarn handy, but I just added, again, one of my fancy Stampin’ Up! tags I already had ready and a stick-on bow! It’s fine!

Then late last night my daughter came out with one of her wrapped gifts. She used some of my retired designer paper taking up space in her bedroom and tied some retired ribbon around it! She was thrilled that it was such a pretty package!

Hope these last-minute ideas help you if you need it! But you probably have had all your packages wrapped since December 1st!

Merry Christmas! Stay warm!

A Gift Idea! Paper Pumpkin!

Paper Pumpkin Kit December 2022 Good Things

If you are not familiar with Paper Pumpkin by Stampin’ Up!, it is a monthly subscription papercrafting kit that comes in the mail to you! Every month you get this cute box with all the supplies you need, including adhesive, to make the project for that month. Mostly the kits are cards, but they can be little treat boxes or a home decor item, a small album, gift card holders, special projects for holidays….almost anything! With the first kit, you receive a special acrylic block on which to mount your stamps that come in a set in the kit. You can always watch a video, plus read the directions to make each project. And if you want to, Paper Pumpkin always gives you alternative ideas for using the materials in the kit.

Paper Pumpkin Kits are good for the new crafter, for a crafter who doesn’t want to buy a lot of supplies, and even an experienced crafter who just wants to sit down and enjoy making a project without coming up with the idea herself! It’s also fun to do with friends, family members, and grandchildren! Anyone!

This is the December Kit which has already been sent out but you can watch this video and see how a kit comes and how a video shows you everything you need to know to make your project.

Order one for yourself as a monthly subscription HERE OR if you are giving it as a gift, go to the Stampin’ Up! Online Store and check under Paper Pumpkin – Prepaid Subscription. You can choose the length of the subscription from one, three, six, or 12-month subscription. You’ll get an email with all the information on how to set up your account, which you could then give to the recipient if you were buying this as a gift. They can set up their account with their information and it’s already paid for!

The next kit must be signed up for by January 10th. It is called “Key to My Heart” and will have a “love” theme to it which you can use for Valentine’s Day or any occasion! It will ship out mid-January and it will show up in the recipient’s mailbox!

So check out Paper Pumpkin as a treat for yourself or a great gift for someone!

Christmas Tree Triangle Box in Neutral

Christmas Tree Triangle Box in Neutral

It’s time to be wrapping packages this close to Christmas! If you need something cute for a small gift or treat, this easy triangle box might be just the thing for you! I’ve made a lot of them and they really are easy. Then you decorate however you like.

These are the basic instructions for how to make a Triangle Box:

  • Cut card stock in half lengthwise:  4 1/4″ x 11″
  • Score at 5 1/2″.
  • Mark the center of the strip on both ends at 2 1/8″ with a pencil mark.
  • Score with the Paper Trimmer at an angle, putting that center pencil mark on the track on the Paper Trimmer while also lining up the middle score line on that track.
  • Score both sides of the paper and both ends of the paper. That will make two triangles, one on each half of the paper.
  • Fold all the score lines and put the box together.
  • At the top point of the box punch holes for the ribbon to go through.
Christmas Tree Triangle Box scored

Somewhere I saw an idea like this: using a neutral color and a white pen to make the triangle box look like a Christmas tree. Of course, I couldn’t find it again, but I’m happy with my own version!

I chose Crumb Cake Cardstock for the neutral-colored tree. Before assembling, I just drew little white lines with a white gel pen to make it look like tree needles, I suppose. To tie the top closed I used a Gold & Vanilla 3/8″ Satin Edged Ribbon.

For the top of the tree, I found a retired star punch and some retired gold glitter paper (you could use Gold Foil Sheets, too). I punched a couple of extra gold stars and decided to use them on the front of the tree. It still needed a little more, so I used the Adhesive Backed Season Sequins in gold to fill in the tree.

Now the triangle box is ready to put a gift or treat inside and then tie up the bow at the top! Try one and see how easy it is! You could emboss the cardstock before assembling it if you like. Decorate one for any occasion!

Christmas tree triangle box

Framed & Festive Painted Christmas Cards

Framed & Festive Painted Christmas Cards

If you are looking for some more fairly easy ideas for Christmas cards, these Framed & Festive Painted Christmas Cards might be the ones. You can make yours even easier by leaving off the diecut greenery and berries. How about just designer paper, a greeting, and some ribbon?

This is the Painted Christmas Designer Series Paper. It was around last year and was carried over this year which I was happy about! I still had some from last year so I was happy to have another chance to use it, and I did use it a lot. I think I only have a little bit of paper left! It is on the Last Chance Sale so you can grab some at a bargain price! I especially loved the two patterns of paper I used on these two cards.

Both greetings are in the Framed & Festive Stamp Set. I loved using these this season. Stampin’ Up! released this stamp set in the Fitting Florets Collection, but this stamp set will not continue on into the Spring Mini Catalog. I loved the font of the greetings and they were ones I would actually use on my Chritsmas cards, either on the card front or maybe inside the card. If you want this stamp set, be sure to get it by January 4th.

The top card has a Garden Green card base. I had to use two patterns of designer paper because I only had this one strip with the evergreens and red berries left, not enough for a full card so I used another pattern for the bottom portion. I used this Real Red Ribbon (retired) to cover up that seam of the two papers, plus for decoration.

The greeting is stamped in Real Red ink and diecut with a one in the Painted Labels Dies. It almost looks like the die is too small for this greeting but it does actually fit.

The second card has a Real Red card base and uses a full front layer of designer paper. I just added a bow to the bottom of the greeting. The greetings are popped up on Stampin’ Dimensionals on both cards.

Now if you have time and energy, use whatever dies or punches you have to cut out some greenery and maybe some Red Glimmer Paper berries! I used the leafy dies in the Christmas Banner Dies and the berry die is in the Organic Beauty Dies. Just stick a few in under the greeting. On the second card, I used that really sparkly paper from the previous Sale-A-Bration! You can’t get any more sparkly than that paper!

It does take a little bit of time to die-cut that greenery and berries so if you are down to the wire (as I am!), just skip that part and make the cards without it!