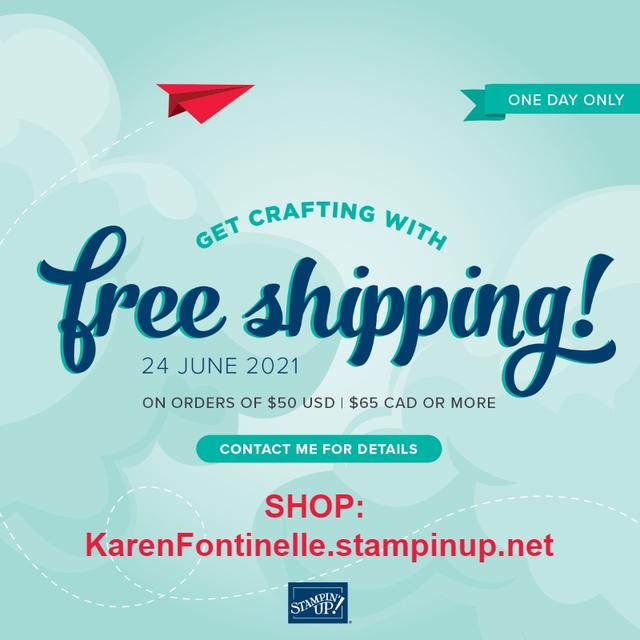
Time to stock up and save on your favorite products from Stampin’ Up!
ONE DAY ONLY, Thursday, June 24th (this Thursday!!) with an order of $50 or more in merchandise, you will get FREE SHIPPING!! This is a rare occurrence so enjoy it while you can!
(If you happen to be using a coupon, that will subtract from your total so you still need to reach $50.)
If you already have all the new products you want in the new Annual Catalog (ha! ha! ha!), maybe you want to stock up on basics like adhesive and cardstock. And get everything you want from the January-June Mini Catalog that is retiring this month!
Get whatever you want, it’s all FREE SHIPPING! But only on Thursday!! All day!! June 24th!! With a $50 or more order!
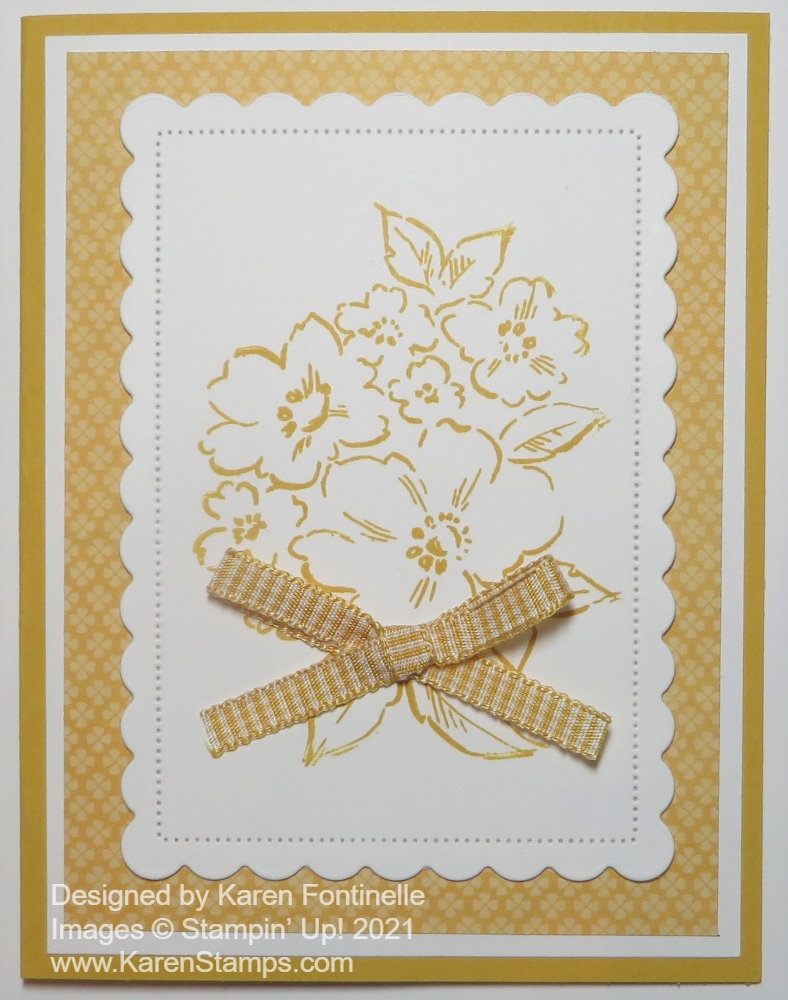
I didn’t have much mojo left when it was time to make a card so I knew I had to come up with something simple, and when you’re in that situation, sometimes a monochromatic card makes it all easy! This Hand-Penned Petals Monochromatic Bumblebee Card was just the perfect card to make after a busy day and evening.
The card base is Bumblebee Cardstock. Have you ever thought about how this color name is the only one that is just one word? Just “Bumblebee”. I looked through some of my designer paper for inspiration even though I was thinking about a monochromatic card. When I saw this Bumblebee-colored designer paper in the Pansy Petals Designer Series Paper, I knew what I was going to do.
I could have had just a layer of the designer paper on the card front, but I thought a bit of white underneath would help it stand out a little. For the front of the card, I stamped the floral bouquet from the Hand-Penned Petals Stamp Set in Bumblebee Ink on Basic White Cardstock, then cut it out with the Scalloped Contours Dies. These are some of the best dies we’ve ever had, in my current opinion! I love them! For an embellishment, I tied a bow out of the Bumblebee 1/4″ Gingham Ribbon. I planned to stamp a greeting on the card, but we don’t ALWAYS have to have a greeting on the front of the card! Sometimes it can just be plain and you can stamp something inside or write a note. Or add a greeting when you are ready to send the card, if you are just making cards for fun, and then decide which greeting would be appropriate.
I also thought about putting some jewel embellishments on the card to look like they matched the yellow of the Bumblebee, but I just said to myself, “Stop!” The card was fine as it was, simple but nice enough, with a small bow for an embellishment, not to mention the very nice scalloped rectangle die complete with the stitched look. It was fine and sometimes you just have to know when to stop!
The days are winding down for the January-June 2021 Mini Catalog so be sure you are looking through the catalog another few times and getting everything you want. Some things carried over to the new Annual Catalog so we don’t have to say goodbye to those products! And some retiring products are reduced in price for the Last Chance Sale so see if you can find any bargains you “need”.
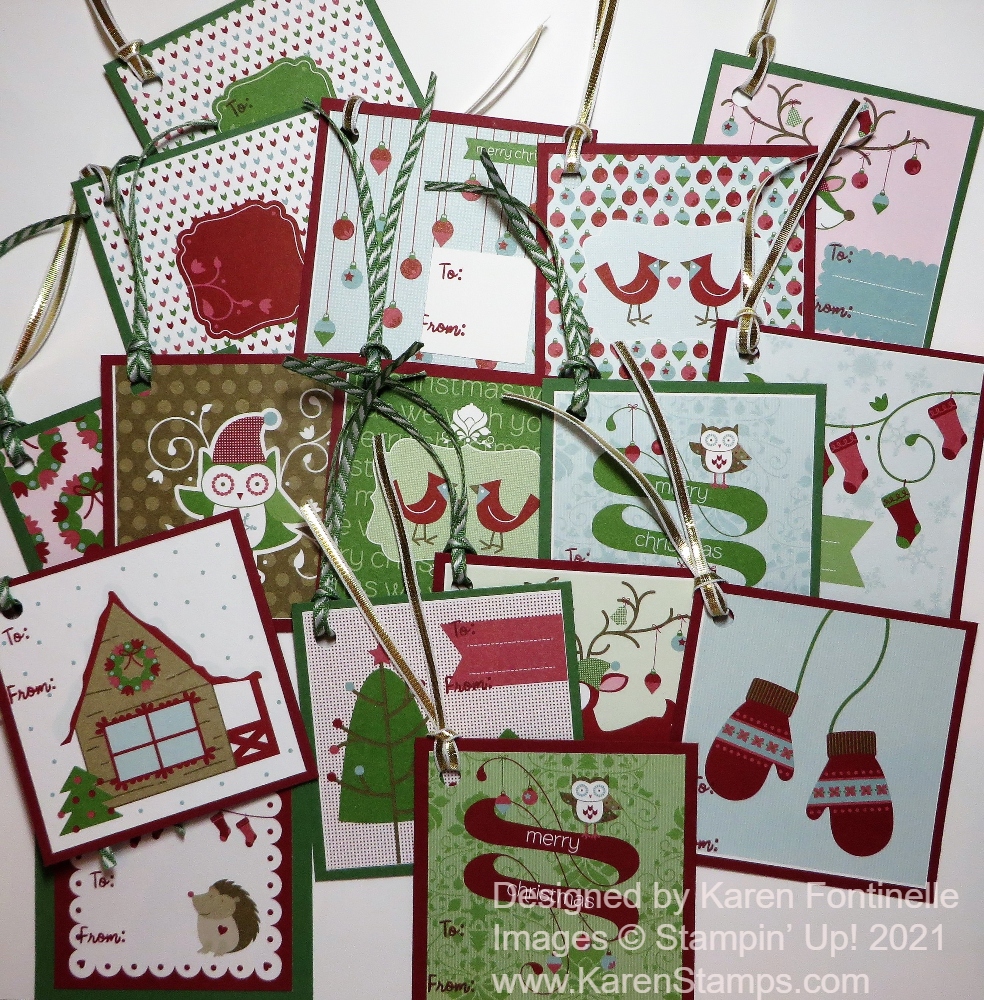
Don’t think you are on the wrong year on my blog! It IS 2021! But this paper is not! I was going through my stash of retired Stampin’ Up! designer series paper recently and came across this single sheet! I’m sure there was another sheet just like this but I don’t know how I used it. I guess I made tags, but I don’t remember. I don’t know the name of this paper or what year it is from. All I know is that when I came across it, instead of sticking it back in the pile, I just thought I should keep it out and actually make some gift tags out of it right away!
Of course, all that really had to be done was cut the squares apart! Then I chose the matching colors of Cherry Cobbler and Garden Green and cut those for the back layer of the tags. The tags mostly don’t have a good place to put the “To:” and “From” so they needed to be layered on cardstock. The opposite side of the paper was a diagonal stripe in Christmas colors so no place to write and the paper needed a cardstock layer anyway.
As it turned out, I found a To & From in the Snowman Season Stamp Set so I used that and mostly stamped somewhere right on the front of the tag. For the tags with no good place to stamp it, I used a retired Square Punch and punched out several white squares and stamped on those, then glued to the back of the tag.
With a hole punch, I punched a hole in the corner of the tag and tied on some retired ribbon to match. That’s all there was to it! They will just be tags for our own gifts so they don’t need to be fancy. And having these on hand just might save a last minute trip to the store for more gift tags at Christmas time!
It is so hot here that I figured having a day of making cute, easy Christmas tags would cool me off! You might like looking through your old designer papers and see what you can find to make on a hot summer day!
When you need a big wish for someone, use the Biggest Wish Stamp Set and make something like this Biggest Wish Hello Card For a Friend. This will be a fun stamp set to play with since there are so many possibilities and something a little bit different.
To make this card, I just did random stamping by hand. I didn’t use the Stamparatus, just hoped I lined things up reasonably straight and in a decent place! This is my first attempt and I made others, but eventually decided this stamped card front was the best of the bunch!
I wanted to add the word “friend” at the bottom but found that stamping it on a tag or label did not fit very well on the card. It could be done but you probably need to start stamping at the very tip-top of the card. Or start stamping a little lower down and don’t stamp near the bottom of the card. I just stamped it at the bottom right on the card front, and it fit just fine there.
I used all the new In Colors on this card. The card base is Polished Pink. I used four of the In Colors on the “Hello” and then used Evening Evergreen for the word “friend”. The extra little tiny stamped images are also in the In Colors. If I had stamped the word “friend” before adding the little “pluses”, I wouldn’t have had to stamp over those! For some extra embellishment, I added some of the 2021-23 In Color Jewels. They sold out for a while but are back in stock now!
Use the Biggest Wish Stamp Set when you want to send a Big Wish! There are big words of Thanks, Birthday, Happy, and Friend plus Hello, of course, and then smaller cursive words the same words plus the little “pluses” images. You will have fun making projects with this stamp set!
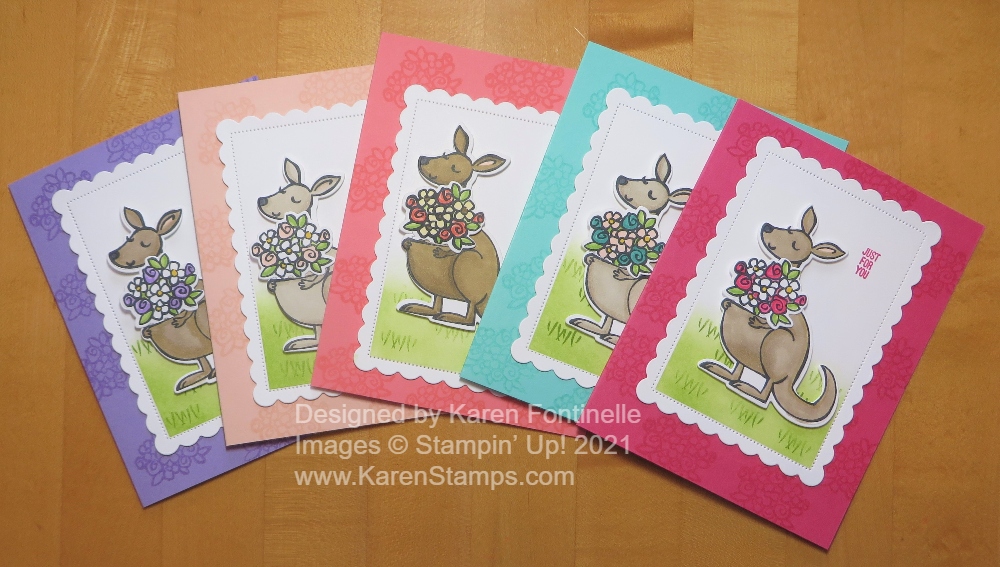
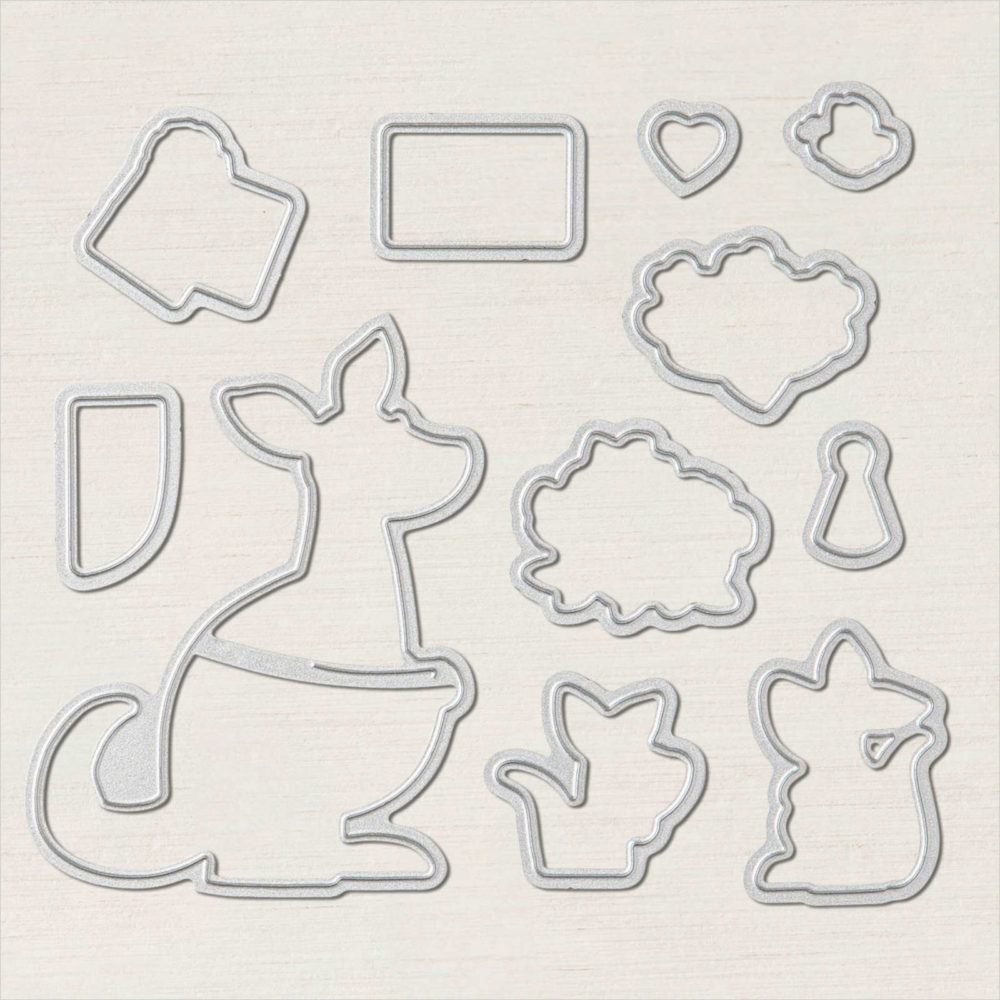
I hate to tempt you with these Kangaroo Just For You Cards because the Kangaroo & Company Stamp Set is sold out. But I loved making these even though I was a little late to the party with ordering the stamp set and dies and even later in using them. I’m sure you have seen plenty of samples of the Kangaroo cards. There are so many cute ideas out there!
If you already have the Kangaroo & Company Stamp Set, but you don’t own the Kangaroo Dies, I would encourage you to order them now! They are on the Last Chance List for the January-June 2021 Mini Catalog and are HALF-PRICE! Sometimes dies are just an extra expense when we want so many things, but for this price, I would get them.
Kangaroo Dies #154334
Just search for “Kangaroo” or else the item number #154334 for them to come up.
Here is another card I made a little while back. This stamp set and dies can be used for birthday cards, baby cards, general “thinking of you” cards, all kinds of fun occasions! As I said, the stamp set seems to be sold out, but if you already have it, you might want to get the dies at half-price.
Sometimes when I make cards, I like to make several at one time while I have all the supplies out and mainly the idea for the design! For this set of cards, I just chose several colors of cardstock and started stamping and die-cutting! If you make cards assembly-line style, stamp all the kangaroos, stamp all the flowers, stamp all the card bases, do all the die-cutting of each thing, etc. it goes pretty fast. You develop sort of a muscle memory while you are doing it! This is especially useful for Christmas cards!
Check out the Last Chance products, some discounted, before the end of June if there are any retiring products you want from the Spring Mini!
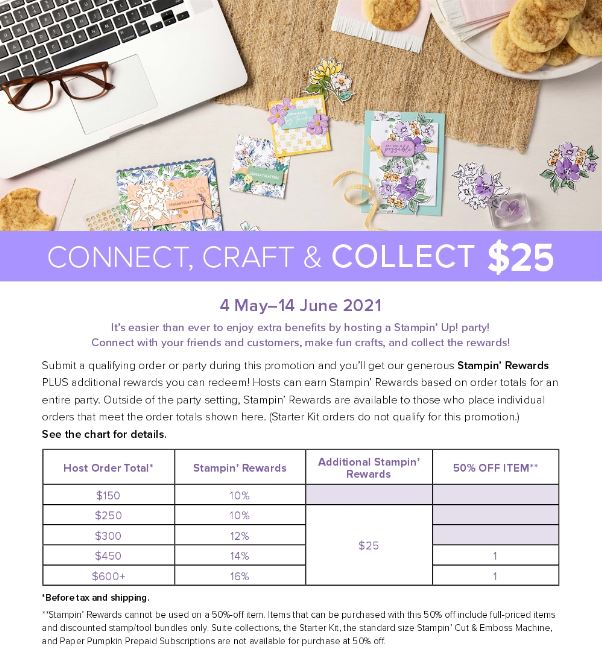
Today, Monday, June 14th, is the LAST DAY to take advantage of an additional $25 in Stampin’ Rewards with a $250 order! You may place your individual order if you want to go in with friends, you can do that.
With the new Stampin’ Up! Annual Catalog out, if you haven’t ordered yet, you just might be able to hit that total! And if you do, you not only earn the usual Stampin’ Rewards of 10% at $250, but you receive an additional $25. That’s free merchandise!
If you are a little bit short, maybe a friend would like to select some ribbon or notecards or some other products to add in. Or think ahead to some gifts you may be needing and see if there is some gift packaging you’d like to pick up or a kit with which to make a group of cards to give someone or our wonderful Paper Snips scissors! Look through the catalog and you will find things you can use as gifts to others! Add a few months of a prepaid Paper Pumpkin subscription for you or someone else! This is when those Prepaid subscriptions come in handy, even if you are already subscribed month to month. You can still purchase a Prepaid subscription and enter the code in your account and use that up before reverting back automatically to your regular monthly subscription.
This special offer ends Monday, June 14th! Start shopping!
One of the products I hate to see retire in the January-June 2021 Mini Catalog is this black and white paper which is so fun to play with! You can leave it as is for a black and white card or you can color in the designs as I did on this True Love Colored Daisies Card. Just do whatever strikes your fancy!
This is the True Love Designer Series Paper on page 11 in the Love You Always Suite. There are large flowers in the designs which are fun to color in with Blends or color in the space around the flowers. This time I came across this paper with these tiny daisies and decided to do something with this.
I thought it would be fun to make the paper colorful, but of course, I didn’t want to color each flower! I got out my Sponge Daubers and some ink pads and just picked up some ink, rubbed the Dauber over several areas of the paper, and then added another color. I used Flirty Flamingo, Daffodil Delight, Gorgeous Grape, and Granny Apple Green. I felt like I should add a touch of green in there for the leaves, not that I could color in the leaves themselves. Gorgeous Grape was too dark unless I rubbed some off on scrap paper before. I ruined my first attempt with dark blobs of purple on my card!
When I was finished coloring the flowers with my Sponge Daubers, I chose a greeting stamped and die-cut with the Messages Die. I almost adhered the greeting to the card without any ribbon as an embellishment. It was pretty enough, the white greeting with black ink on the busy background. But I did add some Whisper White 1/4″ Crinkled Seam Binding Ribbon just for a little something and also adhered a bow I tied with Glue Dots.
Here is another card I made with the larger flowers in the True Love Designer Series Paper, colored with Stampin’ Blends, and then cut out and added to a card. It’s one of my favorites because I love red and I loved the red with the black and white.
Before this paper is gone, be sure to check it out, especially if you like to color! Some of the pages are generic designs like dots or stripes so you can use those as backgrounds on cards or other ways.
The January-June Mini Catalog will end on June 30. Some products are discounted. Last Chance products are only available while supplies last!
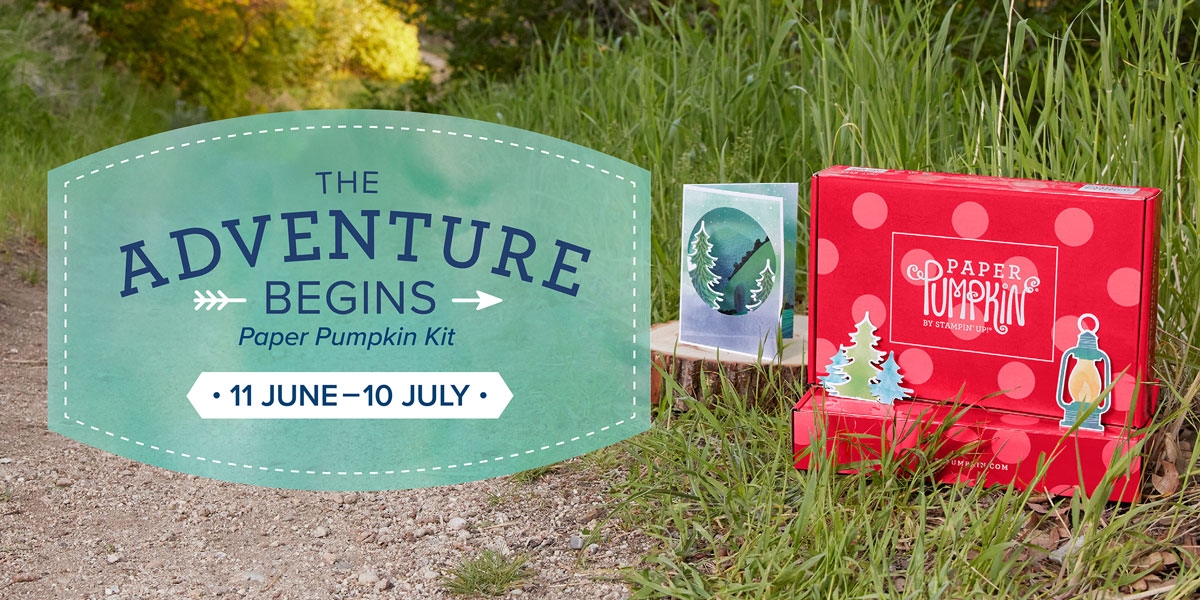
Here it is! A peek at the new July Paper Pumpkin Kit! It looks fun and perfect as we enter summer adventures and travel.
“Life is full of big adventures that are best experienced together! This month’s The Adventure Begins Paper Pumpkin Kit helps you celebrate those exciting new chapters in the most creative of ways with enough supplies to create twelve motivating cards—plus coordinating envelopes—all featuring the exciting colors of nature.
Like the still moments before a great adventure, the kit’s designs contain a quiet energy that hint at all the grand possibilities of what is yet to come. Share this kit with your family and friends about to embark on a new journey and make connections while you explore and discover new levels of your creativity!”
Paper Pumpkin is a themed kit that comes to you in the mail once a month! All supplies you need are included, plus instructions and a website where you can watch a video. All you have to do is open the box and see what is inside! Follow the directions exactly, or if you feel like branching out and creating something different, you can do that too! No risk or obligation because you can subscribe and skip a month if you need to or even cancel if Paper Pumpkin isn’t for you.
If you always want more greetings and sentiments for your cards and projects, you should consider the Many Messages Bundle which is going away when the January-June Mini Catalog ends on June 30. The stamp set and dies aren’t really going away, though. You will find them in the new Stampin’ Up! Annual Catalog on page 42, but they are being sold separately rather than in the Bundle since most Bundles “retire” with a new catalog. If you want to save 10% with both the Many Messages Stamp Set and the Messages Dies, then buy the Bundle now before the Spring Mini Catalog retires.
Also, there is a new stamp set on the order of Many Messages called Many Happenings in the Annual Catalog on the same page 42. If you want to be awash in greetings, get this stamp set, too, along with the Many Messages Bundle before it retires and you will have a complete set with the die and two stamp sets of sentiments!
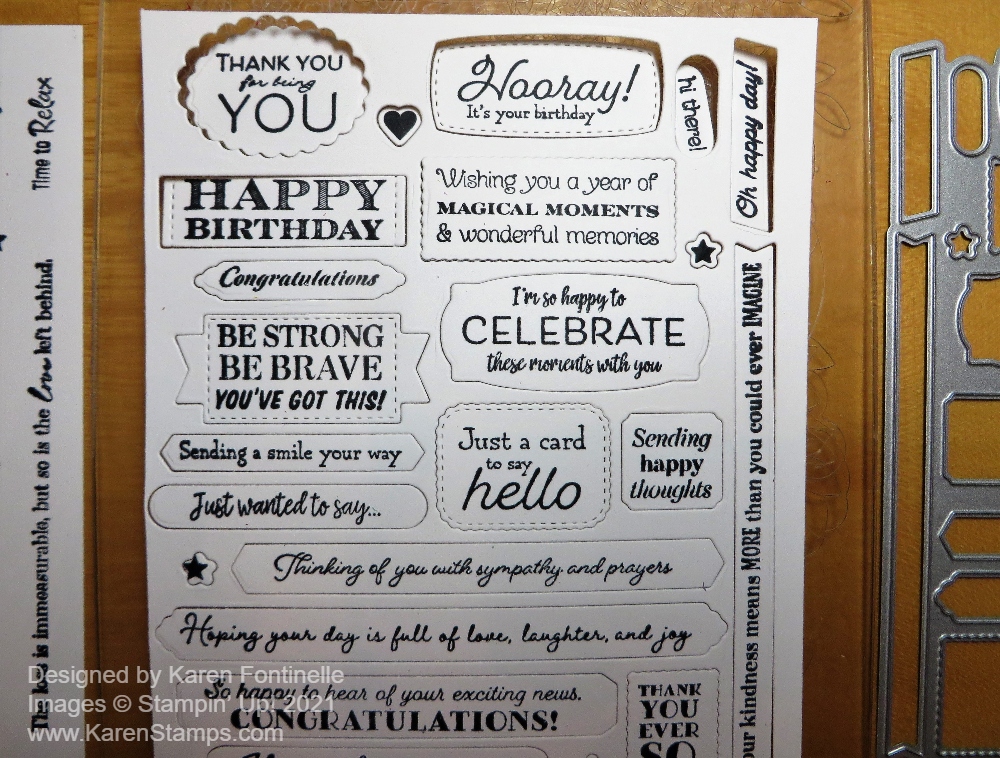
The main idea is that you stamp all these greetings at one time and then die cut them all at one time. Then you can save the greetings in a little bag or box and you can just choose one when you make a card! If you have the Stamparatus, this is a great time to use it with this large stamp. Make sure your ink pad is pretty juicy with ink, ink up your stamp, then use the Stamparatus to stamp your cardstock. You could make quite a collection by stamping these greetings in different colors or on different colors of cardstock and have a ton of greetings ready to go! The beauty of the Stamparatus is that if part of the stamp doesn’t stamp well, you can reink, even just that area, and stamp again with the Stamparatus since the cardstock has remained in the same place. Give a good push each time evenly over the surface to get the best results.
In the photo above, you can see the large stamp with all the greetings, the paper in the Stamparatus that has been stamped, and on the right, the one large Messages Die that will cut out all the greetings at one time with the Stampin’ Cut & Emboss Machine.
On the photo above, you can see how the greetings have been die-cut in different shapes, some with stitching around the edge and some plain. The tiny little stars and hearts on the stamp are to help line up the die on the stamped paper. I found that my very well-used cutting plates that are slightly warped made it difficult to keep the die lined up perfectly, but I keep some rolls of old washi tape by my Stampin’ Cut & Emboss Machine to tape down a die if need be. (You might want to get some of the washi tape stickiness off by sticking it on and off your clothing a couple of times and being careful where you place it so it doesn’t tear the paper if it is too sticky.) But it was pretty easy to line everything up with the stamped words.
Now I am finally ready to have these greetings on hand to make it quicker and easier to use on cards and other projects! I also stamped the Many Happenings set so I have lots to choose from!
Remember, if you buy the Many Messages Bundle now before it retires, you will save 10% and then you can also order the Many Happenings Stamp to use with the Messages Die in the Bundle. If you own the Stamparatus, all the better, and if not, just add one to your order as well!
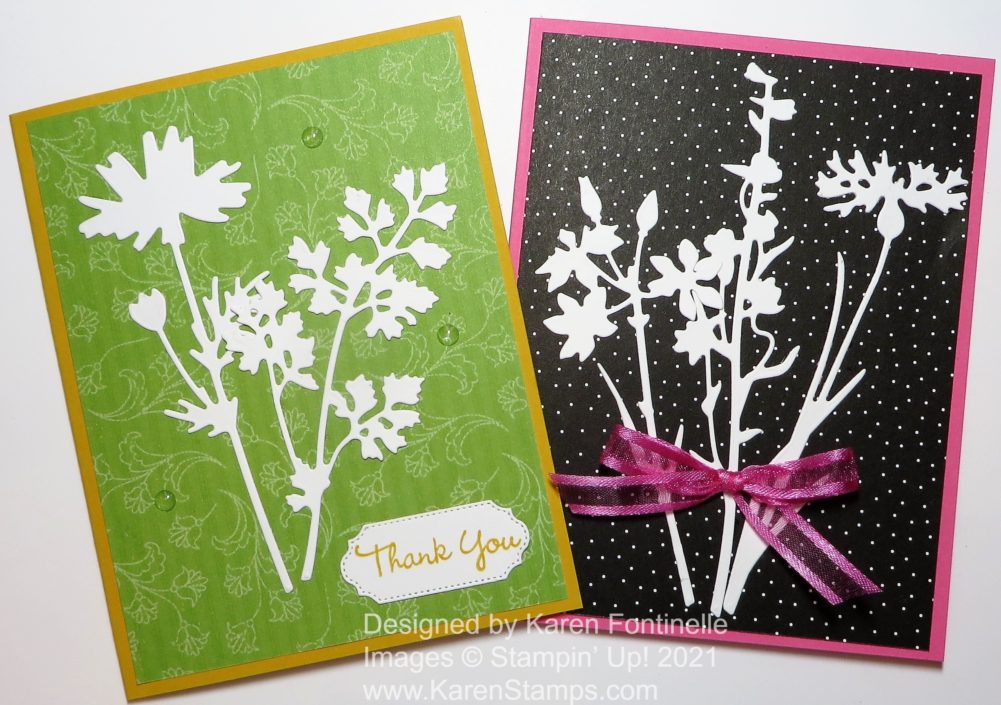
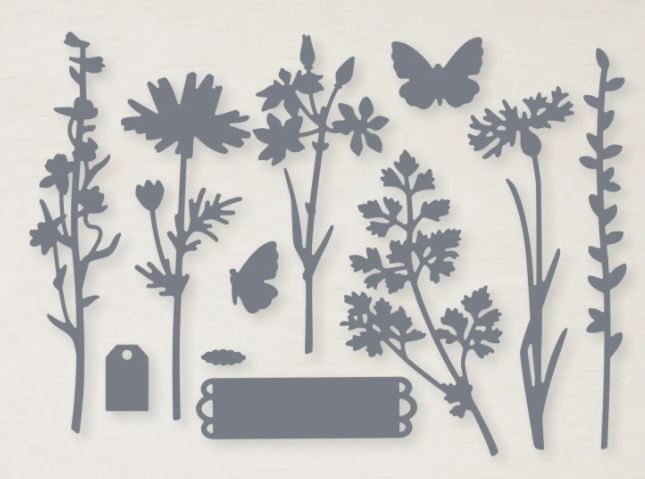
If you want an easy way to make cards that look like you put a lot of effort into, check out the Meadow Dies. The dies look like wildflowers with many different blossoms. You can use them many different ways, and the way I used them on these cards is probaby the easiest way.
These dies come in the Quiet Meadow Bundle, which includes the Quiet Meadow Stamp Set. If you look at both, you will see that while the stamp set is very pretty with very useful sentiments, the dies do not match any of the stamps.
While I should be trying to convince you to buy both, if you have tons of things on your Wish List, you can do what I did and just buy the dies and use them in different ways. But if you think you might ever want the stamp set, you might as well buy them together in the Bundle and save 10%! If you get both, you can stamp on the card and add or overlay one or more of the dies for extra texture and interest.
Both of my cards use the Pattern Party Designer Series Paper, available in the Stampin’ Up! Annual Catalog as a Stampin’ Reward with an order of $150 or more. I simply cut out all the wildflower die cuts out of Basic White Cardstock so I could play with all of them! After trying out several patterns of the designer paper because I needed the white wildflower silhouettes to show up well on the card front, I chose the Granny Apple Green pattern and also the black with tiny white dots pattern, just because I had to many wildflowers to use!
It would be good to remember to use the Adhesive Sheets as you cut out the wildflowers so that they already had adhesive on their skinny stems and leaves. I was able to use teeny tiny dots of Multipurpose Liquid Glue on the backs of the dies to adhere to the card, but this can get messy! Be sure to squeeze out some glue onto scrap paper to make sure you don’t get a big blob on your skinny die cut! These die-cuts would also be pretty popped up on Dimensionals if you could do it without them being on the back of the stems!
On the green card, I just used two die-cuts and added a greeting, die cut from the Ornate Frames Dies. It’s perfect. The greeting is in the Pansy Patch Stamp Set. I used Crushed Curry for the card base, a color I rarely use, but I like it on this card. For some embellishment, I used three of the Clear Epoxy Essentials which I loved because you can see through the clear and see the color underneath.
On the second card, I used Polished Pink for the card base. I used three of the wildflowers and also adhered a Polished Pink Open Weave Ribbon bow to the stems. I didn’t even add a greeting because I liked the card as it was.
I think the way you can use these dies provide a different look to our cards, using these die-cuts as silhouettes. You could also color the die-cuts and I will try that another time! Just remember or notice that the dies do not match the stamp set but you can use them together beautifully.
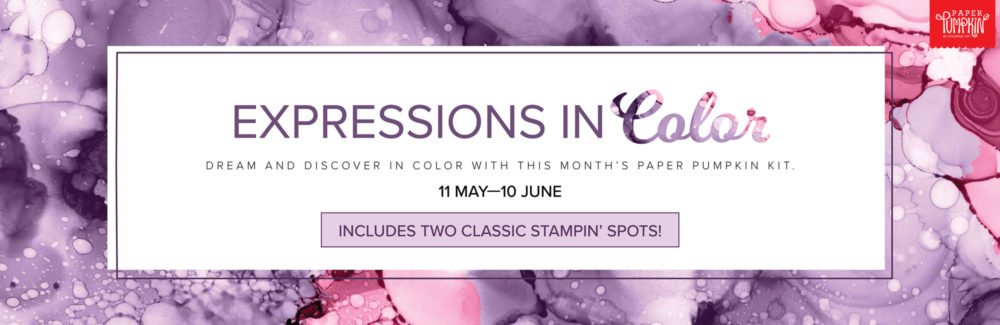
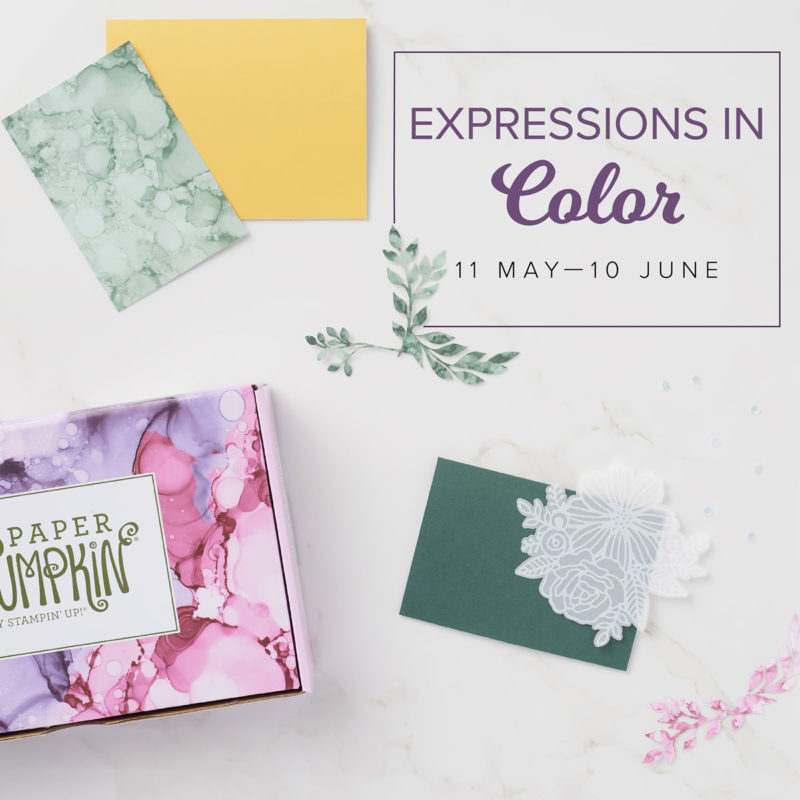
Paper Pumpkin always looks fun, but this upcoming kit for June really got me excited for it! Paper Pumpkin is the monthly papercrafting kit that comes to you in the mail from Stampin’ Up! and this kit for June is extra special! It will introduce you to the new 2021-23 In Color collection, and you’ll also find a familiar shade from the 2020-22 In Color Collection.
The In Color Collections are new colors introduced that are new, fresh, and trendy, but they only stick around for two years! So every year it is important to get the In Colors to add to your ink, marker, and paper collection!
This Paper Pumpkin Kit will have all the supplies you need to make 9 cards, 3 each of 3 designs plus coordinating envelopes! And by coordinating, they mean “not plain white”. You will receive printed card bases, die-cut paper pieces, embellishments, adhesive, and more! The coordinating colors in June are Bumblebee, Evening Evergreen, Fresh Freesia, and Polished Pink.
As always, this month’s kit features an exclusive stamp set. But, this month’s kit also includes not one, but two Classic Stampin’ Spots! (Little ink pads!) And to top it all off, the kit comes in a cute, colorful, and collectible box.
An extra bonus is that this kit coordinates with products from theExpressions in Ink Suite (item #155459) in the new Stampin’ Up! Catalog. You will find this Suite on pages 96-97. It is also featured on the front of the new catalog! This Suite jumped right off the page at me and I absolutely love it!! The designer paper is stunning! That makes the Paper Pumpkin Kit extra exciting! And if you are not ready for the whole Suite yet, you can get a taste with the Paper Pumpkin Kit! At this moment, the Suite is backordered but likely will be available toward the end of June.
Get a taste of the new In Colors as well as coordination with the new Expressions In Ink Suite in the new catalog! Join Paper Pumpkin today and be assured your name is on the list for June’s Paper Pumpkin! OR add a Prepaid Kit or several months to your regular Stampin’ Up! order. Maybe it will help you reach Stampin’ Rewards!
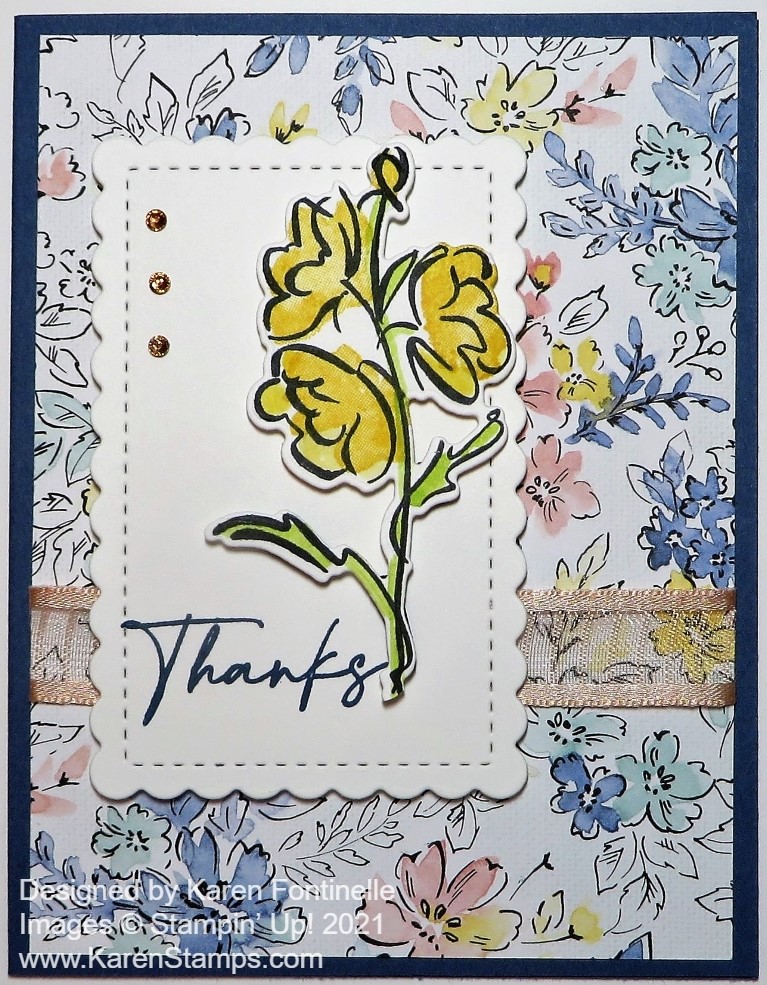
A quick glance in my package of the Hand-Penned Designer Paper led to this Hand-Penned Floral Thank You Card because I loved this floral design and colors. Sometimes you just have to go with what “strikes” you when you are looking at your paper or stamp sets when you get ready to make a card or any project. I was actually hoping the backside of this floral design had some pink generic print because I was planning to use it with the print. However, the other side was a yellow color and I wasn’t in a yellow mood. As you can see, though, I ended up using a yellow flower as the focal point of the card! You never know what you will end up with when you are creating!
You might not be able to tell, but the card base is Misty Moonlight, although it looks darker in this photo. It’s a pretty dark blue but not totally dark. It really went well with this paper, although I thought about pink, too. I used a full layer of the pretty paper in the Hand-Penned Designer Series Paper. I adhered a piece of the Petal Pink 5/8″ Organdy Striped Ribbon around the designer paper. I love this ribbon and I’m so happy it carried over to the new Annual Catalog.
I decided to add this flower from the Color & Contour Stamp Set and then die-cut it with the Scalloped Contours Die. You can save 10% by buying this stamp set and dies in the Color & Contour Bundle. This Bundle, particularly the dies, is one of my favorite and most-used products in the new catalog! Be sure that you check it out! I also die-cut one of the smaller scalloped rectangles to use with my flower.
The flower comes with a stamp that fills in the petals almost like two-step stamping. However, it doesn’t line up exactly so it gives a different look. I actually filled in a little of the white space on the flower petals with the Daffodil Delight Ink and my Water Painter. Or you can color in the whole thing on your own without stamping. I added some Granny Apple Green Ink to the leaves and just drew in a little green along the stem, too.
The greeting is in the Hand-Penned Petals Stamp Set, and I stamped it in Misty Moonlight Ink. Then I adhered the die-cut flower with Stampin’ Dimensionals®. In some cases I had to cut very small pieces of Dimensionals to fit on the narrow spaces of the flower if I wanted support on that area. The whole rectangle is also popped up with Dimensionals. For some bling, I added three Champagne Rhinestone Basic Jewels. I would have liked a bow with that pretty ribbon, but with the busy floral background, I thought it might be too much.
This is a card you could make for a birthday, anniversary, sympathy, thinking of you – lots of occasions. Change up the colors to give a different look to a similar card. Here is another card I made with another pattern of the paper and a larger stamped floral image for the focal point of the card. The Hand-Penned Suite is a beautiful one, I discovered a little later than most people! I also think the Color & Contour Bundle goes well with this Suite as you read above in making this Hand-Penned Floral Thank You Card.
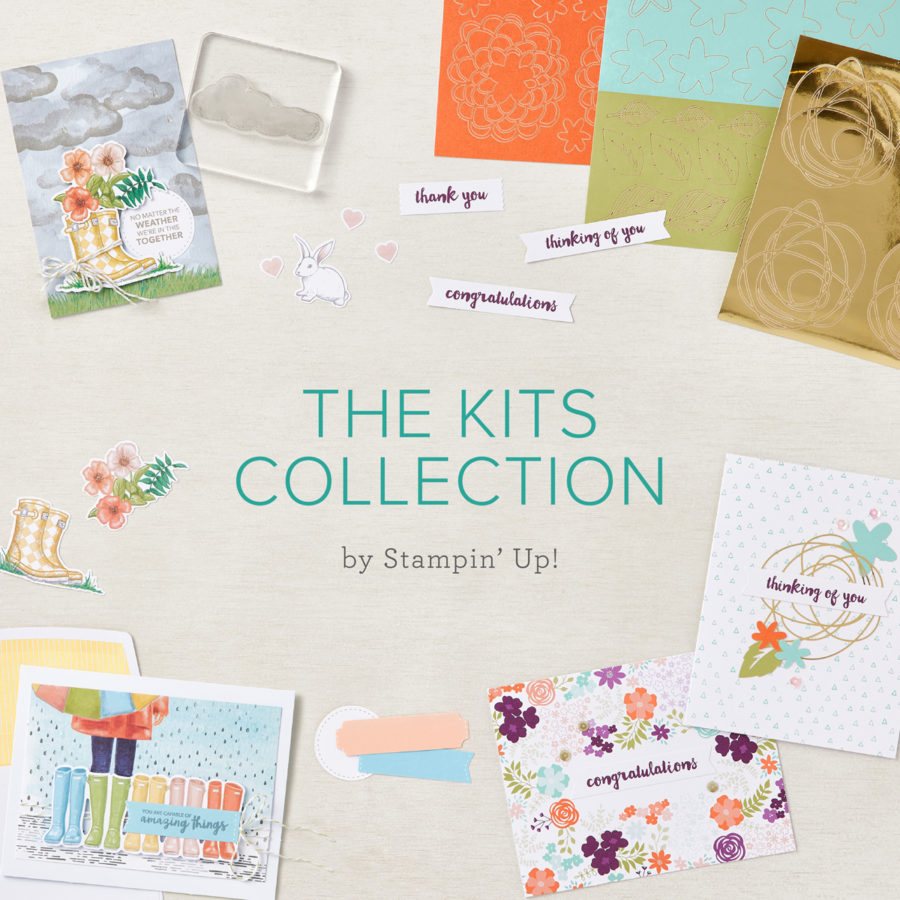
Stampin’ Up! has introduced a new, all-inclusive kit line this month! This is the perfect introduction to papercrafting, the Kits Collection by Stampin’ Up! especially for beginners but really for anyone who loves to stamp and be creative!
With the Kits Collection, you can now go online and choose from a variety of affordably priced, versatile kits for multiple occasions. For events—where everyone will choose and make their own kit—this allows new (and slightly nervous!) papercrafters to be in control and choose the kit experience that is most comfortable for them. If you have friends or family you would like to craft with, have each person choose whichever kit appeals to them, and then you can all get together (in person or online!) and make your individual kits! Everyone doesn’t need to have the same kit!
Each kit will provide step-by-step instructions, giving you an expertly choreographed experience that encourages success and builds creative confidence. Kits are all-inclusive, precut, and ready to use; plus, new kits will be added regularly so be sure to check back often!
Stampin’ Up! designed the Kits Collection by Stampin’ Up! to help encourage creative confidence and reach beginner crafters—even those who insist they aren’t artistic or “crafty”! But as I said, any of us will enjoy sitting down with a kit, no design planning necessary unless you want to, and just make a project that is all in a box, everything you need, and just start crafting.
If you have been a Paper Pumpkin subscriber for quite awhile, you will recognize these kits as past Paper Pumpkin Kits. If you missed one of these kits in the past, this is a chance to get one now! Stampin’ Up! is “starting” this new Kit Collection with past Paper Pumpkin Kits just to get the program going. There will be other new kits in the future.
These kits will be the Online Store and once they are sold out, they are gone. This way we don’t have to worry about backorders if you wanted to get together with others to craft. Just choose another kit if the one you wanted is gone.
Some of the kits don’t even require stamping so those are REALLY great for beginners or non-crafters! They might even discover that they are pretty crafty after all!
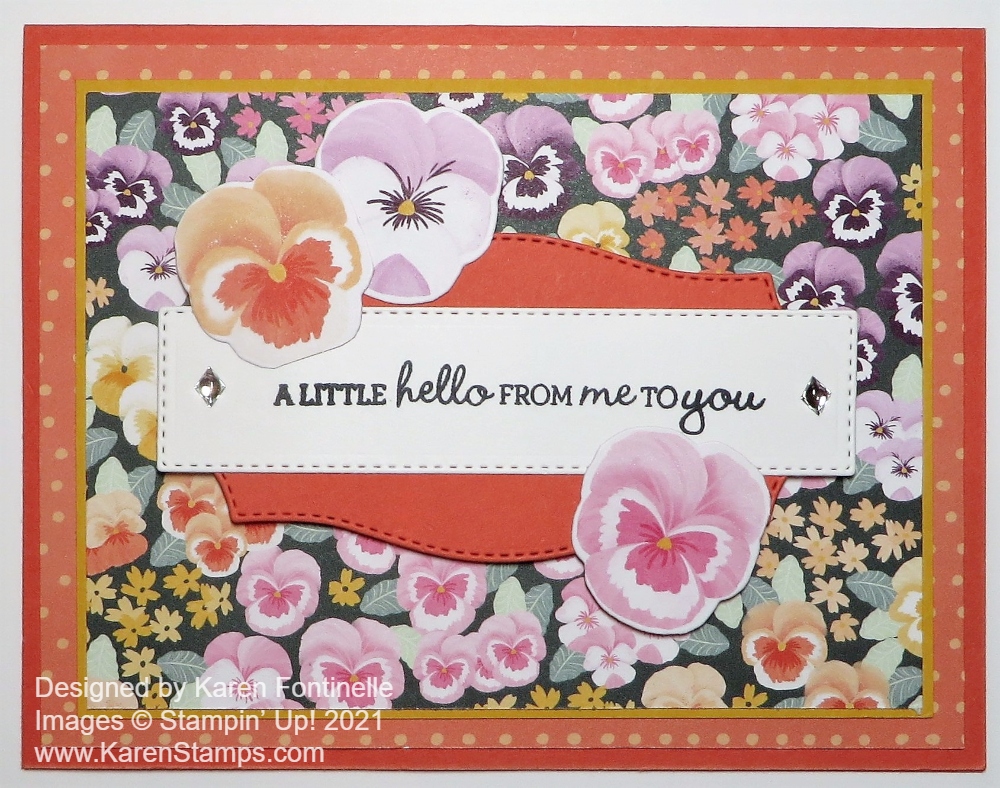
I think this Pansy Petals Floral Hello Card would count as a bright and happy card to send to someone! As I looked through the designer paper, trying to come up with an idea for a card, I couldn’t pass up this design with all the little pansies on it.
For the card base, I ultimately chose Calypso Coral Cardstock, after considering Bumblebee. For a layer, I added the “backside” of one of the pansy designs for the dotted design and then the tiny pansy floral cut even smaller than usual to show off the dotted designer paper. After a little consideration, I added a thin layer of Bumblebee under the pansies. This designer paper is called “Pansy Petals Designer Series Paper” and is in the new Stampin’ Up! Annual Catalog on page 132.
The greeting is in the Pansy Patch Stamp Set. I love a generic greeting like this one to put on a card to use for almost any reason or just to send a note. I cut it out with a die in the Ornate Layers set. I almost missed it because it’s a stitched rectangle, plain, but in the midst of all the fancy, “ornate” dies. Then it is layered across a Calypso Coral die in the ever-useful Tasteful Labels Dies. I popped that up on Stampin’ Dimensionals and then added some die-cut pansies from one of the designer papers that has a matching die. You could easily cut these pansies out by hand because they are small. I put a Dimensional under one side of them so they would be even with the greeting and a bit of adhesive on the other side that would be adhering to the greeting.
For a finishing touch, besides the cutout pansies, I added a Silver Epoxy Essential Embellishment to each end of the greeting. There are also clear ones in the same package so they are very useful for just a little touch of something when you need it!
So here is an easy card, just some layers of cardstock and designer paper, plus a greeting and some embellishments. The Pansy Petals Suite Collection has been a popular one if you want ALL the things with one ordering number or you can purchase items individually like normal. Here is a similar card I made with the same small pansies paper and also gingham for a background. You will make lots of pretty cards and projects with this collection!
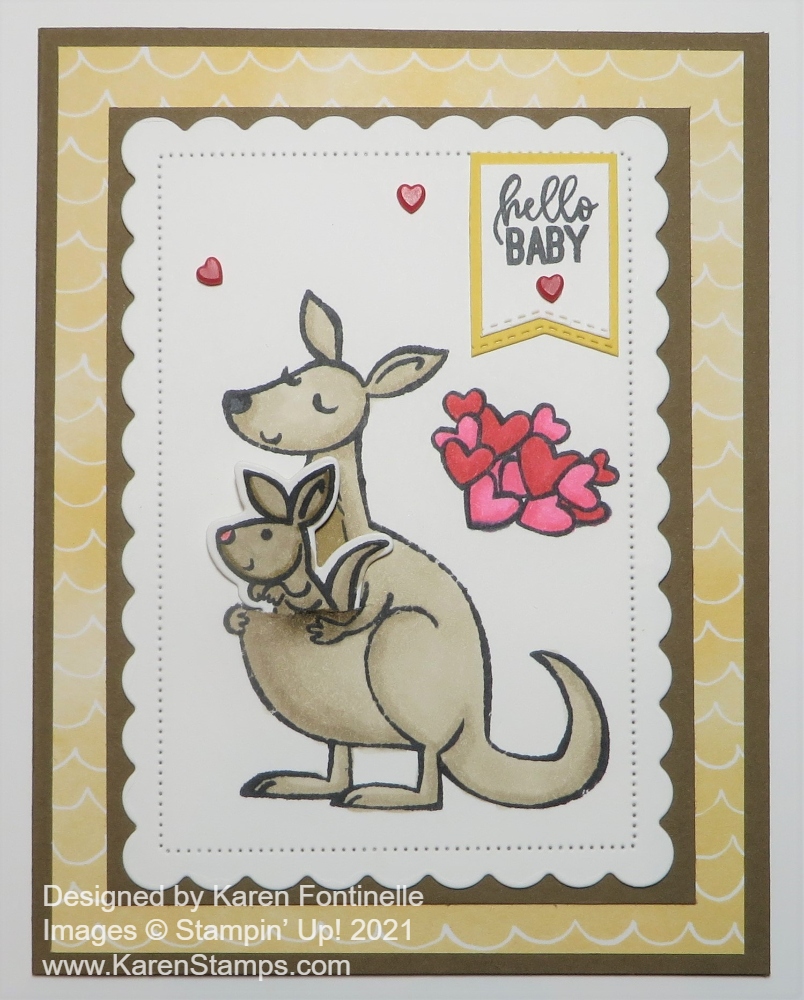
Who doesn’t love the image of a kangaroo and a baby in her pouch as on this Kangaroo & Company Baby Card? Although I’ve had this stamp set and dies for a while and thought it was such a cute set, I hadn’t been using it. If I had waited even longer, I could have gotten the dies on a steal right now on the Last Chance list for the January-June 2021 Mini Catalog! But you can still take advantage of this Bundle. Actually, it is a better deal to NOT buy the Bundle and to buy the stamp set and dies separately because the dies are 50% off, while supplies last!
This card uses the Kangaroo & Company Stamp Set (sold out now) and Kangaroo Dies. The stamp set comes with so many cute little stamps from hearts to packages to flowers, even a party hat. And many greetings to use for all kinds of occasions! So the kangaroo doesn’t have to be just for kids or babies! You can get by with just the stamp set and just do stamping or even cut things out by hand, but at the 50% off price for the dies, I think they are well worth it!
To make this card, I used a Soft Suede Cardstock card base and a layer of Daffodil Delight patterned paper in the Hand-Penned Designer Series Paper. I used one of theScalloped Contour Dies (one of the best dies sets we’ve ever had!) to cut out a Basic White scalloped panel and then stamped the kangaroo on it for the card front. I decided to add a layer of Soft Suede underneath to help it stand out from the designer paper.
A fun thing you can do with this kangaroo, is cut a slit in its pouch in which you can insert on of the stamps in the set, whether the baby kangaroo, flowers, heart, or whatever you want. You could maybe even write a message on the back so the recipient can pull it out of the pouch and read the message or insert it but adhere it with a Glue Dot or even a Stampin’ Dimensional to have it pop up a bit.
I colored the kangaroos with Stampin’ Blend, mostly in Light and Dark Crumb Cake and maybe a little Soft Suede. The group of hearts was stamped and colored in with Real Red and also Flirty Flamingo Stampin’ Blends. You can use whatever colors you like! So many choices!
The “Hello Baby” greeting is stamped and die cut with the die in the Tasteful Labels Dies. I also cut one in Daffodil Delight, then trimmed down the greeting die-cut to fit layered over the yellow die-cut. For some bling, I added some Resin Hearts Embellishments, 50% off now in the Last Chance Sale! For half-price, you can have a package of stick-on hearts to use for many occasions just as a little embellishment. The hearts come in white and red.
You could make this same card and just change the greeting and send it for occasions other than a new baby! The Kangaroo & Company Stamp Set is very versatile, cute and fun to use, so take a look at it in the Spring Mini Catalog before it retires and while they are still available, I would consider the half-price dies as well!