Author Archives: Karen Fontinelle

LAST DAY for Free Shipping at Stampin’ Up!

Stampin' Up! Free Shipping

Today is the LAST DAY for FREE SHIPPING (with a minimum order of $75) at Stampin’ Up! It has been going on for three days but I thought I would remind you one more time today! And in doing that, I reminded myself I have my order in my cart from last night but haven’t pressed the button yet! I wanted to check my cardstock inventory since that will be a price increase in the new Annual Catalog May 6th! Luckily, I am already plenty stocked up!

Don’t miss out! It’s a good time to get what you still wanted from the retiring Annual Catalog and Spring Mini. It’s also a good time to take inventory of your cardstock because there is a price increase in the new catalog.

  • Free shipping is for three days only. Orders must be opened and closed April 23–25.
  • Free shipping automatically applies to your cart after the qualifying amount has been met, which is $75 USD (before tax).
  • Using Stampin’ Rewards will lower your order’s retail amount. Orders must meet the qualifying amount ($75) after Rewards are applied to be eligible for free shipping.
  • The additional cost for expedited shipping is not covered by this promotion.
  • Prepaid 3-, 6-, and 12-month Paper Pumpkin subscriptions and month-to-month subscriptions do not qualify for free shipping. Refills, past kits and add-ons do qualify toward free shipping, but you must be a subscriber to purchase. Subscriptions billed and shipped this month will be charged for the normal amount ($25.00 USD shipping included) + tax.

Don’t forget the Last Chance products and Online Exclusives (including Kits).

This promotion ends tonight, April 25th, at 11:59 pm MT, 12:59 am Central Time 1:59 am Eastern Time, and 10:59 Pacific Time.

Have fun shopping! Check your Cart to make sure the SHIPPING shows $0.00!

SHOP STAMPIN’ UP!

Storybook Moments Best Wishes Card

Storybook Moments Best Wishes Card

This Storybook Moments Best Wishes Card is easy to make with this delightful designer series paper! This card could be made for many different occasions. Even with this greeting it could be for different occasions and situations….marriage, anniversary, new home, new job…whatever you are sending good wishes for!

The card base is Old Olive cardstock. I used a strip of the Timeless Plaid 6″ x 6″ Designer Series Paper along the side. It measures 5 1/4″ x 1 3/4″. This paper is so versatile and the colors great! I didn’t order it at first but I am happy that I finally did on the next order. It is in the Spring Mini Catalog in the Storybook Moments Suite Collection.

The focal point of the card has one of those “panels” as I call them in the Storybook Moments Designer Series Paper. It is a page with these panels that you cut apart and can use them separately on cards or in scrapbooking. Some are frames, some are background prints, some have characters on them. This one had this fancy frame. I cut out the center by hand and layered it over a picture of one of the cottages in the paper to look like this cute little home was framed. Then the panel was layered on a piece of Mossy Meadow cardstock cut at 3 1/4″ x 3 3/4″.

The greeting is in the Greetings For All Ephemera Pack in the Spring Mini Catalog. I sponged around the edges with Old Olive ink to take the bright white off of it a little bit to match the more subtle colors of the cottage. I love using these greetings in the ephemera packs! Makes it so easy! The greeting is popped up on Stampin’ Dimensionals.

The Storybook Moments Designer Series Paper has been so popular! It is expected back in stock the week of May 12 so if you don’t already have it, your chance will be coming up. Check back earlier just in case!

Stampin' Up! Free Shipping

Remember, this is Day Two of FREE SHIPPING at Stampin’ Up! with a minimum order of $75! Plus you will earn Stampin’ Rewards of 10% to use on a future order!

Two Stampin’ Up! Specials Today!

Free Shipping Open Box Confetti Info

Stampin’ Up is offering FREE SHIPPING beginning today, Wednesday, through Friday of this week!! Don’t miss out! It’s a good time to get what you still wanted from the retiring Annual Catalog and Spring Mini. It’s also a good time to take inventory of your cardstock because there is a price increase in the new catalog.

  • Free shipping is for three days only. Orders must be opened and closed April 23–25.
  • Free shipping automatically applies to your cart after the qualifying amount has been met, which is $75 USD (before tax).
  • Using Stampin’ Rewards will lower your order’s retail amount. Orders must meet the qualifying amount ($75) after Rewards are applied to be eligible for free shipping.
  • The additional cost for expedited shipping is not covered by this promotion.
  • Prepaid 3-, 6-, and 12-month Paper Pumpkin subscriptions and month-to-month subscriptions do not qualify for free shipping. Refills, past kits and add-ons do qualify toward free shipping, but you must be a subscriber to purchase. Subscriptions billed and shipped this month will be charged for the normal amount ($25.00 USD shipping included) + tax.

Don’t forget the Last Chance products and Online Exclusives (including Kits) PLUS the Paper Pumpkin sale below:

Paper Pumpkin Sale

If you are an active Paper Pumpkin subscriber (you can join any time!), big savings start today!

Today & Tomorrow, April 23–24, Paper Pumpkin subscribers can save up to 75% OFF on refills, past kits, and add-ons! BONUS! You can also get FREE SHIPPING during the sale (on qualifying orders which would be a minimum order of $75)! This special offer is only available to active subscribers, so subscribe today—but hurry because this sale is only while supplies last!

“Past Kits” are ones that have already been offered, but are the complete kit. “Refills” do not contain the exclusive stamp set and ink spot but you can likely use your own stamps and ink or markers. Often there is not a lot of stamping that needs to be done so you can get away with just the refill. Or make extras with the refill that matches a kit you had already gotten. Add-ons are small dies that were offered to go along with some of the kits for just a little extra something!

Paper Pumpkin is a treat you give yourself when you find that box in your mail once a month! It’s even wrapped like a gift inside complete with colored tissue paper! All the supplies you need are in the kit except maybe for scissors. It’s really relaxing and fun to just open the box and start creating without having to have a lot of supplies (or look for them!) or designing the project. Of course, you can create your own project and alternatives with the supplies if you prefer.

FREE SHIPPING! April 23-25, 2025

Free Shipping Open Box Confetti Info

FREE SHIPPING AT STAMPIN’ UP!

Don’t shop at Stampin’ Up! TODAY! Wait until tomorrow or the next two days after that! Stampin’ Up! is offering FREE SHIPPING April 23 – 25 this week! PERFECT TIME to stock up on some basics before the new catalog (and some price increases) goes LIVE on May 6th. For one thing, cardstock is increasing in price in the new catalog.

And remember, orders of $20 or more will now receive Stampin’ Rewards in your account for a future order (like the new catalog??). Be sure to open an account if you don’t have one and be sure to Opt In to receive rewards. You will get some sort of pop up box or it will be there when you sign in to your account.

  • Free shipping is for three days only. Orders must be opened and closed April 23–25.
  • Free shipping automatically applies to your cart after the qualifying amount has been met, which is $75 USD (before tax).
  • Coupon codes and product credits will lower your order’s retail amount. Orders must meet the qualifying amount to be eligible for free shipping.
  • The additional cost for expedited shipping is not covered by this promotion.
  • Prepaid 3-, 6-, and 12-month Paper Pumpkin subscriptions and month-to-month subscriptions do not qualify for free shipping. Refills, past kits and add-ons do qualify toward free shipping, but you must be a subscriber to purchase. Subscriptions billed and shipped this month will be charged for the normal amount ($25.00 USD shipping included) + tax.

If you have already started an order in your cart, start over on one of the free shipping days or it will not give you free shipping.

Think about some basics you need like cardstock, reinkers, adhesives, Paper Trimmer blades, envelopes, Note cards & Envelopes, twine or whatever you are getting low on!

*ALSO: If you are an active Paper Pumpkin subscriber (you can join any time!), big savings start tomorrow! From April 23–24 Paper Pumpkin subscribers can save up to 75% OFF on refills, past kits, and add-ons! BONUS! You can also get FREE SHIPPING during the sale (on qualifying orders which would be a minimum order of $75)! This special offer is only available to active subscribers, so subscribe today—but hurry because this sale is only while supplies last!

Don’t forget the LAST CHANCE LIST!

The April 2025 Paper Pumpkin Kit Inked Occasions

Paper Pumpkin Kit April 2025 Contents

My April 2025 Paper Pumpkin Kit, Inked Occasions, surprisingly was delivered to me on Saturday before Easter! I guess I hadn’t kept up with the tracking and it must have been delivered in the morning by the “package” mail truck because our regular mail came later in the day or evening (!) as is the usual schedule. I was looking forward to this kit becauses I’ve seen this kind of artwork and thought it was interesting and beautiful. When I opened the Paper Pumpkin box, I gasped out loud because the card bases were so stunning with all the colors and the gold accents! It would be fun to actually create the art you see printed on the cards myself, but on the other hand, just making these Paper Pumpkin cards from the kit was WAY easier and less messy! Sometimes you just want to enjoy “easy” and that’s what Paper Pumpkin provides – Just open the box and make the cards or project. No hunting around for all your supplies or thinking up the design in the first place!

In the photo at the top of the page are the three card bases and the extra diecuts to embellish the cards. All I had to do was fold those card bases in half on the score line and then add the design elements according to the directions. Usually I watch the video that is available for each kit but this time I did not. I just dove right in to this Paper Pumpkin Kit rather than setting it aside and then not getting around to making it pretty promptly. That’s how you end up with a stack of Paper Pumpkin Kits that haven’t been made yet even though you really wanted to make them!

This is a closeup of one of the card base designs and a peek at the gold foil words to place on one of the cards. This coloring is just gorgeous!

Paper Pumpkin Kit April 2025 Card Designs

Here are the other two card bases in the kit. One has the bright colors and the edge of the card on the right side of the photo has the lighter colors in the same style. Once you get the kit in your mailbox, you can do with it what you want! Follow the directions and make the cards as designed. Or strike out on your own and do something different with the supplies! This kit in particular would be easy to cut the card bases in half and use those halves as the layer on another card base from card stock you already have and get twice as many cards! You would need to add your own envelopes of course. And before I forget to mention, the envelopes in this kit have these artistic designs on the corner of the envelope!

And finally, here is the photo of my finished cards! I changed the greetings on some of them to be something I might be more likely to use.

Paper Pumpkin Kit April 2025 Cards Inked Occasions

If you would like to have the fun and excitement of receiving your own Paper Pumpkin Kit in the mail, just subscribe HERE by May 10th to get the May 2025 Kit, Mountain Majesties. It is a card kit with a masculine theme. Perfect for Father’s Day and other occasions. But women like mountain scenery too so I don’t see that it is just “masculine”. It’s just that we often find it a little harder to make cards for men, and things in the craft world in general, so when we find something that really works for men, we tend to call it “masculine”. And once you are a Paper Pumpkin subscriber, you can check out the past kits and refills (refills have all the materials but not the stamp set or ink spot). Any extra kits that Stampin’ Up! has left over will be put online for sale at a certain time after that kit goes out to subscribers.

Check out my blog post HERE telling you about the May Paper Pumpkin Kit!

JOIN PAPER PUMPKIN TODAY!

Old Easter Bunny Joke!

Chocolate Bunny Easter Joke

This old bunny stamp and this old Easter Bunny joke made into a card still makes me laugh! It wasn’t my original idea. I got it from someone else online at least six years ago if not longer! And I still have the stamp! And this card was made long ago, too!

It goes along with the talking point, do you bit off the chocolate bunny’s ears first or his butt? The ears would be the easiest, but if you want to keep the main shape of the bunny I guess you would go for the bottom!

In either case, I hope the Easter Bunny leaves you a BIG chocolate bunny to munch on whichever way you like!

PS: If you need last-minute Easter ideas (cards or treats!) just click on the drop down box under Categories on the right side of my blog, under the Annual Catalog, and choose Easter. You’ll find lots of things that I hope will give you some inspiration!

Storybook Moments Z-Fold Bunnies Card

Storybook Moments Z-Fold Bunnies Card

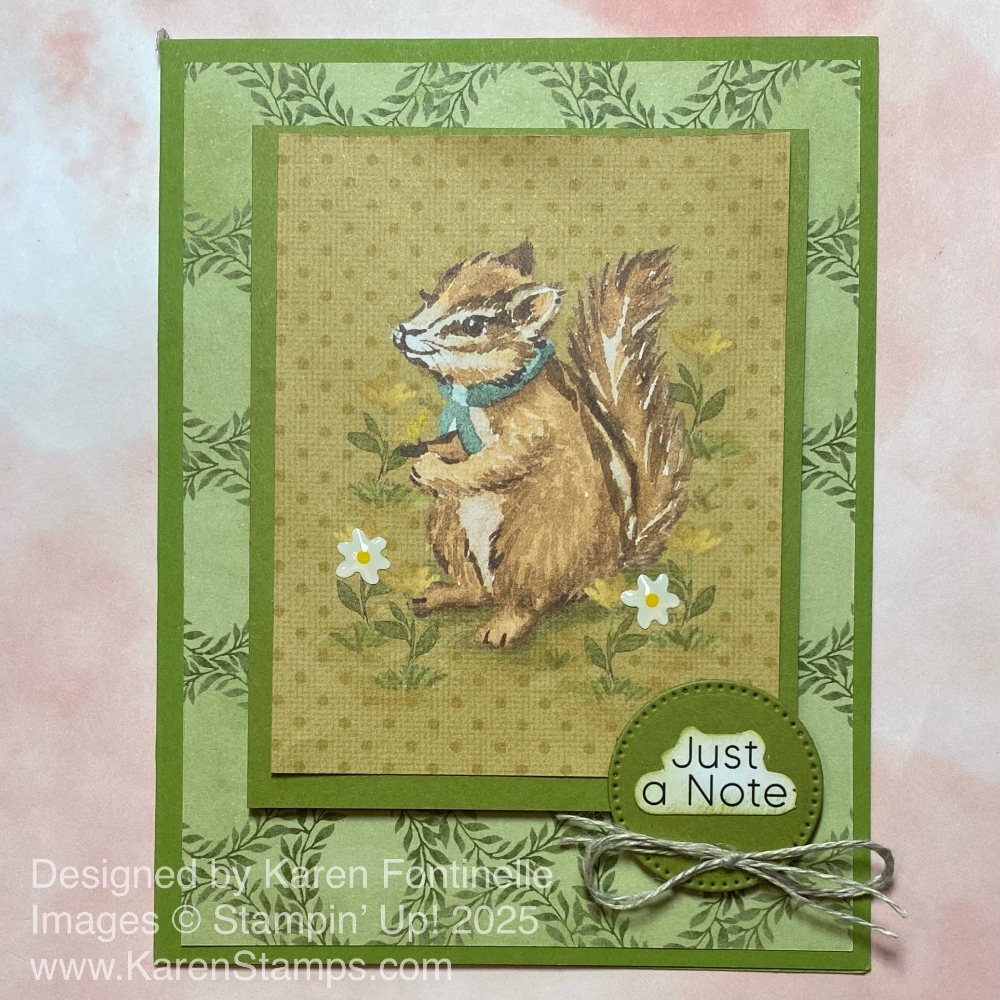
I think this Storybook Moments Z-Fold Bunnies Card turned out so sweet, not because I made it, but because the paper and the bunnies are just irresistible. I didn’t even add a greeting because this was not meant to be an Easter card (although it could be!) and I wasn’t sure for what occasion I would send it or to whom I would send it. And I could have no sentiment and just write a personal message inside.

This is a Z-Fold card which I think always looks special and yet is simple to make. It is just the front of the card folded back on a center score line. The only tricky part is adhering the center panel on the front, centered properly, so that if you have a stamped greeting on the inside, it is completely hidden from the front because of how you place it.

This card starts with a base of Boho Blue cardstock. Cut the usual card size, 8 1/2″ x 5 1/2″. Score at 2 1/8″ and 4 1/4″. Or score the card at 4 1/4″ as usual, then score the card front in half. Half of 4 1/4″ is 2 1/8″. Or just fold the card front in half lining it up with the card fold. Then decorate however you like.

I used the Storybook Moments Specialty Designer Series Paper for this card. I have liked this paper so much I have almost used all of it and that doesn’t usually happen! I just love the patterns with the strawberries and I got to use both on this card! One has a pinkish background and one has blue. My friend said she’d like to have the blue one for wallpaper! That would take a lot of packages of paper!

I adhered a piece of the pink strawberry pattern to the front panel. It is cut at 5 3/8″ x 2″. The main thing to think about is keeping margins the same wherever you place paper on the card. This measurement gave a teeny tiny margin around the edges. If you want the usual margin, then cut the designer paper a little narrower and shorter. But then so that with the inside layer and the strip on the right-hand edge of the card, IF you are doing those. The inside of my card has a Basic White piece cut at 4 1/8″ x 5 3/8″. I played and played trying to decide on the paper design for the edge of the card and finally the blue background strawberry pattern looked perfect.

The Basic White paper on the inside of the card (for a stamped or written message or note) looked too stark white against the other papers so I used a Small Blending Brush (or you could use a sponge) to apply just a very light shade of Crumb Cake ink just around the edges and even a bit in the center. Very light! It’s just enough to match the background of the paper with the bunnies instead of looking so white.

The focal point of the card uses the Storybook Moments DSP pattern with the larger images of bunnies in a variety of poses and actions. I used the largest circle die in the Stylish Shapes Dies because that was the size I needed to get every bit of the bunnies in the die. That left me with nothing larger for the layer. After looking through my dies, I chose the Memorable Blooms Dies (which were on the Last Chance List and now must be discontinued). The octagon shape fit the bunny diecut very well and the Old Olive cardstock helped it stand out from the background.

The strip on the side of the card is 1″ x 5 3/8″, again, matching the same length of the other papers and margins on the card. You can vary this size or not even add it. For a finishing touch, I added a small bow under the bunny piece. I haven’t gone through my ribbons in awhile so this one may be retired as well. It was a Granny Apple Green in a Ribbon Duo Combo Pack. Use whatever you have. Linen Thread would look perfect on this card as well. Another important tip is to only put glue or adhesive on the half of the focal point panel so that it only is sticky on the side going on the Z-Fold and not sticking to the inside of the card!

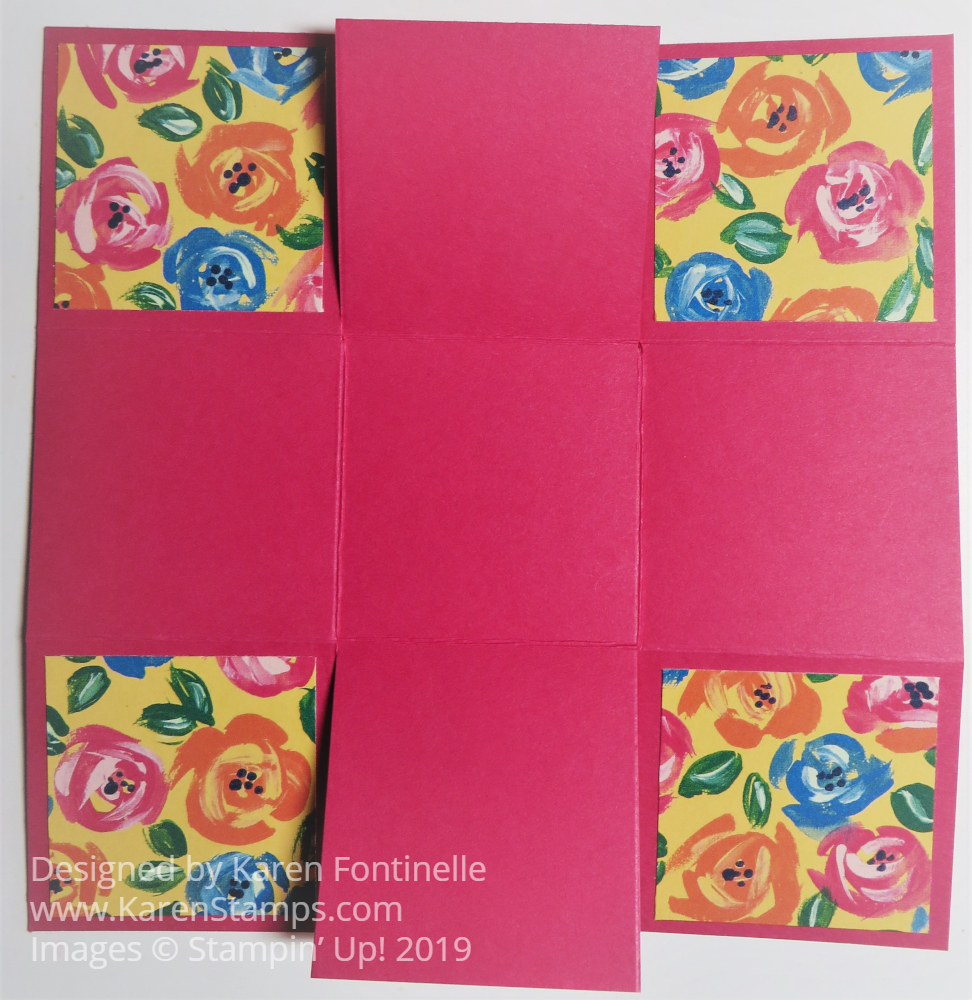
Here is a photo of the card opened up so you can see how the Z-Fold looks.

Storybook Moments Z-Fold Bunnies Card Open

As much as I like to add bling or sparkles, I felt this card was fine without anything else, just the bow!

Don’t forget about the Last Chance List! Some items are discounted but not all and once they are gone from there, they are gone. The Last Chance List of retiring products has now taken the place of the Clearance Rack. If a product in any retiring catalog is carrying over, if you don’t see it in the new catalog it is in the Online Exclusives category in the Online Store!

Also, remember that now you get Stampin’ Rewards in your account to spend on a future order any time you place an order of $20 or more in merchandise! In fact, I noticed that when you view a product in the Online Store, it will tell you what your rewards would be for that product!

SHOP STAMPIN’ UP ONLINE HERE!

See the Stampin’ Rewards Video

Stampin' Up Rewards Banner purple

Yesterday, April 15, Stampin’ Up! gave us a new Stampin’ Rewards program! No longer do we have to accumulate a large order to get rewards or get none. Now, with every order of $20 or more (before shipping and tax, of course), we will earn 10% in Stampin’ Rewards! All you need is an account and to be “opted in”. If you already have an account, all you have to do is sign in and a pop up will direct you through the steps to opt in. It’s easy and will only take a minute. If you do not have an account, just click “Create Account” from the Sign In box and put in your information. If you purchase as a “Guest” or do not “opt in” to receive awards, you will not receive any, although you can always change your mind. The system will keep track of your rewards and you can use them on your next order or any future orders. Use them each time or save them up. You will not use rewards on the order on which you are earning them. They are for future orders.

To earn Stampin’ Rewards through a Paper Pumpkin subscription, you must spend $20.00 USD per order.

  • 3-month Paper Pumpkin subscription = $5.40 USD in Stampin’ Rewards*
  • 6-month Paper Pumpkin subscription = $10.80 USD in Stampin’ Rewards*
  • 12-month Paper Pumpkin subscription = $21.60 USD in Stampin’ Rewards*
  • Any month-to-month Paper Pumpkin subscription with two or more kits per month = $1.80 USD for every kit

Note: Single month-to-month Paper Pumpkin subscriptions with only one kit per month do not qualify for Stampin’ Rewards because the shipping included in the subscription brings the cost below the $20.00 USD threshold for earning rewards. Paper Pumpkin refills, past kits, and add-ons also qualify for rewards as long as the product total meets the threshold.

*Before discounts or coupon codes applied.

I think one thing to remember is that we will earn rewards on the “Retail Amount” in the Shopping cart which must be $20 or more. If you use a $5 reward on that order, which you can do, it will drop the Retail amount to $15 and therefore be less than $20 so you would not earn more rewards on that order. It has worked that way with other Product Credits that we have earned as Demonstrators or maybe on some promotions, customers. For example, if in the past I had a order entered in my Cart for $150 and expected to get Stampin’ Rewards of $15 on that order, but I used $50 in product credits, that dropped the retail amount to $100 so I was no longer eligible for Stampin’ Rewards. So you can’t get rewards on the amount subtracted with your rewards. I think these are the little details that will be confusing at first, but otherwise, the process is clear and straightforward. You will see that in your Shopping Cart.

Watch this video from Sara at Stampin’ Up! and you’ll see how easy it is! Then go sign in to your account, opt in, and be ready for your next order!

Click HERE to see the video at Stampin’ Up! and Learn More about the new Stampin’ Rewards program!

Happy Stampin’ Rewards!!

Storybook Moments Just A Note Card

Storybook Moments Just A Note Card

While Stampin’ Up! is updating the website with the new Stampin’ Rewards program, let’s enjoy another card, the Storybook Moments Just A Note Card, using the adorable Storybook Moments Specialty Designer Series Paper. You could change the greeting on this card for another occasion, even a “Happy Easter” greeting if you need a last minute card! The Storybook Moments paper has two sheets designed with a variety of individual panels that you can cut apart and use separately, unlike normal sheets of designer paper. This chipmunk was one of those panels, as I call them, so I just cut it apart from the rest of the paper and mounted it on this card! Couldn’t be easier!

This card has an Old Olive cardstock base. The background paper is actually the “other side” of the paper with the separate panels. The other side of this chipmunk image is the background foliage pattern you see on the card. To help the chipmunk stand out better against the background, I layered him on a piece of Old Olive and popped that up with Stampin’ Dimensionals. The chipmunk picture is 3″ x 3 3/4″ so the Old Olive layer is 3 1/4″ x 4″.

The greeting is in the Greetings For All Ephemera Pack in the Spring Mini Catalog on page 13. To keep it small, I cut around the words. I also sponged a little bit of Old Olive ink around the edges to take off just a bit of the “whiteness” of the ephemera paper since the rest of the card didn’t have any bright white. The greeting is layered on a small circle, diecut with the Stylish Shapes Dies. It has one Stampin’ Dimensional underneath the area that doesn’t layer on top of the already popped up chipmuch picture. You can put a bit of regular glue under the part that is flat on the chipmunk. I also tied a bow with a double strand of Linen Thread and adhered that to the greeting with a Mini Glue Dot. If you don’t own any Linen Thread, you should definitely get some because it is perfect to use when you just need a little something or don’t have the right color ribbon or twine. I have used it a lot through the years!

I still had a few of the retired Adhesive-Backed Hearts & Flowers, so I added a couple of the little white flowers on the green flower stems around the chipmunk. I think they look cute there!

That’s all there is to making this card! The characters on this Storybook Moments Designer Paper are so sweet and adorable! You can’t get enough of them and I have made lots of cards and treats with this paper. It’s not just for Easter, either. It is perfect for baby cards, scrapbook pages, and other projects, plus just any cards or scrapbook pages you want to make!

Remember, the Stampin’ Up! website should be down today for about six hours, but once it goes back up, the new Rewards system will be in place and you can start earning Stampin’ Rewards on any order over $20! Everyone will earn 10% in rewards on every order of $20 or more; no more accumulating an order of $150 so you can get $15 in free product. Now you can spend your reward on your NEXT order or save them up from several orders to add to a large order. The reward will expire one year from when it was issued and the system will know which ones are the oldest to take off your order first. I think this is a good thing for all customers. I know some stores offer “store cash” with purchases that you can spend the next time you shop, so this is modeled somewhat after that. If you have questions, just ask.

The only thing customers need to do is 1.) Have a Stampin’ Up! account, and 2.) Opt in to the Rewards program. There will be an Opt In box that pops up that will look like this:

Stampin' Rewards Opt In Box

If you don’t opt in, that’s fine, but you will not earn rewards although you can always sign up in the future. Demonstrators will no longer be able to take your order and use your credit card number for your order due to new banking and privacy laws. However, if you cannot put in your own online order, you can pay your Demonstrator directly (like with cash, Paypal, check, etc.). I think once we all figure it out the first time it will be fine and a benefit for every customer!

You should be able to order later today when the website is back up and running with the new Stampin’ Rewards program!

SHOP STAMPIN’ UP! HERE!

New Stampin’ Rewards Program Begins April 15th!

New Stampin' Rewards Program Banner

Tomorrow is the big day at Stampin’ Up! and for YOU! They are finalizing website changes they have been working on and part of that is putting in place the NEW Stampin’ Rewards Program. The main thing to know about the new rewards program is that every order over $20 will receive 10% in Stampin’ Rewards. You no longer have to have an order of $150 to receive rewards. This used to be more about a Hostess having a gathering and she would get the rewards for the total amount of the orders from her guests. Or if you were ordering by yourself, if your order was $149 you would not receive any rewards. Now every time you place an order of $20 or more, you will receive 10% in Stampin’ Rewards in your account. The NEXT time you order, within a year, you can apply those rewards to your order.

The only “catch” is that you have to have an account and you have to “Opt In”. Next time you log in to your account, you will see a pop up asking you to Opt In. Go ahead and do that because who doesn’t want rewards?! Obviously, you don’t have to opt in if you don’t want to and don’t want to receive rewards. These rewards will be automatically added to your account each time and you’ll be able to see them. You can save them up or use them on each order. Just use before the expiration date which I believe will be one year.

The website will be down tomorrow morning for about six hours while they transition.

More details later, just wanted to get you prepared! I think this program will be better for everyone!

Shopping Cart & Bags

Three Fun Little Easter Baskets To Make

Three Easy Paper Easter Baskets

If you are looking for some easy and fun Easter baskets to make, here are Three Fun Little Easter Baskets To Make to help you get started! You can copy these exactly or make the basic basket and then choose how you are going to decorate it. These baskets are from five years ago apparently but they have been very popular through the years! I have made newer ones in recent years, including this year, but these just seem classic. Use whatever colors you like, use cardstock or designer series paper, decorate with stamping or punch art, whatever your creative mind comes up with!

Gingham Basket Pattern

This is some Gingham Gala 6″ x 6″ Designer Series Paper (retired) that I used back then. Since it was already 6″ x 6″ in size, it was perfect. Score at 2″ and 4″ on one side, then turn the paper and score at 2″ and 4″ so you have that tic-tac-toe pattern as I like to call it. All three baskets are made this way. Cut up on the two vertical score lines up to the horizontal score line. Do the same on the opposite side. If you like, you can round off the corners as I did on this basket if you have a punch that can do that. But it is fine if you don’t. Cut a matching handle of about 8 1/2″ x 1/2″.

Fold the paper into a basket and use brads or glue to hold the sides and handle together. The handle goes in between the two side flaps and the center flap. That hides it a little bit on the inside.

Easy Paper Easter Basket With Bunny

This gingham basket is decorated with a little punch art bunny face! So cute! I made the bunny face with a circle die and two oval dies. You could use punches. If you don’t have any ovals, you might have a leaf die or punch that would work or just cut something out by hand. I used the tip end of Stampin’ Blends markers to draw on the parts of his face and the little “stitching” around the sides of the face and ears. Adhere to the side of the basket with Stampin’ Dimensionals.

Easy Paper Easter Basket with DSP

This basket is made with Melon Mambo cardstock, scored and cut the same way as the basket above. The paper is the retired Garden Impressions 6″ x 6″ Designer Series Paper (retired). Each section of the Melon Mambo basket is 2″ x 2″ so you can cut the designer paper just a “smidge” less than 2″ on each side or 1 3/4″ x 1 3/4″ if you want a little bit of margin showing.

Easy Paper Easter Basket with Daisy

Just fold the sides of the basket together, adhere with brads or glue, adding in the handle as well. Then decorate with a flower such as with the Daisy Punch or whatever you have and add a gem to the center.

Easy Paper Easter Basket Stamped

This last basket is pretty enough with some floral stamping on the cardstock! It is Pool Party cardstock stamped with flowers in the Painted Glass Stamp Set (retired) with Pool Party ink. Just add a pretty ribbon like this Variegated Petal Pink and White ribbon.

Fill the baskets with Easter grass or paper shred and some Easter candy treats! These would be cute as a little favor at each place setting at your Easter table. Or make one for yourself for a decoration in your home! Complete with chocolate candy, of course!

New Paper Pumpkin May 2025 Kit Mountain Majesties

Paper Pumpkin May 2025 Mountain Majesties Banner

Here is the new Paper Pumpkin Kit for May, the Mountain Majesties Paper Pumpkin Kit! You will find it in your mailbox the middle of next month if you subscribe by May 10th! This is a card kit with a masculine theme so it will be perfect for making Father’s Day cards, birthday cards for dads, uncles, sons, grandfathers, anyone!

Create Father’s Day cards with layered mountain landscapes!
• Makes 9 cards: 3 each of 3 designs with 9 coordinating envelopes
• Precut vellum and paper pieces
• Watercolor card bases and coordinating envelopes
• Coordinating colors: Basic Black, Lost Lagoon, Misty Moonlight, (Classic Stampin’ Spot), Mossy Meadow, Pecan Pie, Petal Pink

Includes vellum pieces for layering and sentiments tailored to men!

What's in the Paper Pumpkin Box
Images © Stampin’ Up! 2025

Easy Chocolate Easter Bunny Treat

Easy Chocolate Easter Bunny Treat

Here is an Easy Chocolate Easter Bunny Treat that you can easily make for a little favor or treat for Easter. All you have to do is buy some chocolate bunnies! They are required for Easter, aren’t they? I’ve made these little treats through the years and you can vary the size according to the size of your chocolate bunny or whatever you are putting inside.

If you have a bigger treat, just make the treat holder taller or wider and possibly increase the size of the base if you need to to make the treat fit inside. You don’t even have to cut a window in the front if you want to decorate the front and hide the treat a bit. But my preference is making a cute opening so you can see the treat inside as if it is in its little home!

For this particular one, since I had just a small chocolate bunny, I cut a strip of Pool Party cardstock at 2″ x 8 1/2″. I could have made it a little bit shorter or probably wider would have been better for wider sides to be a little sturdier. After cutting the 2″ wide strip, score at 3 3/4″ from each end. That gives you the middle section which will become the flat base of the treat holder and you will put the treat on that center base. You should be careful with adhesive and candy, but I did put a little Stampin’ Seal on the bottom of the treat holder to hold the bunny in place.

For the opening, I used one of the rectangle dies in the Nested Essentials Dies. Position it on what will be the front side of the treat holder and exactly where you want it to be. If you are decorating your treat holder with designer paper, then adhere that to the front first before you diecut. After you have the front opening cut out, fold and crease the two score lines and punch two holes for ribbon at the top, unless you are going to use some other closure. Decide if you want another color or stamping on the inside background behind the candy and adhere that to the inside before adding the candy.

Decorate the front however you like, with stamping, DSP, embellishments, a greeting, whatever you like. I used a few diecuts in the Celebrate Love Ephemera Pack. See! It wasn’t just for Valentine’s Day! I even glued a stem of flowers to the inside. Oh, and I put some Lemon Lime Twist grass at the bottom. When I used to make these I used the Scalloped Tag Topper Punch I think it was named to make the top edges fancy. But rather than look for a punch, I just clipped the two corners off to give it a little something. Then I tied it together with some silver trim I had handy.

As you can see, you can make one of these little Easter decorations pretty quickly and easily and they will give your guests a smile on their face to receive one! Plus one by each dinner plate at your table for a little favor and to decorate the table! Or put one in an Easter basket!

Here is a side view of the treat holder.

Easy Chocolate Easter Bunny Treat Side

Just play with this idea and see what cute things you come up with!

New Kits in the Kits Collection!

Kits Collection New Kits Banner Apr 2025

Last week Stampin’ Up! released THREE new Kits in the Kits Collection! In my opinion, one Kit is especially noteworthy for Spring! It’s the Paper Bouquet Kit that will take your breath away just to see the photo! The other two kits are for cards and are very pretty also, as always! These kits in the Kits Collection are available in the Online Store. They are not subscriptions and not to be confused with the Paper Pumpkin monthly subscription. You can buy these kits whenever they are available, putting them on your order as usual. Kits are perfect for anyone – new crafters, crafters who don’t have a stash of supplies, and avid crafters who are experienced but who like to just open a box and make a project! Everything you need for the project is included in the box except for maybe scissors! Try one and enjoy!

Paper Bouquet Kit

This is the Paper Bouquet Kit. Wouldn’t you just love to have those flowers in a vase sitting on your table without having to water them or watch them wilt and die? The Kit will make 23 flowers and 11 leaves in all of the new In Colors! You get the precut pieces, floral wire, and pony beads. Hot glue gun required for assembly but not included. Vase not included.

Paper Bouquet Kit Contents
Essential Occasions Card Kit

The Essential Occasions Kit is a card kit. It makes 6 cards, one of each design. The sentiments cover many different occasions you might need a card for, like birthday, well-wishes, or thank you. In the kit you get precut pieces to make the cards, envelopes, and adhesive.

Essential Occasions Kit Contents

Loveliest Wishes Card Kit

This is the Loveliest Wishes Kit! The light colors make it a little difficult to see in the photos but I think you can tell how pretty the cards will be. This kit makes 9 cards, 3 each of 3 designs with precut images and gold foil sentiments for birthdays! The kit colors are Petal Pink, Soft Sea Foam, and white. The envelopes are printed and you also get embellishments with the other supplies.

Loveliest Wishes Card Kit Contents

I can’t tell you yet about assembling the Paper Bouquet Kit, but I would say these two card kits look very easy, great for beginners. Relaxing for experienced stampers and crafters! Order a couple of kits and make them with friends or family for an extra dose of fun! Just follow the directions adhering the pieces to the cards and you’ll have a new, beautiful collection of cards at the ready for many occasions!

SHOP THE STAMPIN’ UP! KITS COLLECTION!