This Over the Moon For You Whimsical Cow Card is a fun one to make with this stamp set! If you like cows, or even if you think you don’t, this Over the Moon Stamp Set will win over your heart! I didn’t pay any attention to it at first and then I thought it might be kind of fun and it is.
You’ll be able to make many kinds of cards with this stamp set. You could even use it for Valentine’s Day or anniversary…..who knows, maybe even for a wedding!
This card is on a base of Whisper White Cardstock, layered with Crushed Curry, although you could also use Daffodil Delight. The front of the card is made with a layer of Night of Navy with a strip of green from the Perennial Essence Designer Series Paper for the grass. The moon is stamped on Crushed Curry and just cut out. The cow is stamped with Memento Ink and colored with Stampin’ Blends markers as is the “thought bubble” with the heart. The cow and bubble are both popped up on Stampin’ Dimensionals. The greeting is also in the stamp set and I just cut a little banner end on one side. I also used the retired stars that I had from last year. If you didn’t have these you could probably use some sequins or something to represent stars or find something in your stash! There’s always something!
While you are waiting for Holiday Catalog time, check out these cute cows in the Over the Moon Stamp Set in the Stampin’ Up! Catalog!
Surprisingly, it is already the end of July and in two days it will be the end of Stampin’ Up! Bonus Coupons. With every $50 you spend in July, you earn a $5 coupon to spend in August! (Kind of like Sale-A-Bration except you get a coupon to spend with every $50 instead of a stamp set!) If you have ordered in July, please check and make sure you received your email from Stampin’ Up! with your coupon codes. You will need these in August.
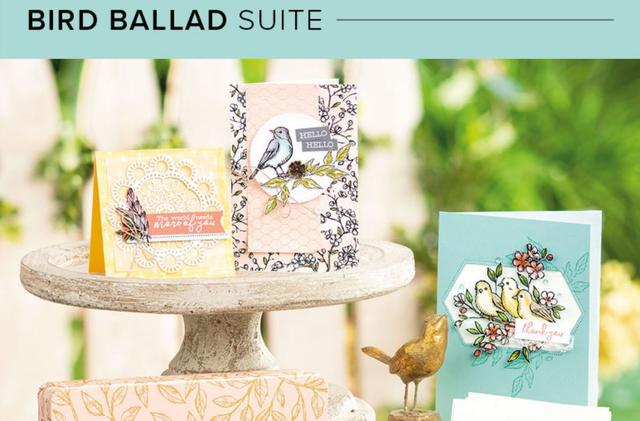
Love the Bird Ballad Suite, especially the Free As a Bird Stamp Set and the Bird Ballad Designer Series Paper! The Scalloped Lace Trim is also beautiful for an embellishment.
Images copyright Stampin’ Up! 2019
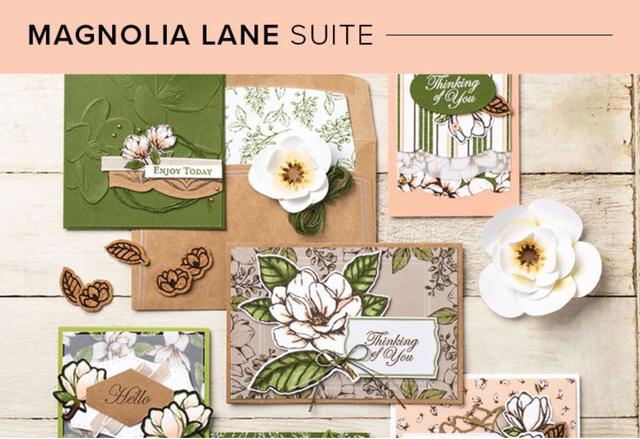
The Magnolia Lane Suite you have probably seen all over the place because of its popularity. The Good Morning Magnolia Stamp Set with the large flower stamp and coordinating dies, plus the gorgeous Magnolia Lane Designer Series Paper. You can even use the Hot Air Balloon Punch to make a large flower resembling a magnolia!
Images copyright Stampin’ Up! 2019
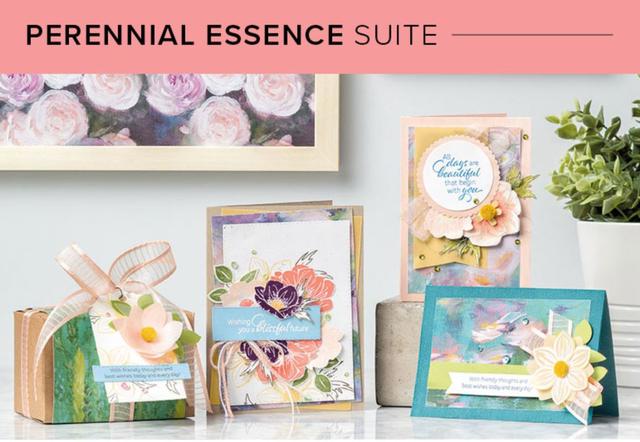
The Perennial Essence Suite is so pretty and somewhat different from other designs we have had. The Perennial Essence Designer Series Paper is the real star and for an embellishment, the Petal Pink Organdy Striped Ribbon is one of the prettiest ribbons we have had.
Of course, I also like most of the other Suites, if not all, but even Demonstrators can’t have everything! I posted the Suites so that you can see all the coordinating products, and they include the Bundle pricing of saving 10% on the particular Bundle.
The Recruiting Promo continues on through August if you are interested in becoming a Stampin’ Up! Demonstrator! Ask me if you have questions!
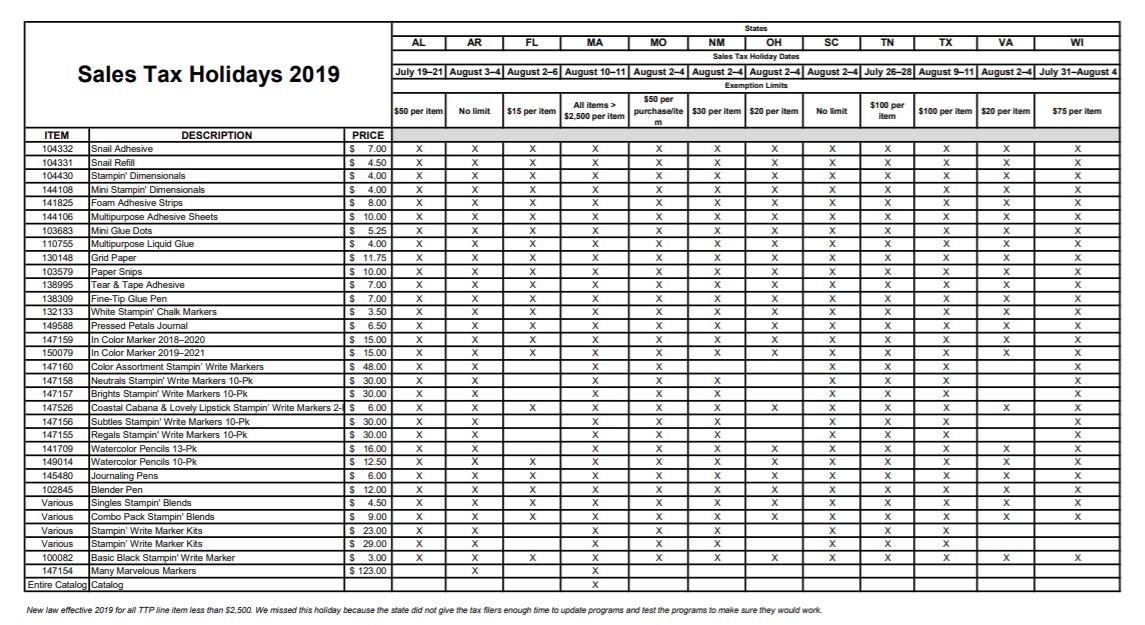
Also, remember Sales Tax Holidays in certain states to save a little bit of money on certain products. Check for your state and dates.
Go check your catalog today and see if you want to order in July in order to earn the Bonus Coupons!
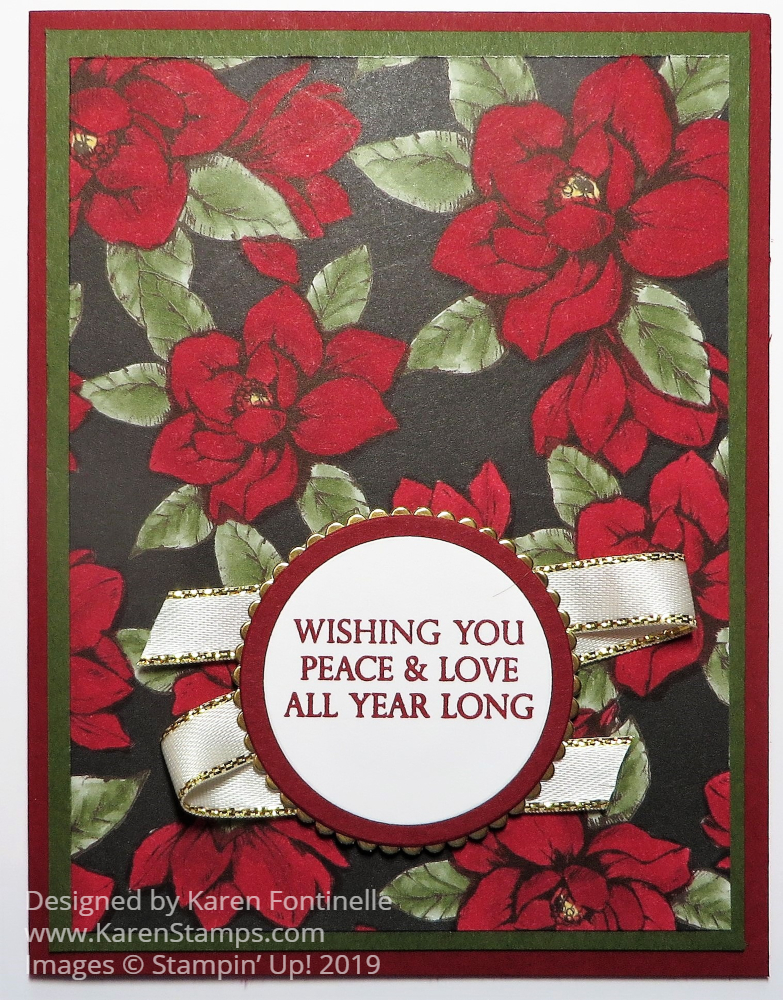
This is one of those creative ideas I never would have thought of myself, but I’ve seen samples that other Demonstrators did like this, coloring in the flowers on the Magnolia Lane Designer Series Paper! A few I saw colored the flowers red with Stampin’ Blends to look like a Christmas card! How cool is that?!
My Magnolia Lane Christmas Card has lots of coloring if you like coloring! This paper pattern has pinkish flowers and green leaves with a black background. Then I used my Cherry Cobbler Stampin’ Blends to color in the flowers. I did use both but if you wanted to make it quicker, just use one of the shades and don’t do any blending and shading. You almost don’t need it. The leaves are already green so you don’t need to color those! If you want to make more than one of these cards, you might want to use a smaller piece of designer paper so you can do less coloring!
The card base is Cherry Cobbler Cardstock with a layer of Mossy Meadow. The greeting is stamped in Cherry Cobbler Ink from the Merry Christmas To All Stamp Set. I die-cut a Cherry Cobbler layer underneath and then a back layer of Gold Foil with one of the scalloped circle dies. For some embellishment, I adhered a piece of Gold 3/8″ Metallic-Edge Ribbon back and forth behind the greeting and then popped up the whole thing with Stampin’ Dimensionals.
I could maybe have added some little embellishment to the greeting but this time I decided to stop while I was ahead! At least I have one Christmas card done! Do you realize Christmas is less than five months away?! Good thing the Holiday Catalog is coming out soon!
Here is a sneak peek of the cover, if you haven’t seen it online already! Demonstrators who earned the free cruise to the Greek Isles already have their copy and the rest of us will get them soon in August. The Holiday Catalog goes live September 4th, just two days after Labor Day!
If you want to get an early start on your Christmas cards, you can color in some of your Magnolia Lane Paper. But it doesn’t have to be for Christmas! Color the flowers some other color if you like! Maybe now we will look at some of our other papers and see if we can use them like this somehow!
Sometimes I saw “Know when to stop!” but for this In Colors Modern Heart Card I said to myself “Keep going!” My brilliant idea in my head was to play with the new In Colors that just came out in the new Stampin’ Up! Catalog. I had purchased the package of markers since the Purple Posy Ink is still unavailable. What I thought I would do was scribble each marker on an acrylic block and then stamp that on paper. As it turned out, I got the idea to use the Modern Heart Stamp Set and it has a squiggle stamp in it that served that purpose rather than the block.
I started by coloring on the squiggle stamp with each In Color and then stamping it on the Thick Whisper White Cardstock, since I was only going to use this for the card with no layers or anything else. Then I stamped the Modern Heart in Memento Black Ink over the stamped squiggle. Next I stamped the greeting from the same set, but it was all too blah. I stamped the smaller modern hearts 3 times in each In Color around the card, but I still didn’t like it. Then I stamped the teeny tiny heart in each color just once. Somehow just that teeny heart I thought made it look better. But still…..
I gave in and chopped the card front off and added In Color cardstock layers and card base and just used the stamped Whisper White piece as the top layer. That was better. When I looked in my drawer for some other embellishment I found these little epoxy gold hearts (retired from last year) and added three of those. Not sure I should have added those, but altogether, I was happier with this card.
Actually, I think part of the problem is maybe I’m not too fond of this years In Colors, but neither have I played with them much. Sometimes that’s what you need to do to like something! So as I said, usually I think don’t overdo things on a card, know when to stop. But in this case, continuing to add some things I think made it better. Not my best or my favorite, but stamped, nonetheless! Nice to just do stamping sometimes!
Last few days to get your $5 Bonus Coupons with every $50 purchase to spend in August! And don’t forget your Tax Free Holidays for certain states on certain dates.
I thought it was time to try out my new Noble Peacock fancy paper so here is the Noble Peacock Daisy Thank You Card that came of that idea! Sometimes I just choose some paper I want to use and then see what ideas I come up with.
I had ordered this Noble Peacock Specialty Designer Series Paper recently so this is my first card trying it out. This jewel-toned paper has foil accents and is a little more heavyweight than other designer papers. It is really pretty and elegant. You will make gorgeous cards and other projects with this paper! You can also purchase the Noble Peacock Foil Sheets to go along with this paper. Keep in mind you can use this paper for your projects even if you do not own the Royal Peacock Stamp Set. But it does all go together if that is what you want.
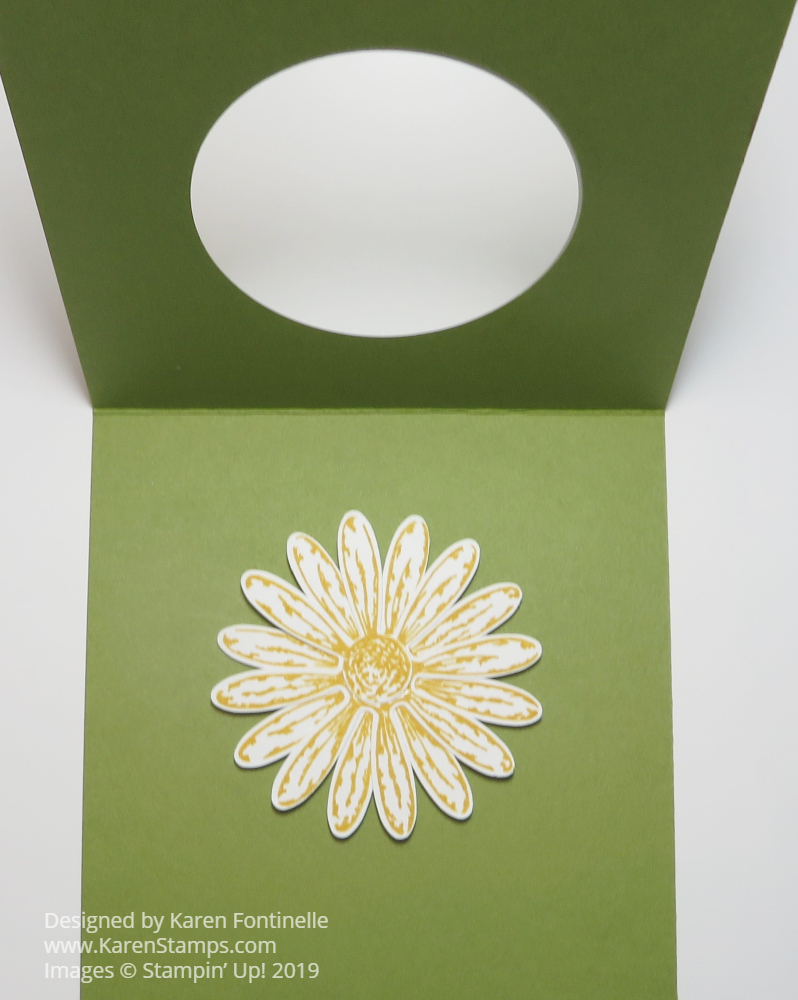
This paper has three coordinating colors – Blueberry Bushel, Pretty Peacock, and Old Olive. I chose the Old Olive pattern for this card so I started with an Old Olive base. It opens at the top so cut the cardstock in half lengthwise and then fold. I decided to die cut a hole in both the Old Olive Cardstock and the Noble Peacock Specialty Paper in order to place the punched daisy on the inside of the card.
The daisy from Daisy Delight is stamped in Crushed Curry Ink and punched out with the Daisy Punch. You can punch just one daisy but I usually stamp and punch two daisies to make the flower look fuller.
Choose the size of the Layering Circles Dies that you want to use. This one was a tight fit but if I used a larger one I thought it would look too big on the card. I first die cut the circle on the specialty paper, then placed it where I wanted it on the Old Olive Cardstock and lightly drew a circle with a pencil around the inside. Then I knew where to place the die on the front of the cardstock. I’m not sure the die would cut through both the paper and the cardstock at the same time although that is the easiest way to do it.
The greeting is stamped in Old Olive Ink from the Daisy Delight Stamp Set and die cut with the Stitched Rectangle Dies. Luckily the “Thank You” fit in this size die because a larger one would have been too big. In that case, I would have just cut it as a banner without a die.
Have fun trying out new ideas with all the new products in the Stampin’ Up! Catalog, like this Noble Peacock Specialty Designer Series Paper. Use the catalog samples for ideas for your stamping if you need inspiration! Remember, we are down to the last few days of July and the last few days of the Bonus Coupon Days. Spend $50 in July, get a coupon code to spend in August!
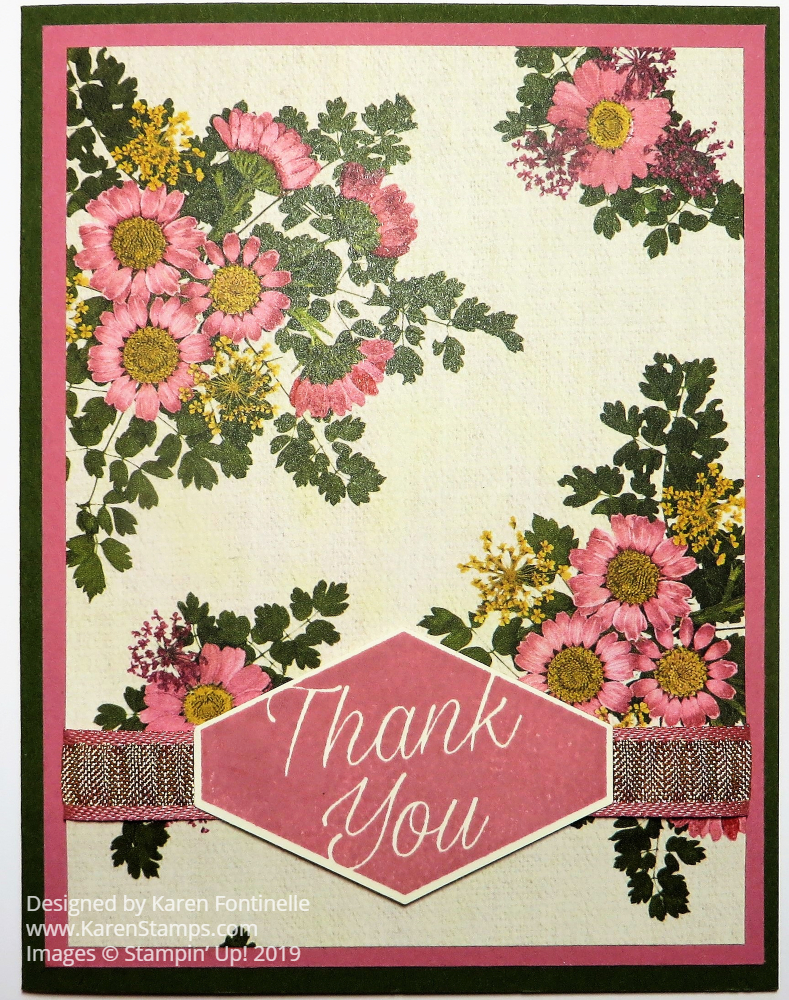
This Pressed Petals Floral Thank You Card is very simple and quick to make! This card design is certainly easy and basic and is also good to use with this beautiful Pressed Petals Specialty Designer Series Paper. The paper itself is so pretty and unusual that you want it to stand on its own. This paper was designed with actual pressed flowers that were photographed by Stampin’ Up! and then printed into paper.
The card base is Mossy Meadow Cardstock with a layer of Rococo Rose, one of the new In Colors. The ribbon adhered around the designer paper is the Rococo Rose 1/2″ Gathered Ribbon. This ribbon is two-toned, with a gold center and Rococo Rose edges.
The greeting is stamped from the Accented Blooms Stamp Set in Rococo Rose Ink. Then it is easily punched out with the Tailored Tag Punch. The greeting is then adhered to the card with Stampin’ Dimensionals at the top and bottom of the center so that it will fit on each side of the ribbon.
Since the Mossy Meadow Cardstock is so dark, I added a Very Vanilla layer inside the card and stamped a little flower in each corner to allow for stamping a sentiment inside or writing a personal note.
Any time you need a quick card, think about this simple design. You could even omit the ribbon if you didn’t have quite the right thing or wanted to make it even simpler. This Pressed Petals Floral Thank You Card is one you can easily make with any cardstock, designer paper, and a greeting! Try it!
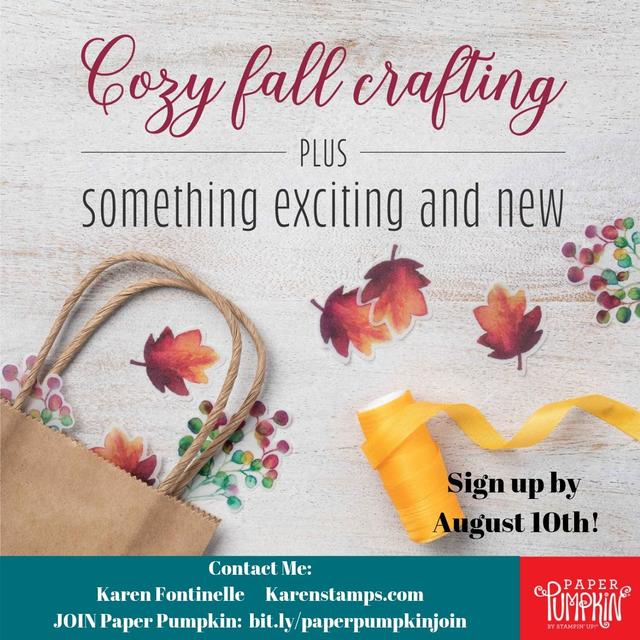
Fall WILL come eventually so get the August Paper Pumpkin Kit and start having hope that cooler days will come! Regardless of the weather, most of us love fall and all the crafting projects that go with it! The fall colors, the colored leaves, the hint of all the holidays to come.
Stampin’ Up! has tried to make almost everyone happy with this kit! Some people only like to make cards and some people like a variety of projects. This Paper Pumpkin papercrafting kit makes six fall gift bags and twelve gift tags. But this month, Stampin’ Up! is also offering an Add-on kit to make 24 cards with envelopes (note card size, 5″ x 3 1/2″). The cards are preprinted with two different designs. This notecard size is just fine and is mailable as is so you won’t find them too small. You do not need the Add-On Kit to make the Paper Pumpkin Kit. It is just an extra for $10 and you will order it through the Stampin’ Up! Online Store beginning August 1st. Just add it to a regular Stampin’ Up! order, if you want it.
Personally, I just LOVE fall and fall projects which evolve into Halloween and Thanksgiving. And it is way too hot here in Houston in the summer so anything that gives me hope that fall will come with “slightly” lower temperatures here makes me happy! I suppose we are often ready for a season change when the time comes four times a year!
Paper Pumpkin is fun! It’s a treat for yourself to know it will be showing up in your mailbox each month. If you get a sneak peek of an upcoming month and it doesn’t appeal to you or you are too busy or out-of-town, you can skip that month just by going into your account before the 10th of any month and changing it. Then go back in the next month and reactivate your account. Stampin’ Up! guarantees all Paper Pumpkin Kits so if you are dissatisfied, Stampin’ Up! will try to make it right with you. You can also simply cancel Paper Pumpkin by going into your account. So no risk, no obligation.
To receive this August Paper Pumpkin and all the fun ones following (think of the holidays coming up!), just click on my personalized link below to go straight to my sign up page. Or go to www.paperpumpkin.com and choose me, Karen Fontinelle, as your Demonstrator.
Sometimes it is good to “just stamp” and that led to this Just Stamping Beautiful Friendship Card. I started off with a different stamp set but it just wasn’t working right for me so I switched to the Beautiful Friendship Stamp Set. Without knowing exactly what I wanted to make, I decided to just stamp some flowers on the piece of Whisper White I had ready. Sometimes you just have to go with where stamping takes you!
This is a beautiful stamp set with the hydrangea-like flowers and the more traditional-shaped roses or whatever flower you think it is. It comes with a few different leaves to stamp and I think that’s how I ended up filling up the whole paper.
I already had a Mint Macaron Cardstock card base ready which I layered with Petal Pink Cardstock. I decided to stamp the hydrangea flower with Petal Pink. I think it’s a little surprising how more “orangish” this Petal Pink looks with the ink when the paper looks “pink”. I originally thought I would only stamp those flowers, but I couldn’t resist the other flowers, stamped in Rococo Rose. Next, I added some leaves stamped in Mint Macaron Ink around the flowers. Then I noticed another kind of leaf stamp so I stamped that in Soft Sea Foam to kind of go with the hydrangea flowers. It looked good so I just keep filling in all the empty spaces!
Perhaps I should have left well enough alone, but I stamped the center of the flower in black. I thought it should look okay but I wasn’t happy with the result. But it’s not SO bad so I left it and didn’t try to start over! I simply stamped the greeting from the Beautiful Friendship Stamp Set right on the card front. Luckily I didn’t mess it up or I would have kicked myself for not using the Stamparatus!! And finally, I decided to add some glimmer with the Wink of Stella Glitter Brush. In the photo, if you notice some speckles on the flowers, that is the glitter! Kind of hard to photograph but looks so pretty!
Check out another card I made with other stamps and colors with the Beautiful Friendship stamp set HERE.
It’s great to use all our fancy products and tools but sometimes it is nice to “just stamp”. Get back to our roots when we first started stamping!
Stamp something today and don’t forget the Bonus Days going on at Stampin’ Up! with every $50 purchase!
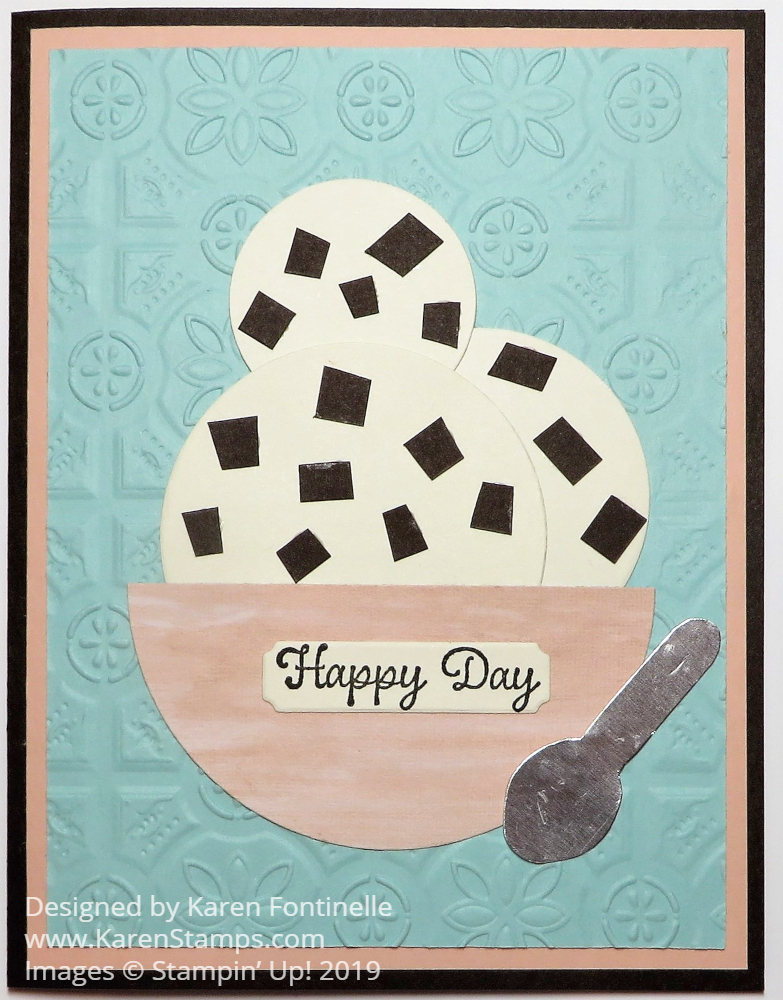
What could be better than A Summer-Themed Card for National Ice Cream Day except for a real bowl of ice cream?! With temperatures as hot as they have been lately around the United States (and always in Houston, Texas!) there’s nothing like a cold bowl of ice cream.
My father loved his dish of ice cream almost every night after dinner. I think what we had growing up was actually something called ice milk. I still remember the translucent plastic container it came in. My mom saved a lot of them and they were perfect for putting cookies in or other things. So I think I got my love of ice cream from my father!
When we lived in Oklahoma when we were first married my favorite was Chocolate Almond ice cream from Braum’s. Little did I know that there would be something better waiting for me when we moved to Houston! Blue Bell Ice Cream!!! There is no other ice cream any better (if you ask us!). When Blue Bell had to shut down production a couple of years ago, we tried many other brands but nothing compared. People even had signs in their yards wanting Blue Bell to come back or that they would rather take a chance on eating it instead of watching cartons being thrown out at the stores! That’s devotion!!
In honor of National Ice Cream Day today, I made a bowl of my favorite flavor, Blue Bell Chocolate Chip! You don’t always have to have an exact stamp set to make a card. Sometimes you can just use punches or dies or parts of punches, dies, or stamps to make what you want. My ice cream scoops are cut from Very Vanilla Cardstock in different sizes of Layering Circle Dies. The bowl is a circle of a piece of pink in the Perennial Essence Designer Series Paper. After cutting the circle, I cut it in half to look like a bowl. The chocolate chips are just little pieces of Early Espresso Cardstock. It looks good enough to eat! I’m always hungry for Chocolate Chip!
Since I knew I would be using Early Espresso for the chocolate chips, I chose it for the card base, with a layer of Petal Pink and then Pool Party. To add some interest, I decided to emboss the Pool Party layer with the Tin Tile 3D Embossing Folder. I thought maybe it looked like a kitchen wall in the background! The spoon is made with Silver Foil Paper and the Perennial Flower Punch! I cut a strip of the Silver Foil wide enough but not too wide, to fit into the punch, fed from the top, to get just the petal portion punched. From that, I trimmed off the rest to round the tip a little and make the spoon handle! Kind of fun to come up with that!
I found the greeting in the Itty Bitty Birthdays Stamp Set. What greeting do you use for National Ice Cream Day? “Happy Day” seemed just right for eating ice cream!
I love some of the other Blue Bell flavors too, like Homemade Vanilla and Moo-llennium Crunch. But Chocolate Chip can’t be beat! Sometimes I like to add pecans on top.
An ice cream treat seems to always be something special, one that cools us off on a hot summer day! If you think about it, you probably have special memories of ice cream! Did you ever walk down to a corner store to buy an ice cream bar? Was there an ice cream truck that drove through your neighborhood ringing a bell or playing a tune for all the kids to run out and want to buy ice cream for a dime or a quarter? Did you have homemade ice cream made in an ice cream freezer with ice and salt?
All of these things make it important to celebrate National Ice Cream Day! It also shows how important our stamping and papercrafting is that we can make almost anything or commemorate almost anything with our crafting supplies!
This handmade card was made for celebrating and honoring the 50th Anniversary of the Apollo 11 Moon Landing. This is a big occasion for the whole country and especially here in Houston at NASA where Mission Control was located. It still seems like such an unbelievable accomplishment and back when it happened it was like science fiction coming true!
Some of you reading this might not have even been born yet when the first men landed on the moon. While I might wish I could claim to be in that group, the US Space Program was part of my growing up. I remember going outside and watching a satellite go over in the night sky (still fun and amazing to see the Space Station go over!). I remember watching one black and white TV on a stand in the cafeteria at elementary school to see the early space shots. We all knew the names of the first seven astronauts. My mother would always say she felt sorry for Alan Shepard, the first man in space because he just went “up” and came back down, while John Glenn was the first one to orbit the earth and got more attention for that, my mother thought! What we take for granted now, no one knew what would happen to men going into space, let alone landing on the moon!
I remember our whole family being very interested and excited about the Apollo 11 mission. Back then we had an old reel-to-reel tape recorder and mostly used it to make tapes to send back and forth to out-of-town relatives for a fun way to keep in touch. So when it was time for Apollo 11, I recorded a lot of the television coverage on the tape recorder! I’m going to send in these three big tapes I have to get them digitized and see what is really on them! This is audio only, no video!
Fifty years ago today my family went to my grandmother’s apartment for dinner and we watched the moon landing, live, on TV in the afternoon. I particularly remember my parents and grandmother just being in awe of the whole event saying this was something they had only read about in comic strips with characters named Buck Rogers and Flash Gordon. To see it actually happening right then on TV was beyond amazing.
The moonwalk came hours later after the landing. I think we drove home to see the first moonwalk, although I think I remember worrying on both trips that we would miss something on TV. Anyone who is old enough to remember any of this will tell you that it was all quite the moment and everyone was glued to their TV’s!
I wanted to make a card for the Apollo 11 50th Anniversary, of course, how do you make the lunar landing vehicle out of paper?? Well, I just made “something” that represents it out of silver foil paper! I just looked at some pictures of various drawings and pictures online and came up with this! Of course, it is not accurate, but it’s just paper!
The moon is made with watercolor paper and just colored with several colors of gray inks and Aqua Painter. When it was dry I kind of painted in some “craters” on the moon! No die was large enough for cutting the moon so I just used a bowl turned over and traced the edge.
The little astronaut, representing Neil Armstrong, the first man to walk on the moon, I drew while following this video! And of course, I had to have the flag that they planted on the moon! Buzz Aldrin was the second man to walk on the moon, just nineteen minutes after Armstrong. While they were on the moon, Michael Collins was flying the orbiter that got them up there and which would get them back to earth assuming everything went as planned. No one knew for sure. I added a few stars that I had from the last catalog in the Night of Navy sky.
Sometimes you just have to use your imagination and artistic license to create what you want. That’s certainly what I did making this card! I didn’t even know what it would turn out to be. But I wanted something to post to commemorate the 50th anniversary of the Apollo 11 mission and the first men landing on the moon!
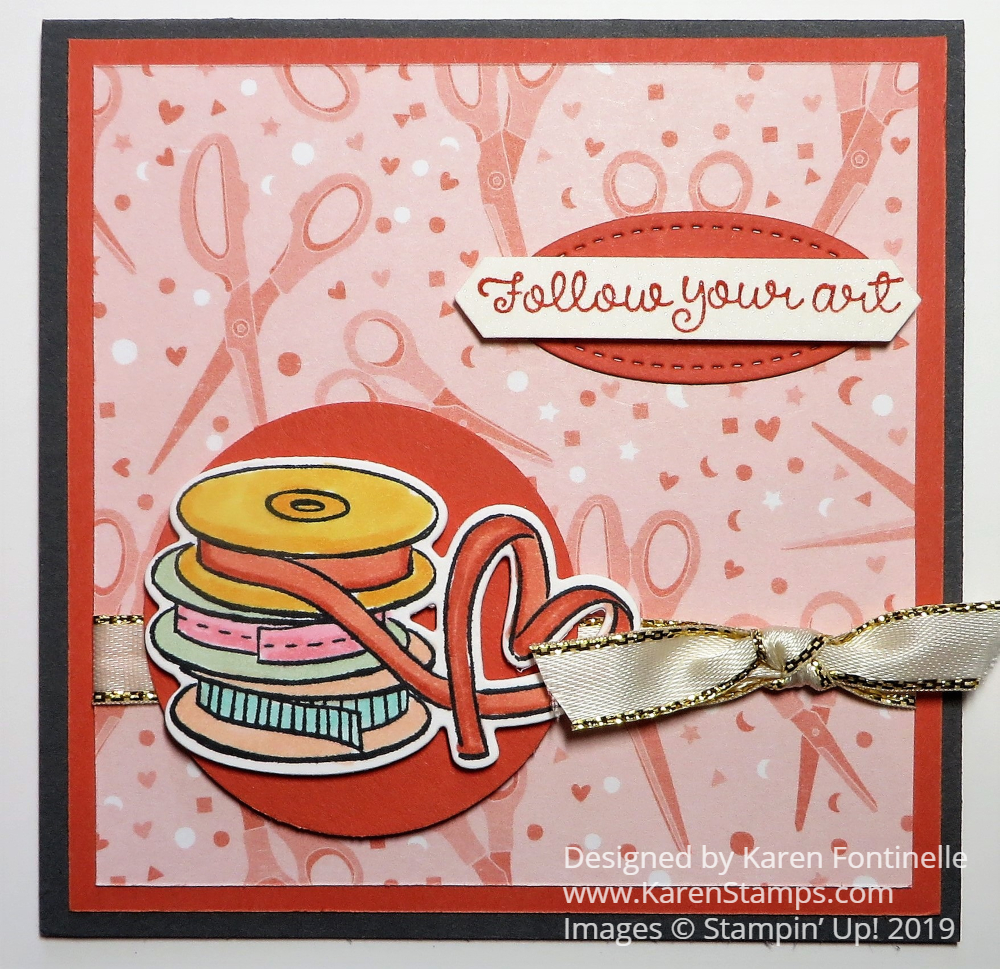
You will find the Follow Your Art Suite in the new Stampin’ Up! Catalog on page 52 with a stamp set, coordinating dies, matching designer series paper, plus accessories. What a perfect suite for all of us crafters of many kinds! You can also use the Crafting Forever Stamp Set from last year’s catalog that will work well with this new suite.
I was on a roll one day playing with this paper stamps, and dies. This is a square card, 4 1/4″ x 4 1/4″. It’s nice to make a card of another size after usually making the normal size. The card base is Basic Gray with a layer of Calypso Coral. The designer paper is a pattern in the Follow Your Art package.
I stamped the stack of ribbons in the It Starts With Art Stamp Set and colored in with Stampin’ Blends markers. Then I was able to die cut these with a die in the Arts & Crafts Dies. To help the ribbon piece stand out a little bit from the paper, I placed it over a large circle of Calypso Coral.
The greeting is in the stamp set and is punched with the Classic Label Punch. Then it is layered on a die-cut oval in the Stitched Shapes Dies. The ribbon adds a little extra embellishment. This Gold 3/8″ Metallic-Edge Ribbon is so useful on many cards. It is worth having in your stash!
If you want another idea for this suite, here is another card I made, A Card For Crafters. Sometimes it is fun to just work with one set of stamps, paper, and maybe dies and just see what all you come up with. Then be sure to mail some cards to your crafty friends!
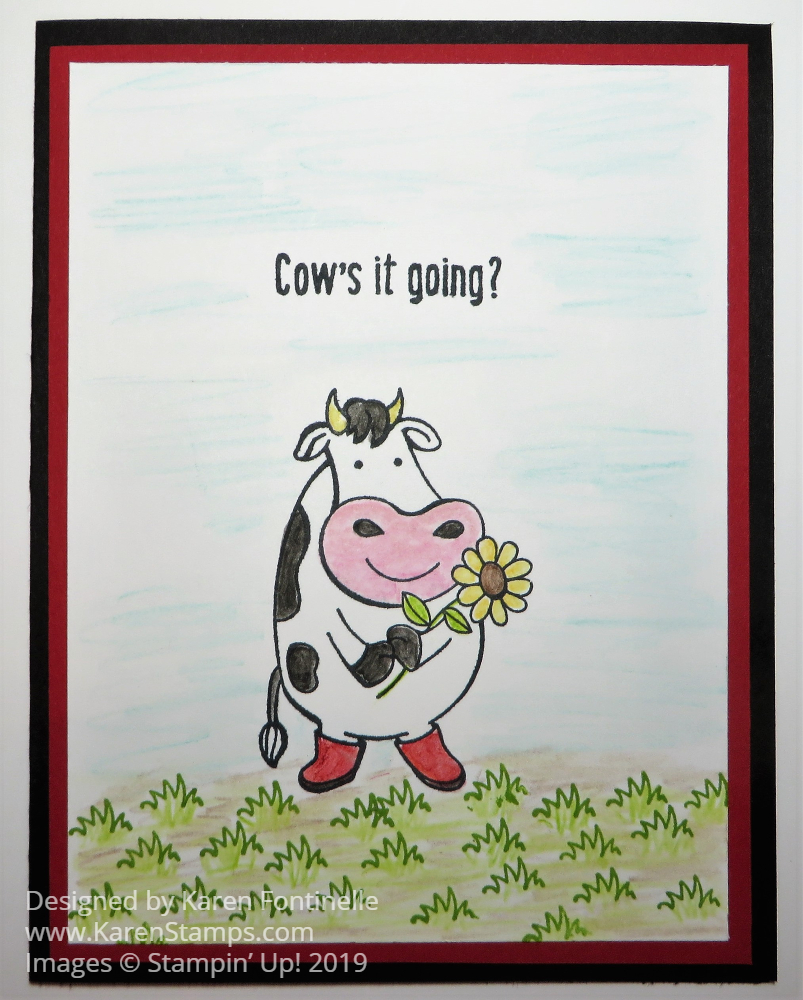
Another stamp set that didn’t jump off the page at me at first until I saw some fun cards made with this stamp set! This Over the Moon Cow Card will just be a silly card to send to someone! There are some other fun cows in this stamp set and funny sayings to go with them. You’ve got to check out the Over The Moon Stamp Set.
I think the boots on the cow made me think of red boots which made me start with a Basic Black card base and a Real Red layer. I used my Stamparatus to stamp the cow and the saying.
I decided to use my Watercolor Pencils and Blender Pen to color the cow instead of my usual Stampin’ Blends markers. I have to say, when I first became a Demonstrator I absolutely loved our (older) watercolor pencils and using the Blender Pen to smooth out the color. Now that I am used to Stampin’ Blends, I don’t care for the Watercolor Pencils as much but then they are not as expensive as the Blends. So it’s nice we have lots of choices! I still think it is kind of magical to use the Blender Pen or Aqua Painter to smooth out the coloring with WC Pencils, so maybe I do still like them! They give a softer look I think.
The little tufts of grass are stamped in Granny Apple Green and then colored with the Granny Apple Green WC Pencil. So there you can actually see the difference between the ink and the pencil. I also scribbled in some Early Espresso to look like dirt and then used the Blender Pen over the whole area. You do have to be light-handed and careful doing this right on Whisper White as it won’t hold up to very much moisture. Shimmery White Cardstock or Watercolor Paper are good choices if you want to get serious with the WC Pencils and Blender Pen or Aqua Painter.
I wondered if the whole plain white background was okay or not, but opted to scribble in some blue to suggest sky and again, used the Blender Pen over this whole area, carefully. I’m not sure Memento Ink was the right thing to use with the WC Pencils but it worked out. If I had thought ahead I might have used Stazon instead.
If you like cows or animals or just want to make some fun cow cards, get the Over the Moon Stamp Set in the new Stampin’ Up! Catalog!
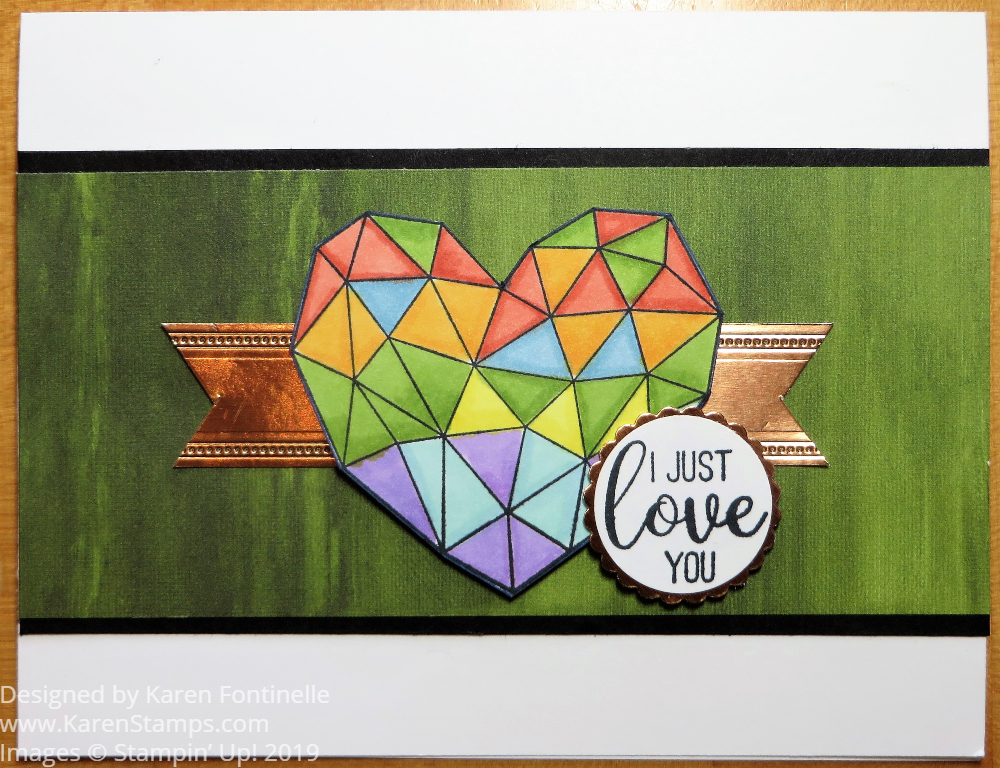
This Modern Heart Stamp Set is one that I skipped over initially and then soon discovered was kind of cute and had really nice sentiments. I love the fonts on the sentiments. You can stamp this heart many ways and make many types of cards with it. I made it a Modern Heart Anniversary Card for my husband.
You can just stamp the heart and color it in, or stamp in a color and leave it as is. You can stamp the “swooshy thing” and then stamp the heart over it. You can emboss the heart if you like some dimension. You can use the new Fluid 100 Watercolor Paperand use the new Pigment Sprinkles. So many opportunities for creativity!
In this case, I wanted to do some coloring using my Stampin’ Blends. I just stamped the heart on Whisper White in Memento Ink and used several shades of markers……Calypso Coral Combo, Mango Melody Combo, Pineapple Punch Combo, Balmy Blue Combo, Granny Apple Green Combo, Pool Party Combo, Highland Heather Combo and Night of Navy Dark just to color around the edge after I cut out the heart.
Take a look at this Modern Heart Stamp Set and see if it is one you want in your collection! Remember, for every $50 you spend in July, you will receive a $5 coupon code to use on your order in August! No limit! It’s Stampin’ Up! Bonus Days! Keep your code(s) in a safe place so you will have them handy to use in August.
Sales Tax Holidays are coming in at least a few states and some are in July! These sales tax holidays are to help with buying back to school supplies and clothes. Depending on the sales tax in your state it might not be very much, but if you buy a lot it can add up. At a minimum, it saves you a little bit of money. Of course it is not just back-to-school parents and students that get to use this Sales Tax Holiday! Anyone can as long as you buy eligible items.
I suppose since some of the Stampin’ Up! products can be used for school supplies (and how many times have we moms had to share our craft or stamping supplies with family members for school, Scout or other projects?!). Even if you don’t have a child going back to school, if you order during your state’s tax holiday you can take advantage of this savings.
Just some examples of Stampin’ Up! products that “may” qualify (depends on your state) are adhesives, markers, Stampin’ Blends (yea!), In Color Markers, Grid Paper, the new Pressed Petals Journal, Paper Snips, Watercolor Pencils, and more. Zoom in and look over that chart!
To read this Sales Tax Holiday chart, click HERE and even then you may have to zoom in on your computer screen to be able to read it. You will have to check the dates and items for your own state. Note that Alabama starts July 19-21 and Tennesee and Wisconsin are later in July. Several begin almost right away in August. Just sayin’….be ready! You can plan ahead if you are going to order.
However, remember the Bonus Days in July where you get a $5 coupon to spend in August with every $50 purchase of merchandise. Those early July states can double-dip!
I’m still thinking that school just got out for the summer (because once your kids are grown, except for school crossings when you are driving, your life doesn’t revolve around school schedules anymore) but I have already seen Back-to-School supplies out in the store! And even crazier, someone on Instagram said Halloween items are going out in craft stores already!
So it is coming up on Back -to-School time and you may be able to save a little bit of money during the Sales Tax Holidays on “your” school supplies for stamping!
Sometimes all you have to do is look at a package of designer paper and a certain pattern jumps out at you and demands you make a card with it such as this Garden Lane Daisy Card. This is a very easy card to make if you have the two daisy punches and would be a wonderful way to encourage a friend or loved one with this greeting.
You may already have the Daisy Punch from a previous catalog that coordinates with the Daisy Delight Stamp Set. Did you know there is a new, smaller Medium Daisy Punch in the new Stampin’ Up! Catalog? You can use this punch on its own or stack with the larger Daisy Punch. And it has a new stamp set that coordinates with it, Daisy Lane. That gives you two punches and two stamp sets, all involving daisies, with which you can make beautiful cards and projects!
The card base for this card is the Whisper White THICK Cardstock. While not absolutely necessary, if you would like a little more sturdiness to your card, using the Thick cardstock is a little better than the regular Whisper White. As I said, I chose a pattern from the Garden Lane Designer Series Paper. There is something about this paper, to me, that looks so fresh and calming. Maybe it is the greenery look to it. Back to nature!
First I was going to just use the Medium Daisy Punch, with two flowers together on this card, but then I decided to use it with the larger daisy punch in the center of this card. I just punched two daisies of each size and glued them all together with the Multipurpose Liquid Glue. Then the one large flower was adhered to the card front. If you like, you can curl the ends of the petals a little with a Bone Folder to make the flower stand off the card a little bit. In the center, I placed a Gold Faceted Gem.
The greeting is stamped with Garden Green Ink from the Daisy Lane Stamp Set. You can purchase the Medium Daisy Punch with this stamp set in the Daisy Lane Bundle and save 10% if you like!