Tag Archives: Daisy Punch

Sunshine & Rainbows Daisy Card

Sunshine & Rainbows Daisy Card

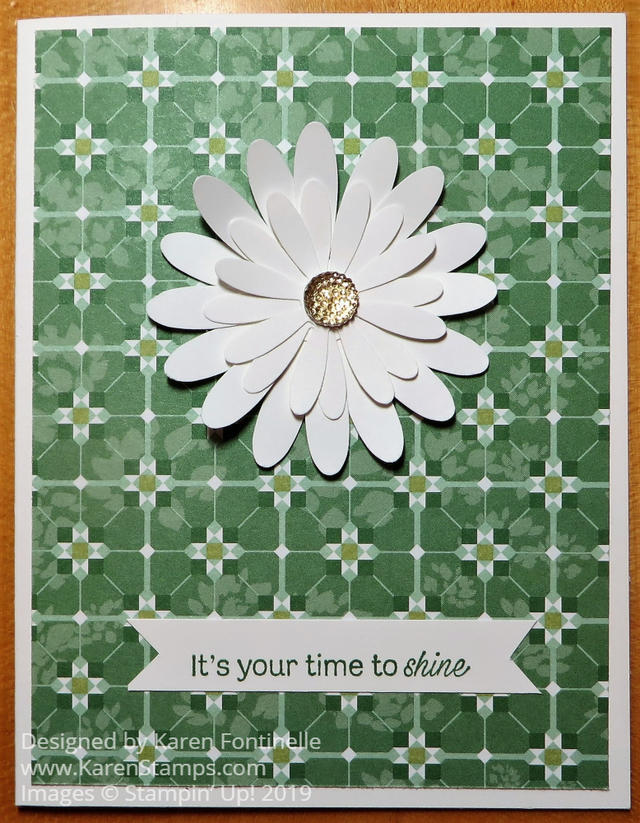
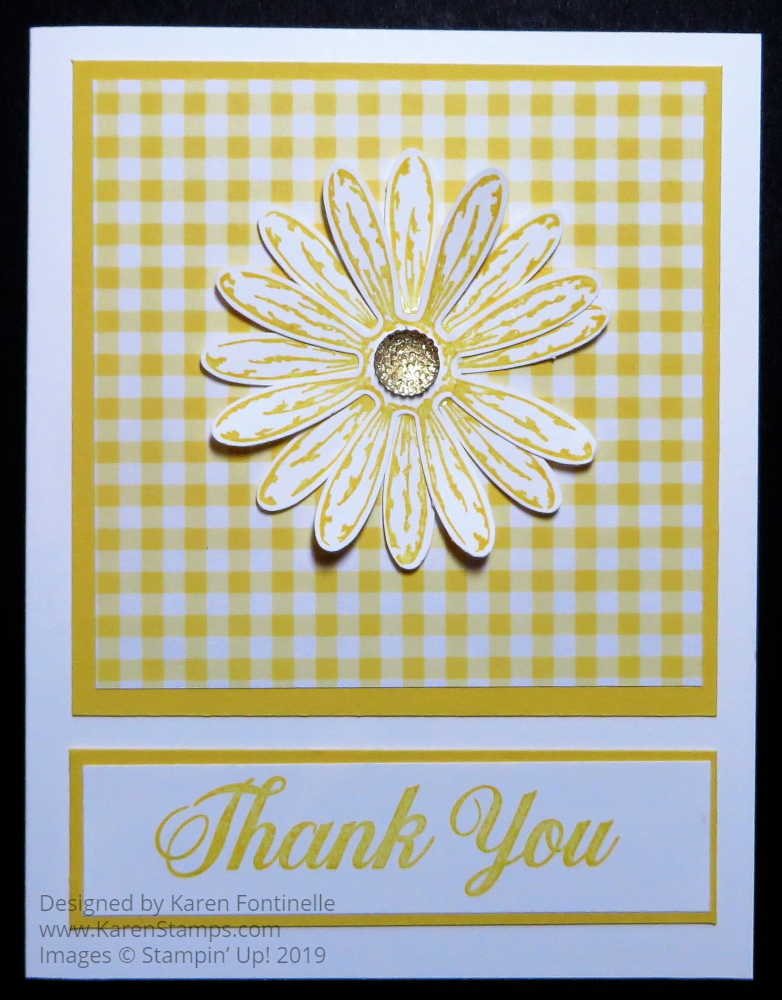
The other side of this paper is the pattern I used the other day on a card with the bright and cheerful sunshine and rainbows. But when I happened to look at this other side, the sunshine images made me think of daisies! I hadn’t used my Daisy Punch in a long time!

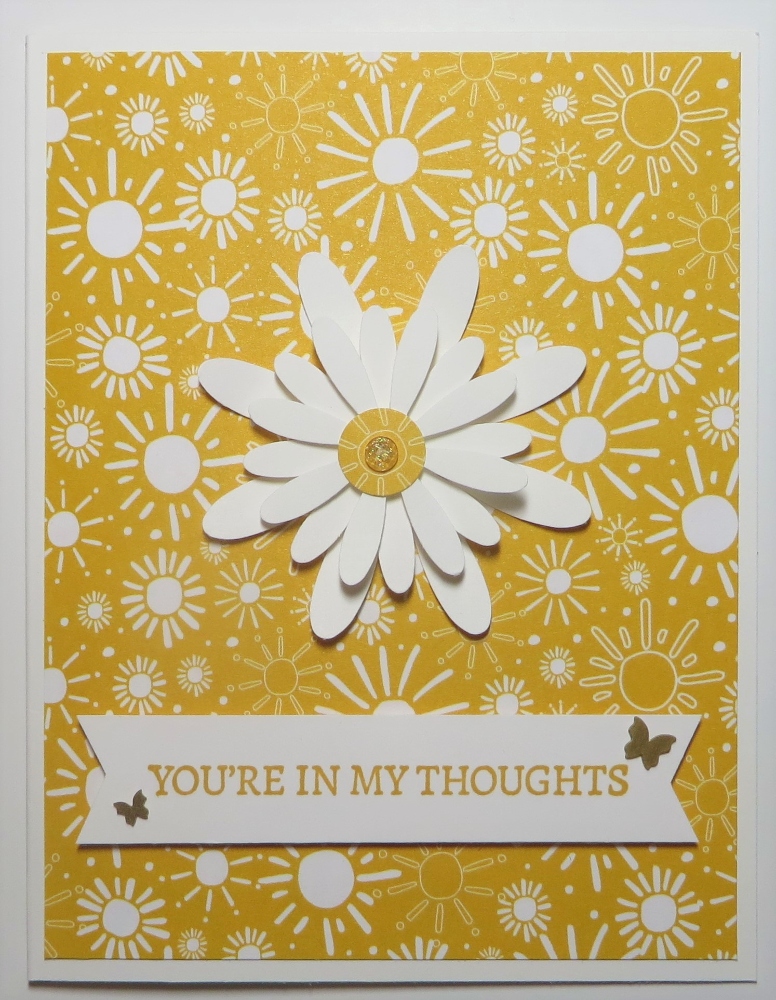
This card has a Basic White card base, not really visible in this photo. I layered the Sunshine & Rainbows Designer Paper on the card base. Remember, you can earn this paper FREE during Sale-A-Bration with a $50 Stampin’ Up! purchase!

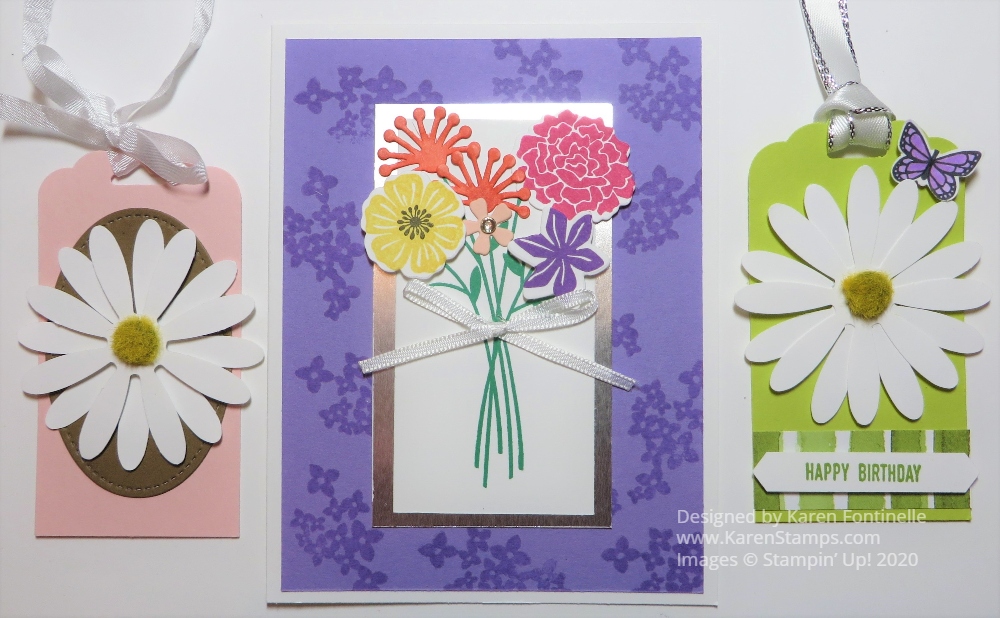
The daisy is made with both daisy punches, the Daisy Punch and the smaller Medium Daisy Punch. I punched one large daisy and two of the smaller and layered them in a staggered fashion. The largest daisy is adhered directly to the card, the smaller two are popped up with Stampin’ Dimensionals®. I used my retired 1/2″ Circle Punch to punch out a piece of the same designer paper for the flower center and also added one of the small Elegant Faceted Gems to the center.

The greeting is from the Encircled in Friendship Stamp Set. I simply stamped it on a scrap strip of Basic White I already had in Bumblebee Ink. Then I punched the banner ends using the point of the Tailored Tag Punch. This greeting is popped up on Stampin’ Dimensionals also. For a finishing touch, I added two of the Brushed Brass Butterflies. I love these because they are so dainty and delicate and FLAT so no problem mailing them!

That’s the story of this card that I never dreamed I was going to make! You never know what kind of inspiration might strike! Even if you don’t know exactly what to make, just get out your supplies and see what pops up!

SHOP STAMPIN’ UP! ONLINE HERE!

Floral Cards and Tags From Scraps

Floral Cards and Tags From Scraps

The other day I said I had cleaned off my kitchen table to “sanitize” it and decided to use my little pile of scraps of cardstock, designer paper, die cuts, punched pieces, etc. to make cards and here are some Floral Cards and Tags From Scraps that I made.

Saturday afternoon, Sara Douglass, CEO of Stampin’ Up! did a Facebook Live at her home showing her family having a craft party! I happened to catch it at the beginning so I moved my laptop over to the table and got out my scraps that were on my table plus another baggie full! I sat there and did my own stamping and cardmaking while watching and listening to the Douglass family in the background. It was the most relaxing afternoon for me!

If you are on Facebook, just search for Sara Douglass, Stampin’ Up! CEO. You will find her craft party video plus a new Facebook Live she did yesterday just checking in with everyone. More important than just telling you about her family Facebook Live, is telling you to check out the projects her girls were doing! Such cute things! Sara later posted more details about the projects that you will see in her posts. Near the end, Sara makes her own cards with the Magnolia Memories & More Large Specialty Cards & Envelopes. Even her husband makes a card he saw on the internet! Even if you missed it Saturday, you can still stamp along with the Douglass family!

I found several punched daisies in my scraps so I put two together on each card and added the Perennial Essence Floral Centers. The daisies are punched with the Daisy Punch. These tags were already in my scraps! I can keep them as tags or I can add them to the front of a card.

The center card is made with stamped flowers from the Beautiful Bouquet Stamp Set and die cut with the Bouquet Bunch Dies. I don’t remember what dies the orange flowers came from but they were in my scrap stash. In fact, they were white but I wanted color, so I just colored them with Stampin’ Blends. The little panel with stems was already stamped. I just cut down the length and layered it on a piece of Silver Foil. The background on the card is stamped with Versamark Ink although it still came out darker than I expected.

You can check out some other cards I made with my scraps the other day HERE. It’s fun to sit down with whatever scraps you have, it’s almost like a treasure hunt! You don’t know for sure what you will find if it has been a long time since you looked! Then just let your imagination run and see what cards you can come up with! You can still add other stamping or embellishments and greetings, but try to use as many scraps as you can as I did with this Floral Cards & Tags!

Noble Peacock Daisy Thank You Card

Noble Peacock Daisy Thank You Card

I thought it was time to try out my new Noble Peacock fancy paper so here is the Noble Peacock Daisy Thank You Card that came of that idea! Sometimes I just choose some paper I want to use and then see what ideas I come up with.

I had ordered this Noble Peacock Specialty Designer Series Paper recently so this is my first card trying it out. This jewel-toned paper has foil accents and is a little more heavyweight than other designer papers. It is really pretty and elegant. You will make gorgeous cards and other projects with this paper! You can also purchase the Noble Peacock Foil Sheets to go along with this paper. Keep in mind you can use this paper for your projects even if you do not own the Royal Peacock Stamp Set. But it does all go together if that is what you want.

This paper has three coordinating colors – Blueberry Bushel, Pretty Peacock, and Old Olive. I chose the Old Olive pattern for this card so I started with an Old Olive base. It opens at the top so cut the cardstock in half lengthwise and then fold. I decided to die cut a hole in both the Old Olive Cardstock and the Noble Peacock Specialty Paper in order to place the punched daisy on the inside of the card.

Noble Peacock Daisy Thank You Card Inside

The daisy from Daisy Delight is stamped in Crushed Curry Ink and punched out with the Daisy Punch. You can punch just one daisy but I usually stamp and punch two daisies to make the flower look fuller.

Choose the size of the Layering Circles Dies that you want to use. This one was a tight fit but if I used a larger one I thought it would look too big on the card. I first die cut the circle on the specialty paper, then placed it where I wanted it on the Old Olive Cardstock and lightly drew a circle with a pencil around the inside. Then I knew where to place the die on the front of the cardstock. I’m not sure the die would cut through both the paper and the cardstock at the same time although that is the easiest way to do it.

The greeting is stamped in Old Olive Ink from the Daisy Delight Stamp Set and die cut with the Stitched Rectangle Dies. Luckily the “Thank You” fit in this size die because a larger one would have been too big. In that case, I would have just cut it as a banner without a die.

Have fun trying out new ideas with all the new products in the Stampin’ Up! Catalog, like this Noble Peacock Specialty Designer Series Paper. Use the catalog samples for ideas for your stamping if you need inspiration! Remember, we are down to the last few days of July and the last few days of the Bonus Coupon Days. Spend $50 in July, get a coupon code to spend in August!

SHOP STAMPIN’ UP! ONLINE TODAY!

Garden Lane Daisy Card

Garden Lane Daisy Card

Sometimes all you have to do is look at a package of designer paper and a certain pattern jumps out at you and demands you make a card with it such as this Garden Lane Daisy Card. This is a very easy card to make if you have the two daisy punches and would be a wonderful way to encourage a friend or loved one with this greeting.

You may already have the Daisy Punch from a previous catalog that coordinates with the Daisy Delight Stamp Set. Did you know there is a new, smaller Medium Daisy Punch in the new Stampin’ Up! Catalog? You can use this punch on its own or stack with the larger Daisy Punch. And it has a new stamp set that coordinates with it, Daisy Lane. That gives you two punches and two stamp sets, all involving daisies, with which you can make beautiful cards and projects!

The card base for this card is the Whisper White THICK Cardstock. While not absolutely necessary, if you would like a little more sturdiness to your card, using the Thick cardstock is a little better than the regular Whisper White. As I said, I chose a pattern from the Garden Lane Designer Series Paper. There is something about this paper, to me, that looks so fresh and calming. Maybe it is the greenery look to it. Back to nature!

First I was going to just use the Medium Daisy Punch, with two flowers together on this card, but then I decided to use it with the larger daisy punch in the center of this card. I just punched two daisies of each size and glued them all together with the Multipurpose Liquid Glue. Then the one large flower was adhered to the card front. If you like, you can curl the ends of the petals a little with a Bone Folder to make the flower stand off the card a little bit. In the center, I placed a Gold Faceted Gem.

The greeting is stamped with Garden Green Ink from the Daisy Lane Stamp Set. You can purchase the Medium Daisy Punch with this stamp set in the Daisy Lane Bundle and save 10% if you like!

Pressed Petals Gift Bag and Gift Card

Pressed Petals Gift Bag and Gift Card

The Pressed Petals Specialty Designer Series Paper is so pretty and I thought I would make something other than a regular card with it. Here is my Pressed Petals Gift Bag and Gift Card that you could also make for just a small gift. The bag is just 6″ high and the paper is very lightweight so you could put some pieces of candy inside, a piece of jewelry, a gift card, or a diamond ring! (Might as well aim high!)

The Pressed Petals Paper is designed with photographic images of real pressed flower petals. One side of the paper has the flower images, the other side has subtle vintage designs like old sheet music, lines of script, wood grain, and vintage plant descriptions. One design has portions you can cut apart and use on cards, much like the Petal Promenade Paper we previously had.

This bag is one of those easy things to make, as I have done many times before. Start with a 12″ x 6″ piece of designer paper (or cardstock). Score at 1″, 3 3/4″, 6 1/2″ and 9 1/4″. Then turn long ways and score at 2″ to make the bottom flaps. Cut off the smallest little section and cut up on the botton flap score lines to the horizontal score line. Then crease and fold to form the bag. Leave it open at the top or punch two holes and tie it closed with ribbon. Here’s a similar example.

Easy Botanical Butterfly Mini Gift Bag Cutting Diagram

You can see the little bag I made previously HERE with the Botanical Butterfly Paper.

I stamped two daisies with the Daisy Delight Stamp Set and punched out with the Daisy Punch. I like putting one of the Gold Faceted Gems in the daisy center. A new item we have now in the new Stampin’ Up! Catalog is the Perennial Essence Floral Centers, actual fuzzy embellishments to look like the center of real flowers, that you could use.

The ribbon I used is the Gold 3/8″ Metallic Edge Ribbon. Just push the sides of the bag in a little bit and pull the top edges of the bag together to close the top. If you don’t want to get punched holes on all four sides of the bag, punch the front and back holes first before you pull the bag together! You could also hold the top of the bag together with a Mini Library Clip or check the Clearance Rack for two other styles (and bargains!). Don’t forget! Some stamp sets were added to the Clearance Rack the other day you might want to check out!

And while I had the paper out, I decided to make just a cute little matching card, 3″ x 6″ folded in half with a 2 3/4″ x 2 3/4″ piece of designer paper on top. The little “hello” is found in the Bloom & Grown Stamp Set. I thought it was cute for that card and is punched out with the Classic Label Punch to make it easy. Just for a little something, I added the smallest size Gold Faceted Gem on to the greeting to match the bag. I wish it was even smaller but I think it is fine.

Use your Pressed Petals Specialty Designer Series Paper to make simple gift bags like this one plus a gift card to match!

Delightful Daisy Twin Birthday Cards

Delightful Daisy Twin Birthday Cards

If these two cards, my Delightful Daisy Twin Birthday Cards, look a lot alike, it’s because they were meant to since they were going to my twin nieces! I usually make their birthday cards almost the same but slightly different! I got the idea for this card from someone on Instagram, @leannecreates. I don’t know her but we both seem to like each other’s cards on Instagram! She really liked the look of the pink and navy together on her card and I have to agree. I made the second card with a slightly different color.

To make my cards a little bit differently, I embossed both Night of Navy card bases with an embossing folder. The card with the Powder Pink daisy is embossed with the Tufted Dynamic Embossing Folder. The card with the Flirty Flamingo daisy is embossed with the Petal Burst Embossing Folder. The colored layer on each card is plain, then the Whisper White Cardstock is embossed with the Subtle Dynamic Embossing Folder.

The daisies were both stamped with the Daisy Delight Stamp Set and then punched out with the Daisy Punch. I punched two daisies for each card so the flower would look fuller. The leaves are also stamped from that set and cut out. Luckily, the Daisy Punch is carrying over to the new catalog plus there is a new Medium Daisy Punch! I also stamped the flower center and cut out by hand with my Paper Snips. (If you don’t own a pair of these scissors, you should order them as soon as possible as they are so good for cutting out small pieces and lots of other things!)

The birthday sentiment on the pink daisy card is from the Detailed With Love Stamp Set and on the Flirty Flamingo card it is from the another stamp set that I can’t remember! It really doesn’t matter! You can use any birthday greeting or any greeting for another occasion. This style of card can be used for most any occasion. If you left off the sequins, you could even use it for a sympathy card with some subtle colors and the appropriate greeting. I added some sequins for a little pizzazz. You could also use pearls or rhinestones, whatever you like.

Consider making this kind of card for your next occasion. Change the greeting, change the colors, maybe even use a piece of designer series paper as the layer. Use different flowers or some other image. Lots of possibilities with this card design.

REMEMBER: Today is the LAST DAY for the Everything Is Rosy Product Medley! Don’t get confused with retiring products going until June 3rd. This special set of products ends today, May 31.

Everything is Rosy Products
Image (c) Stampin’ Up! 2019

ALSO: Stampin’ Up! discounted SELECT retiring products yesterday afternoon! Be sure to check out the sale, 10% – 30% off! While supplies last!

DISCOUNTED Select Last-Chance Products!!

Daisy Delight Thank You Card

Daisy Delight Thank You Card

Memorial Day seems to signal the beginning of summer, even though the official date isn’t until later this month, but I thought a bright Daisy Delight Thank You Card was in order today!

This is the last week of the current Stampin’ Up! catalog and all the Last-Chance products. Remember, it is not just the Annual Catalog retiring but also the Occasions Catalog. Also, the Everything is Rosy Product Medley ends on May 31 so grab that if you want it!

With the warm weather and sunny days, I thought about the Daisy Delight Stamp Set and the Gingham Gala Designer Paper. The Gingham Gala 6″ x 6″ paper has been very popular and sold out a few times, so I’m really surprised it is still available, as I write this. It is such “happy” paper! I’m glad the Daisy Delight Stamp Set and coordinating Daisy Punch are carrying over to the new catalog along with a new smaller Medium Daisy Punch that will be fun to use! Keep your eye out for that on page 187.

To make this card I just used a card base of Whisper White Cardstock and added a 3 3/4″ x 3 3/4″ layer of Daffodil Delight Cardstock. The Gingham Gala layer is 3 1/2″ x 3 1/2″. The two daisies are stamped and then punched out with the Dasy Punch and adhered to the gingham layer. I added a Gold Faceted Gem to the center of the daisy. I’m happy to say these are also carrying over to the new catalog!

I used the “Thank You” that comes in the Daisy Delight Stamp Set and stamped in Daffodil Delight on Whisper White, layered on Daffodil Delight Cardstock. These layers match up with the daisy piece above. Here is another card I made two years ago that is very similar but gives you a slightly different idea.

This Daisy Delight Thank You Card is sure to brighten someone’s day with it’s bright colors and pretty 3D daisy! Make one today!