Catching Butterflies Greeting Card

Catching Butterflies Greeting Card

While I didn’t think this Sale-A-Bration stamp set was very exciting, I am very happy with this Catching Butterflies Greeting Card I came up with! The stamp set may look simple, but there are many different ways you can work with it! And best of all, it is FREE with a $50 Stampin’ Up! order during Sale-A-Bration! However, Sale-A-Bration is coming to an end soon, on February 28. That’s not far off anymore!

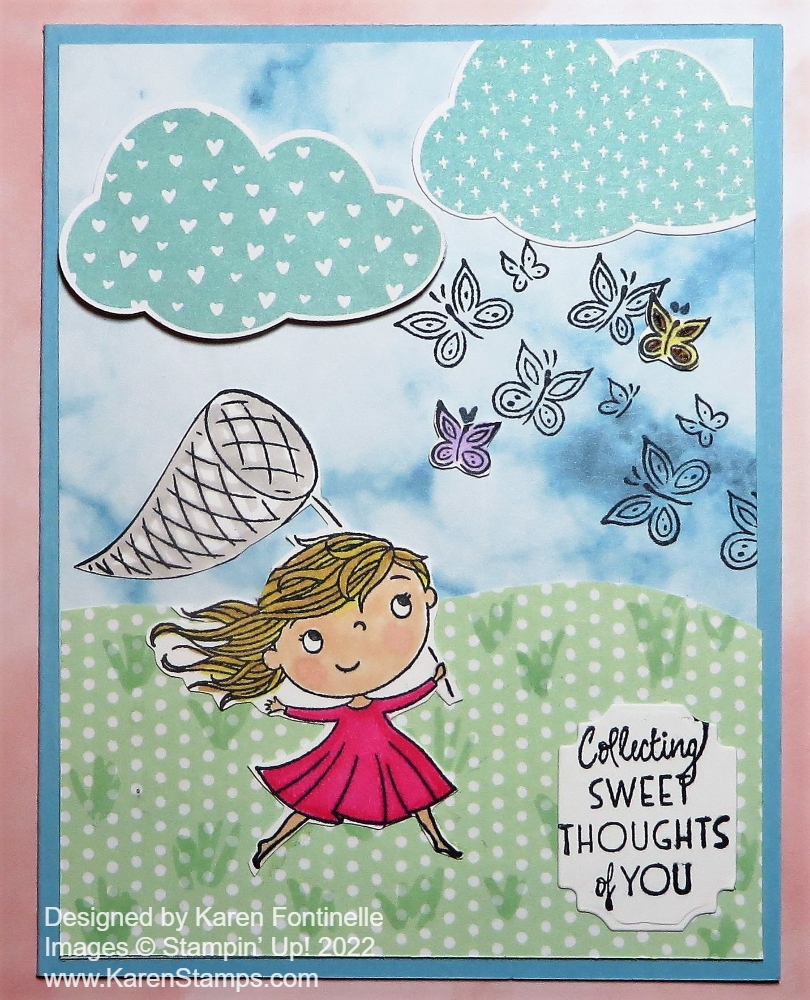
This Catching Butterflies Stamp Set is in the Sale-A-Bration Brochure on page 6. I really like the sentiments in the set. The little girl is cute and you could even cut the butterfly net stick out of her hand and not use it! Or have her be holding something else, like a group of balloons. The little butterflies are cute almost any time to stamp.

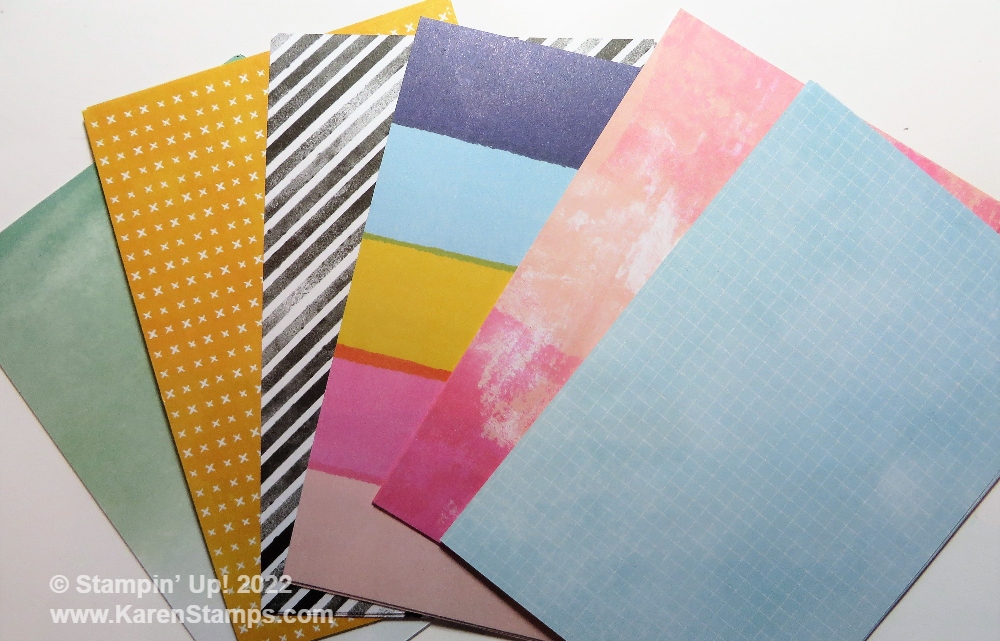
This card has a card base of Balmy Blue. For the background layer on the card, I used a piece of the Simply Marbleous 6″ x 6″ Designer Series Paper, another item you can earn free during Sale-A-Bration, found on page 10 of the SAB Brochure. I didn’t use the “swirly” side, I used the “other” side of one of the blue papers. I thought it looked like sky and also found a green patterned paper in the Sunshine & Rainbows 6″ x 6″ Designer Series Paper to look like the grass the little girl is running in.

For the grass piece, I cut a curvy edge on the top of it to look more natural. Then I used my Light Mint Macaron Stampin’ Blend Marker to draw in bits of grass, just little short lines, quick and fast!

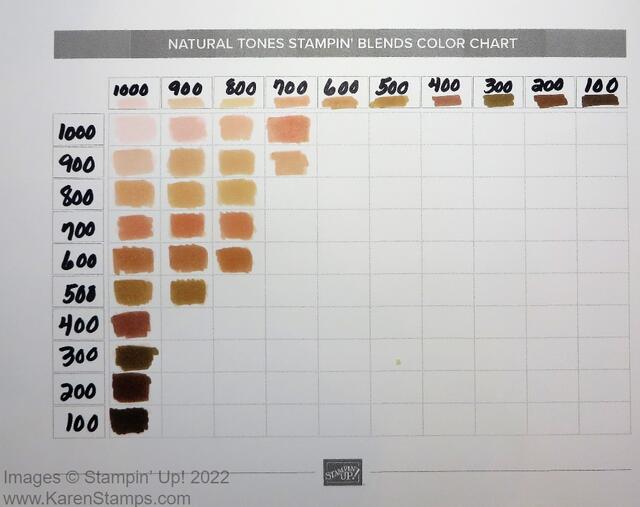
The little girl is stamped with Memento Ink and colored in with Stampin’ Blends. I used Light Melon Mambo for her dress and some of the new Natural Tones Stampin’ Blends markers (read this post for more information) to color her skin and put a little blush on her cheeks! If you fill in that chart of marker combinations to get different shades, you can choose what you would like to use. And remember, these Natural Tones Markers aren’t just for skin tones! I used one for her hair color with some added Light Daffodil Delight. You aren’t limited to one color or Light and Dark Combo of Stampin’ Blends markers, you can use different colors together to get different shades or different blending.

Natural Tones Stampin’ Blends Color Chart

Print it out on Basic White Cardstock so you get true colors rather than computer paper. Then add each marker number across the top and down the side. Color the two marker shades that coordinate in each box to see what the two colors together look like. Here’s how I started mine. Your colors may differ because of computer screens, etc.

Natural Tones Stampin' Blends Color Chart

For the butterfly net, I just lightly colored over the strings with the Light Gray Granite Stampin’ Blend Marker. After the girl was all colored in, I just cut her out with Paper Snips. Notice I did not go all the way into every white area, and when you looked at my card, you probably didn’t even notice! Neither will your recipient so don’t worry about precise cutting!

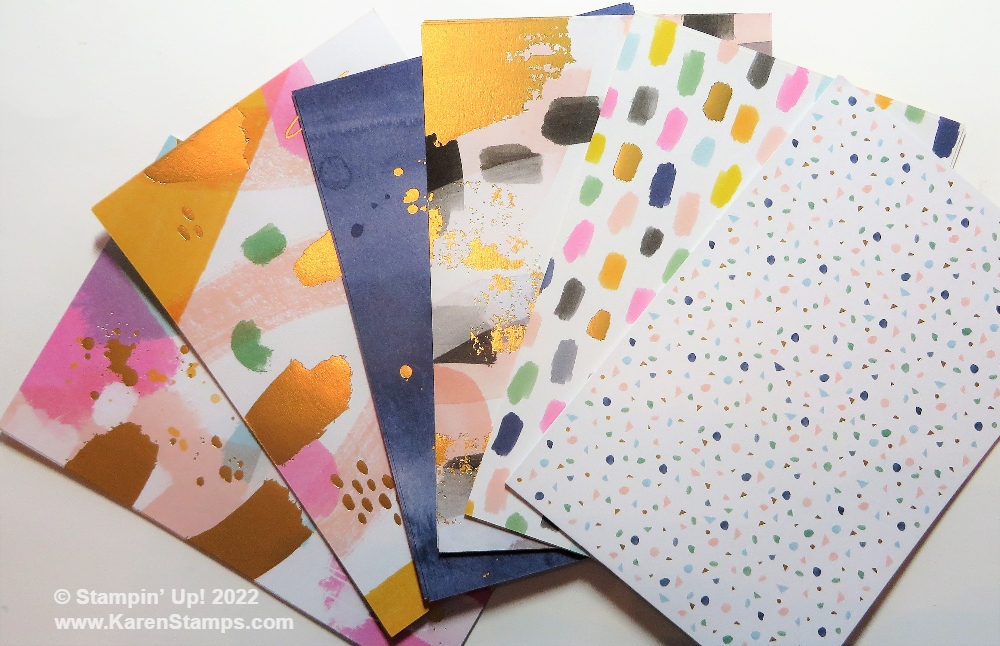
I used the Sunshine & Rainbows Designer Paper again to punch out the clouds with the Cloud Punch. If you don’t have the paper, just punch out some white or light blue clouds. If you don’t have the punch, just cut out some cloud shapes from the paper or plain cardstock.

The butterflies are all in a group on one stamp so I stamped those in Memento Ink and didn’t color them in, although I could have. There is also a single stamp of a small butterfly so I did stamp two of those on Basic White Cardstock and colored and cut them out. They are stuck on with Mini Glue Dots.

The sentiment is stamped from the Catching Butterflies Stamp Set, as I’ve said, and cut out with one of the Ornate Frames Dies. I needed something small enough to fit in the space as compactly as possible since the card is already rather “busy”.

This is one of those cards that you can make very simply or have all kinds of pieces to “play” with to make the card! Do however much or little you like! If you earn this stamp set during Sale-A-Bration, have fun playing with it! You will make some happy, cheerful cards with it for many occasions!

SHOP STAMPIN’ UP! ONLINE HERE!

Calming Camellia Birthday Card in Fresh Freesia

Calming Camellia Birthday Card in Fresh Freesia

I so loved making the card the other day with the Calming Camellia stamp that I had to try another one. This Calming Camellia Birthday Card in Fresh Freesia though was really super simple! The stamp does all the work of making a beautiful card!

The card base, as you might have guessed, is Fresh Freesia Cardstock, one of the 2021-23 In Colors. I really like this group of In Colors. I cut the Basic White layer for the card front a little smaller than usual just to let more of the Fresh Freesia color show. It is 5″ x 3 3/4″. I stamped the camellia up a little high in the center of the Basic White with Fresh Freesia ink. The entire image you see on that card is all from the Distinktive stamp, a new type of stamp developed by Stampin’ Up! You don’t have to add anything else to get that full look of all the texture and detail.

The birthday greeting is also in the Calming Camellia Stamp Set so I stamped that near the bottom of the card. I decided not to do a die-cut or punch, but just to stamp right on the card front (unless I messed up!). Then I just tied the Fresh Freesia Open Weave Ribbon around with a bow so it looked like the bow was on the flower stem. That’s all there is to it! I didn’t even add any jewels this time, I just wanted the card to be simple and basic.

Now this stamp set, Calming Camellia, is special because you can’t just purchase it. It’s a Host set to earn with a $300 order during Sale-A-Bration which is quickly coming to an end in less than ten days! It can be all your own order or go in with some friends to reach that amount.

You can earn Sale-A-Bration products by ordering from either of the catalogs plus from the Clearance Rack! Just spend $50 and choose a product in the Sale-A-Bration Brochure. Spend $100 and you have additional choices! No limit to the products you can earn, so shop in $50 increments!

SHOP STAMPIN’ UP! ONLINE HERE!

Calming Camellia Card With Stamped Background

Calming Camellia Stamped Background

What do you think of this beautiful background paper on this Calming Camellia Card With Stamped Background? Could you imagine that it is just a stamped background using the Calming Camellia Stamp Set? This Calming Camellia Stamp Set is available FREE during Sale-A-Bration as a Host Reward with a $300 order, either yours alone or with a group of friends. You can make a card like this one in about five seconds! Well, maybe a tiny bit longer! But this was some of the most satisfying stamping I have ever done!

This Calming Camellia Stamp Set is one of the Stampin’ Up!’s Distinktive** stamps. As Stampin’ Up! describes it, “This is a Distinktive** stamp set; it has a special texture that gives added depth and dimension in a single step, creating photo-realistic images. **Patent pending.” All you have to do is ink up the stamp and you get this beautiful stamping with almost no effort! It’s amazing!

I’ve seen some interesting techniques you can do with this stamp. I saw another Demonstrator on Instagram stamp with certain colors of ink on certain colors of cardstock. I doubt there was anything magical about her choices, she was probably experimenting with ink colors used with certain cardstock colors, which you can do as well! But I thought it was beautiful.

My card today is Flirty Flamingo ink on Blushing Bride cardstock. The card base is Blushing Bride, with a layer of Basic White just to show off the stamped layer a little better. I just made 1/8″ margins instead of the usual 1/4″. The top layer is Blushing Bride cardstock and then stamped with the Calming Camellia largest stamp. The greeting is one that is in the stamp set and I used the Everyday Label Punch. It is stamped in Flirty Flamingo ink. I tried layering it on different shapes and die cuts but in the end, I used my Blending Brush to ink around the edges of the label. I think this helps the white not be so stark against the stamped background yet helps it to stand out a bit almost like a layer underneath.

For some embellishment, I used a piece of the Very Vanilla 3/8″ Scalloped Lace Trim just going across the card underneath the greeting. The Iridescent Rhinestone Basic Jewels are perfect on each side of the greeting.

Let’s talk about the actual stamping! It’s so easy! Just ink up the large camellia stamp and stamp randomly around on the cardstock! You can fill it up completely or leave an empty space. Whatever you like! The stamp really does ALL the work! It is amazing! Of course, you can also just stamp a single image on Basic White or some other color and use that as the focal point on your card or project. I just thought stamping all over the piece of cardstock with this particular stamp was so much fun. I would even say the name of the stamp, “CALMING Camellia” is true! It was so satisfying and calming to stamp with this type of stamp!

Sale-A-Bration ends February 28 so if you need to stock up on ink, cardstock, adhesives, maybe pick up some new products like the Blending Brushes or Water Painters, ribbon, new embellishments, Stampin’ Blends markers you don’t have…..now is the time! Maybe you can earn the Calming Camellia Stamp Set or at least earn some other free products! Another good idea is to purchase a Prepaid Paper Pumpkin Subscription which goes on your Stampin’ Up! order like any other product if you need something good to put yourself up to the level you want!

SHOP STAMPIN’ UP!

Driving By With Beauty of the Earth Paper Card

Driving By With Beauty of the Earth Paper

This Driving By With Beauty of the Earth Paper Card is one that surprised me when I got finished. As I worked on it, with what I first thought was a good idea, I didn’t really think it was going to turn out well and I thought I would have to work on it and rework it to make it into a good card. But when the card was finished, I really liked it! And it’s probably the first time I ever colored in cars! This stamp set, Driving By, is one that you can earn FREE during Sale-A-Bration with a $50 purchase IF you hurry and order before the end of the month. February 28th is the last day! Can you believe we are at the end of Sale-A-Bration already (almosts!)?!

I just got this Driving By Stamp Set recently with my last order but even then I didn’t get to play with it right away. I suppose all the days of making Valentines leading up to Valentine’s Day took away time from some other stamps and cardmaking. Finally I got a chance and made this card.

I thought maybe the Beauty of the Earth Designer Series Paper would have a paper with trees that I could use as a background for my cars. Most of them had very heavy-duty trees and colors and I thought it might overwhelm the little cars. But then I came across this sheet which has a light-colored design that seemed perfect for a little road scene! It reminds me of when you are driving along a highway and see all the trees off the side of the road or maybe even a bit of a haze off in the distance in the trees. When I got the card finished, thought the background paper was perfect for my little scene!

The van and the car (Volkswagon??) are stamped in Memento ink and then colored with Stampin’ Blends. You can choose whatever colors you like. My van is colored with Old Olive (light and dark) Stampin’ Blends and the car with Night of Navy (light and dark). I used one of the light grays for the bumpers and then a darker gray or maybe even the Light Basic Black for the tired. For the windows I colored in lightly with the Light Balmy Blue Marker. I just cut the cars out by hand.

For the roadway, I used a strip of a light gray (I get my grays mixed up!) and just made a hand-drawn divider line with a black marker and a ruler. The van is popped up on Stampin’ Dimensionals®. The car is adhered flat to the card. The card base is Thick Basic White just because I thought I wasn’t going to have layers on my card at first. Then a layer of a dark gray and then the Designer Paper.

The greeting is in the stamp set and is die cut with one of the Tailor Made Tags. I used a piece of the Misty Moonlight ribbon in the 1/8″ Cotton Ribbon Combo Pack because I thought the blue ribbon goes well with the blue car and the duller colors of the trees.

Don’t forget about Sale-A-Bration ending on February 28 and it’s alreaday February 16th! Time flies during a Pandemic! It’s also a good time to stock up on adhesives or cardstock and earn some free products while you’re at it!

SHOP STAMPIN’ UP! HERE!

Daffodil Afternoon Hello Sunshine Card

Daffodil Afternoon Hello Sunshine Card

Our weather here has turned into spring, at least by afternoon, so I thought this Daffodil Afternoon Hello Sunshine Card was appropriate for this week! When you think of spring you often think of daffodils, tulips, and other spring weather flowers. On this card, I only used the Daffodil Afternoon Designer Series Paper, even cutting out the flowers from the paper. This paper will only be available during Sale-A-Bration, which, unfortunately, is going to end on February 28.

The card base is a color I have barely used – Evening Evergreen cardstock. I added a layer of Basic White so the designer paper would show up a little better. I already had these strips cut as scraps and I wanted to use this background of strips of designer paper for the background card design. All I had to do was trim them to 3 3/4″ inches long. They were already 1 1/2″ wide. To get more patterns than three on this card I would have to make the strips narrower. I didn’t really do any math, just placed the strips on the Basic White so they were spaced evenly. I think the middle strip breaks up the strong flower designs of the other papers.

The center piece is one of the die cuts from the Scalloped Contours Dies in Evening Evergreen. Separately, I cut just a Basic White rectangle with the Paper Trimmer to fit inside the die-cut. Then I cut out by hand some of the daffodils in the designer paper and some stems and leaves to arrange on that Basic White center. First I stamped the greeting in the Special Moments Stamp Set. This is a stamp set you can earn with a $100 Sale-A-Bration purchase. It is great as it has so many good sentiments in it. This tiny sentiment fit perfectly in the small space I had for it.

The daffodils are just placed in a pleasing way with a few stems and leaves. Two of the flowers are popped up on Stampin’ Dimensionals. The other one and the stems and leaves are glued down with Multipurpose Liquid Glue. Before I adhered the center piece, I thought it would also make a pretty tag on its own!

This Daffodil Afternoon paper is very pretty and easy to work with to make lots of cards, scrapbook pages, or other projects! Be sure you get some if you like it before it is gone in less than two weeks! Wow!

Shop Stampin’ Up! Online HERE.

Give Yourself Paper Pumpkin For Valentine’s Day!

It’s Valentine’s Day but don’t wait for someone to send you flowers! Get yourself your own gift! Subscribe to the March Paper Pumpkin which I have a feeling is going to be a great kit! Paper Pumpkin is the papercrafting kit that comes to you in the mail once a month. It’s the gift you give yourself, I say! A treat once a month, a project already designed for you with all the supplies in one box, including adhesive! Just open and start crafting!

“From the hands and hearts of our in-house artisans to you—our fellow crafters and creators—comes this month’s breathtaking kit. The Beyond the Horizon Paper Pumpkin Kit includes watercolor prints and designs inspired by the beautiful nature around us to create nine cards and coordinating envelopes. And paper pieces that perfectly coordinate with the New Horizons Suite Collection in the January–June 2022 Mini Catalog.

Don’t forget the FREE stamp set inside (yes—that’s two stamp sets in one kit!) as our way of saying THANK YOU to all of our wonderful Paper Pumpkin subscribers.

With all these marvelous materials and more, we can’t wait to see how you take this kit far beyond the horizon!”

ABOUT THIS MONTH’S KIT

Name: Beyond the Horizon

Details:

  • This month’s kit contains enough elements to create 9 cards—3 each of 3 designs—and 9 coordinating envelopes. This all-inclusive kit includes printed card bases, die-cut paper pieces, embellishments, adhesive, and more!
  • The Beyond the Horizon Paper Pumpkin Kit includes a Misty Moonlight Classic Stampin’ Spot!
  • This kit’s stamp set is perfect for any occasion. With sentiments that say “thanks”, “hello”, “thinking of you,” and so many more, you’ll be able to use this stamp set year round.
  • And if you thought one stamp set was great just wait—this month’s kit comes with a BONUS stamp set for FREE! That’s two stamp sets in one kit! It’s our way of saying THANK YOU to you our Paper Pumpkin subscribers.
  • That’s not all! This kit perfectly coordinates with the New Horizons Suite Collection in our January–June 2022 Mini Catalog Which means even more exclusive elegant watercolor designs curated by our in-house artists just for you!
  • Card size: 4-1/4″ x 5-1/2″ (10.8 x 14 cm)
  • Envelope size: 4-1/2″ x 5-3/4″ (11.4 x 14.6 cm)
  • Coordinating colors: Bumblebee, Calypso Coral, Evening Evergreen, Misty Moonlight, Night of Navy, Old Olive, Pale Papaya

SUBSCRIBE TO PAPER PUMPKIN TODAY!

The deadline is March 10th but do it today so you don’t forget! This is my personal link so you don’t have to look up my name. If you have a Demonstrator you already work with, please ask them for their link

Blessings of Home Floral Bouquet Valentine

Blessing of Home Floral Bouquet Valentine

Although this card has the title of Blessings of Home Floral Bouquet Valentine, it could be a valentine but it could be a wedding card, anniversary card, or engagement card. Change the greeting for a birthday or “thinking of you” card. Flowers can be for almost anything!

I actually wanted to make a card that could be a valentine without hearts like all the other ones I made. I chose this bouquet stamp in the Blessings of Home Stamp Set in the Spring Mini Catalog. I used my Stamparatus to stamp the image on Basic White because I wanted to make sure I got a good impression. As it turned out, it was okay but I re-stamped it which was easy to do with the Stamparatus just to make it a tiny bit darker.

I looked through the Heart & Home Designer Series Paper and decided on this green leafy background which I thought would look good against the bouquet of flowers. The card base turned out to be Melon Mambo cardstock after I colored the flowers. The first layer on the card base is Basic White embossed with the Pretty Flowers Embossing Folder. The designer paper is cut smaller so the embossing shows at least a little bit around the margins.

Can you guess what the flowers are colored with? Almost always I use Stampin’ Blends Markers, but I was in the mood for something different and tried the Watercolor Pencils! We have two different packages of Watercolor Pencils. I used some colors from both boxes. When you color with Watercolor Pencils, you likely will want to use a Blender Pen to smooth and blend the colors. You can actually just kind of scribble in some color and then use the Blender Pen, which is moist, to move the color around and smooth it out. You can’t work it too much or you will rub and moisten the Basic White paper too much. Just a light and quick touch are all you need. Watercolor Pencils always take me back to my early days in Stampin’ Up! when we used Watercolor Pencils a lot and I loved using them with the Blender Pen! Now we have more things for coloring and I think they get forgotten, but they are fun and easy to use.

Stampin' Up! Watercolor Pencils

The whole flower bouquet was die cut with one of the Flowers of Home Dies. You can purchase the stamp set and dies together in the Blessings of Home Bundle and save 10%.

The greeting is stamped in Melon Mambo ink and is from a stamp in the Blessings of Home Stamp Set. It is die cut with one of the Rectangle Stitched Dies. It fits just underneath the floral bouquet, which is popped up on Stampin’ Dimensionals®. For a little sparkle, I adhered three Iridescent Rhinestone Basic Jewels.

Whether you use this card for a Valentine or some other occasion, using the Blessings of Home Stamp Set will guarantee you a pretty card!

Stampin’ Up! Online Store HERE!

Sweet Talk 2-4-6-8 Valentine Gift Bag

Sweet Talk 2-4-6-8 Gift Bag

If you want a quick and easy little Valentine treat or gift bag, this Sweet Talk 2-4-6-8 Valentine Gift Bag is perfect and easy to make! It’s a great way to keep using that cute Sweet Talk Designer Series Paper for Valentine’s Day and even afterward for other occasions and projects.

Once you hear about and learn about stamping and papercrafting, you probably will pretty quickly learn how to make a 2-4-6-8 bag! It’s a basic thing that’s been around as long as I have been stamping! There are variations if you would like a different size so you can always change it up.

Cut a piece of designer paper or cardstock 8 1/2″ x 5 1/2″ for this sample. Score at 2″, 4″, 6″, and 8″. Then turn the paper lengthwise and score at 1 1/2″ to make the bottom flaps. If your paper has a pattern and direction to it, be sure you are scoring it so the images will not be upside down!

Sweet Talk Gift Bag Unassembled

Once the paper is scored, cut the bottom flaps apart with scissors. I like to angle my cut just a tiny bit, not cutting directly on the score line. Sometimes this helps the flaps fold together a little better without that extra paper. That last little 1 1/2″ x 1/2″ piece is cut off, as you can see in the photo above.

Here is a good diagram with all the lines marked.

Diagram 2-4-6-8 Box

Crease all the folds and see how the bag will go together. The adhesive will go on that 1/2″ area on the end. You can use Tear & Tape or Multipurpose Liquid Glue. The glue gives you a little maneuvering time if you need it! Just fold the opposite side over to the narrow flap where the adhesive goes and make sure you have everything straight. You can do this with the paper flat on the table. Then fold the flaps in at the bottom, using a little bit of adhesive where the paper flaps meet. I like to stick my Bone Folder (the rounded end, not the point) down inside the bag and press it around to make sure they are all adhered well.

After everything adheres well and your bag is assembled, pinch in the sides to bring the top together. Often I punch holes in the top through which to run my ribbon to hold it closed, but this time, I just wrapped some Real Red 3/8″ Mini Ruffled Ribbon tightly around the top. You can add a Mini Glue Dot to hold the ribbon in place if you need to. I tied a bow.

To decorate, I die cut a tag from the Sweet Hearts Dies and tied it onto the red ribbon with a bit of Linen Thread. I added a pink die cut heart to the tag and stamped a greeting on a narrow strip of Basic White cardstock. The greeting is from the Banner Year Stamp Set.

Once you know how to make a 2-4-6-8 bag (or box) you are ready to go! You can make them for any occasion, out of cardstock, stamped or unstamped, or designer paper. Decorate as you choose for the person or the occasion. Here is another Valentine 2-4-6-8 gift bag I made two years ago! You can search for other 2-4-6-8 bags on my blog. There are many!

You can even leave the top open and have it be like a box or make a little lid for it. So many choices. I hope this Sweet Talk 2-4-6-8 Valentine Gift Bag will give you ideas for what you can make yourself!

SHOP STAMPIN’ UP! ONLINE HERE!

Sweet Talk Little Envelope Valentine Card

Sweet Talk Little Envelope Valentine Card

I was still in the mood for making a few more valentines, and I got lucky designing this Sweet Talk Little Envelope Valentine Card. I might have thought it up myself, but it turned out the paper size just made this card into what it is! I planned to use my favorite sheet of paper in the Sweet Talk Designer Series Paper which is the top of this card with all the hearts. The other side of that paper is this purple stripe, which I used on this card in my previous post. As it turned out, when I cut my designer paper and cut the length at 5 1/4″, the piece that was left over on the length was this purple stripe piece! Instead of making the whole card front the hearts paper, I added the striped section at the bottom and I really liked it!

Usually, to cover the seam between two papers, I like to add some ribbon. On this card, I added the Real Red 3/8″ Mini Ruffled Ribbon and just tied on an extra piece in a knot, rather than a bow. I was keeping it simple! I adhered this piece to the Real Red card base.

Since there was a die cut that forms that little envelope lying on my table, I decided to just use it! The die in the Sweet Hearts Dies cuts out the envelope and also makes the score lines so all you have to do is fold it up! Add just tiny bits of glue when the paper is going to meet so you keep the envelope “open” if you want to stick in some hearts or something.

I adhered the envelope to the card and then found two cut-out hearts to insert. One is a conversation candy heart from the designer paper that is just cut out by hand and the red and white heart is cut out from the paper sheet with the candy box designs and little bitty hearts. I added a Rhinestone Basic Jewel to the front of the little envelope.

The greeting is stamped in Real Red ink from the Sweet Conversations Stamp Set just on a scrap strip of Basic White Cardstock. I flagged the ends just by cutting with my Paper Snips.

This was an easy card to make, and I say, when you come across a design you like or color combination, or paper combination, go for it! Make several! It was one of those days that after I made this card, I just started making a bunch of similar cards. Some had the same paper combination, some had a different focal point on the front….whatever I came up with! It was so much fun!

If you are still making valentines (or haven’t started yet!) just go for one basic style and as your creativity develops in the moment, change up the paper or the greeting or the embellishments or flip the card from vertical to horizontal. Just play and have fun!

SHOP STAMPIN’ UP! ONLINE HERE!

Nuts & Bolts Valentine For a Girl

Robot card IG

If you envisioned the Nuts & Bolts Stamp Set to be only for making cards for boys, I decided to be “woke” enough (LOL!) to think why not a Nuts & Bolts Valentine For a Girl! I certainly know girls and women work in the field of robotics and science, so why not use this stamp set and card designs for everyone?!

I got the idea for this card from one I saw online when I was looking for ideas. This Demonstrator, Angie Pyjas, made her card into a shadow box so at first, I passed it up, but then I realized I could just use her card for inspiration for a card front. I even simplified her design a little bit, but it was the striped purple paper and the punched hearts that caught my eye!

That striped paper is in the Sweet Talk Designer Series Paper that I love so much! As you can see, once Valentine’s Day is over, use the “other side” of the themed side of the papers which are more generic. You can use these stripes for anything! To go with the striped paper, I used Highland Heather for a card base with a layer of Basic White. The sample I was “copying” used a robot that was cut out and the hearts lower down. I thought I was going to copy that, but I found a scrap of this robot already stamped on a Layering Circle Die. I decided why not use that and see how everything fits?

The robot is colored in with Stampin’ Blends markers. I always get the gray colors mixed up so I don’t remember which ones I used, maybe all of them, plus some Basic Black. I wanted this robot to have a little “feminine” color to it, so instead of light pink, I used Flirty Flamingo that I thought might show up better. I just scribbled on some Flirty Flamingo here and there and blended it with one of the grays, maybe Light Smoky Slate. This robot initially had solid Flirty Flamingo “shoes” or feet but I blended those, too. The gear flower is colored with Highland Heather.

The greeting is stamped on Basic White and punched with one of the punches in the Heart Punch Pack and layered on a Highland Heather scalloped heart in the same punch pack.

I just played around with the placement of everything on the card front and decided the stamped circle would fit and look fine without cutting out the robot! Then I placed the hearts in the upper left of the circle. I added a tiny bow with the White 1/4″ Crinkled Seam Binding Ribbon. I also added some In Color 2021-23 Jewels for some bling. I think I need one more jewel on there so I have an odd number!

As you can see, this Nuts & Bolts Stamp Set is fun for everyone! I liked using this striped paper for a Valentine, but it could have been a birthday card instead of a valentine.

SHOP STAMPIN’ UP!

New Magnet Board Kit in Kits Collection!

Here’s something really new and different from Stampin’ Up! The new Kit in the Kits Collection is the Celebrate Today Magnet Board Kit! What?!

With the Celebrate Today Magnet Board Kit, you can create and customize your very own magnet board with included stickers to organize daily tasks and sentiments of positive affirmations. Since when have daily chores looked so cute?

Watch this video by Sara Douglass and see how the kit works. Of course, you are free to customize your magnet board however you like!

DETAILS


  • Kit includes one framed magnet board
  • Includes sticker sheets, double-sided cards, and double-sided paper to decorate with
  • Includes six magnet clips and two pocket envelopes to attach things to your board
  • Finished magnet board size (inside of frame): 12″ x 12″ (30.5 x 30.5 cm) 
  • Coordinating colors: Basic Black, Blushing Bride, Flirty Flamingo, Melon Mambo, Mint Macaron, Smoky Slate
Magnet Board Kit

Today, Tuesday, February 9 is the first day to purchase this kit! I’m guessing it will be very popular so you might want to grab one early! Remember, Sale-A-Bration is going on the rest of this month so this kit will help you earn FREE Sale-A-Bration products!

SHOP FOR THE MAGNET BOARD KIT HERE!

Early Release Coming: Waves of the Ocean

What could be better during these stressful times than a stamp set and accessories that make us think about beautiful, calming ocean waves, especially if we can’t be on a beach in person?! Stampin’ Up! is doing an early release on March 1, 2022, of this stamp set and dies that will be in the new Stampin’ Up! Annual Catalog PLUS during this promotion period, special blue foil paper, rhinestones, and designer paper.

Demonstrators can order this collection now during February to make samples and get acquainted with the products to be ready for customers to order March 1.

Waves Collection

The Waves of Inspiration Stamp Set and Waves Dies can be ordered separately if desired.
The Waves of Inspiration Stamp Set and Waves of the Ocean Collection are available in English, French, and German.


The following exclusive products are only available while supplies last:
Waves of the Ocean 12″ x 12″ (30.5 x 30.5 cm) Designer Series Paper
Blue Foils 12″ x 12″ (30.5 x 30.5 cm) Specialty Paper
Rhinestone Waves Basic Jewels

Qualifying orders are eligible for Stampin’ Rewards. (Except for the Waves of the Ocean Collection)
Waves of the Ocean items can be added to a starter kit.

Click HERE to view the entire Flyer! (and scroll down, it’s two pages)

COMING MARCH 1st!

Nuts & Bolts Heart Robot Valentine

Nuts & Bolts Heart Robot Valentine

I just got this Nuts & Bolts Stamp Set recently in the Spring Mini Catalog and one of the first valentines I made was this Nuts & Bolts Heart Robot Valentine. This is just a cute stamp set that I couldn’t resist, plus something a little different. I only wish I had two elementary-age little boys who needed to make a pile of valentines for their class parties! Ah, the good old days!!

This little robot stamp set is cute and fun to work with! There are three robot stamps to choose from. You can stamp the robot in one color to match the card or stamp and then color it in with a variety of techniques. For this card, I stamped the robot holding a heart with Memento Ink and then colored him with several different Stampin’ Blends markers. I thought about using my Watercolor Pencils, though, for something different, but the Blends are hard to resist! I pulled out Gray Granite and Smoky Slate plus Basic Black and used probably all of them here and there. To add a little interest to the robot, I used some Pumpkin Pie orange for a little rust and blended it in. You could even use other fun colors for your robots!

I did cut the robot with one of the Layering Circles Dies plus the Real Red layer with one of the scalloped circle dies. I didn’t have a heart diecut the right size so I just used circles!

The card base is Basic Gray with a layer of Real Red. The top layer is Basic White. I stamped the X and O in the Sweet Conversations Stamp Set all across the white cardstock, making my own designer paper! I love to stamp like that! I used one of the lighter grays.

The sentiment is in the stamp set, of course. I happened to have a strip of Basic White that was just the right width, then I trimmed the ends and punched the banner ends with the Tailored Tag Punch. You can use the top point of that tag to make those flagged ends. Really easy!

AFTER I adhered the saying to the card, I decided it didn’t stand out enough so I took my Real Red Stampin’ Blend marker and drew on the edge of that greeting! Pretty risky but it worked! I didn’t mess it up! Since we were talking about nuts & bolts, I used two gold Gilded Gems on each end of the greeting. I think they kind of go with the robot!

Check out the photo below for the rare peek inside the card! I added a Basic White layer stamped with another of the Nuts & Bolts sentiments in the set and another robot. This robot I didn’t color in, just stamped in one of the gray inks. Since I tried stamping the two little hearts and got an extra ink line off to the side, I had to fix it. I simply covered the boo boo with some die cut hearts from the Sweet Hearts Dies! There are no mistakes in stamping!

Nuts & Bolts Heart Robot Valentine Inside

You still might have time to order this Nuts & Bolts Stamp Set or anything else you need for making valentines, but if you don’t get it in time, you can use these cute robots for birthdays or other fun cards!

SHOP STAMPIN’ UP! ONLINE!

Did You Notice All These Spring Mini Products?

The January-June 2022 Mini Catalog has been out for a month already but sometimes I miss one or more of the new products! Certain products get all the attention, it seems, but there are other interesting and good ones, sometimes not noticed as much. So I thought I would mention or give you some closer-up views of a few products! Lots of good stuff in that Spring Mini, that’s for sure!

Supple Shimmer Paper

Did you notice the Supple Shimmer 12″ x 12″ Specialty Paper on page 67? It’s just on the edge of the page and your attention probably goes to the rainbow shaker cards on the same page. You get two sheets of this sparkly glimmer paper, one in pink and one in blue. Almost all of us like a little glimmer on our projects and you can get it with these sheets.

Slimline Envelopes

Did you catch these new Slimline Envelopes? You will for sure notice the Slimline Cards on pages 52-53, but you might miss that you can purchase these Slimline Envelopes for your cards. You get 5 each of three colors – Soft Succulent, White, and Smoky Slate. And inside you’ll see a nice design to make your slimline card even more special when the recipients open the envelope.

Ribbon Evening Evergreen
Ribbon Cotton Combo

Here are two new ribbons you might like. The top one, the Evening Evergreen Windowpane Checked Ribbon, is very noticeable on page 15 and you also see a bit of it on the catalog cover, but I mention it because it’s something different! This 1/8″ Cotton Ribbon Combo Pack doesn’t really jump out on the page of the New Horizons Suite on page 43. I didn’t notice it at first, but later I ordered it and it’s a very nice ribbon, soft and thin. The colors are Petal Pink and Misty Moonlight.

New Horizons Paper

Speaking of the New Horizons Suite, wait until you see this paper in person! At first glance, you might not care for it. Shelli and Sara, on our virtual Stampin’ Up! OnStage event, were “assigned” this Suite for their stamping presentation and even admitted that they didn’t like it at first! I thought their honesty was hilarious! But as most of us do, as they worked with it, they came to love it! Those New Horizons 6″x 6″ papers are just so creative and fascinating! You can cut pieces out of the paper that would give very different looks from one paper. These scenes were handpainted by one of the Stampin’ Up! artists!

Mother of Pearl Paper

This paper is very difficult to photograph because of the glare but maybe you can see the mother of pearl shimmer in this Mother of Pearl 12″ x 12″ Specialty Paper! You’ll find it on page 23 in the Symbols of Fortune Suite. It is stunning and will make you gasp when you first take it out of the package! It’s different than any other paper we have ever had. It’s not a usual glitter or glimmer paper, the shimmer is IN the paper! It’s almost like a car finish! That’s what it reminded me of at first! I haven’t tried it yet, but Stampin’ Up! says it can be stamped on with Stazon.

Embellishments Hexagons and Stars

Here are two different embellishments in the Spring Mini – the Adhesive Backed Hexagons on page 49 and the fun Resin Stars Embellishments. I love to have lots of these little embellishments even if I didn’t purchase the products they go with. You can use stars for lots of projects and the hexagons are something fun and different!

Embellishments Glass and Pebbles

Now these two embellishments are really something different! The Faux Sea Glass Shapes are part of the Artfully Composed Suite. The colors are Basic White, Just Jade, and Old Olive. They really do look like little pieces of sea glass you would find on a beach! You can use them with several other collections in this catalog.

The Pebbles Enamel Shapes are also something different and fun! They are Cinnamon Cider in color plus two grays. So fun to use with the Horizons Papers and some of the scenic stamp sets.

Abstract Beauty Paper4

The Abstract Beauty Suite has some unique products in it! For one thing, the Abstract Beauty Designer Paper is a new size, 4″ x 6″! Did you notice that in the catalog? I overlooked this Suite at first, but then the colors in this Suite caught my eye.

Abstract Beauty Paper3
Abstract Beauty Paper2
Abstract Beauty Paper1
Abstract Beauty Ephemera Pack

This Abstract Beauty Ephemera Pack looks fun! Bright colors and gold foil! Just punch out some of these pieces and add them to your cards or projects.

Abstract Beauty Cards

Here are the Abstract Beauty Cards in the Suite! Use the Ephemera Pack for quick decorating! And you get envelopes too! The cards are the 4″ x 6″ size.

Abstract Beauty Envelopes

So that’s my look at some of the products I just recently received, some that I wouldn’t have thought I would order at first glance through the Spring Mini Catalog. Maybe you didn’t think you were interested in them either at first, but now that I’ve pointed some of them out that you might have missed in the catalog or just didn’t think it was your thing, you might change your mind!

Remember to think of Sale-A-Bration as you order so you can take full advantage of the promotion!

Sweet Talk Conversation Hearts Valentine

Sweet Talk Conversation Hearts Valentine

It’s time to be busy making valentines to send or give out! Valentine’s Day is coming up in about ten days so here is an idea you can use, the Sweet Talk Conversation Hearts Valentine. This is a fairly simple card to make if you like to do some embossing and diecutting.

The card base is Highland Heather, one of the coordinating colors with the Sweet Talk Designer Series Paper. It has a layer of Petal Pink cardstock that is embossed with the Gingham Embossing Folder. I can’t say that this looks like a “gingham” design, but whatever it is, it is fine and makes for a good textured background with no special theme so you can use it on almost anything.

For the focal point of this card, I used one of the Heart & Home Doilies but turned it over to the “other” side, which is white. Maybe not as white as our Basic White cardstock, but not the colored side. So you can get double use out this pack of doilies that have three colors in the package. Underneath the doily, I added a strip of the cute Sweet Talk DSP, the pattern with the conversation hearts, like the popular candy.

In the center of the doily, I found a Layering Circle die that fit in the center for a contrasting background. The cute little envelope is a diecut from the Sweet Hearts Dies. It even makes the score lines for you so it is easy to fold and assemble.

The conversation hearts are cut out from one of the sheets in the Sweet Talk DSP. You could also stamp them with the Sweet Conversations Stamp Set. You can diecut the hearts from the paper or just trim them by hand as I did. Sometimes that is quicker and easier. I just cut out an assortment and placed a couple as if they were inside the envelope and the rest scattered around. I let the hearts act as the greeting on the card and I can still stamp “Happy Valentine’s Day” inside the card. For some sparkle, I added several Champagne Rhinestone Basic Jewels. I have found these rhinestones to be very versatile to use on lots of cards. The color and sparkle goes with a lot of other colors and designs.

On the inside of the card, put a layer of Basic White so you have a lighter place to stamp or write a message. Stamp a few hearts inside or adhere some of the little conversation hearts! Something like that is always a nice surprise for the recipient! Try this Sweet Talk Conversation Hearts Valentine and if you don’t own the paper, just cut plain hearts out of your cardstock and make some similar design!

SHOP STAMPIN’ UP! AND SALE-A-BRATION!