Tag Archives: Sweet Talk Designer Series Paper

Decorated Sweet Little Box

Decorated Sweet Little Box

If you remember seeing the Sweet Little Boxes (157628) in the retiring January-June 2022 Mini Catalog, you might have thought they were only for Valentine’s Day and the designer paper in the Suite was also only for Valentine’s Day. But here I have decorated this assembled Sweet Little Box with “Valentine” paper and a brand new stamp set. So you can stock up while they are half-price and have them on hand!

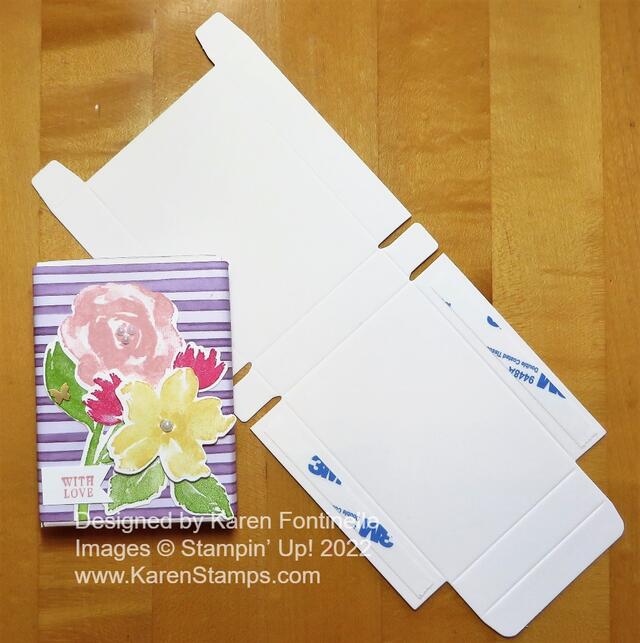
These Sweet Little Boxes are on page 9 of the Spring Mini in the Sweet Talk Suite. The boxes are a small size and are food safe. You can stick a gift card inside, a small gift like a necklace or earrings, or maybe some candy or a small cookie. The boxes assemble easily and even come with adhesive on the sides! I cut a piece of the Sweet Talk Designer Series Paper, the purple stripe, which can be for any occasion. This paper is on sale for 50% off, by the way. I cut a piece 3 3/8″ x 7 1/4″ and wrapped it around with the seam at the back of the box. You could also cut a front and back piece to just glue on the front and back of the box. I also cut a very slim piece for the top of the box, 2 1/2″ x 1/2″.

I stamped some flowers and leaves from the True Beauty Stamp Set to decorate the box. This is a new stamp set and Bundle with the dies in the new Stampin’ Up! Annual Catalog. I used Blushing Bride and So Saffron ink for the two large flowers and Melon Mambo for the small ones for a pop of brighter color. The leaves and stem were all stamped in Granny Apple Green ink. Then I used the Organic Beauty Dies to cut them all out. The little greeting is also in the True Beauty Stamp Set.

For embellishments, I used a little Brushed Brass Butterfly and some of the Iridescent Pearl Basic Jewels on the flowers. I love how this little box turned out! Just remember, during the Last Chance Sale you can save 50% on both the Sweet Talk Designer Series Paper and the Sweet Little Boxes!

SHOP STAMPIN’ UP! ONLINE HERE!

Sweet Talk Little Envelope Valentine Card

Sweet Talk Little Envelope Valentine Card

I was still in the mood for making a few more valentines, and I got lucky designing this Sweet Talk Little Envelope Valentine Card. I might have thought it up myself, but it turned out the paper size just made this card into what it is! I planned to use my favorite sheet of paper in the Sweet Talk Designer Series Paper which is the top of this card with all the hearts. The other side of that paper is this purple stripe, which I used on this card in my previous post. As it turned out, when I cut my designer paper and cut the length at 5 1/4″, the piece that was left over on the length was this purple stripe piece! Instead of making the whole card front the hearts paper, I added the striped section at the bottom and I really liked it!

Usually, to cover the seam between two papers, I like to add some ribbon. On this card, I added the Real Red 3/8″ Mini Ruffled Ribbon and just tied on an extra piece in a knot, rather than a bow. I was keeping it simple! I adhered this piece to the Real Red card base.

Since there was a die cut that forms that little envelope lying on my table, I decided to just use it! The die in the Sweet Hearts Dies cuts out the envelope and also makes the score lines so all you have to do is fold it up! Add just tiny bits of glue when the paper is going to meet so you keep the envelope “open” if you want to stick in some hearts or something.

I adhered the envelope to the card and then found two cut-out hearts to insert. One is a conversation candy heart from the designer paper that is just cut out by hand and the red and white heart is cut out from the paper sheet with the candy box designs and little bitty hearts. I added a Rhinestone Basic Jewel to the front of the little envelope.

The greeting is stamped in Real Red ink from the Sweet Conversations Stamp Set just on a scrap strip of Basic White Cardstock. I flagged the ends just by cutting with my Paper Snips.

This was an easy card to make, and I say, when you come across a design you like or color combination, or paper combination, go for it! Make several! It was one of those days that after I made this card, I just started making a bunch of similar cards. Some had the same paper combination, some had a different focal point on the front….whatever I came up with! It was so much fun!

If you are still making valentines (or haven’t started yet!) just go for one basic style and as your creativity develops in the moment, change up the paper or the greeting or the embellishments or flip the card from vertical to horizontal. Just play and have fun!

SHOP STAMPIN’ UP! ONLINE HERE!

Sweet Talk Conversation Hearts Valentine

Sweet Talk Conversation Hearts Valentine

It’s time to be busy making valentines to send or give out! Valentine’s Day is coming up in about ten days so here is an idea you can use, the Sweet Talk Conversation Hearts Valentine. This is a fairly simple card to make if you like to do some embossing and diecutting.

The card base is Highland Heather, one of the coordinating colors with the Sweet Talk Designer Series Paper. It has a layer of Petal Pink cardstock that is embossed with the Gingham Embossing Folder. I can’t say that this looks like a “gingham” design, but whatever it is, it is fine and makes for a good textured background with no special theme so you can use it on almost anything.

For the focal point of this card, I used one of the Heart & Home Doilies but turned it over to the “other” side, which is white. Maybe not as white as our Basic White cardstock, but not the colored side. So you can get double use out this pack of doilies that have three colors in the package. Underneath the doily, I added a strip of the cute Sweet Talk DSP, the pattern with the conversation hearts, like the popular candy.

In the center of the doily, I found a Layering Circle die that fit in the center for a contrasting background. The cute little envelope is a diecut from the Sweet Hearts Dies. It even makes the score lines for you so it is easy to fold and assemble.

The conversation hearts are cut out from one of the sheets in the Sweet Talk DSP. You could also stamp them with the Sweet Conversations Stamp Set. You can diecut the hearts from the paper or just trim them by hand as I did. Sometimes that is quicker and easier. I just cut out an assortment and placed a couple as if they were inside the envelope and the rest scattered around. I let the hearts act as the greeting on the card and I can still stamp “Happy Valentine’s Day” inside the card. For some sparkle, I added several Champagne Rhinestone Basic Jewels. I have found these rhinestones to be very versatile to use on lots of cards. The color and sparkle goes with a lot of other colors and designs.

On the inside of the card, put a layer of Basic White so you have a lighter place to stamp or write a message. Stamp a few hearts inside or adhere some of the little conversation hearts! Something like that is always a nice surprise for the recipient! Try this Sweet Talk Conversation Hearts Valentine and if you don’t own the paper, just cut plain hearts out of your cardstock and make some similar design!

SHOP STAMPIN’ UP! AND SALE-A-BRATION!

Sweet Conversations Envelope With Hearts Card

We have this week and next to make valentines for our loved ones and friends so here is another card idea. I got this idea, Sweet Conversations Envelope With Hearts Card, from a similar one I saw on the virtual Stampin’ Up! event OnStage I watched back in November but reviewed the other day to make sure I got all the notes I wanted from it!

This card has a Real Red card base and a layer of pink and red hearts on a pattern from the Sweet Talk Designer Series Paper in the Spring Mini Catalog. This has been a really fun designer paper to work with and one of my favorite valentine’s papers! However, we will be able to use the “other side” of the patterns that look more “valentine-y” for more cards throughout the year. I love the stripe on one of the papers, for example!

Copying from the OnStage card I saw, I cut a piece of Vellum Cardstock smaller than normal for a layer and embossed it with the Gingham Embossing Folder. It is cut at 3 1/4″ x 4 1/2″. This Gingham Embossing Folder will be good for almost any background, very versatile.

On top of the vellum is a die-cut rectangle from the Stitched So Sweetly Dies in Basic White. The cute little envelope on top is made with one of the dies in the Sweet Hearts Dies. This die will be cute to use on future cards, as well, not just Valentine’s Day. Just cut it out, then fold on the already scored lines and add a little glue where the edges overlap, especially being careful if you want to stick something down into the envelope. I stamped and cut out two hearts from the Sweet Talk Designer Series Paper or you could stamp them from the Sweet Conversations Stamp Set.

Before adhering the rectangle to the card, I wrapped around the pink ribbon in the 1/8″ Cotton Ribbon Combo and tied a bow. Before adhering the vellum to the card, see where the embossed vellum is going to be and then add adhesive underneath where that rectangle will be placed so the adhesive will not show under the vellum as it is prone to do with vellum.

The greeting is stamped on a narrow strip of Basic White from the Sweet Conversations Stamp Set and flagged the ends to look like a little banner. It is popped up on Stampin’ Dimensionals®. And finally, a Polished Dot embellishment was added to the cute little red envelope adhered to the scalloped rectangle.

On the inside, I added a piece of Basic White on which to stamp a greeting or write a message. To decorate that a bit, I had a scrap of the hearts designer paper 3/4″ x 4″ that I adhered to the bottom of the white cardstock. You could also stamp a few hearts or cut out hearts from the designer paper.

Time to make those valentines and get them in the mail soon if need be! If you’d like to see another card using this same hearts pattern of designer paper, click HERE to see this post. It’s actually a similar design using the rectangle in the center with a decoration on top of it. To see more Valentine ideas, click on the Valentine category in the right sidebar of my blog under “Categories”. I hope you can get some ideas from this Sweet Conversations Envelope With Hearts Card!

SHOP STAMPIN’ UP! HERE!

Sweet Talk Candy Heart Valentine Card

Sweet Talk Candy Hearts Valentine Card

This Sweet Talk Candy Heart Valentine Card is another idea for you as Valentine’s Day creeps up on us! It’s almost February!! This designer paper is so cute you will want to make lots of Valentines to give and send to those you love! Think of how a card with this cute paper, handmade by you, will brighten someone’s day!

The card base is Blushing Bride cardstock, one of the coordinating colors. This paper is the Sweet Talk Designer Series Paper on page 9 of the January-June 2022 Mini Catalog. Every paper in this collection is one you will like. It’s “happy” paper! I chose the print with the conversation hearts. You could use any of those colors of hearts as the card base. Before adhering the designer paper to the card base, I added a strip of the White 3/8″ Glittered Organdy Ribbon vertically on the card, then tied a bow onto the strip of ribbon. The white is sheer but the little pink glitter speckles show up nicely against the card!

Instead of die-cutting, I punched two hearts with the Heart Punch Pack. You get two heart punches, one with a scalloped edge that you can use as a layer to the smaller one, or use the hearts individually. I used these punches on a card in THIS POST just the other day. The scalloped punch is Basic White and the smaller heart is Blushing Bride to match the card base.

To stamp the greeting on this card, I had to use a different technique since the heart wasn’t large enough for the long greeting. I wanted to use the “Happy Valentine’s Day” greeting in the Sweet Conversations Stamp Set but it is long and narrow. I simply stamped it on a strip of Basic White cardstock and then cut the words apart and glued them in place on the heart. To jazz it up a little bit, I added three of the smallest Elegant Faceted Gems.

This, of course, is one of the easiest basic card designs there is! Just change out the designer paper or the color of the card base and add a greeting and you are set! With all the cute and fun designs in the Sweet Talk Designer Series Paper, almost any paper you pick will make for an adorable Valentine!

SHOP STAMPIN’ UP! ONLINE HERE!

Sweet Talk Lots of Love Valentine

Sweet Talk Lots of Love Valentine

This Sweet Talk Lots of Love Valentine seems like one of those traditional valentine cards you would make or send to someone! Lots of hearts, red paper, red and pink hearts, and a doily! Nothing else can say “Valentine” more than that!

Of course, this paper is in the Sweet Talk Designer Series Paper and is layered on a card base of Real Red cardstock. That’s a simple start! All those hearts crowded onto that designer paper really gets you in the mood for Valentine’s Day!

I wanted to use a doily on this card so I pulled out the new Heart & Home Doilies in the new Spring Mini Catalog as part of the Heart & Home Suite Collection. They come in three colors but you can turn them over and use the white side!.

Just because there was a Real Red die cut rectangle from the Scalloped Contours Dies already in my bag of cardstock, I decided to use it behind the doily. I think it helps it stand out a tiny bit against that busy background of all the little hearts.

Instead of using dies, I remembered we actually had a Heart Punch Pack of two coordinating punches! Dies are great but punches are faster! One heart has little scallops around the edge and the other is smaller and plain. I punched the scalloped heart in Real Red and the plain heart in Basic White. The greeting (actually stamped first before punching) is in the Celebrating You Stamp Set in the Spring Mini Catalog. The doily is glued down flat on the card but the hearts are popped up on Stampin’ Dimensionals®.

Since the Sweet Hearts Dies have some little bitty hearts dies, I decided to die cut a bunch of hearts in Real Red and Blushing Bride colors. They are adhered to the Basic White heart to mimic the many hearts on the designer paper. Partly for the sparkle and partly to cover up any bit of glue seeping behind the hearts, I added just three Champagne Rhinestone Jewels to the little hearts!

On the inside of the card, I added a layer of Basic White stamped with “Happy Valentine’s Day” from the Sweet Conversations Stamp Set and two little bitty die-cut hearts I had leftover!

Get Your Valentine Supplies at Stampin’ Up! Today!

Sweet Talk Lots of Love Valentine Closeup

Sweet Talk Candy Valentine Card

All of the papers in the Sweet Talk Designer Series Paper are so cute, but I especially love this paper with the candy! I decided to make a very simple and easy card to show as much of this paper as possible. As simple as it is, when I placed that paper layer on the Real Red card base to make this Sweet Talk Candy Valentine Card I just loved it! You have lots of color choices for a card base using this paper, too!

As I said, this card begins with a base of Real Red cardstock. Why not? It’s for Valentine’s Day! The Sweet Talk paper is cut at 4″ x 5 1/4″. Before adhering to the base, I adhered a piece of Real Red Mini Ruffled Ribbon around the side and then adhered that layer to the card base. Those candies just look so cute and colorful on the card!

For a greeting, I die cut the tag in the Sweet Hearts Dies and stamped the heart with greeting on it with Real Red ink. This little tag is a perfect size! Not too big and not too small. I tied it to the ribbon already on the card with a longer piece and tied a bow. To jazz up the tag a little bit, I added two Real Red die-cut hearts. I could have also stamped two little hearts as well. And of course, what would a Valentine be without a little sparkle, so I added a few Iridescent Rhinestone Basic Jewels to the tag and to the designer paper.

We don’t often show the inside of the card, but I added a layer of Basic White since the Real Red is rather dark for signing or writing a message. The greeting is from the Sweet Conversations Stamp Set. Since I had some extra die cut hearts, I put two of those on the corner of the inside of the card. I could have stamped something as well from that stamp set.

You can purchase the dies and stamp set together in the Sweet Conversations Bundle and save 10% by buying them together! I like that the dies come with one to make a little envelope and that tag I mentioned, plus lots of hearts!

Valentine’s Day is really sneaking up on us fast this year it seems! It’s less than a month away and if you consider a week ahead to mail cards, we have even less time! Think about how much fun making valentines were in elementary school with the construction paper, doilies, and paste! Now we have much better materials to use! Order what you need now so you have plenty of time for Valentine-making fun!

SHOP STAMPIN’ UP! ONLINE!

Sweet Talk Valentine’s Day Card With Tags

Sweet Talk Valentine's Day Card with Tags

Believe it or not, as I’m putting away my Christmas decorations, Valentine’s Day is not so far off, only a month away so here is my first Valentine sample card, Sweet Talk Valentine’s Day Card With Tags. I started this card by simply looking through the very cute Sweet Talk 12″ x 12″ Designer Series Paper and picking out one paper I especially liked. I liked a lot of them, probably all of them!

I decided to place the designer paper on the Real Red card base in a slightly different way. I cut it as wide as the card (4 1/4″) but only 4 1/2″ long. If you place it in the center of the card front, this leaves a 1/2″ margin at the top and bottom of the card. Just something a little different! Before you adhere any designer paper, think about if you want the ribbon to wrap around to the back or whatever else.

While trying to decide what else to do with the card, I looked at the Sweet Hearts Dies and got the idea to use the tag die in there. I decided to die cut and stamp three tags and then sort of string them across the card with some ribbon. I used the Sweet Conversations Stamp Set. You can get the stamp set and dies in the Sweet Conversations Bundle. I stamped a different heart, color, and saying on each one. I used Granny Apple Green, Pool Party, and Real Red outline with a Blushing Bride pink heart. The hearts are two-step stamping. Stamp the outline and words, the stamp the solid heart to fill in if you like.

I used the Real Red Faux Linen Ribbon to string the hearts together and adhered the ribbon around on the back of the designer paper before adhering the paper to the card base. I used Stampin’ Dimensionals® under each tag to hold it in place but you could let them dangle if you wanted to! I also tied a separate bow and adhered it to the top of the middle tag with Mini Glue Dots.

The greeting at the bottom is also in that stamp set. I just stamped it in Real Red ink on a scrap strip of Basic White and also stamped the little flower design on each end. The strip is layered on Real Red just 1/4″ wider and then made the banner ends with the Tailored Tag Punch.

For the grand finale, I had to add some of the new Iridescent Rhinestones Basic Jewels, one on each flower at the end of the greeting and one on each heart on the tags! They look prettier in person than they do on the photo!

When you are trying to think of a card design, just pull out some designer paper and see what speaks to you and see what you come up with! Some ideas will come to you for sure, even if they are simple!

Start thinking about Valentine’s Day because it is only a month away!!

SHOP STAMPIN’ UP! ONLINE HERE!