Tag Archives: Sweet Conversations Stamp Set

Sweet Talk Conversation Hearts Valentine

Sweet Talk Conversation Hearts Valentine

It’s time to be busy making valentines to send or give out! Valentine’s Day is coming up in about ten days so here is an idea you can use, the Sweet Talk Conversation Hearts Valentine. This is a fairly simple card to make if you like to do some embossing and diecutting.

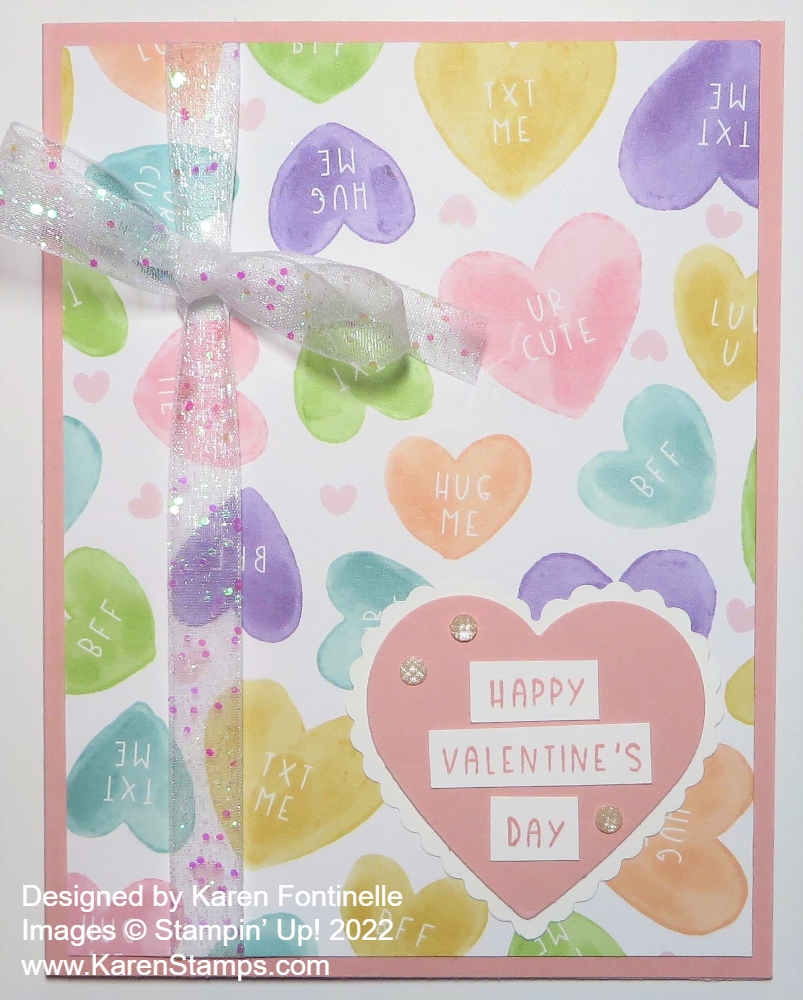
The card base is Highland Heather, one of the coordinating colors with the Sweet Talk Designer Series Paper. It has a layer of Petal Pink cardstock that is embossed with the Gingham Embossing Folder. I can’t say that this looks like a “gingham” design, but whatever it is, it is fine and makes for a good textured background with no special theme so you can use it on almost anything.

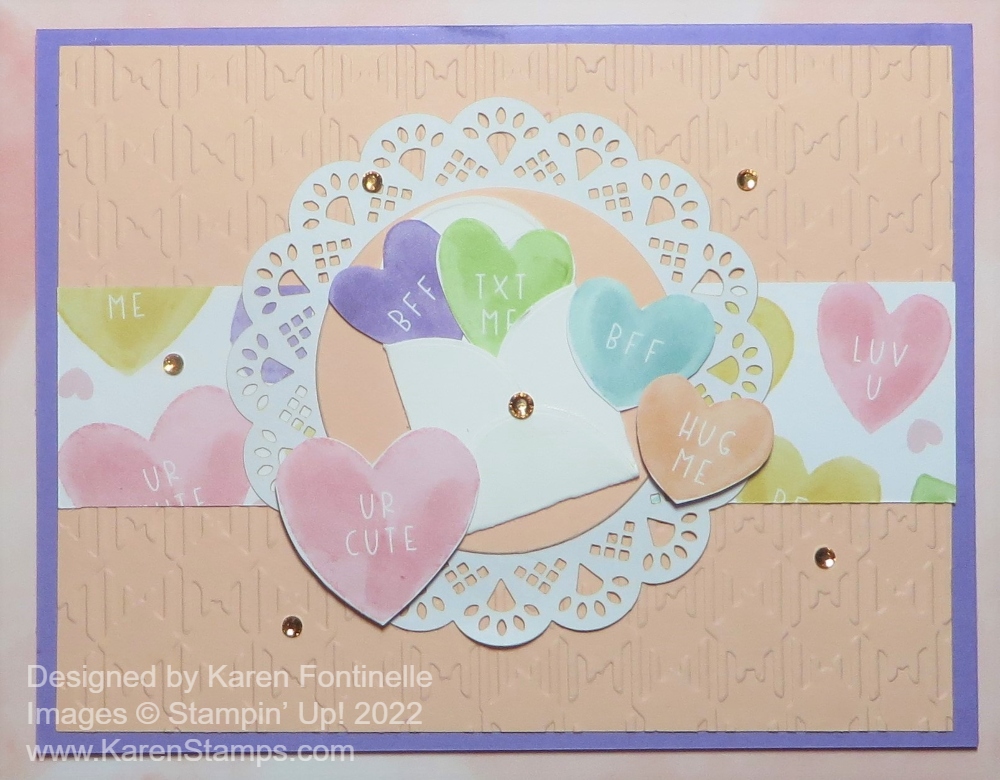
For the focal point of this card, I used one of the Heart & Home Doilies but turned it over to the “other” side, which is white. Maybe not as white as our Basic White cardstock, but not the colored side. So you can get double use out this pack of doilies that have three colors in the package. Underneath the doily, I added a strip of the cute Sweet Talk DSP, the pattern with the conversation hearts, like the popular candy.

In the center of the doily, I found a Layering Circle die that fit in the center for a contrasting background. The cute little envelope is a diecut from the Sweet Hearts Dies. It even makes the score lines for you so it is easy to fold and assemble.

The conversation hearts are cut out from one of the sheets in the Sweet Talk DSP. You could also stamp them with the Sweet Conversations Stamp Set. You can diecut the hearts from the paper or just trim them by hand as I did. Sometimes that is quicker and easier. I just cut out an assortment and placed a couple as if they were inside the envelope and the rest scattered around. I let the hearts act as the greeting on the card and I can still stamp “Happy Valentine’s Day” inside the card. For some sparkle, I added several Champagne Rhinestone Basic Jewels. I have found these rhinestones to be very versatile to use on lots of cards. The color and sparkle goes with a lot of other colors and designs.

On the inside of the card, put a layer of Basic White so you have a lighter place to stamp or write a message. Stamp a few hearts inside or adhere some of the little conversation hearts! Something like that is always a nice surprise for the recipient! Try this Sweet Talk Conversation Hearts Valentine and if you don’t own the paper, just cut plain hearts out of your cardstock and make some similar design!

SHOP STAMPIN’ UP! AND SALE-A-BRATION!

Sweet Talk Candy Heart Valentine Card

Sweet Talk Candy Hearts Valentine Card

This Sweet Talk Candy Heart Valentine Card is another idea for you as Valentine’s Day creeps up on us! It’s almost February!! This designer paper is so cute you will want to make lots of Valentines to give and send to those you love! Think of how a card with this cute paper, handmade by you, will brighten someone’s day!

The card base is Blushing Bride cardstock, one of the coordinating colors. This paper is the Sweet Talk Designer Series Paper on page 9 of the January-June 2022 Mini Catalog. Every paper in this collection is one you will like. It’s “happy” paper! I chose the print with the conversation hearts. You could use any of those colors of hearts as the card base. Before adhering the designer paper to the card base, I added a strip of the White 3/8″ Glittered Organdy Ribbon vertically on the card, then tied a bow onto the strip of ribbon. The white is sheer but the little pink glitter speckles show up nicely against the card!

Instead of die-cutting, I punched two hearts with the Heart Punch Pack. You get two heart punches, one with a scalloped edge that you can use as a layer to the smaller one, or use the hearts individually. I used these punches on a card in THIS POST just the other day. The scalloped punch is Basic White and the smaller heart is Blushing Bride to match the card base.

To stamp the greeting on this card, I had to use a different technique since the heart wasn’t large enough for the long greeting. I wanted to use the “Happy Valentine’s Day” greeting in the Sweet Conversations Stamp Set but it is long and narrow. I simply stamped it on a strip of Basic White cardstock and then cut the words apart and glued them in place on the heart. To jazz it up a little bit, I added three of the smallest Elegant Faceted Gems.

This, of course, is one of the easiest basic card designs there is! Just change out the designer paper or the color of the card base and add a greeting and you are set! With all the cute and fun designs in the Sweet Talk Designer Series Paper, almost any paper you pick will make for an adorable Valentine!

SHOP STAMPIN’ UP! ONLINE HERE!

Sweet Talk Valentine’s Day Card With Tags

Sweet Talk Valentine's Day Card with Tags

Believe it or not, as I’m putting away my Christmas decorations, Valentine’s Day is not so far off, only a month away so here is my first Valentine sample card, Sweet Talk Valentine’s Day Card With Tags. I started this card by simply looking through the very cute Sweet Talk 12″ x 12″ Designer Series Paper and picking out one paper I especially liked. I liked a lot of them, probably all of them!

I decided to place the designer paper on the Real Red card base in a slightly different way. I cut it as wide as the card (4 1/4″) but only 4 1/2″ long. If you place it in the center of the card front, this leaves a 1/2″ margin at the top and bottom of the card. Just something a little different! Before you adhere any designer paper, think about if you want the ribbon to wrap around to the back or whatever else.

While trying to decide what else to do with the card, I looked at the Sweet Hearts Dies and got the idea to use the tag die in there. I decided to die cut and stamp three tags and then sort of string them across the card with some ribbon. I used the Sweet Conversations Stamp Set. You can get the stamp set and dies in the Sweet Conversations Bundle. I stamped a different heart, color, and saying on each one. I used Granny Apple Green, Pool Party, and Real Red outline with a Blushing Bride pink heart. The hearts are two-step stamping. Stamp the outline and words, the stamp the solid heart to fill in if you like.

I used the Real Red Faux Linen Ribbon to string the hearts together and adhered the ribbon around on the back of the designer paper before adhering the paper to the card base. I used Stampin’ Dimensionals® under each tag to hold it in place but you could let them dangle if you wanted to! I also tied a separate bow and adhered it to the top of the middle tag with Mini Glue Dots.

The greeting at the bottom is also in that stamp set. I just stamped it in Real Red ink on a scrap strip of Basic White and also stamped the little flower design on each end. The strip is layered on Real Red just 1/4″ wider and then made the banner ends with the Tailored Tag Punch.

For the grand finale, I had to add some of the new Iridescent Rhinestones Basic Jewels, one on each flower at the end of the greeting and one on each heart on the tags! They look prettier in person than they do on the photo!

When you are trying to think of a card design, just pull out some designer paper and see what speaks to you and see what you come up with! Some ideas will come to you for sure, even if they are simple!

Start thinking about Valentine’s Day because it is only a month away!!

SHOP STAMPIN’ UP! ONLINE HERE!