Amazing Life All-Occasion Happy Life Card

Amazing Life All-Occasion Happy Life Card

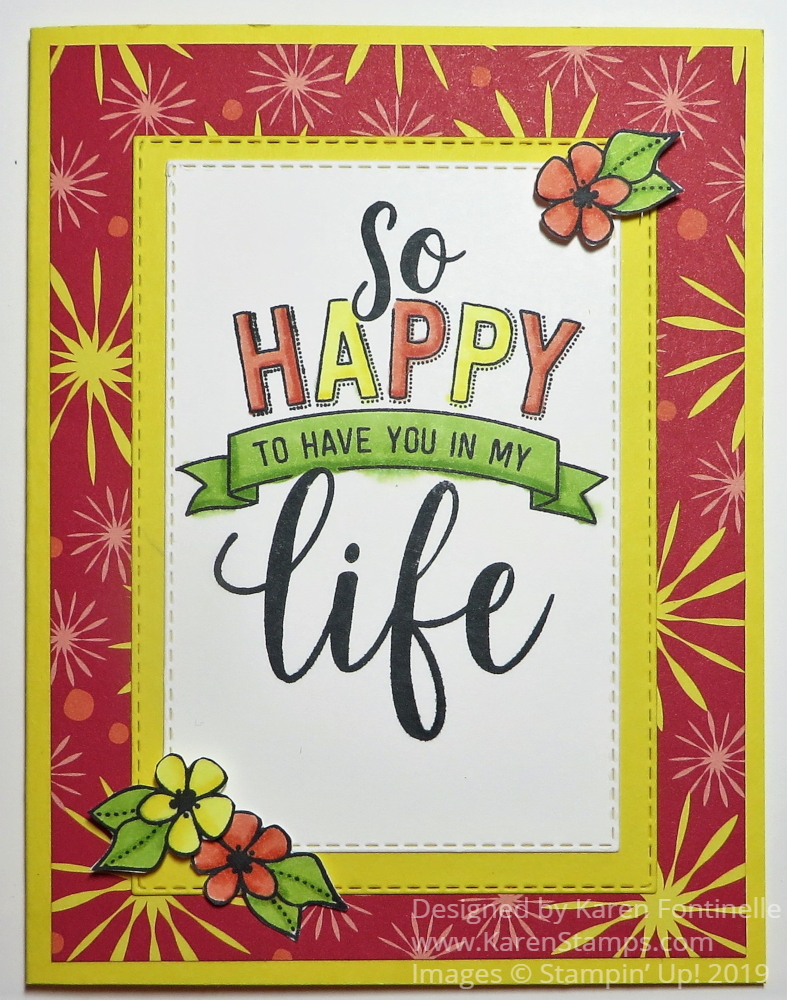
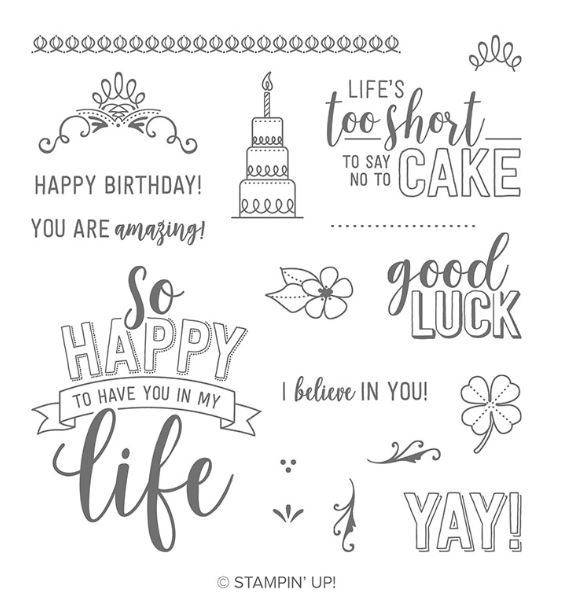
Sad to say, this Amazing Life All-Occasion Happy Life Card is the first time I have used the Amazing Life Stamp Set and now it is on the Last-Chance list! How does that happen? This is a perfectly wonderful stamp set with lots of great greetings, a cute cake, some flowers, and little embellishments.

To make this card, since I hadn’t used this stamp set before, I chose a color for the card that I haven’t used very much, Pineapple Punch. I also chose a paper from the Happiness Blooms Designer Series Paper for the layer on the card. It’s not my favorite paper in the bunch, but it works fine on this card. Actually, it is a good lesson on how to use bold patterns that maybe you don’t care for. If you use extra layers which partially cover up the bold pattern, then obviously it is not as noticeable.

I love this large greeting in the stamp set, and it was so much fun to color in. With the designer paper and the colorful greeting, this is such a “happy” card to send to someone! Whose day wouldn’t be brightened by receiving this card?! I stamped the greeting in Memento Ink and used the Stamparatus® for a couple of reasons. Since it was a new stamp, it was possible it might not stamp clearly the first time. With the Stamparatus I could stamp it over and over again (without moving the paper or the stamp) to make sure I got a good image. And I was right to use the Stampartus…..it took several times to make sure everything was stamped fully! I never could have done that without the Stamparatus.

After stamping the greeting on Whisper White, I die cut that piece with the 4th from the largest of the Rectangle Stitched Dies. Then I cut a layer of Pineapple Punch with the next largest die. I love that they both have that stitched edge! You can purchase the Amazing Life Stamp Set and the Rectangle Dies in a Bundle and save 10% if you order before the new catalog.

The flowers are stamped from the set and just cut out with Paper Snips. Even though I was stamping them on scrap paper, I used the Stamparatus and just moved the plate down one lower hinge at a time to get them all stamped on the paper. I didn’t have to do that but it was easy. Two of the flowers are popped up with the Mini Stampin’ Dimensionals.

That’s it! A pretty easy card to make and I always love the opportunity to color with the Stampin’ Blends Markers. If you like this stamp set, stamps are guaranteed to be available until May 24th since Stampin’ Up! manufactures stamps themselves. Although the Rectangle dies carry over to the new catalog, if you want the stamp set and dies, be sure to order the Bundle and save a little bit of money. Make someone’s day by mailing them a bright and happy card like this Amazing Life All-Occasion Happy Life Card.

SHOP STAMPIN’ UP! ONLINE TODAY!

Hurry & Shop the Stampin’ Up! Clearance Rack!

Clearance Rack Banner 2019

The Stampin’ Up! Clearance Rack has been updated so don’t delay, race right over there and see what you want! Some items could go fast! Right now one of my favorite dies is on there…the Mini Treat Bag Thinlits Dies! Make cute little treat bags with the Big Shot and decorate for any occasion.

There are all kinds of punches, dies, trinkets, designer paper, Watercolor Pencils 2, even a little bit of cardstock. There are some kits if you want to get an early start on Christmas cards. Just check it out!

SHOP STAMPIN’ UP! ONLINE HERE!

Lovely As A Tree Watercolor Card on Earth Day 2019

Lovely As A Tree Watercolor Card

On Earth Day 2019 here is a Lovely As a Tree Watercolor card to celebrate. Earth Day is to celebrate our planet and appreciate nature, and I think one stamp set that can do that is Lovely As a Tree.

Lovely As a Tree has been around longer than I have been a Demonstrator! I see the copyright on the stamp set is 2001. I can’t think of another stamp set that is more classic and just as “current” now as it was 18 years ago. I wonder how many millions of cards and projects have been made with this stamp set!

However, Lovely As a Tree is on the Last-Chance List this year! Say it ain’t so, Stampin’ Up! I know we have other “tree” stamp sets available now, but I doubt anything will fill the shoes of Lovely As a Tree! It was good for masculine cards, Father’s Day cards, all-occasion cards and oh, the gorgeous Christmas cards!!

I’ll always remember with fondness one of the first stamped Christmas cards I learned to make with Lovely as a Tree, Dazzling Diamonds Glitter, and the Two-Way Glue Pen we used to sell! This is a card I made again years later! You can’t always do that with other stamp sets that become outdated, but this set stands the test of time!

Lovely As a Tree Christmas Card

All good things must come to an end, I suppose so this is how I made today’s card. I used the good Shimmery White Cardstock since I thought I would try watercoloring the sky and a background suggesting hills or mountains. Shimmery White will hold up to watercoloring better than Whisper White Cardstock (and not quite as good as real Watercolor Paper).

Lovely As a Tree Watercolor Background

I was going to use Stampin’ Blends markers, but I decided to watercolor the background with my Aqua Painter and ink refills. I simply chose a couple of greens and Crumb Cake for the ground and a couple of blues plus a yellow, pink and coral for the sky. Just lay down the colors! Nothing is professional painting about this! Just pick up some ink with the Aqua Painter or a watercolor brush and paint it on the paper!

When this background dried, I stamped the evergreen trees in the foreground with Mossy Meadow green. I would ink up a stamp and stamp it, then stamp again without reinking. That gives some lighter images. Next, I chose a sentiment to stamp in Memento Ink, but I used my Stamparatus to make sure I got a good image! Good thing I did because I had to over-stamp it a couple of times! That’s why the Stamparatus is so good to have!

Lovely As A Tree Watercolor Card

I had a card base of Mossy Meadow Cardstock and I added a layer of Blushing Bride Cardstock which brought out the pink in the sky. I tried various colors, but I liked the pink the best.

Next, I added a layer of Shimmery White for inside the card since the card base is so dark. I stamped some other trees from the Lovely As a Tree Stamp Set on the inside. There is still room for a greeting or a note.

Lovely As A Tree Watercolor Card

If you don’t already own Lovely As a Tree, you are probably a newer stamper, but don’t let this one get away! If you have to buy it online in the future, I would bet the price might be quite high. Go check it out in the Stampin’ Up! Online Store in the Last-Chance List (sob!).

Lovely As A Tree Stamp Set

If you don’t already own Lovely As a Tree, you are probably a newer stamper, but don’t let this one get away! If you have to buy it online in the future, I would bet the price might be quite high. Go check it out in the Stampin’ Up! Online Store in the Last-Chance List (sob!).

This Lovely As a Tree Watercolor Card for Earth Day is, of course, not just for Earth Day, not by a long shot, but for many, many occasions you will have to send a card!

Fable Friends Bunny and His Basket

Fable Friends Bunny and His Basket

There’s still a little bit of time for Easter bunnies, so here is the cute Fable Friends Easter Bunny and his basket! I wanted to make a gray bunny for a change and I found a way to make some small Easter eggs with a punch!

The other day I discovered that I could use the Christmas Bulb Builder Punch. I just punched out the bulb and trimmed off the little thing on the end. Voila! You have an Easter egg! I just grabbed some scrap cardstock and designer paper to punch out some eggs, even one stamped heart! Instead of laying in the scrap heap, it is now an Easter egg!

The card base is Pear Pizzazz to coordinate with the Floral Romance Specialty Designer Series Paper layer. I liked the look of the leaves as if the bunny is out in the forest with his Easter basket!

The bunny is stamped in Memento Ink and colored in with Stampin’ Blends markers. Love those! I originally thought I would cut out the bunny, but then I thought he might not show up very well so I left him on the Whisper White paper and added the basket. The basket is just a piece of Crumb Cake cardstock embossed with the Basket Weave Embossing Folder. The grass is first stamped with a tiny little grass stamp in the Sheltering Tree Stamp Set. I have actually used this grass stamp a lot! Then I filled in with a Stamping Blends marker. I used Mossy Meadow ink with the stamp and Pear Pizzazz marker. I also sponged a little Balmy Blue ink in the background for some sky. The plain white looked too stark.

The greeting is in the Fable Friends Stamp Set, along with other greetings you can use for other occasions. I used the Tailored Tag Punch to finish off the ends of the greeting. I’m not sure that was the best choice but it’s okay. I used some Gold Faceted Gems for an embellishment. I’m so glad this stamp set is carrying over! It will be great for baby cards also!

Be sure to check the Last-Chance products in the Online Store! That’s the best way to see everything and to see what is still in stock. Click on THIS POST to find the links to the lists and for more information.

If you own the Fable Friends Stamp Set, make a fun bunny card today and give it to someone on Easter!

Chocolate Bunny Easter Joke

Chocolate Bunny Easter Joke

The other day I saw a card online that reminded me of this Chocolate Bunny Easter Joke! I knew I had the Chocolate Bunny Stamp from several(?) years ago and I was able to find it in my huge stash of old retired stamps! Even though it is retired, I couldn’t resist using it for a little Easter funny!

I suppose everyone jokes about which part of a chocolate bunny they bite off first—the rear or the ears! I think I eat the ears first! The important thing is that you HAVE a chocolate bunny to eat at Easter time! I suppose there are less solid chocolate bunnies nowadays than the “empty” ones. Either one is delicious as long as it is chocolate!

You might have noticed that the stamp has the bunny facing one direction, but my Easter card has one bunny facing the opposite direction. So how was this done? It is called “mirror image stamping”. There is a way to do this now with our Stamparatus and I was all ready to use my Stamparatus until I realized…..I had a wood-block stamp! So I went back to the “old-fashioned” technique of doing this.

To do this mirror image stamping, simply ink up the stamp well and stamp the image on a window sheet. Then use the window sheet like a stamp and place it on the paper. I was able to press and rub the image without smearing any ink underneath. The image will be slightly lighter than using the real stamp. On this particular mirror image, I was able to carefully, but not too perfectly, go over some of the lines with the Stampin’ Write Early Espresso Marker, the same color as the ink, just to make it a little darker.

The card is made with a card base of Early Espresso Cardstock with a layer of Pool Party. In order to make it stand out a bit more, I opted to add a layer of Whisper White Cardstock. The bunnies were stamped on Whisper White and cut out.

I had the Make a Difference Stamp Set out to use the letters to spell out the words I used, but I decided instead to just print out the words with the marker. The word bubble stamps are from an old Project Life stamp set. Once I noticed the spray of flowers stamp in the Make a Difference Stamp Set, I used that to stamp, with Versamark Ink, on the Pool Party background.

I have to say, even though I have been purchasing the clear-mount and photopolymer stamps since they came out, with rare exception, having that wood block stamp in my hand as I stamped the chocolate bunnies sure felt good! There is something very satisfying about holding that wood block, even though the other stamps have all their advantages.

I hope you got a laugh out of my Chocolate Bunny Easter card and this old joke that has been around for quite awhile!

Don’t Miss the Paper Pumpkin Kit For May!

Shelli Paper Pumpkin Kit 2019 Flyer

Don’t miss the Paper Pumpkin Kit for May! And the way to make sure that you get this special kit is to subscribe or reactivate your subscription! This kit has been designed by Shelli Gardner, the co-founder of Stampin’ Up! Shelli has always been loved by Demonstrators and I expect this kit to be very popular. It may even sell out so if you are interested I would subscribe now and not wait until the last minute. Subscribe by May 10th for sure!

Just the box alone is almost worth a subscription! It certainly will put you in the mood to take some time to sit down and make the project inside. This “Hugs From Shelli” kit will come in the beautiful vintage-look box and will contain supplies to make 12 cards, 3 each of 4 unique designs. The card in the photo above I can tell you “looks like Shelli” so I am really looking forward to this kit in the mail!

Watch the video below to learn more about it.

I’m sure now you can’t wait to get this May Paper Pumpkin Kit so let me tell you how to get one!

Subscribe by the month HERE!

A Paper Pumpkin kit will automatically be sent to you each month (you will get emails telling you when you have been billed and when your kit has shipped). You can always skip a month if you need to. Every kit is guaranteed by Stampin’ Up! so no risk, no obligation!

OR

Buy a PREPAID PAPER PUMPKIN KIT on your regular Stampin’ Up! order! Lots of information there, too, about Paper Pumpkin!

This is good if you want Paper Pumpkin to count toward a Stampin’ Rewards amount. You can choose a 1-month, 3-month, 6-month, or 12-month subscription. Just use your code you will get in an email to go make yourself an account and activate it before May 10th so you get the May kit! It’s easy!

Even if you already have a month-to-month subscription, you can do the prepaid and the month-to-month will resume after your prepaid kits have been used. I’m doing that right now! No problem!

Either way, I feel sure this is going to be a really good kit and it is a perfect time to try Paper Pumpkin if you haven’t already! Like Shelli says, it is so much fun to receive the Paper Pumpkin Kit in your mailbox and then open it like a gift to yourself and see a project inside all ready to go! No muss, no fuss! No preparation, just make it!

Click the button above to subscribe! This is my personalized link that goes to my Paper Pumpkin page so you don’t have to hunt for my name as your Demonstrator or anything!

Unless you don’t care for Shelli’s style on the sample card, I would say this is the month to try a Paper Pumpkin Kit because I think it will be good! Just sign up by May 10th and preferably, right away!

Add a prepaid subscription to your Stampin’ Up! order if you prefer. For example, if you have a $100 order of Stampin’ Up! products, add a 3-month Prepaid subscription for $57 and then you will have a large enough order ($150+) to earn 10% in Hostess Rewards so you can choose around $15 in free merchandise!

Please share with your friends or on Facebook if you know someone who might be interested and wants some crafting fun in their life!

Whatever you decide to do, don’t miss the

May Paper Pumpkin Kit!

Stampin’ Up! Last-Chance Products 2019

Stampin' Up! Last-Chance Products 2019 Banner
Image (c) Stampin’ Up! 2019

It’s Here! The Stampin’ Up! List of Retiring Products!

(Check Edit at the bottom about Cling Stamps!)

2018-19 Annual Catalog

Download the PDF HERE.

2019 Occasions Catalog

Download the PDF HERE.

SHOP Last-Chance Products Here!

The Fine Print:

Promotion Dates: April 15–June 3, 2019

  • All retiring items are only available while supplies last and will be discontinued after June 3.
  • Due to the high demand for retiring stamp sets, these items will have guaranteed availability until May 24; all other products are not guaranteed and are available while supplies last only.
  • Retiring items are eligible for Stampin’ Rewards with qualifying orders.
  • Retiring host sets may be purchased using Stampin’ Rewards from a qualifying party only. If a customer buys a product at retail price and then it is later discounted, Stampin’ Up! will not refund the difference.

There! That’s enough to get you started I think! You will need your reading glasses or magnifying glass to read the lists! Maybe someone with technical skills will make them better.

Let me know if you have any questions! I haven’t even looked at the list yet! Just wanted to get it up!

SHOP STAMPIN’ UP! ONLINE HERE!

Edited to Add: If it looks like almost all stamp sets are retiring, remember the transition to Cling Stamps! All wood-mount (except Background stamps) and Clear-mount stamps will be replaced with the new Cling Stamps (with the really sticky label!). Here’s a note from Stampin’ Up! plus a list of the Carryover Stamps:

Effective immediately, stamp sets offered in clear-mount or wood-mount in the 2018–2019 annual catalog that are carrying over into the 2019–2020 annual catalog will be offered in clear-mount and/or wood-mount until existing inventory has been depleted or until June 4, 2019 (whichever comes first). If our inventory is depleted, you will be notified of the automatic switch to cling when placing an order for that stamp set. This means that you may end up purchasing select cling stamp sets (in carryover artwork) before they can be ordered from the catalog! All carryover rubber stamp sets will be available in cling medium only (with the exception of background stamps in North America) beginning June 4, 2019.

Carryover Stamps Transitioning to Cling PDF

De-Stress on Tax Day With the Stampin’ Up! Retirement List!

Retirement 2019

Today is Tax Day so I hope you got yours done and sent off to the IRS so this afternoon you can de-stress and relax with the Stampin’ Up! Retirement List later this afternoon at 1:00 PM (MT) when it comes out! You can mark off in the catalog what is going away and decide which Stampin’ Up! products you can’t live without.

Over the weekend the Stampin’ Up! event called OnStage was held in Auckland, New Zealand with local events of one day held in scattered cities around the world. Demonstrators received the next new Stampin’ Up! Annual Catalog, so you can look online and probably find a picture of the cover! They were also allowed to show photos of some of the new stamp sets, paper, and In Colors coming and the prizes and gifts they received. Any Stampin’ Up! event is a fun thing to attend, I can tell you for sure!

Just be thinking ahead if there are things you fear could sell out when the Retirement List comes out today so you are ready to POUNCE! Who knows, of course, but sometimes the In Color refills and cardstock that are going out are the first things to go. Any accessories with those colors are also susceptible! There are new In Colors coming!

The Retiring List is supposed to be released at 1 PM (Mountain Time) (2:00 pm Central) today so give me some time to check it out and get it posted and then come back to my blog and/or Facebook to find out all about it! Get your work done early so you can de-stress with the Retirement List!

Monochromatic Fable Friends Bunny Easter Card

Monochromatic Fable Friends Bunny Easter Card

Even though this Botanical Butterfly Designer Paper is no longer available since Sale-A-Bration ended, but I’ve had this Monochromatic Fable Friends Bunny Easter Card in my mind for a awhile and I imagine a lot of you have this paper from your Sale-A-Bration order.

Easter is only a week away, so if you are pressed for time to make some cards and get them sent out, you might want to make something easy like this card.

The card base is Highland Heather Cardstock, one of the new colors from the current catalog. This is one of the coordinating colors of the Botanical Butterflies paper and we have a whole sheet of this floral Highland Heather all in one color. It was a paper that I could use with the bunny from the Fable Friends Stamp Set. I just trimmed about a 1 1/4″ strip of the floral paper and a layer of Whisper White and adhered the paper to the Whisper White. I tied a ribbon and bow around the strip with the Whisper White 1/8″ Sheer Ribbon. The bunny is stamped in Highland Heather Ink on the Whisper White as is the greeting in the same stamp set of Fable Friends.

Not one to leave things alone, I risked messing up the whole card by coloring in the bunny’s jacket with a Blender Pen and a tiny bit of Highland Heather Ink. I just touched the Blender Pen to the ink pad, wiped it a little bit on my Grid Paper to make it lighter and then colored in the jacket. I even added a bit of the color to the inside of his ears. I think it helps set off the bunny a little bit.

If you really like to color, I would highly recommend coloring in the bunny with whatever method you like…..but if you want to make a super easy, quick card try this monochromatic method. It also works well on the smaller Notecards & Envelopes.

For a quick card, try making something that you can just stamp in one ink color with maybe a coordinating piece of designer paper or ribbon like this Monochromatic Fable Friends Bunny Easter Card.

PS: Remember! The Stampin’ Up! Retiring List comes out tomorrow afternoon, April 15, at 1:00 PM (MT). Also, the Stampin’ Up! OnStage events were held over the weekend so if you look around online, you will find photos of the new catalog cover and some of the new stamp sets, new In Colors, and more!

Easter Candy Chick Treat Holder

Easter Candy Chick Treat Holder

If you need a cute and easy little Easter treat, try this Easter Candy Chick Treat Holder. You just need one strip of paper and a 3D piece of Easter candy that you can display inside. You can change the measurements to fit any size of candy. If you have a larger chocolate bunny you could make this a little wider and taller. You just can’t use the Scalloped Tag Topper Punch on paper cut wider than 2″. There are several variations can do with this project.

My sample starts with a strip of cardstock measuring 8 1/2″ x 2″. I used Flirty Flamingo just for something different. Stick each end into the Scalloped Tag Topper Punch. If your paper is wider, then just leave the top as is, or round the corners, or simply punch a hole for the ribbon. Whatever you would like to do!

Using each scalloped end of the cardstock, put that end on the 3 3/4″ mark on the Stampin’ Trimmer and score. Turn it to the other end, line up the end of the scallop and score at 3 3/4″. Crease both score lines. Then using an Oval die or Oval Punch or another shape, cut out a hole so that you can see the candy later. If you want, put a hole on each side if you want a total see-through. I decided to add a piece of Whisper White 3″ x 1 7/8″, sponged with Pool Party ink and stamped some grass at the bottom. The grass was really a waste since you can’t see it anyway! But I kind of like the light blue background.

Adhere the candy chick, bunny, lamb, whatever you have to the bottom, in between the two score lines. I used just a short line of Snail Adhesive or you could use Mini Glue Dots. Just make sure any glue is not touching the candy!

The little greeting is stamped in Flirty Flamingo Ink from the Itty Bitty Greetings Stamp Set (a must have!). I punched it out with the Classic Label Punch and just trimmed off the banner ends since it was a little too long. Then I added a few little sequins but I’m not sure they look quite right. But I am going to leave them! I tied it closed with the Silver 3/8″ Metallic Ribbon.

I think this Easter Candy Chick Treat Holder is pretty cute, especially the chocolate chick! And it’s very easy, especially if you just copy mine and don’t have to think about how to make it! Have fun stamping!

SHOP STAMPIN’ UP!

Don’t forget to order extra cutting blades for your Stampin’ Trimmer while they are available! There are two in a package and until April 15 you can order 3 packages. April 15 and after you can order 6 packages.

Easy Easter Folded Candy Holders

Easy Easter Folded Candy Holders

If you are looking for some easy little Easter candy treats, these Easy Easter Folded Candy Holders might be just what you are looking for! The basic holder is so simple to make and then you can add whatever you want for the front design.

You can modify the measurements any way you like to suit what you are putting inside. Besides a piece of candy, you could put a tea bag or a small cookie or maybe even a gift card. As I said, just change up the dimensions.

My sample starts with a piece of paper 9 3/4″ x 3 1/2″. Mine uses the Floral Romance Specialty Designer Series Paper. I used the same piece of paper, just opposite sides for the front of the candy holder. When you use designer paper you get to see the opposite side of the paper on the inside. However, you could also use cardstock for the holder and use designer paper for a layer on the front or embellishment. Score the paper at 3 1/4″ from each end. This divides the paper into thirds. The end section on the right-hand side will have a diagonal cut. This piece will fold over and be adhered at the bottom to form a pocket. This is where you can put a piece of candy or tea bag or something. I used Tear & Tape Adhesive.

Easy Easter Folded Candy Holders Inside

On my candy holders, I stamped images from the Fable Friends Stamp Set. These were each colored with Stampin’ Blends markers (although I almost used Watercolor Pencils for a change!) and then die cut and layered on cardstock.

In order to have the ribbon going around to tie the candy holders closed, I popped up the images on the front of the holder with Stampin’ Dimensionals at the top and bottom. That way I could run ribbon underneath, in between the Dimensionals, and around the back. I put a little bit of Snail Adhesive on the back underneath the ribbon to hold it in place. The ribbon is the Whisper White 3/8″ Classic Weave Ribbon. (One advantage of white ribbon is that you can dye it another color with reinkers or maybe markers to match something!)

If you want to see the same kind of candy holder made for Christmas one year, click HERE.

You can make these candy holders for any occasion, of course, and make them as simple or fancy as you like. These work particularly well for the square Ghirardelli chocolate candy. I had these Ghirardelli chocolate eggs, which do fit, but they are not flat like the squares. Use whatever you like or modify the measurements on the candy holder to fit your kind of candy or treat. Go have fun making a few of these easy Easter folded candy holders.

New Major Stampin’ Up! Products Coming!

Breaking News

Big News From Stampin’ Up!

Yesterday we were surprised to hear some big news from Stampin’ Up! about new products that will be coming in the future. If you are on my Mailing List, you got this information yesterday afternoon in my newsletter.

Stampin’ Trimmer Being Replaced

Stampin’ Up! is retiring the Stampin’ Trimmer and all its accessories on June 3rd while they search for a suitable replacement, due to supplier issues. This will leave a gap in time until a new paper cutter is released, which will not particularly affect those of us who already own the trimmer or another paper trimmer. If you are new to stamping or have always wanted this trimmer, NOW is the time to purchase this one. However, if you want to see what new product comes out, then wait and see.

How this affects my customers is that replacement Cutting Blades could be an issue. Stampin’ Up! has increased their inventory and will continue ordering until September. When the retirement list comes out April 15, the Cutting Blades limit will be increased from 3 to 6. Even with increased inventory, these could go on backorder. So….if you need Cutting Blades to last until we get a new trimmer (if you decide to purchase a new one at that time), or RIGHT NOW, then I would order Cutting Blades ASAP and maybe as available throughout the retirement period. In other words, get what you need while you can! (At this moment it looks like the Cutting Mats and Scoring Blades are not available.)

Big Shot Being Replaced

Big Shot Machine

The Big Shot Die-Cutting Machine will be retired as Stampin’ Up! wants to work directly with a manufacturer to better meet our needs and designs after extensive research and evaluation including Demonstrator feedback. This should lead to a better product in the future, but in the meantime, we can still use the Big Shots that we own and even the new dies coming in the new catalog will still work in the Big Shot and any die-cutting machine you may own or purchase. It’s possible, due to machine differences, that maybe something like a shim may be needed with dies. Also, the “fancy” language of Framelits, Thinlits, Textured Impressions Embossing Folders, etc. will be simplified to just “dies” and “embossing folders”.

How this affects my customers is that you can continue to use your Big Shot as long as you like, until a new die-cutting machine comes out and you have the opportunity to choose to purchase or not. There will be new dies in the new catalog, made in a slightly better design. Perhaps we will need to add a shim or finagle something but we will figure it out together! The new die design seems like it will cut closer which will be great! New dies will be the new design. Old dies will continue to be sold until the inventory is depleted, then the new design will take over. There could be backorder situations during this transition.

If there are dies that you want now or in the near future, just like with the Trimmer and Blades, I would order what you want as soon as you can to avoid disappointment. No way to tell what could be sold out. (But of course, there are always new things coming that sometimes make us forget the old things!)

If you have always wanted a Big Shot, buy one now so you have it and you can reassess machines when a new one comes out. I love mine and would hate to do without it, but if you already have one, in a way, nothing changes!

There are no time frames given for these new products so there likely will be a long gap in between the retirement and new products announced. Just my guess.

The Retiring List comes out April 15. Anything you REALLY, REALLY want from the outgoing catalog or Occasions Catalog, I would not wait until April 15 when the rush starts. I’m sure we will hear more information as time goes on. Just keep in mind, Stampin’ Up! is always trying to make our stamping and papercrafting experiences and products as positive and high quality as possible so sometimes we have to go through these bumps in the road! But once the new pavement is down, we are usually very happy with the new products they have released! Keep your fingers crossed and enjoy what we do have!

Let me know if you have any questions/comments about these announcements of new Stampin’ Up! products either in an email or leaving a comment on this post!

SHOP STAMPIN’ UP! ONLINE HERE!

Sign Up For Paper Pumpkin With New Distinktive® Stamps

Paper Pumpkin Distinktive Banner April 2019 Kit

Last Two Days! Sign up now!

The April Paper Pumpkin Kit is going to have something different….brand new Stampin’ Up! Distinktive® stamp images.

This is it! The deadline is tomorrow, April 10th, to get signed up for Paper Pumpkin, the papercrafting kit that Stampin’ Up! sends right to your mailbox each month with a fun project inside, all materials, stamps, and ink included! What could be more fun to look forward to!

What are Distinktive stamp images? Stampin’ Up! says…….

  1. Distinktive stamps give you photo-realistic images with just one stamp. They have a special texture that gives added depth and dimension in a single step.
  2. These stamps are available only from Stampin’ Up! and are made using a patent-pending process.
  3. Distinktive stamps are available in red rubber and photopolymer; Paper Pumpkin’s April kit includes photopolymer stamps.
  4. Shop Distinktive stamps in the online store by searching “Distinktive,” or look for the Distinktive icon in Stampin’ Up! catalogs.

Join Paper Pumpkin today and your April Paper Pumpkin Kit will be in the mail in just another week. Get the first set of Distinktive stamps to appear in Paper Pumpkin. You must subscribe (or reactivate) your subscription by April 10th to receive this kit. Do it now so you don’t miss out!

JOIN PAPER PUMPKIN TODAY!

The link above is my personalized link for my Paper Pumpkin page to make it easy for you to sign up. If you have a Demonstrator you want to use, then go to Paperpumpkin.com and search for their name.

Delightfully Detailed Paper Birthday Card

Delightfully Detailed Paper Birthday Card

Maybe you already had some of this Delightfully Detailed Laser-Cut Specialty Paper or maybe you got some free during Sale-A-Bration, but it’s time to use it on a card something like my Delightfully Detailed Paper Birthday Card.

This paper is beautiful but has to be handled with a little bit of care. Be sure to keep the tissue paper in between the sheets in the package and it’s not a good idea to cut it with the Stampin’ Trimmer. Using a scissors and cutting out a larger piece than you need, then trimming that down, is a lot easier.

Delightfully Detailed Laser-Cut Paper Placement

It seems I rarely use Very Vanilla in my cards, so I flipped the Delightfully Detailed Specialty Paper over to use the Very Vanilla side. One side is white and one side is vanilla so take your pick!

I wanted a monochromatic kind of look, so I used a Very Vanilla card base and layered the laser paper on top. As I said, I cut out a larger piece than I needed with scissors, then sponged very lightly some Multipurpose Liquid Glue on the back side of the paper so it would adhere to the card base. I managed to do this without a gluey mess! Then I just trimmed off the excess with my scissors around the border of the card. Of course, you could also make a smaller layer with the laser paper like we normally do on a card.

For a greeting, I die cut this label piece from the Stitched Labels Framelits Dies and stamped a greeting from the Detailed With Love Stamp Set to make it a birthday card. You could use any greeting. This would make a lovely engagement, wedding, or anniversary card as well. The ink is Calypso Coral and the ribbon tied on the ends is the Calypso Coral 1/4″ Ombre Ribbon.

This is a pretty easy card to make except for the little bit of fussing with the laser-cut paper, handling it carefully so it doesn’t get tangled with itself or tear. You will also find the Beautifully Detailed Laser-Cut Specialty Paper in the Occasions Catalog which is white on one side and Petal Pink on the other.

Here are some other cards I made with the laser-cut paper and a colored card base. This paper comes with 8 sheets, 4 each of 2 designs. The other sheet has sections that you can cut apart to use on cards or other projects rather than the one big floral sheet. You can color the designs as well with markers or sponging color on or using the Sponge Brayer.

This Delightfully Detailed Laser-Cut Specialty Paper provides a different kind of paper that gives a different look to our cardmaking and other projects. It’s always fun to change things up a bit! If you already own this paper, try this Delightfully Detailed Paper Birthday Card or make up your own design!