Category Archives: Easter

Fable Friends Bunny Garden Impressions Easter Card

Fable Friends Bunny Garden Impressions Easter Card

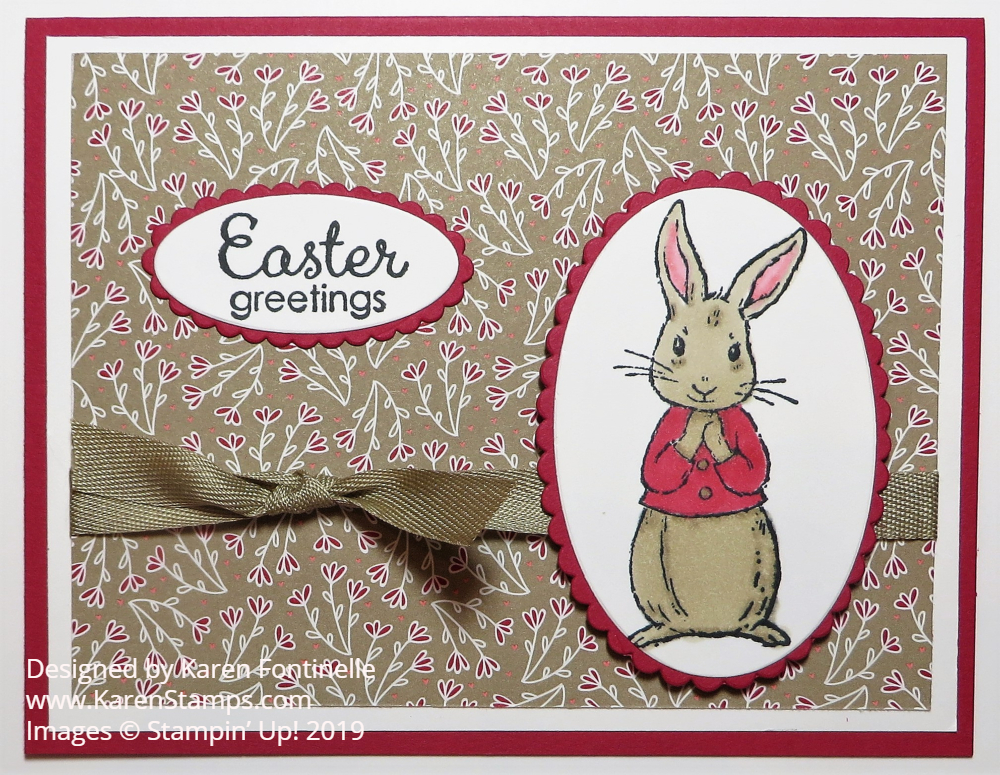
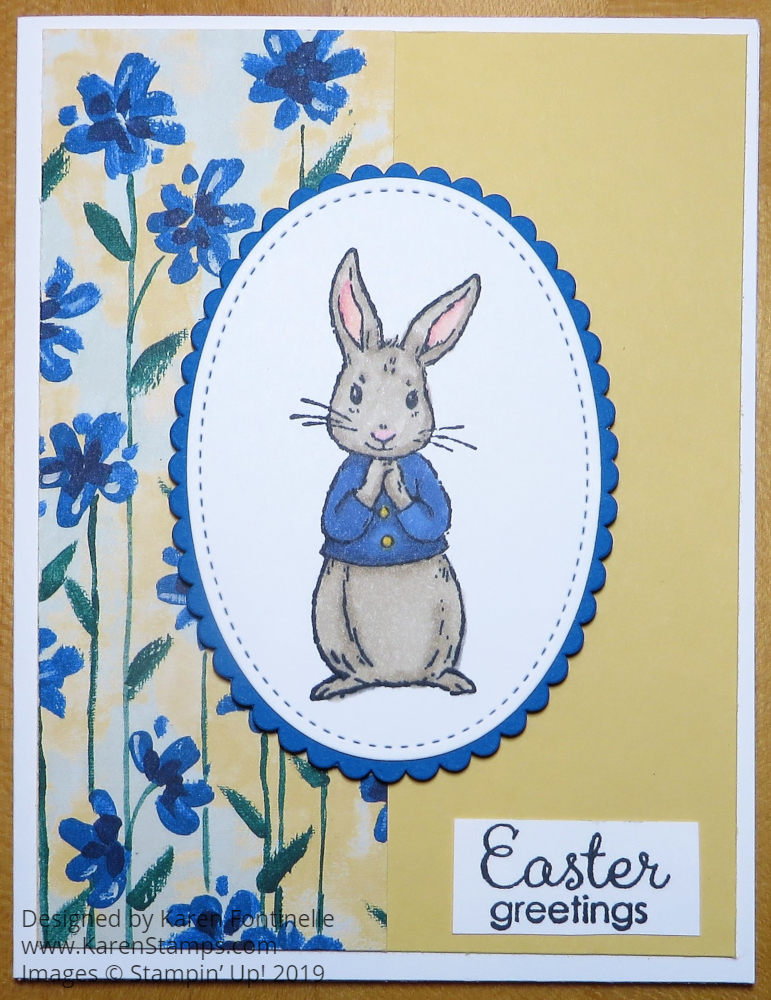
Once you start using the Fable Friends Stamp Set you can hardly stop using this cute bunny for Easter cards! You can make this Fable Friends Bunny Garden Impressions Easter Card or you can change the greeting and have it be a baby card, birthday card, or other occasions. And what a relaxing way to spend some time coloring in this cute bunny!

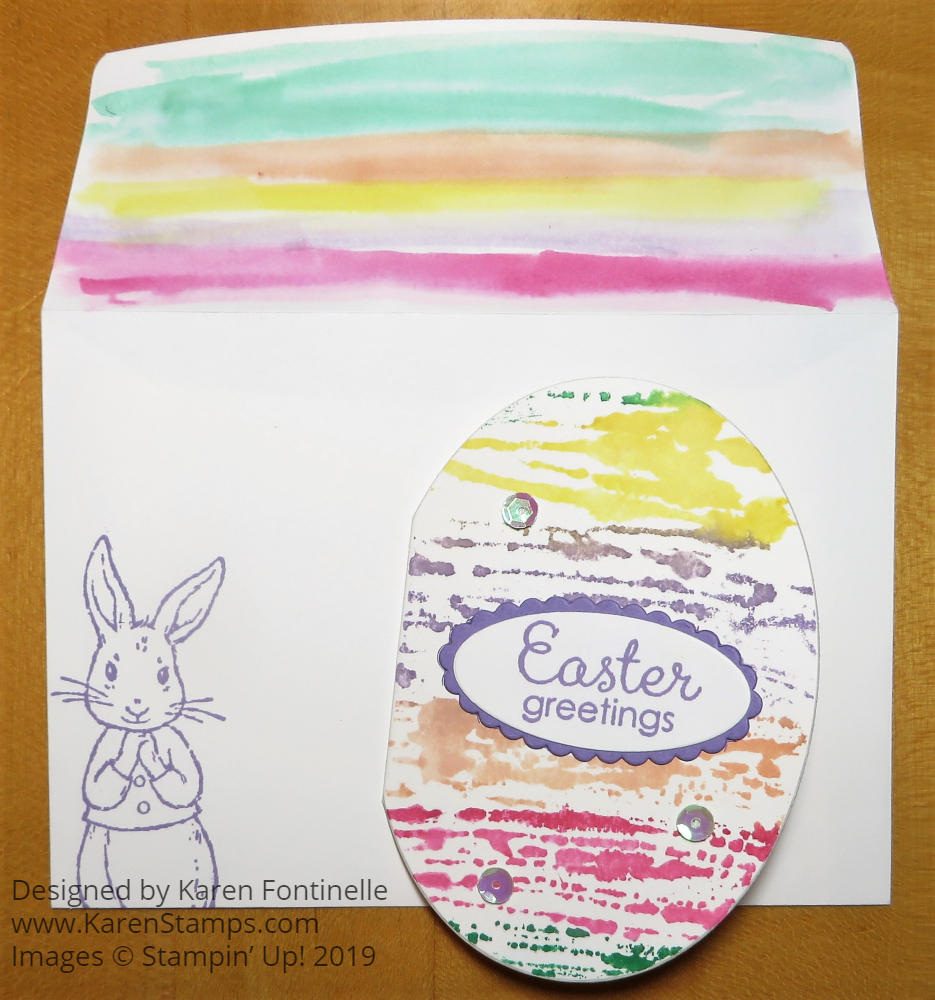
I decided to show a little love to my package of the Garden Impressions 6″ x 6″ Designer Series Paper. I placed a strip of 2″ x 5 1/4″ blue floral pattern on the layer of So Saffron Cardstock. This is all layered on a Whisper White card base. The bunny is colored in to match the flowers on the Garden Impressions paper and I just LOVE how the bunny looks – a little like Peter Rabbit I think! While I first thought the blue color was Night of Navy, some of it is, but some is Pacific Point. I chose to use Pacific Point as the scalloped oval color and the color of the bunny’s jacket. The Night of Navy was too dark but the Pacific Point was perfect!

After coloring in the Fable Friends bunny with Stampin’ Blends markers, I die cut the bunny with the Stitched Shapes Framelits Dies. He is then layered on a scalloped oval in the Layering Ovals Framelits Dies. You can glue the bunny down flat on the card or pop him up on Stampin’ Dimensionals.® I chose the Easter greeting in the Fable Friends Stamp Set but you could make the same card with another greeting. You could add some ribbon as well, but I was keeping it simple.

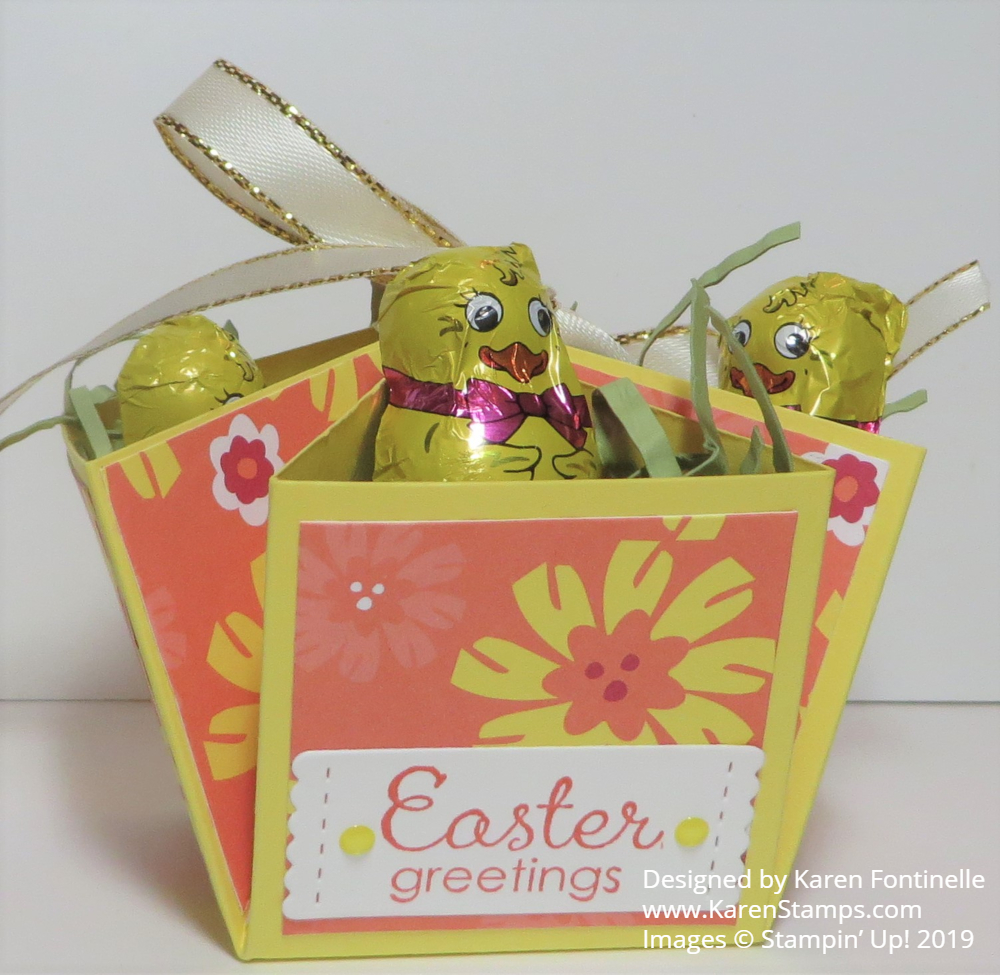
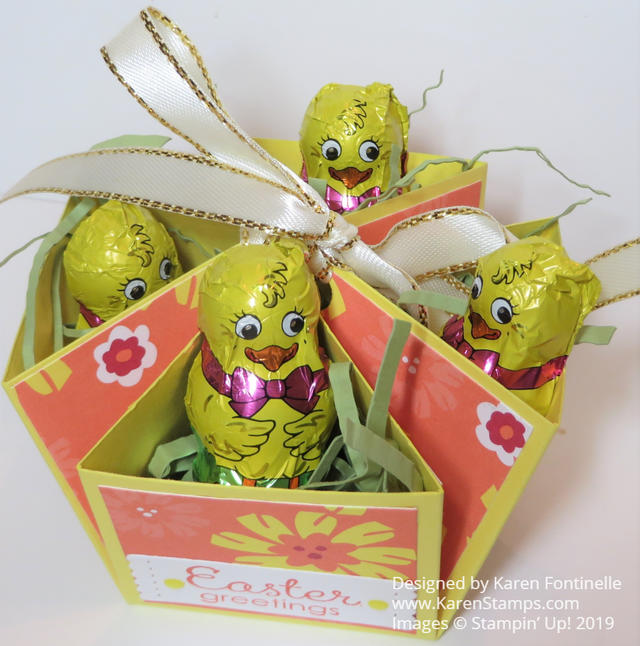
Go check out the Fable Friends Stamp Set for making Easter cards and treats! You will find it in the Stampin’ Up! Online Store from the Occasions Catalog!

Make an Easy Paper Easter Basket

Three Easy Paper Easter Baskets

Here is an easy paper Easter Basket anyone can make, so easy in fact that you can make THREE little Easter baskets for treats! At least here are three different ideas for you to show you what you can make!

Just start with a 6″ x 6″ square piece of paper (I used a sheet of Gingham Gala 6″ x 6″ Designer Series Paper) and score like a tic tac toe. Score at 2″ and 4″, then turn and score at 2″ and 4″. Cut up on the two vertical score lines up to the horizontal score line. Do the same on the opposite side. See the diagram below. Cut a handle of about 8 1/2″ x 1/2″.

Easy Paper Easter Basket Scored Diagram

Crease and fold all score lines. If you like, use the Detailed Trio Punch to round all four corners. Or you can leave them as is. Form the paper into a basket and use brads or glue to hold the sides and handle together. The handle goes in between the two side flaps and the center flap. That hides it a little bit on the inside.

Easy Paper Easter Basket Assembled

Decorate however you like. I made a bunny face with a Circle Die and two Oval Dies (or you could use punches) and then used the tip end of Stampin’ Blends markers to draw on the pieces to make a face. Just adhere to the side of the basket with Stampin’ Dimensionals.

Easy Paper Easter Basket With Bunny

If you would like to use cardstock for the basket and decorate with some designer paper, this is how you would do it! I used Melon Mambo Cardstock and Garden Impressions 6″ x 6″ Designer Series Paper. Everything else is the same as the gingham bunny basket.

Easy Paper Easter Basket with DSP
Easy Paper Easter Basket with Daisy

For this basket, I used the Daisy Punch to punch two layers and adhered the flower to the side of the basket. I added a Gold Faceted Gem to the center.

Easy Paper Easter Basket Stamped

For my last basket, I simply stamped on the cardstock to decorate it! It uses Pool Party Cardstock and the flower is from the Painted Glass Stamp Set. To finish it off, I tied a bow with the Petal Pink/Whisper White Variegated Ribbon.

Now just fill the basket(s) with some Easter grass or paper shred and fill with some delicious Easter candy! These would make cute treats for someone or a cute table favor for Easter dinner.

Have fun making your Easy Paper Easter Baskets!

Watercolored Easter Egg Notecard

Watercolored Easter Egg Notecard

The other day I saw on Facebook a Stampin’ Up! post of a stamping technique that a French Demonstrator, on the Artisan Design Team, had used on a card using the acrylic blocks. I had already been reminded of an Easter card I made of an oval shape and decorated like an Easter egg, so I used her technique to make a Watercolored Easter Egg Notecard.

You can use the largest oval framelit in the Layering Ovals Framelits Dies to make this card although it is a little small. If you want a larger card you will need some kind of template. I just used a notecard in the Note Card & Envelopes since the egg will be small anyway. Fold the note card and position the largest oval die over the note card (closed) but having it off the card a bit over the fold. In other words, you do not want to cut a portion of the fold. If you do, you will have two ovals cut out of the Note Card but they won’t be connected by the fold. Just slide the oval off to the left a little bit so you will still have a fold.

You can see how I made an Easter egg-shaped card HERE a few years ago. The die will cut through the two layers of the card and still have a fold as long as you move the die to the left of the fold.

This is how I colored my egg card. I used a larger acrylic block that the egg could fit on. Then I chose several colors of ink pads and picked up ink from each color with my Aqua Painter one at a time and colored it onto the acrylic block. Instead of picking up the block and stamping it on the card, I placed the front of the egg card down onto the acrylic block loaded with stripes of colors of watery ink. Just press and then lift up carefully.

Depending on how much ink and how much water from your Aqua Painter (or brush) that you use and how you lay down the colors, you will get a different look on your card each time you make one. It’s really fun to do a technique where each time the final look will be a surprise! You could also color directly on the card, but Whisper White cardstock doesn’t hold up really well to very much water. I would recommend using Shimmery White Cardstock.

To decorate my Easter card, I used the Easter greeting from the Fable Friends Stamp Set. It is stamped in Highland Heather ink and layered on Highland Heather Cardstock, both die cut from the Layering Ovals Framelits Dies. For a little bling, I added some self-adhesive Basic Sequins.

As I was getting an envelope for the note card, I decided to color the envelope flap to match. It doesn’t match exactly because I didn’t use an acrylic block, I just colored directly onto the envelope flap. This does make the flap a little “warpy” and the glue on the flap inside gets a little damp so make sure the flap is open. And finally I stamped the bunny from the Fable Friends Stamp Set in Highland Heather on the front of the envelope.

This is a pretty small little Easter egg card but very cute and fun! You can try this technique or you can make one like the one I linked to from three years ago. Of course you can use this ink-on-the-acrylic-block technique to make lots of different kinds of cards, even just stamping the block onto cardstock and leaving a rectangular stamped shape as the Artisan team member did. Get out some ink and an acrylic block and experiment for yourself in making whatever cards you like or one for Easter like my Watercolored Easter Egg Notecard.

SALE-A-BRATION ENDS SUNDAY, MARCH 31! DON’T MISS IT!

Small Easter Basket With Scalloped Tag Punch

Small Easter Basket With Scalloped Tag Punch

If you are looking for a fun and easy little basket, try this Small Easter Basket with the Scalloped Tag Punch. It is really easy to make and you can decorate it however you like. The Scalloped Tag Topper Punch makes cute sides with an opening for the handle, but if you didn’t have this punch, you could just leave the side as is, unpunched. I just love this cute little Easter candy I found! It looks so cute in a little basket! Some chocolate eggs would be nice, too!

It’s very easy to make this little basket! I used Calypso Coral Cardstock with a layer of Happiness Blooms Designer Series Paper on the front and back sides. You could use whatever paper you like, or stamp the cardstock, heat emboss, or emboss with the Big Shot and a folder. Anything goes! To make the basket, cut two strips of cardstock 2″ x 7 1/2″ and punch one end on each strip with the Scalloped Tag Topper Punch. Score at 3″ from the scalloped top and fold. Those will be the ends of the basket and you can adhere the bottom pieces together, one on top of the other.

Also cut two pieces of cardstock 2″ x 5 1/2″.  Score 1/2″ at each end. These pieces will be the front and back sides of the basket. If you are going to adhere designer paper or stamp or decorate these two pieces, it’s a good idea to do it before you assemble the basket. The designer paper pieces are cut at 1 3/4″ x 5 1/4″. Once you have everything ready, glue all the pieces together to form the basket.

For the handle, cut a strip 1/2″ x 8 1/2″. Insert each end through the scalloped tag punch opening and glue to inside of basket. See photo of inside.

Small Easter Basket With Scalloped Tag Punch Handle

Just to decorate the basket a little, I tied around a piece of Calypso Coral 3/8″ Satin Ribbon. You could make a little paper flower or add an Easter greeting or whatever you like!

Go get your “craft supplies” (chocolate candy!) at the store and then make some Easter baskets like this Small Easter Basket With Scalloped Tag Punch.

Don’t Miss Stampin’ Up! Sale-A-Bration!

Fable Friends Bunny Easter Card

Fable Friends Bunny Easter Card

It’s time to start making Easter cards like this Fable Friends Bunny Easter Card. Isn’t that bunny the cutest thing?! This is an easy card to make so you could make multiples and make lots of people happy to receive a card from you during the Easter season. The Fable Friends Stamp Set is great for Easter but you can also use it for other cards, like for a baby.

The card base is Lovely Lipstick with a layer of Whisper White under the designer paper which is from the All My Love Designer Series Paper. Don’t tell anybody, but I stamped the bunny on the middle part of the Whisper White paper, die cut it and then used that piece as the layer. Nobody will ever know that there is an oval hole in the Whisper White layer unless they take the card apart! You can save a little bit of paper this way although I don’t always think of doing that little trick.

The bunny is stamped in Memento Black Ink. This is the ink that works with the Stampin’ Blends alcohol markers. I love to color with these markers! Just pick out whatever colors you like. The bunny is easy to color! This oval piece is layered on a scalloped oval Lovely Lipstick piece.

The ribbon is the Crumb Cake 3/8″ Classic Weave Ribbon . This ribbon has a very nice soft feel to it. I just tied a knot to keep it simple and popped the bunny up on Stampin’ Dimensionals.

The greeting is from the same Fable Friends Stamp Set and layered on a piece of Lovely Lipstick.

That’s it! That’s all there is to this easy Easter card using the Fable Friends stamp set. Easter is a month away so you have time to order this stamp set, add a few things, and reach $50 so you can take advantage of Sale-A-Bration! Get a free product with each $50 you spend. Don’t miss it!

Shop Stampin’ Up! Online!

An Easy Candy Basket For Easter With Candy Chicks

Candy Basket For Easter With Candy Chicks

Here is a fun little Easy Candy Basket For Easter With Candy Chicks, one you may have made in the past to fill with candy. Easter is late this year, but it will still sneak up on us! Now is the time to start having fun making Easter cards to send and maybe some little projects for your Easter dinner or home decorations!

This small little basket is made with just a 6″ x 6″ piece of cardstock and pieces of designer paper. Score at 2″ and 4″ on each side so it ends up looking like a tic tac toe board with six sections. Then on each corner, score diagonally. You can do it easily with the Stampin’ Trimmer by lining up the top and bottom corners on the cutting track of the Trimmer. Don’t score all the way down the paper, just in that corner. That center piece will be the bottom of the basket. See photo below.

Candy Basket How to Score

This is what your paper will look like when it is all scored and creased.

Candy Basket Scored Piece

After the scoring is done, be sure to crease on all the score lines and just see how it is going to fold up into a basket when assembled. Note where the bottom is and put an X on the bottom with a pencil just so you know. Then cut and adhere pieces of designer series paper (or stamp on the cardstock) to each area. The squares will be 1 3/4″ x 1 3/4″. Note that for the four pieces that will go on the corners must be cut diagonally in half and adhered on each half of that scored corner. You do not need a piece of designer paper for the bottom of the basket, that you have already marked.

Candy Basket with Designer Paper

To assemble the basket just fold up into a container shape, folding those diagonal corners in. The way the basket will stay together is by tieing the four corners together in the center. In order to do that, you will need to punch a hole in each corner. It’s probably best to do this after you adhere the designer paper, but you can do it to the plain cardstock and then just re-punch if needed. You can see the punched holes in the corners in the photo above if you look closely. Run some ribbon around through the holes and then pull and gather the corners to the center and tie the ribbon into a bow.

Candy Basket Top View

Add some shred or make your own by cutting very narrow strips of cardstock and crinkle with your hands or with a paper crimper. Then add your treats, like these chocolate Easter chicks!

Chocolate Candy for Easter

I spotted this candy at Home Goods and thought it would be perfect for Easter projects…..and it tastes good too!

My basket is made with Pineapple Punch Cardstock and Happiness Blooms Designer Series Paper. If you are using a paper with a certain pattern, make sure you have each piece going the way you want it to go on the finished basket. The ribbon is the Gold 3/8″ Metallic-Edge Ribbon. The Easter greeting is stamped from the Fable Friends Stamp Set and die-cut with a die in the Stitched Labels Framelits Dies. If you didn’t have this die set you could just cut a rectangle or an oval for the front of the basket.

Candy Basket Full View

That’s how you make this Easy Candy Basket For Easter With Candy Chicks and anyone can do it, even with a larger piece of cardstock. Make one for a little Easter treat or decoration at your house!

SHOP STAMPIN’ UP! ONLINE HERE! SALE-A-BRATION ENDS MARCH 31!

SALE-A-BRATION ENDS MARCH 31!

Looking For Last Minute Easter Papercrafting Ideas?

Easter Collage

In case you are looking for some last minute Easter papercrafting ideas, here are some of my projects from past years! If you don’t have the newest Stampin’ Up! products, maybe you have some of these supplies!  Even if you don’t make this exact project, it might just give you an idea of something close that you want to make with the supplies that you have!

I think the Circle of Spring Easter Card is a beautiful card to make with that pretty wreath that you can customize for any season or occasion.  You can just stamp the wreath with the Circle of Spring Stamp Set and then easily color it in with markers or an Aqua Painter. If you have the Wonderful Wreath Framelits Dies you can cut out the wreath and then adhere it to the front of your card.

The Easter Lamb Easter Card is one of my favorites!  I loved that Easter Lamb stamp from a previous year in the Occasions Catalog!  The background was stamped with the Watercolor Wash Background Stamp.

The card with the Easter cross is actually pretty easy and you can make it with any little flower punch or die you have! I accented each flower with a little Rhinestone Jewel in the center. The back layer is embossed with an embossing folder, don’t remember which one.

You can also make an oval Easter egg-shaped card if you have the Layering Ovals Framelits Dies or the older retired Oval Die. Then the egg is colored with the curved swish from the Work of Art Stamp Set.

I used the Easter Lamb again on the Easter Basket made with the Berry Basket Die (retired). There are many ways you can make a little Easter basket, much like you would make a gift box.

And the last card is the Emboss Resist  Watercolor Easter Egg CardIt’s fun to make by stamping with Versamark Ink on Watercolor Paper and then embossing with Clear Embossing Powder and watercoloring over it.  The embossing resists the watercolor so it’s almost like when you dye Easter eggs but first write on the eggshell with a wax crayon! Remember doing that as kids?!

There are lots of fun spring and Easter papercrafting ideas, just find some project you like and go for it!

Shop Stampin’ Up! Online 24/7 


Easter Basket of Flowers Card on a Basket Weave Background

Easter Basket of Flowers Card on a Basket Weave Background

Images (c) Stampin’ Up! 2018 Design by Karen Fontinelle

Easter is fast approaching so you might enjoy making an Easter Basket of Flowers Card on a Basket Weave Background. Even if you don’t have these exact supplies, this card might give you an idea for your own creation with whatever supplies you own!

I’ve said it before, but I’ll say it again.  This Basket Weave Dynamic Embossing Folder works magic on a plain piece of cardstock!  You will just gasp when you take the paper out of the folder and see the deep embossing that looks like basket weave!  For best results, spritz some water lightly on the cardstock first, or some people recommend spritzing rubbing alcohol. Rubbing alcohol tends to dry faster but really by the time I run the paper through the Big Shot and work on my card, my paper is dry.  Don’t get it “wet”…just spritz it.

The Basket Weave Folder is available in a Bundle with the Blossoming Basket Stamp Set during Sale-A-Bration with a $100 purchase. And if you would rather pay for it in the future, you will be able to buy the Embossing Folder in the new Stampin’ Up! Annual Catalog.  Either way, I think you will LOVE this embssoing folder!  And of course it is perfect for Easter and Spring cards!

For this card, I embossed Crumb Cake Cardstock for the basket weave background and adhered that to a card base of Whisper White Cardstock.

The basket of Easter flowers is stamped with the Blossoming Basket Stamp Set and colored in.  Even though the Stampin’ Blends markers are not orderable right now, you can use other coloring techniques like the Watercolor Pencils and Blender Pen.  I cut out the basket just around the outside and left the part inside the handle alone. I don’t think it takes anything away from the look of the basket.  Besides, the pretty bow at the top of the basket will catch the eye of anyone looking at the card!  The ribbon is the Gold 3/8″ Metallic-Edge Ribbon.

And for a little something to set off the basket, I pulled out a doily from my stash!  Sometimes a doily or even a piece of a doily is just what a card needs!  This one is the Delicate White Doilies by Stampin’ Up!  I really like the look of the doily on this card!

The greeting is from Teeny Tiny Wishes, the stamp set that has practically every greeting you will need!  It’s punched with the Classic Label Punch and accented with two Enamel Shapes.

There you have it! A card you could use for Easter, for spring, for a birthday, anniversary, and more! Make a card you can send someone for Easter or another occasion like this Easter Basket of Flowers Card on a Basket Weave Background.

Sale-A-Bration Ends March 31st!


Springtime Foils All-Occasion Butterfly Card

Springtime Foils All-Occasion Butterfly Card

This Springtime Foils All-Occasion Butterfly Card  can suit almost any occasion, it would even make a pretty Easter card with an Easter greeting or springtime.  After all, it uses the Springtime Foils Specialty Designer Series Paper, still available this week during Sale-A-Bration.

This is another card I made the the other day when I was making a stack of cards with the Springtime Foils Paper.  This paper is so pretty you almost don’t need to do anything else to it except add a greeting if you like. On this card, I used two different patterns of the paper, side by side (with a tiny bit of overlap). I also colored in the flowers with some of the Stampin’ Blends alcohol markers that unfortunately are not available right now until they get them restocked.

The butterfly is cut with a die we’ve had for awhile, the Butterflies Thinlits Dies. Some dies are just classic and can be used for a lot of things.  This is one of them. I cut the butterfly out of the Copper Foil Sheet.  All of our foil paper is so gorgeous!

The ribbon adds something to the card.  Sometimes I have to remember to tie it around the paper before I glue it down to the card!  This ribbon is the Pool Party 3/8″ Shimmer Ribbon.  Very pretty!

Here is the card from the other day that I made using the Springtime Foils paper and the butterfly.

All this card needs is a greeting before you put it in an envelope!  And really, I think it could just go the way it is and you can write a personal note inside or a greeting.  Not every card has to have a greeting on the front, but that’s what we usually do.

You could make a card design like this with any designer paper you have.  Get into your stash and see what you can make, something like this Springtime Foils All-Occasion Butterfly Card.

Last week for Stampin’ Up! Sale-A-Bration!  Ends March 31.


Easy Easter Bunny Clear Tiny Treat Box

Easy Easter Bunny Clear Tiny Treat BoxIf you want to make something for a little Easter treat, try this quick and Easy Easter Bunny Clear Tiny Treat Box. These little treat boxes are handy to have on hand for when you want to take a little treat to someone and it is almost time to walk out the door!  Yes, it would be better to plan ahead, but if you didn’t……you can do this!  And the recipient will love it!

These Clear Tiny Treat Boxes are very small and come flat so they are easy to store!  Just take one out when you need it and unfold and assemble.  I happened to have a little bit of brown “shred” from another package and I thought it would look cute in this treat box.  Then I put some Easter chocolates inside and tied up the box with the Powder Pink 3/8″ Shimmer Ribbon.

To decorate the box, I stamped the bunny from the We Must Celebrate Stamp Set.  Yes, I cut the little animals apart that were on the one stamp!  I thought that the bunny would be cute to use for Easter.  You can see how I did that in THIS POST HERE.  You have to be very careful but it can be done!

I stamped the bunny with Memento Black Ink and then colored in just a little with Stampin’ Blends markers.  Since I was in a big hurry, I just punched out the bunny with the 1 3/4″ Circle Punch and layered it on a piece of pink cardstock punched out with the 2″ Circle Punch. You might want to add an Easter greeting.

You can use the Clear Tiny Treat Boxes for any occasion!  It looks snazzy to have the clear box, I think, with the treat inside showing through. And if you want something quick and easy, make this Easy Easter Bunny Clear Tiny Treat Box or change it up for a different occasion.

An Easy Card For Spring, Easter, or Any Occasion

An Easy Card For Spring, Easter, or Any Occasion

I would hazard a guess that one of the most popular Sale-A-Bration items this year is the Springtime Foils Designer Series Paper, available FREE with a $50 purchase to make cards like this Easy Card For Spring, Easter, or Any Occasion.

This Springtime Foils Paper is beautiful enough just on its own, but if you like, you can color in a little or a lot with the Stampin’ Blends markers or other coloring techniques.

REMEMBER:  The Stampin’ Blends Markers will become unorderable TODAY at Noon (MT). If you want to get some that are not backordered or order all of them and be ready for your order to go out when they get restocked in late May perhaps, be sure to place them on your order before Noon Mountain Time today.  That way you can get Sale-A-Bration rewards even though you have to wait for your markers.

Here’s a card I was coloring with the Stampin’ Blends in several colors.

This card is just a Whisper White card base and a layer of the Springtime Foils Designer Paper. I colored in some, but not all, the leaves with the Old Olive Blends markers. I also tied around a piece of the Lemon Lime Twist 1/4″ Ombre Ribbon.  The butterfly is die cut with the Big Shot and the Butterflies Thinlits Dies out of Copper Foil.

I didn’t add a greeting yet to this card because I don’t know if I will use it as an Easter card or thank you or maybe something else.  Honestly, I don’t know what occasion you couldn’t use it for except maybe Christmas!

When you find a card design you like or designer papers, make a stack of cards….at least 3….and keep them on hand.  You can always add an appropriate greeting later!  I made other cards with this beautiful paper, some colored in and some left plain, different ribbons, some with two patterns of the papers on it, top and bottom. Try you hand at making an easy card for Spring, Easter, or any occasion, make multiples, and keep them in your stash for when you need a card at the ready!

Make an Easter Card With a Basket of Flower Blossoms

Easter Card With a Basket of Flower BlossomsMake an Easter card with  a basket of flower blossoms using the beautiful stamp, Blossoming Basket. You can earn this stamp set free during Stampin’ Up!’s promotion called Sale-A-Bration! With a $100 purchase, you can earn not only this Blossoming Basket Stamp Set but also the Basket Weave Dynamic Textured Impressions Embossing Folder. Check out the Blossoming Basket Bundle.

The card base is made with Crumb Cake Cardstock. Then I chose Blushing Bride for a pink background layer and embossed it with the Basket Weave Embossing Folder.  I am still saying “Wow!” every time I open up that embossing folder and take out the embossed paper! The Dynamic heavyweight folder really embosses the paper into a deep basket weave!  It’s best to spritz the paper with a little bit of water or rubbing alcohol to dampen the paper fibers to allow for the deep embossing.  It really is stunning!

I stamped the basket with Memento Ink on Whisper White Cardstock, and enjoyed coloring everything in with my Stampin’ Blends alcohol markers

  • Unfortunately, Stampin’ Up! just announced that they will turn off the ordering for these markers on Friday, March 23 at Noon (MT). The good news is that so many people love these markers that they were selling like hotcakes, but the bad news is that was happening at the same time as factories were shutting down in China for Chinese New Year and whatever other difficulties the supplier was having to keep up with the demand. So to take some time to catch up, Stampin’ Up! is making the markers unorderable until the supply is restocked probably the end of May.  You can try getting some of the markers that you want before Friday and get the rest later on.  This way you can still take advantage of Sale-A-Bration even if you have to wait for all your markers.  But do it before the deadline tomorrow!

I die cut the Whisper White paper with the basket using the Lots of Layers Framelits Dies. The Easter greeting is from Teeny Tiny Wishes.  The bow is tied with the Powder Pink 3/8″ Shimmer Ribbon.  And for a bit of embellishment, I adhered two little Subtles Enamel Shapes to the ends of the greeting.

If you want to see one of the first cards I made with this folder and stamp set, please click HERE.

This Basket Weave Embossing Folder is going to be available in the new Stampin’ Up! catalog, if you happen to  miss out during Sale-A-Bration. I’m not sure about the Blossoming Basket Stamp Set, but it will not be bundled with the Folder even if it is.

Of course this Easter Card With a Basket of Flower Blossoms is not just for Easter, just change the greeting or don’t even put on a greeting and you have a beautiful card for any occasion!

All-Occasion Lavender Springtime Card

All-Occasion Lavender Springtime Card

Here I have made an All-Occasion Lavender Springtime Card.  I will probably make it into an Easter card, but before I put any greeting on it, I liked it so much as is that I just left it plain.  Now I can add any greeting I like or need to this card!  You might consider making a stack of cards like this that are ready to go for almost any occasion, and then if you need a birthday card, sympathy, congratulations you can simply add a greeting for the occasion!

This lavender bouquet is stamped with the Lots of Lavender Photopolymer Stamp Set that you can get FREE during Sale-A-Bration with a $50 purchase from Stampin’ Up! It’s actually a 2-step stamping process, if you want to do it entirely with stamps. You can stamp over the image to color in the flowers and even to color in the leaves. With the stamps being photopolymer you can see through them for placement.  And it doesn’t have to be perfect! Many artistic images are not colored in “completely”.

This simple card was actually made over time! Awhile back, I made THIS CARD and at the same time I was stamping, I stamped this lavender bouquet you see on my card above, but I got a smudge or something on the paper.  So I put that aside and made the Easy Easter Card With Lavender. I thought maybe I could just cut out the lavender bouquet on the smudged paper to eliminate the smudge.  Then at some point I wanted to color in the stripes on this Springtime Foils paper to see what it would look like. After that I thought maybe that lavender bouquet would look pretty on the Springtime Foils paper! Finally, the whole card came together with the cut-out lavender bouquet and an oval die-cut layer underneath of Whisper White, layered on a Silver Foil scalloped oval die cut. For these oval die-cuts I used the Layered Ovals Framelits Dies.  You could add more embellishment to this card, but I liked it simple the way it is.

I used Wisteria Wonder Cardstock for the card base even though I used the Pool Party Stampin’ Blends Marker to color the Springtime Foils paper.  I think it has a greenish look to it which goes with the leaves on the bouquet.

The photo doesn’t do this card justice because of the glare from the foils. It’s very simple and pretty in person! I think I should make more to have on hand, as I suggested to you!

There are only about two more weeks left of Sale-A-Bration so don’t let it slip by!  Sale-A-Bration ends March 31. Lots of great choices this year!

Today your assignment is go make several cards like this All-Occasion Lavender Springtime Card and leave it plain so you can add any greeting you like when you need a card next time, or add some greetings and send out the cards right away!

Easter Bunny Tiny Treat Box For Candy

Easter Bunny Tiny Treat Box For Candy

Here’s a fun Easter Bunny Tiny Treat Box for candy or even a small Easter gift! It’s so handy to keep some of the Clear Tiny Treat Boxes on hand for making cute little treat boxes or party favors like this one for any occasion.

The Clear Tiny Treat Boxes come flat so storage is not a problem.  They are small, just 2″ x 2″ x 2″ and even food safe.  But that size is big enough to make a cute project out of them.  Just assemble when you are ready and fill with your special treat or gift!

For Easter, I made this cute punch art bunny!  Just use one of the heart die cuts in the Sweet & Sassy Framelits Dies for the bunny face, or you can use a heart punch if you have one the right size.  For the ears, I used a small oval from the Stitched Shapes Framelits Dies and then layered on a scalloped oval die cut from the Layering Ovals Framelits Dies.  I just drew on the face myself.  Use oval punches for the ears if you prefer.

After you put the treat in the box, just tie with a ribbon! I used the Powder Pink 1/2″ Finely Woven Ribbon, which is a beautiful light pink color and has such a nice feel to it. In fact, I think I have used up my roll so it’s time to order more!

Speaking of ribbon, if you need or want any of the 2016-2018 In Colors that will be retiring in May (at least if Stampin’ Up! follows their usual routine!), whether you need ink refills, cardstock, any ribbon with those colors or designer paper (well, usually most designer papers retire!), I would suggest ordering what you need in those In Colors right now before everyone else is thinking about it.  As soon as that retirement list comes out, people rush to order, especially the ink refills, and later on you will end up paying a higher price on an auction site! I know it is early to think about retiring products and the list won’t come out until May, but that’s only a month and a half away!  Beat the rush so you won’t be disappointed.

But right now, we have Easter coming up, so if you want some easy cute treats for your family, your guests, teachers, co-workers, try this Easter Bunny Tiny Treat Box and impress everyone!