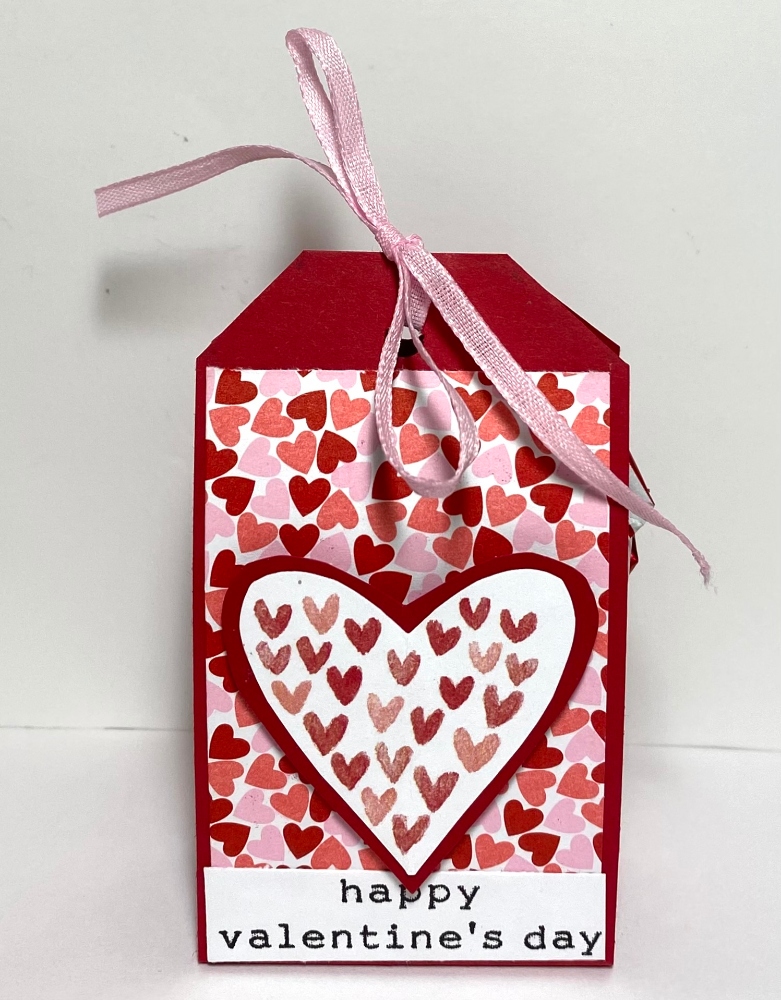
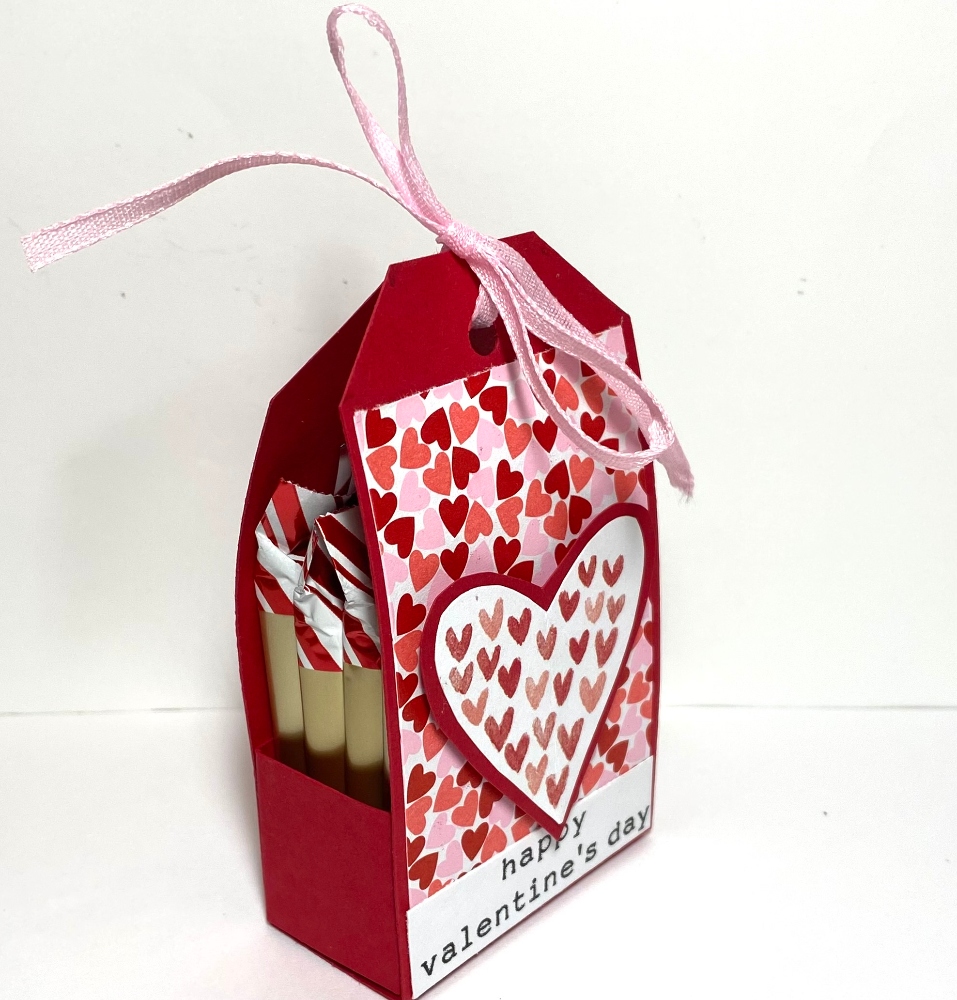
Tag Archives: candy treat

Sweet Little Boxes For Valentine’s Day

Sweet Little Boxes For Valentine's Day

Be sure to not overlook these cute boxes in the Spring Mini Catalog that I used on this Sweet Little Boxes For Valentine’s Day. These boxes are great because they are food safe and come scored and even have adhesive strips on the sides of the box! All you have to do is fold on the score lines, pull the paper strip off the adhesive (like Tear & Tape), and adhere the sides of the box. Just one end opens. Then decorate!! They store flat, of course, until you need them.

Sweet Little Boxes Flat

It would be great to keep a stash of these boxes on hand because they can be decorated for any occasion. Just add some candy treats, tea bags, small tags or cards, a small gift, whatever fits! Right now we are thinking of Valentine’s Day treats but these could be for Halloween or birthdays or Easter!

On this box, I just wrapped around a piece of designer paper, the cute Sweet Talk Designer Series Paper. First I just wrapped the paper around and creased it with my fingers on each edge of the box. Then I took it off and folded it on those creased lines making sure the paper stayed straight. You could also score it with your Paper Trimmer but I didn’t find that necessary. You just don’t want to measure first and then score without wrapping around the box or it might turn out to be too tight of a fit. My paper was cut at 3 3/8″ x 7″. That wrapped around with enough margin to place Stampin’ Seal Adhesive on the overlapping edge.

You could use any of the pretty patterns in the Sweet Talk Designer Paper. I chose this one with the lines of little hearts. I die cut the tag shape in the Sweet Hearts Dies from Basic White cardstock. I wanted it to show up a little better, so I adhered the Basic White tag onto Real Red cardstock and simply cut around with Paper Snips following the shape. It doesn’t have to be perfect!

From another sheet of the Sweet Talk paper with the candy prints, I cut out the heart-shaped lollipop and a couple of the small candies. I wouldn’t do this if I was making multiples of the box! It would be a little too tedious! But I loved the candy sheet of paper and wanted to use it as decorations on my box! I glued those flat onto the tag and then popped the tag up with Stampin’ Dimensionals®. I tied a small red bow with the Real Red Faux Linen Ribbon and adhered that to the top of the tag with Mini Glue Dots.

You could just add a heart and a greeting to make a simple decoration. There are so many ways to decorate these boxes and it is so easy to do! Order several packs and keep them on hand whether you are making Sweet Little Boxes For Valentine’s Day or other occasions!

SHOP STAMPIN’ UP! ONLINE!

An Easy Candy Basket For Easter With Candy Chicks

Candy Basket For Easter With Candy Chicks

Here is a fun little Easy Candy Basket For Easter With Candy Chicks, one you may have made in the past to fill with candy. Easter is late this year, but it will still sneak up on us! Now is the time to start having fun making Easter cards to send and maybe some little projects for your Easter dinner or home decorations!

This small little basket is made with just a 6″ x 6″ piece of cardstock and pieces of designer paper. Score at 2″ and 4″ on each side so it ends up looking like a tic tac toe board with six sections. Then on each corner, score diagonally. You can do it easily with the Stampin’ Trimmer by lining up the top and bottom corners on the cutting track of the Trimmer. Don’t score all the way down the paper, just in that corner. That center piece will be the bottom of the basket. See photo below.

Candy Basket How to Score

This is what your paper will look like when it is all scored and creased.

Candy Basket Scored Piece

After the scoring is done, be sure to crease on all the score lines and just see how it is going to fold up into a basket when assembled. Note where the bottom is and put an X on the bottom with a pencil just so you know. Then cut and adhere pieces of designer series paper (or stamp on the cardstock) to each area. The squares will be 1 3/4″ x 1 3/4″. Note that for the four pieces that will go on the corners must be cut diagonally in half and adhered on each half of that scored corner. You do not need a piece of designer paper for the bottom of the basket, that you have already marked.

Candy Basket with Designer Paper

To assemble the basket just fold up into a container shape, folding those diagonal corners in. The way the basket will stay together is by tieing the four corners together in the center. In order to do that, you will need to punch a hole in each corner. It’s probably best to do this after you adhere the designer paper, but you can do it to the plain cardstock and then just re-punch if needed. You can see the punched holes in the corners in the photo above if you look closely. Run some ribbon around through the holes and then pull and gather the corners to the center and tie the ribbon into a bow.

Candy Basket Top View

Add some shred or make your own by cutting very narrow strips of cardstock and crinkle with your hands or with a paper crimper. Then add your treats, like these chocolate Easter chicks!

Chocolate Candy for Easter

I spotted this candy at Home Goods and thought it would be perfect for Easter projects…..and it tastes good too!

My basket is made with Pineapple Punch Cardstock and Happiness Blooms Designer Series Paper. If you are using a paper with a certain pattern, make sure you have each piece going the way you want it to go on the finished basket. The ribbon is the Gold 3/8″ Metallic-Edge Ribbon. The Easter greeting is stamped from the Fable Friends Stamp Set and die-cut with a die in the Stitched Labels Framelits Dies. If you didn’t have this die set you could just cut a rectangle or an oval for the front of the basket.

Candy Basket Full View

That’s how you make this Easy Candy Basket For Easter With Candy Chicks and anyone can do it, even with a larger piece of cardstock. Make one for a little Easter treat or decoration at your house!

SHOP STAMPIN’ UP! ONLINE HERE! SALE-A-BRATION ENDS MARCH 31!

SALE-A-BRATION ENDS MARCH 31!