Tag Archives: Merriest Trees Dies

Scrappy Merriest Christmas Tree Card

Scrappy Merriest Christmas Tree Card

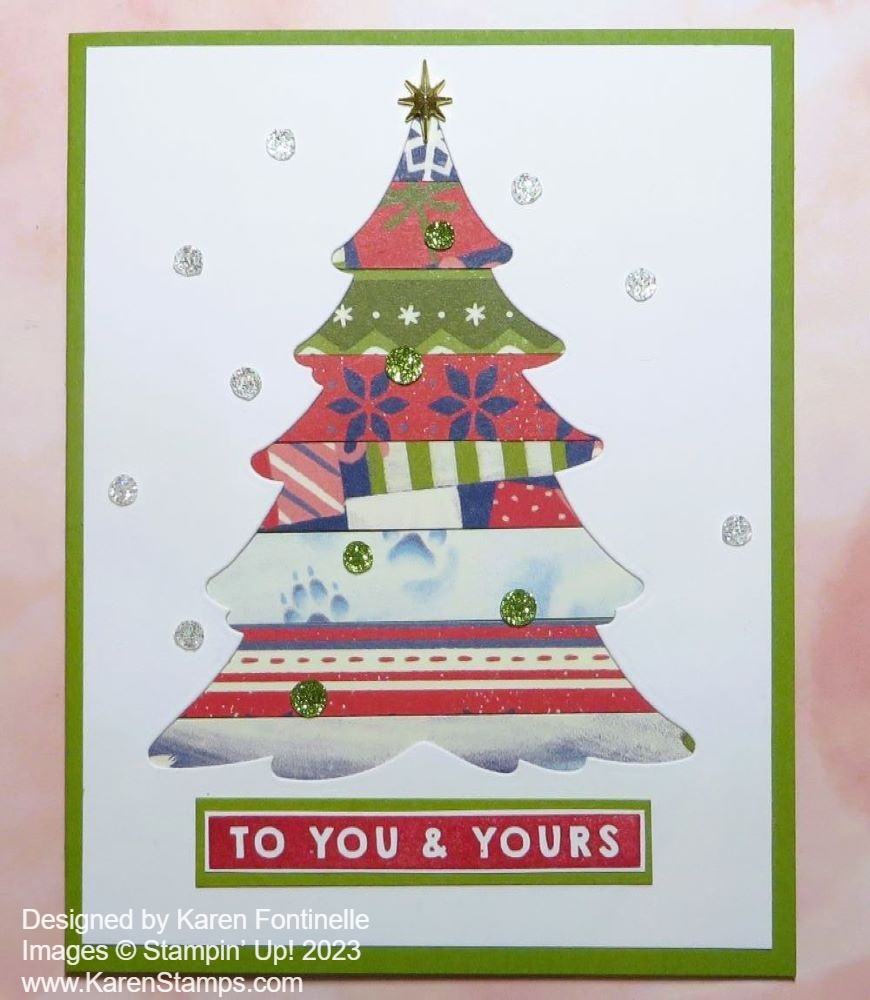
People who have been making a lot of Christmas cards and projects by now probably have a lot of scraps of paper (depending on how many scraps you hoard!). This Scrappy Merriest Christmas Tree Card is a great way to use those scraps!

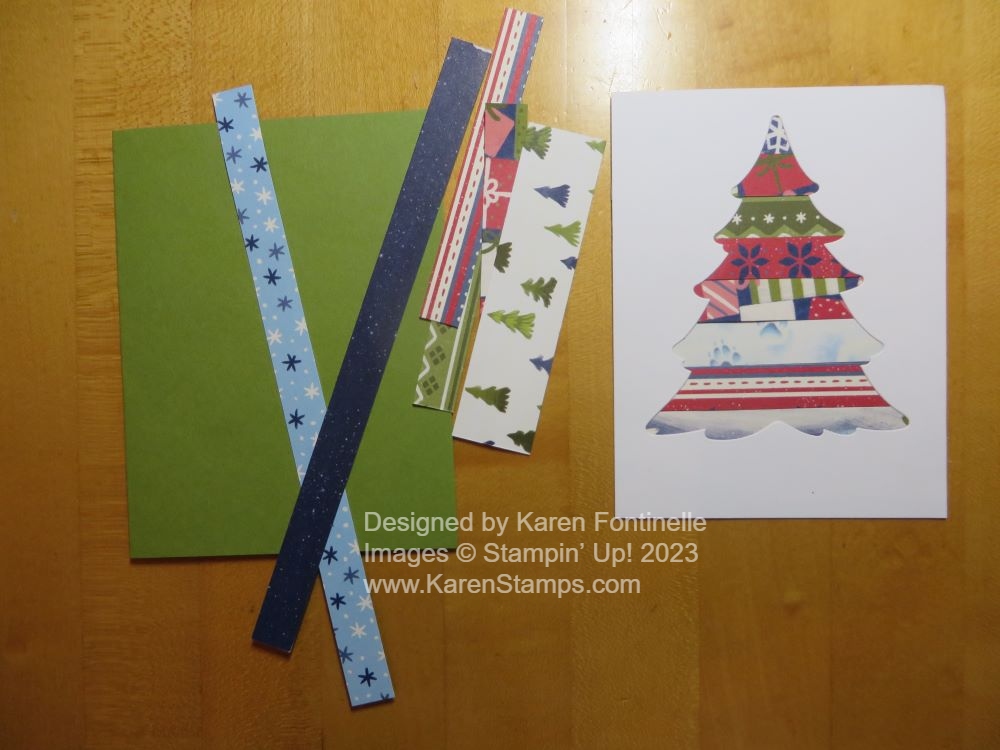
The card base is Old Olive but you could choose almost any color, possibly depending on the colors in your scraps. Even something neutral like Crumb Cake would probably work. I diecut a piece of Basic White cardstock with the largest tree in the Merriest Trees Dies in the Holiday Mini. Instead of using the diecut tree, I used the negative. You could also do this in green.

For scraps, at first, I pulled out all my Christmas papers, but as it turned out, I only used scraps from the Beary Christmas Designer Series Paper because I’d worked with it earlier in the day. you don’t even need too many but you do need a strip that will go across the width of the bottom of the tree. I cut mine at 1/2″ wide. You could also use scraps of ribbon and I may try that another day! I know we all have SO much excess ribbon!!

On the back of the negative piece, I applied Stampin’ Seal Adhesive all around the border of the cutout tree. I didn’t even trim down the scraps lengthwise. You can just place them and trim off the excess afterward. Even though I was putting them close together, from the front there seemed to be slight gaps but I knew those wouldn’t show with the green Old Olive background. You probably want to keep the strips straight or else put them on a diagonal.

Scrappy Merriest Christmas Tree Prep

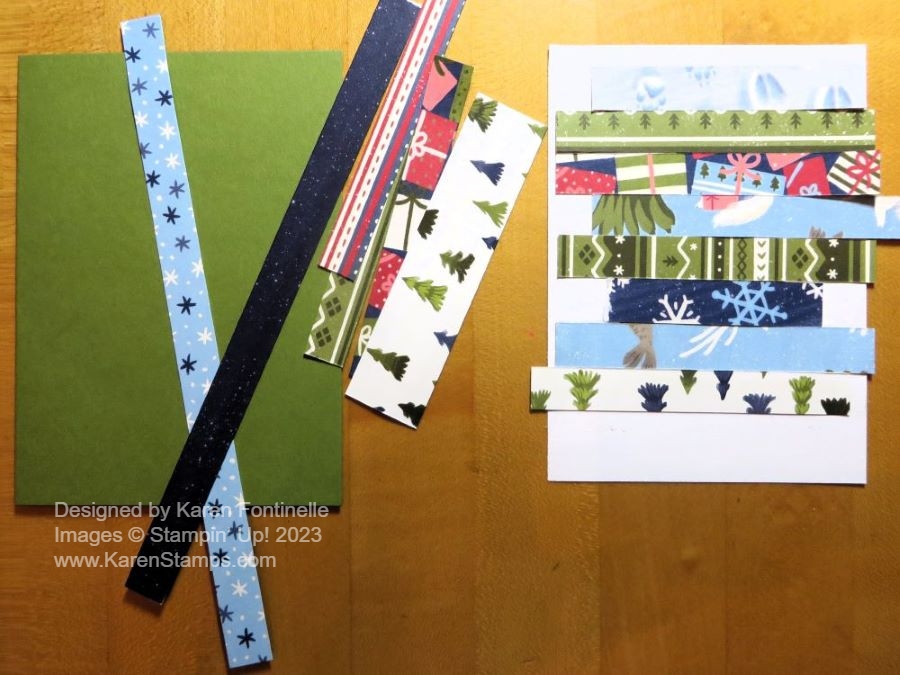
After trimming off the lengths of the scraps, I applied Stampin’ Seal Adhesive (you could use the Multipurpose Glue) on the back of the card, across all the strips, and then adhered it to the card base.

Scrappy Merriest Christmas Tree Back

To finish the card, I stamped a greeting from the Merry & Bright Stamp Set in Real Red on a scrap strip of Basic White and trimmed it down to fit on a layer of Old Olive, then adhered to the card below the tree.

Of course, I had to do some embellishing! I put a Star Trinket (no longer available) at the top, which didn’t photograph very well, but looks really nice. Then I started playing with the Adhesive-Backed Glitter Sequins and probably didn’t stop soon enough! I put white ones around the tree to maybe look like snow and I put green ones on the tree to give it some sparkle! These are retiring but are still in the Online Store as I write this so I would recommend putting a package or two on your next order because they will be good year round and being flat, are great for mailing!

Scrappy Merriest Christmas Tree Card

Check out your paper scraps (or ribbon scraps) and see what you come up with! Every card could be different!

Merriest Trees Decorated Christmas Card

Merriest Trees Decorated Christmas Card

This Merriest Trees Decorated Christmas Card is the first card I’ve made with this Merriest Trees Bundle (162048) in the upcoming Stampin’ Up! Holiday Mini Catalog! You can make all kinds of cards with this Bundle from simple to fancy. I think I started with fancy on this one! This card is for someone who likes “little bitty” things. I’ll explain as I go along in this blog post!

This Merriest Trees Bundle comes with the Merriest Trees Stamp Set and the Merriest Trees Dies. (Do you like how they are now naming the stamp set and dies the SAME?!) If you buy them both together in the Bundle, you will save 10% on the price. The stamp set has a tree that you can ink up and stamp as is, or you can use the second tree stamp for some added highlights on that tree. There are some nice sentiments to use and several accessories. There is a tree trunk, gifts, bows, ornaments, a star, and some little twinkles I suppose you would call them! The trees are actually pretty large so you will need Clear Block E for sure!

Merriest Trees Bundle

As you can see in the set of dies, there are LOTS of extra pieces! On the one hand, that is extra-fun and on the other hand, there are some LITTLE pieces there to work with! One great thing is that when you stamp the little ornaments, they are on one stamp and there is a die that matches that arrangement so the die will cut out all three ornaments at one time! The other great thing is that there are THREE ornament dies so you can stamp three sets of three ornaments and die-cut them all in one fell swoop with your machine! You can cut out chains or garlands for the tree with the one die that makes all the different lengths of garlands from that one die. It would be good if you used Adhesive Sheets on the back of the paper before you cut those out! I don’t know how you would get glue on the back of those except with the teeniest drop of glue. Even with the Adhesive Sheets on the back to turn them into stickers, they are very fragile although even if you accidentally tear them apart you can match the ends back up again.

If you stamp the solid tree, it may work better to lay the stamp and block face up on the table and then apply the ink rather than try to ink up the tree by patting it on the ink pad. Even better if you have the retired Stamparatus. Be sure to use a cushion underneath your stamp. It’s often a little difficult to get a perfect impression the first time with a large solid image like this tree.

This card has a card base of Shaded Spruce. I added a layer of Gold Foil underneath this interesting red pattern of designer paper in the Joy of Christmas Designer Series Paper (161958). This designer paper has all kinds of different patterns that can be for Christmas or for other occasions.

The Christmas tree is die-cut from Shaded Spruce. I used the other tree piece with Versamark Ink to stamp and embossed with white embossing powder using a Heat Tool. This makes it look like a little bit of snow on the Christmas tree! Then I used Adhesive Sheets on the back of a small piece of gold More Dazzle 6″ x 6″ Specialty Paper. It’s in the Annual Catalog but you may already have some from a previous catalog. Then I used the die to cut out several different lengths of garlands. If you have the Take a Pick Tool or some other piercing tool it makes it easier to pry off the backing sheet. As I said before, these little diecut garlands are very delicate and fragile.

The little ornaments are stamped in Real Red on Basic White and then diecut. They just need a tiny drop of glue on the back to adhere to the tree however you would like to place them. Use different colors of ornaments if you like. There are two different styles of stars to choose from to put at the top of the tree.

No Christmas tree would be complete without packages! You can stamp little gift boxes and bows and die-cut them, or you could die-cut the presents out of solid cardstock or scraps of designer paper.

The greeting is one in the Merriest Trees Stamp Set. It is stamped in Real Red Ink and die cut with a small banner in the Stylish Shapes Dies. I cut off the banner end on the right so it would line up with the edge of the designer paper background. Once again I will point out that this greeting is very small.

If you like lots of detail when you make a card, this card might be for you. If you want to make a few of these cards to send for Christmas, I say go for it! Once you have your design and make everything in an assembly-line fashion it will be easier than it looks. But if you are making 50 Christmas cards to send, maybe you want a simpler design with fewer little pieces! This exact card takes more than a few minutes to make, so plan ahead!

SHOP STAMPIN’ UP! ONLINE HERE!