Tag Archives: Beary Christmas Designer Series Paper

Beary Christmas Scenes Christmas Cards

Beary Christmas cropped paper

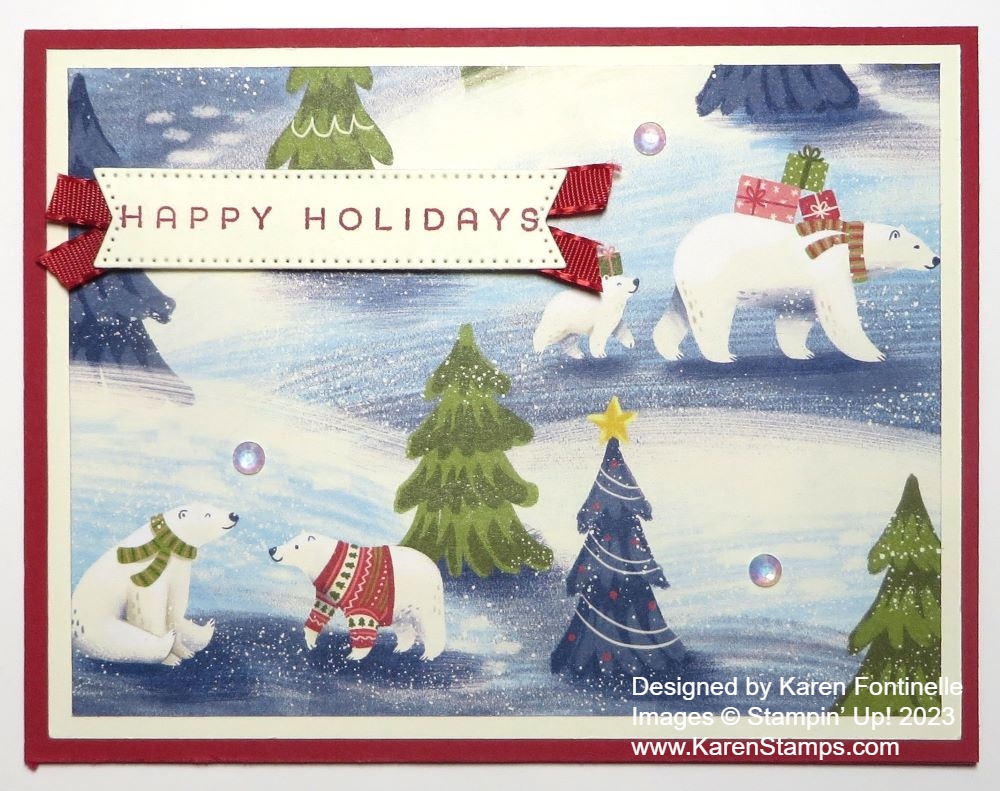
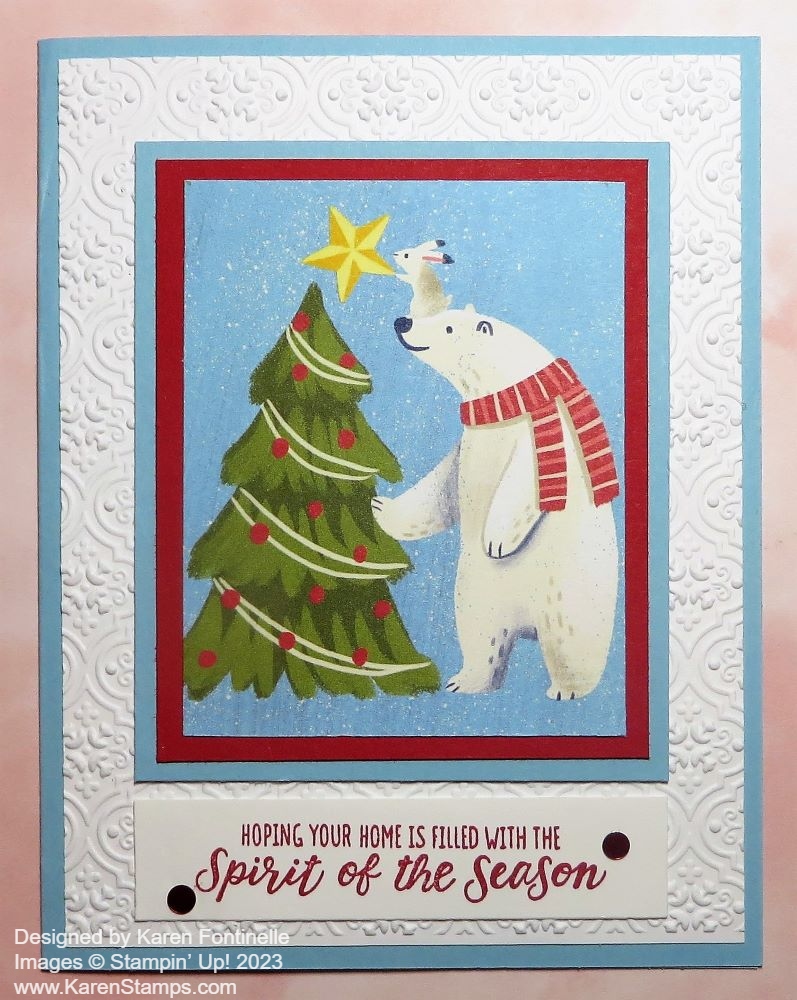
Back in September and November, I made Christmas cards with this Beary Christmas Designer Series Paper. I’ve made other cards with this paper, too, but for the ones I am referring to I used a “scene” from the paper to be the card front. The other day when I was using this paper for more cards, I decided it was time to cut out more scenes to use. It is a little tricky because you have to figure out what area you can cut out without getting something you don’t want in the scene. But it can be done, and making the area smaller, like with a layer underneath rather than directly on the card base might make it easier. It is handy to have a ruler that you can measure with to get an idea of what scene will work.

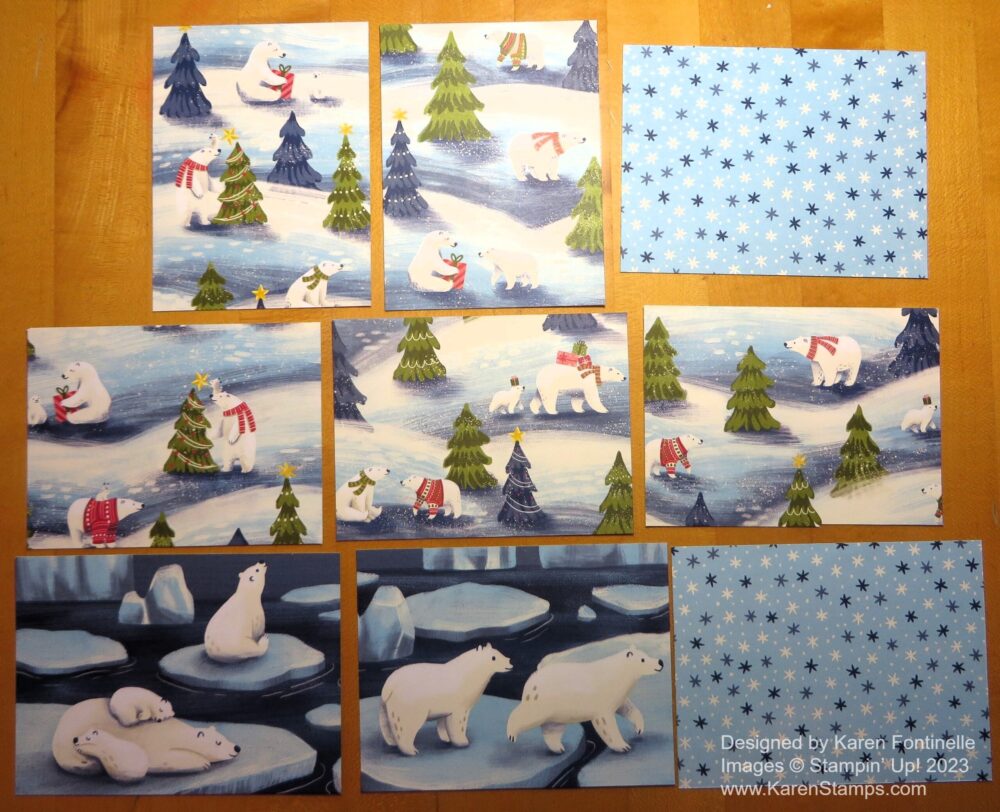
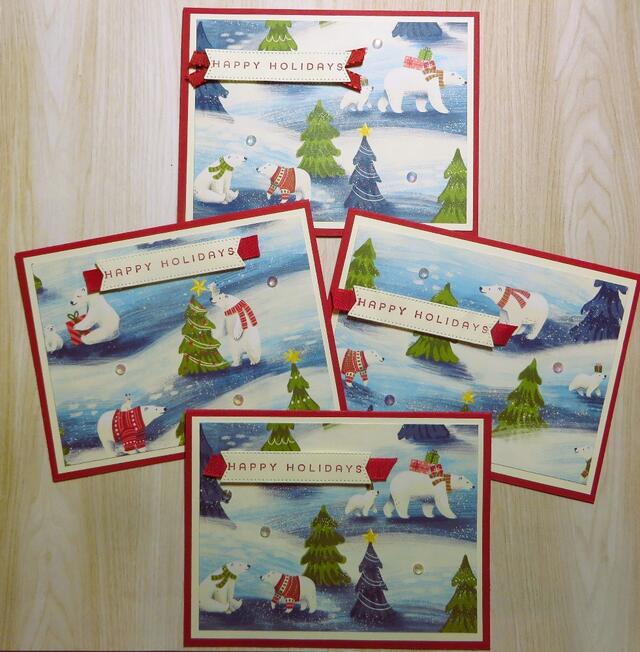
In the top photo, you can see the large-enough “scenes’ I could cut out of the paper. This paper is just so cute with bears and other forest animals on other sheets. I didn’t use all of the scenes yet, but here are some cards I made with the scenes that I cut out. I was sort of copying the two previous cards I had made, but you usually can’t get the exact same scenes. Maybe this will give you some ideas!

Beary Christmas Tis the Season Card

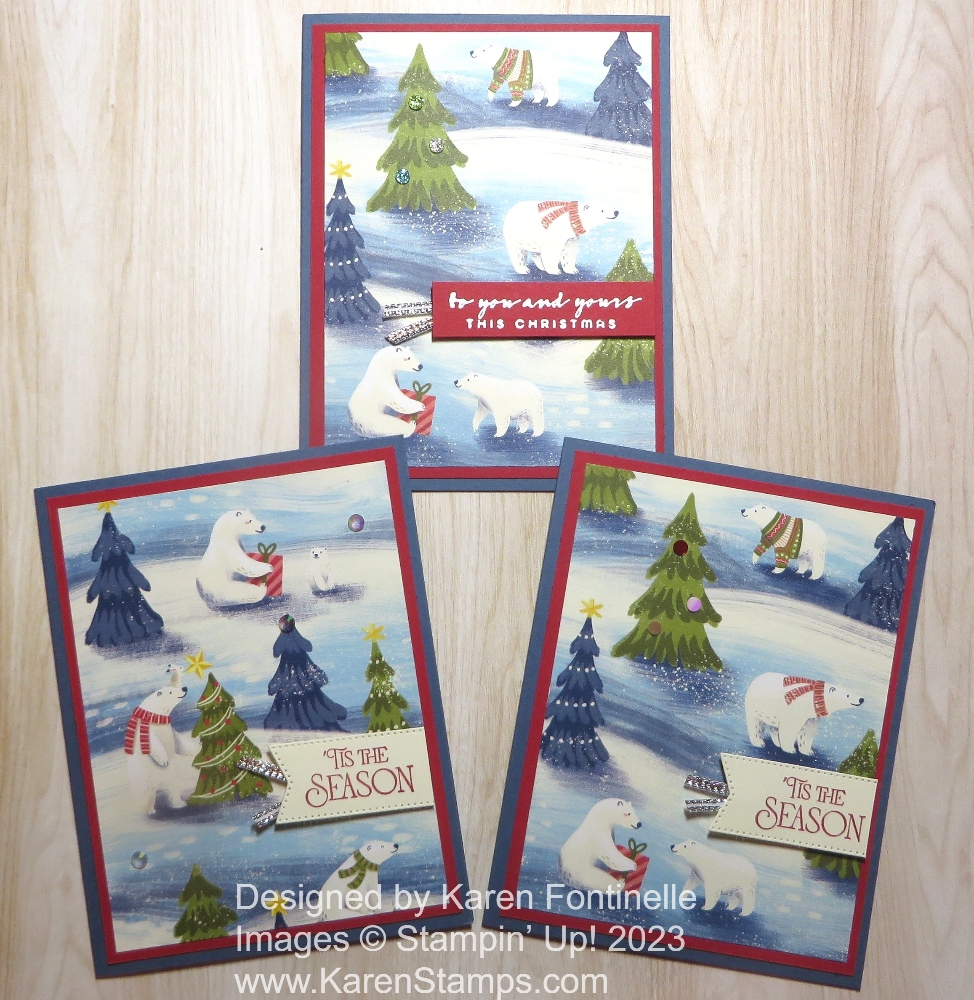
On these cards, I was able to cut out the exact same scene as on the top card from the second sheet of designer paper. But the card on the left has a different scene. I wasn’t in the mood to do embossing, so I just stamped a new greeting in the Brightest Glow Stamp Set and die cut with a banner die in the Stylish Shapes Dies. I put the greeting up against the edge of the paper so I cut off the banner end to just have a straight edge on the right. I tucked under a little piece of Silver Trim on the banner end.

Beary Christmas Happy Holidays Christmas Card

The top card is the original one I made. The bottom card matches the top card, but then the two middle cards have different scenes. You may even have to move your greeting around to different spots depending on the scene on the card.

I also added some Iridescent Rhinestone Jewels to some of the cards and some Iridescent Adhesive-Backed Discs on other cards.

I didn’t do anything yet with the bears floating on the ice or the snowflake paper, which is the opposite side of the bear on the ice. But I went ahead and cut out the paper so it is ready to go.

This Beary Christmas DSP is still available in the Online Store but will be retiring in January. So if you like it and don’t have it yet, get it while you can!

Don’t forget to shop the Clearance Rack in the Online Store as well!

Beary Christmas Happy Holidays Christmas Card

Beary Christmas Happy Holidays Christmas Card

This Beary Christmas Happy Holidays Christmas Card is an easy card to make although you will have to work with the paper a little bit. I grew to LOVE this paper after I got it because there are so many pretty patterns to use and such adorable bears for holiday cards! It’s the Beary Christmas Designer Series Paper in the Holiday Mini Catalog and will retire at the end of the Holiday Mini sales period (while supplies last).

The main thing about this card is choosing the scene in the designer series paper you want on the card front. You must look over the sheet of designer paper that has the bear scenes and see how you can cut it out in a way that pleases you. You want to capture as many bears as you can without cutting them off the edge of the paper or something! So that takes a little planning to figure out how to cut out the scene you want. In some cases, maybe you will want to cut out a bear from a part of the paper you are not using and add that to the scene you cut out. I just used my Paper Trimmer to cut out this scene.

This card base is Real Red with a layer of Very Vanilla cardstock underneath the designer paper. Sometimes I like to add a Basic White or Very Vanilla layer under designer paper because I think it helps the paper to stand out. I don’t do it very often, just sometimes.

Once you have your scene cut out, all you have to do is layer it on your card base. I stamped a greeting from the Brightest Glow Stamp Set in Real Red ink and cut it out with a banner die in the Stylish Shapes Dies. The greeting is popped up on Stampin’ Dimensionals. Then I took just two little snippets of Real Red ribbon and folded them under each end of the banner. I also added three Iridescent Rhinestone Jewels to the front of the card for a little sparkle in the snow!

Here is the inside of the card.

Beary Christmas Happy Holidays Christmas Card Inside

If you would like to see another Christmas card I made with this Beary Christmas Designer Paper, click HERE. That card is a vertical one so it’s a little different look but the same idea.

Have fun trying out a card like this one!

SHOP STAMPIN’ UP! ONLINE HERE!

Penguin Punch Christmas Gift Tags

Penguin Punch Christmas Gift Tags

If you don’t already own the Penguin Builder Punch, run and get it on the Stampin’ Up! Clearance Rack so you can make these Penguin Punch Christmas Gift Tags! I can’t believe it is still available but it is marked down to $4.50 instead of $19.00! You may as well buy one for that price! Or you may already have one from a previous catalog so dig it out and make something fun for Christmas!

I thought it would be fun to make a couple of gift tags using the Penguin Punch and some new designer series paper. You can use a tag die that you have or cut your own rectangle and then cut the top corners at an angle. I intended to use the tag die in the new Merriest Trees Dies (coming soon!) but then I came across the Tailor Made Tags Dies. If you have those, just use either of the die shapes.

I cut out a piece of designer series paper and cardstock for each of the tags. That makes them both the same size so you can’t layer them, but I just trimmed off inside the stitched marks on the designer paper, which made it fit just inside the stitched lines of the cardstock tag.

The Penguin tag on the left is made with Poppy Parade Cardstock and the Fa La La La La pattern in the Merry Bold & Bright Designer Series Paper (161945). This paper is so bright and happy, you will love it! I adhered the designer paper onto the cardstock tag and popped the penguin up with Stampin’ Dimensionals. For a finishing touch, I got the idea to just cut out a short strand of the Christmas lights on another of the papers and put it on the tag up at the top. If you want, you can put a piece of Basic White on the back of the tag if you think you need something to write your “To & From” on or a personal message.

The penguin tag on the right is made with Misty Moonlight cardstock and the snowflake paper in the Beary Christmas Designer Series Paper (162015). Before I adhered the penguin with Stampin’ Dimensionals, I got the idea to cut out some trees from the A Walk in the Forest Designer Series Paper (162377). It’s the paper at the top of page 5 in the Holiday Mini so don’t miss it. Maybe some dies would have cut out some of these little trees but I didn’t look! (Actually, some dies will cut out the fuller trees, not the skinny straight ones.) For a greeting, I used one in the Brightest Glow Stamp Set but cut the words apart and cut them smaller so they would fit on the tag.

The penguins are super easy to make with the punch. Just cut the two pieces out of black and white and the little feet out of Pumpkin Pie cardstock or something similar. I do not have the coordinating stamp set so I just drew in the little black eyes with a marker and the little beak with a Pumpkin Pie Stampin’ Write Marker. If you want, you could add a scarf around his neck or make a little hat.

The die punches out the hole in the tag so you don’t have to do that. Just pick a ribbon you like to tie through the hole so your tag is ready to go when you start wrapping gifts!

Remember to check out the Clearance Rack and see what other bargains you need plus the Penguin Punch!

SHOP STAMPIN’ UP! HERE!

Beary Christmas Spirit of the Season Card

Beary Christmas Spirit of the Season Card

I didn’t even know what card I was going to make when I started, but when I saw my package of this designer paper, I had an idea right away. I decided to use this bear and Christmas tree and came up with this Beary Christmas Spirit of the Season Card.

This Beary Christmas Designer Series Paper (162015) is a fun one for holiday cards with all the cute polar bears and other animals! For this card, I chose to use this one piece with the bear and bunny decorating the Christmas tree in the forest. If you want to cut out just a piece of this designer paper, you will have to figure out how to cut out that area properly. I used a ruler to see about how wide and tall the bear and tree were. Then I used my Paper Trimmer to cut out that image while trying not to get any neighboring images. I had to cut it down pretty close.

After I had my image cut out of the designer paper, I layered it on a piece of Real Red and then on a larger layer of Balmy Blue.

The card base is Balmy Blue with a layer of Basic White. It almost looked fine and simple with just the plain white layer, but I decided to emboss it with the Quatrefoil Tile Embossing Folder. Another good choice would be the Snowflake Sky 3D Embossing Folder.

The greeting is in the Merriest Trees Stamp Set and is stamped in Real Red ink just on a narrow strip of Basic White. I added two Iridescent Adhesive-Backed Discs (161954). They are red (really Poppy Parade) but they appear very dark in the photo. You definitely want this Discs for fun additions to your cards!

The Holiday Mini Catalog is coming next week! Woohoo!