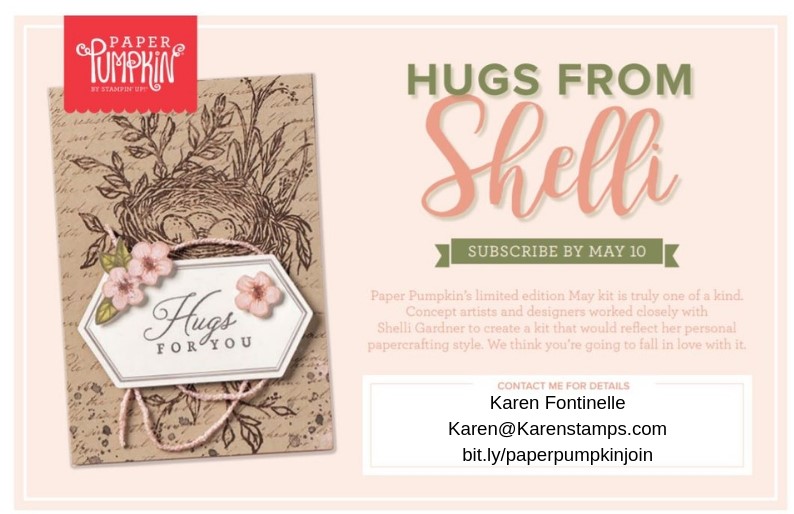
Category Archives: Cards

Celebrate Paper Pumpkin’s 6th Birthday With the March 2019 Kit!

Paper Pumpkin Birthday March 2019 Banner

Image © Stampin’ Up! 2019

Paper Pumpkin is turning SIX and we want you to celebrate with the March 2019 Paper Pumpkin Kit, so be sure you are subscribed!  If you previously were a subscriber, you might want to sign up again! And if you sometimes skip a month, make sure you reactivate your account!  Don’t forget!

SIGN UP FOR PAPER PUMPKIN NOW!

(This is my personalized link to make it easy for you!)

Why should you want to celebrate with Paper Pumpkin in March??

(If you want to be surprised, don’t read any further!!)

Stampin’ Up! is pulling out all the stops for this kit!  You’ll get an adorable kit, a special box, and most importantly, you’ll get TWO stamp sets instead of one.  All for only $19.95 which includes shipping! TWO STAMP SETS!!

* Don’t look if you want to be surprised!!

*

*

*

Here’s a little bit about the March kit! Because it’s our birthday, we decided to create a kit that is perfect for making birthday cards!

  • The March kit features eight full-sized, mailable cards.
  • Coordinating colors are Basic Black, Bermuda Bay, Daffodil Delight, Flirty Flamingo, and Poppy Parade.
  • This kit has an element that is sure to “pop”!    ??????
  • The FREE stamp set is even bigger and better than your typical Paper Pumpkin stamp set and can be used on a variety of crafting projects.

You KNOW you want to get this Paper Pumpkin Birthday Kit in your mailbox next month!!

JOIN PAPER PUMPKIN TODAY!

You KNOW you want to have some crafting fun!

If you already have your own Demonstrator and want to sign up under her, just go to www.paperpumpkin.com and find her name.  Otherwise, I am HAPPY to have you!

No risk, no obligation!  Try out Paper Pumpkin for this great kit!  Stampin’ Up! guarantees every kit.

Sign up today so you don’t forget, but the deadline for sure is March 10, 2019.


Easy Floral Card For a Friend

Easy Floral Card For a Friend

This Easy Floral Card For a Friend came about because I found the paper pieces already cut to the right sizes in my cardstock and designer paper packages!  I didn’t even have to think about it!  Sometimes scraps and pieces you didn’t use for another project all come in handy at another time.

The Rich Razzleberry card base was already cut to 4 1/4″ x 11″ so I just scored it at 5 1/2″ and it then became a card base with the fold at the top. There’s no reason not to make cards that open at the top sometimes instead of always at the side!

The Share What You Love Specialty Designer Series Paper is one of the prettiest we have ever had, I believe!  I love that paper with its shimmer and pretty patterns.  I found this designer paper already cut to almost the correct size for the card.  Then I took another scrap of Whisper White and stamped the greeting from the stamp set Detailed With Love in Petal Pink Ink.

I also love the Whisper White 5/8″ Polka Dot Tulle Ribbon and added it to this card with a bow. Even though the ribbon is “busy” with the polka dots and the paper is a floral print, since you can see through the ribbon it doesn’t interfere too much, I don’t think.  It adds a pretty embellishment to the flowers on the paper.

For the greeting,  I grabbed the leftover adhesive hearts from the January 2019 Paper Pumpkin Kit and stuck on a couple of those. That little sheet of heart embellishments is one of my favorite things I have gotten in a Paper Pumpkin Kit!  So cute!!  I also used them on my card yesterday with some other extra pieces from the kit.

Inside the card, I added a layer of Whisper White since the Rich Razzleberry is too dark to write on.  I also stamped one of the images that looks like a narrow scallop border in the Detailed With Love Stamp Set at the bottom of the Whisper White in Petal Pink Ink just to have a little something on that piece.

Sometimes take a look at your scraps and see what kind of card or project you can come up with.  The result may surprise you! I made this very simple Easy Floral Card For a Friend just by finding some pieces in my scraps that were already cut and ready to go!

SHOP STAMPIN’ UP! ONLINE TODAY!

A Kangaroo Card With Paper Pumpkin Extra Pieces

A Kangaroo Card With Paper Pumpkin Extra Pieces

This is what you can do when you have extra pieces leftover from a Paper Pumpkin Kit! Just make a card like this one I came up with, A Kangaroo Card With Paper Pumpkin Extra Pieces! It was a really easy card to make and one that I’m really happy with in the end.

I absolutely had no idea of what card I was going to make, but I just chose some designer paper.  It turned out to be this Floral Romance Specialty Designer Paper that has the printed vellum sheets, although I used this regular paper in the package.  When I saw all the leaves, I thought I would put a flower on it somewhere.  But it also reminded me of the Animal Expedition Suite and that reminded me that the January 2019 Paper Pumpkin Kit coordinated with that suite.  I pulled out the extra pieces I had left over after making all my pillow boxes for Valentine’s Day.

Valentine Treat Pillow Boxes Paper Pumpkin Jan 2019

I just die cut a large circle on which to place my leftover kangaroo and a larger scallop circle out of the Grapefruit Grove Foil Sheet (sadly, no longer available!).  I thought the Whisper White would be too stark so I used a Sponge Dauber to just apply a tiny bit of Balmy Blue ink for the sky and colored in a little ground with my Crumb Cake Light Stampin’ Blends Marker.

The greeting is stamped from the Itty Bitty Greetings Stamp Set in Pear Pizzazz Ink to match the card base.  I just stuck one end under the foil a little bit.  Then I remembered there were the little adhesive hearts left over in the Paper Pumpkin Kit and those were just what I needed to complete the card!  Sometimes it’s the little things!

Here’s my Animal Expedition Kangaroo Little Hello Card that actually is kind of similar to my card today.  I made that one out of the Animal Expedition Designer Series Paper.  What a great suite and fun to use with as inspiration with the Paper Pumpkin Kit in January!

Shop Stampin’ Up! for all your cardmaking needs!


How to Make a Daisy Card For a Friend

Daisy Card For a Friend

We had a pretty nice almost-spring type day here in Houston so I thought this Daisy Card For a Friend could exemplify that and give everyone hope that spring will arrive! Here is how to make this easy card.

I loved the fresh look of this pattern in the Happiness Blooms Designer Series Paper and I also thought the Daisy Punch would go well with it!  The card base is Night of Navy, but I wanted to add a layer of Whisper White in between the Night of Navy and the designer paper. I seldom think of doing this, but if you wanted to save some paper, use the area under a layer that will be hidden anyway to cut out a piece of paper that you need!  Here is a photo of how I punched out the two daisies from the Whisper White layer and I’m positive no one will get this card and say, “Why was she so chintzy punching out daisy shapes underneath this?!”  They won’t be able to tell and won’t even know your papercrafting secret.

Daisy Card For a Friend How to Make

I like to layer two daisy punches for more fullness.  I think it looks more realistic.  I also like to turn up the leaves at the ends a little bit.  For the flower center, I used the 1/2″ Circle Punch and even stuck it in an embossing folder to give it some texture!  Just for fun!

Daisy Card For a Friend

I thought I would like a ribbon on the card, and even though it is not the same green, I thought the 1/8″ Shaded Spruce Ribbon from the Metallic Ribbon Combo Pack.  Close enough! It’s fine.

I thought most greetings would be too big on the card with the daisy, so I stamped a greeting from the Itty Bitty Greetings Stamp Set and tied it on to the ribbon with a bit of Linen Thread for a different look.  I hadn’t done that in a long time!  I think Linen Thread is one of those staples everyone should have on hand just for things like this.  I have used it many times.  You can cheat and add a bit of adhesive or Stampin’ Dimensional underneath the little greeting tag to hold it in place.  Or you can leave it loose and hanging.

Easy and fresh card to make for a friend, for a birthday, for a just thinking of you card, whatever you like!  The Happiness Blooms Designer Series Paper is perfect for those bright and happy cards you want to make while we wait for spring to arrive!  Did you see my card I made yesterday HERE?

Dust off your Daisy Punch that you may have forgotten about and make a Daisy Card For a Friend!


Happiness Blooms Birthday Card

Happiness Blooms Birthday Card

After all the reds and pinks of Valentine’s Day, it seemed like a good idea to switch to some bold colors like this Happiness Blooms Birthday Card.  This designer paper wasn’t something I was attracted to at first, but I think it’s a nice change of pace for some bright, colorful projects and cards!

This birthday card starts with the green Call Me Clover, one of the 2018-2020 In Colors, for the card base. Next is a layer of Night of Navy Cardstock, another one of the coordinating colors with the designer paper. I chose the bold paper pattern with the Call Me Clover, Night of Navy, Pineapple Punch and Whisper White colors as the decorative layer. I made it 3″ wide so I could have side margins of other colors.  The designer paper is Happiness Blooms.  This paper has the bold, bright floral designs on one side of the paper and more general designs on the other side.  You are sure to find something that is just right for your cards.

To jazz up the layers, I added a strip of Pineapple Punch Cardstock along each side of the designer paper.  To make it more interesting, I die cut the Pineapple Punch with a die from the Be Mine Stitched Framelits Dies.  It makes a little bit of a stylized scalloped edge.

The greeting is stamped in Night of Navy ink on Whisper White and punched with the Pretty Label Punch.  In order to make it stand out a little bit more, I wanted a Night of Navy layer underneath, but of course the punch would be the same size.  The solution is to punch two labels and then layer those, one a little bit above and one a little bit below the greeting. It works out perfectly on the sides.  Just play with it until you get the layers just right.

The greeting is from the stamp set Hello Cupcakeavailable FREE during Sale-A-Bration with a $50 purchase. This is a great stamp set!  Who doesn’t like a cupcake stamp?  You can do so many things with this set, plus the greetings are very nice to use.

Here is another birthday card I made with the Hello Cupcake Stamp Set and using my Stamparatus® to stamp the greeting perfectly lined up.

Do your Stampin’ Up! order as you normally would, perhaps thinking in terms of $50 increments so you can take advantage of Sale-A-Bration. There is no limit to the number of Sale-A-Bration items you can choose.  You can order from the Annual Catalog, the Occasions Catalog, and even the Clearance Rack!  The Clearance Rack is always worth checking. Remember, an order of $150 earns Hostess Stampin’ Rewards. And during Sale-A-Bration, an order of $250 earns you an EXTRA $25 in product.

The Happiness Blooms Designer Series Paper contains bright and bold papers for some bright and happy cards and projects.  This paper is sure to put a smile on someone’s face who receives it and can be used for many occasions. Order this paper and make a card like my Happiness Blooms Birthday Card and brighten someone’s day!

SHOP STAMPIN’ UP! ONLINE TODAY!

Sale-A-Bration 2019 2nd Release: 3 New Items To Choose From!

Sale-A-Bration 2nd Release 2019

Beginning today, there are 3 more items to choose from during Sale-A-Bration 2019, the 2nd Release.  This is about the halfway point of the great promotion called Sale-A-Bration by Stampin’ Up! With every $50 you spend, you can choose a free Sale-A-Bration product.  With a $100 purchase you have a couple of choices for one more valuable item instead of two $50 items.

The new items are a stamp set called All Adorned, a great stamp set to use with the Stamparatus, a new embossing folder called Country Floral, and with a $100 purchase, there is a beautiful choice, the Painted Seasons Bundle.  This Bundle comes with the Painted Seasons Stamp Set and the Painted Seasons Designer Series Paper.  This is really a beautiful set!  And in March you can purchase the coordinating dies separately.

Watch the Stampin’ Up! video to see this Bundle!

Here is a Stampin’ Up! video about the All Adorned Stamp Set and how fun it is to use it with the Stamparatus!

Keep these new releases in mind when you choose your Sale-A-Bration free items with your $50 or $100 or more Stampin’ Up! orders!  They are available starting TODAY! If there is something you really want, don’t delay.  Sometimes there are backorders!

SHOP STAMPIN’ UP! AND GET YOUR FREE PRODUCTS!


A Valentine Card Just For You

A Valentine Card Just For You

You still have a little bit more time to make some Valentines, maybe like this Valentine Card Just For You. It’s really funny how cards come together sometimes. You may have an idea of exactly what you want to make and you make it  You may be copying an idea you saw and you make that. Or you make something and it’s not quite right but with a little tweaking, you get it right to your satisfaction. And sometimes maybe you don’t have an exact design in mind but you start with some paper, add some embellishments and a greeting and it turns out great.

This card started out with just wanting to use the heart patterned paper in the All My Love Designer Series Paper.  The card base is Lovely Lipstick Cardstock with a Whisper White layer and then the heart paper.  On my table, in a pile of extra die cut pieces that I didn’t end up using, I found this large heart cut out with the Be Mine Stitched Framelits Dies out of the Lovely Lipstick Foil.  I cut it out to use on another card but couldn’t make it work.  So I tried it on this card and I like it!

For the greeting, I used the stamp in the Meant To Be set.  I die cut that with a square in the Stitched Shapes Framelits Dies.  It is layered on a larger square in the same set cut out of the Lovely Lipstick Foil.  (That foil is just so gorgeous you would be amazed to see it in person!)  Then this square greeting is layered over the large heart.  I think it works!  What do you think?

For one more touch, I found the little swirly die cut piece out of Lovely Lipstick Cardstock with the die in the Be Mine Dies. It seemed to fit perfectly under the greeting.

Make a Valentine for someone. It might be too late to mail, unless the person would rather get a card late than no card! Or make one for your family or a neighbor or friend  Just have fun for Valentine’s Day making cards!


So Hoppy Together Frog Valentine Card

So Hoppy Together Frog Valentine CardI have to admit, this So Hoppy Together Stamp Set has been a lot cuter than I would have thought when I first saw it in the Sale-A-Bration Brochure!  Frogs, okay.  But once I started stamping with it myself and seeing lots of fun samples online, I quickly came to love it! You can even use it to make a valentine like this So Hoppy Together Frog Valentine Card.

My first idea was for the frog to be holding a very big heart, but then I saw that his hands (feet?) were pretty far apart and the tip of the heart was going to come down over his face!  So I found this small heart that seemed like the right size for one hand!  I always enjoy coloring these frogs with the Stampin’ Blends markers!  If you don’t have any yet, you might want to order a few and try them out.  I find it so relaxing to color with these markers!

And then I felt like some watercoloring was in order!  Since I had used Shimmery White Cardstock, I was able to do a little watercoloring on the paper.  Regular Whisper White might not hold up as well to the water.  We do sell Watercolor Paper, which is the best, but Shimmery White works well, too.  I used my Aqua Painter to pick up just a little bit of ink from the lids of ink pads and just swiped across the card front.  Then I stamped the greeting over the watercoloring (when it was dry).  The greeting is from the Meant To Be Stamp Set.

I couldn’t resist adding a few little Gold Foil hearts die cut from the hearts die in the Be Mine Stitched Framelits Dies.  I love that die with the group of hearts!  You can use all the little hearts of various sizes that come out of the die cut…..OR you can use the piece with the hearts out of it.  Either way is great.

Remember, Sale-A-Bration is going on at Stampin’ Up!  Just spend $50 on any products and choose a FREE Sale-A-Bration item!  Spend $100 and choose two or choose one $100 level product.  The more you spend, the more you get free, in $50 increments!  You might want to choose this cute froggy stamp set, So Hoppy Together!

Here is another of my frog cards!  You just can’t help but love the stamp sets that Stampin’ Up! designs!  So if you already have the So Hoppy Together Stamp Set, make a valentine with it like my So Hoppy Together Frog Valentine Card.  And after Valentine’s Day, use the frogs for other fun cards!  Just have fun with your stamping!

CHECK OUT STAMPIN’ UP! SALE-A-BRATION!

Valentine Candy Clear Tiny Treat Box

Valentine Candy Clear Tiny Treat Box

If you already have the Clear Tiny Treat Boxes then you are always ready to make a treat of some kind to give someone, like this Valentine Candy Clear Tiny Treat Box. These are so easy to assemble and then decorate to hold a small gift or a candy treat!

With Valentine’s Day just a few days away, you might still need some ideas for treats for classes, office co-workers, friends, or neighbors. You could use these Tiny Treat Boxes for party favors for any occasion. Even if all you did was fill the box with candy or whatever treat and tied a ribbon around, you would have something cute to give!

One easy way to decorate a Clear Tiny Treat Box is to wrap around a piece of designer paper. In this case, I used a piece of the All My Love Designer Series Paper, the pattern with all the hearts. One thing that’s really nice is that you can see the pattern on the other side of the paper, flowers, from the inside of the box.  I had various hearts that were already die cut so I chose a few and layered them on the front of the box.  These came from the Be Mine Stitched Framelits Dies, which you can use way beyond Valentine’s Day.  Depending on the dies, sometimes it is useful to just die cut extras, maybe in various colors, so you have a little stash of pieces to use on cards and projects.

Have you seen these gigantic M&M’s??  They are way bigger than the regular ones!  Really fun to put in a treat box like this one! (And certainly fun to eat!)

For another idea, I had also made this treat box using the So Hoppy Together frog! In this project, I didn’t wrap paper around so the green candies could be seen easily to match the frog!  I always have a package or two of these Clear Tiny Treat Boxes  on hand because they are so useful and easy to come up with creative ideas!

Clear Tiny Treat Boxes

Have fun making your preparations for Valentine’s Day, if that is a big holiday for you and your family!  Valentine’s Day just holds so many memories for most of us since we have been making valentines since we were children!  Take some time to relax and make some valentines to give away!

SHOP STAMPIN’ UP! ONLINE HERE!

All My Love Hearts Valentine Card

All My Love Hearts Valentine Card

This All My Love Hearts Valentine Card came about mostly from scraps on my kitchen table!  At first, I couldn’t come up with any decent design so I just walked away for a while.  Then I looked online for some inspiration and found a card with the print heart that I used on this card, which I already had cut out in the pile on my table. Suddenly it all came together, but really it’s just a simple card.

The card base is Lovely Lipstick Cardstock.  The print heart is from the All My Love Designer Serie Paper, die cut with the narrower heart from the Be Mine Stitched Framelits Dies.  When you use this die to cut out a heart, it cuts out the inside heart and then you can poke out the narrow border heart from the die.  I almost forget it is in there!  In this case, I just used the opposite side of the paper for the heart outline.

The gold grouping of little hearts is another die in the same Be Mine Stitched Dies. It was just on my table but didn’t quite fit across the card……so I cut it in half and the heart covers it so it doesn’t have to stretch all the way across.!  You can do that with a lot of things!

Next, the card needed a greeting somewhere, somehow.  I decided to just stamp right on the card with this greeting which fit perfectly.  I wanted to put Happy Valentine’s Day but that didn’t fit right so I stamped that on the inside of the card!  I used the Stamparatus to stamp the greeting on the front of the card so I wouldn’t mess it up since I already had the heart and gold foil adhered to the layer.

Since the inside of the card would be the Lovely Lipstick Cardstock, I added a layer of Whisper White so I could stamp a greeting, which, as I said, turned out to be “Happy Valentine’s Day.  Since there were some little heart stamps in the set, I stamped a few in the corner.  Then I took a wild and crazy chance and stamped two on the front of the card.  I think that finished it off nicely and I didn’t need to add anything else.  Know when to stop!  Sometimes I don’t!

Are you going to be busy making Valentines this weekend?  It is time to make them and send them!  You can either make one design and make several of the same card in assembly-line fashion or have fun making all different designs.  Just don’t make them too complicated or you won’t get as many finished!  Do you have any doctor or hair appointments this week?  Make some Valentine treats to take to the office staff!  They really appreciate that.

You could also stand at your Big Shot and die cut a bunch of pieces at one time out of different papers and cardstock, then go back to your craft table and see what you can come up with!  Either way, have fun making some Valentines like this All My Love Hearts Valentine Card.

SHOP STAMPIN’ UP! ONLINE HERE!

PS:  Sign up to get Paper Pumpkin today so you don’t miss the deadline (tomorrow, Feb. 10th)!

Floral Romance Sympathy Card

Floral Romance Sympathy Card

While we all hate to make sympathy cards because it means the loss of someone we knew and cared about, we usually want to make a special card to send to the family, and with the Floral Romance Specialty Designer Series Paper you can’t go wrong as on this Floral Romance Sympathy Card.  The paper is so beautiful in itself I think it is perfect for this type of card. It’s pretty but soft and calming.

The Floral Romance paper is 12 sheets: 6 sheets of vellum, 2 each of 3 designs and the 6 sheets of regular printed paper.  The vellum is really pretty and something different.  Being printed, adhesives don’t seem to show through the paper so that makes it easier to use than regular plain vellum.

This card base is Petal Pink, one of the coordinating colors with this sheet of vellum.  The vellum is adhered to a piece of Whisper White Cardstock of the same size which shows off the design of the vellum.

The sympathy greeting is from the Flourishing Phrases Stamp Set.  This stamp set has some beautiful greetings plus very nice images. It’s one of those sets you will go back to many times.

The greeting is stamped on Whisper White Cardstock, die cut with the Big Shot and Stitched Shapes Framelits Dies.  I love the Stitched Shapes Dies and use them a lot. This piece is then layered on a Petal Pink scalloped oval, die cut with the Layering Ovals Framelits Dies.

The ribbon is the beautiful Rich Razzleberry 1/4″ Velvet Ribbon.  Although it is not one of the official coordinating colors, I thought it looked nice with the paper and certainly the ribbon itself is pretty and rich-looking. I couldn’t resist a few sequins on the card.  We all love the Basic Adhesive-Backed Sequins because they are easy to use!  No more tiny drops of glue!

You’ll find this pretty Floral Romance Designer Paper in the Occasions Catalog.  Although this card is a sympathy card, I had previously made a similar card you can see HERE with a different greeting, of course.  I sent this one to my daughter as a congratulatory card when she ran a 5K race and came in first in her age group!

Add this Floral Romance Designer Paper to your order.  Remember, with a purchase of $50 you can choose a free Sale-A-Bration item!  You will be able to use all this Floral Romance Paper on many different kinds of cards, including sympathy cards when necessary.

Shop the Stampin’ Up! Online Store HERE!

Precious Parcel Sale-A-Bration 2019 Card Kit

Precious Parcel Sale-A-Bration 2019 Card Kit Finished

Sale-A-Bration is the biggest promotion Stampin’ Up! has during the year and the one that everyone gets the most excited about, because who doesn’t like free stuff like this Precious Parcel Card Kit?!  With every $50 you spend on any Stampin’ Up! products, you may choose a FREE Sale-A-Bration item!  This promotion goes on through the end of March and a few new SAB items to choose from will be available February 15th.

One of the choices this year in the Sale-A-Bration Brochure is this Precious Parcel Card Kit.  It makes eight beautiful cards, four each of two designs. And they are unusual cards with the special card that is inserted in the slot on the front of the card where you can write or stamp a note or greeting plus the card actually opens with plenty of room for a personal greeting.

Everything is included in the kit and adhesive strips are already applied to the inside of the card. I have to say this is probably the easiest card kit I have ever put together and it looks so nice when finished!  The only hard part is remembering to tie on the little twine bow through the front holes of the card before adhering the folded portion of the card!  But even then I was able to reach inside and insert the twine through those poked holes!  And if not, I could have just tied the bow and glued it to the front!  The little gold foil accents to look like metal pieces for the corners of the card as so cute.  And I love the little clip and stamp that is attached to the inserted card in the “mailbox”.  The whole thing is very cute and I loved making these cards!

This Precious Parcel Card Kit has been very popular so if you are planning to order and really want this kit, you might consider getting it soon so that it doesn’t go on backorder just when you want it.  This and the Grapefruit Grove and Lovely Lipstick Foil Sheets are both in danger of backorder.  Might not happen, but both of these items are really great!

Precious Parcel Sale-A-Bration 2019 Card KitPrecious Parcel Sale-A-Bration 2019 Card Kit Contents

If you would like something where you just sit down and make beautiful cards with no planning, no getting out supplies, then choose this Precious Parcel Kit with your $50 or more purchase during Sale-A-Bration!

SHOP STAMPIN’ UP! DURING SALE-A-BRATION!

Red Money Envelopes For Chinese New Year 2019 Year of the Pig

Chinese Red Money Envelopes Year of the Pig 2019

It is the Chinese tradition to give out red envelopes with money inside to celebrate the Chinese New Year, which begins today. Here are Red Money Envelopes For Chinese New Year 2019 Year of the Pig, handmade for a Chinese acupuncture doctor who has asked me to make some for her for a couple of years now.  She likes them all different and a few without the animal of the year, so it is both a challenge and great creative fun to come up with many different designs for the envelopes.  It’s really like making a card, maybe just in a different shape.

One of the time-savers of this process is using my Envelope Punch Board.  I used Real Red Cardstock, cut to a certain size, and then punched and scored with the punch board very easily. Next, I creased all the score lines and assembled with Multipurpose Liquid Glue. So that she can put the cash gift inside and seal the envelope later, I just put a Stampin’ Dimensional on the envelope flap that will seal the envelope when she removes the little paper on the dimensional.

To design the envelopes, I looked back at past money envelopes I made, such as these from last year and ideas for the stamp sets I might use. This year, the Year of the Pig, it was easy to choose the  This Little Piggy Stamp Set in the Annual Catalog.  When I am doing custom projects for someone, I often pull out retired stamp sets and accessories and embellishments to use, so you may see some things that are not current.

Here are some more money envelopes with stamping, coloring, and other embellishments.

Chinese New Year Red Money Envelopes 2019

Great to use the Large Numbers dies again.  They come in handy for projects like this.

Chinese New Year 2019 Money Envelopes

I did some embossing on some of the envelopes to add an interesting background.
Chinese New Year 2019 Money Envelopes
It’s fun using the little piggy in different positions and with a little bit of glimmer through paper or Wink of Stella.

Chinese Red Money Envelopes 2019 Year of the Pig

Chinese New Year 2019 Red Money Envelopes

Chinese New Year 2019 Red Money Envelopes

I especially loved using my Stampin’ Blends alcohol markers to color in all the pigs! I love the feel of those markers when I am coloring!

If you have some Chinese friends or family, you might like to surprise them by making your own red money envelopes to celebrate the Chinese New Year!  You can find templates online or make your own envelopes easily with the Envelope Punch Board from Stampin’ Up!

Happy Chinese New Year!


Need Super Bowl Football Card Ideas?

Today is Super Bowl LIII, the New England Patriots playing the Los Angeles Rams, so if you would like to make a card for your favorite football fan, here are some Super Bowl Football Card Ideas from years past!

Super Bowl 2017 Owl Punch Art Football Game Card

Super Bowl 2017 Punch Art Football Game Card

One of the most popular punches of all time (I would think!) was the Owl Punch, used to make these football players out on the field! Just using a couple of narrow strips of paper can make a card look like a football field.

Super Bowl LI Football Card

A Football Card For Super Bowl LI in Houston, Texas

A couple years ago we were so excited and proud in Houston to host the Super Bowl! Maybe someday our Houston Texans will actually be IN the Super Bowl!  Maybe!

Super Bowl 2017 Card With Punch Art Football Helmets

Super Bowl 2017 Card With Punch Art Football Helmets

Make some football helmets for your card with a few punches!  Use your team colors!

Super Bowl Sunday 2016 Football Owl Punch Card

Super Bowl Sunday 2016 Football Owl Punch Card

Here are these owls again playing football!  Substitute one of our current animal stamps if you don’t have the Owl Punch in your stash!

Lace Embossed Heart Valentine Card


Lace Embossed Heart Valentine Card

The Lovely Lipstick Foil Sheets are beyond gorgeous, as you can see on this Lace Embossed Heart Valentine Card.  They are something you can earn FREE during Sale-A-Bration with a $50 purchase and you get two colors! Check out this card I made with the Grapefruit Grove Foil Sheet the other day.

Foil is difficult to photograph with the glare so you can expect that the paper in real life is much more beautiful than this photograph can capture!  Not only is the color of the foil gasp-worthy every time you look in the package, but when you use the Lace Dynamic Textured Impressions Embossing Folder you really come up with something fancy!

This card base is the Lovely Lipstick Cardstock with a layer of Whisper White Cardstock embossed with the very pretty Tufted Dynamic Textured Impressions Embossing Folder.  This is another very nice embossing folder to have for when you want a little texture or interest in the background but nothing overwhelming.

The greeting is stamped from the Forever Lovely Stamp Set in Lovely Lipstick Ink.  It is popped up on Stampin’ Dimensionals over the die cut heart.

TIP:  When you are die-cutting and embossing, be sure to do the die-cutting first, then emboss.  If you emboss first, then run the piece through the Big Shot again to die-cut it, you run the risk of flattening out the embossed design.

The little design at the bottom is made of two die cut pieces of the Lovely Lipstick Foil.  It is a die in the Be Mine Stitched Framelits DIes.  It is shorter than the width of the card so I cut two pieces and trimmed off just a tiny piece of a swirl so it would better match the other piece it was connecting with.  It adds a nice little fancy border without taking anything away from the main focal point of the card.  I just used teeny tiny dots of Multipurpose Liquid Glue to adhere that piece.  Adhesive sheets would be good to use!

The large heart is also die-cut with the Be Mine Stitched Framelits Dies.  You might consider the Meant to Be Bundle containing these dies plus the Meant to Be Stamp Set and save 10%.  Not to mention, purchasing the Bundle earns a FREE Sale-A-Bration item!  And if you order another $50 worth of product, you can choose two FREE Level 1 Sale-A-Bration items or 1 of the Level 2 Choices.  What a great deal!!

It’s time to make Valentines so make sure you have all the supplies you need!  Just remember that hearts are for any time, not just Valentine’s Day so don’t hesitate to purchase Stampin’ Up! hearts whenever they have them!  Think of weddings, engagements, anniversaries, even just thinking of you or graduation. Lots of opportunities to use hearts!  And these are lovely ones this year!

Lace Embossed Heart Valentine Closeup

SHOP STAMPIN’ UP! ONLINE HERE!